IDEA工具第二篇:自定义Java方法注释模板 | 京东云技术团队
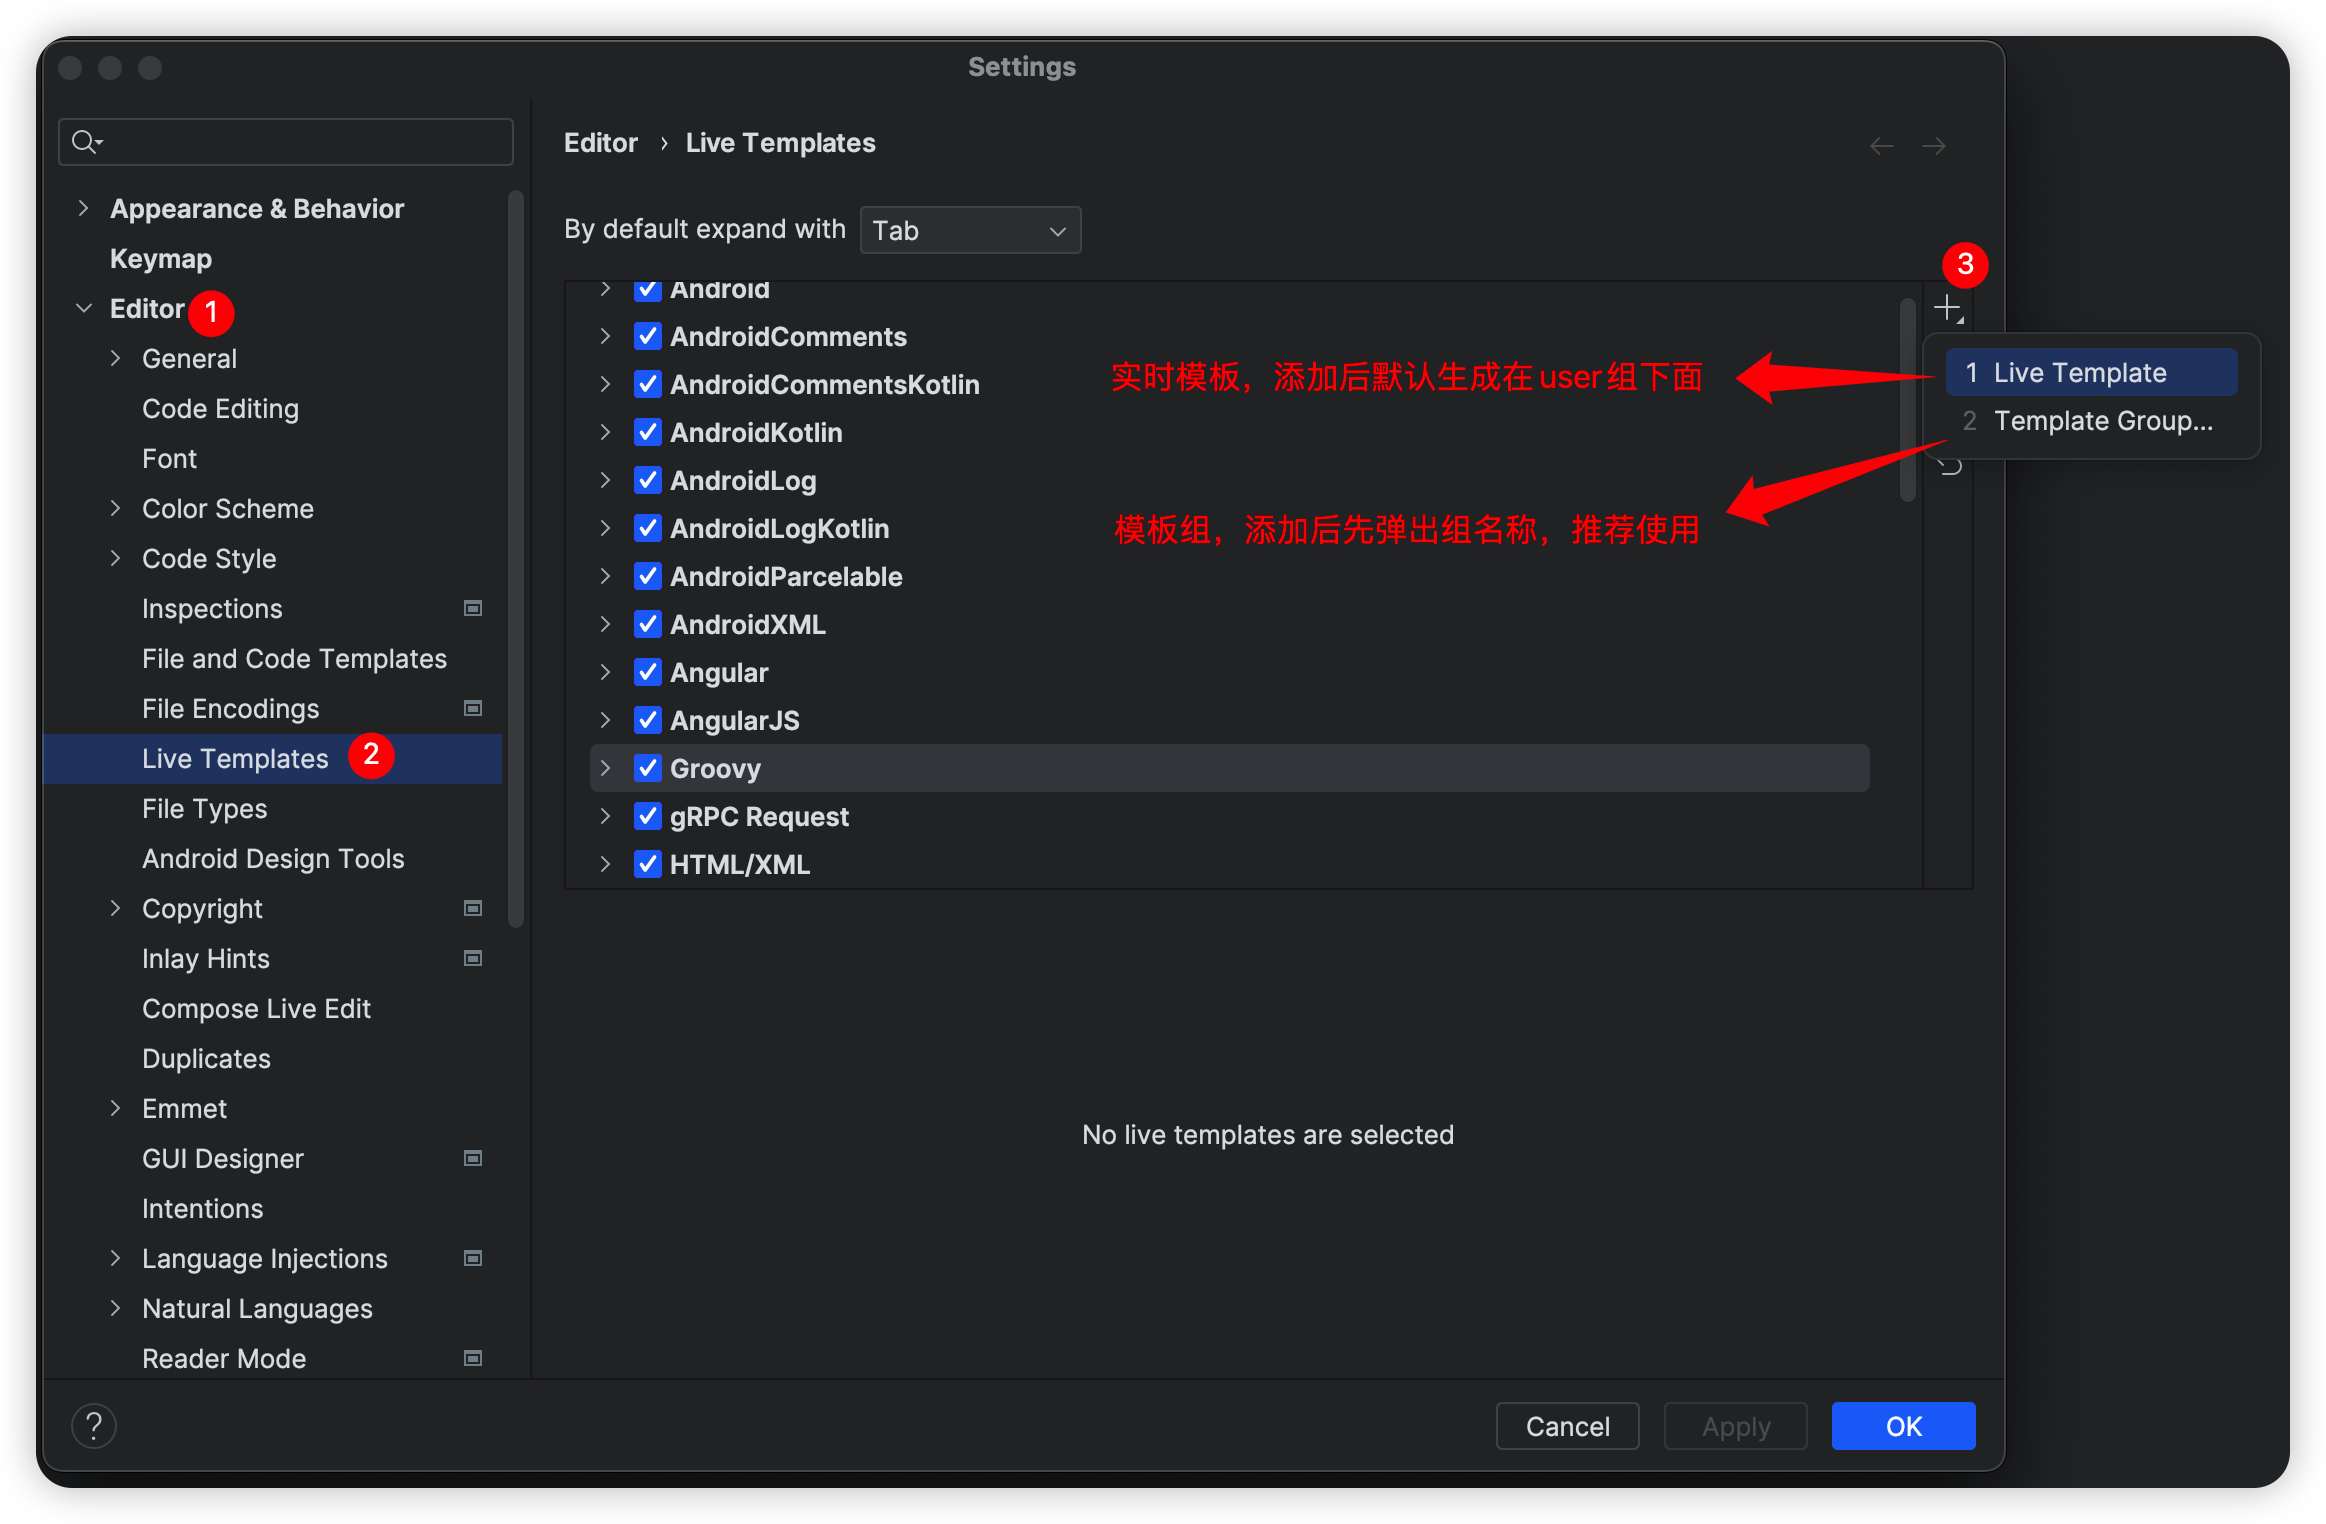
网上搜索类似的文章有很多,但是一味的复制粘贴总会出现各种奇葩问题,最后然并卵!今天特意自己研究琢磨一下,将最终结果分享给大家,100%亲测可用。 一、说明 想必大家都用过Eclipse的方法注释生成,方法上输入 /**,回车走你,巴拉巴拉如下的注释便生成了,今天就悄悄告诉大家如何自定义这样的模板生成,一般人我可不告诉他😂,快捷的注释模板势必会提升一定的工作效率。 /** * 查询学生基本信息 * * @param studentId 学生ID * @param studentType V学生类型 * @return 学生展示对象 * @author admin * @date 2023/06/18 6:18 */ public StudentVO queryStudentInfo(Long studentId, Integer studentType) { // 省略。。。。。。 } 二、增加注释模板 1、首先 打开IDEA设置Settings...(Windows快捷键:Ctrl + Alt + S,Mac快捷键:command + ,)---> Editor ---> Live Templates ---> 点击右侧加号"+" 2、然后 设置以下六处相应的内容 以上6处需要注意的地方: ①Abbreviation:快捷缩略词,可以输入数值、字母、符号,到时配合 /*使用(依模板内容而定),例如你输入一个,那么到时候输入/回车即可,以下为本人设置内容(👈此处是关键核心设置内容_)_* * ②Description:实时模板的说明文字,提示显示用,以下为本人设置内容 java方法注释快捷操作 ③Edit variables:编辑变量按钮,默认灰色不可编辑,只有④中输入了带有 $参数$的变量时才会解锁,以下为本人设置内容 param: 由于默认的表达式 methodParameters()生成的多参数在同一行显示,且格式为 [参数名1, 参数名2....] 这种风格,此处进行改造自定义groovy脚本生成参数列表(👈此处是关键核心设置内容) groovyScript("def result=''; def stop=false; def params=\"${_1}\".replaceAll('[\\\\[|\\\\]|\\\\s]', '').split(',').toList(); if (params.size()==1 && (params[0]==null || params[0]=='null' || params[0]=='')) { stop=true; }; if(!stop) { for(i=0; i < params.size(); i++) {if(i==0) result += '\\n'; result +=((i < params.size() - 1) ? ' * @param ' + params[i] + '\\r\\n' : ' * @param ' + params[i] + '')}; }; return result;", methodParameters()) return: 由于默认的表达式 methodReturnType()不返回void类型,此处若想设置成无返回值也返回[@return](https://my.oschina.net/u/556800) void可以通过自定义groovy脚本(👈此处是关键核心设置内容) groovyScript("def result=''; def data=\"${_1}\"; def stop=false; if(data==null || data=='null' || data=='' || data=='void') { stop=true; }; if(!stop) { result += '\\n'; result += ' * @return ' + data; }; return result;", methodReturnType()) date: 对日期格式有要求的,可以在Expression列中对date()加参,以下为本人设置内容 date("yyyy/MM/dd HH:mm") ④Template text:模板内容,即自定义注释展示内容,以下为本人设置内容(👈此处是关键核心设置内容) * * 一句话描述该方法的作用 $param$ $return$ * @author admin * @date $date$ */ 第一行默认无缩进一个*号,从第二行开始默认缩进一个空格,其中$param$和$return$前面不加*号(因为在具体的参数方法里面已做处理),和其它非第一行*号保持对齐。此处格式一定要使用这种,因为会配合下面的groovy脚本解析使用。若修改该内容,切记同时修改相应的groovy脚本,否则生成的注释不堪入目😩。 ⑤Applicable contexts:应用于哪个位置,由于此次操作为Java,固只在Java前挑勾应用,以下为本人设置内容 勾选Java下的Comment ⑥Options:其他参数,包括格式化、展开方式等,以下为本人设置内容 Expand with选择Enter,勾选Reformat according to style和Shorten FQ names 3、最后 放上一张设置好的成品图,同时测试一下自定义方法注释,在方法前面输入/**,然后按回车Enter即可 3.1、多个参数有返回值: /** * 一句话描述该方法的作用 * @param name * @param type * @return java.lang.Object * @author admin * @date 2023/08/15 16:28 */ public Object selectInfoTest(String name, Integer type) { return null; } 3.2、多个参数无返回值: /** * 一句话描述该方法的作用 * @param name * @param id * @author admin * @date 2023/08/15 16:28 */ public void deleteInfoTest(String name, Integer id) { } 3.3、无参数无返回值: /** * 一句话描述该方法的作用 * @author admin * @date 2023/08/15 16:29 */ public void initInfoTest() { } 3.4、单一参数无返回值: /** * 一句话描述该方法的作用 * @param id * @author admin * @date 2023/08/15 20:36 */ public void initInfoByIdTest(Integer id) { } 三、总结 完美落幕,如果什么地方有不妥之处,请评论区留言或者私信。 作者:京东零售马宏伟 来源:京东云开发者社区 转载请注明来源