首页 文章 精选 留言 我的

精选列表

搜索[快速入门],共10000篇文章
优秀的个人博客,低调大师

yaml 语言入门

编程免不了要写配置文件,YAML 是专门用来写配置文件的语言,非常简洁和强大,远比 JSON 格式方便。本文介绍 YAML 的语法,以JS-YAML的实现为例。你可以去在线 Demo验证下面的例子。 一、简介 YAML 语言(发音 /ˈjæməl/ )的设计目标,就是方便人类读写。它实质上是一种通用的数据串行化格式。 它的基本语法规则如下。 大小写敏感 使用缩进表示层级关系 缩进时不允许使用Tab键,只允许使用空格。 缩进的空格数目不重要,只要相同层级的元素左侧对齐即可 #表示注释,从这个字符一直到行尾,都会被解析器忽略。 YAML 支持的数据结构有三种。 对象:键值对的集合,又称为映射(mapping)/ 哈希(hashes) / 字典(dictionary) 数组:一组按次序排列的值,又称为序列(sequence) / 列表(list) 纯量(scalars):单个的、不可再分的值 以下分别介绍这三种数据结构。 二、对象 对象的一组键值对,使用冒号结构表示。 animal: pets 转为 JavaScript 如下。 { animal: 'pets' } Yaml 也允许另一种写法,将所有键值对写成一个行内对象。 hash: { name: Steve, foo: bar } 转为 JavaScript 如下。 { hash: { name: 'Steve', foo: 'bar' } } 三、数组 一组连词线开头的行,构成一个数组。 - Cat - Dog - Goldfish 转为 JavaScript 如下。 [ 'Cat', 'Dog', 'Goldfish' ] 数据结构的子成员是一个数组,则可以在该项下面缩进一个空格。 - - Cat - Dog - Goldfish 转为 JavaScript 如下。 [ [ 'Cat', 'Dog', 'Goldfish' ] ] 数组也可以采用行内表示法。 animal: [Cat, Dog] 转为 JavaScript 如下。 { animal: [ 'Cat', 'Dog' ] } 四、复合结构 对象和数组可以结合使用,形成复合结构。 languages: - Ruby - Perl - Python websites: YAML: yaml.org Ruby: ruby-lang.org Python: python.org Perl: use.perl.org 转为 JavaScript 如下。 { languages: [ 'Ruby', 'Perl', 'Python' ], websites: { YAML: 'yaml.org', Ruby: 'ruby-lang.org', Python: 'python.org', Perl: 'use.perl.org' } } 五、纯量 纯量是最基本的、不可再分的值。以下数据类型都属于 JavaScript 的纯量。 字符串 布尔值 整数 浮点数 Null 时间 日期数值直接以字面量的形式表示。 number: 12.30 转为 JavaScript 如下。 { number: 12.30 } 布尔值用true和false表示。 isSet: true 转为 JavaScript 如下。 { isSet: true } null用~表示。 parent: ~ 转为 JavaScript 如下。 { parent: null } 时间采用 ISO8601 格式。 iso8601: 2001-12-14t21:59:43.10-05:00 转为 JavaScript 如下。 { iso8601: new Date('2001-12-14t21:59:43.10-05:00') } 日期采用复合 iso8601 格式的年、月、日表示。 date: 1976-07-31 转为 JavaScript 如下。 { date: new Date('1976-07-31') } YAML 允许使用两个感叹号,强制转换数据类型。 e: !!str 123 f: !!str true 转为 JavaScript 如下。 { e: '123', f: 'true' } 六、字符串 字符串是最常见,也是最复杂的一种数据类型。 字符串默认不使用引号表示。 str: 这是一行字符串 转为 JavaScript 如下。 { str: '这是一行字符串' } 如果字符串之中包含空格或特殊字符,需要放在引号之中。 str: '内容: 字符串' 转为 JavaScript 如下。 { str: '内容: 字符串' } 单引号和双引号都可以使用,双引号不会对特殊字符转义。 s1: '内容\n字符串' s2: "内容\n字符串" 转为 JavaScript 如下。 { s1: '内容\\n字符串', s2: '内容\n字符串' } 单引号之中如果还有单引号,必须连续使用两个单引号转义。 str: 'labor''s day' 转为 JavaScript 如下。 { str: 'labor\'s day' } 字符串可以写成多行,从第二行开始,必须有一个单空格缩进。换行符会被转为空格。 str: 这是一段 多行 字符串 转为 JavaScript 如下。 { str: '这是一段 多行 字符串' } 多行字符串可以使用|保留换行符,也可以使用>折叠换行。 this: | Foo Bar that: > Foo Bar 转为 JavaScript 代码如下。 { this: 'Foo\nBar\n', that: 'Foo Bar\n' } +表示保留文字块末尾的换行,-表示删除字符串末尾的换行。 s1: | Foo s2: |+ Foo s3: |- Foo 转为 JavaScript 代码如下。 { s1: 'Foo\n', s2: 'Foo\n\n\n', s3: 'Foo' } 字符串之中可以插入 HTML 标记。 message: | <p style="color: red"> 段落 </p> 转为 JavaScript 如下。 { message: '\n<p style="color: red">\n 段落\n</p>\n' } 七、引用 锚点&和别名*,可以用来引用。 defaults: &defaults adapter: postgres host: localhost development: database: myapp_development <<: *defaults test: database: myapp_test <<: *defaults 等同于下面的代码。 defaults: adapter: postgres host: localhost development: database: myapp_development adapter: postgres host: localhost test: database: myapp_test adapter: postgres host: localhost &用来建立锚点(defaults),<<表示合并到当前数据,*用来引用锚点。 下面是另一个例子。 - &showell Steve - Clark - Brian - Oren - *showell 转为 JavaScript 代码如下。 [ 'Steve', 'Clark', 'Brian', 'Oren', 'Steve' ] 八、函数和正则表达式的转换 这是JS-YAML库特有的功能,可以把函数和正则表达式转为字符串。 # example.yml fn: function () { return 1 } reg: /test/ 解析上面的 yml 文件的代码如下。 var yaml = require('js-yaml'); var fs = require('fs'); try { var doc = yaml.load( fs.readFileSync('./example.yml', 'utf8') ); console.log(doc); } catch (e) { console.log(e); } 从 JavaScript 对象还原到 yaml 文件的代码如下。 var yaml = require('js-yaml'); var fs = require('fs'); var obj = { fn: function () { return 1 }, reg: /test/ }; try { fs.writeFileSync( './example.yml', yaml.dump(obj), 'utf8' ); } catch (e) { console.log(e); }

优秀的个人博客,低调大师

ActiveMQ入门实例

在开始之前需要去到网上去下载一个activeMQ,(官方网站下载:http://activemq.apache.org/),然后直接解压运行bin目录下面的activemq.bat文件,启动后登陆:http://localhost:8161/admin/,创建一个Queue,命名为FirstQueue,到这里准备工作就完成了,然后就可以开始了。 第一步,创建一个普通的java项目,然后导入java包(本人导入的是activemq-all-5.9.0.jar) 第二步、添加消息发送者 publicclassSender{ //连接工厂 privatestaticConnectionFactoryconnectionFactory; static{ connectionFactory=newActiveMQConnectionFactory(ActiveMQConnection.DEFAULT_USER,ActiveMQConnection.DEFAULT_PASSWORD,"tcp://localhost:61616"); } publicstaticvoidmain(String[]args){ //连接 Connectionconnection=null; //会话 Sessionsession=null; //目的地,消息要发往的地方 Destinationdestination; //消息发送者 MessageProducerproducer=null; try{ //获取消息连接 connection=connectionFactory.createConnection(); //开启连接 connection.start(); //通过连接创建会话 session=connection.createSession(Boolean.TRUE,Session.AUTO_ACKNOWLEDGE); //创建消息队列 destination=session.createQueue("FirstQueue"); //创建发送者 producer=session.createProducer(destination); //发送消息 send(session,producer); }catch(JMSExceptione){ e.printStackTrace(); }finally{ try{ session.commit(); connection.close(); }catch(JMSExceptione){ e.printStackTrace(); } } } publicstaticvoidsend(Sessionsession,MessageProducerproducer)throwsJMSException{ for(inti=0;i<10;i++){ //创建消息 TextMessagemsg=session.createTextMessage("消息"+i); //发送消息 producer.send(msg); System.out.println("发送消息:消息"+i); } } } 最后一步,添加消息的接受者 publicclassconsumer{ privatestaticConnectionFactoryconnectionFactory; static{ connectionFactory=newActiveMQConnectionFactory(ActiveMQConnection.DEFAULT_USER,ActiveMQConnection.DEFAULT_PASSWORD,"tcp://localhost:61616"); } publicstaticvoidmain(String[]args){ Connectionconnection=null; Sessionsession=null; Destinationdestination; MessageConsumerconsumer=null; try{ connection=connectionFactory.createConnection(); connection.start(); session=connection.createSession(Boolean.FALSE,Session.AUTO_ACKNOWLEDGE); destination=session.createQueue("FirstQueue"); consumer=session.createConsumer(destination); while(true){ TextMessagemsg=(TextMessage)consumer.receive(30000); if(msg!=null){ System.out.println("接受到的消息:"+msg.getText()); }else{ break; } } }catch(JMSExceptione){ e.printStackTrace(); }finally{ try{ consumer.close(); session.commit(); connection.close(); }catch(JMSExceptione){ e.printStackTrace(); } } } } 注意:接受消息还可以通过MessageListener接收 publicclassconsumerList{ privatestaticConnectionFactoryconnectionFactory; static{ connectionFactory=newActiveMQConnectionFactory(ActiveMQConnection.DEFAULT_USER,ActiveMQConnection.DEFAULT_PASSWORD,"tcp://localhost:61616"); } publicstaticvoidmain(String[]args){ Connectionconnection=null; Sessionsession=null; Destinationdestination; MessageConsumerconsumer=null; try{ connection=connectionFactory.createConnection(); connection.start(); session=connection.createSession(Boolean.TRUE,Session.AUTO_ACKNOWLEDGE); destination=session.createQueue("FirstQueue"); consumer=session.createConsumer(destination); consumer.setMessageListener(newMessageListener(){ @Override publicvoidonMessage(Messagemessage){ TextMessagemsg=(TextMessage)message; try{ System.out.println(msg.getText()); }catch(JMSExceptione){ e.printStackTrace(); } } }); }catch(JMSExceptione){ e.printStackTrace(); }finally{ try{ consumer.close(); session.commit(); connection.close(); }catch(JMSExceptione){ e.printStackTrace(); } } } }

优秀的个人博客,低调大师

Spring MVC入门

Spring mvc架构 1.1架构图 1.2.架构流程 1.用户发送请求至前端控制器DispatcherServlet 2.DispatcherServlet收到请求调用HandlerMapping处理器映射器。 3.处理器映射器根据请求url找到具体的处理器,生成处理器对象及处理器拦截器(如果有则生成)一并返回给DispatcherServlet。 4.DispatcherServlet通过HandlerAdapter处理器适配器调用处理器 5.执行处理器(Controller,也叫后端控制器)。 6.Controller执行完成返回ModelAndView 7.HandlerAdapter将controller执行结果ModelAndView返回 8.DispatcherServletDispatcherServlet将ModelAndView传给ViewReslover视图解析器 9.ViewReslover解析后返回具体View 10.DispatcherServlet对View进行渲染视图(即将模型数据填充至视图中)。 11.DispatcherServlet响应用户 一.前端控制器(DispatcherServlet) <servlet> <servlet-name>JdbcSqlServlet</servlet-name> <servlet-class>com.imooc.page.servlet.JdbcSqlServlet</servlet-class> </servlet> <servlet-mapping> <servlet-name>JdbcSqlServlet</servlet-name> <url-pattern>/jdbcSql/JdbcSqlServlet</url-pattern> </servlet-mapping> 二.Spring MVC配置文件(同Spring配置文件) <?xmlversion="1.0"encoding="UTF-8"?> <beansxmlns="http://www.springframework.org/schema/beans" xmlns:mvc="http://www.springframework.org/schema/mvc"xmlns:context="http://www.springframework.org/schema/context" xmlns:tx="http://www.springframework.org/schema/tx"xmlns:aop="http://www.springframework.org/schema/aop" xmlns:p="http://www.springframework.org/schema/p"xmlns:xsi="http://www.w3.org/2001/XMLSchema-instance" xsi:schemaLocation=" http://www.springframework.org/schema/beans http://www.springframework.org/schema/beans/spring-beans.xsd http://www.springframework.org/schema/mvc http://www.springframework.org/schema/mvc/spring-mvc.xsd http://www.springframework.org/schema/context http://www.springframework.org/schema/context/spring-context.xsd http://www.springframework.org/schema/tx http://www.springframework.org/schema/tx/spring-tx.xsd http://www.springframework.org/schema/aop http://www.springframework.org/schema/aop/spring-aop.xsd"> 前端控制器(DispatcherServlet)带有默认的,映射器和适配器 三.处理器映射器(HandlerMapping) 用户发起的request请求,前端控制器(DispatcherServlet) 首先会请求 处理器映射器(HandlerMapping)来查找 后端控制器(Handler) 四.处理器适配器(HandlerAdapter) 处理器映射器将查找到的Handler返回给DispatcherServlet后,DispatcherServlet会调用适配器执行Handler,通过适配器去扩展对不同Handler的执行。 五.后端控制器的编写(Handler) Controller.java 六.配置视图解析器(ViewResolver) <bean class="org.springframework.web.servlet.view.InternalResourceViewResolver"> </bean>

优秀的个人博客,低调大师

Yaml入门笔记

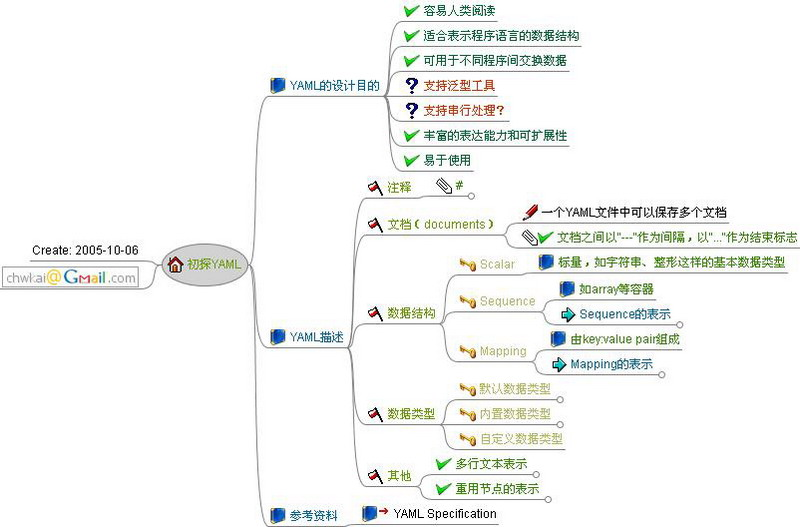
什么是yamlYAML是"YAML Ain't a Markup Language"(YAML不是一种置标语言)的递归缩写,早先YAML的意思其实是:"Yet Another Markup Language"(另外一种置标语言),但为了强调这种语言以数据做为中心,而不是以置标语言为重点,而用返璞词重新命名,YAML的官方定义很简单,即一种人性化的数据格式定义语言,其主要功能用途类似于XML或JSON,YAML使用空白字符和分行来分隔数据,且巧妙避开各种封闭符号,如:引号、括号等,以避免这些符号在复杂层次结构中变得难以辨认。YAML的语法与高阶语言类似,可以很简单地表述序列(java中的list)、杂凑表(java中的map)、标量(java中的基本类型等)数据结构,它重点强调可阅读性。 本文内容 image.png YAML的设计目的 容易人类阅读 适合表示程序语言的数据结构 可用于不同程序间交换数据 支持泛型工具 支持串行处理? 丰富的表达能力和可扩展性 易于使用 xml和yaml的代码块: xml代码块: <site> <name>github</name> <url>https://github.com</url> </site> <site> <name>简书</name> <url>https://www.jianshu.com</url> </site> yaml代码块: --- site: name: github url: https://github.com --- site: name: 简书 url: https://www.jianshu.com --- #或者 --- site:{name:github,url:https://github.com} --- site:{name:简书,url:https://jianshu.com} 主要标记 注释-comment 举例: # Comment Example # Profile Of Mary Mary: - name: Mary - age : 19 # age property 文档(document) # documents example --- site: name: github url: https://github.com --- site: name: 简书 url: https://www.jianshu.com 数据结构 YAML的设计者认为在配置文件中所要表达的数据内容有三种类型:标量(Scalar,如字符串和整数等)、序列(Sequence,如数组)和Mapping(类似hash的key/value pair)。 sequence.png mapping.png 例子:我们用YAML来描述一本书: # 《单元测试之道-c#版》描述 --- # begin of document 书名 : '单元测试之道-C#版' 出版社: '电子工业出版社' 原作者: ['Andrew Hunt', 'David Thomas'] 译者 : - 陈伟柱 - 陶文 前二章节 : - 第一章: 序言 - 第二章: 你的首个单元测试计划 #end document 注意:YAML推荐使用空格作为缩进,避免了在不同编辑器中对tab的表示形式不同而可能产生误解。 YAML 与 XML 优势: YAML的可读性好 YAML和脚本语言的交互性好 YAML使用实现语言的数据类型 YAML有一个一致的信息模型 YAML易于实现 上面5条是XML不足的地方,同时,YAML也具有XML的下列优点: YAML可以基于流来处理 YAML表达能力强,扩展性好 YAML类似于XML的数据描述语言,语法比XML简单很多,YAML试图用一种比XML更敏捷的方式,来完成XML所完成的任务。 YAML 与 JSON JSON的语法其实是YAML的子集,大部分的JSON文件都可以被YAML的剖析器剖析。虽然大部分的数据分层形式也可以使用类似JSON的格式,不过YAML并不建议这样使用,除非这样编写能让文件可读性增加,更重要的是,YAML的许多扩展在JSON是找不到的,如:进阶资料形态、关系锚点、字串不需要引号、映射资料形态会储存键值的顺序等。 YAML用途 脚本语言 由于实现简单,解析成本很低,YAML特别适合在脚本语言中使用。列一下现有的语言实现:Ruby,Java,Perl,Python,PHP,OCaml,JavaScript,除了Java,其他都是脚本语言。 序列化 YAML比较适合做序列化。因为它是宿主语言数据类型直转的。 配置文件 YAML做配置文件也不错。写YAML要比写XML快得多(无需关注标签或引号),并且比ini文档功能更强。 调试 由于其很强的阅读性,用于调试过程中dump出信息供分析也是一种比较方便的做法。 YAML缺陷与不足 YAML没有自己的数据类型的定义,而是使用实现语言的数据类型。一个YAML文件,在不同语言中解析后得到的数据类型可能会不同,由于其兼容性问题,不同语言间的数据流转不建议使用YAML。 YAML语法与范例 YAML使用可打印的Unicode字符,可使用UTF-8或UTF-16 使用空白字符(不能使用<kbd>Tab</kbd>)分层,同层元素左侧对齐 单行注解由井字号(<kbd> #</kbd> )开始,可以出现在行中任何位置 每个清单成员以单行表示,并用短杠+空白(<kbd>- </kbd>)起始 每个杂凑表的成员用冒号+空白(<kbd>: </kbd>)分开键和值 杂凑表的键值可以用问号 (<kbd>?</kbd>)起始,表示多个词汇组成的键值 字串一般不使用引号,但必要的时候可以用引号框住 使用双引号表示字串时,可用倒斜线(<kbd></kbd>)进行特殊字符转义 区块的字串用缩排和修饰词(非必要)来和其他资料分隔,有新行保留(使用符号<kbd>|</kbd>)或新行折叠(使用符号<kbd>></kbd>)两种方式 在单一档案中,可用连续三个连字号(<kbd>---</kbd>)区分多个档案 可选择性的连续三个点号(<kbd>...</kbd>)用来表示档案结尾(在流式传输时非常有用,不需要关闭流即可知道到达结尾处) 重复的内容可使从参考标记星号 (<kbd>*</kbd>)复制到锚点标记(<kbd>&</kbd>) 指定格式可以使用两个惊叹号 ( !! ),后面接上名称 receipt: Oz-Ware Purchase Invoice date: 2007-08-06 customer: given: Dorothy family: Gale items: - part_no: A4786 descrip: Water Bucket (Filled) price: 1.47 quantity: 4 - part_no: E1628 descrip: High Heeled "Ruby" Slippers price: 100.27 quantity: 1 bill-to: &id001 street: | 123 Tornado Alley Suite 16 city: East Westville state: KS ship-to: *id001 specialDelivery: > Follow the Yellow Brick Road to the Emerald City. Pay no attention to the man behind the curtain. ... 这个文件的的顶层由七个键值组成:其中一个键值"items",是个两个元素构成的清单,清单中的两个元素同时也是包含了四个键值的杂凑表。 文件中重复的部分处理方式:使用锚点(&)和参考(*)标签将"bill-to"杂凑表的内容复制到"ship-to"杂凑表。也可以在文件中加入选择性的空行,以增加可读性。 YAML的JAVA实现 YAML已经有了多种语言不少实现,详见YAML官网。 一般YAML文件扩展名为.yaml,比如John.yaml,其内容为: name: John Smith age: 37 children: - name: Jimmy Smith age: 15 - name: Jenny Smith age: 12 spouse: name: Jane Smith age: 25 由于yaml的超强可读性,我们了解到:John今年37岁,两个孩子Jimmy 和Jenny活泼可爱,妻子Jane年轻美貌,而且年仅25岁,一个幸福的四口之家。 对John.yaml进行java描述,抽象出一个Person类,如下: public class Person { private String name; private int age; private Person sponse; private Person[] children; // setXXX, getXXX方法略. } 现在我们使用java装配一个Jone: Person john = new Person(); john.setAge(37); john.setName("John Smith"); Person sponse = new Person(); sponse.setName("Jane Smith"); sponse.setAge(25); john.setSponse(sponse); Person[] children = {new Person(), new Person()}; children[0].setName("Jimmy Smith"); children[0].setAge(15); children[1].setName("Jenny Smith"); children[1].setAge(12); john.setChildren(children); 使用SnakeYAML实现 项目主页:http://code.google.com/p/snakeyaml/ 使用手册:https://code.google.com/p/snakeyaml/wiki/Documentation SnakeYAML是一个标准的YAML的java实现,它有以下特点: 完全支持YAML 1.1,可以跑通规范中的所有示例 支持YAML的所有类型 支持UTF-8/UTF-16的输入和输出 提供了本地java对象的序列化和反序列化的高层API 提供相对合理的错误提示信息 使用SnakeYAML将john dump出来,如果有引用相同对象,则dump出到yaml文件会自动使用<kbd>&</kbd>和<kbd></kbd>进行锚点和引用*: DumperOptions options = new DumperOptions(); options.setDefaultFlowStyle(DumperOptions.FlowStyle.BLOCK); Yaml yaml = new Yaml(options); //Yaml yaml = new Yaml(); String dump = yaml.dump(john); System.out.println(dump); 内容如下: !!Person age: 37 children: - age: 15 children: null name: Jimmy Smith sponse: null - age: 12 children: null name: Jenny Smith sponse: null name: John Smith sponse: age: 25 children: null name: Jane Smith sponse: null 现在用SnakeYAML把yaml load进来,如果yaml文件中使用了<kbd>&</kbd>和<kbd></kbd>,则会自动对load出来的对象赋相同的值*: Yaml yaml = new Yaml(); Object load = yaml.load(new FileInputStream(new File("jhon.yaml"))); System.out.println(load.getClass()); System.out.println(yaml.dump(load)); 或 Yaml yaml = new Yaml(options); Person person = yaml.loadAs(inputStream, Person.class); System.out.println(person.getSponse().getChildren().length); 如果一个yaml文件中有多个文档,由<kbd>---</kbd>分割,解析如下: Yaml yaml = new Yaml(); int counter = 0; for (Object data : yaml.loadAll(input)) { System.out.println(data); counter++; } 保存一个Map对象: Map<String, Object> data = new HashMap<String, Object>(); data.put("name", "Silenthand Olleander"); data.put("race", "Human"); data.put("traits", new String[] { "ONE_HAND", "ONE_EYE" }); Yaml yaml = new Yaml(); String output = yaml.dump(data); System.out.println(output); // or StringWriter writer = new StringWriter(); yaml.dump(data, writer); System.out.println(writer.toString()); 将多个文档dump出到同一个yaml文件中去: List<Integer> docs = new LinkedList<Integer>(); for (int i = 1; i < 4; i++) { docs.add(i); } DumperOptions options = new DumperOptions(); //options.setCanonical(true); options.explicitStart(true); Yaml yaml = new Yaml(options); System.out.println(yaml.dump(docs)); System.out.println(yaml.dumpAll(docs.iterator())); --- [1, 2, 3] --- 1 --- 2 --- 3 YAML JAVA !null null !!bool Boolean !!int Integer, Long, BigInteger !!float Double !!binary String !!timestamp java.util.Date, java.sql.Date, java.sql.Timestamp !!omap, !!pairs List of Object[] !!set Set !!str String !!seq List !!map Map YAML与java类型对照表: YAML JAVA !null null !!bool Boolean !!int Integer, Long, BigInteger !!float Double !!binary String !!timestamp java.util.Date, java.sql.Date, java.sql.Timestamp !!omap, !!pairs List of Object[] !!set Set !!str String !!seq List !!map Map 集合的默认实现是: List: ArrayList Map: LinkedHashMap 使用JYaml实现 JYaml(最新版本是2007年的,可以考虑放弃了),使用JYaml把Jone “Dump” 出来: File dumpfile = new File("John_dump.yaml"); Yaml.dump(john, dumpfile); 下面我们看看John_dump.yaml是什么样子: --- !yaml.test.internal.Person age: 37 children: !yaml.test.internal.Person[] - !yaml.test.internal.Person age: 15 name: Jimmy Smith - !yaml.test.internal.Person age: 12 name: Jenny Smith name: John Smith sponse: !yaml.test.internal.Person age: 25 name: Jane Smith 其中!yaml.test.internal.Person是一些类型的信息。load的时候需要用。 现在用JYaml把Jone_dump.yaml load进来: Person john2 = (Person) Yaml.loadType(dumpfile, Person.class); 还可以用下面的代码dump出没有类型信息的John.yaml: Yaml.dump(john,dumpfile, true); 我们再来看看JYaml对流处理的支持,为简便起见,我们只是把同一个john写10次: YamlEncoder enc = new YamlEncoder(new FileOutputStream(dumpfile)); for(int i=0; i<10; i++){ john.setAge(37+i); enc.writeObject(john); enc.flush(); } enc.close(); 下面再把这十个对象一个一个读出来(注意while循环退出的方式): YamlDecoder dec = new YamlDecoder(new FileInputStream(dumpfile)); int age = 37; while(true){ try{ john = (Person) dec.readObject(); assertEquals(age, john.getAge()); age++; }catch(EOFException eofe){ break; } } 参考文档: YAML Specification YAML 数据类型说明 http://blog.csdn.net/conquer0715/article/details/42108061 http://www.cnblogs.com/chwkai/archive/2009/03/01/249924.html

优秀的个人博客,低调大师

maven入门(一)

现在基本上很多项目开始使用maven进行构建项目,已经不是直接在lib文件夹下统一放置jar包,所以还是有必要学习掌握下maven的。 针对maven。这篇文章主要介绍一下几点,大家如果都明白了,就可以参照这个思维导图,再复习下,毕竟知识长时间不用,会忘记的。 一、 maven 是什么 Maven的Apache公司开源项目,是项目构建工具,也用来依赖管理。 二、maven的好处 1、由于maven构建的项目是没有jar包的,所以项目的大小上,肯定是maven的项目比较小。 2、jar包统一交给maven管理。 3、maven同样可以进行项目构建。 maven主要就是 项目构建和依赖(jar包)管理 三、maven安装 maven程序安装前提:maven程序java开发,它的运行依赖jdk。 1、 首先去Maven官网,下载Maven的包,地址为http://maven.apache.org/download.cgi 2、下载完解压,然后配置一下环境变量,和JDK的环境变量配置类似(如图) 3、查询maven版本信息 4、 配置本地仓库 找到 解压目录下的 config/setting.xml,我的就是 E:\app\apache-maven-3.5.3\conf\setting.xml 主要修改2个地方 4.1 修改本地仓库路径 4.2 修改成阿里云镜像 <mirror> <id>nexus-aliyun</id> <mirrorOf>*</mirrorOf> <name>Nexus aliyun</name> <url>http://maven.aliyun.com/nexus/content/groups/public</url> </mirror> 4.4 复制刚刚设置好的setting.xml 到你设置的本地仓库路径 我的是E:\dev_maven 5.仓库类型有哪些 四、 使用maven构建项目 这里我是用eclipse 进行创建的 1、eclipse配置 1.1 配置maven程序 1.2 配置userSetting ,知道仓库位置 1.3 构建索引,方便查找jar包(Window->show view ->maven Repository) 2、开始创建项目 2.1 这里选择普通项目- Maven Project ,点击next 2.2 打包方式选择war ,完成。 2.3 web.xml缺失报错 此时,会报错,需要在src-main-webapp 下面创建 WEB-INF/web.xml 目录结构 web.xml 内容 <?xml version="1.0" encoding="UTF-8"?> <web-app xmlns:xsi="http://www.w3.org/2001/XMLSchema-instance" xmlns="http://java.sun.com/xml/ns/javaee" xmlns:web="http://java.sun.com/xml/ns/javaee/web-app_2_5.xsd" xsi:schemaLocation="http://java.sun.com/xml/ns/javaee http://java.sun.com/xml/ns/javaee/web-app_2_5.xsd" id="WebApp_ID" version="2.5"> <welcome-file-list> <welcome-file>index.html</welcome-file> <welcome-file>index.htm</welcome-file> <welcome-file>index.jsp</welcome-file> <welcome-file>default.html</welcome-file> <welcome-file>default.htm</welcome-file> <welcome-file>default.jsp</welcome-file> </welcome-file-list> </web-app> 同时创建一个index.xml_(src\main\webapp\index.html) <!DOCTYPE html> <html> <head> <meta charset="UTF-8"> <title>Insert title here</title> </head> <body> <h1>Hello maven</h1> </body> </html> 设置jdk编译版本为1.8.默认为1.5 修改pom文件 <project xmlns="http://maven.apache.org/POM/4.0.0" xmlns:xsi="http://www.w3.org/2001/XMLSchema-instance" xsi:schemaLocation="http://maven.apache.org/POM/4.0.0 http://maven.apache.org/xsd/maven-4.0.0.xsd"> <modelVersion>4.0.0</modelVersion> <groupId>com.zhb</groupId> <artifactId>maven_hello</artifactId> <version>0.0.1-SNAPSHOT</version> <packaging>war</packaging> <build> <plugins> <plugin> <groupId>org.apache.maven.plugins</groupId> <artifactId>maven-compiler-plugin</artifactId> <version>3.5.1</version> <configuration> <source>1.8</source> <target>1.8</target> <encoding>UTF-8</encoding> </configuration> </plugin> </plugins> </build> </project> 更新maven 运行项目 tomcat:run 4.大功告成 五、maven 常用命令 clean:清理 将项目根目录下target目录清理掉 compile:编译 将项目中.java文件编译为.class文件 test:单元测试 单元测试类名有要求:XxxxTest.java 将项目根目录下src/test/java目录下的单元测试类都会执行。 package:打包 web project --- war包 java project --- jar 包 将项目打包,打包项目根目录下taget目录。 install:安装 本地多个项目公用一个jar包。 打包到本地仓库 这里大家自己尝试一下,进入工程目录里面 如打包 则执行 mvn package 2018年5月20日更新 我现在发现 我先在使用idea开发,大家可以在自己电脑的c盘的,m2 文件夹下将setting.xml 考到里面,这样本地仓库就是你设置的了 好了,写了好久。终于弄完了。玩的开心。 学习不是要么0分,要么100分的。80分是收获;60分是收获;20分也是收获。有收获最重要。但是因为着眼于自己的不完美,最终放弃了,那就是彻底的0分了。

资源下载

更多资源
Mario

Mario

马里奥是站在游戏界顶峰的超人气多面角色。马里奥靠吃蘑菇成长,特征是大鼻子、头戴帽子、身穿背带裤,还留着胡子。与他的双胞胎兄弟路易基一起,长年担任任天堂的招牌角色。

腾讯云软件源

腾讯云软件源

为解决软件依赖安装时官方源访问速度慢的问题,腾讯云为一些软件搭建了缓存服务。您可以通过使用腾讯云软件源站来提升依赖包的安装速度。为了方便用户自由搭建服务架构,目前腾讯云软件源站支持公网访问和内网访问。

Spring

Spring

Spring框架(Spring Framework)是由Rod Johnson于2002年提出的开源Java企业级应用框架,旨在通过使用JavaBean替代传统EJB实现方式降低企业级编程开发的复杂性。该框架基于简单性、可测试性和松耦合性设计理念,提供核心容器、应用上下文、数据访问集成等模块,支持整合Hibernate、Struts等第三方框架,其适用范围不仅限于服务器端开发,绝大多数Java应用均可从中受益。

Rocky Linux

Rocky Linux

Rocky Linux(中文名:洛基)是由Gregory Kurtzer于2020年12月发起的企业级Linux发行版,作为CentOS稳定版停止维护后与RHEL(Red Hat Enterprise Linux)完全兼容的开源替代方案,由社区拥有并管理,支持x86_64、aarch64等架构。其通过重新编译RHEL源代码提供长期稳定性,采用模块化包装和SELinux安全架构,默认包含GNOME桌面环境及XFS文件系统,支持十年生命周期更新。

用户登录
用户注册