首页 文章 精选 留言 我的

精选列表

搜索[环境部署],共10032篇文章
优秀的个人博客,低调大师

【Android电量】Battery Historian环境部署

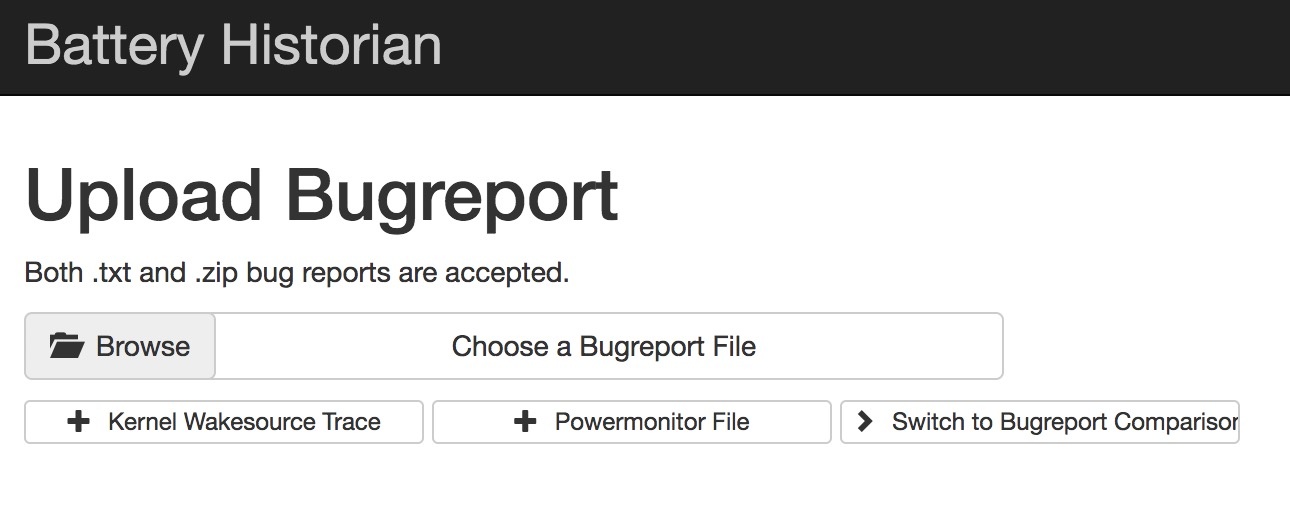
1、Install Docker Desktop for Mac (ps: Requires Apple Mac OS Sierra 10.12 or above.)手动下载安装 https://docs.docker.com/docker-for-mac/install/ 使用 Homebrew 安装 brew cask install docker(推荐) 2、Run the Battery Historian image. 使用命令 docker run -d -p 9999:9999 bhaavan/battery-historian 加载启动镜像 (有问题的镜像,不要用) docker run -p 9998:9998 gcr.io/android-battery-historian/stable:3.0 --port 9998 (亲测可用镜像) didi@localhost  ~  docker run -p 9998:9998 gcr.io/android-battery-historian/stable:3.0 --port 9998 Unable to find image 'gcr.io/android-battery-historian/stable:3.0' locally 3.0: Pulling from android-battery-historian/stable c62795f78da9: Pull complete d4fceeeb758e: Pull complete 5c9125a401ae: Pull complete 0062f774e994: Pull complete 6b33fd031fac: Pull complete a6bd6e1d0bdb: Pull complete 76cf9d0635af: Pull complete 856d20d533e0: Pull complete e63a73f6a528: Pull complete 1a75578c9353: Pull complete 24f3649604d9: Pull complete 10f637765748: Pull complete e06a9fa76cf2: Pull complete Digest: sha256:265a37707f8cf25f2f85afe3dff31c760d44bb922f64bbc455a4589889d3fe91 Status: Downloaded newer image for gcr.io/android-battery-historian/stable:3.0 2019/04/15 12:46:23 Listening on port: 9998 2019/04/15 12:48:19 Trace starting analysisServer processing for: GET 2019/04/15 12:48:19 Trace finished analysisServer processing for: GET 2019/04/15 12:48:20 Trace starting analysisServer processing for: GET 2019/04/15 12:48:20 Trace finished analysisServer processing for: GET 2019/04/15 12:48:27 Trace starting analysisServer processing for: POST 2019/04/15 12:48:27 Trace starting reading uploaded file. 2330165 bytes 2019/04/15 12:48:28 failed to extract battery info: could not find battery time info in bugreport 2019/04/15 12:48:28 failed to extract time information from bugreport dumpstate: open /usr/lib/go-1.6/lib/time/zoneinfo.zip: no such file or directory 2019/04/15 12:48:28 Trace started analyzing "bugreport-ALP-AL00-HUAWEIALP-AL00-2019-04-15-14-31-10.zip~bugreport-ALP-AL00-HUAWEIALP-AL00-2019-04-15-14-31-10/bugreport-ALP-AL00-HUAWEIALP-AL00-2019-04-15-14-31-10.txt" file. 2019/04/15 12:48:28 Trace finished processing checkin. 2019/04/15 12:48:28 Trace finished processing summary data. 2019/04/15 12:48:28 Trace finished generating Historian plot. 2019/04/15 12:48:28 Trace finished analyzing "bugreport-ALP-AL00-HUAWEIALP-AL00-2019-04-15-14-31-10.zip~bugreport-ALP-AL00-HUAWEIALP-AL00-2019-04-15-14-31-10/bugreport-ALP-AL00-HUAWEIALP-AL00-2019-04-15-14-31-10.txt" file. 2019/04/15 12:48:29 Trace ended analyzing file. 2019/04/15 12:48:29 Trace finished analysisServer processing for: POST didi@localhost  /usr/local/Cellar/go/1.12.4/src/github.com/google/battery-historian   master  docker ps -all CONTAINER ID IMAGE COMMAND CREATED STATUS PORTS NAMES c19bb05d9198 bhaavan/battery-historian "/bin/sh -c 'go run …" 19 minutes ago Up 19 minutes 0.0.0.0:9999->9999/tcp sad_shaw didi@localhost  /usr/local/Cellar/go/1.12.4/src/github.com/google/battery-historian   master  didi@localhost  /usr/local/Cellar/go/1.12.4/src/github.com/google/battery-historian   master  docker images REPOSITORY TAG IMAGE ID CREATED SIZE bhaavan/battery-historian latest 9a3a9fd0ca2f 2 years ago 922MB 3、Open BHRun historian and visit http://localhost:9999 4、Upload Report Both .txt and .zip bug reports are accepted. To take a bug report from your Android device, you will need to enable USB debugging under Settings > System > Developer Options To obtain a bug report from your development device running Android 7.0 and higher: $ adb bugreport bugreport.zip didi@localhost  ~  adb bugreport bugreport.zip /data/user_de/0/com.android.shell/files/bugreports/bugreport-ALP-AL00-HUAWEIALP-AL00-2019-04-15-11-08-01.zip: 1 file pulled. 23.2 MB/s (2295220 bytes in 0.094s) // 手机本地 didi@localhost  ~  adb pull /data/user_de/0/com.android.shell/files/bugreports/bugreport-ALP-AL00-HUAWEIALP-AL00-2019-04-15-12-08-32.zip /Users/didi/Documents/ # 导出到电脑 /data/user_de/0/com.android.shell/files/bugreports/bugreport-ALP-AL00-HUAWEIALP-AL00-2019-04-15-12-08-32.zip: 1 file pulled. 24.1 MB/s (2415380 bytes in 0.096s) For devices 6.0 and lower: $ adb bugreport > bugreport.txt 5、Start analyzing! Timeline: System stats: App stats:

优秀的个人博客,低调大师

Dockerfile分离构建LNMP环境部署wordpress

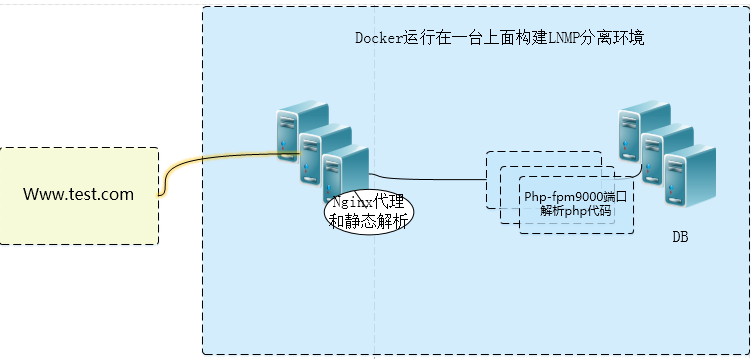
最近忙着写自己的项目,也把一个站点的bbs论坛打算迁移到Docker中,测试没发现啥大问题。在单台上面的架构如下;(往后我们也是要讲到compose和swarm调度的慢慢来) 1、首先我们先安装一下docker,好多人都发现国内用yum安装有各种问题;这里我们用国内的https://www.daocloud.io.登录后注册,然后点击下载。里面有提示,我们点击Linxu安装然后复制代码执行到shell上即可。 [root@test nginx]# curl -sSL https://get.daocloud.io/docker | sh 2、安装好之后,安装dockhub加速器,点击加速器,复制代码粘贴到shell. [root@testnginx]#curl-sSLhttps://get.daocloud.io/daotools/set_mirror.sh|sh-shttp://681a96df.m.daocloud.io {"registry-mirrors":["http://681a96df.m.daocloud.io"], "live-restore":true } Success. Youneedtorestartdockertotakeeffect:sudosystemctlrestartdocker ##执行脚本,主要是把仓库地址写到daemon.json文件下。 [root@testnginx]#cat/etc/docker/daemon.json {"registry-mirrors":["http://681a96df.m.daocloud.io"], "live-restore":true } 3、准备工作都已经完成了,接下来我们来构建一下dockerfile在三个目录下,看下目录结构: [root@testtest]#tree-L2--charsetASCII |--mysql ||--Dockerfile ||--epel-6.repo ||--my.cnf |`--startup.sh |--nginx ||--Dockerfile ||--nginx-1.11.10 ||--nginx-1.11.10.tar.gz ||--nginx.conf |`--nginx_default.conf `--php-fpm |--Centos-6.repo |--Dockerfile |--epel-6.repo |--php-5.5.38 `--php-5.5.38.tar.gz 5、看一下nginx 的 Dockerfile: [root@testnginx]#catDockerfile #lnmpcentos6.0 fromcentos:centos6 MAINTAINERxiaoluo ENVAPP_DIR/web addnginx-1.11.10/nginx-1.11.10 RUNyum-ygroupinstall"DevelopmentTools""ServerPlatformDeveopment" RUNyum-yinstallopenssl-develpcre-devel RUNuseraddnginx-s/sbin/nologin RUNcd/nginx-1.11.10&&./configure--prefix=/usr/local/nginx--user=nginx--group=nginx--with-http_ssl_module--with-http_flv_module--with-http_stub_status_module--with-http_gzip_static_module--with-pcre&&make&&makeinstall RUNmkdir/usr/local/nginx/conf/vhosts RUNmkdir/var/log/nginx ADDnginx.conf/usr/local/nginx/conf/nginx.conf ADDnginx_default.conf/usr/local/nginx/conf/vhosts/default.conf EXPOSE80 CMD["/usr/local/nginx/sbin/nginx"] ##nginx 相关php配置: [root@testnginx]#catnginx_default.conf server{ listen80default_server; server_namelocalhost; #charsetkoi8-r; location/{ root/web; indexindex.phpindex.htmlindex.htm; } #redirectservererrorpagestothestaticpage/50x.html # error_page500502503504/50x.html; location=/50x.html{ rootAPP_DIR; } #Disablenginxlogwritefavicon.ico location=/favicon.ico{ log_not_foundoff; access_logoff; } #passthePHPscriptstoFastCGIserverlisteningonport9000 # location~\.php${ root/web; fastcgi_passphp:9000; #fastcgi_passunix:/tmp/php-fpm.sock; fastcgi_indexindex.php; fastcgi_paramSCRIPT_FILENAME$document_root$fastcgi_script_name; includefastcgi_params; } } ###php:9000是通过后面的--link 容器之间互联指定 6、开始构建nginx镜像: [root@testnginx]#dockerbuild-tlnmp/nginx:1.0. ##查看是否生成镜像: [root@testnginx]#dockerimages REPOSITORYTAGIMAGEIDCREATEDSIZE lnmp/nginx1.05f5d4169189d4minutesago669MB 7、开始构建php镜像: [root@testphp-fpm]#catDockerfile fromcentos:centos6 ADDCentos-6.repo/etc/yum.repos.d/CentOS-Base.repo ADDepel-6.repo/etc/yum.repos.d/epel.repo addphp-5.5.38/php-5.5.38 RUNyum-ygroupinstall"DesktopPlatformDevelopment" RUNyum-yinstalllibmcrypt-develbzip2-develgccopenssl-develphp-mcryptlibmcrypt RUNcd/php-5.5.38&&./configure--prefix=/usr/local/php--with-mysql=mysqlnd--with-pdo-mysql=mysqlnd--with-mysqli=mysqlnd--with-openssl--enable-mbstring--with-freetype-dir--with-jpeg-dir--with-png-dir--with-zlib--with-libxml-dir=/usr--enable-xml--enable-sockets--with-mcrypt--with-bz2--enable-fpm--with-gd&&make&&makeinstall RUNcp/php-5.5.38/php.ini-production/usr/local/php/etc/php.ini RUNmv/usr/local/php/etc/php-fpm.conf.default/usr/local/php/etc/php-fpm.conf RUNuseradd-M-s/sbin/nologinphp RUNsed-i-e's\;pid=run/php-fpm.pid\pid=run/php-fpm.pid\g'-e's\nobody\php\g'-e's\listen=127.0.0.1:9000\listen=0.0.0.0:9000\g'/usr/local/php/etc/php-fpm.conf RUNsed-i's\;daemonize=yes\daemonize=no\g'/usr/local/php/etc/php-fpm.conf EXPOSE9000 CMD["/usr/local/php/sbin/php-fpm"] 8、开始构建php镜像: [root@testphp-fpm]#dockerbuild-tlnmp/php:1.0. 9、构建mysql镜像的Dockerfile: [root@testmysql]#catDockerfile FROMcentos:centos6 MAINTAINERxiaoluo"18878774@163.com" RUNyuminstall-ymysql-servermysql ADD./startup.sh/opt/startup.sh RUNchmod+x/opt/startup.sh EXPOSE3306 CMD["/bin/bash","/opt/startup.sh"] ##启动脚本: [root@testmysql]#catstartup.sh #!/bin/bash if[!-f/var/lib/mysql/ibdata1];then mysql_install_db /usr/bin/mysqld_safe& sleep10s mysql-e"grantallprivilegeson*.*to'root'@'%'identifiedby'123456';FLUSHPRIVILEGES;" killallmysqld sleep10s fi /usr/bin/mysqld_safe **正常启动的时候,是没有问题的;当时当我们用-v做持久化的时候,好像说用户就失去对/var/lib/mysql的控制权,所以启动的时候我们要判断初始化才可以用-v来持久化相关目录,这个地方之前搞了好久就是挂不起来,后面原来是这个地方。 10、开始构建mysql镜像: [root@testmysql]#dockerbuild-tlnmp/mysql:1.0. 11、下面我们开始启动相关容器: [root@testweb]#dockerrun-dit--namephp-v/web:/weblnmp/php:1.0 [root@testweb]#dockerrun-dit--nameweb-p80:80-v/web:/web--linkphp:phplnmp/nginx:1.0 [root@testweb]#dockerrun-dit--namemysql-p3306:3306-v/opt/data:/var/lib/mysqllnmp/mysql:1.0 ##### [root@testmysql]#dockerps CONTAINERIDIMAGECOMMANDCREATEDSTATUSPORTSNAMES 3527cddb4c50lnmp/mysql:1.0"/bin/bash/opt/st..."4secondsagoUp3seconds0.0.0.0:3306->3306/tcpmysql fab93953c438lnmp/nginx:1.0"/usr/local/nginx/..."AboutaminuteagoUpAboutaminute0.0.0.0:80->80/tcpweb d5854337c10blnmp/php:1.0"/usr/local/php/sb..."3minutesagoUp2minutes9000/tcp php ##可以看到我们已经都启动了所有的容器了。 12、接下来我们登录一下mysql.创建一下wordpress使用的数据库: [root@testmysql]#mysql-uroot-p123456-h192.168.63.200 MySQL[(none)]>CREATEDATABASEwordpressDEFAULTCHARACTERSETutf8; QueryOK,1rowaffected(0.00sec) 13、然后我们把wordpress代码放到我们挂载的本地/web目录下面: [root@testweb]#wgethttps://cn.wordpress.org/wordpress-4.7.2-zh_CN.tar.gz #然后解压出来。我们直接访问一下当前主机的IP地址: 直接往下走注册即可: ##到此在Docker 分离下安装wordpress已经完成,但是我们要思考一个问题,就是有没有更好的方法统一编排一下这些容器呢,给容器更好的分组管理:可以留意一下docker-compose,在1.13之后更是结合栈来实现跨主机编排。 ##还有一个就是如何给这些容器做成集群管理,保证节点的高可用。和资源监控调度呢。可以看一下1.12之后的docker swarm,构建集群非常简单。

优秀的个人博客,低调大师

Dockerfile构建LNMP分离环境部署wordpress

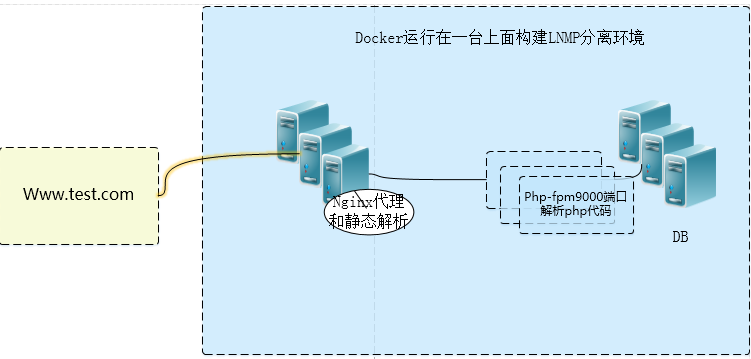
最近忙着写自己的项目,也把一个站点的bbs论坛打算迁移到Docker中,测试没发现啥大问题。在单台上面的架构如下;(往后我们也是要讲到compose和swarm调度的慢慢来) 1、首先我们先安装一下docker,好多人都发现国内用yum安装有各种问题;这里我们用国内的https://www.daocloud.io.登录后注册,然后点击下载。里面有提示,我们点击Linxu安装然后复制代码执行到shell上即可。 1 [root@testnginx]#curl-sSLhttps://get.daocloud.io/docker|sh 2、安装好之后,安装dockhub加速器,点击加速器,复制代码粘贴到shell. 1 2 3 4 5 6 [root@testnginx]#curl-sSLhttps://get.daocloud.io/daotools/set_mirror.sh|sh-shttp://681a96df.m.daocloud.io {"registry-mirrors":["http://681a96df.m.daocloud.io"], "live-restore":true } Success. Youneedtorestartdockertotakeeffect:sudosystemctlrestartdocker ##执行脚本,主要是把仓库地址写到daemon.json文件下。 1 2 3 4 [root@testnginx]#cat/etc/docker/daemon.json {"registry-mirrors":["http://681a96df.m.daocloud.io"], "live-restore":true } 3、准备工作都已经完成了,接下来我们来构建一下dockerfile在三个目录下,看下目录结构: 1 2 3 4 5 6 7 8 9 10 11 12 13 14 15 16 17 18 [root@testtest]#tree-L2--charsetASCII |--mysql ||--Dockerfile ||--epel-6.repo ||--my.cnf |`--startup.sh |--nginx ||--Dockerfile ||--nginx-1.11.10 ||--nginx-1.11.10.tar.gz ||--nginx.conf |`--nginx_default.conf `--php-fpm |--Centos-6.repo |--Dockerfile |--epel-6.repo |--php-5.5.38 `--php-5.5.38.tar.gz 5、看一下nginx 的 Dockerfile: 1 2 3 4 5 6 7 8 9 10 11 12 13 14 15 16 [root@testnginx]#catDockerfile #lnmpcentos6.0 fromcentos:centos6 MAINTAINERxiaoluo< xiaoluo @test.com> ENVAPP_DIR/web addnginx-1.11.10/nginx-1.11.10 RUNyum-ygroupinstall"DevelopmentTools""ServerPlatformDeveopment" RUNyum-yinstallopenssl-develpcre-devel RUNuseraddnginx-s/sbin/nologin RUNcd/nginx-1.11.10&&./configure--prefix=/usr/local/nginx--user=nginx--group=nginx--with-http_ssl_module--with-http_flv_module--with-http_stub_status_module--with-http_gzip_static_module--with-pcre&&make&&makeinstall RUNmkdir/usr/local/nginx/conf/vhosts RUNmkdir/var/log/nginx ADDnginx.conf/usr/local/nginx/conf/nginx.conf ADDnginx_default.conf/usr/local/nginx/conf/vhosts/default.conf EXPOSE80 CMD["/usr/local/nginx/sbin/nginx"] ##nginx 相关php配置: 1 2 3 4 5 6 7 8 9 10 11 12 13 14 15 16 17 18 19 20 21 22 23 24 25 26 27 28 29 30 31 [root@testnginx]#catnginx_default.conf server{ listen80default_server; server_namelocalhost; #charsetkoi8-r; location/{ root/web; indexindex.phpindex.htmlindex.htm; } #redirectservererrorpagestothestaticpage/50x.html # error_page500502503504/50x.html; location=/50x.html{ rootAPP_DIR; } #Disablenginxlogwritefavicon.ico location=/favicon.ico{ log_not_foundoff; access_logoff; } #passthePHPscriptstoFastCGIserverlisteningonport9000 # location~\.php${ root/web; fastcgi_passphp:9000; #fastcgi_passunix:/tmp/php-fpm.sock; fastcgi_indexindex.php; fastcgi_paramSCRIPT_FILENAME$document_root$fastcgi_script_name; includefastcgi_params; } } ###php:9000是通过后面的--link 容器之间互联指定 6、开始构建nginx镜像: [root@test nginx]# docker build -t lnmp/nginx:1.0 . ##查看是否生成镜像: 1 2 3 [root@testnginx]#dockerimages REPOSITORYTAGIMAGEIDCREATEDSIZE lnmp/nginx1.05f5d4169189d4minutesago669MB 7、开始构建php镜像: 1 2 3 4 5 6 7 8 9 10 11 12 13 14 15 [root@testphp-fpm]#catDockerfile fromcentos:centos6 ADDCentos-6.repo/etc/yum.repos.d/CentOS-Base.repo ADDepel-6.repo/etc/yum.repos.d/epel.repo addphp-5.5.38/php-5.5.38 RUNyum-ygroupinstall"DesktopPlatformDevelopment" RUNyum-yinstalllibmcrypt-develbzip2-develgccopenssl-develphp-mcryptlibmcrypt RUNcd/php-5.5.38&&./configure--prefix=/usr/local/php--with-mysql=mysqlnd--with-pdo-mysql=mysqlnd--with-mysqli=mysqlnd--with-openssl--enable-mbstring--with-freetype-dir--with-jpeg-dir--with-png-dir--with-zlib--with-libxml-dir=/usr--enable-xml--enable-sockets--with-mcrypt--with-bz2--enable-fpm--with-gd&&make&&makeinstall RUNcp/php-5.5.38/php.ini-production/usr/local/php/etc/php.ini RUNmv/usr/local/php/etc/php-fpm.conf.default/usr/local/php/etc/php-fpm.conf RUNuseradd-M-s/sbin/nologinphp RUNsed-i-e's\;pid=run/php-fpm.pid\pid=run/php-fpm.pid\g'-e's\nobody\php\g'-e's\listen=127.0.0.1:9000\listen=0.0.0.0:9000\g'/usr/local/php/etc/php-fpm.conf RUNsed-i's\;daemonize=yes\daemonize=no\g'/usr/local/php/etc/php-fpm.conf EXPOSE9000 CMD["/usr/local/php/sbin/php-fpm"] 8、开始构建php镜像: 1 [root@testphp-fpm]#dockerbuild-tlnmp/php:1.0. 9、构建mysql镜像的Dockerfile: 1 2 3 4 5 6 7 8 [root@testmysql]#catDockerfile FROMcentos:centos6 MAINTAINERxiaoluo"18878774@163.com" RUNyuminstall-ymysql-servermysql ADD./startup.sh/opt/startup.sh RUNchmod+x/opt/startup.sh EXPOSE3306 CMD["/bin/bash","/opt/startup.sh"] ##启动脚本: 1 2 3 4 5 6 7 8 9 10 11 [root@testmysql]#catstartup.sh #!/bin/bash if[!-f/var/lib/mysql/ibdata1];then mysql_install_db /usr/bin/mysqld_safe& sleep10s mysql-e"grantallprivilegeson*.*to'root'@'%'identifiedby'123456';FLUSHPRIVILEGES;" killallmysqld sleep10s fi /usr/bin/mysqld_safe **正常启动的时候,是没有问题的;当时当我们用-v做持久化的时候,好像说用户就失去对/var/lib/mysql的控制权,所以启动的时候我们要判断初始化才可以用-v来持久化相关目录,这个地方之前搞了好久就是挂不起来,后面原来是这个地方。 10、开始构建mysql镜像: 1 [root@testmysql]#dockerbuild-tlnmp/mysql:1.0. 11、下面我们开始启动相关容器: 1 2 3 [root@testweb]#dockerrun-dit--namephp-v/web:/weblnmp/php:1.0 [root@testweb]#dockerrun-dit--nameweb-p80:80-v/web:/web--linkphp:phplnmp/nginx:1.0 [root@testweb]#dockerrun-dit--namemysql-p3306:3306-v/opt/data:/var/lib/mysqllnmp/mysql:1.0 ##### 1 2 3 4 5 [root@testmysql]#dockerps CONTAINERIDIMAGECOMMANDCREATEDSTATUSPORTSNAMES 3527cddb4c50lnmp/mysql:1.0"/bin/bash/opt/st..."4secondsagoUp3seconds0.0.0.0:3306->3306/tcpmysql fab93953c438lnmp/nginx:1.0"/usr/local/nginx/..."AboutaminuteagoUpAboutaminute0.0.0.0:80->80/tcpweb d5854337c10blnmp/php:1.0"/usr/local/php/sb..."3minutesagoUp2minutes9000/tcpphp ##可以看到我们已经都启动了所有的容器了。 12、接下来我们登录一下mysql.创建一下wordpress使用的数据库: 1 2 3 [root@testmysql]#mysql-uroot-p123456-h192.168.63.200 MySQL[(none)]>CREATEDATABASEwordpressDEFAULTCHARACTERSETutf8; QueryOK,1rowaffected(0.00sec) 13、然后我们把wordpress代码放到我们挂载的本地/web目录下面: [root@test web]# wget https://cn.wordpress.org/wordpress-4.7.2-zh_CN.tar.gz #然后解压出来。我们直接访问一下当前主机的IP地址: 直接往下走注册即可: ##到此在Docker 分离下安装wordpress已经完成,但是我们要思考一个问题,就是有没有更好的方法统一编排一下这些容器呢,给容器更好的分组管理:可以留意一下docker-compose,在1.13之后更是结合栈来实现跨主机编排。(docker-compose:文章http://xiaoluoge.blog.51cto.com/9141967/1902816) ##还有一个就是如何给这些容器做成集群管理,保证节点的高可用。和资源监控调度呢。可以看一下1.12之后的docker swarm,构建集群非常简单。 Docker详情与集群架构部分可以查看:http://www.roncoo.com/course/view/3e9d9c48f76f4c698b8349d04b763467 附件:http://down.51cto.com/data/2366471 本文转自 小罗ge11 51CTO博客,原文链接:http://blog.51cto.com/xiaoluoge/1902501,如需转载请自行联系原作者

资源下载

更多资源
Mario

Mario

马里奥是站在游戏界顶峰的超人气多面角色。马里奥靠吃蘑菇成长,特征是大鼻子、头戴帽子、身穿背带裤,还留着胡子。与他的双胞胎兄弟路易基一起,长年担任任天堂的招牌角色。

Nacos

Nacos

Nacos /nɑ:kəʊs/ 是 Dynamic Naming and Configuration Service 的首字母简称,一个易于构建 AI Agent 应用的动态服务发现、配置管理和AI智能体管理平台。Nacos 致力于帮助您发现、配置和管理微服务及AI智能体应用。Nacos 提供了一组简单易用的特性集,帮助您快速实现动态服务发现、服务配置、服务元数据、流量管理。Nacos 帮助您更敏捷和容易地构建、交付和管理微服务平台。

Spring

Spring

Spring框架(Spring Framework)是由Rod Johnson于2002年提出的开源Java企业级应用框架,旨在通过使用JavaBean替代传统EJB实现方式降低企业级编程开发的复杂性。该框架基于简单性、可测试性和松耦合性设计理念,提供核心容器、应用上下文、数据访问集成等模块,支持整合Hibernate、Struts等第三方框架,其适用范围不仅限于服务器端开发,绝大多数Java应用均可从中受益。

Rocky Linux

Rocky Linux

Rocky Linux(中文名:洛基)是由Gregory Kurtzer于2020年12月发起的企业级Linux发行版,作为CentOS稳定版停止维护后与RHEL(Red Hat Enterprise Linux)完全兼容的开源替代方案,由社区拥有并管理,支持x86_64、aarch64等架构。其通过重新编译RHEL源代码提供长期稳定性,采用模块化包装和SELinux安全架构,默认包含GNOME桌面环境及XFS文件系统,支持十年生命周期更新。


用户登录
用户注册