首页 文章 精选 留言 我的

精选列表

搜索[源码],共10005篇文章
优秀的个人博客,低调大师

java源码-LinkedList

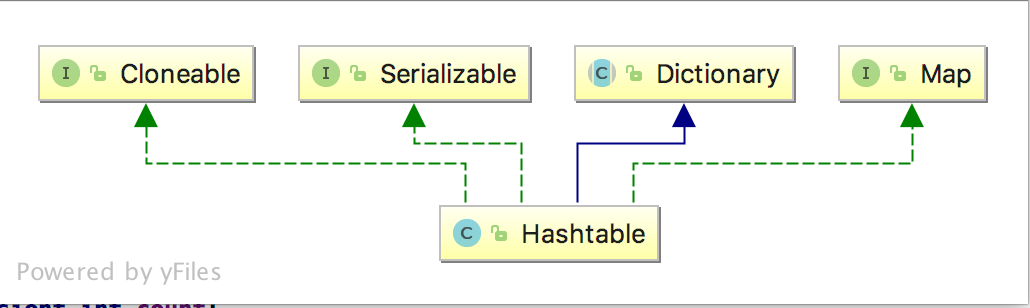
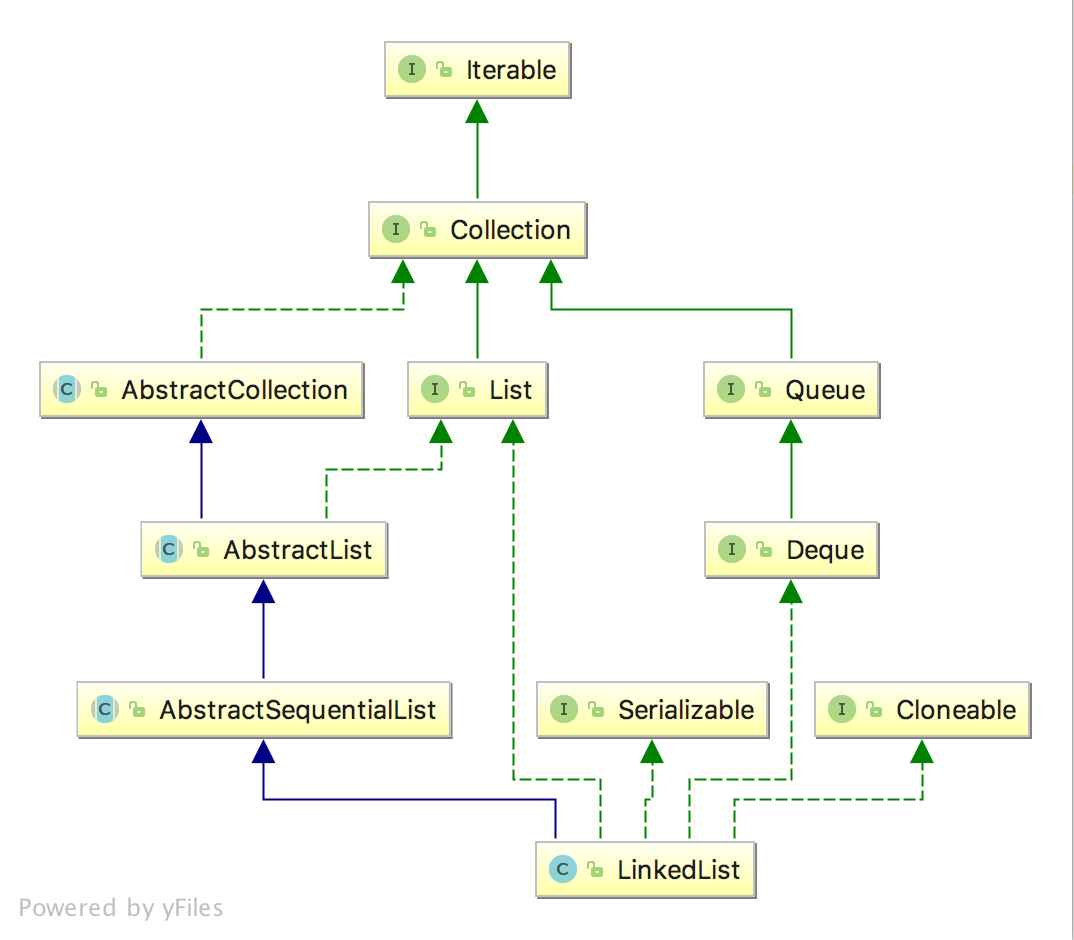
开篇 LinkedList基于链表实现,在List中间进行插入和删除的代价较低,提供了优化的顺序访问。LinkedList在随机访问方面相对比较慢,但是它的特性集较ArrayList更大。 LinkedList的实现是一个双向链表,LinkedList存储的Node节点包含指向前置后置节点的指针。 LinkedList类图 LinkedList类图 LinkedList的数据存储结构图 LinkedList类定义 LinkedList的类定义中包含first节点和last节点,通过first节点(指向头节点)和last节点(指向尾节点)将串联所有的list中的节点,看下Node的定义就知道了。 Node的prev和next节点分别指向前后节点。 public class LinkedList<E> extends AbstractSequentialList<E> implements List<E>, Deque<E>, Cloneable, java.io.Serializable { transient int size = 0; // 指向LinkedList的第一个节点 transient Node<E> first; // 指向LinkedList的最后一个节点 transient Node<E> last; private static class Node<E> { E item; Node<E> next; Node<E> prev; Node(Node<E> prev, E element, Node<E> next) { this.item = element; this.next = next; this.prev = prev; } } } LinkedList构造函数 LinkedList的构造函数非常简单,关键是看下参数为Collection的构造函数,在该构造函数当中通过addAll()方法将元素通过尾插入法添加到LinkedList当中。allAll参数的index标记从哪个位置开始插入。 public LinkedList() { } public LinkedList(Collection<? extends E> c) { this(); addAll(c); } public boolean addAll(Collection<? extends E> c) { return addAll(size, c); } public boolean addAll(int index, Collection<? extends E> c) { // 确定是否超过index的下标 checkPositionIndex(index); Object[] a = c.toArray(); int numNew = a.length; if (numNew == 0) return false; // 确定插入位置的前后节点位置,pred是前置节点,succ是后置节点 Node<E> pred, succ; if (index == size) { succ = null; pred = last; } else { succ = node(index); pred = succ.prev; } // 直接采用链表插入法插入即可 for (Object o : a) { @SuppressWarnings("unchecked") E e = (E) o; Node<E> newNode = new Node<>(pred, e, null); if (pred == null) first = newNode; else pred.next = newNode; pred = newNode; } if (succ == null) { last = pred; } else { pred.next = succ; succ.prev = pred; } size += numNew; modCount++; return true; } LinkedList常用操作 LinkedList的add方法 LinkedList的add()方法其实非常简单,就是在LinkedList的尾部进行插入,然后更新last节点就可以了。 public boolean add(E e) { linkLast(e); return true; } // 在尾部插入新的值 void linkLast(E e) { final Node<E> l = last; final Node<E> newNode = new Node<>(l, e, null); last = newNode; if (l == null) first = newNode; else l.next = newNode; size++; modCount++; } public void add(int index, E element) { checkPositionIndex(index); if (index == size) linkLast(element); else linkBefore(element, node(index)); } // 设计巧妙,力求最少时间定为索引位置 Node<E> node(int index) { // assert isElementIndex(index); if (index < (size >> 1)) { Node<E> x = first; for (int i = 0; i < index; i++) x = x.next; return x; } else { Node<E> x = last; for (int i = size - 1; i > index; i--) x = x.prev; return x; } } // 在合适的节点之前插入 void linkBefore(E e, Node<E> succ) { // assert succ != null; final Node<E> pred = succ.prev; final Node<E> newNode = new Node<>(pred, e, succ); succ.prev = newNode; if (pred == null) first = newNode; else pred.next = newNode; size++; modCount++; } LinkedList的remove方法 LinkedList的remove()的方法也非常简单,通过移除头部节点即可,然后将first节点后移即可。 public E remove() { return removeFirst(); } public E removeFirst() { final Node<E> f = first; if (f == null) throw new NoSuchElementException(); return unlinkFirst(f); } private E unlinkFirst(Node<E> f) { // assert f == first && f != null; final E element = f.item; final Node<E> next = f.next; f.item = null; f.next = null; // help GC first = next; if (next == null) last = null; else next.prev = null; size--; modCount++; return element; } LinkedList的indexOf方法 LinkedList的indexOf()方法主要从first到last进行遍历依次比较即可。 public int indexOf(Object o) { int index = 0; if (o == null) { for (Node<E> x = first; x != null; x = x.next) { if (x.item == null) return index; index++; } } else { for (Node<E> x = first; x != null; x = x.next) { if (o.equals(x.item)) return index; index++; } } return -1; } LinkedList迭代器 LinkedList的迭代器主要分为两个: iterator主要是在AbstractList类中定义,通过java的多态性调用LinkedList的size()方法和get()方法实现索引的比较和数据的获取等。 listIterator在LinkedList类中实现,通过index指定迭代器开始遍历的位置,通过前后指针进行next移动,通过index和size比较是否遍历完成。 public Iterator<E> iterator() { return new Itr(); } private class Itr implements Iterator<E> { int cursor = 0; int lastRet = -1; int expectedModCount = modCount; // 调用LinkedList的size()方法 public boolean hasNext() { return cursor != size(); } public E next() { checkForComodification(); try { int i = cursor; // get()方法调用的是LinkedList的方法 E next = get(i); lastRet = i; cursor = i + 1; return next; } catch (IndexOutOfBoundsException e) { checkForComodification(); throw new NoSuchElementException(); } } } public ListIterator<E> listIterator(int index) { checkPositionIndex(index); return new ListItr(index); } private class ListItr implements ListIterator<E> { private Node<E> lastReturned; private Node<E> next; private int nextIndex; private int expectedModCount = modCount; ListItr(int index) { // assert isPositionIndex(index); next = (index == size) ? null : node(index); nextIndex = index; } public boolean hasNext() { return nextIndex < size; } public E next() { checkForComodification(); if (!hasNext()) throw new NoSuchElementException(); lastReturned = next; next = next.next; nextIndex++; return lastReturned.item; } }

优秀的个人博客,低调大师

java源码-ArrayList

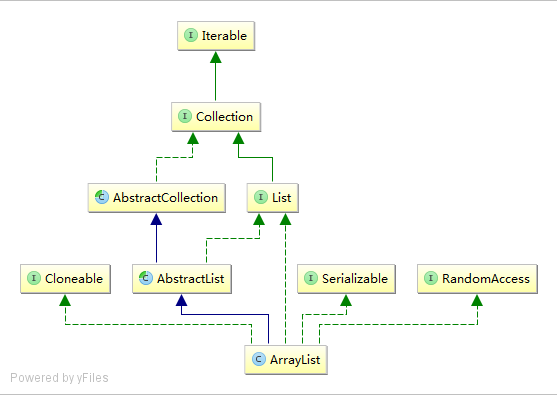
开篇 ArrayList主要由如下特性: ArrayList实际上是通过一个数组去保存数据的,当我们构造ArrayList时,如果使用默认构造函数,ArrayList的默认容量大小是10。 当ArrayList容量不足以容纳全部元素时,ArrayList会自动扩张容量,新的容量 = 1.5*原始容量。 ArrayList的克隆函数,将全部元素克隆到一个数组中,采用Arrays.copyOf方法实现。 ArrayList实现java.io.Serializable的方式。当写入到输出流时,先写入“容量”,再依次写出“每一个元素”;当读出输入流时,先读取“容量”,再依次读取“每一个元素”。 在做ArrayList的遍历的时候有3中遍历的方法,分别是随机访问遍历,用迭代器遍历和强制for循环遍历,按照效率来说最快的是随机访问遍历,最差的是迭代器遍历。 ArrayList的遍历是不安全的,在遍历的时候如果改变了集合的结构会抛出ConcurrentModificationException异常。 ArrayList类图 ArrayList类图 ArrayList类定义 ArrayList的类定义比较简单,基本上可以看出来默认值数组大小为10,数据存储通过elementData变量。 public class ArrayList<E> extends AbstractList<E> implements List<E>, RandomAccess, Cloneable, java.io.Serializable { private static final long serialVersionUID = 8683452581122892189L; // 默认初始化大小 private static final int DEFAULT_CAPACITY = 10; private static final Object[] EMPTY_ELEMENTDATA = {}; private static final Object[] DEFAULTCAPACITY_EMPTY_ELEMENTDATA = {}; //默认是package-private access,保存数据 transient Object[] elementData; //实际保存的数据量大小 private int size; } ArrayList构造函数 ArrayList的构造数非常简单,根据传入的参数initialCapacity初始化数组大小。如果不传参数就默认构建空数组。 public ArrayList(int initialCapacity) { if (initialCapacity > 0) { this.elementData = new Object[initialCapacity]; } else if (initialCapacity == 0) { this.elementData = EMPTY_ELEMENTDATA; } else { throw new IllegalArgumentException("Illegal Capacity: "+ initialCapacity); } } public ArrayList() { this.elementData = DEFAULTCAPACITY_EMPTY_ELEMENTDATA; } public ArrayList(Collection<? extends E> c) { elementData = c.toArray(); if ((size = elementData.length) != 0) { // c.toArray might (incorrectly) not return Object[] (see 6260652) if (elementData.getClass() != Object[].class) elementData = Arrays.copyOf(elementData, size, Object[].class); } else { // replace with empty array. this.elementData = EMPTY_ELEMENTDATA; } } ArrayList常用操作 ArrayList的add操作 ArrayList的add操作其实就是分两步走: 以size+1的大小去看下是否容纳的下新元素,否则就以1.5的原有空间扩容。 在扩容后的新数组的index位置插入新元素。 grow()方法内部实现扩容和旧元素的拷贝,采用Arrays.copyOf(elementData, newCapacity)实现。 public boolean add(E e) { ensureCapacityInternal(size + 1); // Increments modCount!! elementData[size++] = e; return true; } public void add(int index, E element) { rangeCheckForAdd(index); ensureCapacityInternal(size + 1); // Increments modCount!! System.arraycopy(elementData, index, elementData, index + 1, size - index); elementData[index] = element; size++; } private void ensureCapacityInternal(int minCapacity) { if (elementData == DEFAULTCAPACITY_EMPTY_ELEMENTDATA) { minCapacity = Math.max(DEFAULT_CAPACITY, minCapacity); } ensureExplicitCapacity(minCapacity); } private void ensureExplicitCapacity(int minCapacity) { modCount++; // overflow-conscious code if (minCapacity - elementData.length > 0) grow(minCapacity); } private void grow(int minCapacity) { // overflow-conscious code int oldCapacity = elementData.length; int newCapacity = oldCapacity + (oldCapacity >> 1); if (newCapacity - minCapacity < 0) newCapacity = minCapacity; if (newCapacity - MAX_ARRAY_SIZE > 0) newCapacity = hugeCapacity(minCapacity); // minCapacity is usually close to size, so this is a win: elementData = Arrays.copyOf(elementData, newCapacity); } ArrayList的remove操作 ArrayList的remove操作分两步走: 将待移除的index往后的元素拷贝至index开始的位置。 将最后一位元素置null并且size-1即可。 ArrayList的clear操作负责将数组全部置null即可。 public E remove(int index) { rangeCheck(index); modCount++; E oldValue = elementData(index); int numMoved = size - index - 1; if (numMoved > 0) System.arraycopy(elementData, index+1, elementData, index, numMoved); elementData[--size] = null; // clear to let GC do its work return oldValue; } public void clear() { modCount++; // clear to let GC do its work for (int i = 0; i < size; i++) elementData[i] = null; size = 0; } ArrayList迭代器 ArrayList的迭代器实现很简单,通过创建Itr对象。在Itr类当中将cursor初始化为0,next过程中就是返回变量同时将cursor+1,hasNext()方法只是判断cursor是否等于size的值。 public Iterator<E> iterator() { return new Itr(); } private class Itr implements Iterator<E> { int cursor; // 默认初始化值为0 int lastRet = -1; // 上一个返回值的下标 int expectedModCount = modCount; public boolean hasNext() { return cursor != size; } public E next() { checkForComodification(); int i = cursor; if (i >= size) throw new NoSuchElementException(); Object[] elementData = ArrayList.this.elementData; if (i >= elementData.length) throw new ConcurrentModificationException(); cursor = i + 1; return (E) elementData[lastRet = i]; } } 参考文章 ArrayList的特性

优秀的个人博客,低调大师

java源码-LinkedHashSet

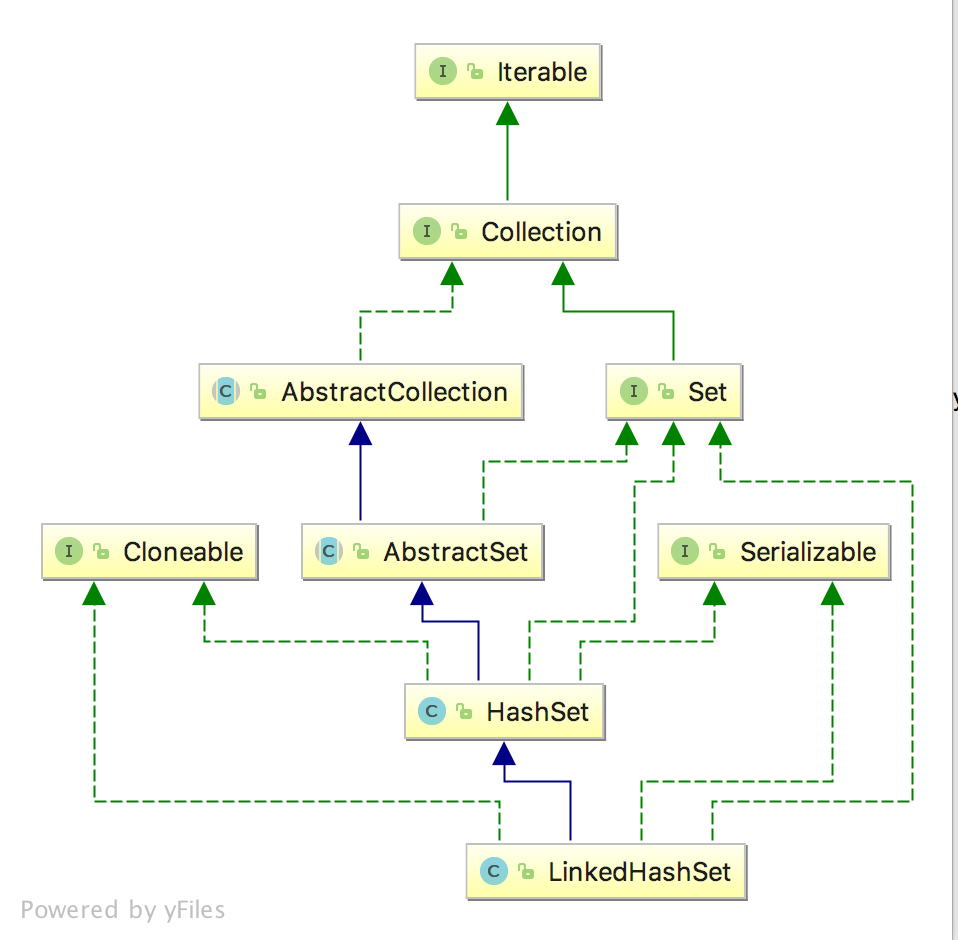
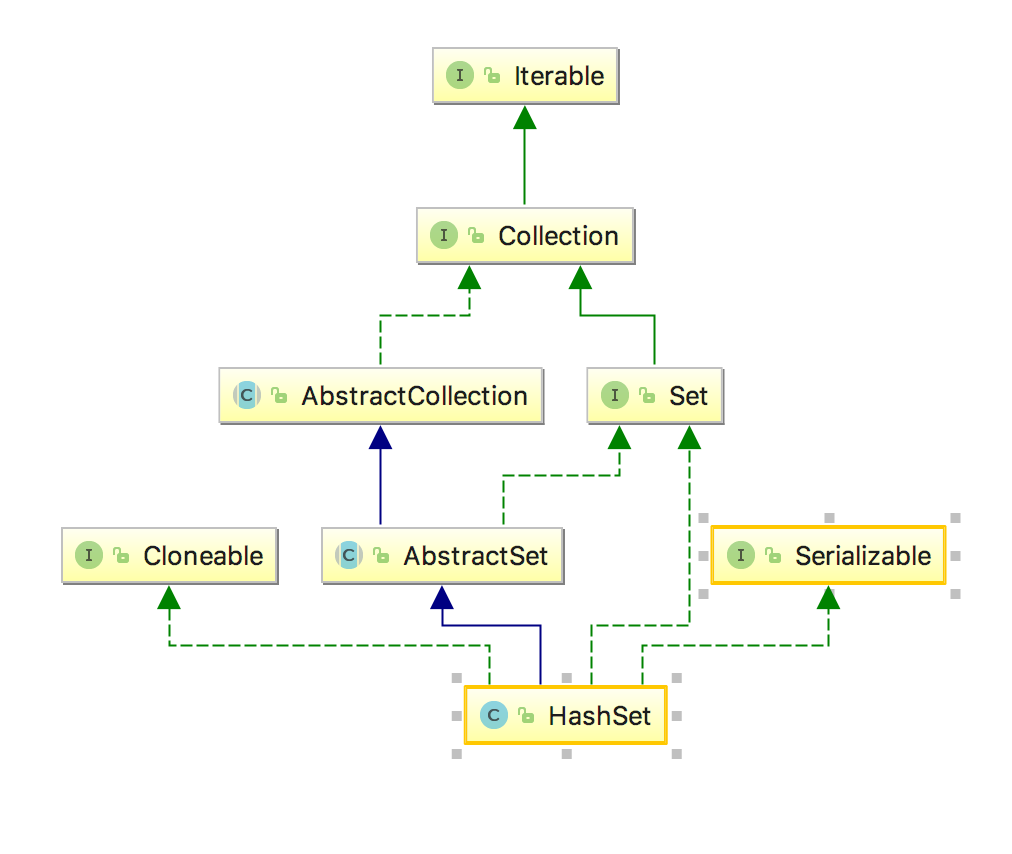
开篇 LinkedHashSet按照元素插入的顺序进行迭代,即迭代输出的顺序与插入的顺序保持一致。 LinkedHashSet类图 LinkedHashSet类图 LinkedHashSet构造函数 LinkedHashSet继承自HashSet,而在HashSet的构造函数当中我们构建了一个LinkedHashMap对象,所以LinkedHashSet的实现其实是依赖于LinkedHashMap实现的。 LinkedHashSet的构造函数当中通过super接口初始化了父类HashSet类,而HashSet的构造函数当中我们初始化了map = new LinkedHashMap<>(initialCapacity, loadFactor)对象。 LinkedHashSet对外提供的方法基本上都是HashSet内部实现的,它本身没有方法实现。 public class LinkedHashSet<E> extends HashSet<E> implements Set<E>, Cloneable, java.io.Serializable { public LinkedHashSet(int initialCapacity, float loadFactor) { super(initialCapacity, loadFactor, true); } public LinkedHashSet(int initialCapacity) { super(initialCapacity, .75f, true); } public LinkedHashSet() { super(16, .75f, true); } public LinkedHashSet(Collection<? extends E> c) { super(Math.max(2*c.size(), 11), .75f, true); addAll(c); } } public class HashSet<E> extends AbstractSet<E> implements Set<E>, Cloneable, java.io.Serializable { static final long serialVersionUID = -5024744406713321676L; private transient HashMap<E,Object> map; HashSet(int initialCapacity, float loadFactor, boolean dummy) { map = new LinkedHashMap<>(initialCapacity, loadFactor); } } LinkedHashSet常用操作 LinkedHashSet的操作基本上都是HashSet提供的接口,而HashSet的操作基本上都是map对外提供的接口,所以最终就是LinkedHashMap对外提供的接口。 public class HashSet<E> extends AbstractSet<E> implements Set<E>, Cloneable, java.io.Serializable { static final long serialVersionUID = -5024744406713321676L; private transient HashMap<E,Object> map; // Dummy value to associate with an Object in the backing Map private static final Object PRESENT = new Object(); public boolean isEmpty() { return map.isEmpty(); } public boolean contains(Object o) { return map.containsKey(o); } public boolean add(E e) { return map.put(e, PRESENT)==null; } public boolean remove(Object o) { return map.remove(o)==PRESENT; } } LinkedHashSet的迭代器 LinkedHashSet的迭代器就是LinkedHashMap内部实现的迭代器,所以基本上只需要了解LinkedHashMap的迭代器就可以了。 public class HashSet<E> extends AbstractSet<E> implements Set<E>, Cloneable, java.io.Serializable { static final long serialVersionUID = -5024744406713321676L; private transient HashMap<E,Object> map; private static final Object PRESENT = new Object(); HashSet(int initialCapacity, float loadFactor, boolean dummy) { map = new LinkedHashMap<>(initialCapacity, loadFactor); } public Iterator<E> iterator() { return map.keySet().iterator(); } } ---------------------LinkedHashMap.java--------------------- public class LinkedHashMap<K,V> extends HashMap<K,V> implements Map<K,V> { public Set<K> keySet() { Set<K> ks = keySet; if (ks == null) { ks = new LinkedKeySet(); keySet = ks; } return ks; } final class LinkedKeySet extends AbstractSet<K> { public final int size() { return size; } public final void clear() { LinkedHashMap.this.clear(); } public final Iterator<K> iterator() { return new LinkedKeyIterator(); } } final class LinkedKeyIterator extends LinkedHashIterator implements Iterator<K> { public final K next() { return nextNode().getKey(); } } abstract class LinkedHashIterator { LinkedHashMap.Entry<K,V> next; LinkedHashMap.Entry<K,V> current; int expectedModCount; LinkedHashIterator() { next = head; expectedModCount = modCount; current = null; } public final boolean hasNext() { return next != null; } final LinkedHashMap.Entry<K,V> nextNode() { LinkedHashMap.Entry<K,V> e = next; if (modCount != expectedModCount) throw new ConcurrentModificationException(); if (e == null) throw new NoSuchElementException(); current = e; next = e.after; return e; } public final void remove() { Node<K,V> p = current; if (p == null) throw new IllegalStateException(); if (modCount != expectedModCount) throw new ConcurrentModificationException(); current = null; K key = p.key; removeNode(hash(key), key, null, false, false); expectedModCount = modCount; } } }

优秀的个人博客,低调大师

java源码-TreeSet

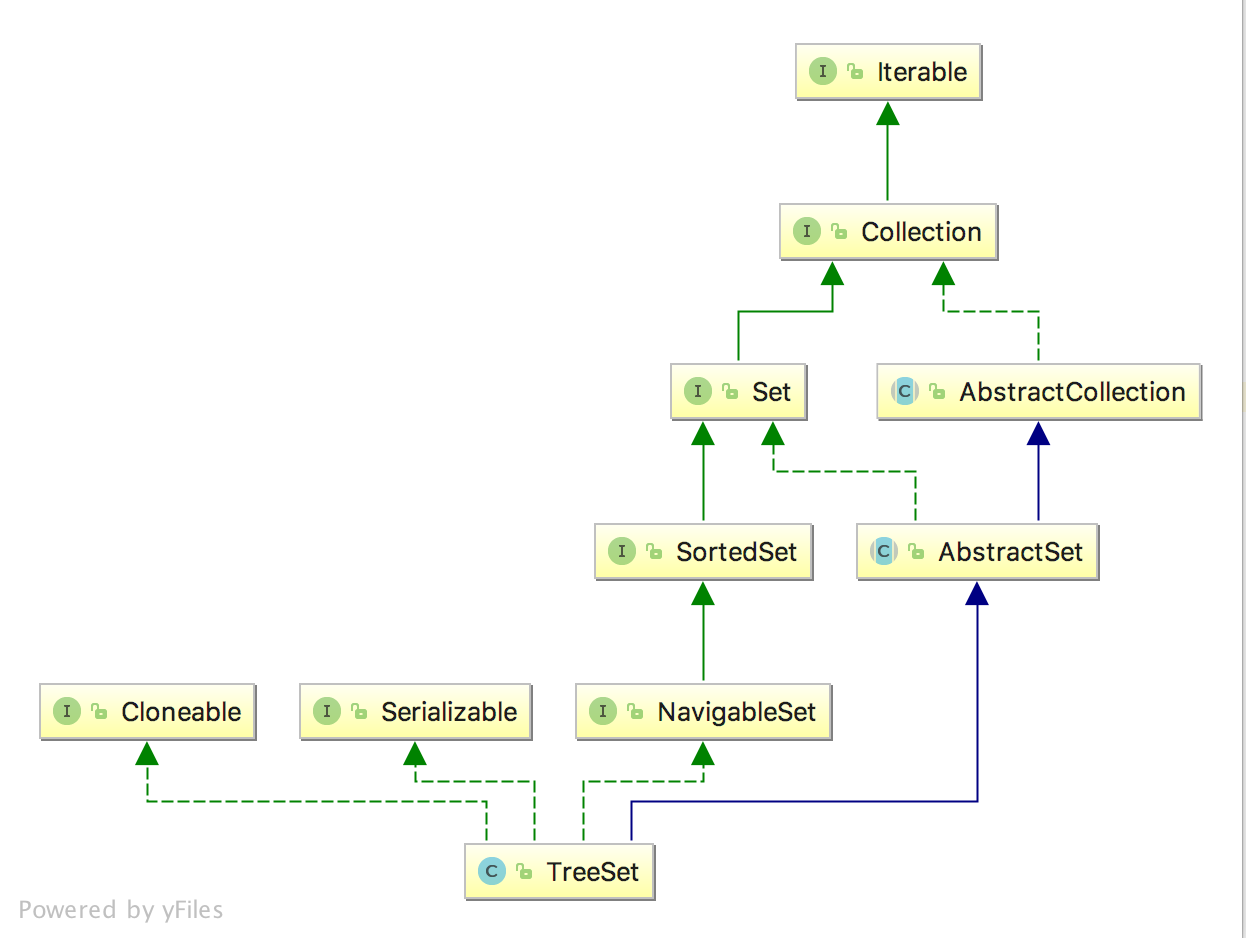
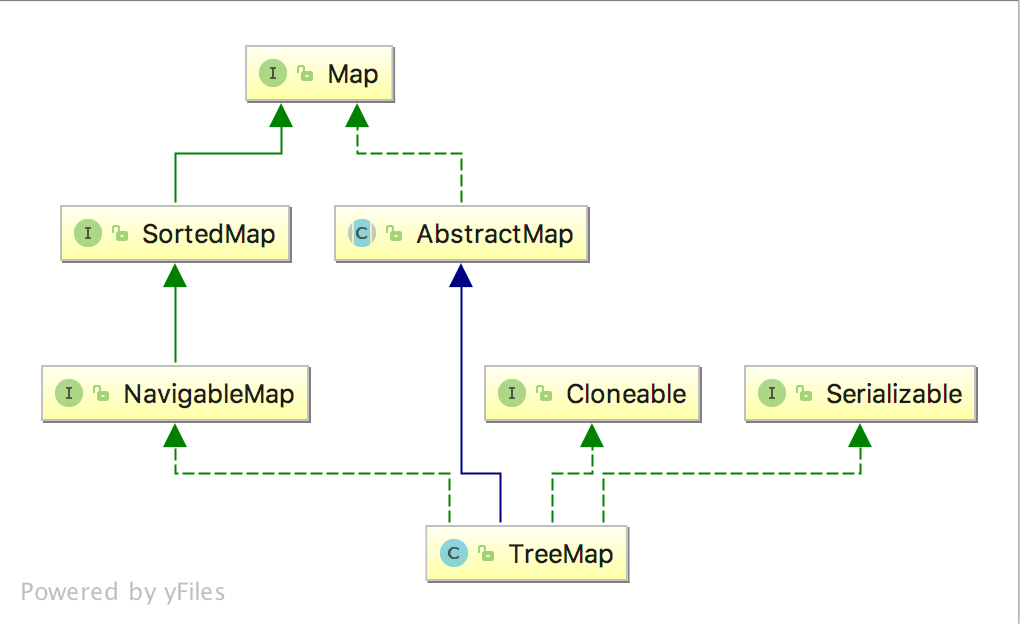
开篇 TreeSet作为HashSet的姊妹类型,TreeSet是用来排序的, 可以指定一个顺序, 对象存入之后会按照指定的顺序排列。 TreeSet类图 TreeSet类图 TreeSet类图 TreeSet秉承了HashSet的一贯做法,内部通过Map来保存key/value数据,由于Set只保存key,所以内部的Map的value公用了一个定义的Object对象PRESENT。 TreeSet由于维持有序性,所以内部通过TreeMap存储数据。 public class TreeSet<E> extends AbstractSet<E> implements NavigableSet<E>, Cloneable, java.io.Serializable { // 用于保存TreeMap的对象,会在构造函数当中赋值TreeMap对象 private transient NavigableMap<E,Object> m; // TreeMap当中所有的value都是保存的PRESENT对象 private static final Object PRESENT = new Object(); } TreeSet的构造函数 TreeSet的构造函数分为两大类: 通过创建TreeMap对象赋值给TreeSet当中NavigableMap<E,Object> m变量; 通过创建NavigableMap<E,Object> m变量并通过addAll方法方法添加到TreeMap当中。 在TreeSet的addAll()方法通过super.addAll()方法调用AbstractCollection的addAll()方法,在该方法内部最后又调用TreeSet的add()方法添加到TreeMap m当中。 TreeSet(NavigableMap<E,Object> m) { this.m = m; } public TreeSet() { this(new TreeMap<E,Object>()); } public TreeSet(Comparator<? super E> comparator) { this(new TreeMap<>(comparator)); } public TreeSet(Collection<? extends E> c) { this(); addAll(c); } public TreeSet(SortedSet<E> s) { this(s.comparator()); addAll(s); } public boolean addAll(Collection<? extends E> c) { // Use linear-time version if applicable if (m.size()==0 && c.size() > 0 && c instanceof SortedSet && m instanceof TreeMap) { SortedSet<? extends E> set = (SortedSet<? extends E>) c; TreeMap<E,Object> map = (TreeMap<E, Object>) m; Comparator<?> cc = set.comparator(); Comparator<? super E> mc = map.comparator(); if (cc==mc || (cc != null && cc.equals(mc))) { map.addAllForTreeSet(set, PRESENT); return true; } } return super.addAll(c); } public boolean add(E e) { return m.put(e, PRESENT)==null; } ----------AbstractCollection.java中代码----------- public boolean addAll(Collection<? extends E> c) { boolean modified = false; for (E e : c) if (add(e)) modified = true; return modified; } TreeSe常用操作 TreeSet常用的操作其实都是针对TreeMap进行的操作,这里就不再多做啰嗦了,基本上都是TreeMap对外提供的api而已。 private transient NavigableMap<E,Object> m; public E first() { return m.firstKey(); } public E last() { return m.lastKey(); } public E pollFirst() { Map.Entry<E,?> e = m.pollFirstEntry(); return (e == null) ? null : e.getKey(); } public E pollLast() { Map.Entry<E,?> e = m.pollLastEntry(); return (e == null) ? null : e.getKey(); } TreeSet迭代器 TreeSet的iterator本质也是TreeMap当中实现的,在TreeMap.java中的navigableKeySet()方法中创建KeySet类对象,在KeySet类iterator方法当中我们可以看出来其实就是应用了TreeMap的keyIterator()方法。 这里再一次印证了TreeSet只是使用了TreeMap的key而已。 public Iterator<E> iterator() { return m.navigableKeySet().iterator(); } ----------------TreeMap.java------------------------ public NavigableSet<K> navigableKeySet() { KeySet<K> nks = navigableKeySet; return (nks != null) ? nks : (navigableKeySet = new KeySet<>(this)); } static final class KeySet<E> extends AbstractSet<E> implements NavigableSet<E> { private final NavigableMap<E, ?> m; KeySet(NavigableMap<E,?> map) { m = map; } public Iterator<E> iterator() { if (m instanceof TreeMap) return ((TreeMap<E,?>)m).keyIterator(); else return ((TreeMap.NavigableSubMap<E,?>)m).keyIterator(); }

优秀的个人博客,低调大师

java源码-LinkedHashMap

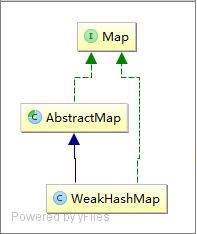
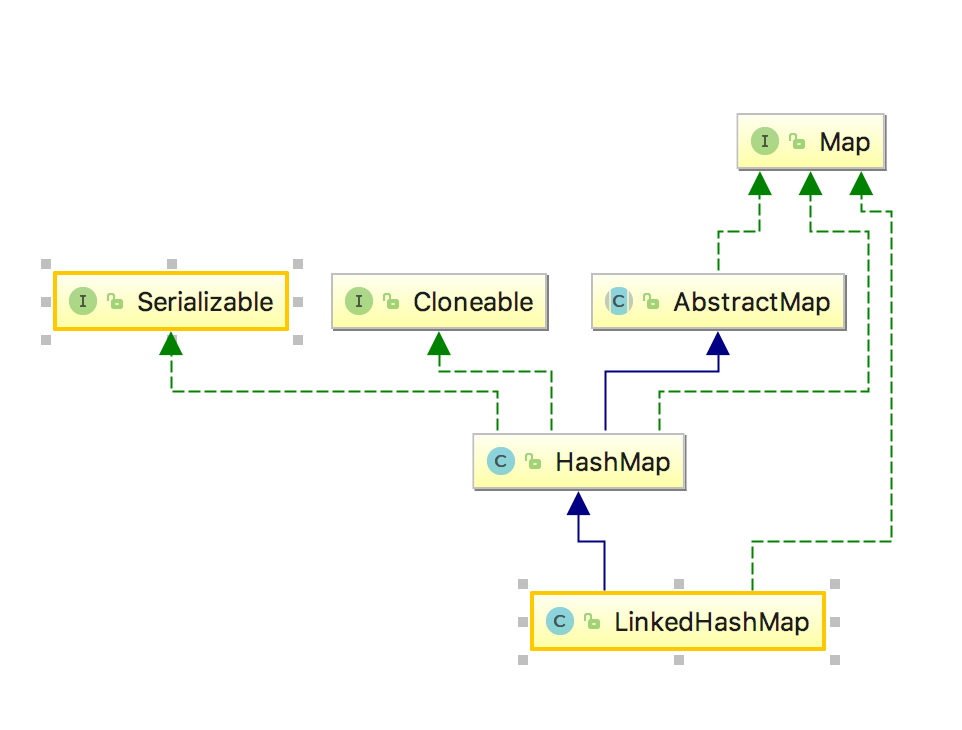
开篇 LinkedHashMap是HashMap的变种,有一些额外的特性其中最重要的就是维护数据插入的有序性,这篇文章就是为了讲清楚LinkedHashMap的实现细节。 LinkedHashMap类图 LinkedHashMap类图 LinkedHashMap和HashMap的差别 LinkedHashMap可以认为是HashMap+LinkedList,即它既使用HashMap操作数据结构,又使用LinkedList维护插入元素的先后顺序。 LinkedHashMap除了维持Map的有序性质外,其他和HashMap是一模一样的, LinkedHashMap实现细节 从LinkedHashMap的类依赖图可以看出来,LinkedHashMap其实是继承自HashMap类,所以LinkedHashMap的所有接口基本上都是继承自己HashMap类,当然也存在一个非常核心的差别。 LinkedHashMap用于存储key/value的结果是继承自己HashMap的,但是LinkedHashMap本身维护着一个有序列表。 head是LinkedHashMap的列表头,tail是LinkedHashMap的列表尾,通过这两个变量保证了维护LinkedHashMap的插入顺序。 LinkedHashMap的Entry相比HashMap.Node对象增加了before和after两个变量,由于指向前后节点。 LinkedHashMap通过重写HashMap的newNode方法,创建Entry对象并在内部初始化了HashMap当中的Node节点。 在创建Entry的newNode过程中通过linkNodeLast()方法按照put顺序维持LinkHashMap的有序性。 public class LinkedHashMap<K,V> extends HashMap<K,V> implements Map<K,V> { static class Entry<K,V> extends HashMap.Node<K,V> { Entry<K,V> before, after; Entry(int hash, K key, V value, Node<K,V> next) { super(hash, key, value, next); } } // 保存HashMap有序列表的头 transient LinkedHashMap.Entry<K,V> head; // 保存HashMap有序列表的尾 transient LinkedHashMap.Entry<K,V> tail; final boolean accessOrder; private void linkNodeLast(LinkedHashMap.Entry<K,V> p) { LinkedHashMap.Entry<K,V> last = tail; tail = p; if (last == null) head = p; else { p.before = last; last.after = p; } } Node<K,V> newNode(int hash, K key, V value, Node<K,V> e) { LinkedHashMap.Entry<K,V> p = new LinkedHashMap.Entry<K,V>(hash, key, value, e); linkNodeLast(p); return p; } private void linkNodeLast(LinkedHashMap.Entry<K,V> p) { LinkedHashMap.Entry<K,V> last = tail; tail = p; if (last == null) head = p; else { p.before = last; last.after = p; } } LinkedHashMap实际存储结构图 image.png 说明: 上述按照Entry1->Entry6的顺序进行存储的,不过这个图有些问题,正常的情况是head就是Entry1的对象,tail是Entry6的对象。 参考文章 图解LinkedHashMap原理

优秀的个人博客,低调大师

ButterKnife源码解析

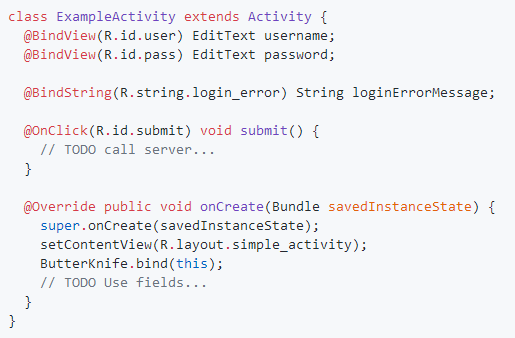
ButterKnife(https://github.com/JakeWharton/butterknife)是一款android平台的依赖注入框架,通过该工具可以实现View、OnClickListener的注入,省去了findViewById、setOnClickListener的过程。使用方法如下: 通过@BindView注解实现findViewById的功能,完成View注入;通过@OnClick完成OnClickListener点击事件的注入,给ID对应的View设置点击事件和响应函数。关于注解的定义和解析可以参照这篇文章:Java注解。ButterKnife使用的就是编译时解析注解的技术,在编译时对注解进行解析,生成中间文件,在ButterKnife.bind时引用注解编译器生成的中间文件,完成依赖注入。 注解的定义 BindView注解定义 BindView注解定义中使用了元注解@Retention(CLASS)定义了该注解只保留到编译期间,运行时会丢弃;@Target(FIELD)表示该注解只能用在成员变量上面。 OnClick注解 OnClick注解中@Target(METHOD)表示该注解只能用于方法上; ListenerClass ListenerClass是一个@Target(ANNOTATION_TYPE)类型的注解,表示ListenerClass只能用在注解上;且@Retention(RUNTIME)表示该注解可以保留到JVM中,也就是运行时能够通过反射来获取。 注解的解析 下面对@BindView和@OnClick两种注解的解析进行讲解。编译时注解的解析: 编译时 Annotation 指 @Retention 为 CLASS 的 Annotation,由编译器自动解析。需要做的 a. 自定义类集成自 AbstractProcessor(编译器在编译时自动查找所有继承自 AbstractProcessor 的类,然后调用他们的 process 方法去处理) b. 重写其中的 process 函数 ButterKnife实现了ButterKnifeProcessor来进行编译时注解的解析: ButterKnifeProcessor ButterKnifeProcessor.process()函数如下: ButterKnifeProcessor.process process函数先调用findAndParseTargets生成bindingMap,然后通过binding.brewJava老生成Java文件。findAndParseTargets的实现如下(这里只关注@BindView和@OnClick): findAndParseTargets 其中调用parseBindView对注解为@BindView的Field进行解析;findAndParseListener对@OnClick之类的Listener注解进行解析。parseBindView代码如下: parseBindView parseBindView的主要工作是创建了BindingSet.Builder。getOrCreateBindingBuilder()如下: getOrCreateBindingBuilder getOrCreateBindingBuilder内部调用了BindingSet.newBuilder。 BindingSet.newBuilder newBuilder生成了Builder对象,Builder对象定义了生成的Java文件名、mView所属对象的类型等。Builder对象生产后,parseBindView就根据@BindView注解信息生成FieldViewBinding对象,之后调用了Builder.build()函数;@BindView的解析已经完成后,最后通过BindingSet.brewJava来生成中间文件。@BindView在生成文件对应了如下: addViewBinding 生成的中间文件如下所示: 中间文件 可以看到,中间文件里完成了对Target中成员变量的注入。 那么中间文件又是在什么时候被调用的呢?答案就是ButterKnife.bind(this) bind函数根据调用的类名查找其对应的className_ViewBinding的类名,然后反射调用其构造函数。 至此,ButterKnife的@BindView的运行流程就是这样。

优秀的个人博客,低调大师

gobblin 源码分析

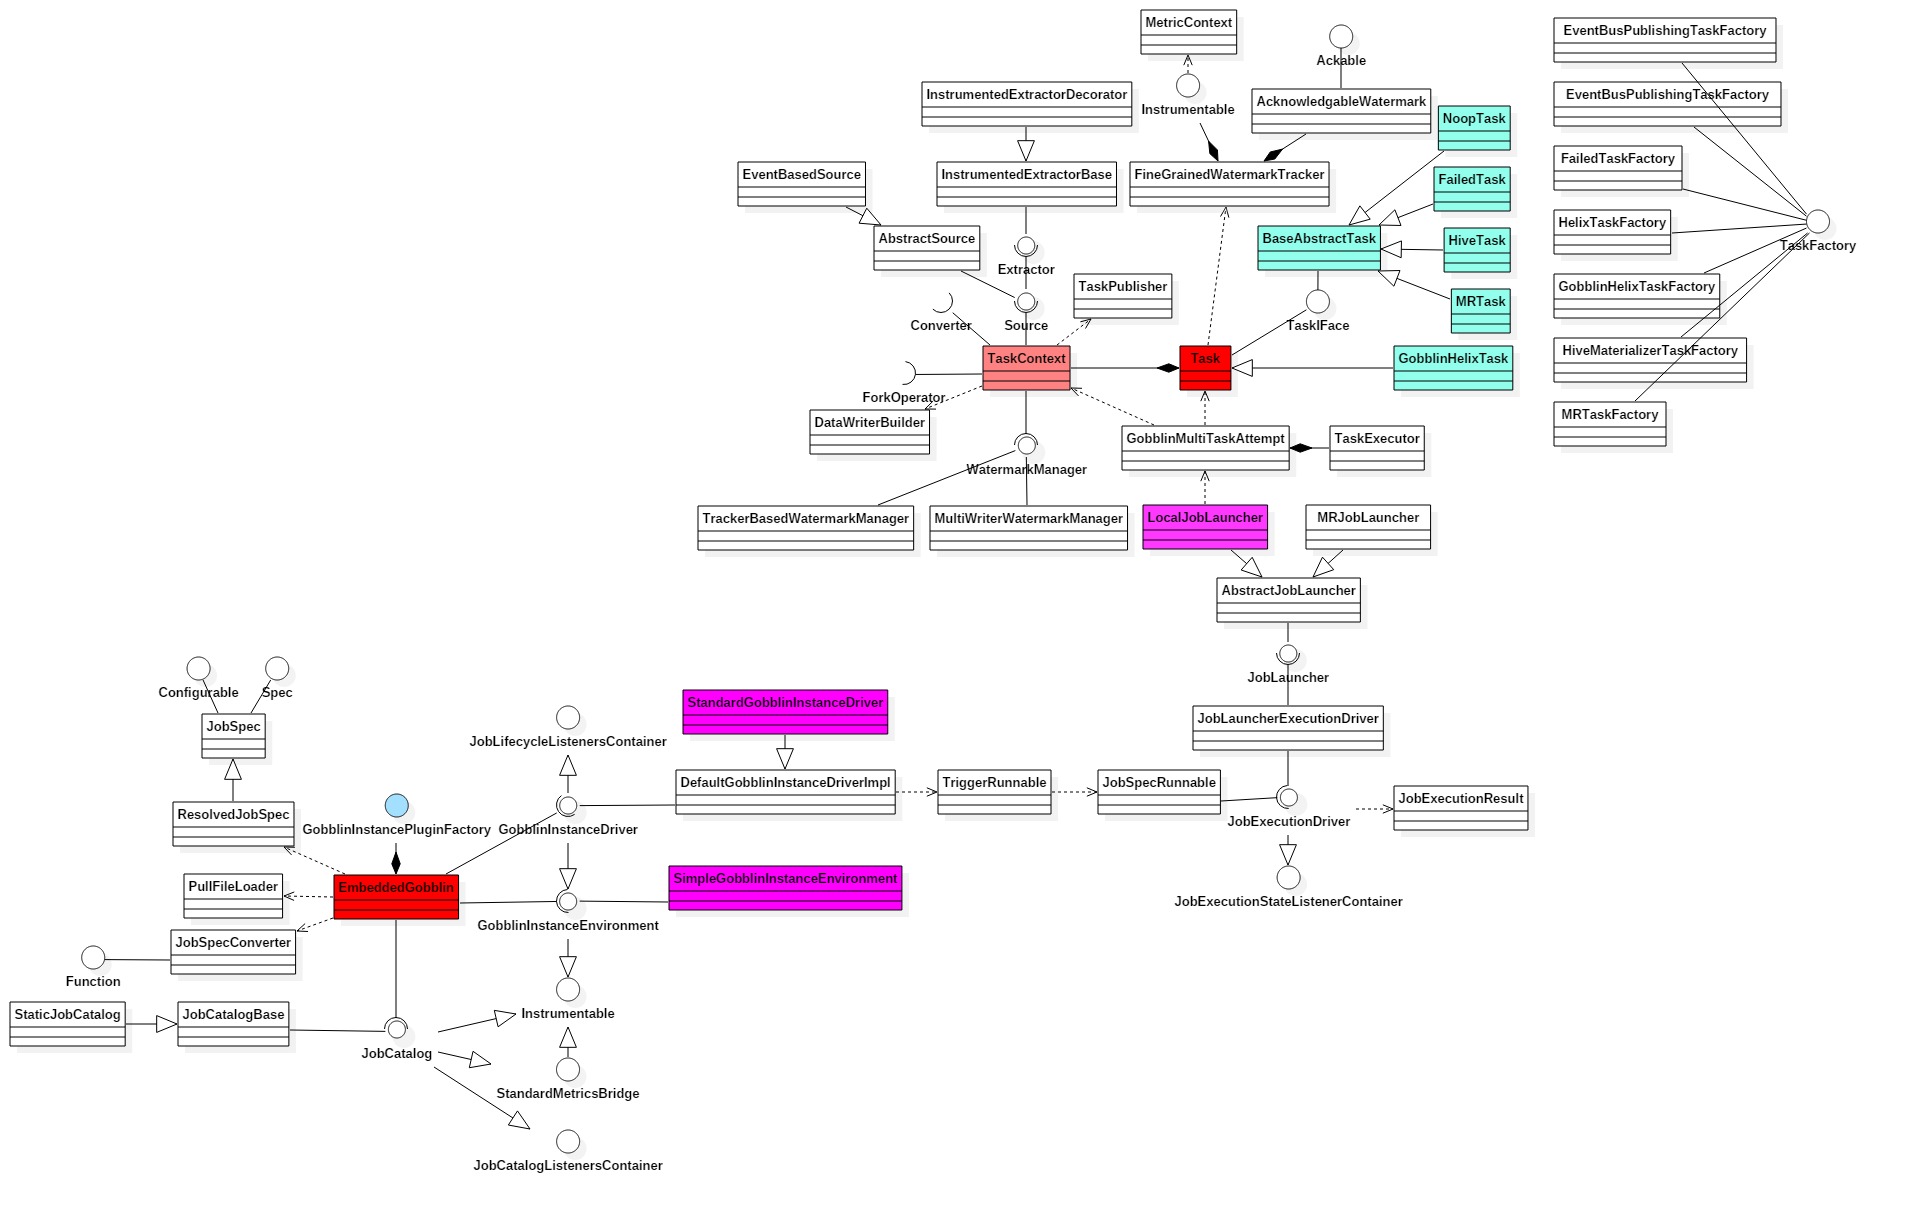
最近,开始搞些大数据相关的内容,遇到的第一个问题,就是数据入库,小白刚入手,又不想写太多代码,于是从网上找,入库手段很多: DataX,Sqoop,以及Flume 等以及直接使用 Spark 进行入库,想了下当下的场景(不是简单的倒库,要从kafka拉,然后过滤些东西,在进入库里),后来发现了 linkedin 的 gobblin ,感觉很强大的,说是国内 JD 也在用... 进入正题.... 架构分析 如下图所示, 本人使用的是独立运行的单机程序,因此使用的 EmbeddedGobblin 来启动 Job ,顺着这条路一直缕到 Gobblin 内部运行机制: 架构类图 如上图所示,EmbededGobblin 作为 Gobblin 启动项,通过 Task 的方式将 Job 管理起来,如果存在多个不同的 Fork ,分别将数据进行复制,并传递到各个 Fork 中进行进一步的计算处理。 整个过程中主要可能涉及到的是 Converter 的配置, Watermark, Writer等相关内容的应用,通过结合 Watermark 与 Writer 配合,也能做到反馈当前写到哪里,方便当前程序停掉之后,下次启动时接着这次继续运行。

优秀的个人博客,低调大师

android datepicker源码

/* * Copyright (C) 2007 The Android Open Source Project * * Licensed under the Apache License, Version 2.0 (the "License"); * you may not use this file except in compliance with the License. * You may obtain a copy of the License at * * http://www.apache.org/licenses/LICENSE-2.0 * * Unless required by applicable law or agreed to in writing, software * distributed under the License is distributed on an "AS IS" BASIS, * WITHOUT WARRANTIES OR CONDITIONS OF ANY KIND, either express or implied. * See the License for the specific language governing permissions and * limitations under the License. */ package android.widget; import android.annotation.Widget; import android.content.Context; import android.content.res.TypedArray; import android.os.Parcel; import android.os.Parcelable; import android.text.format.DateFormat; import android.text.format.DateUtils; import android.util.AttributeSet; import android.util.SparseArray; import android.view.LayoutInflater; import android.widget.NumberPicker; import android.widget.NumberPicker.OnChangedListener; import com.android.internal.R; import java.text.DateFormatSymbols; import java.text.SimpleDateFormat; import java.util.Calendar; import java.util.Locale; /** * A view for selecting a month / year / day based on a calendar like layout. * * <p>See the <a href="{@docRoot}resources/tutorials/views/hello-datepicker.html">Date Picker * tutorial</a>.</p> * * For a dialog using this view, see {@link android.app.DatePickerDialog}. */ @Widget public class DatePicker extends FrameLayout { private static final int DEFAULT_START_YEAR = 1900; private static final int DEFAULT_END_YEAR = 2100; // This ignores Undecimber, but we only support real Gregorian calendars. private static final int NUMBER_OF_MONTHS = 12; /* UI Components */ private final NumberPicker mDayPicker; private final NumberPicker mMonthPicker; private final NumberPicker mYearPicker; /** * How we notify users the date has changed. */ private OnDateChangedListener mOnDateChangedListener; private int mDay; private int mMonth; private int mYear; private Object mMonthUpdateLock = new Object(); private volatile Locale mMonthLocale; private String[] mShortMonths; /** * The callback used to indicate the user changes the date. */ public interface OnDateChangedListener { /** * @param view The view associated with this listener. * @param year The year that was set. * @param monthOfYear The month that was set (0-11) for compatibility * with {@link java.util.Calendar}. * @param dayOfMonth The day of the month that was set. */ void onDateChanged(DatePicker view, int year, int monthOfYear, int dayOfMonth); } public DatePicker(Context context) { this(context, null); } public DatePicker(Context context, AttributeSet attrs) { this(context, attrs, 0); } public DatePicker(Context context, AttributeSet attrs, int defStyle) { super(context, attrs, defStyle); LayoutInflater inflater = (LayoutInflater) context.getSystemService(Context.LAYOUT_INFLATER_SERVICE); inflater.inflate(R.layout.date_picker, this, true); mDayPicker = (NumberPicker) findViewById(R.id.day); mDayPicker.setFormatter(NumberPicker.TWO_DIGIT_FORMATTER); mDayPicker.setSpeed(100); mDayPicker.setOnChangeListener(new OnChangedListener() { public void onChanged(NumberPicker picker, int oldVal, int newVal) { mDay = newVal; notifyDateChanged(); } }); mMonthPicker = (NumberPicker) findViewById(R.id.month); mMonthPicker.setFormatter(NumberPicker.TWO_DIGIT_FORMATTER); final String[] months = getShortMonths(); /* * If the user is in a locale where the month names are numeric, * use just the number instead of the "month" character for * consistency with the other fields. */ if (months[0].startsWith("1")) { for (int i = 0; i < months.length; i++) { months[i] = String.valueOf(i + 1); } mMonthPicker.setRange(1, NUMBER_OF_MONTHS); } else { mMonthPicker.setRange(1, NUMBER_OF_MONTHS, months); } mMonthPicker.setSpeed(200); mMonthPicker.setOnChangeListener(new OnChangedListener() { public void onChanged(NumberPicker picker, int oldVal, int newVal) { /* We display the month 1-12 but store it 0-11 so always * subtract by one to ensure our internal state is always 0-11 */ mMonth = newVal - 1; // Adjust max day of the month adjustMaxDay(); notifyDateChanged(); updateDaySpinner(); } }); mYearPicker = (NumberPicker) findViewById(R.id.year); mYearPicker.setSpeed(100); mYearPicker.setOnChangeListener(new OnChangedListener() { public void onChanged(NumberPicker picker, int oldVal, int newVal) { mYear = newVal; // Adjust max day for leap years if needed adjustMaxDay(); notifyDateChanged(); updateDaySpinner(); } }); // attributes TypedArray a = context.obtainStyledAttributes(attrs, R.styleable.DatePicker); int mStartYear = a.getInt(R.styleable.DatePicker_startYear, DEFAULT_START_YEAR); int mEndYear = a.getInt(R.styleable.DatePicker_endYear, DEFAULT_END_YEAR); mYearPicker.setRange(mStartYear, mEndYear); a.recycle(); // initialize to current date Calendar cal = Calendar.getInstance(); init(cal.get(Calendar.YEAR), cal.get(Calendar.MONTH), cal.get(Calendar.DAY_OF_MONTH), null); // re-order the number pickers to match the current date format reorderPickers(months); if (!isEnabled()) { setEnabled(false); } } @Override public void setEnabled(boolean enabled) { super.setEnabled(enabled); mDayPicker.setEnabled(enabled); mMonthPicker.setEnabled(enabled); mYearPicker.setEnabled(enabled); } private void reorderPickers(String[] months) { java.text.DateFormat format; String order; /* * If the user is in a locale where the medium date format is * still numeric (Japanese and Czech, for example), respect * the date format order setting. Otherwise, use the order * that the locale says is appropriate for a spelled-out date. */ if (months[0].startsWith("1")) { format = DateFormat.getDateFormat(getContext()); } else { format = DateFormat.getMediumDateFormat(getContext()); } if (format instanceof SimpleDateFormat) { order = ((SimpleDateFormat) format).toPattern(); } else { // Shouldn't happen, but just in case. order = new String(DateFormat.getDateFormatOrder(getContext())); } /* Remove the 3 pickers from their parent and then add them back in the * required order. */ LinearLayout parent = (LinearLayout) findViewById(R.id.parent); parent.removeAllViews(); boolean quoted = false; boolean didDay = false, didMonth = false, didYear = false; for (int i = 0; i < order.length(); i++) { char c = order.charAt(i); if (c == '\'') { quoted = !quoted; } if (!quoted) { if (c == DateFormat.DATE && !didDay) { parent.addView(mDayPicker); didDay = true; } else if ((c == DateFormat.MONTH || c == 'L') && !didMonth) { parent.addView(mMonthPicker); didMonth = true; } else if (c == DateFormat.YEAR && !didYear) { parent.addView (mYearPicker); didYear = true; } } } // Shouldn't happen, but just in case. if (!didMonth) { parent.addView(mMonthPicker); } if (!didDay) { parent.addView(mDayPicker); } if (!didYear) { parent.addView(mYearPicker); } } public void updateDate(int year, int monthOfYear, int dayOfMonth) { if (mYear != year || mMonth != monthOfYear || mDay != dayOfMonth) { mYear = year; mMonth = monthOfYear; mDay = dayOfMonth; updateSpinners(); reorderPickers(getShortMonths()); notifyDateChanged(); } } private String[] getShortMonths() { final Locale currentLocale = Locale.getDefault(); if (currentLocale.equals(mMonthLocale) && mShortMonths != null) { return mShortMonths; } else { synchronized (mMonthUpdateLock) { if (!currentLocale.equals(mMonthLocale)) { mShortMonths = new String[NUMBER_OF_MONTHS]; for (int i = 0; i < NUMBER_OF_MONTHS; i++) { mShortMonths[i] = DateUtils.getMonthString(Calendar.JANUARY + i, DateUtils.LENGTH_MEDIUM); } mMonthLocale = currentLocale; } } return mShortMonths; } } private static class SavedState extends BaseSavedState { private final int mYear; private final int mMonth; private final int mDay; /** * Constructor called from {@link DatePicker#onSaveInstanceState()} */ private SavedState(Parcelable superState, int year, int month, int day) { super(superState); mYear = year; mMonth = month; mDay = day; } /** * Constructor called from {@link #CREATOR} */ private SavedState(Parcel in) { super(in); mYear = in.readInt(); mMonth = in.readInt(); mDay = in.readInt(); } public int getYear() { return mYear; } public int getMonth() { return mMonth; } public int getDay() { return mDay; } @Override public void writeToParcel(Parcel dest, int flags) { super.writeToParcel(dest, flags); dest.writeInt(mYear); dest.writeInt(mMonth); dest.writeInt(mDay); } public static final Parcelable.Creator<SavedState> CREATOR = new Creator<SavedState>() { public SavedState createFromParcel(Parcel in) { return new SavedState(in); } public SavedState[] newArray(int size) { return new SavedState[size]; } }; } /** * Override so we are in complete control of save / restore for this widget. */ @Override protected void dispatchRestoreInstanceState(SparseArray<Parcelable> container) { dispatchThawSelfOnly(container); } @Override protected Parcelable onSaveInstanceState() { Parcelable superState = super.onSaveInstanceState(); return new SavedState(superState, mYear, mMonth, mDay); } @Override protected void onRestoreInstanceState(Parcelable state) { SavedState ss = (SavedState) state; super.onRestoreInstanceState(ss.getSuperState()); mYear = ss.getYear(); mMonth = ss.getMonth(); mDay = ss.getDay(); updateSpinners(); } /** * Initialize the state. * @param year The initial year. * @param monthOfYear The initial month. * @param dayOfMonth The initial day of the month. * @param onDateChangedListener How user is notified date is changed by user, can be null. */ public void init(int year, int monthOfYear, int dayOfMonth, OnDateChangedListener onDateChangedListener) { mYear = year; mMonth = monthOfYear; mDay = dayOfMonth; mOnDateChangedListener = onDateChangedListener; updateSpinners(); } private void updateSpinners() { updateDaySpinner(); mYearPicker.setCurrent(mYear); /* The month display uses 1-12 but our internal state stores it * 0-11 so add one when setting the display. */ mMonthPicker.setCurrent(mMonth + 1); } private void updateDaySpinner() { Calendar cal = Calendar.getInstance(); cal.set(mYear, mMonth, mDay); int max = cal.getActualMaximum(Calendar.DAY_OF_MONTH); mDayPicker.setRange(1, max); mDayPicker.setCurrent(mDay); } public int getYear() { return mYear; } public int getMonth() { return mMonth; } public int getDayOfMonth() { return mDay; } private void adjustMaxDay(){ Calendar cal = Calendar.getInstance(); cal.set(Calendar.YEAR, mYear); cal.set(Calendar.MONTH, mMonth); int max = cal.getActualMaximum(Calendar.DAY_OF_MONTH); if (mDay > max) { mDay = max; } } private void notifyDateChanged() { if (mOnDateChangedListener != null) { mOnDateChangedListener.onDateChanged(DatePicker.this, mYear, mMonth, mDay); } } } <?xml version="1.0" encoding="utf-8"?> <!-- ** ** Copyright 2007, The Android Open Source Project ** ** Licensed under the Apache License, Version 2.0 (the "License"); ** you may not use this file except in compliance with the License. ** You may obtain a copy of the License at ** ** http://www.apache.org/licenses/LICENSE-2.0 ** ** Unless required by applicable law or agreed to in writing, software ** distributed under the License is distributed on an "AS IS" BASIS, ** WITHOUT WARRANTIES OR CONDITIONS OF ANY KIND, either express or implied. ** See the License for the specific language governing permissions and ** limitations under the License. */ --> <!-- Layout of date picker--> <!-- Warning: everything within the parent is removed and re-ordered depending on the date format selected by the user. --> <LinearLayout xmlns:android="http://schemas.android.com/apk/res/android" android:id="@+id/parent" android:orientation="horizontal" android:layout_gravity="center_horizontal" android:layout_width="wrap_content" android:layout_height="wrap_content"> <!-- Month --> <NumberPicker android:id="@+id/month" android:layout_width="80dip" android:layout_height="wrap_content" android:layout_marginLeft="1dip" android:layout_marginRight="1dip" android:focusable="true" android:focusableInTouchMode="true" /> <!-- Day --> <NumberPicker android:id="@+id/day" android:layout_width="80dip" android:layout_height="wrap_content" android:layout_marginLeft="1dip" android:layout_marginRight="1dip" android:focusable="true" android:focusableInTouchMode="true" /> <!-- Year --> <NumberPicker android:id="@+id/year" android:layout_width="95dip" android:layout_height="wrap_content" android:layout_marginLeft="1dip" android:layout_marginRight="1dip" android:focusable="true" android:focusableInTouchMode="true" /> </LinearLayout> 本文转自农夫山泉别墅博客园博客,原文链接:http://www.cnblogs.com/yaowen/p/4989988.html,如需转载请自行联系原作者
优秀的个人博客,低调大师

Elasticsearch安装-源码

安装Elasticsearch [root@test opt]#unzip elasticsearch-2.3.4.zip [root@test opt]# ll elasticsearch-2.3.4 总用量44 drwxr-xr-x. 2 root root 4096 6月 30 2016 bin drwxr-xr-x. 2 root root 4096 6月 30 2016 config drwxr-xr-x. 2 root root 4096 6月 30 2016 lib -rw-rw-r--. 1 root root 11358 6月 30 2016 LICENSE.txt drwxr-xr-x. 5 root root 4096 4月 18 22:44 modules -rw-rw-r--. 1 root root 150 6月 30 2016 NOTICE.txt -rw-rw-r--. 1 root root 8700 6月 30 2016 README.textile [root@test opt]# 创建Elasticsearch运行的普通账号 [root@test opt]# useradd elasticsearch 切换到elasticsearch普通账号 [root@test opt]# su - elasticsearch [elasticsearch@test ~]$ cd /opt/ 后台启动Elasticsearch [elasticsearch@test opt]$ ./elasticsearch-2.3.4/bin/elasticsearch -d 简单测试Elasticsearch [root@test ~]# curlhttp://127.0.0.1:9200 { "name" : "Interloper", "cluster_name" : "elasticsearch", "version" : { "number" : "2.3.4", "build_hash" : "e455fd0c13dceca8dbbdbb1665d068ae55dabe3f", "build_timestamp" : "2016-06-30T11:24:31Z", "build_snapshot" : false, "lucene_version" : "5.5.0" }, "tagline" : "You Know, for Search" } [root@test ~]# 成功! 本文转自 cexpert 51CTO博客,原文链接:http://blog.51cto.com/cexpert/1831980

资源下载

更多资源
Mario

Mario

马里奥是站在游戏界顶峰的超人气多面角色。马里奥靠吃蘑菇成长,特征是大鼻子、头戴帽子、身穿背带裤,还留着胡子。与他的双胞胎兄弟路易基一起,长年担任任天堂的招牌角色。

腾讯云软件源

腾讯云软件源

为解决软件依赖安装时官方源访问速度慢的问题,腾讯云为一些软件搭建了缓存服务。您可以通过使用腾讯云软件源站来提升依赖包的安装速度。为了方便用户自由搭建服务架构,目前腾讯云软件源站支持公网访问和内网访问。

Spring

Spring

Spring框架(Spring Framework)是由Rod Johnson于2002年提出的开源Java企业级应用框架,旨在通过使用JavaBean替代传统EJB实现方式降低企业级编程开发的复杂性。该框架基于简单性、可测试性和松耦合性设计理念,提供核心容器、应用上下文、数据访问集成等模块,支持整合Hibernate、Struts等第三方框架,其适用范围不仅限于服务器端开发,绝大多数Java应用均可从中受益。

Rocky Linux

Rocky Linux

Rocky Linux(中文名:洛基)是由Gregory Kurtzer于2020年12月发起的企业级Linux发行版,作为CentOS稳定版停止维护后与RHEL(Red Hat Enterprise Linux)完全兼容的开源替代方案,由社区拥有并管理,支持x86_64、aarch64等架构。其通过重新编译RHEL源代码提供长期稳定性,采用模块化包装和SELinux安全架构,默认包含GNOME桌面环境及XFS文件系统,支持十年生命周期更新。

用户登录
用户注册