开篇
Vector 类可以实现可增长的对象数组。与数组一样,它包含可以使用整数索引进行访问的组件。但是,Vector 的大小可以根据需要增大或缩小,以适应创建 Vector 后进行添加或移除项的操作。Vector 是同步的,可用于多线程。
Vector 是线程安全版本的ArrayList,这点可以从后续的源码中看出来,基本上增删改查都是用关键synchronized进行修饰。
ArrayList的出现估计为了降低锁的使用吧,否则跟vector相比几乎是一模一样的。
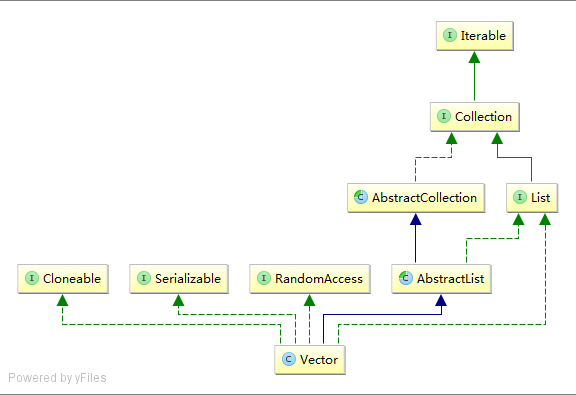
vector类图
vector类图及构造函数
vector的类变量和构造函数都比较简单,相比ArrayList而言,vector有参数可以指定扩容的增量capacityIncrement,其他的跟ArrayList是一致的。
public class Vector<E>
    extends AbstractList<E>
    implements List<E>, RandomAccess, Cloneable, java.io.Serializable
{

    //保存元素的数组
    protected Object[] elementData;
    //记录元素个数
    protected int elementCount;
    //记录Vector扩容的速度
    protected int capacityIncrement;
    private static final long serialVersionUID = -2767605614048989439L;

    public Vector(int initialCapacity, int capacityIncrement) {
        super();
        if (initialCapacity < 0)
            throw new IllegalArgumentException("Illegal Capacity: "+
                                               initialCapacity);
        this.elementData = new Object[initialCapacity];
        this.capacityIncrement = capacityIncrement;
    }

    public Vector(int initialCapacity) {
        this(initialCapacity, 0);
    }

    public Vector() {
        this(10);
    }

    public Vector(Collection<? extends E> c) {
        elementData = c.toArray();
        elementCount = elementData.length;
        // c.toArray might (incorrectly) not return Object[] (see 6260652)
        if (elementData.getClass() != Object[].class)
            elementData = Arrays.copyOf(elementData, elementCount, Object[].class);
    }
vector日常操作
vector添加元素
vector的add操作跟ArrayList一个重要的不同就是通过synchronized进行了修饰保证线程安全,其他跟ArrayList保持一致,在add元素的时候会先grow一下新的容量而已。
public synchronized void addElement(E obj) {
        modCount++;
        ensureCapacityHelper(elementCount + 1);
        elementData[elementCount++] = obj;
    }


public void add(int index, E element) {
        insertElementAt(element, index);
    }


public synchronized void insertElementAt(E obj, int index) {
        modCount++;
        if (index > elementCount) {
            throw new ArrayIndexOutOfBoundsException(index
                                                     + " > " + elementCount);
        }
        ensureCapacityHelper(elementCount + 1);
        System.arraycopy(elementData, index, elementData, index + 1, elementCount - index);
        elementData[index] = obj;
        elementCount++;
    }


private void ensureCapacityHelper(int minCapacity) {
        if (minCapacity - elementData.length > 0)
            grow(minCapacity);
    }

    private void grow(int minCapacity) {
        // overflow-conscious code
        int oldCapacity = elementData.length;
        int newCapacity = oldCapacity + ((capacityIncrement > 0) ?
                                         capacityIncrement : oldCapacity);
        if (newCapacity - minCapacity < 0)
            newCapacity = minCapacity;
        if (newCapacity - MAX_ARRAY_SIZE > 0)
            newCapacity = hugeCapacity(minCapacity);
        elementData = Arrays.copyOf(elementData, newCapacity);
    }
vector删除元素
vector的remove操作也通过synchronized进行修饰,其他的remove动作和ArrayList是一致的。
public synchronized E remove(int index) {
        modCount++;
        if (index >= elementCount)
            throw new ArrayIndexOutOfBoundsException(index);
        E oldValue = elementData(index);

        int numMoved = elementCount - index - 1;
        if (numMoved > 0)
            System.arraycopy(elementData, index+1, elementData, index,
                             numMoved);
        elementData[--elementCount] = null; // Let gc do its work

        return oldValue;
    }


public synchronized void removeAllElements() {
        modCount++;
        // Let gc do its work
        for (int i = 0; i < elementCount; i++)
            elementData[i] = null;

        elementCount = 0;
    }
vector查找元素
vector查找同样用synchronized变量修饰,保证了线程安全。其他的就是按照下标去查找元素而已。
public synchronized E get(int index) {
        if (index >= elementCount)
            throw new ArrayIndexOutOfBoundsException(index);

        return elementData(index);
    }

E elementData(int index) {
        return (E) elementData[index];
    }


public int indexOf(Object o) {
        return indexOf(o, 0);
    }

public synchronized int indexOf(Object o, int index) {
        if (o == null) {
            for (int i = index ; i < elementCount ; i++)
                if (elementData[i]==null)
                    return i;
        } else {
            for (int i = index ; i < elementCount ; i++)
                if (o.equals(elementData[i]))
                    return i;
        }
        return -1;
    }
vector迭代器
vector的迭代器同样使用了synchronized变量进行了修饰保证线程安全,迭代器的内部实现中hasNext通过比较index是否超出下标上限来实现,next通过移动下标往前迭代。
public synchronized Iterator<E> iterator() {
        return new Itr();
    }

    private class Itr implements Iterator<E> {
        int cursor;       // index of next element to return
        int lastRet = -1; // index of last element returned; -1 if no such
        int expectedModCount = modCount;

        // 判断是否存在下一个元素
        public boolean hasNext() {
            // Racy but within spec, since modifications are checked
            // within or after synchronization in next/previous
            return cursor != elementCount;
        }

        // 查找下一个元素
        public E next() {
            synchronized (Vector.this) {
                checkForComodification();
                int i = cursor;
                if (i >= elementCount)
                    throw new NoSuchElementException();
                cursor = i + 1;
                return elementData(lastRet = i);
            }
        }

        //判断遍历过程中是否发生数据变化
        final void checkForComodification() {
            if (modCount != expectedModCount)
                throw new ConcurrentModificationException();
        }
    }