开篇
LinkedList基于链表实现,在List中间进行插入和删除的代价较低,提供了优化的顺序访问。LinkedList在随机访问方面相对比较慢,但是它的特性集较ArrayList更大。
LinkedList的实现是一个双向链表,LinkedList存储的Node节点包含指向前置后置节点的指针。
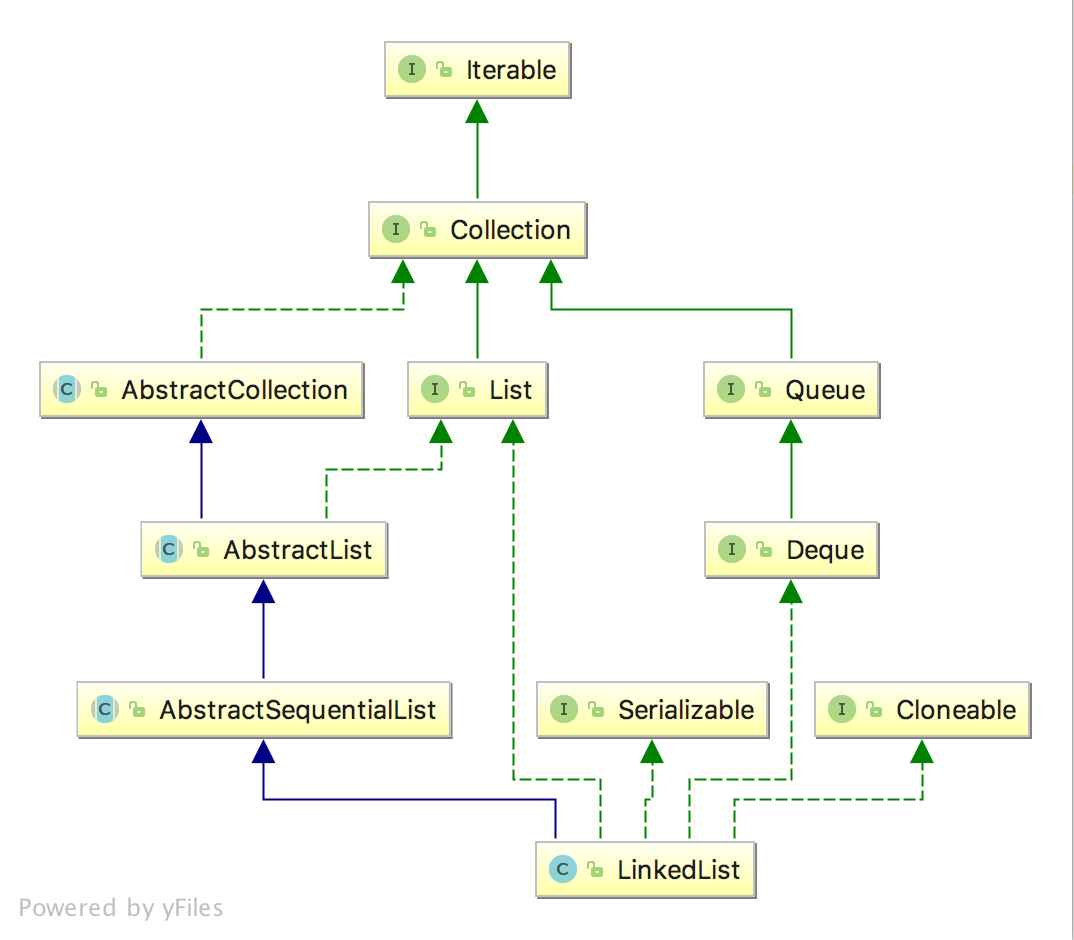
LinkedList类图
LinkedList类定义
LinkedList的类定义中包含first节点和last节点,通过first节点(指向头节点)和last节点(指向尾节点)将串联所有的list中的节点,看下Node的定义就知道了。
Node的prev和next节点分别指向前后节点。
public class LinkedList<E>
    extends AbstractSequentialList<E>
    implements List<E>, Deque<E>, Cloneable, java.io.Serializable
{
    transient int size = 0;

    // 指向LinkedList的第一个节点
    transient Node<E> first;

   // 指向LinkedList的最后一个节点
    transient Node<E> last;

    private static class Node<E> {
        E item;
        Node<E> next;
        Node<E> prev;

        Node(Node<E> prev, E element, Node<E> next) {
            this.item = element;
            this.next = next;
            this.prev = prev;
        }
    }
}
LinkedList构造函数
LinkedList的构造函数非常简单,关键是看下参数为Collection的构造函数,在该构造函数当中通过addAll()方法将元素通过尾插入法添加到LinkedList当中。allAll参数的index标记从哪个位置开始插入。
public LinkedList() {
    }


public LinkedList(Collection<? extends E> c) {
        this();
        addAll(c);
    }

public boolean addAll(Collection<? extends E> c) {
        return addAll(size, c);
    }


public boolean addAll(int index, Collection<? extends E> c) {
        // 确定是否超过index的下标
        checkPositionIndex(index);

        Object[] a = c.toArray();
        int numNew = a.length;
        if (numNew == 0)
            return false;

        // 确定插入位置的前后节点位置,pred是前置节点,succ是后置节点
        Node<E> pred, succ;
        if (index == size) {
            succ = null;
            pred = last;
        } else {
            succ = node(index);
            pred = succ.prev;
        }

        // 直接采用链表插入法插入即可
        for (Object o : a) {
            @SuppressWarnings("unchecked") E e = (E) o;
            Node<E> newNode = new Node<>(pred, e, null);
            if (pred == null)
                first = newNode;
            else
                pred.next = newNode;
            pred = newNode;
        }

        if (succ == null) {
            last = pred;
        } else {
            pred.next = succ;
            succ.prev = pred;
        }

        size += numNew;
        modCount++;
        return true;
    }
LinkedList常用操作
LinkedList的add方法
LinkedList的add()方法其实非常简单,就是在LinkedList的尾部进行插入,然后更新last节点就可以了。
public boolean add(E e) {
        linkLast(e);
        return true;
    }

// 在尾部插入新的值
void linkLast(E e) {
        final Node<E> l = last;
        final Node<E> newNode = new Node<>(l, e, null);
        last = newNode;
        if (l == null)
            first = newNode;
        else
            l.next = newNode;
        size++;
        modCount++;
    }
public void add(int index, E element) {
        checkPositionIndex(index);

        if (index == size)
            linkLast(element);
        else
            linkBefore(element, node(index));
    }

// 设计巧妙,力求最少时间定为索引位置
Node<E> node(int index) {
        // assert isElementIndex(index);

        if (index < (size >> 1)) {
            Node<E> x = first;
            for (int i = 0; i < index; i++)
                x = x.next;
            return x;
        } else {
            Node<E> x = last;
            for (int i = size - 1; i > index; i--)
                x = x.prev;
            return x;
        }
    }

// 在合适的节点之前插入
void linkBefore(E e, Node<E> succ) {
        // assert succ != null;
        final Node<E> pred = succ.prev;
        final Node<E> newNode = new Node<>(pred, e, succ);
        succ.prev = newNode;
        if (pred == null)
            first = newNode;
        else
            pred.next = newNode;
        size++;
        modCount++;
    }
LinkedList的remove方法
LinkedList的remove()的方法也非常简单,通过移除头部节点即可,然后将first节点后移即可。
public E remove() {
        return removeFirst();
    }

public E removeFirst() {
        final Node<E> f = first;
        if (f == null)
            throw new NoSuchElementException();
        return unlinkFirst(f);
    }

private E unlinkFirst(Node<E> f) {
        // assert f == first && f != null;
        final E element = f.item;
        final Node<E> next = f.next;
        f.item = null;
        f.next = null; // help GC
        first = next;
        if (next == null)
            last = null;
        else
            next.prev = null;
        size--;
        modCount++;
        return element;
    }
LinkedList的indexOf方法
LinkedList的indexOf()方法主要从first到last进行遍历依次比较即可。
public int indexOf(Object o) {
        int index = 0;
        if (o == null) {
            for (Node<E> x = first; x != null; x = x.next) {
                if (x.item == null)
                    return index;
                index++;
            }
        } else {
            for (Node<E> x = first; x != null; x = x.next) {
                if (o.equals(x.item))
                    return index;
                index++;
            }
        }
        return -1;
    }
LinkedList迭代器
LinkedList的迭代器主要分为两个:
- iterator主要是在AbstractList类中定义,通过java的多态性调用LinkedList的size()方法和get()方法实现索引的比较和数据的获取等。
- listIterator在LinkedList类中实现,通过index指定迭代器开始遍历的位置,通过前后指针进行next移动,通过index和size比较是否遍历完成。
public Iterator<E> iterator() {
        return new Itr();
    }

private class Itr implements Iterator<E> {
        int cursor = 0;
        int lastRet = -1;
        int expectedModCount = modCount;

        // 调用LinkedList的size()方法
        public boolean hasNext() {
            return cursor != size();
        }

        public E next() {
            checkForComodification();
            try {
                int i = cursor;
                // get()方法调用的是LinkedList的方法
                E next = get(i);
                lastRet = i;
                cursor = i + 1;
                return next;
            } catch (IndexOutOfBoundsException e) {
                checkForComodification();
                throw new NoSuchElementException();
            }
        }
    }
public ListIterator<E> listIterator(int index) {
        checkPositionIndex(index);
        return new ListItr(index);
    }

    private class ListItr implements ListIterator<E> {
        private Node<E> lastReturned;
        private Node<E> next;
        private int nextIndex;
        private int expectedModCount = modCount;

        ListItr(int index) {
            // assert isPositionIndex(index);
            next = (index == size) ? null : node(index);
            nextIndex = index;
        }

        public boolean hasNext() {
            return nextIndex < size;
        }

        public E next() {
            checkForComodification();
            if (!hasNext())
                throw new NoSuchElementException();

            lastReturned = next;
            next = next.next;
            nextIndex++;
            return lastReturned.item;
        }
}