首页 文章 精选 留言 我的

精选列表

搜索[demo],共9521篇文章
优秀的个人博客,低调大师

maxCompute的UDAF demo,实现累加功能

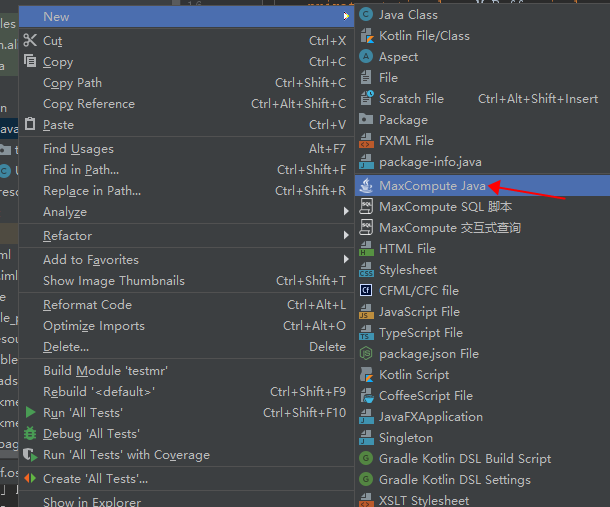
需求:将表中数据按照name聚合,并且count进行累加 name count Jan 1 Jan 2 Feb 3 Feb 1 Mar 1 Mar 5 预期结果: name count Jan 3 Feb 7 Mar 13 使用idea的maxCompute studio新增UDAF 然后自动生成未实现的方法,我的字段name是string,count是bigint所以@Resolve("string,bigint->bigint") 新增一个class用来存储字段 private String name; private Long count; @Override public void write(DataOutput out) throws IOException { out.writeUTF(name); out.writeLong(count); } @Override public void readFields(DataInput in) throws IOException { name = in.readUTF(); count = in.readLong(); } } 这样newBuffer就可以这样写了 public Writable newBuffer() { return new MyBuffer(); } 还需要一个Map来存储key(name)和value(count),一个long类型的参数存储累加的值 Long old_count = 0L;//存储累加值 private LongWritable ret = new LongWritable();//存储输出值 完整代码参考: public class UDAFTest extends Aggregator { private static class MyBuffer implements Writable { private String name; private Long count; @Override public void write(DataOutput out) throws IOException { out.writeUTF(name); out.writeLong(count); } @Override public void readFields(DataInput in) throws IOException { name = in.readUTF(); count = in.readLong(); } } @Override public Writable newBuffer() { return new MyBuffer(); } Map<String,Long> map = new LinkedHashMap<>(); Long old_count = 0L; @Override public void iterate(Writable buffer, Writable[] args) throws UDFException { String arg = String.valueOf(args[0]); Long cnt = Long.parseLong(String.valueOf(args[1])); MyBuffer buf = (MyBuffer) buffer; if (arg != null) { if(map.containsKey(arg)){ Long newcnt = map.get(arg); old_count = cnt+newcnt; map.put(arg,old_count); }else { map.put(arg,old_count+cnt); } } buf.name = arg; buf.count = map.get(arg); } private LongWritable ret = new LongWritable(); @Override public Writable terminate(Writable arg0) throws UDFException { MyBuffer buffer = (MyBuffer) arg0; ret.set(buffer.count); return ret; } @Override public void merge(Writable buffer, Writable partial) throws UDFException { MyBuffer buf = (MyBuffer) buffer; MyBuffer p = (MyBuffer) partial; buf.name = p.name; buf.count = p.count; } } 然后通过maxCompute studio发布下 发布名为test20191119,这样就可以在Dataworks中调用了。 其中原表数据:

优秀的个人博客,低调大师

建立缓存,防高并发代码demo

我在之前的博客中提到过——缓存并发,当一个key过期时,访问这个key的请求量过大,穿透到数据库.解决办法:1,分布式锁,保证每个key同时只有一个线程去查询数据库,其他线程没有获得分布式锁的权限,只需要等待.具体实现如下@Overridepublic AppUser findById(Long id) { if (redisService.exists("user:" + id)) { String appUserStr = redisService.get("user:" + id); return JSONObject.parseObject(appUserStr,AppUser.class); } else { //获取分布式锁 if (RedisTool.tryGetDistributedLock(redisService,"useridlock:" + id,Long.toString(id),180)) { AppUser appUser = appUserDao.findById(id); redisService.set("user:" + id, JSONObject.toJSONString(appUser)); redisService.expire("user:" + id, 864000); //释放分布式锁 RedisTool.releaseDistributedLock(redisService,"useridlock:" + id,Long.toString(id)); return appUser; } else { //无获得分布式锁权限时 try { //当前线程休眠1秒,可根据适当情况调整这个休眠时间 Thread.currentThread().sleep(1000); if (redisService.exists("user:" + id)) { String appUserStr = redisService.get("user:" + id); return JSONObject.parseObject(appUserStr,AppUser.class); }else { return null; } } catch (InterruptedException e) { e.printStackTrace(); return null; } } } }Redis分布式锁的写法可参考本人上一篇博客,谢谢!

优秀的个人博客,低调大师

【Android Demo】图片之网格视图(GridView)

1.介绍 就是GridView组件的应用!九宫格什么的都可以通过这个组件实现。 2.效果图 3.XML文件 <?xml version="1.0" encoding="utf-8"?> <FrameLayout xmlns:android="http://schemas.android.com/apk/res/android" android:layout_width="fill_parent" android:layout_height="fill_parent"> <GridView android:id="@+id/gridview" android:layout_width="wrap_content" android:layout_height="wrap_content" android:numColumns="auto_fit" android:columnWidth="100sp" android:stretchMode="columnWidth" android:gravity="center" /> </FrameLayout> 4.Java代码 package wei.ye.g1; import android.app.Activity; import android.content.Context; import android.os.Bundle; import android.view.View; import android.view.ViewGroup; import android.widget.BaseAdapter; import android.widget.GridView; import android.widget.ImageView; public class Wangge extends Activity { private static int[] images = { R.drawable.baos, R.drawable.caoc, R.drawable.chenyj, R.drawable.chenyy, R.drawable.gouj, R.drawable.guany, R.drawable.hanx, R.drawable.lp, R.drawable.liub, R.drawable.qinq, R.drawable.tiemz, R.drawable.wus, R.drawable.xiangy, R.drawable.yuef, R.drawable.zhaoky, R.drawable.zhugl, R.drawable.xis, R.drawable.yingz }; GridView gv; @Override protected void onCreate(Bundle savedInstanceState) { // TODO Auto-generated method stub super.onCreate(savedInstanceState); setContentView(R.layout.wangge); setTitle("网格视图"); gv = (GridView) findViewById(R.id.gridview); gv.setAdapter(new ImageAdapter(this)); } public class ImageAdapter extends BaseAdapter { private Context mContext; public ImageAdapter(Context c) { mContext = c; } @Override public int getCount() { return images.length; } @Override public Object getItem(int position) { return null; } @Override public long getItemId(int position) { return 0; } // 创建一个ImageView,并设定对应的图片.images 就是需要显示的图片 public View getView(int position, View convertView, ViewGroup parent) { ImageView imageView; // System.out.println(convertView); // if -- else 为了节省内存空间,减少对象的创建 if (convertView == null) { imageView = new ImageView(mContext); //设置显示图片的大小 imageView.setLayoutParams(new GridView.LayoutParams(120, 120)); imageView.setScaleType(ImageView.ScaleType.CENTER_CROP); imageView.setPadding(8, 8, 8, 8); } else { imageView = (ImageView) convertView; } imageView.setImageResource(images[position]); return imageView; } } } 本文转自叶超Luka博客园博客,原文链接:http://www.cnblogs.com/yc-755909659/archive/2012/04/15/2450061.html,如需转载请自行联系原作者

优秀的个人博客,低调大师

python spark 决策树 入门demo

Refer to theDecisionTreePython docsandDecisionTreeModelPython docsfor more details on the API. from pyspark.mllib.tree import DecisionTree, DecisionTreeModel from pyspark.mllib.util import MLUtils # Load and parse the data file into an RDD of LabeledPoint. data = MLUtils.loadLibSVMFile(sc, 'data/mllib/sample_libsvm_data.txt') # Split the data into training and test sets (30% held out for testing) (trainingData, testData) = data.randomSplit([0.7, 0.3]) # Train a DecisionTree model. # Empty categoricalFeaturesInfo indicates all features are continuous. model = DecisionTree.trainClassifier(trainingData, numClasses=2, categoricalFeaturesInfo={}, impurity='gini', maxDepth=5, maxBins=32) # Evaluate model on test instances and compute test error predictions = model.predict(testData.map(lambda x: x.features)) labelsAndPredictions = testData.map(lambda lp: lp.label).zip(predictions) testErr = labelsAndPredictions.filter(lambda (v, p): v != p).count() / float(testData.count()) print('Test Error = ' + str(testErr)) print('Learned classification tree model:') print(model.toDebugString()) # Save and load model model.save(sc, "target/tmp/myDecisionTreeClassificationModel") sameModel = DecisionTreeModel.load(sc, "target/tmp/myDecisionTreeClassificationModel") Find full example code at "examples/src/main/python/mllib/decision_tree_classification_example.py" in the Spark repo. classpyspark.mllib.tree.DecisionTree[source] Learning algorithm for a decision tree model for classification or regression. New in version 1.1.0. classmethodtrainClassifier( data, numClasses, categoricalFeaturesInfo, impurity='gini', maxDepth=5, maxBins=32, minInstancesPerNode=1, minInfoGain=0.0) [source] Train a decision tree model for classification. Parameters: data– Training data: RDD of LabeledPoint. Labels should take values {0, 1, ..., numClasses-1}. numClasses– Number of classes for classification. categoricalFeaturesInfo– Map storing arity of categorical features. An entry (n -> k) indicates that feature n is categorical with k categories indexed from 0: {0, 1, ..., k-1}. impurity– Criterion used for information gain calculation. Supported values: “gini” or “entropy”. (default: “gini”) maxDepth– Maximum depth of tree (e.g. depth 0 means 1 leaf node, depth 1 means 1 internal node + 2 leaf nodes). (default: 5) maxBins– Number of bins used for finding splits at each node. (default: 32) minInstancesPerNode– Minimum number of instances required at child nodes to create the parent split. (default: 1) minInfoGain– Minimum info gain required to create a split. (default: 0.0) Returns: DecisionTreeModel. Example usage: >>> from numpy import array >>> from pyspark.mllib.regression import LabeledPoint >>> from pyspark.mllib.tree import DecisionTree >>> >>> data = [ ... LabeledPoint(0.0, [0.0]), ... LabeledPoint(1.0, [1.0]), ... LabeledPoint(1.0, [2.0]), ... LabeledPoint(1.0, [3.0]) ... ] >>> model = DecisionTree.trainClassifier(sc.parallelize(data), 2, {}) >>> print(model) DecisionTreeModel classifier of depth 1 with 3 nodes >>> print(model.toDebugString()) DecisionTreeModel classifier of depth 1 with 3 nodes If (feature 0 <= 0.0) Predict: 0.0 Else (feature 0 > 0.0) Predict: 1.0 >>> model.predict(array([1.0])) 1.0 >>> model.predict(array([0.0])) 0.0 >>> rdd = sc.parallelize([[1.0], [0.0]]) >>> model.predict(rdd).collect() [1.0, 0.0] 摘自:https://spark.apache.org/docs/latest/api/python/pyspark.mllib.html#pyspark.mllib.tree.DecisionTree 本文转自张昺华-sky博客园博客,原文链接:http://www.cnblogs.com/bonelee/p/7150483.html ,如需转载请自行联系原作者


优秀的个人博客,低调大师

spark 决策树分类算法demo

分类(Classification) 下面的例子说明了怎样导入LIBSVM 数据文件,解析成RDD[LabeledPoint],然后使用决策树进行分类。GINI不纯度作为不纯度衡量标准并且树的最大深度设置为5。最后计算了测试错误率从而评估算法的准确性。 from pyspark.mllib.regression import LabeledPoint from pyspark.mllib.tree import DecisionTree, DecisionTreeModel from pyspark.mllib.util import MLUtils # Load and parse the data file into an RDD of LabeledPoint. data = MLUtils.loadLibSVMFile(sc, 'data/mllib/sample_libsvm_data.txt') # Split the data into training and test sets (30% held out for testing) (trainingData, testData) = data.randomSplit([0.7, 0.3]) # Train a DecisionTree model. # Empty categoricalFeaturesInfo indicates all features are continuous. model = DecisionTree.trainClassifier(trainingData, numClasses=2, categoricalFeaturesInfo={}, impurity='gini', maxDepth=5, maxBins=32) # Evaluate model on test instances and compute test error predictions = model.predict(testData.map(lambda x: x.features)) labelsAndPredictions = testData.map(lambda lp: lp.label).zip(predictions) testErr = labelsAndPredictions.filter(lambda (v, p): v != p).count() / float(testData.count()) print('Test Error = ' + str(testErr)) print('Learned classification tree model:') print(model.toDebugString()) # Save and load model model.save(sc, "myModelPath") sameModel = DecisionTreeModel.load(sc, "myModelPath") 以下代码展示了如何载入一个LIBSVM数据文件,解析成一个LabeledPointRDD,然后使用决策树,使用Gini不纯度作为不纯度衡量指标,最大树深度是5.测试误差用来计算算法准确率。 # -*- coding:utf-8 -*- """ 测试决策树 """ importos importsys importlogging frompyspark.mllib.treeimportDecisionTree,DecisionTreeModel frompyspark.mllib.utilimportMLUtils # Path for spark source folder os.environ['SPARK_HOME']="D:\javaPackages\spark-1.6.0-bin-hadoop2.6" # Append pyspark to Python Path sys.path.append("D:\javaPackages\spark-1.6.0-bin-hadoop2.6\python") sys.path.append("D:\javaPackages\spark-1.6.0-bin-hadoop2.6\python\lib\py4j-0.9-src.zip") frompysparkimportSparkContext frompysparkimportSparkConf conf=SparkConf() conf.set("YARN_CONF_DIR ","D:\javaPackages\hadoop_conf_dir\yarn-conf") conf.set("spark.driver.memory","2g") #conf.set("spark.executor.memory", "1g") #conf.set("spark.python.worker.memory", "1g") conf.setMaster("yarn-client") conf.setAppName("TestDecisionTree") logger=logging.getLogger('pyspark') sc=SparkContext(conf=conf) mylog=[] #载入和解析数据文件为 LabeledPoint RDDdata = MLUtils.loadLibSVMFile(sc,"/home/xiatao/machine_learing/") #将数据拆分成训练集合测试集 (trainingData,testData)=data.randomSplit([0.7,0.3]) ##训练决策树模型 #空的 categoricalFeauresInfo 代表了所有的特征都是连续的 model=DecisionTree.trainClassifier(trainingData,numClasses=2,categoricalFeaturesInfo={},impurity='gini',maxDepth=5,maxBins=32) # 在测试实例上评估模型并计算测试误差 predictions=model.predict(testData.map(lambdax:x.features)) labelsAndPoint=testData.map(lambdalp:lp.label).zip(predictions) testMSE=labelsAndPoint.map(lambda(v,p):(v-p)**2).sum()/float(testData.count()) mylog.append("测试误差是") mylog.append(testMSE) #存储模型 model.save(sc,"/home/xiatao/machine_learing/") sc.parallelize(mylog).saveAsTextFile("/home/xiatao/machine_learing/log") sameModel=DecisionTreeModel.load(sc,"/home/xiatao/machine_learing/") 本文转自张昺华-sky博客园博客,原文链接:http://www.cnblogs.com/bonelee/p/7149804.html ,如需转载请自行联系原作者

优秀的个人博客,低调大师

【Android Demo】图片之滑动效果(Gallery)

1.介绍 就是Gallery组件,可滑动图片,产生图片的滑动效果! 2.效果图 3.XML文件 <?xml version="1.0" encoding="utf-8"?> <RelativeLayout xmlns:android="http://schemas.android.com/apk/res/android" android:orientation="vertical" android:layout_width="match_parent" android:layout_height="match_parent"> <Gallery android:layout_width="fill_parent" android:id="@+id/gallery1" android:layout_height="fill_parent" android:spacing="16dp"></Gallery> </RelativeLayout> 4.Java代码 package wei.ye.g1; import android.app.Activity; import android.content.Context; import android.os.Bundle; import android.view.View; import android.view.ViewGroup; import android.view.ViewGroup.LayoutParams; import android.widget.BaseAdapter; import android.widget.Gallery; import android.widget.ImageView; public class Huadong extends Activity { private static int[] images = { R.drawable.baos, R.drawable.caoc, R.drawable.chenyj, R.drawable.chenyy, R.drawable.gouj, R.drawable.guany, R.drawable.hanx, R.drawable.lp, R.drawable.liub, R.drawable.qinq, R.drawable.tiemz, R.drawable.wus, R.drawable.xiangy, R.drawable.yuef, R.drawable.zhaoky, R.drawable.zhugl, R.drawable.xis, R.drawable.yingz }; Gallery gallery; @Override protected void onCreate(Bundle savedInstanceState) { // TODO Auto-generated method stub super.onCreate(savedInstanceState); setContentView(R.layout.huadong); setTitle("只用了Gallery的效果"); gallery = (Gallery) findViewById(R.id.gallery1); gallery.setAdapter(new ImageAdapter(this)); gallery.setSelection(images.length / 2); } private class ImageAdapter extends BaseAdapter { private Context context; public ImageAdapter(Context context) { this.context = context; } // 可以return images.lenght(),在这里返回Integer.MAX_VALUE // 是为了使图片循环显示 public int getCount() { return Integer.MAX_VALUE; } public Object getItem(int position) { return null; } public long getItemId(int position) { return 0; } public View getView(int position, View convertView, ViewGroup parent) { ImageView iv = new ImageView(context); //设置具体要显示的图片 iv.setImageResource(images[position % images.length]); //设置ImageView的高度和宽度 iv.setLayoutParams(new Gallery.LayoutParams( LayoutParams.FILL_PARENT, LayoutParams.FILL_PARENT)); iv.setAdjustViewBounds(true); return iv; } } } 本文转自叶超Luka博客园博客,原文链接:http://www.cnblogs.com/yc-755909659/archive/2012/04/13/2446493.html,如需转载请自行联系原作者

优秀的个人博客,低调大师

阿里云机器翻译NET使用Demo

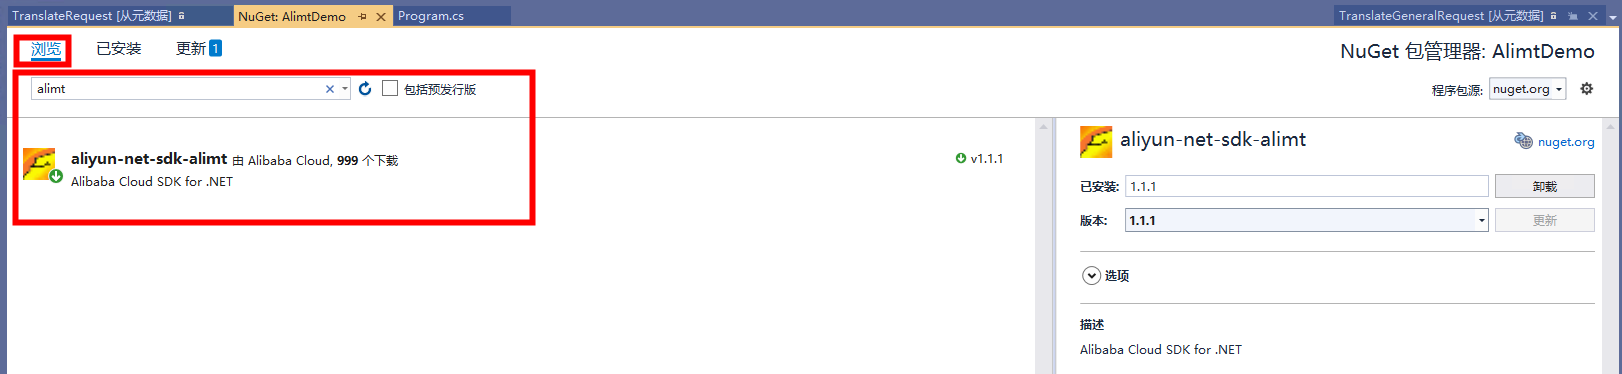
概述 阿里巴巴机器翻译是由阿里巴巴匠心打造的在线智能机器翻译服务。依托领先的自然语言处理技术和海量的互联网数据优势,阿里巴巴成功上线基于注意力机制的深层神经网络翻译系统(NMT),帮助用户跨越语言鸿沟,畅享交流和获取信息,实现无障碍沟通。凭借海量数据积累及关键技术创新,在电商领域翻译质量独具优势。很多用户有在NET环境下使用机器翻译的需求,下面分别介绍使用:NET Core SDK和机器翻译封装的SDK调用机器翻译,实际使用任选其一即可。 Step By Step 机器翻译封装的SDK调用 1、SDK安装:aliyun-net-sdk-alimt 2、Code Sample using System; using Aliyun.Acs.Core; using Aliyun.Acs.Core.Exceptions; using Aliyun.Acs.Core.Profile; using Aliyun.Acs.alimt.Model.V20181012; namespace AlimtDemo { class Program { static void Main(string[] args) { IClientProfile profile = DefaultProfile.GetProfile("cn-hangzhou", "LTAIOZZgYX******", "v7CjUJCMk7j9aKduMAQLjy********"); DefaultAcsClient client = new DefaultAcsClient(profile); TranslateGeneralRequest translateGeneralRequest = new TranslateGeneralRequest(); translateGeneralRequest.Method = Aliyun.Acs.Core.Http.MethodType.POST; translateGeneralRequest.FormatType = "text"; translateGeneralRequest.TargetLanguage = "en"; translateGeneralRequest.SourceLanguage = "zh"; translateGeneralRequest.SourceText = "北京欢迎你"; translateGeneralRequest.Scene = "general"; try { var response = client.GetAcsResponse(translateGeneralRequest); Console.WriteLine(System.Text.Encoding.Default.GetString(response.HttpResponse.Content)); Console.ReadKey(); } catch (ServerException e) { Console.WriteLine(e); } catch (ClientException e) { Console.WriteLine(e); } Console.ReadKey(); } } } 3、The Result {"RequestId":"C4B626D3-AA4B-419B-9499-7799015AA88A","Data":{"Translated":"Welcome to Beijing"},"Code":"200"} NET Core SDK 调用 1、SDK安装:aliyun-net-sdk-core 2、Code Sample using Aliyun.Acs.Core; using Aliyun.Acs.Core.Profile; using System; namespace CoreSDKDemo { class Program { static void Main(string[] args) { IClientProfile profile = DefaultProfile.GetProfile("cn-hangzhou", "LTAIOZZgYX******", "v7CjUJCMk7j9aKduMAQLjy********"); DefaultAcsClient client = new DefaultAcsClient(profile); CommonRequest commonRequest = new CommonRequest(); commonRequest.Action = "TranslateGeneral"; commonRequest.Version = "2018-10-12"; commonRequest.Method = Aliyun.Acs.Core.Http.MethodType.POST; commonRequest.Domain = "mt.cn-hangzhou.aliyuncs.com"; commonRequest.AddBodyParameters("FormatType", "text"); commonRequest.AddBodyParameters("Scene", "general"); commonRequest.AddBodyParameters("SourceLanguage", "zh"); commonRequest.AddBodyParameters("SourceText", "中国人民共和国"); commonRequest.AddBodyParameters("TargetLanguage", "en"); CommonResponse response = null; // Initiate the request and get the response response = client.GetCommonResponse(commonRequest); Console.WriteLine("Result:" + response.Data); Console.ReadKey(); } } } 3、The Result Result:{"RequestId":"7EF04C0F-4FD6-423A-BE77-F2CA2E3CD18A","Data":{"Translated":"People's Republic of China"},"Code":"200"} 更多参考 机器翻译通用版调用指南阿里云常见参数获取位置

优秀的个人博客,低调大师

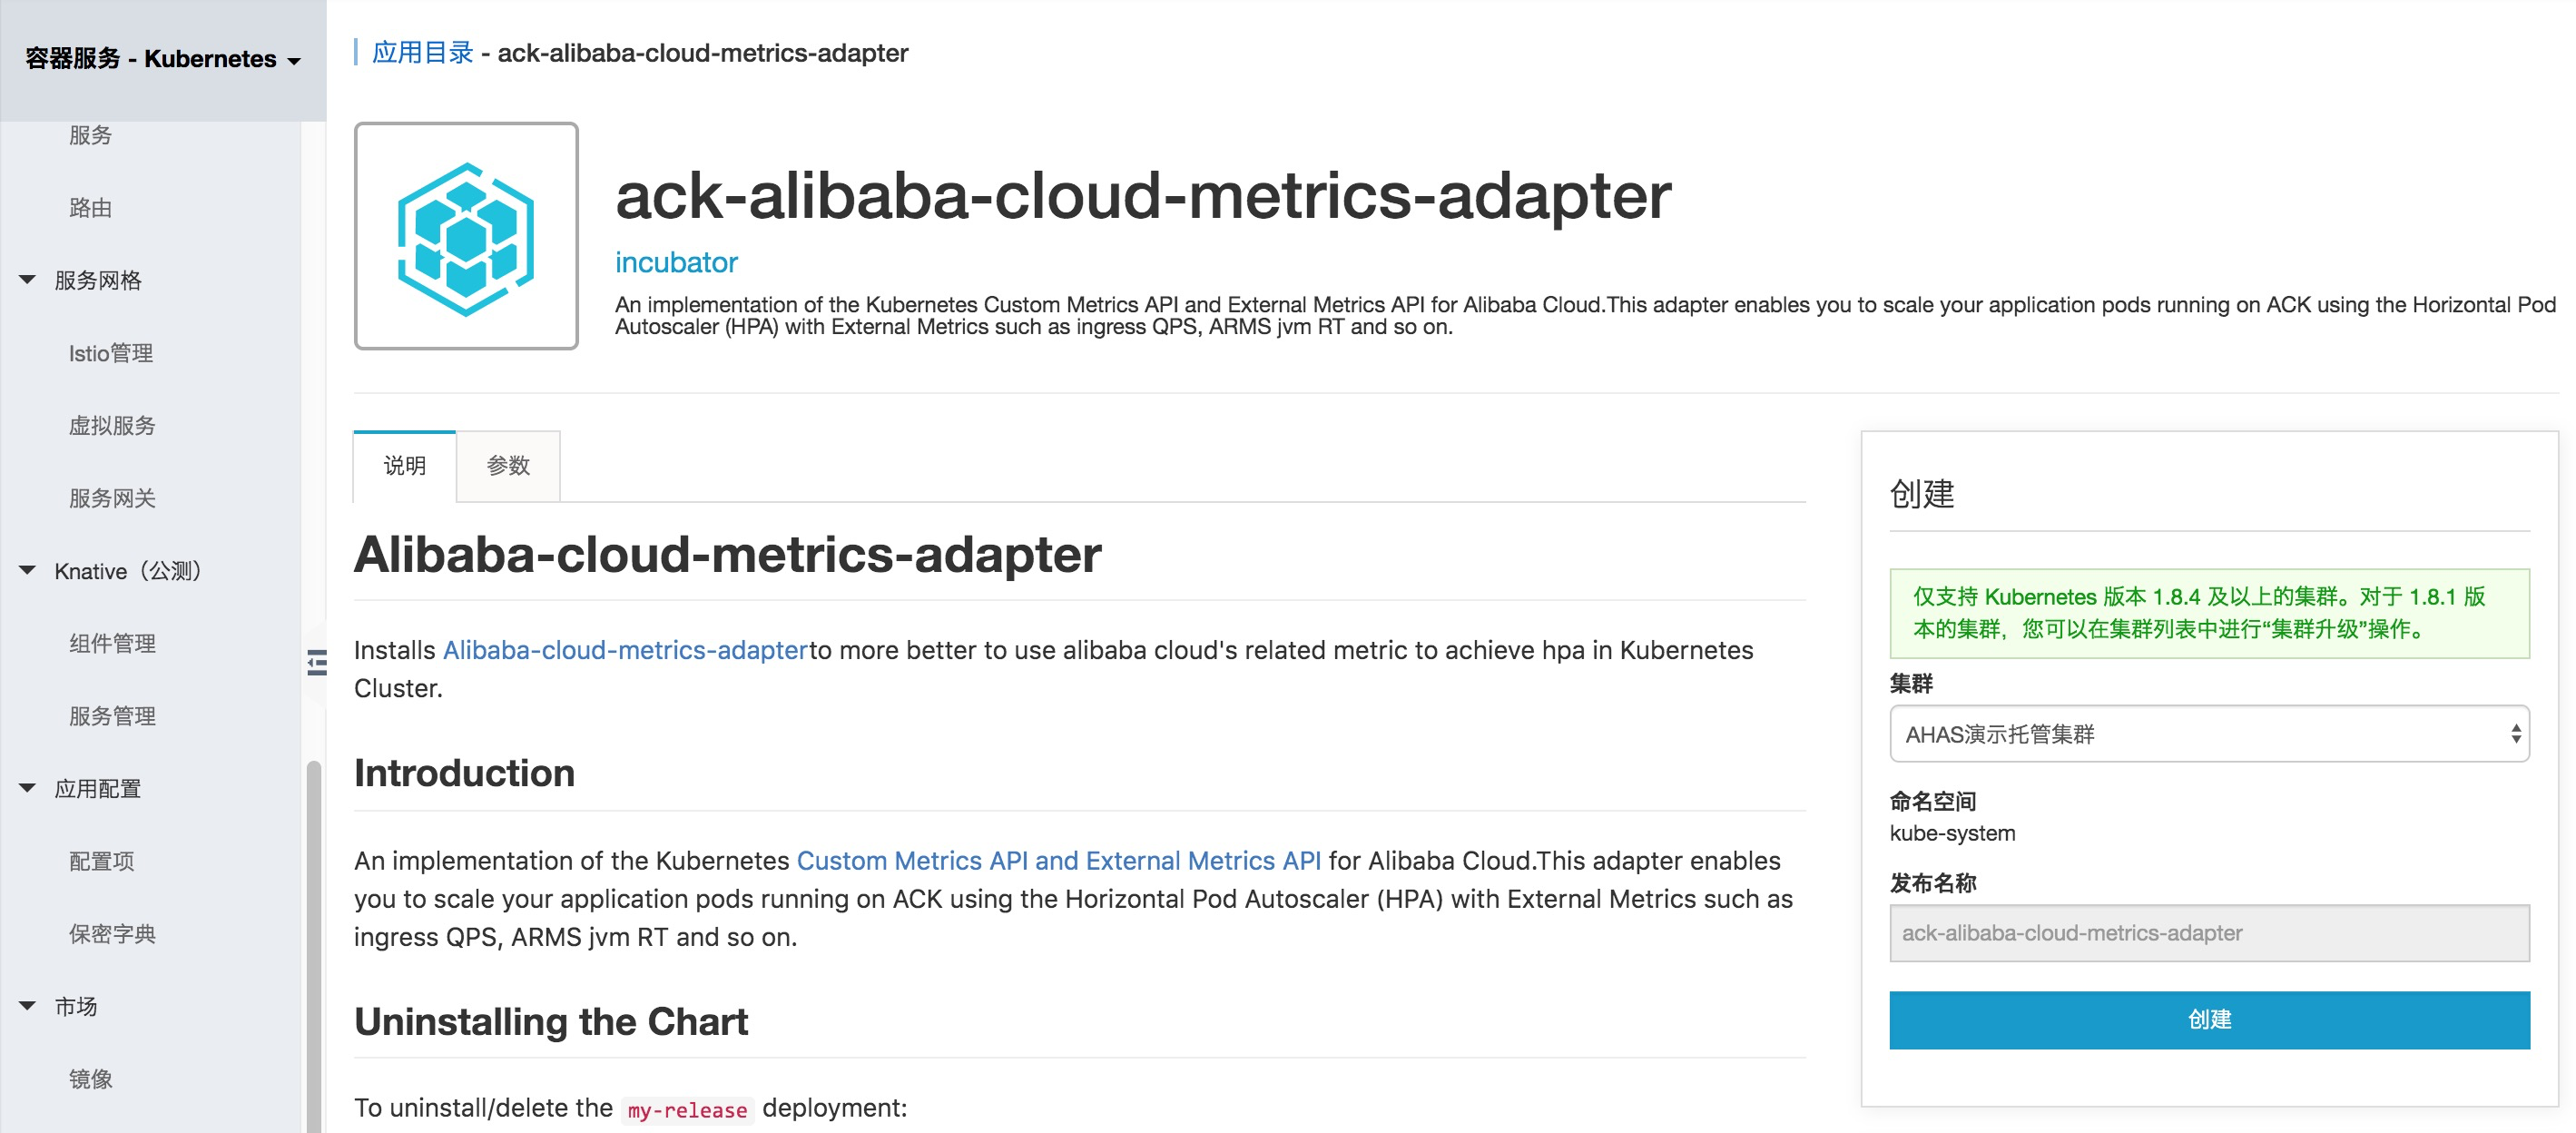
容器服务&&AHAS Sentinel 弹性 Demo

应用高可用服务 AHAS(Application High Availability Service)是一款阿里云应用高可用服务相关产品。只要容器服务中的 Java 应用接入了 AHAS 应用流控组件后,用户的应用实例就可以自动根据 AHAS Sentinel 收集的指标(如 QPS、平均响应时间等)进行弹性伸缩,使得系统可以自动根据实时的流量情况进行扩缩容,保证系统的可用性。 0. 安装 alibaba-cloud-metrics-adapter 可以直接在容器服务控制台 应用目录 中安装 alibaba-cloud-metrics-adapter。 相关 repo:https://github.com/AliyunContainerService/alibaba-cloud-metrics-adapter 1. 安装 AHAS Sen

资源下载

更多资源
腾讯云软件源

腾讯云软件源

为解决软件依赖安装时官方源访问速度慢的问题,腾讯云为一些软件搭建了缓存服务。您可以通过使用腾讯云软件源站来提升依赖包的安装速度。为了方便用户自由搭建服务架构,目前腾讯云软件源站支持公网访问和内网访问。

Rocky Linux

Rocky Linux

Rocky Linux(中文名:洛基)是由Gregory Kurtzer于2020年12月发起的企业级Linux发行版,作为CentOS稳定版停止维护后与RHEL(Red Hat Enterprise Linux)完全兼容的开源替代方案,由社区拥有并管理,支持x86_64、aarch64等架构。其通过重新编译RHEL源代码提供长期稳定性,采用模块化包装和SELinux安全架构,默认包含GNOME桌面环境及XFS文件系统,支持十年生命周期更新。

Sublime Text

Sublime Text

Sublime Text具有漂亮的用户界面和强大的功能,例如代码缩略图,Python的插件,代码段等。还可自定义键绑定,菜单和工具栏。Sublime Text 的主要功能包括:拼写检查,书签,完整的 Python API , Goto 功能,即时项目切换,多选择,多窗口等等。Sublime Text 是一个跨平台的编辑器,同时支持Windows、Linux、Mac OS X等操作系统。

WebStorm

WebStorm

WebStorm 是jetbrains公司旗下一款JavaScript 开发工具。目前已经被广大中国JS开发者誉为“Web前端开发神器”、“最强大的HTML5编辑器”、“最智能的JavaScript IDE”等。与IntelliJ IDEA同源,继承了IntelliJ IDEA强大的JS部分的功能。

用户登录
用户注册