首页 文章 精选 留言 我的

精选列表

搜索[demo],共9481篇文章
优秀的个人博客,低调大师

沙箱环境和正式环境配置与demo测试

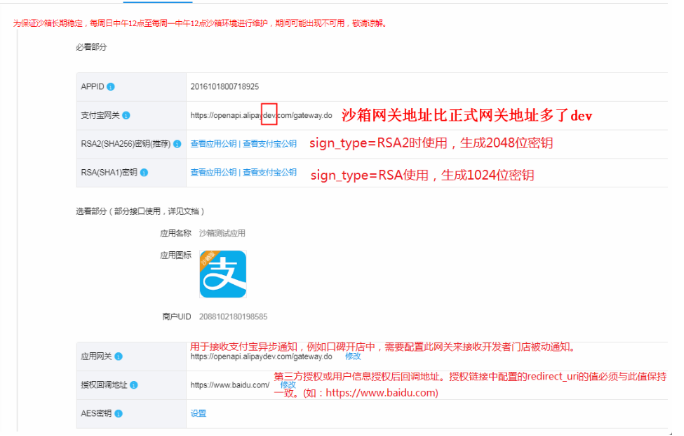
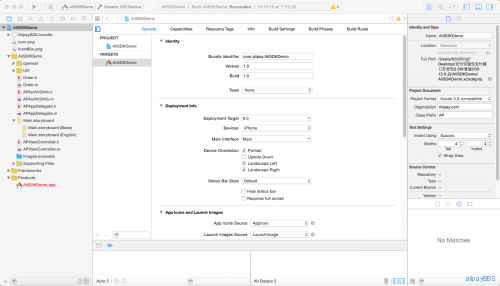
一、沙箱环境 沙箱地址:[url]https://openhome.alipay.com/platform/appDaily.htm[/url] 1、沙箱测试必须使用沙箱环境下的appid,密钥,网关等 2、沙箱环境使用须知: 3、代码配置 沙箱测试app支付注意事项: APP支付只支持Android版接入,在使用sdk时,在支付接口前调用如下方法 EnvUtils.setEnv(EnvUtils.EnvEnum.SANDBOX); 方法调用位置如下图所示: 沙箱测试付款须知:需使用沙箱账号中的买家账号进行支付,否则会报ALI3174 二、正式环境 正式环境地址:[url]https://openhome.alipay.com/platform/developerIndex.htm[/url] 正式环境配置与沙箱环境相是,重点需记住网关地址[url]h

优秀的个人博客,低调大师

Demo Show | 蚂蚁金服 mPaaS IDEA 插件实践

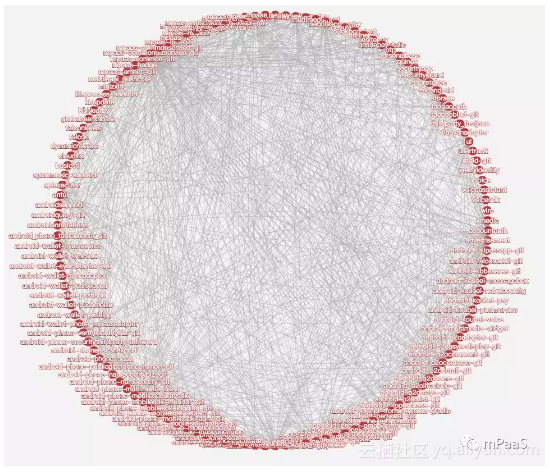
前言 本文将结合上周在 JetBrains 开发者大会分享的《mPaaS IDEA 插件实践》,深入展开 mPaaS 在 IDEA 插件开发之路上踩过的坑和沉淀的思考,希望能够带来一些参考性: mPaaS 冷启动过程如何通过工具选择优化接入成本 IDEA Plugin 开发过程中踩过的坑 思考未来 Code&Build 效率的提升 开篇介绍 mPaaS 移动开发平台(Mobile PaaS,简称 mPaaS)是源于支付宝 App 的移动开发平台,为移动开发、测试、运营及运维提供云到端的一站式解决方案,能有效降低技术门槛、减少研发成本、提升开发效率,协助企业快速搭建稳定高质量的移动 App。 筚路蓝缕以启山林 mPaaS 冷启动时的接入成本优化 这是对 mPaaS 刚启动并对外服务的时候,项目组开发资源的真实描摹。在当时,四五个工程师需要 h

优秀的个人博客,低调大师

文件完整性hash验证demo(python脚本)

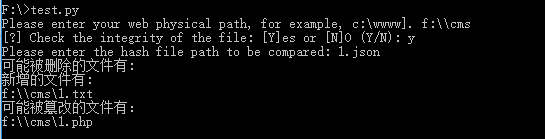
一个简单的文件完整性hash验证脚本 #!/usr/bin/env python # -*- coding: utf-8 -*- import os import hashlib import json #网站目录所有文件列表 path_list=[] #静态文件可以不做hash效验 White_list=['.js','.jpg','.png','.html','.htm'] def GetFile(path): for dirpath, dirnames, filenames in os.walk(path): for dirname in dirnames: dir=os.path.join(dirpath, dirname) #print dir path_list.append(dir) for filename in filenames: file=os.path.join(dirpath, filename) if os.path.splitext(file)[1] not in White_list: #print file path_list.append(file) return path_list #使用文件迭代器,循环获取数据 def md5sum(file): m=hashlib.md5() if os.path.isfile(file): f=open(file,'rb') for line in f: m.update(line) f.close else: m.update(file) return (m.hexdigest()) def Get_md5result(webpath): pathlist=GetFile(webpath) md5_file={} for file in pathlist: md5_file[file]=md5sum(file) json_data=json.dumps(md5_file) fileObject = open('result.json', 'w') fileObject.write(json_data) fileObject.close() def load_data(json_file): model={} with open(json_file,'r') as json_file: model=json.load(json_file) return model def Analysis_dicts(dict1,dict2): keys1 = dict1.keys() keys2 = dict2.keys() ret1 = [ i for i in keys1 if i not in keys2] ret2 = [ i for i in keys2 if i not in keys1] print u"可能被删除的文件有:" for i in ret1: print i print u"新增的文件有:" for i in ret2: print i print u"可能被篡改的文件有:" ret3=list((set(keys1).union(set(keys2)))^(set(keys1)^set(keys2))) for key in ret3: if key in keys1 and key in keys2: if dict1[key] == dict2[key]: pass else: print key if __name__ == '__main__': webpath = raw_input("Please enter your web physical path, for example, c:\\wwww]. ").lower() Get_md5result(webpath) dict2=load_data("result.json") methodselect= raw_input("[?] Check the integrity of the file: [Y]es or [N]O (Y/N): ").lower() if methodselect == 'y': file=raw_input("Please enter the hash file path to be compared: ").lower() dict1=load_data(file) Analysis_dicts(dict1,dict2) elif methodselect == 'n': exit()

优秀的个人博客,低调大师

【Android Demo】通过WebService获取今日天气情况

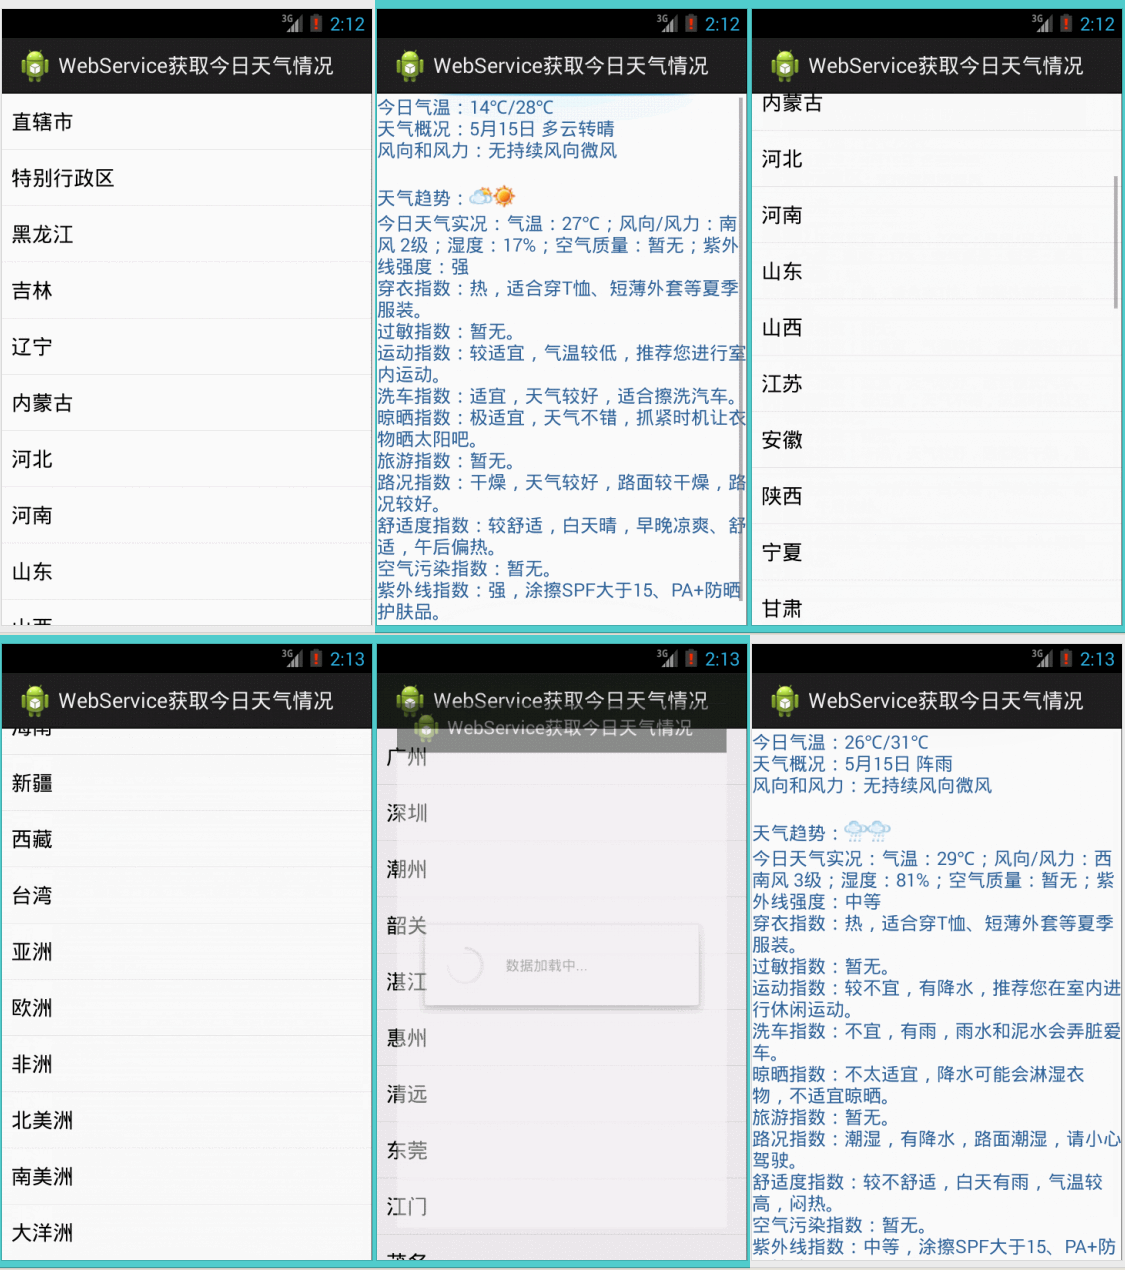
因为本身是在搞.NET方面的东东,现在在学习Android,所以想实现Android通过WebService接口来获取数据,网上很多例子还有有问题的。参考:Android 通过WebService进行网络编程,使用工具类轻松实现这篇博客,还是实现了通过一个公开的WebService获取今日天气情况这么一个功能。实现效果如下: 有时候我们需要用到WebService接口来获取数据,WebService是一种基于SOAP协议的远程调用标准,通过webservice可以将不同操作系统平台、不同语言、不同技术整合到一块。在Android SDK中并没有提供调用WebService的库,因此,需要使用第三方的SDK来调用WebService。PC版本的Webservice客户端库非常丰富,例如Axis2,CXF等,但这些开发包对于Android系统过于庞大,也未必很容易移植到Android系统中。因此,这些开发包并不是在我们的考虑范围内。适合手机的WebService客户端的SDK有一些,比较常用的有Ksoap2,可以从http://code.google.com/p/ksoap2-android/wiki/HowToUse?tm=2进行下载,将jar包加入到libs目录下就行了。http://www.webxml.com.cn/zh_cn/web_services.aspx这里面有一些免费的WebService接口,其中天气接口的地址为:http://www.webxml.com.cn/WebServices/WeatherWebService.asmx 下面是WebService方法图解: 具体代码可以看下实例,解释写的蛮清楚的:WebServiceTry.zip 本文转自叶超Luka博客园博客,原文链接:http://www.cnblogs.com/yc-755909659/p/3729955.html,如需转载请自行联系原作者

优秀的个人博客,低调大师

【Android Demo】获取指定网页的页面源代码

1.直接上效果图 2.代码 主要就是工具类HtmlService.java: import java.io.ByteArrayOutputStream; import java.io.InputStream; import java.net.HttpURLConnection; import java.net.URL; /** * 获取HTML数据 * * @author David * */ public class HtmlService { public static String getHtml(String path) throws Exception { // 通过网络地址创建URL对象 URL url = new URL(path); // 根据URL // 打开连接,URL.openConnection函数会根据URL的类型,返回不同的URLConnection子类的对象,这里URL是一个http,因此实际返回的是HttpURLConnection HttpURLConnection conn = (HttpURLConnection) url.openConnection(); // 设定URL的请求类别,有POST、GET 两类 conn.setRequestMethod("GET"); //设置从主机读取数据超时(单位:毫秒) conn.setConnectTimeout(5000); //设置连接主机超时(单位:毫秒) conn.setReadTimeout(5000); // 通过打开的连接读取的输入流,获取html数据 InputStream inStream = conn.getInputStream(); // 得到html的二进制数据 byte[] data = readInputStream(inStream); // 是用指定的字符集解码指定的字节数组构造一个新的字符串 String html = new String(data, "utf-8"); return html; } /** * 读取输入流,得到html的二进制数据 * * @param inStream * @return * @throws Exception */ public static byte[] readInputStream(InputStream inStream) throws Exception { ByteArrayOutputStream outStream = new ByteArrayOutputStream(); byte[] buffer = new byte[1024]; int len = 0; while ((len = inStream.read(buffer)) != -1) { outStream.write(buffer, 0, len); } inStream.close(); return outStream.toByteArray(); } } MainActivity.java修改如下: public class MainActivity extends Activity { private String path = "http://www.cnblogs.com/yc-755909659/"; @Override protected void onCreate(Bundle savedInstanceState) { super.onCreate(savedInstanceState); setContentView(R.layout.activity_main); TextView textView = (TextView)this.findViewById(R.id.textView); try { String htmlContent = HtmlService.getHtml(path); textView.setText(htmlContent); } catch (Exception e) { textView.setText("程序出现异常:"+e.toString()); } } } activity_main.xml很简单,还是放上来吧 <ScrollView xmlns:android="http://schemas.android.com/apk/res/android" android:layout_width="fill_parent" android:layout_height="fill_parent" > <TextView android:id="@+id/textView" android:layout_width="wrap_content" android:layout_height="wrap_content" /> </ScrollView> 最后,记得添加网络访问权限哦 <uses-permission android:name="android.permission.INTERNET"/> 本文转自叶超Luka博客园博客,原文链接:http://www.cnblogs.com/yc-755909659/p/4193947.html,如需转载请自行联系原作者

优秀的个人博客,低调大师

【Android Demo】Android中取得手机屏幕大小

先看效果图: 其实就是 DisplayMetrics类 的应用 ,代码如下: package yc.android.resolution;import android.app.Activity;import android.os.Bundle;import android.util.DisplayMetrics;import android.view.View;import android.widget.Button;import android.widget.TextView;public class TheResolutionActivity extends Activity {private TextView tv;private Button btn;// 获取手机屏幕分辨率的类 private DisplayMetrics dm;public void onCreate(Bundle savedInstanceState) {super.onCreate(savedInstanceState); setContentView(R.layout.main);// 获取布局中TextView,Button对像 tv = (TextView) findViewById(R.id.tv); btn = (Button) findViewById(R.id.btnOK);// 增加button事件响应 btn.setOnClickListener(new View.OnClickListener() {public void onClick(View v) { dm = new DisplayMetrics(); getWindowManager().getDefaultDisplay().getMetrics(dm);// 获得手机的宽度和高度像素单位为px String strPM = "手机屏幕分辨率为:" + dm.widthPixels + "* " + dm.heightPixels; tv.setText(strPM); } }); } } 也可以这样: package yc.android.resolution;import android.app.Activity;import android.os.Bundle;import android.view.Display;import android.view.View;import android.view.WindowManager;import android.widget.Button;import android.widget.TextView;public class TheResolutionActivity extends Activity {private TextView tv;private Button btn;public void onCreate(Bundle savedInstanceState) {super.onCreate(savedInstanceState); setContentView(R.layout.main);// 获取布局中TextView,Button对像 tv = (TextView) findViewById(R.id.tv); btn = (Button) findViewById(R.id.btnOK);// 增加button事件响应 btn.setOnClickListener(new View.OnClickListener() {public void onClick(View v) { WindowManager windowManager = getWindowManager(); Display dm = windowManager.getDefaultDisplay();// 获得手机的宽度和高度像素单位为px String strPM = "手机屏幕分辨率为:" + dm.getWidth() + "* " + dm.getHeight(); tv.setText(strPM); } }); } } 这两种方法都可以获取Android手机屏幕的分辨率的。 本文转自叶超Luka博客园博客,原文链接:http://www.cnblogs.com/yc-755909659/archive/2012/04/04/2432308.html,如需转载请自行联系原作者

优秀的个人博客,低调大师

阿里云物联网平台设备日志上报示例Demo

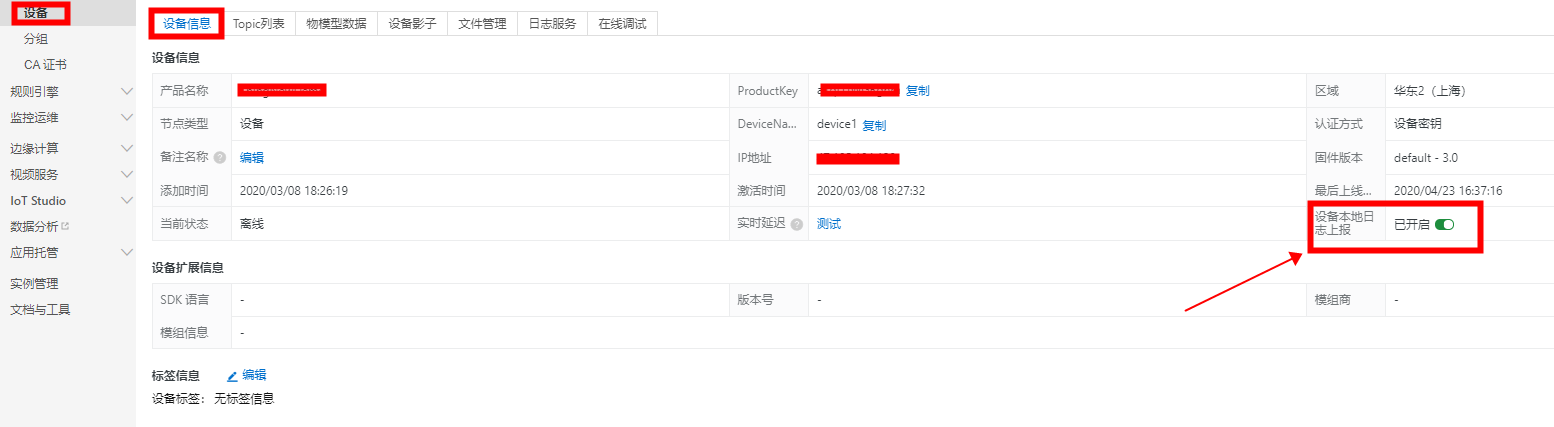
概述 物联网平台支持设备将本地日志上报到云端,在控制台进行查询和故障分析。在设备详情页,开启设备本地日志上报开关后,设备才能将本地日志上报到云端。 Step By Step 一、设备获取日志配置(通过该功能,设备端可以主动获取:设备本地日志上报开关的开启情况) 数据上行 - 请求Topic:/sys/${productKey}/${deviceName}/thing/config/log/get - 响应Topic:/sys/${productKey}/${deviceName}/thing/config/log/get_reply 1、设备端订阅:响应Topic2、设备端publish如下格式消息到服务端: { "id" : 123, "version":"1.0", "params" : { "configScope":"device", "getType":"content" }, "method":"thing.config.log.get" } 3、设备端即可获取设备本地日志上报开关的开启情况(mode为0表示未开启,mode为1表示开启) 4、Code Sample,参考链接:基于开源JAVA MQTT Client连接阿里云IoT import com.alibaba.taro.AliyunIoTSignUtil; import org.eclipse.paho.client.mqttv3.*; import org.eclipse.paho.client.mqttv3.persist.MemoryPersistence; import java.util.HashMap; import java.util.Map; public class IoTDemoPubSubDemoSLSGetPro { // 设备三元组信息 public static String productKey = "a1qLU******"; public static String deviceName = "device1"; public static String deviceSecret = "cA9wzIM6bL2QI6Dg****************"; public static String regionId = "cn-shanghai"; // 物模型-属性上报topic private static String pubTopic = "/sys/" + productKey + "/" + deviceName + "/thing/config/log/get"; // 自定义topic,在产品Topic列表位置定义 private static String subTopic = "/sys/" + productKey + "/" + deviceName + "/thing/config/log/get_reply"; private static MqttClient mqttClient; public static void main(String [] args){ initAliyunIoTClient(); postDeviceProperties(); try { mqttClient.subscribe(subTopic); // 订阅Topic } catch (MqttException e) { System.out.println("error:" + e.getMessage()); e.printStackTrace(); } // 设置订阅监听 mqttClient.setCallback(new MqttCallback() { @Override public void connectionLost(Throwable throwable) { System.out.println("connection Lost"); } @Override public void messageArrived(String s, MqttMessage mqttMessage) throws Exception { System.out.println("Sub message"); System.out.println("Topic : " + s); System.out.println(new String(mqttMessage.getPayload())); //打印输出消息payLoad } @Override public void deliveryComplete(IMqttDeliveryToken iMqttDeliveryToken) { } }); } /** * 初始化 Client 对象 */ private static void initAliyunIoTClient() { try { // 构造连接需要的参数 String clientId = "java" + System.currentTimeMillis(); Map<String, String> params = new HashMap<>(16); params.put("productKey", productKey); params.put("deviceName", deviceName); params.put("clientId", clientId); String timestamp = String.valueOf(System.currentTimeMillis()); params.put("timestamp", timestamp); // cn-shanghai String targetServer = "tcp://" + productKey + ".iot-as-mqtt."+regionId+".aliyuncs.com:1883"; String mqttclientId = clientId + "|securemode=3,signmethod=hmacsha1,timestamp=" + timestamp + "|"; String mqttUsername = deviceName + "&" + productKey; String mqttPassword = AliyunIoTSignUtil.sign(params, deviceSecret, "hmacsha1"); connectMqtt(targetServer, mqttclientId, mqttUsername, mqttPassword); } catch (Exception e) { System.out.println("initAliyunIoTClient error " + e.getMessage()); } } public static void connectMqtt(String url, String clientId, String mqttUsername, String mqttPassword) throws Exception { MemoryPersistence persistence = new MemoryPersistence(); mqttClient = new MqttClient(url, clientId, persistence); MqttConnectOptions connOpts = new MqttConnectOptions(); // MQTT 3.1.1 connOpts.setMqttVersion(4); connOpts.setAutomaticReconnect(false); connOpts.setConnectionTimeout(10); // connOpts.setCleanSession(true); connOpts.setCleanSession(false); connOpts.setUserName(mqttUsername); connOpts.setPassword(mqttPassword.toCharArray()); connOpts.setKeepAliveInterval(60); mqttClient.connect(connOpts); } /** * 汇报属性 */ private static void postDeviceProperties() { try { //上报数据 //高级版 物模型-属性上报payload System.out.println("上报设备日志:"); String payloadJson = "{\n" + " \"id\" : 123,\n" + " \"version\":\"1.0\",\n" + " \"params\" : {\n" + " \"configScope\":\"device\", \n" + " \"getType\":\"content\"\n" + " },\n" + " \"method\":\"thing.config.log.get\"\n" + "}"; MqttMessage message = new MqttMessage(payloadJson.getBytes("utf-8")); message.setQos(1); mqttClient.publish(pubTopic, message); } catch (Exception e) { System.out.println(e.getMessage()); } } } 5、Result: Sub message Topic : /sys/a1qLU******/device1/thing/config/log/get_reply {"code":200,"data":{"content":{"mode":1},"getType":"content"},"id":"123","method":"thing.config.log.get","version":"1.0"} 二、设备接收订阅云端推送日志配置 数据下行 - Topic:/sys/${productKey}/${deviceName}/thing/config/log/push 1、设备端订阅下行Topic; private static String subTopicSLS = "/sys/" + productKey + "/" + deviceName + "/thing/config/log/push"; mqttClient.subscribe(subTopicSLS); 2、平台修改:设备本地日志上报 开关状态 3、设备端监听情况 Sub message Topic : /sys/a1qLU******/device1/thing/config/log/push {"method":"thing.config.log.push","id":"1174554406","params":{"getType":"content","content":{"mode":0}},"version":"1.0"} 三、设备上报日志内容(与常规的物模型属性上报类似) 数据上行 - 请求Topic:/sys/${productKey}/${deviceName}/thing/log/post - 响应Topic:/sys/${productKey}/${deviceName}/thing/log/post_reply 1、向请求Topic上行消息,格式如下: { "id" : 123, "version":"1.0", "params" :[{ "utcTime": "2020-04-24T15:15:27.464+0800", "logLevel": "ERROR", "module": "ModuleA", "code" :"", "traceContext": "123456", "logContent" : "some log content" }], "method" : "thing.log.post" } 2、Code Sample /** * 上报设备日志 */ private static void postDeviceProperties() { try { //上报数据 //高级版 物模型-属性上报payload System.out.println("上报设备日志:"); String payloadJson = "{\n" + " \"id\" : 123,\n" + " \"version\":\"1.0\",\n" + " \"params\" :[{\n" + " \"utcTime\": \"2020-04-24T15:15:27.464+0800\", \n" + " \"logLevel\": \"ERROR\", \n" + " \"module\": \"ModuleA\", \n" + " \"code\" :\"\", \n" + " \"traceContext\": \"123456\", \n" + " \"logContent\" : \"some log content\" \n" + " }], \n" + " \"method\" : \"thing.log.post\"\n" + "}"; MqttMessage message = new MqttMessage(payloadJson.getBytes("utf-8")); message.setQos(1); mqttClient.publish(pubTopic, message); } catch (Exception e) { System.out.println(e.getMessage()); } } 3、控制台:设备本地日志查看 参考链接 设备日志上报设备本地日志基于开源JAVA MQTT Client连接阿里云IoT

优秀的个人博客,低调大师

IoT Studio服务开发MySQL数据流转示例Demo

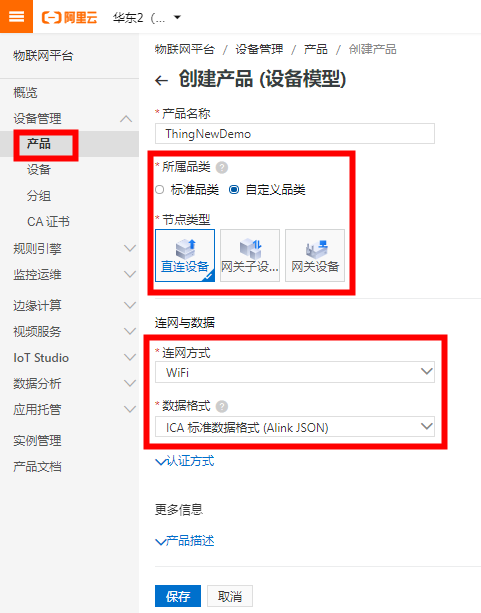
概述 阿里云物联网平台的规则引擎功能支持将数据流转到MySQL数据库,但是仅支持同区域(上海--华东二)的数据流转,这里介绍使用IoT Studio服务开发:云数据库MySQL节点,通过MySQL数据库的公网地址,完成跨区域的数据流转。 Step By Step 物联网产品及设备的创建 1、创建产品 2、导入物模型 model.json { "schema":"https://iotx-tsl.oss-ap-southeast-1.aliyuncs.com/schema.json", "profile":{ "productKey":"<替换为自己产品的productkey>" }, "properties":[ { "identifier":"Distance", "name":"距离", "accessMode":"rw", "required":false, "dataType":{ "type":"double", "specs":{ "min":"0", "max":"10000", "unit":"m", "step":"1" } } }, { "identifier":"GeoLocation", "name":"自定义地理位置", "accessMode":"rw", "required":false, "dataType":{ "type":"struct", "specs":[ { "identifier":"Longitude", "name":"经度", "dataType":{ "type":"double", "specs":{ "min":"-180", "max":"180", "unit":"°", "step":"0.01" } } }, { "identifier":"Latitude", "name":"纬度", "dataType":{ "type":"double", "specs":{ "min":"-90", "max":"90", "unit":"°", "step":"0.01" } } }, { "identifier":"CoordinateSystem", "name":"坐标系统", "dataType":{ "type":"enum", "specs":{ "1":"WGS_84", "2":"GCJ_02" } } } ] } }, { "identifier":"CellSignalStrength", "name":"信号强度", "accessMode":"r", "required":false, "dataType":{ "type":"int", "specs":{ "min":"-128", "max":"127", "unit":"dBm", "step":"1" } } } ], "events":[ { "identifier":"post", "name":"post", "type":"info", "required":true, "desc":"属性上报", "method":"thing.event.property.post", "outputData":[ { "identifier":"Distance", "name":"距离", "dataType":{ "type":"double", "specs":{ "min":"0", "max":"10000", "unit":"m", "step":"1" } } }, { "identifier":"GeoLocation", "name":"自定义地理位置", "dataType":{ "type":"struct", "specs":[ { "identifier":"Longitude", "name":"经度", "dataType":{ "type":"double", "specs":{ "min":"-180", "max":"180", "unit":"°", "step":"0.01" } } }, { "identifier":"Latitude", "name":"纬度", "dataType":{ "type":"double", "specs":{ "min":"-90", "max":"90", "unit":"°", "step":"0.01" } } }, { "identifier":"CoordinateSystem", "name":"坐标系统", "dataType":{ "type":"enum", "specs":{ "1":"WGS_84", "2":"GCJ_02" } } } ] } }, { "identifier":"CellSignalStrength", "name":"信号强度", "dataType":{ "type":"int", "specs":{ "min":"-128", "max":"127", "unit":"dBm", "step":"1" } } } ] } ], "services":[ { "identifier":"set", "name":"set", "required":true, "callType":"async", "desc":"属性设置", "method":"thing.service.property.set", "inputData":[ { "identifier":"Distance", "name":"距离", "dataType":{ "type":"double", "specs":{ "min":"0", "max":"10000", "unit":"m", "step":"1" } } }, { "identifier":"GeoLocation", "name":"自定义地理位置", "dataType":{ "type":"struct", "specs":[ { "identifier":"Longitude", "name":"经度", "dataType":{ "type":"double", "specs":{ "min":"-180", "max":"180", "unit":"°", "step":"0.01" } } }, { "identifier":"Latitude", "name":"纬度", "dataType":{ "type":"double", "specs":{ "min":"-90", "max":"90", "unit":"°", "step":"0.01" } } }, { "identifier":"CoordinateSystem", "name":"坐标系统", "dataType":{ "type":"enum", "specs":{ "1":"WGS_84", "2":"GCJ_02" } } } ] } } ], "outputData":[ ] }, { "identifier":"get", "name":"get", "required":true, "callType":"async", "desc":"属性获取", "method":"thing.service.property.get", "inputData":[ "Distance", "GeoLocation", "CellSignalStrength" ], "outputData":[ { "identifier":"Distance", "name":"距离", "dataType":{ "type":"double", "specs":{ "min":"0", "max":"10000", "unit":"m", "step":"1" } } }, { "identifier":"GeoLocation", "name":"自定义地理位置", "dataType":{ "type":"struct", "specs":[ { "identifier":"Longitude", "name":"经度", "dataType":{ "type":"double", "specs":{ "min":"-180", "max":"180", "unit":"°", "step":"0.01" } } }, { "identifier":"Latitude", "name":"纬度", "dataType":{ "type":"double", "specs":{ "min":"-90", "max":"90", "unit":"°", "step":"0.01" } } }, { "identifier":"CoordinateSystem", "name":"坐标系统", "dataType":{ "type":"enum", "specs":{ "1":"WGS_84", "2":"GCJ_02" } } } ] } }, { "identifier":"CellSignalStrength", "name":"信号强度", "dataType":{ "type":"int", "specs":{ "min":"-128", "max":"127", "unit":"dBm", "step":"1" } } } ] } ] } 注意: 替换自己产品的ProductKey 3、添加设备 IoT Studio绑定产品+设备 1、创建项目 2、项目创建完成后分别关联创建的产品和设备 3、新建业务服务 4、业务流程搭建 5、云数据库MySQL节点配置介绍 5.1 MySQL的版本 请使用MySQL5.7或MySQL5.6版本,其它版本兼容性会有问题,可能会出现连接异常。 5.2 参数配置 { "table": "iotdevice1", "rows": [ { "CellSignalStrength": "{{query.props.CellSignalStrength.value}}", "Distance": "{{query.props.Distance.value}}", "Longitude": "{{query.props.GeoLocation.value.Latitude}}", "Latitude": "{{query.props.GeoLocation.value.Longitude}}" } ] } 也可以是(注意节点Id按照具体节点情况修改): { "table": "iotdevice1", "rows": [ { "CellSignalStrength": "{{payload.props.CellSignalStrength.value}}", "Distance": "{{query.props.Distance.value}}", "Longitude": "{{query.props.GeoLocation.value.Latitude}}", "Latitude": "{{node.node_339cdef0.props.GeoLocation.value.Longitude}}" } ] } payload表示上一个节点输出参数;query表示输入节点的参数;node.nodeId表示指定某一节点的输出参数。 5.3 MySQL建表语句 /*------- CREATE SQL---------*/ CREATE TABLE `iotdevice1` ( `CellSignalStrength` int(11) DEFAULT NULL, `Distance` double DEFAULT NULL, `Longitude` double DEFAULT NULL, `Latitude` double DEFAULT NULL ) ENGINE=InnoDB DEFAULT CHARSET=utf8 设备在线模拟测试 1、部署调试 2、数据流转查看 3、流程测试正常后,发布即可 参考链接 云数据库MySQLIoT Studio 服务开发概述

资源下载

更多资源
Nacos

Nacos

Nacos /nɑ:kəʊs/ 是 Dynamic Naming and Configuration Service 的首字母简称,一个易于构建 AI Agent 应用的动态服务发现、配置管理和AI智能体管理平台。Nacos 致力于帮助您发现、配置和管理微服务及AI智能体应用。Nacos 提供了一组简单易用的特性集,帮助您快速实现动态服务发现、服务配置、服务元数据、流量管理。Nacos 帮助您更敏捷和容易地构建、交付和管理微服务平台。

Rocky Linux

Rocky Linux

Rocky Linux(中文名:洛基)是由Gregory Kurtzer于2020年12月发起的企业级Linux发行版,作为CentOS稳定版停止维护后与RHEL(Red Hat Enterprise Linux)完全兼容的开源替代方案,由社区拥有并管理,支持x86_64、aarch64等架构。其通过重新编译RHEL源代码提供长期稳定性,采用模块化包装和SELinux安全架构,默认包含GNOME桌面环境及XFS文件系统,支持十年生命周期更新。

Sublime Text

Sublime Text

Sublime Text具有漂亮的用户界面和强大的功能,例如代码缩略图,Python的插件,代码段等。还可自定义键绑定,菜单和工具栏。Sublime Text 的主要功能包括:拼写检查,书签,完整的 Python API , Goto 功能,即时项目切换,多选择,多窗口等等。Sublime Text 是一个跨平台的编辑器,同时支持Windows、Linux、Mac OS X等操作系统。

WebStorm

WebStorm

WebStorm 是jetbrains公司旗下一款JavaScript 开发工具。目前已经被广大中国JS开发者誉为“Web前端开发神器”、“最强大的HTML5编辑器”、“最智能的JavaScript IDE”等。与IntelliJ IDEA同源,继承了IntelliJ IDEA强大的JS部分的功能。

用户登录
用户注册