首页 文章 精选 留言 我的

精选列表

搜索[ios],共10000篇文章
优秀的个人博客,低调大师

[IOS]UITableView分区+索引显示

效果: 步骤: 1.创建一个ViewController,New File->Cocoa Touch->Objective-C class->Class:ViewController,Subclass of:UIViewController 2.打开xib,在view中添加TableView,并将TableView的两个属性拖到File's Owner中, 可以设置tableview的分区样式,选择style 3.ViewController.h: #import <UIKit/UIKit.h> @interface newViewController : UIViewController<UITableViewDataSource,UITableViewDelegate> @property (retain, nonatomic) IBOutlet UITableView *tableView; @property(retain,nonatomic)NSDictionary *dic; @property(retain,nonatomic)NSArray *keys; @end 4.ViewController.m: #import "newViewController.h" @interface newViewController () @end @implementation newViewController - (id)initWithNibName:(NSString *)nibNameOrNil bundle:(NSBundle *)nibBundleOrNil { self = [super initWithNibName:nibNameOrNil bundle:nibBundleOrNil]; if (self) { // Custom initialization } return self; } - (void)viewDidLoad { [super viewDidLoad]; NSString *path = [[NSBundle mainBundle] pathForResource:@"sortednames" ofType:@"plist"]; self.dic = [NSDictionary dictionaryWithContentsOfFile:path]; self.keys = [self.dic allKeys]; self.keys = [self.keys sortedArrayUsingSelector:@selector(compare:)]; } //tableView有多少分区 -(NSInteger)numberOfSectionsInTableView:(UITableView *)tableView { return [self.keys count]; } //每个分区对应多少行 -(NSInteger)tableView:(UITableView *)tableView numberOfRowsInSection:(NSInteger)section { NSString *key = self.keys[section];//通过第几个分区拿到对应的key NSArray *arr = [self.dic objectForKey:key];//通过这个key获得对应的Array return [arr count]; } -(UITableViewCell *)tableView:(UITableView *)tableView cellForRowAtIndexPath:(NSIndexPath *)indexPath { static NSString *str = @"str"; UITableViewCell *cell = [tableView dequeueReusableCellWithIdentifier:str]; if (cell == nil) { cell = [[UITableViewCell alloc] initWithStyle:UITableViewCellStyleDefault reuseIdentifier:str]; } int section = [indexPath section]; int row = [indexPath row]; NSString *key = self.keys[section]; NSArray *arr = [self.dic objectForKey:key]; cell.textLabel.text = arr[row]; return cell; } //在每个分区上显示什么内容 -(NSString *)tableView:(UITableView *)tableView titleForHeaderInSection:(NSInteger)section { return self.keys[section]; } - (void)didReceiveMemoryWarning { [super didReceiveMemoryWarning]; // Dispose of any resources that can be recreated. } //设置索引 -(NSArray *)sectionIndexTitlesForTableView:(UITableView *)tableView { return self.keys; } - (void)dealloc { [_tableView release]; [self.keys release]; [self.dic release]; [super dealloc]; } @end 本文转蓬莱仙羽51CTO博客,原文链接:http://blog.51cto.com/dingxiaowei/1366428,如需转载请自行联系原作者

优秀的个人博客,低调大师

iOS自定义键盘

对于有输入功能的控件,例如UITextField,可以给控件的inputView属性赋值,实现自定义键盘的功能 UIView*view=[[UIViewalloc]initWithFrame:CGRectMake(0,0,[UIScreenmainScreen].bounds.size.width,300)];UIButton*button=[[UIButtonalloc]initWithFrame:CGRectMake(10,10,50,50)]; [buttonsetTitle:@"1"forState:UIControlStateNormal]; button.backgroundColor=[UIColorwhiteColor]; [buttonsetTitleColor:[UIColorblackColor]forState:UIControlStateNormal]; [viewaddSubview:button]; [buttonaddTarget:selfaction:@selector(touchAction)forControlEvents:UIControlEventTouchUpInside]; _textField.inputView=view; 点击下载DEMO 也可以给控件的inputAccessoryView赋值UIToolbar的对象设置工具条。 如果结合第三方键盘监听事件的库IQKeyboard的话,效果更好。 本文转自 卓行天下 51CTO博客,原文链接:http://blog.51cto.com/9951038/1766790,如需转载请自行联系原作者

优秀的个人博客,低调大师

iOS NSNotificationCenter 使用姿势详解

最近在做平板的过程中,发现了一些很不规范的代码。偶然修复支付bug的时候,看到其他项目代码,使用通知的地方没有移除,我以为我这个模块的支付闪退是因为他通知没有移除的缘故。而在debug和看了具体的代码的时候才发现和这里没有关系。在我印象中,曾经因为没有移除通知而遇到闪退的问题。所以让我很意外,于是写了个demo研究了下,同时来讲下NSNotificationCenter使用的正确姿势。 NSNotificationCenter 对于这个没必要多说,就是一个消息通知机制,类似广播。观察者只需要向消息中心注册感兴趣的东西,当有地方发出这个消息的时候,通知中心会发送给注册这个消息的对象。这样也起到了多个对象之间解耦的作用。苹果给我们封装了这个NSNotificationCenter,让我们可以很方便的进行通知的注册和移除。然而,有些人的姿势还是有点小问题的,下面就看看正确的姿势吧! 正确姿势之remove 只要往NSNotificationCenter注册了,就必须有remove的存在,这点是大家共识的。但是大家在使用的时候发现,在UIViewController中addObserver后没有移除,好像也没有挂!我想很多人可能和我有一样的疑问,是不是因为使用了ARC?在你对象销毁的时候自动置为nil了呢?或者苹果在实现这个类的时候用了什么神奇的方式呢?下面我们就一步步来探究下。 首先,向NSNotificationCenter中addObserver后,并没有对这个对象进行引用计数加1操作,所以它只是保存了地址。为了验证这个操作,我们来做下代码的测试。 一个测试类,用来注册通知: @implementationMRCObject-(id)init {if(self=[superinit]){ [[NSNotificationCenterdefaultCenter]addObserver:selfselector:@selector(test)name:@"test"object:nil]; }returnself; } -(void)test {NSLog(@"================="); } -(void)dealloc { [superdealloc]; }@end 这个类很简单,就是在初始化的时候,给他注册一个通知。但是在销毁的时候不进行remove操作。我们在VC中创建这个对象后,然后销毁,最后发送这个通知: -(void)viewDidLoad{ [superviewDidLoad]; MRCObject*obj=[[MRCObjectalloc]init]; [objrelease]; [[NSNotificationCenterdefaultCenter]postNotificationName:@"test"object:nil]; } 在进入这个vc后,我们发现挂了。。而打印出的信息是: 2015-01-1922:49:06.655测试[1158:286268]***-[MRCObjecttest]:messagesenttodeallocatedinstance0x17000e5b0 我们可以发现,向野指针对象发送了消息,所以挂掉了。从这点来看,苹果实现也基本差不多是这样的,只保存了个对象的地址,并没有在销毁的时候置为nil。 这点就可以证明,addObserver后,必须要有remove操作。 现在我们在UIViewController中注册通知,不移除,看看会不会挂掉。 -(void)viewDidLoad{ [superviewDidLoad]; [[NSNotificationCenterdefaultCenter]addObserver:selfselector:@selector(test)name:@"test"object:nil]; } 首先用navigationController进入到这个页面,然后pop出去。最后点击发送通知的按钮事件: -(void)didButtonClicked:(id)sender { [[NSNotificationCenterdefaultCenter]postNotificationName:@"test"object:nil]; } 无论你怎么点击这个按钮,他就是不挂!这下,是不是很郁闷了?我们可以找找看,你代码里面没有remove操作,但是NSNotificationCenter那边已经移除了,不然肯定会出现上面野指针的问题。看来看去,也只能说明是UIViewController自己销毁的时候帮我们暗地里移除了。 那我们如何证明呢?由于我们看不到源码,所以也不知道有没有调用。这个时候,我们可以从这个通知中心下手!!!怎么下手呢?我只要证明UIViewController在销毁的时候调用了remove方法,就可以证明我们的猜想是对的了!这个时候,就需要用到我们强大的类别这个特性了。我们为NSNotificationCenter添加个类别,重写他的- (void)removeObserver:(id)observer方法: -(void)removeObserver:(id)observer {NSLog(@"====%@remove===",[observerclass]); } 这样在我们VC中导入这个类别,然后pop出来,看看发生了什么! 2015-01-1922:59:00.580测试[1181:288728]====TestViewControllerremove=== 怎么样?是不是可以证明系统的UIViewController在销毁的时候调用了这个方法。(不建议大家在开发的时候用类别的方式覆盖原有的方法,由于类别方法具有更高的优先权,所以有可能影响到其他地方。这里只是调试用)。 以上也提醒我们,在你不是销毁的时候,千万不要直接调用[[NSNotificationCenter defaultCenter] removeObserver:self];这个方法,因为你有可能移除了系统注册的通知。 正确姿势之注意重复addObserver 在我们开发中,我们经常可以看到这样的代码: -(void)viewWillAppear:(BOOL)animated { [superviewWillAppear:animated];[[NSNotificationCenterdefaultCenter]addObserver:selfselector:@selector(test)name:@"test"object:nil]; }-(void)viewWillDisappear:(BOOL)animated { [superviewWillDisappear:animated];[[NSNotificationCenterdefaultCenter]removeObserver:selfname:@"test"object:nil]; } 就是在页面出现的时候注册通知,页面消失时移除通知。你这边可要注意了,一定要成双成对出现,如果你只在viewWillAppear 中 addObserver没有在viewWillDisappear 中 removeObserver那么当消息发生的时候,你的方法会被调用多次,这点必须牢记在心。 正确姿势之多线程通知 首先看下苹果的官方说明: Regular notification centers deliver notifications on the thread in which the notification was posted. Distributed notification centers deliver notifications on the main thread. At times, you may require notifications to be delivered on a particular thread that is determined by you instead of the notification center. For example, if an object running in a background thread is listening for notifications from the user interface, such as a window closing, you would like to receive the notifications in the background thread instead of the main thread. In these cases, you must capture the notifications as they are delivered on the default thread and redirect them to the appropriate thread. 意思很简单,NSNotificationCenter消息的接受线程是基于发送消息的线程的。也就是同步的,因此,有时候,你发送的消息可能不在主线程,而大家都知道操作UI必须在主线程,不然会出现不响应的情况。所以,在你收到消息通知的时候,注意选择你要执行的线程。下面看个示例代码 //接受消息通知的回调-(void)test {if([[NSThreadcurrentThread]isMainThread]){NSLog(@"main"); }else{NSLog(@"notmain"); }dispatch_async(dispatch_get_main_queue(),^{//doyourUI }); }//发送消息的线程-(void)sendNotification {dispatch_queue_tdefaultQueue=dispatch_get_global_queue(DISPATCH_QUEUE_PRIORITY_DEFAULT,0);dispatch_async(defaultQueue,^{ [[NSNotificationCenterdefaultCenter]postNotificationName:@"test"object:nil]; }); } 总结 通知平常使用的知识点差不多就这么多。希望对大家有帮助。最后,代码一定要养成良好的习惯,该移除的还是要移除。 文/JamesYu(简书作者) 原文链接:http://www.jianshu.com/p/a4d519e4e0d5 著作权归作者所有,转载请联系作者获得授权,并标注“简书作者”。 本文转自ljianbing51CTO博客,原文链接:http://blog.51cto.com/ljianbing/1845513,如需转载请自行联系原作者

优秀的个人博客,低调大师

ios要求检测飞行模式

项目有需求,要求检测飞行模式,如果是飞行模式提醒用户修改状态... qq.png uc.png wx.png wy.png wyy.png 这些图片是我其他app所做出的提醒,毕竟苹果提供给开发者可用的状态太少了 typedefenum:NSInteger{ NotReachable=0, ReachableViaWiFi, ReachableViaWWAN }NetworkStatus; 就这几种,所以查了下大家都是怎么解决的,stackoverflow上有人问过... 私有的api咱们是不可能使用的,毕竟公司的项目要是不能上传appStore哪玩笑可就开大了.. 折中办法, Paste_Image.png 好吧,不管怎么说,大概的效果是实现了,和其他app的提醒一样关闭飞行或者打开wifi... 本文转自 卓行天下 51CTO博客,原文链接:http://blog.51cto.com/9951038/1747014,如需转载请自行联系原作者

优秀的个人博客,低调大师

ios33--线程通信

// // ViewController.m // 06-掌握-线程间通信 // // atomic:为set方法加锁,线程安全,需要消耗资源。 // nonatomic:不为set方法加锁,非线程安全,适合内存小的移动设备 // #import "ViewController.h" @interface ViewController () @property (weak, nonatomic) IBOutlet UIImageView *imageView; @end @implementation ViewController #pragma mark ---------------------- #pragma Events -(void)touchesBegan:(NSSet<UITouch *> *)touches withEvent:(UIEvent *)event { [NSThread detachNewThreadSelector:@selector(download) toTarget:self withObject:nil]; } #pragma mark ---------------------- #pragma Methods //开子线程下载图片,回到主线程刷新UI -(void)download { //1.确定URL NSURL *url = [NSURL URLWithString:@"/Users/mctc/Desktop/Snip20170907_1.png"]; //2.根据url下载图片二进制数据到本地 NSData *imageData = [NSData dataWithContentsOfURL:url]; //3.转换图片格式 UIImage *image = [UIImage imageWithData:imageData]; NSLog(@"download----%@",[NSThread currentThread]); //self.imageView.image = image;//不可以显示图片,子线程不能刷新UI //4.回到主线程显示UI //waitUntilDone:是否等待,YES表示performSelectorOnMainThread方法执行完之后,代码才能向下走。 [self performSelectorOnMainThread:@selector(showImage:) withObject:image waitUntilDone:NO]; [self performSelector:@selector(showImage:) onThread:[NSThread mainThread] withObject:image waitUntilDone:YES]; [self.imageView performSelectorOnMainThread:@selector(setImage:) withObject:image waitUntilDone:YES]; NSLog(@"---end---"); } //计算代码段执行时间的第一种方法 -(void)download1 { //0.000018 //0.166099 //1.确定URL NSURL *url = [NSURL URLWithString:@"http://img4.duitang.com/uploads/blog/201310/18/20131018213446_smUw4.thumb.700_0.jpeg"]; NSDate *start = [NSDate date]; //获得当前的时间 //2.根据url下载图片二进制数据到本地 NSData *imageData = [NSData dataWithContentsOfURL:url]; NSDate *end = [NSDate date]; //获得当前的时间 NSLog(@"%f",[end timeIntervalSinceDate:start]); //3.转换图片格式 UIImage *image = [UIImage imageWithData:imageData]; //4.显示UI self.imageView.image = image; } //计算代码段执行时间的第二种方法 -(void)download2 { //1.确定URL NSURL *url = [NSURL URLWithString:@"http://img4.duitang.com/uploads/blog/201310/18/20131018213446_smUw4.thumb.700_0.jpeg"]; CFTimeInterval start = CFAbsoluteTimeGetCurrent(); //2.根据url下载图片二进制数据到本地 NSData *imageData = [NSData dataWithContentsOfURL:url]; CFTimeInterval end = CFAbsoluteTimeGetCurrent(); NSLog(@"end-start = %f---%f---%f",end - start,end,start); //3.转换图片格式 UIImage *image = [UIImage imageWithData:imageData]; //4.显示UI self.imageView.image = image; } //更新UI操作 -(void)showImage:(UIImage *)image { self.imageView.image = image; NSLog(@"UI----%@",[NSThread currentThread]); } @end 本文转自农夫山泉别墅博客园博客,原文链接:http://www.cnblogs.com/yaowen/p/7493613.html,如需转载请自行联系原作者

优秀的个人博客,低调大师

iOS JSPatch 热修复使用

概述 一说到热修复,可能很多人会觉得应该很复杂,很难用(我以前是这么觉得的。。。),实际使用起来蛮简单的,这里以一个小demo演示热修复是如何修复崩溃的,具体更深入的用法,可以看这个https://github.com/bang590/JSPatch/wiki/JSPatch-%E5%9F%BA%E7%A1%80%E7%94%A8%E6%B3%95 使用 1.下载SDK 打开JSPatch网站,下载SDK:http://jspatch.com/Index/sdk 2.导入依赖库 新建一个项目,名为JSPatchDemo,将下载后的JavaScriptCore.framework文件拖到项目中,并导入libz.dylib(或libz.tbd) 和 JavaScriptCore.framework 在AppDelegate里配置,startWithAppKey需要配上自己的Key,在第三步会详细介绍。 -(BOOL)application:(UIApplication*)applicationdidFinishLaunchingWithOptions:(NSDictionary*)launchOptions{//Overridepointforcustomizationafterapplicationlaunch. [JSPatchstartWithAppKey:@"你的APPKey"]; //用来检测回调的状态,是更新或者是执行脚本之类的,相关信息,会打印在你的控制台 [JSPatchsetupCallback:^(JPCallbackTypetype,NSDictionary*data,NSError*error){ }]; [JSPatchsetupDevelopment]; [JSPatchsync]; returnYES; } 在ViewController里写上一个方法为jsPatchTest,用于改变文本的文字。 #import"ViewController.h"@interfaceViewController() @property(nonatomic,strong)UILabel*label;@end@implementationViewController-(void)viewDidLoad{ [superviewDidLoad]; _label=[[UILabelalloc]init]; _label.font=[UIFontsystemFontOfSize:14]; _label.frame=CGRectMake(50,100,150,50); _label.backgroundColor=[UIColoryellowColor]; [self.viewaddSubview:_label]; [selfjsPatchTest]; }-(void)jsPatchTest{ self.label.text=@"哈哈哈哈哈哈"; }@end 3、获取AppKey并发布 打开JSPatch官网点击左上角注册 ->http://www.jspatch.com/ 点新增APP,随便填写APP名,如: 将AppKey填写到AppDelegate--StartWithAppKey中 点击添加版本,填写和工程目录的一致,如1.0 创建一个main.js文件并在里面写上以下代码 defineClass('ViewController',{ jsPatchTest:function(){ self.label().setText("label的text被改掉了"); }, }) 发布补丁 再次重新打开app,你会发现,会报http的错。。。在info.plist里加上如下代码,允许http访问 <key>NSAppTransportSecurity</key> <dict> <key>NSAllowsArbitraryLoads</key> <true/> </dict> 总结 总体使用还是比较简单的,更多功能可以去文档中发掘 补充 1、可能很多人都不会写js补丁,好在JSPatch作者还为我们准备了另一个工具。http://bang590.github.io/JSPatchConvertor/ 这个工具可以帮助我们转换OC代码为JS 2、JS一定要加密,下面是方法截图和文档: 文档:http://jspatch.com/Docs/rsa 本文转自ljianbing51CTO博客,原文链接:http://blog.51cto.com/ljianbing/1863988,如需转载请自行联系原作者

优秀的个人博客,低调大师

ios21--xib例子

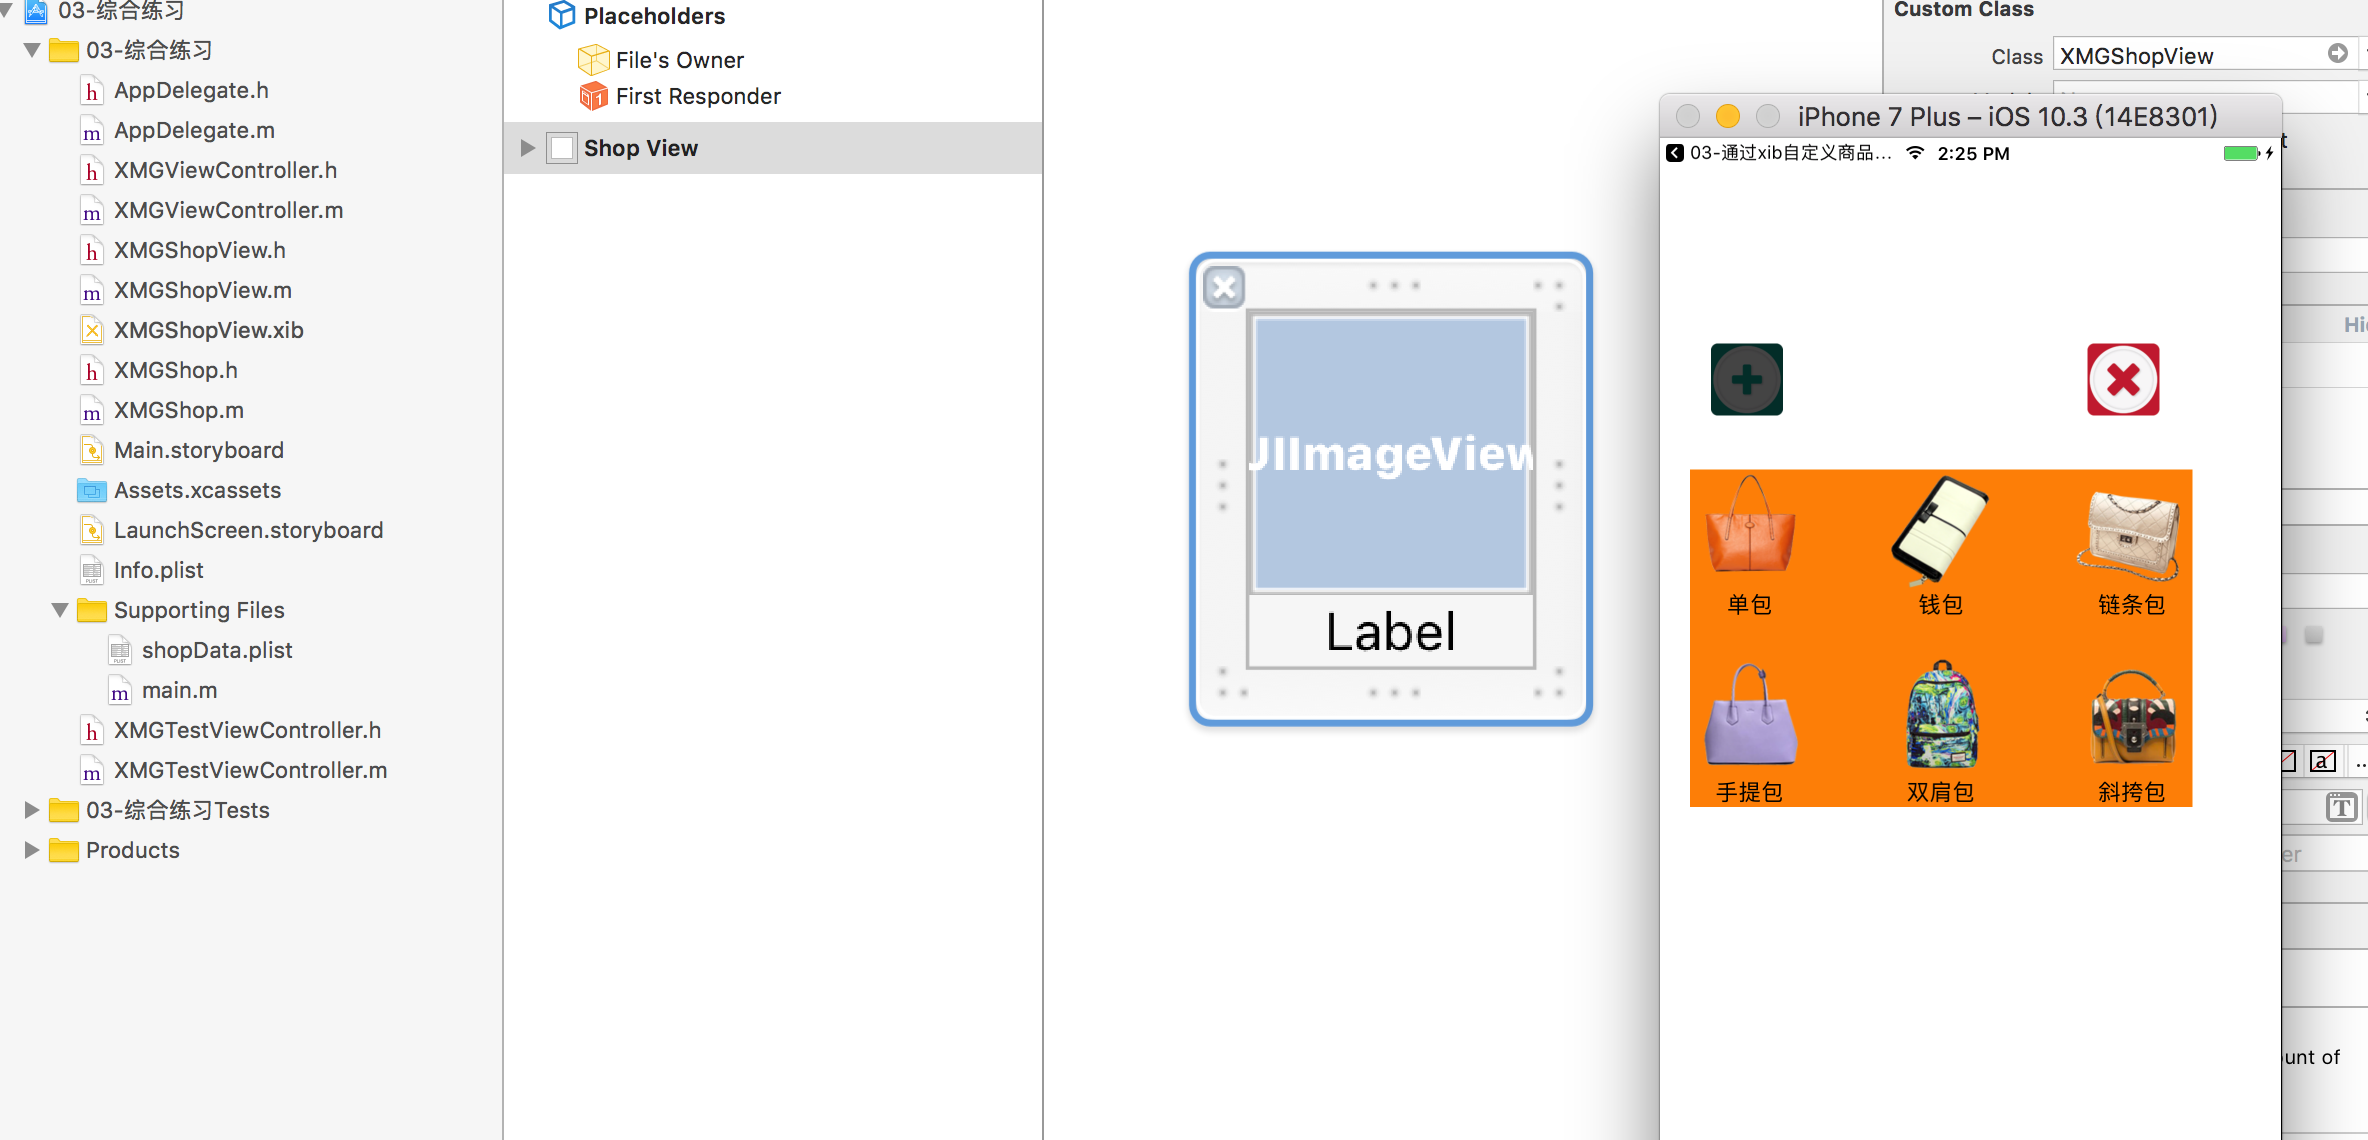
故事板控制器: // // XMGViewController.m // 03-综合练习 // // Created by xiaomage on 15/12/28. // Copyright © 2015年 小码哥. All rights reserved. // #import "XMGViewController.h" #import "XMGShop.h" #import "XMGShopView.h" @interface XMGViewController () // 购物车 @property (weak, nonatomic) IBOutlet UIView *shopCarView; // 添加按钮 @property (weak, nonatomic) IBOutlet UIButton *addButton; // 删除按钮 @property (weak, nonatomic) IBOutlet UIButton *removeButton; /** 数据数组 */ @property (nonatomic, strong) NSArray *dataArr; @end @implementation XMGViewController /** * 懒加载 */ - (NSArray *)dataArr{ if (_dataArr == nil) { // 加载数据 // 1.获取全路径 NSString *dataPath = [[NSBundle mainBundle] pathForResource:@"shopData.plist" ofType:nil]; self.dataArr = [NSArray arrayWithContentsOfFile:dataPath]; // 字典转模型 // 创建临时数组 NSMutableArray *tempArray = [NSMutableArray array]; for (NSDictionary *dict in _dataArr) { // 创建shop对象 XMGShop *shop = [XMGShop shopWithDict:dict]; // 把模型装入数组 [tempArray addObject:shop]; } self.dataArr = tempArray; } return _dataArr; } // 初始化数据 - (void)viewDidLoad { [super viewDidLoad]; } /** * 添加到购物车 * * @param button 按钮 */ - (IBAction)add:(UIButton *)button { /***********************1.定义一些常量*****************************/ // 1.总列数 NSInteger allCols = 3; // 2.商品的宽度 和 高度 CGFloat width = 80; CGFloat height = 100; // 3.求出水平间距 和 垂直间距 CGFloat hMargin = (self.shopCarView.frame.size.width - allCols * width) / (allCols -1); CGFloat vMargin = (self.shopCarView.frame.size.height - 2 * height) / 1; // 4. 设置索引 NSInteger index = self.shopCarView.subviews.count; // 5.求出x值 CGFloat x = (hMargin + width) * (index % allCols); CGFloat y = (vMargin + height) * (index / allCols); /***********************2.创建一个商品*****************************/ XMGShopView *shopView = [XMGShopView shopView]; shopView.frame = CGRectMake(x, y, width, height); // 设置数据 shopView.shop = self.dataArr[index];//set方法 [self.shopCarView addSubview:shopView]; /***********************4.设置按钮的状态*****************************/ button.enabled = (index != 5); // 5.设置删除按钮的状态 self.removeButton.enabled = YES; } /** * 从购物车中删除 * * @param button 按钮 */ - (IBAction)remove:(UIButton *)button { // 1. 删除最后一个商品 UIView *lastShopView = [self.shopCarView.subviews lastObject]; [lastShopView removeFromSuperview]; // 3. 设置添加按钮的状态 self.addButton.enabled = YES; // 4. 设置删除按钮的状态 self.removeButton.enabled = (self.shopCarView.subviews.count != 0); } @end xib界面: xib界面对应的类: // // XMGShopView.h #import <UIKit/UIKit.h> @class XMGShop; @interface XMGShopView : UIView /** 数据模型 */ @property (nonatomic, strong) XMGShop *shop; // 快速构造方法 + (instancetype)shopView; @end // // XMGShopView.m #import "XMGShopView.h" #import "XMGShop.h" @interface XMGShopView () @property (weak, nonatomic) IBOutlet UIImageView *iconView;//跟xib界面连线了的 @property (weak, nonatomic) IBOutlet UILabel *titlelabel;//跟xib界面连线了的 @end @implementation XMGShopView + (instancetype)shopView{ //return [[[NSBundle mainBundle] loadNibNamed:@"XMGShopView" owner:nil options:nil] firstObject]; //XMGShopView是xib的名字 return [[[NSBundle mainBundle] loadNibNamed:NSStringFromClass(self) owner:nil options:nil] firstObject]; } //- (void)awakeFromNib //加子控件 - (void)setShop:(XMGShop *)shop{ _shop = shop; // 设置界面图片和文字 self.iconView.image = [UIImage imageNamed:shop.icon]; self.titlelabel.text = shop.name; } @end xib界面的数据bean类: // // XMGShop.h // 03-综合练习 // // Created by xiaomage on 15/12/29. // Copyright © 2015年 小码哥. All rights reserved. // #import <Foundation/Foundation.h> @interface XMGShop : NSObject /** 图片的名称 */ @property (nonatomic, copy) NSString *icon; /** 商品的名称 */ @property (nonatomic, copy) NSString *name; // 提供构造方法 /* - (instancetype)initWithIcon: (NSString *)icon name: (NSString *)name; + (instancetype)shopWithIcon: (NSString *)icon name: (NSString *)name; */ - (instancetype)initWithDict:(NSDictionary *)dict; + (instancetype)shopWithDict:(NSDictionary *)dict; @end // // XMGShop.m // 03-综合练习 // // Created by xiaomage on 15/12/29. // Copyright © 2015年 小码哥. All rights reserved. // #import "XMGShop.h" @implementation XMGShop /* - (instancetype)initWithIcon:(NSString *)icon name:(NSString *)name{ if (self = [super init]) { self.icon = icon; self.name = name; } return self; } + (instancetype)shopWithIcon:(NSString *)icon name:(NSString *)name{ return [[self alloc] initWithIcon:icon name:name]; } */ - (instancetype)initWithDict:(NSDictionary *)dict{ if (self = [super init]) { self.icon = dict[@"icon"]; self.name = dict[@"name"]; } return self; } + (instancetype)shopWithDict:(NSDictionary *)dict{ return [[self alloc] initWithDict:dict]; } @end 故事板: 本文转自农夫山泉别墅博客园博客,原文链接:http://www.cnblogs.com/yaowen/p/7469541.html,如需转载请自行联系原作者

资源下载

更多资源
Mario

Mario

马里奥是站在游戏界顶峰的超人气多面角色。马里奥靠吃蘑菇成长,特征是大鼻子、头戴帽子、身穿背带裤,还留着胡子。与他的双胞胎兄弟路易基一起,长年担任任天堂的招牌角色。

Nacos

Nacos

Nacos /nɑ:kəʊs/ 是 Dynamic Naming and Configuration Service 的首字母简称,一个易于构建 AI Agent 应用的动态服务发现、配置管理和AI智能体管理平台。Nacos 致力于帮助您发现、配置和管理微服务及AI智能体应用。Nacos 提供了一组简单易用的特性集,帮助您快速实现动态服务发现、服务配置、服务元数据、流量管理。Nacos 帮助您更敏捷和容易地构建、交付和管理微服务平台。

Rocky Linux

Rocky Linux

Rocky Linux(中文名:洛基)是由Gregory Kurtzer于2020年12月发起的企业级Linux发行版,作为CentOS稳定版停止维护后与RHEL(Red Hat Enterprise Linux)完全兼容的开源替代方案,由社区拥有并管理,支持x86_64、aarch64等架构。其通过重新编译RHEL源代码提供长期稳定性,采用模块化包装和SELinux安全架构,默认包含GNOME桌面环境及XFS文件系统,支持十年生命周期更新。

Sublime Text

Sublime Text

Sublime Text具有漂亮的用户界面和强大的功能,例如代码缩略图,Python的插件,代码段等。还可自定义键绑定,菜单和工具栏。Sublime Text 的主要功能包括:拼写检查,书签,完整的 Python API , Goto 功能,即时项目切换,多选择,多窗口等等。Sublime Text 是一个跨平台的编辑器,同时支持Windows、Linux、Mac OS X等操作系统。

用户登录
用户注册
修改密码
忘记密码