首页 文章 精选 留言 我的

精选列表

搜索[ios],共10000篇文章
优秀的个人博客,低调大师

iOS 辛格尔顿

单例模式: 为什么使用单例,单例模式的用途是什么?以下我们举一个样例来诠释一下 举个大家都熟知的样例——Windows任务管理器,如图,我们能够做一个这种尝试,在Windows的“任务栏”的右键弹出菜单上多次点击“启动任务管理器”。看是否能打开多个任务管理器窗体?通常情况下,不管我们启动任务管理多少次。Windows系统始终仅仅能弹出一个任务管理器窗体。也就是说在一个Windows系统中。任务管理器存在唯一性。为什么要这样设计呢?我们能够从下面两个方面来分析:其一,假设能弹出多个窗体,且这些窗体的内容全然一致,所有是反复对象,这势必会浪费系统资源。任务管理器须要获取系统执行时的诸多信息。这些信息的获取须要消耗一定的系统资源。包含CPU资源及内存资源等,浪费是可耻的。并且根本没有必要显示多个内容全然同样的窗体;其二,假设弹出的多个窗体内容不一致,问题就更加严重了,这意味着在某一瞬间系统资源使用情况和进程、服务等信息存在多个状态。比如任务管理器窗体A显示“CPU使用率”为10%,窗体B显示“CPU使用率”为15%,究竟哪个才是真实的呢?这纯属“调戏”用户,给用户带来误解,更不可取。由此可见,确保Windows任务管理器在系统中有且仅有一个很重要。 回到实际开发中,我们也常常遇到类似的情况,为了节约系统资源,有时须要确保系统中某个类仅仅有唯一一个实例,当这个唯一实例创建成功之后,我们无法再创建一个同类型的其它对象,全部的操作都仅仅能基于这个唯一实例。为了确保对象的唯一性,我们能够通过单例模式来实现。这就是单例模式的动机所在。 以下单例模式的几种写法: 在这里创建了一个Person类继承与NSObject .h文件 // Person.h // 单例模式Singleton // Copyright (c) 2014年summer2014mht@sina.com. All rights reserved. #import<Foundation/Foundation.h> @interfacePerson :NSObject //单例:一个类仅仅有一个实例,在外部创建对象时,不能用alloc.(仅仅要alloc.就会在堆区开辟空间,就意味着有多个对象). //所以我们要提供一个创建对象的方法.并且是一个+号方法 //default, standard, main, shared开头的都是单例 + (Person*)sharedPerson; @end .m文件 // Person.m // 单例模式Singleton // Copyright (c) 2014年summer2014mht@sina.com. All rights reserved. #import"Person.h" @implementationPerson /* //写法一 + (Person *)sharedPerson { //声明为static ,保证该变量在程序执行期间空间都不会回收.并且保证仅仅初始化一次 //单例的空间在程序执行期间都不会回收,所以要慎重使用单例,否则会造成内存堆积 static Person *person = nil; @synchronized(self){ if (person == nil) { person = [[Person alloc] init]; } } return person; } */ //写法二(推荐使用) + (Person*)sharedPerson { staticPerson*person =nil; staticdispatch_once_tonceToken; dispatch_once(&onceToken, ^{ person = [[Personalloc]init]; }); returnperson; } @end 版权声明:本文博客原创文章,博客,未经同意,不得转载。 本文转自mfrbuaa博客园博客,原文链接:http://www.cnblogs.com/mfrbuaa/p/4757322.html,如需转载请自行联系原作者

优秀的个人博客,低调大师

iOS开发-UITableView常用方法

UITableView常用来展示数据,类似于Android中的ListView,相对于Android中的ListView而言,UITableView的实现是非常简单,继承UITableViewDataSource,UITableViewDelegate然后根据需要是实现对应的方法即可。UITableView有两个默认的内置风格,Plain和Grouped,Plain表明表格视图自身没有真正地在你自己实际地提供任何外观之前提供很多的外观,大部分情况下,它会做的唯一的事情是它会给你这些header和footer。Grouped表格视图是UIKit提供的分组风格。风格的话如果有特别的需求,还可以自定义分组的风格。 页面布局 页面比较简单,一个简单UITableView: 头文件中的不需要声明,需要实现一下协议: 1 2 3 @interface ViewController : UIViewController <UITableViewDataSource,UITableViewDelegate> @end Demo实现 声明三个数据用来展示数据: 1 2 3 4 5 6 7 @interface ViewController () { NSArray *channelArr; NSMutableArray *filmArr; NSMutableArray *tvArr; } @end 初始化数据: 1 2 3 4 5 6 7 - ( void )viewDidLoad { [ super viewDidLoad]; // Do any additional setup after loading the view, typically from a nib. channelArr=[[ NSArray alloc] initWithObjects:@ "电影" ,@ "电视剧" , nil ]; filmArr=[[ NSMutableArray alloc] initWithObjects:@ "智取威虎山" ,@ "一步之遥" ,@ "匆匆那年" ,@ "北京爱情故事" , nil ]; tvArr=[[ NSMutableArray alloc] initWithObjects:@ "何以笙箫默" ,@ "锋刃" ,@ "陆小凤与花满楼" ,@ "武媚娘传奇" , nil ]; } 设置分组的组数: 1 2 3 4 - ( NSInteger )numberOfSectionsInTableView:(UITableView *)tableView{ NSLog (@ "%lu" ,(unsigned long )channelArr.count); return [channelArr count]; } 设置分组的标题: 1 2 3 - ( NSString *)tableView:(UITableView *)tableView titleForHeaderInSection:( NSInteger )section{ return [channelArr objectAtIndex:section]; } 设置每个分组下内容的个数: 1 2 3 4 5 6 7 8 9 10 11 12 - ( NSInteger )tableView:(UITableView *)tableView numberOfRowsInSection:( NSInteger )section{ NSInteger count=0; switch (section) { case 0: count=[filmArr count]; break ; case 1: count=[tvArr count]; break ; } return count; } 设置每个分组下的具体内容: 1 2 3 4 5 6 7 8 9 10 11 12 - (UITableViewCell *)tableView:(UITableView *)tableView cellForRowAtIndexPath:( NSIndexPath *)indexPath{ UITableViewCell *cell =[[UITableViewCell alloc] initWithStyle:UITableViewCellStyleDefault reuseIdentifier: nil ]; switch (indexPath.section) { case 0: [cell.textLabel setText:[filmArr objectAtIndex:indexPath.row]]; break ; case 1: [cell.textLabel setText:[tvArr objectAtIndex:indexPath.row]]; break ; } return cell; } 设置分组标题和底部的高度: 1 2 3 4 5 6 - (CGFloat)tableView:(UITableView *)tableView heightForHeaderInSection:( NSInteger )section{ return 40; } - (CGFloat)tableView:(UITableView *)tableView heightForFooterInSection:( NSInteger )section{ return 0; } 设置点击事件: 1 2 3 4 5 6 7 8 9 10 11 12 13 - ( void )tableView:(UITableView *)tableView didSelectRowAtIndexPath:( NSIndexPath *)indexPath{ NSString *content; switch (indexPath.section) { case 0: content=[ NSString stringWithFormat:@ "%@-%@" ,channelArr[0],[filmArr objectAtIndex:indexPath.row]]; break ; case 1: content=[ NSString stringWithFormat:@ "%@-%@" ,channelArr[1],[tvArr objectAtIndex:indexPath.row]]; break ; } UIAlertView *alterView=[[UIAlertView alloc] initWithTitle:@ "当前位置:" message:content delegate: self cancelButtonTitle:@ "确定" otherButtonTitles: nil ]; [alterView show]; } 最终效果: 源代码: 1 2 3 4 5 6 7 8 9 10 11 12 13 14 15 16 17 18 19 20 21 22 23 24 25 26 27 28 29 30 31 32 33 34 35 36 37 38 39 40 41 42 43 44 45 46 47 48 49 50 51 52 53 54 55 56 57 58 59 60 61 62 63 64 65 66 67 68 69 70 71 72 73 74 75 76 77 78 79 80 81 82 83 84 85 86 87 88 89 90 91 92 93 // // ViewController.m // TableView //http://www.cnblogs.com/xiaofeixiang/ // Created by keso on 15/1/24. // Copyright (c) 2015年 keso. All rights reserved. // #import "ViewController.h" @interface ViewController () { NSArray *channelArr; NSMutableArray *filmArr; NSMutableArray *tvArr; } @end @implementation ViewController - ( void )viewDidLoad { [ super viewDidLoad]; // Do any additional setup after loading the view, typically from a nib. channelArr=[[ NSArray alloc] initWithObjects:@ "电影" ,@ "电视剧" , nil ]; filmArr=[[ NSMutableArray alloc] initWithObjects:@ "智取威虎山" ,@ "一步之遥" ,@ "匆匆那年" ,@ "北京爱情故事" , nil ]; tvArr=[[ NSMutableArray alloc] initWithObjects:@ "何以笙箫默" ,@ "锋刃" ,@ "陆小凤与花满楼" ,@ "武媚娘传奇" , nil ]; } //设置分组的组数 - ( NSInteger )numberOfSectionsInTableView:(UITableView *)tableView{ NSLog (@ "%lu" ,(unsigned long )channelArr.count); return [channelArr count]; } //设置分组的标题 - ( NSString *)tableView:(UITableView *)tableView titleForHeaderInSection:( NSInteger )section{ return [channelArr objectAtIndex:section]; } //- (NSString *)tableView:(UITableView *)tableView titleForFooterInSection:(NSInteger)section{ // return @"我是底部"; //} //设置每个分组的个数 - ( NSInteger )tableView:(UITableView *)tableView numberOfRowsInSection:( NSInteger )section{ NSInteger count=0; switch (section) { case 0: count=[filmArr count]; break ; case 1: count=[tvArr count]; break ; } return count; } //设置分组中具体的内容 - (UITableViewCell *)tableView:(UITableView *)tableView cellForRowAtIndexPath:( NSIndexPath *)indexPath{ UITableViewCell *cell =[[UITableViewCell alloc] initWithStyle:UITableViewCellStyleDefault reuseIdentifier: nil ]; switch (indexPath.section) { case 0: [cell.textLabel setText:[filmArr objectAtIndex:indexPath.row]]; break ; case 1: [cell.textLabel setText:[tvArr objectAtIndex:indexPath.row]]; break ; } return cell; } //分组标题的行高 - (CGFloat)tableView:(UITableView *)tableView heightForHeaderInSection:( NSInteger )section{ return 40; } - (CGFloat)tableView:(UITableView *)tableView heightForFooterInSection:( NSInteger )section{ return 0; } //选中点击事件 - ( void )tableView:(UITableView *)tableView didSelectRowAtIndexPath:( NSIndexPath *)indexPath{ NSString *content; switch (indexPath.section) { case 0: content=[ NSString stringWithFormat:@ "%@-%@" ,channelArr[0],[filmArr objectAtIndex:indexPath.row]]; break ; case 1: content=[ NSString stringWithFormat:@ "%@-%@" ,channelArr[1],[tvArr objectAtIndex:indexPath.row]]; break ; } UIAlertView *alterView=[[UIAlertView alloc] initWithTitle:@ "当前位置:" message:content delegate: self cancelButtonTitle:@ "确定" otherButtonTitles: nil ]; [alterView show]; } - ( void )didReceiveMemoryWarning { [ super didReceiveMemoryWarning]; // Dispose of any resources that can be recreated. } @end 本文转自Fly_Elephant博客园博客,原文链接:http://www.cnblogs.com/xiaofeixiang/p/4246563.html,如需转载请自行联系原作者

优秀的个人博客,低调大师

iOS开发-数据选择UIPickerView

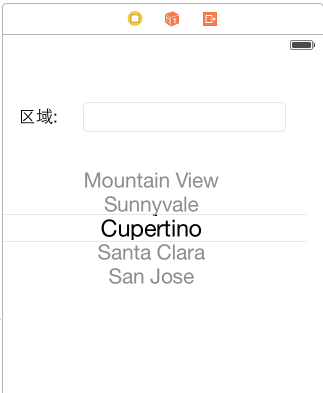
UIPickerView开发一般选择区域或者分级数据的时候会使用到,类似于前端中用到树状结构,不过PC上一般都是从上到下的分级,使用UIPickView是从左到右实现,可以动态的设置UIPickView中中行列数据,将结果显示在文本输入框里,简单的定义一下数据源。通过声明协议捕获事件,展示结果,比较简单,进入正题. 页面布局 页面布局比较简单,一个UIPickerView,一个文本框: 头文件中的声明,实现了UIPickerViewDelegate,UIPickerViewDataSource协议: 1 2 3 4 5 6 @interface ViewController : UIViewController <UIPickerViewDelegate,UIPickerViewDataSource> @property (weak, nonatomic ) IBOutlet UIPickerView *pickView; @property (weak, nonatomic ) IBOutlet UITextField *areaTextField; @end Demo实现 定义存储数据的数组: 1 2 3 4 5 @interface ViewController () { NSArray *areaArr; NSMutableArray *teamArr; } 初始化数据: 1 2 3 4 5 6 7 8 9 10 11 12 - ( void )viewDidLoad { [ super viewDidLoad]; // Do any additional setup after loading the view, typically from a nib. areaArr=@[@ "西南区" ,@ "中央区" ,@ "东南区" ,@ "大西洋区" ,@ "西北区" ,@ "太平洋区" ]; teamArr=[[ NSMutableArray alloc] init]; [teamArr addObject:@[@ "马刺" ,@ "灰熊" ,@ "小牛" ,@ "火箭" ,@ "鹈鹕" ]]; [teamArr addObject:@[@ "活塞" ,@ "步行者" ,@ "骑士" ,@ "公牛" ,@ "雄鹿" ]]; [teamArr addObject:@[@ "热火" ,@ "魔术" ,@ "老鹰" ,@ "奇才" ,@ "黄蜂" ]]; [teamArr addObject:@[@ "凯尔特人" ,@ "76人" ,@ "尼克斯" ,@ "篮网" ,@ "猛龙" ]]; [teamArr addObject:@[@ "森林狼" ,@ "掘金" ,@ "爵士" ,@ "开拓者" ,@ "雷霆" ]]; [teamArr addObject:@[@ "国王" ,@ "太阳" ,@ "湖人" ,@ "快船" ,@ "勇士" ]]; } 设置PickerView的列数: 1 2 3 - ( NSInteger )numberOfComponentsInPickerView:(UIPickerView *)pickerView{ return 2; } 返回行数: 1 2 3 4 5 6 7 8 9 10 - ( NSInteger )pickerView:(UIPickerView *)pickerView numberOfRowsInComponent:( NSInteger )component{ //判断列 if (component==0) { return [areaArr count]; } else { //判断0列中当前的行号 NSInteger currentRow=[pickerView selectedRowInComponent:0]; return [teamArr[currentRow] count]; } } 设置每行每列中的数据: 1 2 3 4 5 6 7 8 9 10 - ( NSString *)pickerView:(UIPickerView *)pickerView titleForRow:( NSInteger )row forComponent:( NSInteger )component{ if (component==0) { //o列从区域数组中选择 return areaArr[row]; } else { //根据0列中选择的行号 NSInteger currentRow=[pickerView selectedRowInComponent:0]; return teamArr[currentRow][row]; } } 选择完成之后的事件: 1 2 3 4 5 6 7 - ( void )pickerView:(UIPickerView *)pickerView didSelectRow:( NSInteger )row inComponent:( NSInteger )component{ [pickerView reloadComponent:1]; NSInteger areaRow=[pickerView selectedRowInComponent:0]; NSInteger teamRow=[pickerView selectedRowInComponent:1]; [_areaTextField setText:[ NSString stringWithFormat:@ "%@-%@" ,areaArr[areaRow],teamArr[areaRow][teamRow]]]; } 具体效果如下: 本文转自Fly_Elephant博客园博客,原文链接:http://www.cnblogs.com/xiaofeixiang/p/4245884.html,如需转载请自行联系原作者

优秀的个人博客,低调大师

IOS开发——Protocol使用协议

protocol ['prəutəkɔl](样例:http://blog.sina.com.cn/s/blog_6aafe9c90100yozz.html)一、说明 两个类进行通讯,用协议就比較方便。 1.协议声明了能够被不论什么类实现的方法 2.协议不是类,它是定义了一个其它对象能够实现的接口 3.假设在某个类中实现了协议中的某个方法,也就是这个类实现了那个协议。 4.协议经经常使用来实现托付对象。一个托付对象是一种用来协同或者代表其它对象的特殊对象。 5:托付,就是调用自定义方法,别的类来实现。 6.新特性说明 @optional预编译指令:表示能够选择实现的方法 @required预编译指令:表示必须强制实现的方法 二、定义 .h @protocol ContactCtrlDelegate -(void)DismissContactsCtrl; @end @interface ContactsCtrl : UIViewController { id <ContactCtrlDelegate> delegate; } @property (nonatomic, assign) id <ContactCtrlDelegate> delegate; .m @synthesize delegate; 三、样例 比如:UITextView @protocol UITextViewDelegate <NSObject> @optional - (BOOL)textViewShouldBeginEditing:(UITextView *)textView; - (BOOL)textViewShouldEndEditing:(UITextView *)textView; - (void)textViewDidBeginEditing:(UITextView *)textView; - (void)textViewDidEndEditing:(UITextView *)textView; - (BOOL)textView:(UITextView *)textView shouldChangeTextInRange:(NSRange)range replacementText:(NSString *)text; - (void)textViewDidChange:(UITextView *)textView; - (void)textViewDidChangeSelection:(UITextView *)textView; @end 假设要调用以上这些方法。就必须设置UITextView的托付:TextView.delegate = self; 四、Demo 1、ContactsCtrl.h #import <UIKit/UIKit.h> //定义协议 @protocol ContactCtrlDelegate -(void)DismissContactsCtrl; @end @interface ContactsCtrl : UIViewController { IBOutlet UINavigationBar *ContactNavBar; id <ContactCtrlDelegate> delegate; } @property (nonatomic, assign) id <ContactCtrlDelegate> delegate; -(IBAction)canCelBtn:(id)sender; @end 2、ContactsCtrl.m @implementation ContactsCtrl @synthesize delegate; // Implement viewDidLoad to do additional setup after loading the view, typically from a nib. - (void)viewDidLoad { [super viewDidLoad]; ContactNavBar.topItem.prompt = @"选取联系人发送短信"; } //调用协议中的方法 -(IBAction)canCelBtn:(id)sender{ [delegate DismissContactsCtrl]; } 3、ProtocolDemoCtrl.h #import <UIKit/UIKit.h> #import "ContactsCtrl.h" @interface ProtocolDemoCtrl : UIViewController <ContactCtrlDelegate>{//加入托付 ContactsCtrl *contactsView; } 4、ProtocolDemoCtrl.m #import "ProtocolDemoCtrl.h" #define BARBUTTONADD(SELECTOR) [[[UIBarButtonItem alloc] initWithBarButtonSystemItem:UIBarButtonSystemItemAdd target:self action:SELECTOR] autorelease]; @implementation ProtocolDemoCtrl @synthesize contactsView; // Implement viewDidLoad to do additional setup after loading the view, typically from a nib. - (void)viewDidLoad { [super viewDidLoad]; self.navigationItem.rightBarButtonItem = BARBUTTONADD(@selector(addContactAction:)); } - (void)addContactAction:(id)sender{ ContactsCtrl *contactView = [[ContactsCtrl alloc] initWithNibName:@"ContactsCtrl" bundle:nil]; self.contactsView = contactView; contactsView.delegate = self;//设置托付 [self presentModalViewController:contactsView animated:YES]; [contactView release]; } //实现ContactCtrlDelegate协议中的方法 -(void)DismissContactsCtrl{ [contactsView dismissModalViewControllerAnimated:YES]; } 综上,假设A类.h文件定义了一个协议,在A类里面我们还须要定义一个托付delegate,协议里面有个必须实现的methodA方法(@required,这种方法在实现了协议的类里面实现),在A类的.m文件里须要调用这个methodA方法,我们使用托付调用这个methodA方法 [delegate DismissContactsCtrl]; 类B实现了这个协议,在.h文件里定义类A的对象a,在.m文件里须要实现methodA方法。而且须要设置托付 a.delegate = self;//设置托付 假设MethodA返回的是B类的对象,那么在A类中就能够调用B类属性和方法国,B这个类可以调用A的属性和方法。 版权声明:本文博客原创文章。博客,未经同意,不得转载。 本文转自mfrbuaa博客园博客,原文链接:http://www.cnblogs.com/mfrbuaa/p/4657138.html,如需转载请自行联系原作者

优秀的个人博客,低调大师

IOS上的socket通信

客户端: 导入头文件: #import <sys/socket.h> #import <netinet/in.h> #import <arpa/inet.h> #import <unistd.h> 1. 创建连接 CFSocketContext sockContext = {0, // 结构体的版本,必须为0 self,// 一个任意指针的数据,可以用在创建时CFSocket对象相关联。这个指针被传递给所有的上下文中定义的回调。 NULL, // 一个定义在上面指针中的retain的回调, 可以为NULL NULL, NULL}; CFSocketRef _socket = (kCFAllocatorDefault, // 为新对象分配内存,可以为nil PF_INET, // 协议族,如果为0或者负数,则默认为PF_INET SOCK_STREAM, // 套接字类型,如果协议族为PF_INET,则它会默认为SOCK_STREAM IPPROTO_TCP, // 套接字协议,如果协议族是PF_INET且协议是0或者负数,它会默认为IPPROTO_TCP kCFSocketConnectCallBack, // 触发回调函数的socket消息类型,具体见Callback Types TCPServerConnectCallBack, // 上面情况下触发的回调函数 &sockContext // 一个持有CFSocket结构信息的对象,可以为nil ); if (_socket != nil) { struct sockaddr_in addr4; // IPV4 memset(&addr4, 0, sizeof(addr4)); addr4.sin_len = sizeof(addr4); addr4.sin_family = AF_INET; addr4.sin_port = htons(8888); addr4.sin_addr.s_addr = inet_addr([strAddress UTF8String]);// 把字符串的地址转换为机器可识别的网络地址 // 把sockaddr_in结构体中的地址转换为Data CFDataRef address = CFDataCreate(kCFAllocatorDefault, (UInt8 *)&addr4, sizeof(addr4)); CFSocketConnectToAddress(_socket, // 连接的socket address, // CFDataRef类型的包含上面socket的远程地址的对象 -1// 连接超时时间,如果为负,则不尝试连接,而是把连接放在后台进行,如果_socket消息类型为kCFSocketConnectCallBack,将会在连接成功或失败的时候在后台触发回调函数 ); CFRunLoopRef cRunRef = CFRunLoopGetCurrent();// 获取当前线程的循环 // 创建一个循环,但并没有真正加如到循环中,需要调用CFRunLoopAddSource CFRunLoopSourceRef sourceRef = CFSocketCreateRunLoopSource(kCFAllocatorDefault, _socket, 0); CFRunLoopAddSource(cRunRef, // 运行循环 sourceRef,// 增加的运行循环源, 它会被retain一次 kCFRunLoopCommonModes// 增加的运行循环源的模式 ); CFRelease(courceRef); } 2. 设置回调函数 // socket回调函数的格式: static void TCPServerConnectCallBack(CFSocketRef socket, CFSocketCallBackType type, CFDataRef address, const void *data, void *info) { if (data != NULL) { // 当socket为kCFSocketConnectCallBack时,失败时回调失败会返回一个错误代码指针,其他情况返回NULL NSLog(@"连接失败"); return; } TCPClient *client = (TCPClient *)info; // 读取接收的数据 [info performSlectorInBackground:@selector(readStream) withObject:nil]; } 3. 接收发送数据 // 读取接收的数据 - (void)readStream { char buffer[1024]; NSAutoreleasePool *pool = [[NSAutoreleasePool alloc] init]; while (recv(CFSocketGetNative(_socket), //与本机关联的Socket 如果已经失效返回-1:INVALID_SOCKET buffer, sizeof(buffer), 0)) { NSLog(@"%@", [NSString stringWithUTF8String:buffer]); } } // 发送数据 - (void)sendMessage { NSString *stringTosend = @"你好"; char *data = [stringTosend UTF8String]; send(SFSocketGetNative(_socket), data, strlen(data) + 1, 0); } 服务器端: CFSockteRef _socket; CFWriteStreamRef outputStream = NULL; int setupSocket() { _socket = CFSocketCreate(kCFAllocatorDefault, PF_INET, SOCK_STREAM, IPPROTO_TCP, kCFSocketAcceptCallBack, TCPServerAcceptCallBack, NULL); if (NULL == _socket) { NSLog(@"Cannot create socket!"); return 0; } int optval = 1; setsockopt(CFSocketGetNative(_socket), SOL_SOCKET, SO_REUSEADDR, // 允许重用本地地址和端口 (void *)&optval, sizeof(optval)); struct sockaddr_in addr4; memset(&addr4, 0, sizeof(addr4)); addr4.sin_len = sizeof(addr4); addr4.sin_family = AF_INET; addr4.sin_port = htons(port); addr4.sin_addr.s_addr = htonl(INADDR_ANY); CFDataRef address = CFDataCreate(kCFAllocatorDefault, (UInt8 *)&addr4, sizeof(addr4)); if (kCFSocketSuccess != CFSocketSetAddress(_socket, address)) { NSLog(@"Bind to address failed!"); if (_socket) CFRelease(_socket); _socket = NULL; return 0; } CFRunLoopRef cfRunLoop = CFRunLoopGetCurrent(); CFRunLoopSourceRef source = CFSocketCreateRunLoopSource(kCFAllocatorDefault, _socket, 0); CFRunLoopAddSource(cfRunLoop, source, kCFRunLoopCommonModes); CFRelease(source); return 1; } // socket回调函数,同客户端 void TCPServerAcceptCallBack(CFSocketRef socket, CFSocketCallBackType type, CFDataRef address, const void *data, void *info) { if (kCFSocketAcceptCallBack == type) { // 本地套接字句柄 CFSocketNativeHandle nativeSocketHandle = *(CFSocketNativeHandle *)data; uint8_t name[SOCK_MAXADDRLEN]; socklen_t nameLen = sizeof(name); if (0 != getpeername(nativeSocketHandle, (struct sockaddr *)name, &nameLen)) { NSLog(@"error"); exit(1); } NSLog(@"%@ connected.", inet_ntoa( ((struct sockaddr_in *)name)->sin_addr )): CFReadStreamRef iStream; CFWriteStreamRef oStream; // 创建一个可读写的socket连接 CFStreamCreatePairWithSocket(kCFAllocatorDefault, nativeSocketHandle, &iStream, &oStream); if (iStream && oStream) { CFStreamClientContext streamContext = {0, NULL, NULL, NULL}; if (!CFReadStreamSetClient(iStream, kCFStreamEventHasBytesAvaiable, readStream, // 回调函数,当有可读的数据时调用 &streamContext)){ exit(1); } if (!CFReadStreamSetClient(iStream, kCFStreamEventCanAcceptBytes, writeStream, &streamContext)){ exit(1); } CFReadStreamScheduleWithRunLoop(iStream, CFRunLoopGetCurrent(), kCFRunLoopCommomModes); CFWriteStreamScheduleWithRunLoop(wStream, CFRunLoopGetCurrent(), kCFRunLoopCommomModes); CFReadStreamOpen(iStream); CFWriteStreamOpen(wStream); } else { close(nativeSocketHandle); } } } // 读取数据 void readStream(CFReadStreamRef stream, CFStreamEventType eventType, void *clientCallBackInfo) { UInt8 buff[255]; CFReadStreamRead(stream, buff, 255); printf("received: %s", buff); } void writeStream (CFWriteStreamRef stream, CFStreamEventType eventType, void *clientCallBackInfo) { outputStream = stream; } main { char *str = "nihao"; if (outputStream != NULL) { CFWriteStreamWrite(outputStream, str, strlen(line) + 1); } else { NSLog(@"Cannot send data!"); } } // 开辟一个线程线程函数中 void runLoopInThread() { int res = setupSocket(); if (!res) { exit(1); } CFRunLoopRun();// 运行当前线程的CFRunLoop对象 } 本文转自 卓行天下 51CTO博客,原文链接:http://blog.51cto.com/9951038/1787766,如需转载请自行联系原作者

优秀的个人博客,低调大师

iOS EGORefreshTableHeaderView使用方法

废话不多说,直接上传代码说明 1.把EGORefreshTableHeaderView.h和EGORefreshTableHeaderView.m文件拉入到工程 2.viewcontroller文件添加引用#import"EGORefreshTableHeaderView.h"和协议<</span>EGORefreshTableHeaderDelegate> 3.定义对象 EGORefreshTableHeaderView*refreshView; BOOLreloading; //注意reloading是必须的 4 实现delegate #pragma mark - EGORefreshTableHeaderDelegate Methods //下拉控件刷新触发事件 - (void)egoRefreshTableHeaderDidTriggerRefresh:(EGORefreshTableHeaderView*)view{ [selfreloadTableViewDataSource]; } - (BOOL)egoRefreshTableHeaderDataSourceIsLoading:(EGORefreshTableHeaderView*)view{ returnreloading;// should return if data source model is reloading } - (NSDate*)egoRefreshTableHeaderDataSourceLastUpdated:(EGORefreshTableHeaderView*)view{ return[NSDatedate];// should return date data source was last changed } #pragma mark - UIScrollViewDelegate Methods - (void)scrollViewDidScroll:(UIScrollView*)scrollView{ [refreshViewegoRefreshScrollViewDidScroll:scrollView]; } - (void)scrollViewDidEndDragging:(UIScrollView*)scrollView willDecelerate:(BOOL)decelerate{ [refreshViewegoRefreshScrollViewDidEndDragging:scrollView]; } 注意要实现UIScrollViewDelegate 5 添加load数据的函数和load完数据的函数 #pragma mark Data Source Loading / Reloading Methods //下拉动作触发事件调用的函数。在这里发送数据请求 - (void)reloadTableViewDataSource{ //should be calling your tableviews data source model to reload //put here just for demo NSLog(@"dragging!!!"); timer= [NSTimerscheduledTimerWithTimeInterval:5target:selfselector:@selector(doneLoadingTableViewData)userInfo:nilrepeats:NO]; reloading=YES; } //请求结束函数。在这里要关闭下拉的视图.并更新表视图 - (void)doneLoadingTableViewData{ //model should call this when its done loading NSLog(@"stop loading"); timer=nil; reloading=NO; [refreshViewegoRefreshScrollViewDataSourceDidFinishedLoading:self.tableView]; [listDataaddObject:[[NSStringalloc]initWithFormat:@"%d",[listDatacount]]]; [self.tableViewreloadData]; } 本文转自 卓行天下 51CTO博客,原文链接:http://blog.51cto.com/9951038/1772576,如需转载请自行联系原作者

优秀的个人博客,低调大师

[IOS]NSUserDefaults读取和写入

NSUserDefaults可以存取一些短小的信息。 比如存入再读出一个字符串到NSUserDefaults: [cpp] view plain copy NSString*string=[NSStringstringWithString@"hahaha"]; NSUserDefaults*ud=[NSUserDefaultsstandardUserDefaults]; [udsetObject:stringforKey:@"myKey"]; NSString*value; value=[udobjectForKey:"myKey"]; 但是并不是所有的东西都能往里放的。NSUserDefaults只支持: NSString, NSNumber, NSDate, NSArray, NSDictionary. 如果把一个自定义的类存到一个NSArray里,然后再存到NSUserDefaults里也是不能成功的。不信可以试试,如果你成功的请告诉我。 那怎么办呢? 我找到的方法是,让这个自定义类实现<NSCoding>协议中的- (id) initWithCoder: (NSCoder *)coder方法和- (void) encodeWithCoder: (NSCoder *)coder方法(obj-c的协议protocol就是java的接口interface,就是C++的纯虚函数),然后把该自定义的类对象编码到NSData中,再从NSUserDefaults中进行读取。 粘代码: 假设有这样一个简单的类对象 [cpp] view plain copy @interfaceBusinessCard:NSObject<NSCoding>{ NSString*_firstName; NSString*_lastName; } @property(nonatomic,retain)NSString*_firstName; @property(nonatomic,retain)NSString*_lastName; @end; @implementationBusinessCard @synthesize_firstName,_lastName; -(void)dealloc{ [_firstNamerelease]; [_lastNamerelease]; [superdealloc]; } -(id)initWithCoder:(NSCoder*)coder { if(self=[superinit]) { self._firstName=[coderdecodeObjectForKey:@"_firstName"]; self._lastName=[coderdecodeObjectForKey:@"_lastName"]; } returnself; } -(void)encodeWithCoder:(NSCoder*)coder { [coderencodeObject:_firstNameforKey:@"_firstName"]; [coderencodeObject:_lastNameforKey:@"_lastName"]; } @end 然后再存取时通过NSData做载体: [cpp] view plain copy BusinessCard*bc=[[BusinessCardalloc]init]; NSUserDefaults*ud=[NSUserDefaultsstandardUserDefaults]; NSData*udObject=[NSKeyedArchiverarchivedDataWithRootObject:bc]; [udsetObject:udObjectforKey:@"myBusinessCard"]; [bcrelease]; udObject=nil; udObject=[udobjectForKey:@"myBusinessCard"]; bc=[NSKeyedUnarchiverunarchiveObjectWithData:udObject]; 以上的代码时由另一个程序中截取的,没有测试过,但意思就是这样了。 如果一个自定义类中由另一个自定义类对象,那么所有嵌套的类都要实现<NSCoding>。 本文转蓬莱仙羽51CTO博客,原文链接:http://blog.51cto.com/dingxiaowei/1366247,如需转载请自行联系原作者

优秀的个人博客,低调大师

iOS 生成随机颜色(UIColor)

#import<UIKit/UIKit.h> @interfaceUIColor (RandomColor) +(UIColor*) randomColor; @end #import"UIColor+RandomColor.h" @implementationUIColor (RandomColor) +(UIColor*) randomColor { CGFloathue = (arc4random() %256/256.0);//0.0 to 1.0 CGFloatsaturation = (arc4random() %128/256.0) +0.5;// 0.5 to 1.0,away from white CGFloatbrightness = (arc4random() %128/256.0) +0.5;//0.5 to 1.0,away from black return[UIColorcolorWithHue:huesaturation:saturationbrightness:brightnessalpha:1]; @end 将随机生成的颜色绘制成图片。 -(void)createImage { NSString* path = [NSSearchPathForDirectoriesInDomains(NSDocumentDirectory,NSUserDomainMask,YES)objectAtIndex:0]; path =@"/Users/shouqiangwei/Desktop/未命名目录2"; NSLog(@"path = %@",path); NSString*imgName; NSString*imgURL; NSString*markNum; UIImage*img; NSData*imgData; NSError*err; intwidth=1000, height=1000, fontSize; CGPointmarkPoint; intbaseLength =320; NSFileManager*fm = [NSFileManagerdefaultManager]; for(inti=0; i<1000; i++) { UIColor*color = [UIColorrandomColor]; [_currentColorImageViewsetBackgroundColor:color]; imgName = [NSStringstringWithFormat:@"%i.jpg", i+1]; _lblCount.text= imgName; imgURL = [pathstringByAppendingPathComponent:imgName]; if(![fmfileExistsAtPath:imgURL]) { constCGFloat*colorComps =CGColorGetComponents(color.CGColor); markNum = [NSStringstringWithFormat:@"%i", i+1]; fontSize = width /5; markPoint =CGPointMake(fontSize/2, fontSize/2); UIGraphicsBeginImageContext(CGSizeMake(width, height)); CGContextRefctx =UIGraphicsGetCurrentContext(); CGContextSetRGBFillColor(ctx, colorComps[0], colorComps[1], colorComps[2], colorComps[3]); CGContextFillRect(ctx,CGRectMake(0,0, width, height)); CGContextSetRGBFillColor(ctx,1.0,1.0,1.0,1.0); //创建图片上的数字。 [markNumdrawAtPoint:markPointwithFont:[UIFontsystemFontOfSize:fontSize]]; img =UIGraphicsGetImageFromCurrentImageContext(); self.imageView.image= img; UIGraphicsEndImageContext(); //创建到本地。 imgData = [NSDatadataWithData:UIImageJPEGRepresentation(img,1.0f)]; [imgDatawriteToFile:imgURLoptions:NSDataWritingAtomicerror:&err]; if(err) { NSLog(@"error: %@\nimage:%@", err.localizedDescription, imgName); }else{ NSLog(@"done: %@", imgName); } } } } 版权声明:本文博客原创文章,博客,未经同意,不得转载。 本文转自mfrbuaa博客园博客,原文链接:http://www.cnblogs.com/mfrbuaa/p/4658763.html,如需转载请自行联系原作者

优秀的个人博客,低调大师

[IOS]地图的简单应用

IOSMapKit如何快速入门?下面我来写一个简单的Demo,做简要介绍。 效果图: 操作步骤: 1.首先创建一个项目,在xib的view中添加一个MapVIew控件,并且导入MapKit.framework和CoreLocation.frameword框架。 2.实现ViewController的代码: ViewController.h: #import <UIKit/UIKit.h> #import <MapKit/MapKit.h> #import <CoreLocation/CoreLocation.h> @interface DXWViewController : UIViewController<CLLocationManagerDelegate> @property (retain, nonatomic) IBOutlet MKMapView *mapview; @property(retain,nonatomic)CLLocationManager *manager; @property(retain,nonatomic)CLLocation *location; @property (retain, nonatomic) IBOutletCollection(UILabel) NSArray *labels; @end ViewController.m: #import "DXWViewController.h" #import "Place.h" @interface DXWViewController () @end @implementation DXWViewController - (void)viewDidLoad { [super viewDidLoad]; self.manager = [[CLLocationManager alloc] init]; self.manager.delegate = self; //精度 self.manager.desiredAccuracy = kCLLocationAccuracyBest; [self.manager startUpdatingLocation]; self.mapview.showsUserLocation = YES; } -(void)locationManager:(CLLocationManager *)manager didUpdateLocations:(NSArray *)locations { self.location = [locations objectAtIndex:0]; [self.labels[0] setText:[NSString stringWithFormat:@"%f\u00B0",self.location.coordinate.longitude]]; [self.labels[1] setText:[NSString stringWithFormat:@"%f\u00B0",self.location.coordinate.longitude]]; [self.labels[2] setText:[NSString stringWithFormat:@"%gm",self.location.horizontalAccuracy]]; [self.labels[3] setText:[NSString stringWithFormat:@"%gm",self.location.altitude]]; [self.labels[4] setText:[NSString stringWithFormat:@"%gm",self.location.verticalAccuracy]]; Place *place = [[Place alloc] init]; place.coordinate = self.location.coordinate; place.title = @"Title"; place.subtitle = @"subTitle"; [self.mapview addAnnotation:place]; //设置精度范围 MKCoordinateRegion region = MKCoordinateRegionMakeWithDistance(place.coordinate, 1000, 1000); [self.mapview setRegion:region animated:YES]; } - (void)didReceiveMemoryWarning { [super didReceiveMemoryWarning]; } - (void)dealloc { [_mapview release]; [_labels release]; [super dealloc]; } @end 3.创建大头针的类: Place.h: #import <Foundation/Foundation.h> #import <MapKit/MapKit.h> @interface Place : NSObject<MKAnnotation> @property(copy,nonatomic)NSString *title; @property(copy,nonatomic)NSString *subtitle; @property(assign,nonatomic)CLLocationCoordinate2D coordinate; @end 本文转蓬莱仙羽51CTO博客,原文链接:http://blog.51cto.com/dingxiaowei/1366415 ,如需转载请自行联系原作者

资源下载

更多资源
优质分享App

优质分享App

近一个月的开发和优化,本站点的第一个app全新上线。该app采用极致压缩,本体才4.36MB。系统里面做了大量数据访问、缓存优化。方便用户在手机上查看文章。后续会推出HarmonyOS的适配版本。

Mario

Mario

马里奥是站在游戏界顶峰的超人气多面角色。马里奥靠吃蘑菇成长,特征是大鼻子、头戴帽子、身穿背带裤,还留着胡子。与他的双胞胎兄弟路易基一起,长年担任任天堂的招牌角色。

Spring

Spring

Spring框架(Spring Framework)是由Rod Johnson于2002年提出的开源Java企业级应用框架,旨在通过使用JavaBean替代传统EJB实现方式降低企业级编程开发的复杂性。该框架基于简单性、可测试性和松耦合性设计理念,提供核心容器、应用上下文、数据访问集成等模块,支持整合Hibernate、Struts等第三方框架,其适用范围不仅限于服务器端开发,绝大多数Java应用均可从中受益。

Rocky Linux

Rocky Linux

Rocky Linux(中文名:洛基)是由Gregory Kurtzer于2020年12月发起的企业级Linux发行版,作为CentOS稳定版停止维护后与RHEL(Red Hat Enterprise Linux)完全兼容的开源替代方案,由社区拥有并管理,支持x86_64、aarch64等架构。其通过重新编译RHEL源代码提供长期稳定性,采用模块化包装和SELinux安全架构,默认包含GNOME桌面环境及XFS文件系统,支持十年生命周期更新。

用户登录
用户注册