Xmake v2.8.6 发布,新的打包插件:XPack
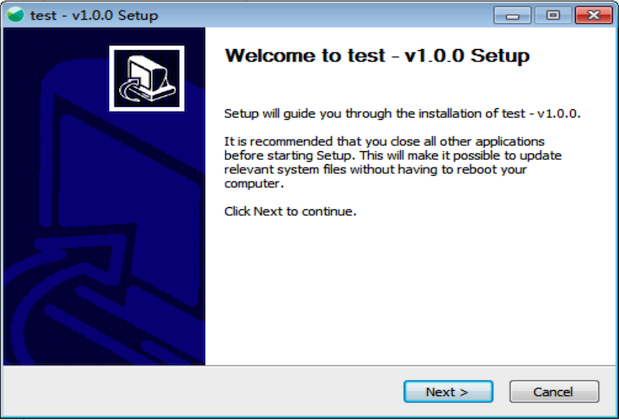
Xmake是一个基于 Lua 的轻量级跨平台构建工具。 它非常的轻量,没有任何依赖,因为它内置了 Lua 运行时。 它使用 xmake.lua 维护项目构建,相比 makefile/CMakeLists.txt,配置语法更加简洁直观,对新手非常友好,短时间内就能快速入门,能够让用户把更多的精力集中在实际的项目开发上。 我们能够使用它像 Make/Ninja 那样可以直接编译项目,也可以像 CMake/Meson 那样生成工程文件,另外它还有内置的包管理系统来帮助用户解决 C/C++ 依赖库的集成使用问题。 目前,Xmake 主要用于 C/C++ 项目的构建,但是同时也支持其他 native 语言的构建,可以实现跟 C/C++ 进行混合编译,同时编译速度也是非常的快,可以跟 Ninja 持平。 Xmake = Build backend + Project Generator + Package Manager + [Remote|Distributed] Build + Cache 尽管不是很准确,但我们还是可以把 Xmake 按下面的方式来理解: Xmake ≈ Make/Ninja + CMake/Meson + Vcpkg/Conan + distcc + ccache/sccache 项目源码 官方文档 入门课程 新特性介绍 在介绍新特性之前,还有个好消息告诉大家,上个版本 Xmake 被收入到了 debian 仓库,而最近 Xmake 又进入了 Fedora 官方仓库,大家可以在 Fedora 39 上,直接通过下面的命令安装 Xmake。 $ sudo dnf install xmake 非常感谢 @topazus @mochaaP 对 Xmake 的贡献,相关信息见:#941。 接下来,我们来介绍下,新版本带来的重量级特性:XPack。 它类似于 CMake 的 CPack 命令,可以将用户工程快速打包生成各种格式的安装包。 目前 Xmake 的 XPack 已经支持以下格式的打包: nsis: Windows 下的可执行安装包 runself: shell 自编译安装包 targz: 二进制文件 tar.gz 包(绿色版) zip: 二进制文件 zip 包(绿色版) srctargz:源文件 tar.gz 包 srczip: 源文件 zip 包 srpm: rpm 源码安装包 rpm: rpm 二进制安装包 除了上述已经支持的打包格式,还有 deb 等包格式也在陆续支持中,并且用户也可以配置生成自定义的包格式文件。 XPack 打包 下面是一个完整例子,我们可以先简单看下: set_version("1.0.0") add_rules("mode.debug", "mode.release") includes("@builtin/xpack") target("test") set_kind("binary") add_files("src/*.cpp") xpack("test") set_formats("nsis", "zip", "targz", "runself") set_title("hello") set_author("ruki") set_description("A test installer.") set_homepage("https://xmake.io") set_licensefile("LICENSE.md") add_targets("test") add_installfiles("src/(assets/*.png)", {prefixdir = "images"}) add_sourcefiles("(src/**)") set_iconfile("src/assets/xmake.ico") after_installcmd(function (package, batchcmds) batchcmds:mkdir(package:installdir("resources")) batchcmds:cp("src/assets/*.txt", package:installdir("resources"), {rootdir = "src"}) batchcmds:mkdir(package:installdir("stub")) end) after_uninstallcmd(function (package, batchcmds) batchcmds:rmdir(package:installdir("resources")) batchcmds:rmdir(package:installdir("stub")) end) 我们通过includes("@builtin/xpack")引入 xpack 的所有配置接口,包括 xpack 配置域,以及它的所有域接口。 然后我们执行: $ xmake pack 即可生成所有安装包。 生成 NSIS 安装包 只要配置了set_formats("nsis")格式,然后执行xmake pack命令,就能生成 NSIS 格式的安装包。 另外,xmake 还会自动安装生成 NSIS 包所需的工具,实现真正的一键打包。 $ xmake pack note: install or modify (m) these packages (pass -y to skip confirm)? in xmake-repo: -> nsis 3.09 please input: y (y/n/m) => install nsis 3.09 .. ok [ 25%]: compiling.release src\main.cpp [ 37%]: compiling.release src\main.cpp [ 50%]: linking.release foo.dll [ 62%]: linking.release test.exe packing build\xpack\test\test-windows-x64-v1.0.0.exe pack ok test-windows-x64-v1.0.0.exe就是我们生成的安装包,双击运行它,就能安装我们的二进制文件到指定目录。 增加组件安装 我们还可以给 NSIS 增加组件安装命令,只有当用户选择指定组件的时候,它的安装命令才会被执行。 xpack("test") add_components("LongPath") xpack_component("LongPath") set_default(false) set_title("Enable Long Path") set_description("Increases the maximum path length limit, up to 32,767 characters (before 256).") on_installcmd(function (component, batchcmds) batchcmds:rawcmd("nsis", [[ ${If} $NoAdmin == "false" ; Enable long path WriteRegDWORD ${HKLM} "SYSTEM\CurrentControlSet\Control\FileSystem" "LongPathsEnabled" 1 ${EndIf}]]) end) 这个例子中,我们在里面添加了一个 NSIS 特有的自定义命令,去实现对长路径的支持。 生成自安装包 我们也可以生成基于 shell 脚本的自编译安装包。我们需要配置 runself 打包格式,然后通过add_sourcefiles添加需要参与编译安装的源文件。 接着,我们需要自定义 on_installcmd 安装脚本,里面去配置如果编译源码包,我们可以简单的调用一个内置的编译安装脚本文件,也可以直接配置make install等编译安装命令。 例如: xpack("test") set_formats("runself") add_sourcefiles("(src/**)") on_installcmd(function (package, batchcmds) batchcmds:runv("make", {"install"}) end) 然后,我们执行xmake pack命令,就可以生成一个自安装的 xxx.gz.run 包,默认采用 gzip 压缩。 $ xmake pack packing build/xpack/test/test-macosx-src-v1.0.0.gz.run pack ok 我们可以使用 sh 去加载运行它来安装我们的程序。 $ sh ./build/xpack/test/test-macosx-src-v1.0.0.gz.run 我们也可以看一个比较完整的例子: xpack("xmakesrc") set_formats("runself") set_basename("xmake-v$(version)") set_prefixdir("xmake-$(version)") before_package(function (package) import("devel.git") local rootdir = path.join(os.tmpfile(package:basename()) .. ".dir", "repo") if not os.isdir(rootdir) then os.tryrm(rootdir) os.cp(path.directory(os.projectdir()), rootdir) git.clean({repodir = rootdir, force = true, all = true}) git.reset({repodir = rootdir, hard = true}) if os.isfile(path.join(rootdir, ".gitmodules")) then git.submodule.clean({repodir = rootdir, force = true, all = true}) git.submodule.reset({repodir = rootdir, hard = true}) end end local extraconf = {rootdir = rootdir} package:add("sourcefiles", path.join(rootdir, "core/**|src/pdcurses/**|src/luajit/**|src/tbox/tbox/src/demo/**"), extraconf) package:add("sourcefiles", path.join(rootdir, "xmake/**"), extraconf) package:add("sourcefiles", path.join(rootdir, "*.md"), extraconf) package:add("sourcefiles", path.join(rootdir, "configure"), extraconf) package:add("sourcefiles", path.join(rootdir, "scripts/*.sh"), extraconf) package:add("sourcefiles", path.join(rootdir, "scripts/man/**"), extraconf) package:add("sourcefiles", path.join(rootdir, "scripts/debian/**"), extraconf) package:add("sourcefiles", path.join(rootdir, "scripts/msys/**"), extraconf) end) on_installcmd(function (package, batchcmds) batchcmds:runv("./scripts/get.sh", {"__local__"}) end) 它是 xmake 自身源码的安装包配置脚本,更完整的配置可以参考:xpack.lua 这里,它通过调用源码包内置的./scripts/get.sh安装脚本去执行编译安装。 生成源码归档包 另外,我们也可以配置srczip和srctargz格式,来生成源码压缩包,它不是完整的安装包,也没有安装命令,仅仅用于源码包分发。 xpack("test") set_formats("srczip", "srctargz") add_sourcefiles("(src/**)") $ xmake pack packing build/xpack/test/test-macosx-src-v1.0.0.zip .. packing build/xpack/test/test-macosx-src-v1.0.0.tar.gz .. pack ok 生成二进制归档包 我们也可以配置zip和targz来生成二进制的压缩包,它会先自动编译所有绑定的 target 目标程序,将所有需要的二进制程序,库文件打包到 zip/tar.gz 格式。 这通常用于制作绿色版的安装包,内部不太任何自动安装脚本,用户需要自己设置 PATH 等环境变量。 xpack("test") set_formats("zip", "targz") add_installfiles("(src/**)") $ xmake pack packing build/xpack/test/test-macosx-v1.0.0.zip .. packing build/xpack/test/test-macosx-v1.0.0.tar.gz .. pack ok !> 需要注意的是,打二进制文件到包里,使用的是add_installfiles而不是add_sourcefiles。 我们也可以通过add_targets去绑定需要安装的 target 目标程序和库。更多详情见下面关于add_targets的接口描述。 生成 SRPM 源码安装包 它可以生成.src.rpm格式的源码安装包。 我们可以通过配置 add_targets 关联需要构建的目标,在生成的 srpm 包中,它会自动调用xmake build和xmake install去构建和安装包。 xpack("test") set_homepage("https://xmake.io") set_license("Apache-2.0") set_description("A cross-platform build utility based on Lua.") set_formats("srpm") add_sourcefiles("(src/**)") add_sourcefiles("./xmake.lua") add_targets("demo") 它会生成类似下面的 spec 文件,然后自动调用 rpmbuild 去生成.src.rpm包。 Name: test Version: 1.0.0 Release: 1%{?dist} Summary: hello License: Apache-2.0 URL: https://xmake.io Source0: test-linux-src-v1.0.0.tar.gz BuildRequires: xmake BuildRequires: gcc BuildRequires: gcc-c++ %description A test installer. %prep %autosetup -n test-1.0.0 -p1 %build xmake build -y test %install xmake install -o %{buildroot}/%{_exec_prefix} test cd %{buildroot} find . -type f | sed 's!^\./!/!' > %{_builddir}/_installedfiles.txt %check %files -f %{_builddir}/_installedfiles.txt %changelog * Fri Dec 22 2023 ruki - 1.0.0-1 - Update to 1.0.0 我们也可以通过on_buildcmd和on_installcmd自定义构建和安装脚本。 xpack("test") set_homepage("https://xmake.io") set_license("Apache-2.0") set_description("A cross-platform build utility based on Lua.") set_formats("srpm") add_sourcefiles("(src/**)") add_sourcefiles("./configure") on_buildcmd(function (package, batchcmds) batchcmds:runv("./configure") batchcmds:runv("make") end) on_installcmd(function (package, batchcmds) batchcmds:runv("make", {"install", "PREFIX=%{buildroot}"}) end) 生成 RPM 二进制安装包 RPM 包将会直接生成编译好的二进制安装包。xmake 会自动调用rpmbuild --rebuild命令去构建 SRPM 包生成它。 而在 XPack 中,我们仅仅只需要配置set_formats("rpm")即可支持 rpm 包生成,其他配置与 srpm 包完全一致。 xpack("test") set_formats("rpm") -- TODO 打包命令参数 指定打包格式 如果我们在配置文件中已经使用set_formats配置了多个打包格式,那么默认情况下,xmake pack会自动生成所有这些格式的包。 当然,我们也可以通过xmake pack --formats=nsis,targz来选择性指定当前需要打哪些格式的包。 修改打包文件名 我们可以在配置文件中,通过set_basename()来修改包名,也可以通过命令行去修改它。 $ xmake pack --basename="foo" packing build/xpack/test/foo.zip .. pack ok 指定输出目录 默认的输出目录是在 build 目录下,但我们也可以修改输出的路径。 $ xmake pack -o /tmp/output 禁用自动构建 如果是打 NSIS 等二进制包,xmake pack会先自动编译所有被绑定的 target 目标文件,然后再去执行打包逻辑。 但是如果我们已经编译过了,不想每次都去编译它,而是直接去打包,可以通过下面的参数禁用自动构建。 $ xmake pack --autobuild=n 接口描述 更多 XPack 打包接口描述见:XPack 打包接口文档。 安装包到本地 默认情况先,通过add_requires("xxx")配置的包都会被安装到全局目录,不同项目共用这些包。 而新版本中,我们新增了一个package.install_locally策略,可以配置让 xmake 将包安装到当前本地项目目录。 set_policy("package.install_locally", true) 更新日志 新特性 添加network.mode策略 #1433: 添加xmake pack命令去生成 NSIS/zip/tar.gz/srpm/rpm/runself 安装包 #4435: 为 UnityBuild 的组模式增加 batchsize 支持 #4485: 新增 package.install_locally 策略支持 新增 NetBSD 支持 Changes #4484: 改进 swig 规则 改进 Haiku 支持 Bugs 修复 #4372: 修复 protobuf 规则 #4439: 修复 asn1c 规则