首页 文章 精选 留言 我的

精选列表

搜索[整合],共10000篇文章
优秀的个人博客,低调大师

springboot2.0+activiti 7 整合(三)--创建自己的业务流程

使用activiti框架,首先要创建bpmn流程图,这里有两种选择,一种是ide自带的插件(eclipse就不说了,网上各种说好用的;idea是真心难用,而且是好几年没更新的插件了),一种是用activiti官方提供的工具activiti-app(6.0的版本,我们只用它来画图),把activiti-app.war放在tomcat运行。 ## 1、绘制流程图 访问地址:http://localhost:8080/activiti-app 账号:admin 密码:test先创建一个流程 创建一个请假流程 流程图如下: 关键属性: 每个矩形框就是一个userTask,最关键的属性:Assignments 任务指定人因为没有使用activiti的identity(认证)部分,所有我选择动态传入一个参数进去(动态变量名不能重复): 每个连接线就是一个sequenceFlow,最关键的属性是:Flow condition 顺序流条件;可以设置条件表达式;这里分支的变量名必须一致,比如审核通过为“${audit==1”},审核不通过为${audit==1”} 2、导入流程图 将画好的流程图下载到本地,在processes目录下新建文件(leave.bpmn20.xml),将流程图用文本打开复制进xml中: <?xml version="1.0" encoding="UTF-8"?> <definitions xmlns="http://www.omg.org/spec/BPMN/20100524/MODEL" xmlns:xsi="http://www.w3.org/2001/XMLSchema-instance" xmlns:xsd="http://www.w3.org/2001/XMLSchema" xmlns:activiti="http://activiti.org/bpmn" xmlns:bpmndi="http://www.omg.org/spec/BPMN/20100524/DI" xmlns:omgdc="http://www.omg.org/spec/DD/20100524/DC" xmlns:omgdi="http://www.omg.org/spec/DD/20100524/DI" typeLanguage="http://www.w3.org/2001/XMLSchema" expressionLanguage="http://www.w3.org/1999/XPath" targetNamespace="http://www.activiti.org/processdef"> <process id="leave" name="请假流程" isExecutable="true"> <startEvent id="startEvent1" name="开始"></startEvent> <userTask id="sid-E9DA7720-703C-4AA1-9233-5B4977C4D7FA" name="填写申请" activiti:assignee="${user}"><!--activiti:assignee 任务指定人--> <extensionElements> <modeler:initiator-can-complete xmlns:modeler="http://activiti.com/modeler"><![CDATA[false]]></modeler:initiator-can-complete> </extensionElements> </userTask> <sequenceFlow id="sid-782B5EB0-C3E4-4EA8-B47C-001493E8CFAA" sourceRef="startEvent1" targetRef="sid-E9DA7720-703C-4AA1-9233-5B4977C4D7FA"></sequenceFlow> <userTask id="sid-F30892E7-AD40-44CE-8FE1-911564290536" name="领导批准" activiti:assignee="${approve}"> <extensionElements> <modeler:initiator-can-complete xmlns:modeler="http://activiti.com/modeler"><![CDATA[false]]></modeler:initiator-can-complete> </extensionElements> </userTask> <sequenceFlow id="sid-9BAB7E50-7E04-4C87-8448-ECDF79CB4405" sourceRef="sid-E9DA7720-703C-4AA1-9233-5B4977C4D7FA" targetRef="sid-F30892E7-AD40-44CE-8FE1-911564290536"></sequenceFlow> <exclusiveGateway id="sid-C7396408-A226-4385-9E87-C63DA1295BEE"></exclusiveGateway> <sequenceFlow id="sid-4570FB2C-F000-4EB9-961B-795DFD3CD037" sourceRef="sid-F30892E7-AD40-44CE-8FE1-911564290536" targetRef="sid-C7396408-A226-4385-9E87-C63DA1295BEE"></sequenceFlow> <endEvent id="sid-E8EA0FBB-EAE1-4316-BAAE-1465DD35D4EA" name="结束"></endEvent> <!--sequenceFlow 流程分支--> <sequenceFlow id="sid-715DC950-61C4-4AA8-9662-A6FD71611EAA" name="审核不通过" sourceRef="sid-C7396408-A226-4385-9E87-C63DA1295BEE" targetRef="sid-E9DA7720-703C-4AA1-9233-5B4977C4D7FA"> <conditionExpression xsi:type="tFormalExpression"><![CDATA[${audit==0}]]></conditionExpression> </sequenceFlow> <sequenceFlow id="sid-EA1D4887-5497-43DE-9D57-A03D3B719681" name="审核通过" sourceRef="sid-C7396408-A226-4385-9E87-C63DA1295BEE" targetRef="sid-E8EA0FBB-EAE1-4316-BAAE-1465DD35D4EA"> <conditionExpression xsi:type="tFormalExpression"><![CDATA[${audit==1}]]></conditionExpression> </sequenceFlow> </process> <bpmndi:BPMNDiagram id="BPMNDiagram_leave"> <bpmndi:BPMNPlane bpmnElement="leave" id="BPMNPlane_leave"> <bpmndi:BPMNShape bpmnElement="startEvent1" id="BPMNShape_startEvent1"> <omgdc:Bounds height="30.0" width="30.0" x="90.0" y="150.0"></omgdc:Bounds> </bpmndi:BPMNShape> <bpmndi:BPMNShape bpmnElement="sid-E9DA7720-703C-4AA1-9233-5B4977C4D7FA" id="BPMNShape_sid-E9DA7720-703C-4AA1-9233-5B4977C4D7FA"> <omgdc:Bounds height="80.0" width="100.0" x="165.0" y="125.0"></omgdc:Bounds> </bpmndi:BPMNShape> <bpmndi:BPMNShape bpmnElement="sid-F30892E7-AD40-44CE-8FE1-911564290536" id="BPMNShape_sid-F30892E7-AD40-44CE-8FE1-911564290536"> <omgdc:Bounds height="80.0" width="100.0" x="300.0" y="125.0"></omgdc:Bounds> </bpmndi:BPMNShape> <bpmndi:BPMNShape bpmnElement="sid-C7396408-A226-4385-9E87-C63DA1295BEE" id="BPMNShape_sid-C7396408-A226-4385-9E87-C63DA1295BEE"> <omgdc:Bounds height="40.0" width="40.0" x="450.0" y="145.0"></omgdc:Bounds> </bpmndi:BPMNShape> <bpmndi:BPMNShape bpmnElement="sid-E8EA0FBB-EAE1-4316-BAAE-1465DD35D4EA" id="BPMNShape_sid-E8EA0FBB-EAE1-4316-BAAE-1465DD35D4EA"> <omgdc:Bounds height="28.0" width="28.0" x="540.0" y="151.0"></omgdc:Bounds> </bpmndi:BPMNShape> <bpmndi:BPMNEdge bpmnElement="sid-782B5EB0-C3E4-4EA8-B47C-001493E8CFAA" id="BPMNEdge_sid-782B5EB0-C3E4-4EA8-B47C-001493E8CFAA"> <omgdi:waypoint x="120.0" y="165.0"></omgdi:waypoint> <omgdi:waypoint x="165.0" y="165.0"></omgdi:waypoint> </bpmndi:BPMNEdge> <bpmndi:BPMNEdge bpmnElement="sid-9BAB7E50-7E04-4C87-8448-ECDF79CB4405" id="BPMNEdge_sid-9BAB7E50-7E04-4C87-8448-ECDF79CB4405"> <omgdi:waypoint x="265.0" y="165.0"></omgdi:waypoint> <omgdi:waypoint x="300.0" y="165.0"></omgdi:waypoint> </bpmndi:BPMNEdge> <bpmndi:BPMNEdge bpmnElement="sid-4570FB2C-F000-4EB9-961B-795DFD3CD037" id="BPMNEdge_sid-4570FB2C-F000-4EB9-961B-795DFD3CD037"> <omgdi:waypoint x="400.0" y="165.20746887966806"></omgdi:waypoint> <omgdi:waypoint x="450.4166666666667" y="165.41666666666666"></omgdi:waypoint> </bpmndi:BPMNEdge> <bpmndi:BPMNEdge bpmnElement="sid-715DC950-61C4-4AA8-9662-A6FD71611EAA" id="BPMNEdge_sid-715DC950-61C4-4AA8-9662-A6FD71611EAA"> <omgdi:waypoint x="470.5" y="145.5"></omgdi:waypoint> <omgdi:waypoint x="470.5" y="26.0"></omgdi:waypoint> <omgdi:waypoint x="215.0" y="26.0"></omgdi:waypoint> <omgdi:waypoint x="215.0" y="125.0"></omgdi:waypoint> </bpmndi:BPMNEdge> <bpmndi:BPMNEdge bpmnElement="sid-EA1D4887-5497-43DE-9D57-A03D3B719681" id="BPMNEdge_sid-EA1D4887-5497-43DE-9D57-A03D3B719681"> <omgdi:waypoint x="489.6144578313253" y="165.3855421686747"></omgdi:waypoint> <omgdi:waypoint x="540.0002509882663" y="165.0838308324056"></omgdi:waypoint> </bpmndi:BPMNEdge> </bpmndi:BPMNPlane> </bpmndi:BPMNDiagram> </definitions> 3、配置application.yml spring: datasource: #数据源基本配置 username: root password: root url: jdbc:mysql://localhost/activiti?serverTimezone=Asia/Shanghai&characterEncoding=UTF-8&nullCatalogMeansCurrent=true&useSSL=false&useLegacyDatetimeCode=false driver-class-name: com.mysql.cj.jdbc.Driver activiti: # 开启历史库 db-history-used: true history-level: audit 历史信息级别可以配置成以下几种(activiti7感觉默认的是none): none: 忽略所有历史存档。这是流程执行时性能最好的状态,但没有任何历史信息可用。 activity: 保存所有流程实例信息和活动实例信息。 在流程实例结束时, 最后一个流程实例中的最新的变量值将赋值给历史变量。 不会保存过程中的详细信息。 audit: 它保存所有流程实例信息, 活动信息, 保证所有的变量和提交的表单属性保持同步 这样所有用户交互信息都是可追溯的,可以用来审计。 full: 这个是最高级别的历史信息存档,同样也是最慢的。 这个级别存储发生在审核以及所有其它细节的信息, 主要是更新流程变量。 4.开启一个任务 /** * 开启一个请假流程 * @param user 用户key * @param processDefinitionKey 流程图key 每一个流程有对应的一个key这个是某一个流程内固定的写在bpmn内的 */ void startLeaveProcess(String user,String processDefinitionKey){ System.out.println(user+"开启一个请假流程:"+ processDefinitionKey); HashMap<String, Object> variables=new HashMap<>(); variables.put("user", user);//userKey在上文的流程变量中指定了 ProcessInstance instance = runtimeService .startProcessInstanceByKey(processDefinitionKey,variables); System.out.println("流程实例ID:"+instance.getId()); System.out.println("流程定义ID:"+instance.getProcessDefinitionId()); System.out.println("=================================================================="); } 运行结果: 张三开启一个请假流程:leave 流程实例ID:34f2f038-0d07-11ea-b319-9c5c8e7034f6 流程定义ID:leave:1:32f7bc77-0d07-11ea-b319-9c5c8e7034f6 ================================================================== 注意数据库的变化: mysql> select ID_,REV_,PROC_INST_ID_,NAME_,ASSIGNEE_ from act_ru_task; +--------------------------------------+------+--------------------------------------+----------+-----------+ | ID_ | REV_ | PROC_INST_ID_ | NAME_ | ASSIGNEE_ | +--------------------------------------+------+--------------------------------------+----------+-----------+ | 34f8958d-0d07-11ea-b319-9c5c8e7034f6 | 1 | 34f2f038-0d07-11ea-b319-9c5c8e7034f6 | 填写申请 | 张三 | +--------------------------------------+------+--------------------------------------+----------+-----------+ 1 row in set 5、根据执行人查询当前流程 /** * 查询当前任务流程 */ void queryLeaveProcessING(String assignee){ System.out.println(assignee+"查询自己当前的流程:"); List<Task> list = taskService.createTaskQuery()//创建任务查询对象 .taskAssignee(assignee)//指定个人任务查询 .list(); if(list!=null && list.size()>0){ for(Task task:list){ System.out.println("任务ID:"+task.getId()); System.out.println("任务名称:"+task.getName()); System.out.println("任务的创建时间:"+task.getCreateTime()); System.out.println("任务的办理人:"+task.getAssignee()); System.out.println("流程实例ID:"+task.getProcessInstanceId()); System.out.println("执行对象ID:"+task.getExecutionId()); System.out.println("流程定义ID:"+task.getProcessDefinitionId()); Map<String, Object> map = task.getProcessVariables(); for (Map.Entry<String, Object> m : map.entrySet()) { System.out.println("key:" + m.getKey() + " value:" + m.getValue()); } for (Map.Entry<String, Object> m : task.getTaskLocalVariables().entrySet()) { System.out.println("key:" + m.getKey() + " value:" + m.getValue()); } } } System.out.println("=================================================================="); } 运行结果: 张三查询自己当前的流程: 任务ID:34f8958d-0d07-11ea-b319-9c5c8e7034f6 任务名称:填写申请 任务的创建时间:Fri Nov 22 17:05:19 CST 2019 任务的办理人:张三 流程实例ID:34f2f038-0d07-11ea-b319-9c5c8e7034f6 执行对象ID:34f3b38a-0d07-11ea-b319-9c5c8e7034f6 流程定义ID:leave:1:32f7bc77-0d07-11ea-b319-9c5c8e7034f6 ================================================================== 6、提交给领导审核 void completeTask(String approve,String taskId){ System.out.println(approve+":提交自己的流程:"+taskId); //任务ID HashMap<String, Object> variables=new HashMap<>(); variables.put("approve", approve);//userKey在上文的流程变量中指定了 taskService.complete(taskId,variables); System.out.println("完成任务:任务ID:"+taskId); System.out.println("=================================================================="); } 运行结果: 领导李四:提交自己的流程:34f8958d-0d07-11ea-b319-9c5c8e7034f6 完成任务:任务ID:34f8958d-0d07-11ea-b319-9c5c8e7034f6 ================================================================== 数据库: mysql> select ID_,REV_,PROC_INST_ID_,NAME_,ASSIGNEE_ from act_ru_task; +--------------------------------------+------+--------------------------------------+----------+-----------+ | ID_ | REV_ | PROC_INST_ID_ | NAME_ | ASSIGNEE_ | +--------------------------------------+------+--------------------------------------+----------+-----------+ | e60702be-0d08-11ea-8a0a-9c5c8e7034f6 | 1 | 34f2f038-0d07-11ea-b319-9c5c8e7034f6 | 领导批准 | 领导李四 | +--------------------------------------+------+--------------------------------------+----------+-----------+ 1 row in set 7、领导审核通过 void completeTask(String user,String taskId,int audit){ System.out.println(user+":提交自己的流程:"+taskId+" ;是否通过:"+audit); //任务ID HashMap<String, Object> variables=new HashMap<>(); variables.put("audit", audit);//userKey在上文的流程变量中指定了 taskService.complete(taskId,variables); System.out.println("完成任务:任务ID:"+taskId); System.out.println("=================================================================="); } 运行结果: 领导李四:提交自己的流程:e60702be-0d08-11ea-8a0a-9c5c8e7034f6 ;是否通过:1 完成任务:任务ID:e60702be-0d08-11ea-8a0a-9c5c8e7034f6 ================================================================== 数据库: mysql> select ID_,REV_,PROC_INST_ID_,NAME_,ASSIGNEE_ from act_ru_task; Empty set 8、查询历史数据 根据流程ID查询: List<HistoricTaskInstance> list=historyService // 历史相关Service .createHistoricTaskInstanceQuery() // 创建历史活动实例查询 .processInstanceId("34f2f038-0d07-11ea-b319-9c5c8e7034f6") // 执行流程实例id .orderByTaskCreateTime() .asc() .list(); for(HistoricTaskInstance hai:list){ System.out.println("活动ID:"+hai.getId()); System.out.println("流程实例ID:"+hai.getProcessInstanceId()); System.out.println("活动名称:"+hai.getName()); System.out.println("办理人:"+hai.getAssignee()); System.out.println("开始时间:"+hai.getStartTime()); System.out.println("结束时间:"+hai.getEndTime()); System.out.println("=================================================================="); } 运行结果: 活动ID:34f8958d-0d07-11ea-b319-9c5c8e7034f6 流程实例ID:34f2f038-0d07-11ea-b319-9c5c8e7034f6 活动名称:填写申请 办理人:张三 开始时间:Fri Nov 22 17:05:19 CST 2019 结束时间:Fri Nov 22 17:17:25 CST 2019 ================================================================== 活动ID:e60702be-0d08-11ea-8a0a-9c5c8e7034f6 流程实例ID:34f2f038-0d07-11ea-b319-9c5c8e7034f6 活动名称:领导批准 办理人:领导李四 开始时间:Fri Nov 22 17:17:25 CST 2019 结束时间:Fri Nov 22 17:31:03 CST 2019 ================================================================== 查询个人历史记录: List<HistoricTaskInstance> list = historyService.createHistoricTaskInstanceQuery().taskAssignee("张三").orderByTaskCreateTime().asc().list(); for(HistoricTaskInstance hai:list){ System.out.println("活动ID:"+hai.getId()); System.out.println("流程实例ID:"+hai.getProcessInstanceId()); System.out.println("活动名称:"+hai.getName()); System.out.println("办理人:"+hai.getAssignee()); System.out.println("开始时间:"+hai.getStartTime()); System.out.println("结束时间:"+hai.getEndTime()); System.out.println("=================================================================="); } 运行结果: 活动ID:34f8958d-0d07-11ea-b319-9c5c8e7034f6 流程实例ID:34f2f038-0d07-11ea-b319-9c5c8e7034f6 活动名称:填写申请 办理人:张三 开始时间:Fri Nov 22 17:05:19 CST 2019 结束时间:Fri Nov 22 17:17:25 CST 2019 ================================================================== 数据库: mysql> select ID_,PROC_INST_ID_,NAME_,ASSIGNEE_ from act_hi_taskinst; +--------------------------------------+--------------------------------------+----------+-----------+ | ID_ | PROC_INST_ID_ | NAME_ | ASSIGNEE_ | +--------------------------------------+--------------------------------------+----------+-----------+ | 34f8958d-0d07-11ea-b319-9c5c8e7034f6 | 34f2f038-0d07-11ea-b319-9c5c8e7034f6 | 填写申请 | 张三 | | e60702be-0d08-11ea-8a0a-9c5c8e7034f6 | 34f2f038-0d07-11ea-b319-9c5c8e7034f6 | 领导批准 | 领导李四 | +--------------------------------------+--------------------------------------+----------+-----------+ 2 rows in set 9.完整的测试类代码 package com.example.activitidemo2; import org.activiti.engine.HistoryService; import org.activiti.engine.RepositoryService; import org.activiti.engine.RuntimeService; import org.activiti.engine.TaskService; import org.activiti.engine.history.HistoricTaskInstance; import org.activiti.engine.runtime.ProcessInstance; import org.activiti.engine.task.Task; import org.junit.jupiter.api.Test; import org.springframework.boot.test.context.SpringBootTest; import javax.annotation.Resource; import java.util.HashMap; import java.util.List; import java.util.Map; @SpringBootTest class ActivitiDemo2ApplicationTests { @Resource RepositoryService repositoryService; @Resource RuntimeService runtimeService; @Resource TaskService taskService; @Resource HistoryService historyService; @Test void contextLoads() { System.out.println("Number of process definitions : " + repositoryService.createProcessDefinitionQuery().count()); System.out.println("Number of tasks : " + taskService.createTaskQuery().count()); runtimeService.startProcessInstanceByKey("oneTaskProcess"); System.out.println("Number of tasks after process start: " + taskService.createTaskQuery().count()); } @Test void testProcess(){ //张三开启一个请假流程 String user = "张三"; String approve = "领导李四"; // startLeaveProcess(user,"leave"); //张三查询自己流程 // queryLeaveProcessING(user); // 提交给领导李四审核 // String taskId = "34f8958d-0d07-11ea-b319-9c5c8e7034f6"; // completeTask(approve,taskId); //领导李四查询自己的流程 // queryLeaveProcessING(approve); //李四提交自己的流程 completeTask(approve,"e60702be-0d08-11ea-8a0a-9c5c8e7034f6",1); //张三查询自己的历史流程 // queryHistoryTask(userKey); } /** * 开启一个请假流程 * @param user 用户key * @param processDefinitionKey 流程图key 每一个流程有对应的一个key这个是某一个流程内固定的写在bpmn内的 */ void startLeaveProcess(String user,String processDefinitionKey){ System.out.println(user+"开启一个请假流程:"+ processDefinitionKey); HashMap<String, Object> variables=new HashMap<>(); variables.put("user", user);//userKey在上文的流程变量中指定了 ProcessInstance instance = runtimeService .startProcessInstanceByKey(processDefinitionKey,variables); System.out.println("流程实例ID:"+instance.getId()); System.out.println("流程定义ID:"+instance.getProcessDefinitionId()); System.out.println("=================================================================="); } /** * 查询当前任务流程 */ void queryLeaveProcessING(String assignee){ System.out.println(assignee+"查询自己当前的流程:"); List<Task> list = taskService.createTaskQuery()//创建任务查询对象 .taskAssignee(assignee)//指定个人任务查询 .list(); if(list!=null && list.size()>0){ for(Task task:list){ System.out.println("任务ID:"+task.getId()); System.out.println("任务名称:"+task.getName()); System.out.println("任务的创建时间:"+task.getCreateTime()); System.out.println("任务的办理人:"+task.getAssignee()); System.out.println("流程实例ID:"+task.getProcessInstanceId()); System.out.println("执行对象ID:"+task.getExecutionId()); System.out.println("流程定义ID:"+task.getProcessDefinitionId()); Map<String, Object> map = task.getProcessVariables(); for (Map.Entry<String, Object> m : map.entrySet()) { System.out.println("key:" + m.getKey() + " value:" + m.getValue()); } for (Map.Entry<String, Object> m : task.getTaskLocalVariables().entrySet()) { System.out.println("key:" + m.getKey() + " value:" + m.getValue()); } } } System.out.println("=================================================================="); } @Test void completeTask(String approve,String taskId){ System.out.println(approve+":提交自己的流程:"+taskId); //任务ID HashMap<String, Object> variables=new HashMap<>(); variables.put("approve", approve);//userKey在上文的流程变量中指定了 taskService.complete(taskId,variables); System.out.println("完成任务:任务ID:"+taskId); System.out.println("=================================================================="); } @Test void completeTask(String user,String taskId,int audit){ System.out.println(user+":提交自己的流程:"+taskId+" ;是否通过:"+audit); //任务ID HashMap<String, Object> variables=new HashMap<>(); variables.put("audit", audit);//userKey在上文的流程变量中指定了 taskService.complete(taskId,variables); System.out.println("完成任务:任务ID:"+taskId); System.out.println("=================================================================="); } @Test void queryHistoryTask(){ List<HistoricTaskInstance> list=historyService // 历史相关Service .createHistoricTaskInstanceQuery() // 创建历史活动实例查询 .processInstanceId("34f2f038-0d07-11ea-b319-9c5c8e7034f6") // 执行流程实例id .orderByTaskCreateTime() .asc() .list(); for(HistoricTaskInstance hai:list){ System.out.println("活动ID:"+hai.getId()); System.out.println("流程实例ID:"+hai.getProcessInstanceId()); System.out.println("活动名称:"+hai.getName()); System.out.println("办理人:"+hai.getAssignee()); System.out.println("开始时间:"+hai.getStartTime()); System.out.println("结束时间:"+hai.getEndTime()); System.out.println("=================================================================="); } // List<HistoricTaskInstance> list = historyService.createHistoricTaskInstanceQuery().taskAssignee("张三").orderByTaskCreateTime().asc().list(); // for(HistoricTaskInstance hai:list){ // System.out.println("活动ID:"+hai.getId()); // System.out.println("流程实例ID:"+hai.getProcessInstanceId()); // System.out.println("活动名称:"+hai.getName()); // System.out.println("办理人:"+hai.getAssignee()); // System.out.println("开始时间:"+hai.getStartTime()); // System.out.println("结束时间:"+hai.getEndTime()); // System.out.println("=================================================================="); // } } }

优秀的个人博客,低调大师

崛起于Springboot2.0.X之整合RabbitMQ企业场景开发(46)

1、博客涵盖点 1.1 入门级rabbitMQ,了解五种默认的五种开发方案 1.2 使用ssm xml方式集成rabbitMq,五种模式+死信队列方案+jdk8 1.3 本博客项目码云地址:==》springboot+RabbitMQ+所有场景 1、fanout:发布/订阅模式 2、rounting:路由模式 3、topic:通配符模式 4、延迟队列之使用CustomExchange方案:需要安装延迟插件 点击==》安装详情 5、延迟队列之死信队列 2、场景 引言:(九天博客实时更新修改,即便你是复制到你的网站博客,也看不到每一篇博客的优化,不如关注我哈) RabbitMQ 场景应用: 1、秒杀场景:高并发请求线程进入消息队列,根据先进先出原则,执行秒杀逻辑 2、延迟队列【两种方式 使用插件延迟 和 死信队列延迟】: 2.1:用户下订单,但是不支付,超过30分钟订单自动取消 2.2:用户注册成功之后,需要过一段时间比如一周后校验用户的使用情况,如果发现用户活跃度较低,则发送邮件或者短信来提醒用户使用。 2.3: 延迟重试。比如消费者从队列里消费消息时失败了,但是想要延迟一段时间后自动重试 3、异步操作【异步操作比同步快】: 3.1:异步记录用户操作日志:用户的登陆app,发送到消息队列,监听记录用户的登陆时间、设备,来源ip等信息... 3.2:异步发送邮件:注册或者忘记密码的时候,通常某某网站会提示发送你邮箱一个链接,请点击。 3.3:异步发送短信验证码:用户忘记密码或者使用手机验证码登陆时,可以执行异步,没必要让程序串行完成所有操作最后才能接受到验证码 3、pom文件 springboot 2.0.X的依赖大家自己加上去吧,应该也适用于 springboot2.1.X。 <dependency> <groupId>org.springframework.boot</groupId> <artifactId>spring-boot-starter-amqp</artifactId> </dependency> <!--工具类--> <dependency> <groupId>cn.hutool</groupId> <artifactId>hutool-all</artifactId> <version>4.6.1</version> </dependency> 4、application.properties spring.rabbitmq.host=localhost spring.rabbitmq.port=5672 spring.rabbitmq.username=guest spring.rabbitmq.password=guest spring.rabbitmq.virtual-host=/ spring.rabbitmq.listener.simple.concurrency=3 spring.rabbitmq.listener.simple.max-concurrency=10 spring.rabbitmq.listener.simple.acknowledge-mode=manual 5、java配置类 4.1 rabbitmq配置 import org.springframework.amqp.core.AcknowledgeMode; import org.springframework.amqp.core.AmqpAdmin; import org.springframework.amqp.rabbit.annotation.EnableRabbit; import org.springframework.amqp.rabbit.config.SimpleRabbitListenerContainerFactory; import org.springframework.amqp.rabbit.connection.CachingConnectionFactory; import org.springframework.amqp.rabbit.connection.ConnectionFactory; import org.springframework.amqp.rabbit.core.RabbitAdmin; import org.springframework.amqp.rabbit.core.RabbitTemplate; import org.springframework.amqp.support.converter.Jackson2JsonMessageConverter; import org.springframework.amqp.support.converter.MessageConverter; import org.springframework.beans.factory.annotation.Value; import org.springframework.context.annotation.Bean; import org.springframework.context.annotation.Configuration; @Configuration @EnableRabbit public class RabbbitConfig { @Value("${spring.rabbitmq.host}") public String host; @Value("${spring.rabbitmq.port}") public int port; @Value("${spring.rabbitmq.username}") public String username; @Value("${spring.rabbitmq.password}") public String password; @Value("${spring.rabbitmq.virtual-host}") public String virtual_host; @Bean public ConnectionFactory connectionFactory() { CachingConnectionFactory connectionFactory = new CachingConnectionFactory(host); connectionFactory.setUsername(username); connectionFactory.setPassword(password); connectionFactory.setPort(port); connectionFactory.setVirtualHost(virtual_host); return connectionFactory; } @Bean public AmqpAdmin amqpAdmin() { return new RabbitAdmin(connectionFactory()); } @Bean public RabbitTemplate rabbitTemplate() { return new RabbitTemplate(connectionFactory()); } //配置消费者监听的容器 @Bean public SimpleRabbitListenerContainerFactory rabbitListenerContainerFactory() { SimpleRabbitListenerContainerFactory factory = new SimpleRabbitListenerContainerFactory(); factory.setConnectionFactory(connectionFactory()); factory.setConcurrentConsumers(3); factory.setMaxConcurrentConsumers(10); factory.setAcknowledgeMode(AcknowledgeMode.MANUAL);//设置确认模式手工确认 return factory; } @Bean MessageConverter messageConverter() { return new Jackson2JsonMessageConverter(); } } 4.2Exchange配置 import org.springframework.amqp.core.*; import org.springframework.context.annotation.Bean; import org.springframework.context.annotation.Configuration; import org.springframework.stereotype.Component; import java.util.HashMap; import java.util.Map; /** * @Author:MuJiuTian * @Description:所有的exchange列表 * @Date: Created in 下午11:04 2019/8/19 */ @Component @Configuration public class ExchangeConfig { /** * 创建类型:fanout交换机 */ @Bean public FanoutExchange fanoutExchange() { return new FanoutExchange("fanout_exchange",true,false,null); } /** * 创建类型:direct交换机 */ @Bean public DirectExchange directExchange() { return new DirectExchange("direct_exchange",true,false,null); } /** * 创建类型:topic交换机 */ @Bean public TopicExchange topicExchange() { return new TopicExchange("IExchange",true,false,null); } /** * 创建类型:custom交换机,该交换机需要安装delay_rabbitmq插件才能运行 */ @Bean public CustomExchange customExchange() { Map<String, Object> args = new HashMap<>(); args.put("x-delayed-type", "direct"); return new CustomExchange("custom_exchange","x-delayed-message",true,false,args); } /** * 创建类型:headers交换机 */ @Bean public HeadersExchange headersExchange() { return new HeadersExchange("headers_exchange",true,false,null); } /** * 延迟:immediate交换机 */ @Bean public DirectExchange immediateExchange() { return new DirectExchange("immediate_exchange"); } /** * 延迟:dlx_delay交换机 */ @Bean public DirectExchange dlxExchange() { return new DirectExchange("dlx_delay_exchange"); } } 4.3Queue配置 import org.springframework.amqp.core.Queue; import org.springframework.context.annotation.Bean; import org.springframework.context.annotation.Configuration; import org.springframework.stereotype.Component; import java.util.HashMap; import java.util.Map; /** * @Author:MuJiuTian * @Description: 所有的队列统一配置 * @Date: Created in 下午11:36 2019/8/19 */ @Configuration @Component public class QueueConfig { /** * 针对fanout交换机的队列 */ @Bean public Queue fanoutQueue1() { return new Queue("fanout_queue_1"); } /** * 针对fanout交换机的队列 */ @Bean public Queue fanoutQueue2() { return new Queue("fanout_queue_2"); } /** * 针对direct交换机的队列 */ @Bean public Queue directQueue1() { return new Queue("direct_queue_1"); } /** * 针对direct交换机的队列 */ @Bean public Queue directQueue2() { return new Queue("direct_queue_2"); } /** * 针对topic交换机的队列 */ @Bean public Queue topicQueue1() { return new Queue("topic_queue_1"); } /** * 针对topic交换机的队列 */ @Bean public Queue topicQueue2() { return new Queue("topic_queue_2"); } /** * 延迟队列 */ @Bean public Queue delayQueue() { return new Queue("delay_queue"); } /** * 死信队列方式中的立即消费队列 */ @Bean public Queue immediateQueue() { return new Queue("immediate"); } /** * 死信队列方式中的延迟队列 */ @Bean public Queue dlxDelay() { Map<String,Object> map = new HashMap<>(); //map.put("x-message-ttl",6000);,延迟时间,不过我们不需要在这里配置,在service设置就好了 // x-dead-letter-exchange 声明了队列里的死信转发到的DLX名称 map.put("x-dead-letter-exchange","immediate_exchange"); // x-dead-letter-routing-key 声明了这些死信在转发时携带的 routing-key 名称。 map.put("x-dead-letter-routing-key","immediate_road"); return new Queue("dlx_delay_queue",true,false,false,map); } } 4.4exchange与queue关系绑定配置 import org.springframework.amqp.core.Binding; import org.springframework.amqp.core.BindingBuilder; import org.springframework.beans.factory.annotation.Autowired; import org.springframework.context.annotation.Bean; import org.springframework.context.annotation.Configuration; /** * @Author:MuJiuTian * @Description: 所有的exchange与queue之间的routing key * @Date: Created in 下午11:39 2019/8/19 */ @Configuration public class BindingConfig { @Autowired ExchangeConfig exchange; @Autowired QueueConfig queue; @Bean public Binding bindFanout1() { return BindingBuilder.bind(queue.fanoutQueue1()).to(exchange.fanoutExchange()); } @Bean public Binding bindFanout2() { return BindingBuilder.bind(queue.fanoutQueue2()).to(exchange.fanoutExchange()); } @Bean public Binding bindDirectOrange() { return BindingBuilder.bind(queue.directQueue1()).to(exchange.directExchange()).with("orange"); } @Bean public Binding bindDirectBlack() { return BindingBuilder.bind(queue.directQueue2()).to(exchange.directExchange()).with("black"); } @Bean public Binding bindDirectGreen() { return BindingBuilder.bind(queue.directQueue2()).to(exchange.directExchange()).with("green"); } @Bean public Binding bindTopic1(){ Binding binding= BindingBuilder.bind(queue.topicQueue1()).to(exchange.topicExchange()).with("*.orange.*"); return binding; } @Bean public Binding bindTopic2(){ Binding binding= BindingBuilder.bind(queue.topicQueue2()).to(exchange.topicExchange()).with("*.*.rabbit"); return binding; } @Bean public Binding bindTopic3(){ Binding binding= BindingBuilder.bind(queue.topicQueue2()).to(exchange.topicExchange()).with("lazy.#"); return binding; } @Bean public Binding bindCustom() { return BindingBuilder.bind(queue.delayQueue()).to(exchange.customExchange()).with("delay_queue_road").noargs(); } @Bean public Binding immediate() { return BindingBuilder.bind(queue.immediateQueue()).to(exchange.immediateExchange()).with("immediate_road"); } @Bean public Binding dlxDelay() { return BindingBuilder.bind(queue.dlxDelay()).to(exchange.dlxExchange()).with("dlx_delay_road"); } } 6、实体类 import java.io.Serializable; /** * @Author:MuJiuTian * @Description: * @Date: Created in 下午6:01 2019/8/19 */ public class Mail implements Serializable { private static final long serialVersionUID = -8140693840257585779L; private String mailId; private String country; private Double weight; public Mail() { } public Mail(String mailId, String country, double weight) { this.mailId = mailId; this.country = country; this.weight = weight; } public String getMailId() { return mailId; } public void setMailId(String mailId) { this.mailId = mailId; } public String getCountry() { return country; } public void setCountry(String country) { this.country = country; } public double getWeight() { return weight; } public void setWeight(double weight) { this.weight = weight; } @Override public String toString() { return "Mail [mailId=" + mailId + ", country=" + country + ", weight=" + weight + "]"; } } 7、service层 public interface Producer { void sendMessage(String exchange, String rountingKey, Object object); void delayMessage(String exchange, String rountingKey, long time, Object object); void dlxDelayMessage(String exchange, String rountingKey, long time, Object object); void sendAndReceive(String exchange, String rountingKey, Object object); } import com.example.rabbit.service.Producer; import org.springframework.amqp.rabbit.core.RabbitTemplate; import org.springframework.beans.factory.annotation.Autowired; import org.springframework.stereotype.Service; import org.springframework.transaction.annotation.Transactional; /** * @Author:MuJiuTian * @Description: * @Date: Created in 下午9:52 2019/8/19 */ @Service @Transactional public class ProducerImpl implements Producer { @Autowired RabbitTemplate rabbitTemplate; /** * @Author:MuJiuTian * @Date:2019/8/20 下午4:10 * @Description: */ @Override public void sendMessage(String exchange, String rountingKey, Object object) { rabbitTemplate.convertAndSend(exchange,rountingKey,object); } /** * @Author:MuJiuTian * @Date:2019/8/20 下午4:41 * @Description: */ @Override public void delayMessage(String exchange, String rountingKey, long time, Object object) { rabbitTemplate.convertAndSend(exchange,rountingKey,object,message -> { message.getMessageProperties().setHeader("x-delay",time); return message; }); } @Override public void dlxDelayMessage(String exchange, String rountingKey, long time, Object object) { rabbitTemplate.convertAndSend(exchange, rountingKey, object, message -> { message.getMessageProperties().setExpiration(time + ""); return message; }); } /** * @Author:MuJiuTian * @Date:2019/8/20 下午4:46 * @Description:发送与消费一步完成,前提是监听器业务逻辑处理没有任何异常 */ @Override public void sendAndReceive(String exchange, String rountingKey, Object object) { rabbitTemplate.convertSendAndReceive(exchange,rountingKey,object); } } 8、controller层 import cn.hutool.core.date.DateUtil; import com.example.rabbit.entity.Mail; import com.example.rabbit.service.impl.ProducerImpl; import org.springframework.beans.factory.annotation.Autowired; import org.springframework.web.bind.annotation.GetMapping; import org.springframework.web.bind.annotation.RequestMapping; import org.springframework.web.bind.annotation.ResponseBody; import org.springframework.web.bind.annotation.RestController; import java.util.Date; import java.util.Random; /** * @Author:MuJiuTian * @Description: * @Date: Created in 下午10:23 2019/8/19 */ @RestController public class RabbitController { @Autowired ProducerImpl producer; /** * @Author:MuJiuTian * @Date:2019/8/20 上午10:59 * @Description:使用fanout交换机模式测试rabbit,该模式没有routingKey */ @RequestMapping(value = "/fanout") public void fanout() { Mail mail = randomMail(); producer.sendMessage("fanout_exchange",null,mail); } /** * @Author:MuJiuTian * @Date:2019/8/20 上午11:00 * @Description:使用direct交换机模式测试rabbit,支持routingKey多路由模式 */ @RequestMapping(value = "/direct") public void direct() { Mail mail = randomMail(); producer.sendMessage("direct_exchange","",mail); } /** * @Author:MuJiuTian * @Date:2019/8/20 上午11:00 * @Description:使用topic交换机模式测试rabbit,支持routingKey通配符模式 */ @RequestMapping(value = "/topic") @ResponseBody public void topic() { Mail mail = randomMail(); //producer.sendMessage("IExchange","lazy.mm",mail); producer.sendMessage("IExchange","love.orange.hate",mail); } /** * @Author:MuJiuTian * @Date:2019/8/20 下午4:34 * @Description:延迟队列测试,毫秒为单位 */ @GetMapping(value = "/delay") @ResponseBody public void delay() { Mail mail = randomMail(); String now = DateUtil.format(new Date(),"yyyy-MM-dd HH:mm:ss"); System.out.println("延迟发送时间:"+now+"数据:"+mail.toString()); producer.delayMessage("custom_exchange","delay_queue_road",3000,mail); } /** * @Author:MuJiuTian * @Date:2019/8/21 上午10:17 * @Description:延迟队列死信队列方式 */ @GetMapping(value = "/dlxDelay") public void dlxDelay() { Mail mail = randomMail(); String now = DateUtil.format(new Date(),"yyyy-MM-dd HH:mm:ss"); System.out.println("延迟发送时间:"+now+"数据:"+mail.toString()); producer.dlxDelayMessage("dlx_delay_exchange","dlx_delay_road",3000,mail); } /** * 随机创建一个Mail实体对象,供接口测试 */ public static Mail randomMail() { Mail mail = new Mail(); mail.setMailId(new Random().nextInt(100)+""); mail.setCountry("China"); mail.setWeight(new Random().nextDouble()); return mail; } } 9、监听器 import cn.hutool.core.date.DateUtil; import com.example.rabbit.entity.Mail; import com.rabbitmq.client.Channel; import org.springframework.amqp.rabbit.annotation.RabbitHandler; import org.springframework.amqp.rabbit.annotation.RabbitListener; import org.springframework.amqp.rabbit.core.RabbitTemplate; import org.springframework.beans.factory.annotation.Autowired; import org.springframework.messaging.handler.annotation.Header; import org.springframework.messaging.handler.annotation.Headers; import org.springframework.messaging.handler.annotation.Payload; import org.springframework.stereotype.Component; import java.io.IOException; import java.text.DateFormat; import java.util.Date; import java.util.Map; /** * @Author:MuJiuTian * @Description: Message包含 @Payload Object obj和@Headers Map<String,Object> heads两者 * @Payload @Headers @Header(name = "amqp_deliveryTag") @RabbitListener @RabbitHandler 总共5个注解的使用 * @Date: Created in 下午10:06 2019/8/19 */ @Component public class MyListener { @Autowired RabbitTemplate rabbitTemplate; @RabbitListener(queues = "fanout_queue_1") public void fanoutQueue1(Mail mail) throws IOException { System.out.println("fanout_queue_1队列取出消息"+mail.toString()); } @RabbitListener(queues = "fanout_queue_2") public void fanoutQueue2(Mail mail) throws IOException { System.out.println("fanout_queue_2队列取出消息"+mail.toString()); } @RabbitListener(queues = "direct_queue_1") public void directQueue1(Mail mail) { System.out.println("direct_queue_1队列取出消息"+mail.toString()); } @RabbitListener(queues = "direct_queue_2") public void directQueue2(Mail mail) { System.out.println("direct_queue_2队列取出消息"+mail.toString()); } @RabbitListener(queues = "topic_queue_1") public void topicQueue1(Mail mail) { System.out.println("从topic_queue_1取出消息"+mail.toString()); } @RabbitListener(queues = "topic_queue_2") public void topicQueue2(@Payload Mail mail, @Headers Map<String,Object> heads,Channel channel) throws IOException { System.out.println("到达监听器,准备处理RabbitMQ业务逻辑,从topic_queue_2取出消息=="+mail.toString()); //第一步:业务逻辑处理,如活动秒杀 //第二部:业务逻辑处理成功之后,消费掉消息 channel.basicAck(Long.valueOf(heads.get("amqp_deliveryTag").toString()),true); } @RabbitListener(queues = "delay_queue") public void delay(@Payload Mail mail, @Header(name = "amqp_deliveryTag") long deliveryTag,Channel channel) throws IOException { System.out.println("延迟队列接受时间:"+ DateUtil.format(new Date(),"yyyy-MM-dd HH:mm:ss")); //第一步:业务逻辑处理,如下订单内30分钟不支付情况下,自动取消订单,这里就不写了,主要体现rabbitmq的延迟功能 //第二部:业务逻辑处理成功之后,消费掉消息 channel.basicAck(deliveryTag,false); } @RabbitListener(queues = "immediate") @RabbitHandler public void immediate(@Payload Mail mail) { System.out.println("此刻时间是:"+ DateUtil.format(new Date(), DateFormat.getDateTimeInstance())+"要处理的数据="+mail); } } 10、项目启动 项目启动后,打开localhost:15672,里面的exchange和queue会自动配置好,不过还是要检查一下exchange和queue有没有绑定关系好,都可以了进行测试,如下: 10.1 topic测试:http://localhost:8080/topic 10.2 延迟队列,使用CustomExchange测试:http://localhost:8080/delay 10.3 延迟队列,方式二,使用死信队列方式测试:http://localhost:8080/dlxDelay 喜欢我就关注我吧....嘻嘻嘻。

优秀的个人博客,低调大师

SpringCloud系列----->SpringBoot项目中整合jooq和postgresql数据库

前言: 公司的BI项目采取的是SpringBoot + Jooq + postgresql 组织形势,现在将这个配置过程,详细记录下来。 Jooq和MyBatis和spring data jpa作用是一样的,都是用来链接操作数据库的。 Jooq的优点: (1)、DSL(Domain Specific Language )风格,代码够简单和清晰。遇到不会写的sql可以充分利用IDEA代码提示功能轻松完成。 (2)、保留了传统ORM 的优点,简单操作性,安全性,类型安全等。不需要复杂的配置,并且可以利用Java 8 Stream API 做更加复杂的数据转换。 (3)、支持主流的RDMS和更多的特性,如self-joins,union,存储过程,复杂的子查询等等。 (4)、丰富的Fluent API和完善文档。 (5)、runtime schema mapping 可以支持多个数据库schema访问。简单来说使用一个连接池可以访问N个DB schema,使用比较多的就是SaaS应用的多租户场景。 好了,不多啰嗦了,Jooq的详细文档还是请大家,看官方文档:https://www.jooq.org/ 公司的项目是采用gradle 组织的,gradle和maven是一样的,但是gradle的配置文件更清晰,maven的xml组织形式,啰嗦长,看着就晕,不简洁。有关gradle和maven的相关详细使用方法的请参考gradle和maven的官网。 闲话少劳聊,直接上build.gradle代码,在代码注释中详细说明每个配置的详细的作用: plugins { id 'org.springframework.boot' version '2.1.3.RELEASE' #springboot版本 id 'java' #标识是java项目 id 'nu.studer.jooq' version '3.0.3' #jooq的版本号 } apply plugin: 'io.spring.dependency-management' apply plugin: 'jacoco' #引入生成文档的jar包 group = 'com.jingdata.asset.manage.bi' #略 version = '0.0.1-SNAPSHOT' #略 sourceCompatibility = '1.8' #java版本 repositories { mavenLocal() mavenCentral() } dependencies { implementation 'org.springframework.boot:spring-boot-starter-data-redis' implementation 'org.springframework.boot:spring-boot-starter-jooq' #springboot对jooq直接支持,jooq的springboot的starter implementation 'org.springframework.boot:spring-boot-starter-web' implementation 'org.springframework.boot:spring-boot-starter-aop' implementation 'org.springframework.boot:spring-boot-starter-actuator' implementation 'org.aspectj:aspectjrt:1.6.11' implementation 'org.aspectj:aspectjweaver:1.6.11' implementation 'cglib:cglib:2.1' implementation 'org.springframework:spring-aop:4.3.9.RELEASE' implementation 'io.springfox:springfox-swagger2:2.8.0' implementation 'io.springfox:springfox-swagger-ui:2.8.0' compile group: 'org.apache.commons', name: 'commons-lang3', version: '3.1' compile("org.togglz:togglz-spring-boot-starter:2.6.1.Final") runtimeOnly 'org.postgresql:postgresql' #postgresql的链接支持 testImplementation 'org.springframework.boot:spring-boot-starter-test' compileOnly 'org.projectlombok:lombok:1.18.2' jooqRuntime 'postgresql:postgresql:9.1-901-1.jdbc4' #postgresql的链接支持 } test { include '**/*Test.class' #单元测试命令,执行gradle test命令只会执行测试文件中以Test结尾的文件中的所有的测试方法。 } task testInteg(type: Test) { include '**/*Integ.class' #单元测试命令,执行gradle testInteg命令只会执行测试文件中以Integ结尾的文件中的所有的测试方法。 #之所以需要gradle test , gradle testInteg两个命令,是因为有些我们这里需要区分涉及外部依赖(redis,mongodb,pg数据库,elasticsearch等)的单元测试,和不涉及外部依赖的单元测试(内存中执行就行),几十个组件的集成测试时,组件之间彼此需要依赖彼此产生的数据时,h2之类的内存数据库,就不能满足测试需要了,跑一次gradle testInteg 命令,把需要的数据保存在redis,mongodb,pg数据库,elasticsearch 等中。 #公司的项目要求,每次git push提交代码和jenkins部署项目的时候需要执行一下gradle test 命令,确认修改的代码没有破坏以前的功能。 #测试同事在整个系统集成的时候,需要执行gradle test , gradle testInteg两个命令,其中gradle test经常执行,gradle testInteg 在系统几十个模块集成的时候,会执行。 } #jooq配置,自动生成数据库表和字段的对应关系的一系列的java class文件 jooq { version = '3.11.9' edition = 'OSS' sample(sourceSets.main) { jdbc { driver = 'org.postgresql.Driver' #jooq链接数据库的驱动 url = 'jdbc:postgresql://127.0.0.1:5432/invest111' #数据库链接地址 user = 'inves111' #连接数据库的用户名 password = 'invest111' #连接数据库的密码 } generator { name = 'org.jooq.codegen.DefaultGenerator' strategy { name = 'org.jooq.codegen.DefaultGeneratorStrategy' // ... } database() { name = 'org.jooq.meta.postgres.PostgresDatabase' inputSchema = 'public' #只生成public schema中的表 includes='paas_bi_.*|paas_datarights_.*|paas_mt_.*|paas_auth_.*|paas_org_.*' #只需要paas_bi 、 paas_datarights、paas_mt、paas_auth、paas_org 开头的一系列的表。 } generate() {} target { packageName = 'com.jingdata.asset.manage.bi.assetmanagesystem.bidb' #生成文件夹的名字 directory = 'src/main/java' #生成文件所在的目录 } } } } settings.gradle文件的内容: pluginManagement { repositories { gradlePluginPortal() } } rootProject.name = 'asset-manage-system' 所有这些配置完成后,就会如图所示,执行这个命令,就会把数据库中的表自动生成出来: ![1564371259390](https://yqfile.alicdn.com/23bcb12200ad1136ea627ee340584ecdcae8e30d.jpeg) 我们执行gradle test命令结果如下: ![2222](https://yqfile.alicdn.com/0457c862e6b19e4203ba81d8e772391c194d0730.jpeg) 会在项目的目录下生成一个build文件夹,这个目录下会有本次执行单元测试生成的单元测试报告,单元测试报告打开后是这样一个效果: ![4444](https://yqfile.alicdn.com/4d75c24182206129c9e068eaf038c909b314981b.jpeg) gradle testInteg命令生成的单元测试也在这里,我这里就不赘述了。 这一部分是jooq自动生成的对应的数据库的表的java文件: ![6666](https://yqfile.alicdn.com/c209be982f43530097f82b35871a919929a8ea30.jpeg) 项目的src/main/resources下的application.properties文件中的配置内容: server.port=8006 spring.datasource.url = jdbc:postgresql://127.0.0.1:5432/invest111 spring.datasource.driver-class-nam = org.postgresql.Driver spring.datasource.username = invest111 spring.datasource.password = invest111 spring.datasource.minIdle = 5 spring.datasource.maxActive = 50 spring.datasource.maxWait = 60000 spring.datasource.timeBetweenEvictionRunsMillis = 60000 spring.datasource.minEvictableIdleTimeMillis = 300000 spring.datasource.validationQuery = SELECT 1 FROM DUAL spring.datasource.testWhileIdle = true spring.datasource.testOnBorrow = false spring.datasource.testOnReturn = false spring.datasource.poolPreparedStatements = true spring.datasource.maxPoolPreparedStatementPerConnectionSize = 20 spring.datasource.connectionProperties = druid.stat.mergeSql=true;druid.stat.slowSqlMillis=5000 spring.jooq.sql-dialect = postgres bi.http.port = 8006 bi.client.host = clientbi.2222.com #日志相关配置 logging.file= ./logs/jingdata-bi-pg logging.level.root= ERROR logging.level.com.jingdata= DEBUG logging.level.org.springframework.web= DEBUG logging.level.com.netflix.discovery.DiscoveryClien= OFF logging.level.com.netflix.discovery.InstanceInfoReplicator= OFF 基本是一看就行,也就不啰嗦了。 下面再给出,一些使用jooq在postgresql 数据中的表中做CURD操作的代码,不啰嗦,直接上,几乎是一看就懂: package com.jingdata.asset.manage.bi.assetmanagesystem.system.impl; import com.jingdata.asset.manage.bi.assetmanagesystem.system.function.IAnnouncementReferencesService; import com.jingdata.asset.manage.bi.assetmanagesystem.system.impl.base.BaseImpl; import com.jingdata.asset.manage.bi.assetmanagesystem.transform.ReferenceInfoVo; import com.jingdata.asset.manage.bi.assetmanagesystem.transform.ReferenceTransform; import org.jooq.Record; import org.jooq.Result; import org.jooq.impl.DSL; import org.slf4j.Logger; import org.slf4j.LoggerFactory; import org.springframework.stereotype.Service; import java.sql.Timestamp; import java.util.List; import static com.jingdata.asset.manage.bi.assetmanagesystem.bidb.Tables.PAAS_BI_ANNOUNCEMENT_REFERENCES; /** * @date 2019-02-28 * */ @Service public class AnnouncementReferencesImpl extends BaseImpl implements IAnnouncementReferencesService { private final Logger logger = LoggerFactory.getLogger(this.getClass()); private ReferenceTransform referenceTransform = new ReferenceTransform(); @Override public List<ReferenceInfoVo> getOneAnnouncementReferences(Integer announcementId) { Result<Record> records = getDSLContext().select().from(PAAS_BI_ANNOUNCEMENT_REFERENCES) .where(DSL.field(PAAS_BI_ANNOUNCEMENT_REFERENCES.USER_ID).eq("5bcfd9f06faa7b79fd28c304")) .and(DSL.field(PAAS_BI_ANNOUNCEMENT_REFERENCES.IS_DELETED).eq(0)) .and(DSL.field(PAAS_BI_ANNOUNCEMENT_REFERENCES.REFERENCE_ID).eq(announcementId)) .orderBy(DSL.field(PAAS_BI_ANNOUNCEMENT_REFERENCES.ID).desc()) .fetch(); return referenceTransform.transformReferenceRecord(records); } @Override public Integer addOneAnnouncementReferences(Integer announcementId, String reportList, String chartList) { return getDSLContext().insertInto(PAAS_BI_ANNOUNCEMENT_REFERENCES) .set(DSL.field(PAAS_BI_ANNOUNCEMENT_REFERENCES.APP_ID), "1111122222") .set(DSL.field(PAAS_BI_ANNOUNCEMENT_REFERENCES.USER_ID), "1111122222") .set(DSL.field(PAAS_BI_ANNOUNCEMENT_REFERENCES.TENANT_ID), "1111122222") .set(DSL.field(PAAS_BI_ANNOUNCEMENT_REFERENCES.CREATED_BY), "1111122222") .set(DSL.field(PAAS_BI_ANNOUNCEMENT_REFERENCES.UPDATED_BY), "1111122222") .set(DSL.field(PAAS_BI_ANNOUNCEMENT_REFERENCES.IS_DELETED), 0) .set(DSL.field(PAAS_BI_ANNOUNCEMENT_REFERENCES.UPDATED_AT), new Timestamp(System.currentTimeMillis())) .set(DSL.field(PAAS_BI_ANNOUNCEMENT_REFERENCES.CREATED_AT), new Timestamp(System.currentTimeMillis())) //1表示报表,2表示图表 .set(DSL.field(PAAS_BI_ANNOUNCEMENT_REFERENCES.REFERENCE_TYPE), 1) //1表示报表,2表示图表 .set(DSL.field(PAAS_BI_ANNOUNCEMENT_REFERENCES.REFERENCE_ID), Integer.parseInt("111")) //1表示报表,2表示图表 .set(DSL.field(PAAS_BI_ANNOUNCEMENT_REFERENCES.SOURCE_ID), announcementId) .execute(); } @Override public Integer deleteOneAnnouncementReferences(String referenceIds) { return getDSLContext().delete(PAAS_BI_ANNOUNCEMENT_REFERENCES) .where(DSL.field(PAAS_BI_ANNOUNCEMENT_REFERENCES.ID).eq(Integer.parseInt(referenceIds))).execute(); } @Override public void deleteByMasterChartId(Long masterId, Context context) { dslContext.update(PAAS_BI_DASHBOARD_LINKAGE) .set(PAAS_BI_DASHBOARD_LINKAGE.IS_DELETED, 1) .set(PAAS_BI_DASHBOARD_LINKAGE.UPDATE_BY, context.getUserId()) .set(PAAS_BI_DASHBOARD_LINKAGE.UPDATE_TIME, System.currentTimeMillis()) .where(PAAS_BI_DASHBOARD_LINKAGE.MASTER_CHART_ID.eq(masterId)) .and(PAAS_BI_DASHBOARD_LINKAGE.TENANT_ID.eq(context.getTenantId())) .and(PAAS_BI_DASHBOARD_LINKAGE.APP_ID.eq(context.getAppId())) .and(PAAS_BI_DASHBOARD_LINKAGE.IS_DELETED.eq(0)) .execute(); } } 基本上增、删、改、查都有了。 更高级的用法,jion 、union等相关写法,请参考jooq的官方文档。 本周会给出在码云上的git 源码的链接地址,如果有疑问的,请参考源码,代码胜千言!!!!!

优秀的个人博客,低调大师

SpringBoot2.0高级案例(02) :整合 RocketMQ ,实现请求异步处理

本文源码:GitHub·点这里 || GitEE·点这里 一、RocketMQ 1、架构图片 2、角色分类 (1)、Broker RocketMQ 的核心,接收 Producer 发过来的消息、处理 Consumer 的消费消息请求、消息的持 久化存储、服务端过滤功能等 。 (2)、NameServer 消息队列中的状态服务器,集群的各个组件通过它来了解全局的信息 。类似微服务中注册中心的服务注册,发现,下线,上线的概念。 热备份: NamServer可以部署多个,相互之间独立,其他角色同时向多个NameServer 机器上报状态信息。 心跳机制: NameServer 中的 Broker、 Topic等状态信息不会持久存储,都是由各个角色定时上报并存储到内存中,超时不上报的话, NameServer会认为某个机器出故障不可用。 (3)、Producer 消息的生成者,最常用的producer类就是DefaultMQProducer。 (4)、Consumer 消息的消费者,常用Consumer类 DefaultMQPushConsumer 收到消息后自动调用传入的处理方法来处理,实时性高 DefaultMQPullConsumer 用户自主控制 ,灵活性更高。 3、通信机制 (1)、Broker启动后需要完成一次将自己注册至NameServer的操作;随后每隔30s时间定时向NameServer更新Topic路由信息。 (2)、Producer发送消息时候,需要根据消息的Topic从本地缓存的获取路由信息。如果没有则更新路由信息会从NameServer重新拉取,同时Producer会默认每隔30s向NameServer拉取一次路由信息。 (3)、Consumer消费消息时候,从NameServer获取的路由信息,并再完成客户端的负载均衡后,监听指定消息队列获取消息并进行消费。 二、代码实现案例 1、项目结构图 版本描述 <spring-boot.version>2.1.3.RELEASE</spring-boot.version> <rocketmq.version>4.3.0</rocketmq.version> 2、配置文件 rocketmq: # 生产者配置 producer: isOnOff: on # 发送同一类消息的设置为同一个group,保证唯一 groupName: CicadaGroup # 服务地址 namesrvAddr: 127.0.0.1:9876 # 消息最大长度 默认1024*4(4M) maxMessageSize: 4096 # 发送消息超时时间,默认3000 sendMsgTimeout: 3000 # 发送消息失败重试次数,默认2 retryTimesWhenSendFailed: 2 # 消费者配置 consumer: isOnOff: on # 官方建议:确保同一组中的每个消费者订阅相同的主题。 groupName: CicadaGroup # 服务地址 namesrvAddr: 127.0.0.1:9876 # 接收该 Topic 下所有 Tag topics: CicadaTopic~*; consumeThreadMin: 20 consumeThreadMax: 64 # 设置一次消费消息的条数,默认为1条 consumeMessageBatchMaxSize: 1 # 配置 Group Topic Tag rocket: group: rocketGroup topic: rocketTopic tag: rocketTag 3、生产者配置 /** * RocketMQ 生产者配置 */ @Configuration public class ProducerConfig { private static final Logger LOG = LoggerFactory.getLogger(ProducerConfig.class) ; @Value("${rocketmq.producer.groupName}") private String groupName; @Value("${rocketmq.producer.namesrvAddr}") private String namesrvAddr; @Value("${rocketmq.producer.maxMessageSize}") private Integer maxMessageSize ; @Value("${rocketmq.producer.sendMsgTimeout}") private Integer sendMsgTimeout; @Value("${rocketmq.producer.retryTimesWhenSendFailed}") private Integer retryTimesWhenSendFailed; @Bean public DefaultMQProducer getRocketMQProducer() { DefaultMQProducer producer; producer = new DefaultMQProducer(this.groupName); producer.setNamesrvAddr(this.namesrvAddr); //如果需要同一个jvm中不同的producer往不同的mq集群发送消息,需要设置不同的instanceName if(this.maxMessageSize!=null){ producer.setMaxMessageSize(this.maxMessageSize); } if(this.sendMsgTimeout!=null){ producer.setSendMsgTimeout(this.sendMsgTimeout); } //如果发送消息失败,设置重试次数,默认为2次 if(this.retryTimesWhenSendFailed!=null){ producer.setRetryTimesWhenSendFailed(this.retryTimesWhenSendFailed); } try { producer.start(); } catch (MQClientException e) { e.printStackTrace(); } return producer; } } 4、消费者配置 /** * RocketMQ 消费者配置 */ @Configuration public class ConsumerConfig { private static final Logger LOG = LoggerFactory.getLogger(ConsumerConfig.class) ; @Value("${rocketmq.consumer.namesrvAddr}") private String namesrvAddr; @Value("${rocketmq.consumer.groupName}") private String groupName; @Value("${rocketmq.consumer.consumeThreadMin}") private int consumeThreadMin; @Value("${rocketmq.consumer.consumeThreadMax}") private int consumeThreadMax; @Value("${rocketmq.consumer.topics}") private String topics; @Value("${rocketmq.consumer.consumeMessageBatchMaxSize}") private int consumeMessageBatchMaxSize; @Resource private RocketMsgListener msgListener; @Bean public DefaultMQPushConsumer getRocketMQConsumer(){ DefaultMQPushConsumer consumer = new DefaultMQPushConsumer(groupName); consumer.setNamesrvAddr(namesrvAddr); consumer.setConsumeThreadMin(consumeThreadMin); consumer.setConsumeThreadMax(consumeThreadMax); consumer.registerMessageListener(msgListener); consumer.setConsumeFromWhere(ConsumeFromWhere.CONSUME_FROM_LAST_OFFSET); consumer.setConsumeMessageBatchMaxSize(consumeMessageBatchMaxSize); try { String[] topicTagsArr = topics.split(";"); for (String topicTags : topicTagsArr) { String[] topicTag = topicTags.split("~"); consumer.subscribe(topicTag[0],topicTag[1]); } consumer.start(); }catch (MQClientException e){ e.printStackTrace(); } return consumer; } } 5、消息监听配置 /** * 消息消费监听 */ @Component public class RocketMsgListener implements MessageListenerConcurrently { private static final Logger LOG = LoggerFactory.getLogger(RocketMsgListener.class) ; @Resource private ParamConfigService paramConfigService ; @Override public ConsumeConcurrentlyStatus consumeMessage(List<MessageExt> list, ConsumeConcurrentlyContext context) { if (CollectionUtils.isEmpty(list)){ return ConsumeConcurrentlyStatus.CONSUME_SUCCESS; } MessageExt messageExt = list.get(0); LOG.info("接受到的消息为:"+new String(messageExt.getBody())); int reConsume = messageExt.getReconsumeTimes(); // 消息已经重试了3次,如果不需要再次消费,则返回成功 if(reConsume ==3){ return ConsumeConcurrentlyStatus.CONSUME_SUCCESS; } if(messageExt.getTopic().equals(paramConfigService.rocketTopic)){ String tags = messageExt.getTags() ; switch (tags){ case "rocketTag": LOG.info("开户 tag == >>"+tags); break ; default: LOG.info("未匹配到Tag == >>"+tags); break; } } // 消息消费成功 return ConsumeConcurrentlyStatus.CONSUME_SUCCESS; } } 6、配置参数绑定 @Service public class ParamConfigService { @Value("${rocket.group}") public String rocketGroup ; @Value("${rocket.topic}") public String rocketTopic ; @Value("${rocket.tag}") public String rocketTag ; } 7、消息发送测试 @Service public class RocketMqServiceImpl implements RocketMqService { @Resource private DefaultMQProducer defaultMQProducer; @Resource private ParamConfigService paramConfigService ; @Override public SendResult openAccountMsg(String msgInfo) { // 可以不使用Config中的Group defaultMQProducer.setProducerGroup(paramConfigService.rocketGroup); SendResult sendResult = null; try { Message sendMsg = new Message(paramConfigService.rocketTopic, paramConfigService.rocketTag, "open_account_key", msgInfo.getBytes()); sendResult = defaultMQProducer.send(sendMsg); } catch (Exception e) { e.printStackTrace(); } return sendResult ; } } 三、项目源码 GitHub·地址 https://github.com/cicadasmile/middle-ware-parent GitEE·地址 https://gitee.com/cicadasmile/middle-ware-parent

优秀的个人博客,低调大师

Spring Boot Security 整合 OAuth2 设计安全API接口服务

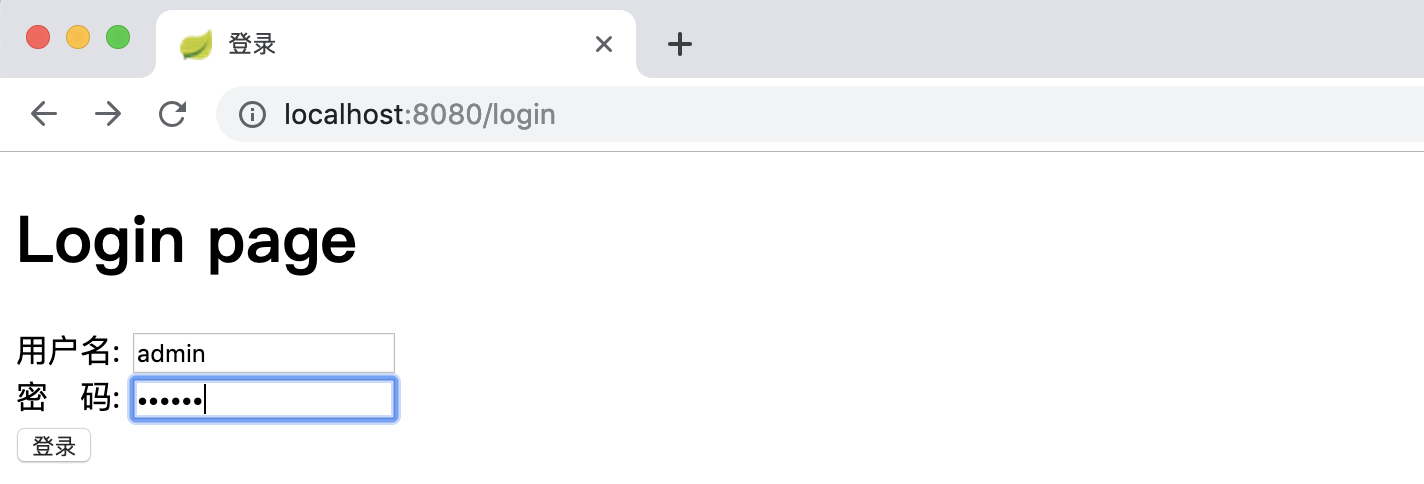
文章首发于公众号《程序员果果》地址:https://mp.weixin.qq.com/s/0PAUErDh0qmcR4SUsTn15Q 简介 OAuth是一个关于授权(authorization)的开放网络标准,在全世界得到广泛应用,目前的版本是2.0版。本文重点讲解Spring Boot项目对OAuth2进行的实现,如果你对OAuth2不是很了解,你可以先理解 OAuth 2.0 - 阮一峰,这是一篇对于oauth2很好的科普文章。 OAuth2概述 oauth2根据使用场景不同,分成了4种模式 授权码模式(authorization code) 简化模式(implicit) 密码模式(resource owner password credentials) 客户端模式(client credentials) 在项目中我们通常使用授权码模式,也是四种模式中最复杂的,通常网站中经常出现的微博,qq第三方登录,都会采用这个形式。 Oauth2授权主要由两部分组成: Authorization server:认证服务 Resource server:资源服务 在实际项目中以上两个服务可以在一个服务器上,也可以分开部署。下面结合spring boot来说明如何使用。 快速上手 之前的文章已经对 Spring Security 进行了讲解,这一节对涉及到 Spring Security 的配置不详细讲解。若不了解 Spring Security 先移步到 Spring Boot Security 详解。 建表 客户端信息可以存储在内存、redis和数据库。在实际项目中通常使用redis和数据库存储。本文采用数据库。Spring 0Auth2 己经设计好了数据库的表,且不可变。表及字段说明参照:Oauth2数据库表说明 。 创建0Auth2数据库的脚本如下: DROP TABLE IF EXISTS `clientdetails`; DROP TABLE IF EXISTS `oauth_access_token`; DROP TABLE IF EXISTS `oauth_approvals`; DROP TABLE IF EXISTS `oauth_client_details`; DROP TABLE IF EXISTS `oauth_client_token`; DROP TABLE IF EXISTS `oauth_refresh_token`; CREATE TABLE `clientdetails` ( `appId` varchar(128) NOT NULL, `resourceIds` varchar(256) DEFAULT NULL, `appSecret` varchar(256) DEFAULT NULL, `scope` varchar(256) DEFAULT NULL, `grantTypes` varchar(256) DEFAULT NULL, `redirectUrl` varchar(256) DEFAULT NULL, `authorities` varchar(256) DEFAULT NULL, `access_token_validity` int(11) DEFAULT NULL, `refresh_token_validity` int(11) DEFAULT NULL, `additionalInformation` varchar(4096) DEFAULT NULL, `autoApproveScopes` varchar(256) DEFAULT NULL, PRIMARY KEY (`appId`) ) ENGINE=InnoDB DEFAULT CHARSET=utf8; CREATE TABLE `oauth_access_token` ( `token_id` varchar(256) DEFAULT NULL, `token` blob, `authentication_id` varchar(128) NOT NULL, `user_name` varchar(256) DEFAULT NULL, `client_id` varchar(256) DEFAULT NULL, `authentication` blob, `refresh_token` varchar(256) DEFAULT NULL, PRIMARY KEY (`authentication_id`) ) ENGINE=InnoDB DEFAULT CHARSET=utf8; CREATE TABLE `oauth_approvals` ( `userId` varchar(256) DEFAULT NULL, `clientId` varchar(256) DEFAULT NULL, `scope` varchar(256) DEFAULT NULL, `status` varchar(10) DEFAULT NULL, `expiresAt` datetime DEFAULT NULL, `lastModifiedAt` datetime DEFAULT NULL ) ENGINE=InnoDB DEFAULT CHARSET=utf8; CREATE TABLE `oauth_client_details` ( `client_id` varchar(128) NOT NULL, `resource_ids` varchar(256) DEFAULT NULL, `client_secret` varchar(256) DEFAULT NULL, `scope` varchar(256) DEFAULT NULL, `authorized_grant_types` varchar(256) DEFAULT NULL, `web_server_redirect_uri` varchar(256) DEFAULT NULL, `authorities` varchar(256) DEFAULT NULL, `access_token_validity` int(11) DEFAULT NULL, `refresh_token_validity` int(11) DEFAULT NULL, `additional_information` varchar(4096) DEFAULT NULL, `autoapprove` varchar(256) DEFAULT NULL, PRIMARY KEY (`client_id`) ) ENGINE=InnoDB DEFAULT CHARSET=utf8; CREATE TABLE `oauth_client_token` ( `token_id` varchar(256) DEFAULT NULL, `token` blob, `authentication_id` varchar(128) NOT NULL, `user_name` varchar(256) DEFAULT NULL, `client_id` varchar(256) DEFAULT NULL, PRIMARY KEY (`authentication_id`) ) ENGINE=InnoDB DEFAULT CHARSET=utf8; DROP TABLE IF EXISTS `oauth_code`; CREATE TABLE `oauth_code` ( `code` varchar(256) DEFAULT NULL, `authentication` blob ) ENGINE=InnoDB DEFAULT CHARSET=utf8; CREATE TABLE `oauth_refresh_token` ( `token_id` varchar(256) DEFAULT NULL, `token` blob, `authentication` blob ) ENGINE=InnoDB DEFAULT CHARSET=utf8; 为了测试方便,我们先插入一条客户端信息。 INSERT INTO `oauth_client_details` VALUES ('dev', '', 'dev', 'app', 'password,client_credentials,authorization_code,refresh_token', 'http://www.baidu.com', '', 3600, 3600, '{\"country\":\"CN\",\"country_code\":\"086\"}', 'false'); 用户、权限、角色用到的表如下: DROP TABLE IF EXISTS `user`; DROP TABLE IF EXISTS `role`; DROP TABLE IF EXISTS `user_role`; DROP TABLE IF EXISTS `role_permission`; DROP TABLE IF EXISTS `permission`; CREATE TABLE `user` ( `id` bigint(11) NOT NULL AUTO_INCREMENT, `username` varchar(255) NOT NULL, `password` varchar(255) NOT NULL, PRIMARY KEY (`id`) ); CREATE TABLE `role` ( `id` bigint(11) NOT NULL AUTO_INCREMENT, `name` varchar(255) NOT NULL, PRIMARY KEY (`id`) ); CREATE TABLE `user_role` ( `user_id` bigint(11) NOT NULL, `role_id` bigint(11) NOT NULL ); CREATE TABLE `role_permission` ( `role_id` bigint(11) NOT NULL, `permission_id` bigint(11) NOT NULL ); CREATE TABLE `permission` ( `id` bigint(11) NOT NULL AUTO_INCREMENT, `url` varchar(255) NOT NULL, `name` varchar(255) NOT NULL, `description` varchar(255) NULL, `pid` bigint(11) NOT NULL, PRIMARY KEY (`id`) ); INSERT INTO user (id, username, password) VALUES (1,'user','e10adc3949ba59abbe56e057f20f883e'); INSERT INTO user (id, username , password) VALUES (2,'admin','e10adc3949ba59abbe56e057f20f883e'); INSERT INTO role (id, name) VALUES (1,'USER'); INSERT INTO role (id, name) VALUES (2,'ADMIN'); INSERT INTO permission (id, url, name, pid) VALUES (1,'/**','',0); INSERT INTO permission (id, url, name, pid) VALUES (2,'/**','',0); INSERT INTO user_role (user_id, role_id) VALUES (1, 1); INSERT INTO user_role (user_id, role_id) VALUES (2, 2); INSERT INTO role_permission (role_id, permission_id) VALUES (1, 1); INSERT INTO role_permission (role_id, permission_id) VALUES (2, 2); 项目结构 resources |____templates | |____login.html | |____application.yml java |____com | |____gf | | |____SpringbootSecurityApplication.java | | |____config | | | |____SecurityConfig.java | | | |____MyFilterSecurityInterceptor.java | | | |____MyInvocationSecurityMetadataSourceService.java | | | |____ResourceServerConfig.java | | | |____WebResponseExceptionTranslateConfig.java | | | |____AuthorizationServerConfiguration.java | | | |____MyAccessDecisionManager.java | | |____entity | | | |____User.java | | | |____RolePermisson.java | | | |____Role.java | | |____mapper | | | |____PermissionMapper.java | | | |____UserMapper.java | | | |____RoleMapper.java | | |____controller | | | |____HelloController.java | | | |____MainController.java | | |____service | | | |____MyUserDetailsService.java 关键代码 pom.xml <dependency> <groupId>org.springframework.boot</groupId> <artifactId>spring-boot-starter-security</artifactId> </dependency> <dependency> <groupId>org.springframework.boot</groupId> <artifactId>spring-boot-starter-thymeleaf</artifactId> </dependency> <dependency> <groupId>org.springframework.boot</groupId> <artifactId>spring-boot-starter-oauth2-client</artifactId> </dependency> <dependency> <groupId>org.springframework.boot</groupId> <artifactId>spring-boot-starter-oauth2-resource-server</artifactId> </dependency> <dependency> <groupId>org.springframework.security.oauth.boot</groupId> <artifactId>spring-security-oauth2-autoconfigure</artifactId> <version>2.1.3.RELEASE</version> </dependency> SecurityConfig 支持password模式要配置AuthenticationManager @Configuration @EnableWebSecurity public class SecurityConfig extends WebSecurityConfigurerAdapter { @Autowired private MyUserDetailsService userService; @Override protected void configure(AuthenticationManagerBuilder auth) throws Exception { //校验用户 auth.userDetailsService( userService ).passwordEncoder( new PasswordEncoder() { //对密码进行加密 @Override public String encode(CharSequence charSequence) { System.out.println(charSequence.toString()); return DigestUtils.md5DigestAsHex(charSequence.toString().getBytes()); } //对密码进行判断匹配 @Override public boolean matches(CharSequence charSequence, String s) { String encode = DigestUtils.md5DigestAsHex(charSequence.toString().getBytes()); boolean res = s.equals( encode ); return res; } } ); } @Override protected void configure(HttpSecurity http) throws Exception { http.csrf().disable(); http.requestMatchers() .antMatchers("/oauth/**","/login","/login-error") .and() .authorizeRequests() .antMatchers("/oauth/**").authenticated() .and() .formLogin().loginPage( "/login" ).failureUrl( "/login-error" ); } @Override @Bean public AuthenticationManager authenticationManagerBean() throws Exception{ return super.authenticationManager(); } @Bean public PasswordEncoder passwordEncoder() { return new PasswordEncoder() { @Override public String encode(CharSequence charSequence) { return charSequence.toString(); } @Override public boolean matches(CharSequence charSequence, String s) { return Objects.equals(charSequence.toString(),s); } }; } } AuthorizationServerConfiguration 认证服务器配置 /** * 认证服务器配置 */ @Configuration @EnableAuthorizationServer public class AuthorizationServerConfiguration extends AuthorizationServerConfigurerAdapter { /** * 注入权限验证控制器 来支持 password grant type */ @Autowired private AuthenticationManager authenticationManager; /** * 注入userDetailsService,开启refresh_token需要用到 */ @Autowired private MyUserDetailsService userDetailsService; /** * 数据源 */ @Autowired private DataSource dataSource; /** * 设置保存token的方式,一共有五种,这里采用数据库的方式 */ @Autowired private TokenStore tokenStore; @Autowired private WebResponseExceptionTranslator webResponseExceptionTranslator; @Bean public TokenStore tokenStore() { return new JdbcTokenStore( dataSource ); } @Override public void configure(AuthorizationServerSecurityConfigurer security) throws Exception { /** * 配置oauth2服务跨域 */ CorsConfigurationSource source = new CorsConfigurationSource() { @Override public CorsConfiguration getCorsConfiguration(HttpServletRequest request) { CorsConfiguration corsConfiguration = new CorsConfiguration(); corsConfiguration.addAllowedHeader("*"); corsConfiguration.addAllowedOrigin(request.getHeader( HttpHeaders.ORIGIN)); corsConfiguration.addAllowedMethod("*"); corsConfiguration.setAllowCredentials(true); corsConfiguration.setMaxAge(3600L); return corsConfiguration; } }; security.tokenKeyAccess("permitAll()") .checkTokenAccess("permitAll()") .allowFormAuthenticationForClients() .addTokenEndpointAuthenticationFilter(new CorsFilter(source)); } @Override public void configure(ClientDetailsServiceConfigurer clients) throws Exception { clients.jdbc(dataSource); } @Override public void configure(AuthorizationServerEndpointsConfigurer endpoints) throws Exception { //开启密码授权类型 endpoints.authenticationManager(authenticationManager); //配置token存储方式 endpoints.tokenStore(tokenStore); //自定义登录或者鉴权失败时的返回信息 endpoints.exceptionTranslator(webResponseExceptionTranslator); //要使用refresh_token的话,需要额外配置userDetailsService endpoints.userDetailsService( userDetailsService ); } } ResourceServerConfig 资源服务器配置 /** * 资源提供端的配置 */ @Configuration @EnableResourceServer public class ResourceServerConfig extends ResourceServerConfigurerAdapter { /** * 这里设置需要token验证的url * 这些url可以在WebSecurityConfigurerAdapter中排除掉, * 对于相同的url,如果二者都配置了验证 * 则优先进入ResourceServerConfigurerAdapter,进行token验证。而不会进行 * WebSecurityConfigurerAdapter 的 basic auth或表单认证。 */ @Override public void configure(HttpSecurity http) throws Exception { http.requestMatchers().antMatchers("/hi") .and() .authorizeRequests() .antMatchers("/hi").authenticated(); } } 关键代码就是这些,其他类代码参照后面提供的源码地址。 验证 密码授权模式 [ 密码模式需要参数:username , password , grant_type , client_id , client_secret ] 请求token curl -X POST -d "username=admin&password=123456&grant_type=password&client_id=dev&client_secret=dev" http://localhost:8080/oauth/token 返回 { "access_token": "d94ec0aa-47ee-4578-b4a0-8cf47f0e8639", "token_type": "bearer", "refresh_token": "23503bc7-4494-4795-a047-98db75053374", "expires_in": 3475, "scope": "app" } 不携带token访问资源, curl http://localhost:8080/hi\?name\=zhangsan 返回提示未授权 { "error": "unauthorized", "error_description": "Full authentication is required to access this resource" } 携带token访问资源 curl http://localhost:8080/hi\?name\=zhangsan\&access_token\=164471f7-6fc6-4890-b5d2-eb43bda3328a 返回正确 hi , zhangsan 刷新token curl -X POST -d 'grant_type=refresh_token&refresh_token=23503bc7-4494-4795-a047-98db75053374&client_id=dev&client_secret=dev' http://localhost:8080/oauth/token 返回 { "access_token": "ef53eb01-eb9b-46d8-bd58-7a0f9f44e30b", "token_type": "bearer", "refresh_token": "23503bc7-4494-4795-a047-98db75053374", "expires_in": 3599, "scope": "app" } 客户端授权模式 [ 客户端模式需要参数:grant_type , client_id , client_secret ] 请求token curl -X POST -d "grant_type=client_credentials&client_id=dev&client_secret=dev" http://localhost:8080/oauth/token 返回 { "access_token": "a7be47b3-9dc8-473e-967a-c7267682dc66", "token_type": "bearer", "expires_in": 3564, "scope": "app" } 授权码模式 获取code 浏览器中访问如下地址: http://localhost:8080/oauth/authorize?response_type=code&client_id=dev&redirect_uri=http://www.baidu.com 跳转到登录页面,输入账号和密码进行认证: 认证后会跳转到授权确认页面(oauth_client_details 表中 “autoapprove” 字段设置为true 时,不会出授权确认页面): 确认后,会跳转到百度,并且地址栏中会带上我们想得到的code参数: 通过code换token curl -X POST -d "grant_type=authorization_code&code=qS03iu&client_id=dev&client_secret=dev&redirect_uri=http://www.baidu.com" http://localhost:8080/oauth/token 返回 { "access_token": "90a246fa-a9ee-4117-8401-ca9c869c5be9", "token_type": "bearer", "refresh_token": "23503bc7-4494-4795-a047-98db75053374", "expires_in": 3319, "scope": "app" } 参考 https://segmentfault.com/a/1190000012260914 https://stackoverflow.com/questions/28537181/spring-security-oauth2-which-decides-security 源码 https://github.com/gf-huanchupk/SpringBootLearning/tree/master/springboot-security-oauth2

优秀的个人博客,低调大师

java配置SSM纯注解整合Redis开发高并发抢红包项目

前言: 前段时间学习点Redis,这次结合ssm实现一个高并发抢红包的项目。跟以前不一样的: 基于java配置SSM,而并非XML.为什么要这样呢?找了点网络上的答案: 在使用Spring开发时,我们经常会看到各种各样xml配置,过于繁多的xml配置显得复杂烦人。 在Spring3之后,Spring支持使用JavaConfig来代替xml配置, 这种方式也得到越来越多人的推荐,甚至在Spring Boot的项目中,基本上已经见不到xml的影子了。 抢红包的记录使用Lua保存到Redis内存中,最后再异步使用批量事务插入到Mysql。目的:Redis内存响应速度比Mysql硬盘响应速度快。 这个项目的目的也是为了实现上面的两个内容。具体的项目我已经放到Github上了:有兴趣的朋友可以下载看看,里面也都写好了注释,如果有不明白的,可以联系我QQ:1115106468 一起交流 https://github.com/jjc123/Grab_RED_PACKET/blob/master/README.md 问题:此项目中高并发为了使用Redis? 如果使用Mysql直接保存,也可以,那如何解决数据不一致的问题?可以使用乐观锁和悲观锁,此次项目中我使用的是Lua+Redis,看一下这三者区别:悲观锁:使用数据库的锁机制,并发的过程中同时只能有一个线程操作数据,其他得不到资源的线程就会被挂起,过程中会频繁得被挂起和恢复,导致cpu频繁切换现场上下文。可以通过for update语句锁行如果是使用主键查询如where id=#{id}是锁行,如果是非主键查询要考虑是否对全表加锁。可以消除数据不一致性,但是性能会下降,因为他是阻塞性的,而且需要大量的恢复过程。乐观锁:不会阻塞并发,是非阻塞锁,他是具有CAS原理,但是会有ABA问题(CAS和ABA具体百度,更详细),可以通过添加版本号,但是会导致多次请求服务失败的概率大大提高,可以通过重入的方法(按时间戳或者次数限定)来提高成功率,但是会导致大量SQL被执行,容易引发性能瓶颈。Lua+Redis:正是因为上面集中方法的局限性,所以选择Redis去实现高并发,因为Lua具有原子性,消除了数据不一致。而且Redis是保存在内存中的,响应速度极快。注意:为了不影响最后抢一个红包的响应时间,在最后一次操作数据的时候,开启一个新的线程,批量处理数据插入Mysql。而且最后还会删除Redis中批量处理的数据。 现在正是开始这个高并发的抢红包项目吧! 首先我们先配置数据库: 两个表:T_RED_PACKET存红包信息T_USER_RED_PACKET存用户抢红包信息 create table T_RED_PACKET( id int(12) not null auto_increment, user_id int(12) not null, amount decimal(16,2) not null, send_date timestamp not null, total int(12) not null, unit_amount decimal(12) not null, stock int(12) not null, version int(12) default 0 not null, note varchar(256) null, primary key clustered(id) ); create table T_USER_RED_PACKET( id int(12) not null auto_increment, red_packet_id int(12) not null, user_id int(12) not null, amount decimal(16,2) not null, grab_time timestamp not null, note varchar(256) null, primary key clustered (id) ); insert into T_RED_PACKET(user_id,amount,send_date,total,unit_amount,stock,note) values(1,200000.00,now(),20000,10.00,20000,'20万元金额,2万个小红包 每个10元'); 注意: amount :金额 要用decimal而不是double send_date :发红包时间 stock:剩余的红包数 primary key clustered (id) 是设置主键和聚集索引 题外话:Ubuntu下设置MySQL字符集为utf8 1.mysql配置文件地址/etc/mysql/my.cnf 2.在[mysqld]在下方添加以下代码[mysqld]init_connect='SET collation_connection = utf8_unicode_ci'init_connect='SET NAMES utf8'character-set-server=utf8collation-server=utf8_unicode_ciskip-character-set-client-handshake 3.重启mysql服务sudo service mysql restart 4.检测字符集是否更新成utf8. 进入mysql,mysql -u root -p,输入show variables like '%character%' 查看字符集 Variable_name Value character_set_client utf8 character_set_connection utf8 character_set_database utf8 character_set_filesystem binary character_set_results utf8 character_set_server utf8 character_set_system utf8 character_sets_dir /usr/share/mysql/charsets/ 配置Redis: 注意:redis的数据即使电脑关机下次打开redis的时候还会存在 进入redis的src然后./redis-server ../redis.conf &指定配置文件启动而且是后台启动再打开新的客户端:./redis-cli127.0.0.1:6379> hset red_packet_2 stock 20000 (保存红包库存 也可以用来直接修改)(integer) 0127.0.0.1:6379> hset red_packet_2 unit_amount 10 (保存单个红包库存)(integer) 0题外话: hget red_packet_2 stock hash获取该键的值 ltrim red_packet_list_2 1 0 清空list对应键的值 RPUSH red_packet_list_2 c list添加单个元素 LRANGE red_packet_list_2 0 -1 获取对应list的所有值 LLEN red_packet_list_2 获取list长度 这些外部内容已经配置好了,具体的项目我也放到了github上 有兴趣的朋友可以看看。 需要注意的是ubuntu每次开机运行项目的时候老是我的端口被占用:查看端口:sudo netstat -lnp | grep 8082杀死占用端口进程:sudo kill-9 进程号 注意:使用jdbc批量处理的时候需要:url添加rewriteBatchedStatements=true 我的测试数据:url添加rewriteBatchedStatements=true 开始保存数据 耗时:5917插入数量:20000 url不添加rewriteBatchedStatements=true 开始保存数据 耗时:13315插入数量:20000 所以批量处理一定要加上rewriteBatchedStatements=true

优秀的个人博客,低调大师

企业级 SpringBoot 教程-sprinboot整合elk,搭建实时日志平台

elk 简介 Elasticsearch是个开源分布式搜索引擎,它的特点有:分布式,零配置,自动发现,索引自动分片,索引副本机制,restful风格接口,多数据源,自动搜索负载等。 Logstash是一个完全开源的工具,他可以对你的日志进行收集、过滤,并将其存储供以后使用(如,搜索)。 Kibana 也是一个开源和免费的工具,它Kibana可以为 Logstash 和 ElasticSearch 提供的日志分析友好的 Web 界面,可以帮助您汇总、分析和搜索重要数据日志。 elk下载安装 elk下载地址:https: //www. elastic. co/downloads/ 建议在 linux上运行,elk在windows上支持得不好,另外需要jdk1.8 的支持,需要提前安装好jdk. 下载完之后: 安装,以logstash为例子: cd /usr/local/ mkdir logstash tar -zxvf logstash-5.3.2.tar.gz mv logstash-5.3.2 /usr/local/logstash 配置、启动 Elasticsearch 打开Elasticsearch的配置文件: vim config/elasticsearch.yml 修改配置: network.host=localhost network.port=9200 它默认就是这个配置,没有特殊要求,在本地不需要修改。 启动Elasticsearch ./bin/elasticsearch 启动成功,访问localhost:9200,网页显示: { "name" : "56IrTCM", "cluster_name" : "elasticsearch", "cluster_uuid" : "e4ja7vS2TIKI1BsggEAa6Q", "version" : { "number" : "5.2.2", "build_hash" : "f9d9b74", "build_date" : "2017-02-24T17:26:45.835Z", "build_snapshot" : false, "lucene_version" : "6.4.1" }, "tagline" : "You Know, for Search" } 配置、启动 logstash 在 logstash的主目录下: vim config/log4j_to_es.conf 修改 log4j_to_es.conf 如下: input { log4j { mode => "server" host => "localhost" port => 4560 } } filter { #Only matched data are send to output. } output { elasticsearch { action => "index" #The operation on ES hosts => "localhost:9200" #ElasticSearch host, can be array. index => "applog" #The index to write data to. } }Spring Cloud大型企业分布式微服务云架构源码一七九一七四三三八零哦 修改完配置后启动: ./bin/logstash -f config/log4j_to_es.conf

优秀的个人博客,低调大师

(七)整合spring cloud云服务架构 - common-service 项目构建过程

我们将对common-service整个项目进行剖析,将整个构建的流程给记录下来,让更多的关注者来参考学习。 首先在构建spring cloud的common-service之前,我们需要准备的技术: Maven(项目构建)、Spring Boot、Spring Cloud、微服务概念、去中心化思想、分布式等,针对于common-service的顶级项目,这里我们主要使用Maven来构建,闲话少说,我们直接上代码是最直观的。完整项目的源码来源 技术支持二一四七七七五六三三 创建一个Maven的顶级项目,其中pom.xml文件配置如下: <?xml version="1.0" encoding="UTF-8"?> <project xmlns="http://maven.apache.org/POM/4.0.0" xmlns:xsi="http://www.w3.org/2001/XMLSchema-instance" xsi:schemaLocation="http://maven.apache.org/POM/4.0.0 http://maven.apache.org/xsd/maven-4.0.0.xsd"> <modelVersion>4.0.0</modelVersion> <parent> <groupId>org.springframework.cloud</groupId> <artifactId>spring-cloud-starter-parent</artifactId> <version>Dalston.RELEASE</version> <relativePath /> </parent> <groupId>com.ml.honghu</groupId> <artifactId>particle-commonservice</artifactId> <version>0.0.1-SNAPSHOT</version> <packaging>pom</packaging> <name>particle-commonservice</name> <description>particle-commonservice project for Spring Boot</description> <modules> <module>particle-commonservice-config</module> <module>particle-commonservice-eureka</module> <module>particle-commonservice-mq</module> <module>particle-commonservice-cache</module> <module>particle-commonservice-sso</module> <module>particle-commonservice-apigateway</module> <module>particle-commonservice-zipkin</module> <module>particle-commonservice-admin</module> <module>particle-commonservice-turbine</module> <module>particle-commonservice-combine</module> <module>particle-commonservice-sequence</module> </modules> <properties> <project.build.sourceEncoding>UTF-8</project.build.sourceEncoding> <project.reporting.outputEncoding>UTF-8</project.reporting.outputEncoding> <java.version>1.8</java.version> <!-- 框架通用包版本设置 --> <validator.version>5.3.4.Final</validator.version> <shiro.version>1.2.3</shiro.version> <druid.version>1.0.26</druid.version> <mybatis-spring.version>1.2.2</mybatis-spring.version> <shiro.version>1.2.3</shiro.version> <druid.version>1.0.11</druid.version> <ehcache.version>2.6.9</ehcache.version> <ehcache-web.version>2.0.4</ehcache-web.version> <sitemesh.version>2.4.2</sitemesh.version> <activiti.version>5.15.1</activiti.version> <wink.version>1.4</wink.version> <sso.client.version>3.4.1</sso.client.version> --> <!-- 通用工具包版本设置 --> <slf4j.version>1.7.7</slf4j.version> <commons-lang3.version>3.3.2</commons-lang3.version> <commons-io.version>2.4</commons-io.version> <commons-codec.version>1.9</commons-codec.version> <commons-fileupload.version>1.3.1</commons-fileupload.version> <commons-beanutils.version>1.9.1</commons-beanutils.version> <fastjson.version>1.1.40</fastjson.version> <xstream.version>1.4.7</xstream.version> <guava.version>17.0</guava.version> <dozer.version>5.5.1</dozer.version> <email.version>1.4.7</email.version> <poi.version>3.9</poi.version> <cglib.version>3.2.5</cglib.version> <!-- aliyun --> <aliyun-sdk-oss.version>2.6.0</aliyun-sdk-oss.version> <aliyun-sdk-openservices-ons.version>1.2.7.Final</aliyun-sdk-openservices-ons.version> <com.ml.honghu.componet.version>0.0.1-SNAPSHOT</com.ml.honghu.componet.version> <spring-boot-admin.version>1.5.1</spring-boot-admin.version> <fastjson.version>1.2.35</fastjson.version> </properties> <dependencyManagement> <dependencies> <!-- spring cloud --> <dependency> <groupId>org.springframework.cloud</groupId> <artifactId>spring-cloud-dependencies</artifactId> <version>Dalston.RELEASE</version> <type>pom</type> <scope>import</scope> </dependency> <dependency> <groupId>org.jasig.cas.client</groupId> <artifactId>cas-client-core</artifactId> <version>3.4.1</version> </dependency> <dependency> <groupId>io.springfox</groupId> <artifactId>springfox-swagger2</artifactId> <version>2.5.0</version> </dependency> <dependency> <groupId>de.codecentric</groupId> <artifactId>spring-boot-admin-server</artifactId> <version>${spring-boot-admin.version}</version> </dependency> <dependency> <groupId>de.codecentric</groupId> <artifactId>spring-boot-admin-server-ui</artifactId> <version>${spring-boot-admin.version}</version> </dependency> <dependency> <groupId>de.codecentric</groupId> <artifactId>spring-boot-admin-server-ui-hystrix</artifactId> <version>${spring-boot-admin.version}</version> </dependency> <dependency> <groupId>de.codecentric</groupId> <artifactId>spring-boot-admin-server-ui-turbine</artifactId> <version>${spring-boot-admin.version}</version> </dependency> <dependency> <groupId>de.codecentric</groupId> <artifactId>spring-boot-admin-server-ui-login</artifactId> <version>${spring-boot-admin.version}</version> </dependency> <dependency> <groupId>de.codecentric</groupId> <artifactId>spring-boot-admin-server-ui-activiti</artifactId> <version>${spring-boot-admin.version}</version> </dependency> <dependency> <groupId>org.slf4j</groupId> <artifactId>slf4j-api</artifactId> <version>1.7.25</version> </dependency> <dependency> <groupId>com.ml.honghu</groupId> <artifactId>component-base</artifactId> <version>${com.ml.honghu.componet.version}</version> </dependency> <dependency> <groupId>com.ml.honghu</groupId> <artifactId>component-redis</artifactId> <version>${com.ml.honghu.componet.version}</version> </dependency> <dependency> <groupId>com.ml.honghu</groupId> <artifactId>component-utils</artifactId> <version>${com.ml.honghu.componet.version}</version> </dependency> <dependency> <groupId>com.ml.honghu</groupId> <artifactId>component-sequence-api</artifactId> <version>${com.ml.honghu.componet.version}</version> </dependency> <dependency> <groupId>com.ml.honghu</groupId> <artifactId>component-admin-ui-zipkin</artifactId> <version>${com.ml.honghu.componet.version}</version> </dependency> <dependency> <groupId>com.ml.honghu</groupId> <artifactId>component-admin-ui-route</artifactId> <version>${com.ml.honghu.componet.version}</version> </dependency> <dependency> <groupId>com.ml.honghu</groupId> <artifactId>component-zuul-label</artifactId> <version>${com.ml.honghu.componet.version}</version> </dependency> </dependencies> </dependencyManagement> </project> 当前的pom.xml文件引入了spring cloud相关版本配置,通用工具版本配置,honghu相关组件配置(因为其他的系统服务项目依赖于相关的组件,组件项目也是后面来创建的) 从现在开始,我这边会将近期研发的spring cloud微服务云架构的搭建过程和精髓记录下来,帮助更多有兴趣研发spring cloud框架的朋友,大家来一起探讨spring cloud架构的搭建过程及如何运用于企业项目。

优秀的个人博客,低调大师

SpringBoot2.x开发案例之整合Quartz任务管理系统

基于spring-boot 2.x + quartz 的CRUD任务管理系统,适用于中小项目。 基于spring-boot +quartz 的CRUD任务管理系统: https://gitee.com/52itstyle/spring-boot-quartz 开发环境 JDK1.8、Maven、Eclipse 技术栈 SpringBoot2.0.1、thymeleaf3.0.9、quartz2.3.0、iview、vue、layer、AdminLTE、bootstrap 启动说明 项目使用的数据库为MySql,选择resources/sql中的tables_mysql_innodb.sql文件初始化数据库信息。 在resources/application.properties文件中替换为自己的数据源。 运行Application main方法启动项目,项目启动会自动创建一个测试任务 见:com.itstyle.quartz.config.TaskRunner.java。 项目访问地址:http://localhost:8080/task 项目截图 版本区别(spring-boot 1.x and 2.x) 这里只是针对这两个项目异同做比较,当然spring-boot 2.x版本升级还有不少需要注意的地方。 项目名称配置: # spring boot 1.x server.context-path=/quartz # spring boot 2.x server.servlet.context-path=/quartz thymeleaf配置: #spring boot 1.x spring.thymeleaf.mode=LEGACYHTML5 #spring boot 2.x spring.thymeleaf.mode=HTML Hibernate配置: # spring boot 2.x JPA 依赖 Hibernate 5 # Hibernate 4 naming strategy fully qualified name. Not supported with Hibernate 5. spring.jpa.hibernate.naming.strategy = org.hibernate.cfg.ImprovedNamingStrategy # stripped before adding them to the entity manager) spring.jpa.properties.hibernate.dialect = org.hibernate.dialect.MySQL5Dialect # Hibernate 5 spring.jpa.hibernate.naming.implicit-strategy=org.hibernate.boot.model.naming.ImplicitNamingStrategyLegacyJpaImpl spring.jpa.hibernate.naming.physical-strategy=org.hibernate.boot.model.naming.PhysicalNamingStrategyStandardImpl quartz配置: # spring boot 2.x 已集成Quartz,无需自己配置 spring.quartz.job-store-type=jdbc spring.quartz.properties.org.quartz.scheduler.instanceName=clusteredScheduler spring.quartz.properties.org.quartz.scheduler.instanceId=AUTO spring.quartz.properties.org.quartz.jobStore.class=org.quartz.impl.jdbcjobstore.JobStoreTX spring.quartz.properties.org.quartz.jobStore.driverDelegateClass=org.quartz.impl.jdbcjobstore.StdJDBCDelegate spring.quartz.properties.org.quartz.jobStore.tablePrefix=QRTZ_ spring.quartz.properties.org.quartz.jobStore.isClustered=true spring.quartz.properties.org.quartz.jobStore.clusterCheckinInterval=10000 spring.quartz.properties.org.quartz.jobStore.useProperties=false spring.quartz.properties.org.quartz.threadPool.class=org.quartz.simpl.SimpleThreadPool spring.quartz.properties.org.quartz.threadPool.threadCount=10 spring.quartz.properties.org.quartz.threadPool.threadPriority=5 spring.quartz.properties.org.quartz.threadPool.threadsInheritContextClassLoaderOfInitializingThread=true 默认首页配置: /** * 配置首页 spring boot 1.x * 创建者 小柒2012 * 创建时间 2017年9月7日 */ @Configuration public class MyAdapter extends WebMvcConfigurerAdapter{ @Override public void addViewControllers( ViewControllerRegistry registry ) { registry.addViewController( "/" ).setViewName( "forward:/login.shtml" ); registry.setOrder( Ordered.HIGHEST_PRECEDENCE ); super.addViewControllers( registry ); } } /** * 配置首页(在SpringBoot2.0及Spring 5.0 WebMvcConfigurerAdapter以被废弃 * 建议实现WebMvcConfigurer接口) * 创建者 小柒2012 * 创建时间 2018年4月10日 */ @Configuration public class MyAdapter implements WebMvcConfigurer{ @Override public void addViewControllers( ViewControllerRegistry registry ) { registry.addViewController( "/" ).setViewName( "forward:/login.shtml" ); registry.setOrder( Ordered.HIGHEST_PRECEDENCE ); } } 待解决问题: /** * Set a strategy for handling the query results. This can be used to change * "shape" of the query result. * * @param transformer The transformer to apply * * @return this (for method chaining) * * @deprecated (since 5.2) * @todo develop a new approach to result transformers */ @Deprecated Query<R> setResultTransformer(ResultTransformer transformer); hibernate 5.2 废弃了 setResultTransformer,说是要开发一种新的获取集合方法,显然目前还没实现,处于TODO状态。 项目源码: https://gitee.com/52itstyle/spring-boot-task 作者: 小柒2012 欢迎关注: https://blog.52itstyle.com

优秀的个人博客,低调大师

SpringBoot开发案例之整合Spring-data-jpa进阶篇

前言 有人说 从 jdbc->jdbctemplate->hibernation/mybatis 再到 jpa,真当开发人员的学习时间不要钱?我觉得到 h/m 这一级的封装已经有点过了,再往深处走就有病了。 还有人说JPA 很反人类(一个面试官),还举了一个很简单举了例子说:一个数据库如果有 50 个字段,那你写各种条件查询不是要写很多?就是应该用类似 SQL 的方式来查询啊? 其实在我看来,存在即合理,人们总是向着好的方向去发展,学习什么不需要成本,底层语言牛逼倒是去学啊,不还是看不懂,弄不明白。很多知识对于程序员来说,都是一通百通,查询文档就是了,最主要的是能方便以后的开发即可。 对于反人类这一说,只能说 to young to simple,JPA的初衷肯定也不会是让你写一个几十个字段的查询,顶多一到两个而已,非要这么极端?再说JPA也是提供了EntityManager来实现SQL或者HQL语句查询的不是,JPA本质上还是集成了Hibernate的很多优点的。 进阶查询 需求: 学生表(app_student)、班级表(app_class)、当然表结构比较简单,比如这时候我们需要查询学生列表,但是需要同时查询班级表的一些数据,并以JSON或者实体的方式返回给调用者。 本次需求,主要实现JPA的以下几个特性: 封装EntityManager基类 多表查询返回一个List 多表查询返回一个Map 多表查询返回一个实体 Entitymanager的核心概念图: 实现 班级表: @Entity @Table(name = "app_class") public class AppClass { @Id @GeneratedValue(strategy = GenerationType.AUTO) @Column(name = "id", nullable = false) private Integer id; private String className; private String teacherName; //忽略部分代码 } 学生表: @Entity @Table(name = "app_student") public class AppStudent { @Id @GeneratedValue(strategy = GenerationType.AUTO) @Column(name = "id", nullable = false) private Integer id; private Integer classId; private String name; private Integer age; //忽略部分代码 } 封装接口 DynamicQuery: /** * 扩展SpringDataJpa, 支持动态jpql/nativesql查询并支持分页查询 * 使用方法:注入ServiceImpl * 创建者 张志朋 * 创建时间 2018年3月8日 */ public interface DynamicQuery { public void save(Object entity); public void update(Object entity); public <T> void delete(Class<T> entityClass, Object entityid); public <T> void delete(Class<T> entityClass, Object[] entityids); /** * 查询对象列表,返回List * @param resultClass * @param nativeSql * @param params * @return List<T> * @Date 2018年3月15日 * 更新日志 * 2018年3月15日 张志朋 首次创建 * */ <T> List<T> nativeQueryList(String nativeSql, Object... params); /** * 查询对象列表,返回List<Map<key,value>> * @param nativeSql * @param params * @return List<T> * @Date 2018年3月15日 * 更新日志 * 2018年3月15日 张志朋 首次创建 * */ <T> List<T> nativeQueryListMap(String nativeSql,Object... params); /** * 查询对象列表,返回List<组合对象> * @param resultClass * @param nativeSql * @param params * @return List<T> * @Date 2018年3月15日 * 更新日志 * 2018年3月15日 张志朋 首次创建 * */ <T> List<T> nativeQueryListModel(Class<T> resultClass, String nativeSql, Object... params); } 封装实现 DynamicQueryImpl: /** * 动态jpql/nativesql查询的实现类 * 创建者 张志朋 * 创建时间 2018年3月8日 */ @Repository public class DynamicQueryImpl implements DynamicQuery { Logger logger = LoggerFactory.getLogger(DynamicQueryImpl.class); @PersistenceContext private EntityManager em; public EntityManager getEntityManager() { return em; } @Override public void save(Object entity) { em.persist(entity); } @Override public void update(Object entity) { em.merge(entity); } @Override public <T> void delete(Class<T> entityClass, Object entityid) { delete(entityClass, new Object[] { entityid }); } @Override public <T> void delete(Class<T> entityClass, Object[] entityids) { for (Object id : entityids) { em.remove(em.getReference(entityClass, id)); } } private Query createNativeQuery(String sql, Object... params) { Query q = em.createNativeQuery(sql); if (params != null && params.length > 0) { for (int i = 0; i < params.length; i++) { q.setParameter(i + 1, params[i]); // 与Hiberante不同,jpa // query从位置1开始 } } return q; } @SuppressWarnings("unchecked") @Override public <T> List<T> nativeQueryList(String nativeSql, Object... params) { Query q = createNativeQuery(nativeSql, params); q.unwrap(SQLQuery.class).setResultTransformer(Transformers.TO_LIST); return q.getResultList(); } @SuppressWarnings("unchecked") @Override public <T> List<T> nativeQueryListModel(Class<T> resultClass, String nativeSql, Object... params) { Query q = createNativeQuery(nativeSql, params);; q.unwrap(SQLQuery.class).setResultTransformer(Transformers.aliasToBean(resultClass)); return q.getResultList(); } @SuppressWarnings("unchecked") @Override public <T> List<T> nativeQueryListMap(String nativeSql, Object... params) { Query q = createNativeQuery(nativeSql, params); q.unwrap(SQLQuery.class).setResultTransformer(Transformers.ALIAS_TO_ENTITY_MAP); return q.getResultList(); } } 业务 IStudentService: public interface IStudentService { /** * 返回List<Object[]> * @Author 科帮网 * @return List<Object[]> * @Date 2018年3月28日 * 更新日志 * 2018年3月28日 科帮网 首次创建 * */ List<Object[]> listStudent(); /** * 返回List<Student> * @Author 科帮网 * @return List<Student> * @Date 2018年3月28日 * 更新日志 * 2018年3月28日 科帮网 首次创建 * */ List<Student> listStudentModel(); /** * List<Map<Object, Object>> * @Author 科帮网 * @return List<Map<Object,Object>> * @Date 2018年3月28日 * 更新日志 * 2018年3月28日 科帮网 首次创建 * */ List<Map<Object, Object>> listStudentMap(); } 业务实现 StudentServiceImpl: @Service public class StudentServiceImpl implements IStudentService { @Autowired private DynamicQuery dynamicQuery; @Override public List<Object[]> listStudent() { String nativeSql = "SELECT s.id AS studentId,c.id AS classId,c.class_name AS className,c.teacher_name AS teacherName,s.name,s.age FROM app_student s,app_class c"; List<Object[]> list = dynamicQuery.nativeQueryList(nativeSql, new Object[]{}); return list; } @Override public List<Student> listStudentModel() { String nativeSql = "SELECT s.id AS studentId,c.id AS classId,c.class_name AS className,c.teacher_name AS teacherName,s.name,s.age FROM app_student s,app_class c"; List<Student> list = dynamicQuery.nativeQueryListModel(Student.class, nativeSql, new Object[]{}); return list; } @Override public List<Map<Object,Object>> listStudentMap() { String nativeSql = "SELECT s.id AS studentId,c.id AS classId,c.class_name AS className,c.teacher_name AS teacherName,s.name,s.age FROM app_student s,app_class c"; List<Map<Object,Object>> list = dynamicQuery.nativeQueryListMap(nativeSql, new Object[]{}); return list; } } 接口测试: @Api(tags ="测试接口") @RestController @RequestMapping("/test") public class StudentController { private final static Logger LOGGER = LoggerFactory.getLogger(StudentController.class); @Autowired private IStudentService studentService; @ApiOperation(value="学生List") @PostMapping("/list") public Result list(HttpServletRequest request){ LOGGER.info("学生List"); List<Object[]> list = studentService.listStudent(); return Result.ok(list); } @ApiOperation(value="学生Map") @PostMapping("/listMap") public Result listMap(HttpServletRequest request){ LOGGER.info("学生Map"); List<Map<Object, Object>> list = studentService.listStudentMap(); return Result.ok(list); } @ApiOperation(value="学生Model") @PostMapping("/listModel") public Result listModel(HttpServletRequest request){ LOGGER.info("学生Model"); List<Student> list = studentService.listStudentModel(); return Result.ok(list); } } Swagger2测试 返回List< Object[] >: 返回List< Map< Object, Object > >: 返回List< Student >: 源码:https://gitee.com/52itstyle/spring-data-jpa 作者: 小柒 出处: https://blog.52itstyle.com 分享是快乐的,也见证了个人成长历程,文章大多都是工作经验总结以及平时学习积累,基于自身认知不足之处在所难免,也请大家指正,共同进步。

优秀的个人博客,低调大师

福利 | 14篇精选行业热点、实战指导、资源整合干货合集

以下为选文组出品的文章: 时事热点系列:与你一起关注当下的社会热点问题。 AI系统首次实现自主编程,完爆初级程序员! 本文为你介绍首个能够自动生成完整软件程序的机器学习系统。 人工智能堵住了应试教育的华容道 本文针对人工智能学习的特点,探讨现行学科教育模式存在的问题及未来的改变。 最顶级的AI科学家正在离开大学:不止财务自由的诱惑 越来越多的顶级AI研究员离开高校走入业界,这是学以致用还是杀鸡取卵? 入门指南系列:世界顶级数据科学家为你指导,带你轻松入门。 吴恩达推荐好文:中国人工智能的崛起 本文为你描述中国的人工智能发展状况,并对其未来发展进行了预测。 Michael I. Jordan:我们并非处于AI大爆炸时代 在人工智能成为炙手可热的话题之后,前百度首席科学家吴恩达的导师、被誉为人工智能领域的“根目录”之一的Michael I. Jordan教授

优秀的个人博客,低调大师

SpringMvc整合美图秀秀M4(头像编辑器)

美图秀秀M4 头像编辑器是一款集旋转裁剪、特效美化、人像美容为一体的在线头像编辑工具。适用于有设置头像需求的BBS、SNS、微博和社区等Web产品。 美图秀秀,JAVA提供了示例可参考,流式上传 或者 标准表单上传,于是采用标准表单上传。 List<FileItem> items = upload.parseRequest(request);//得到所有的文件 以上为截取部分代码,美图的API采用的common-fileupload解析上传操作,但是问题出现了,items获取的值为空,查阅了部分资料,原来是SpringMvc上传配置的锅: <bean id="multipartResolver" class="org.springframework.web.multipart.commons.CommonsMultipartResolver"> <property name="maxUploadSize" value="1000000000" /> </bean> 把这段代码注释掉,重新上传就可以,但是其他使用到了SpringMvc上传的Controller就不起作用了。 原因 原来springMVC已经为我们封装好成自己的文件对象了,转换的过程就在我们所配置的CommonsMultipartResolver这个转换器。 /** * Parse the given servlet request, resolving its multipart elements. * @param request the request to parse * @return the parsing result * @throws MultipartException if multipart resolution failed. */ protected MultipartParsingResult parseRequest(HttpServletRequest request) throws MultipartException { String encoding = determineEncoding(request); FileUpload fileUpload = prepareFileUpload(encoding); try { List<FileItem> fileItems = ((ServletFileUpload) fileUpload).parseRequest(request); return parseFileItems(fileItems, encoding); } catch (FileUploadBase.SizeLimitExceededException ex) { throw new MaxUploadSizeExceededException(fileUpload.getSizeMax(), ex); } catch (FileUploadBase.FileSizeLimitExceededException ex) { throw new MaxUploadSizeExceededException(fileUpload.getFileSizeMax(), ex); } catch (FileUploadException ex) { throw new MultipartException("Failed to parse multipart servlet request", ex); } } 他的转换器里面就是调用common-fileupload的方式解析,然后再使用parseFileItems()方法封装成自己的文件对象 。 List<FileItem> fileItems = ((ServletFileUpload) fileUpload).parseRequest(request); 上面的这句代码,springMVC已经使用过fileUpload解析过request了,而我们在Controller里面接收到的request已经是解析过的,你再次使用fileupload进行解析获取到的肯定是空,这个就是问题的所在。 解决方案 使用SpringMvc的API进行上传操作,部分伪代码: String basePath =request.getSession().getServletContext().getRealPath("/file/avatar/"); //上传文件目录 File filePath = new File(basePath); MultipartHttpServletRequest mRequest = (MultipartHttpServletRequest) request; //注意这里获取的是avatar MultipartFile mf = mRequest.getFile("avatar"); //用户ID做为用户头像的名称 String baseName = userType+"_"+userId; String newFileName = baseName+"_"+FLAG_L+".jpg"; //输出头像 FileOutputStream fos = new FileOutputStream(filePath + Constant.SF_FILE_SEPARATOR + newFileName); fos.write(mf.getBytes());fos.flush();fos.close(); 参考:http://open.web.meitu.com/ 作者: 小柒 出处: https://blog.52itstyle.com 分享是快乐的,也见证了个人成长历程,文章大多都是工作经验总结以及平时学习积累,基于自身认知不足之处在所难免,也请大家指正,共同进步。

资源下载

更多资源
优质分享App

优质分享App

近一个月的开发和优化,本站点的第一个app全新上线。该app采用极致压缩,本体才4.36MB。系统里面做了大量数据访问、缓存优化。方便用户在手机上查看文章。后续会推出HarmonyOS的适配版本。

腾讯云软件源

腾讯云软件源

为解决软件依赖安装时官方源访问速度慢的问题,腾讯云为一些软件搭建了缓存服务。您可以通过使用腾讯云软件源站来提升依赖包的安装速度。为了方便用户自由搭建服务架构,目前腾讯云软件源站支持公网访问和内网访问。

Spring

Spring

Spring框架(Spring Framework)是由Rod Johnson于2002年提出的开源Java企业级应用框架,旨在通过使用JavaBean替代传统EJB实现方式降低企业级编程开发的复杂性。该框架基于简单性、可测试性和松耦合性设计理念,提供核心容器、应用上下文、数据访问集成等模块,支持整合Hibernate、Struts等第三方框架,其适用范围不仅限于服务器端开发,绝大多数Java应用均可从中受益。

Rocky Linux

Rocky Linux

Rocky Linux(中文名:洛基)是由Gregory Kurtzer于2020年12月发起的企业级Linux发行版,作为CentOS稳定版停止维护后与RHEL(Red Hat Enterprise Linux)完全兼容的开源替代方案,由社区拥有并管理,支持x86_64、aarch64等架构。其通过重新编译RHEL源代码提供长期稳定性,采用模块化包装和SELinux安全架构,默认包含GNOME桌面环境及XFS文件系统,支持十年生命周期更新。

用户登录
用户注册