ELK收集nginx日志并用高德地图展示出IP
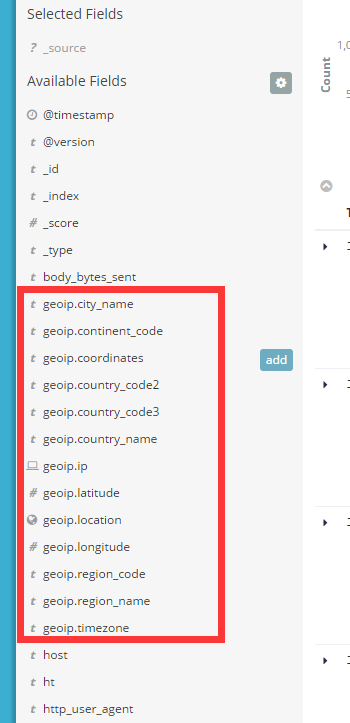
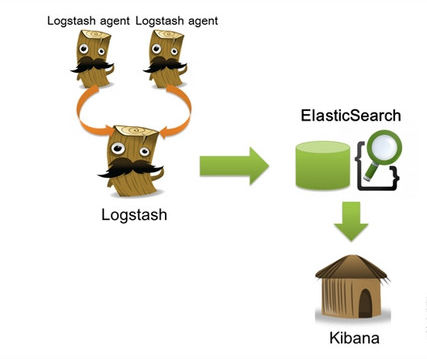
(一)测试的环境 agentd:192.168.180.22 ES:192.168.180.23 kibana:192.168.180.23 采用的拓扑:logstash -->ES-->kibana (二)实施步骤: (1)logstsh具体配置: 1,配置nginx日志格式,采用log_format格式: 1 2 3 log_formatmain '$remote_addr-$remote_user[$time_local]"$request"' '$status$body_bytes_sent"$http_referer"' '"$http_user_agent""$http_x_forwarded_for"' ; 2,在logstash服务器下载IP地址归类查询库 1 2 3 [root@localhostconfig] #cd/usr/local/logstash/config/ [root@localhostconfig] #wgethttp://geolite.maxmind.com/download/geoip/database/GeoLite2-City.mmdb. gz 3,配置logstash客户端 1 2 3 4 5 6 7 8 9 10 11 12 13 14 15 16 17 18 19 20 21 22 23 24 25 26 27 28 29 30 31 [root@localhostconfig] #vim/usr/local/logstash/config/nginx-access.conf input{ file { path=> "/opt/access.log" type => "nginx" start_position=> "beginning" } } filter{ grok{ match=>{ "message" =>"%{IPORHOST:remote_addr}--\[%{HTTPDATE:time_local}\]\"%{WO RD:method}%{URIPATHPARAM:request}HTTP/%{NUMBER:httpversion}\"%{INT:status}%{INT:body_bytes_sent}% {QS:http_referer}%{QS:http_user_agent}" } } geoip{ source => "remote_addr" target=> "geoip" database=> "/usr/local/logstash/config/GeoLite2-City.mmdb" add_field=>[ "[geoip][coordinates]" , "%{[geoip][longitude]}" ] add_field=>[ "[geoip][coordinates]" , "%{[geoip][latitude]}" ] } } output{ elasticsearch{ hosts=>[ "192.168.180.23:9200" ] manage_template=> true index=> "logstash-map-%{+YYYY-MM}" } } 备注: geoip: IP查询插件 source: 需要通过geoip插件处理的field,一般为ip,这里因为通过控制台手动输入的是ip所以直接填message,生成环境中如果查询nginx访问用户,需先将客户端ip过滤出来,然后这里填remote_addr即可 target: 解析后的Geoip地址数据,应该存放在哪一个字段中,默认是geoip这个字段 database: 指定下载的数据库文件 add_field: 这里两行是添加经纬度,地图中地区显示是根据经纬度来识 。如果启动正常的话,可以在kibana看到geoip相关的字段,如下图: 3,启动logstash客户端并加载刚才的配置文件。 1 2 3 4 5 6 7 8 9 10 11 12 [root@localhostconfig] #/usr/local/logstash/bin/logstash-fnginx-access.conf SendingLogstash'slogsto /usr/local/logstash/logs which isnowconfiguredvialog4j2.properties [2017-06-20T22:55:23,801][INFO][logstash.outputs.elasticsearch]ElasticsearchpoolURLsupdated{:changes=>{:removed=>[],:added=>[http: //192 .168.180.23:9200/]}} [2017-06-20T22:55:23,805][INFO][logstash.outputs.elasticsearch]Runninghealthchecktosee if anElasticsearchconnectionisworking{:healthcheck_url=>http: //192 .168.180.23:9200/,:path=> "/" } [2017-06-20T22:55:23,901][WARN][logstash.outputs.elasticsearch]RestoredconnectiontoESinstance{:url=> #<URI::HTTP:0x4e54594dURL:http://192.168.180.23:9200/>} [2017-06-20T22:55:23,909][INFO][logstash.outputs.elasticsearch]Usingmappingtemplatefrom{:path=>nil} [2017-06-20T22:55:23,947][INFO][logstash.outputs.elasticsearch]Attemptingto install template{:manage_template=>{ "template" => "logstash-*" , "version" =>50001, "settings" =>{ "index.refresh_interval" => "5s" }, "mappings" =>{ "_default_" =>{ "_all" =>{ "enabled" => true , "norms" => false }, "dynamic_templates" =>[{ "message_field" =>{ "path_match" => "message" , "match_mapping_type" => "string" , "mapping" =>{ "type" => "text" , "norms" => false }}},{ "string_fields" =>{ "match" => "*" , "match_mapping_type" => "string" , "mapping" =>{ "type" => "text" , "norms" => false , "fields" =>{ "keyword" =>{ "type" => "keyword" }}}}}], "properties" =>{ "@timestamp" =>{ "type" => "date" , "include_in_all" => false }, "@version" =>{ "type" => "keyword" , "include_in_all" => false }, "geoip" =>{ "dynamic" => true , "properties" =>{ "ip" =>{ "type" => "ip" }, "location" =>{ "type" => "geo_point" }, "latitude" =>{ "type" => "half_float" }, "longitude" =>{ "type" => "half_float" }}}}}}}} [2017-06-20T22:55:23,955][INFO][logstash.outputs.elasticsearch]NewElasticsearchoutput{:class=> "LogStash::Outputs::ElasticSearch" ,:hosts=>[ #<URI::Generic:0x1e098115URL://192.168.180.23:9200>]} [2017-06-20T22:55:24,065][INFO][logstash.filters.geoip]Usinggeoipdatabase{:path=> "/usr/local/logstash/config/GeoLite2-City.mmdb" } [2017-06-20T22:55:24,094][INFO][logstash.pipeline]Startingpipeline{ "id" => "main" , "pipeline.workers" =>4, "pipeline.batch.size" =>125, "pipeline.batch.delay" =>5, "pipeline.max_inflight" =>500} [2017-06-20T22:55:24,275][INFO][logstash.pipeline]Pipelinemainstarted [2017-06-20T22:55:24,369][INFO][logstash.agent]SuccessfullystartedLogstashAPIendpoint{:port=>9600} (2)Kibana配置. 1,编辑修改kibana的配置文件kibana.yml在最后添加如下: 1 2 3 4 5 6 #Thedefaultlocale.Thislocalecanbeusedincertaincircumstancestosubstituteanymissing #translations. #i18n.defaultLocale:"en" tilemap.url:'http: //webrd02 .is.autonavi.com /appmaptile ?lang=zh_cn&size=1&scale=1&style=7&x={x}&y={y}& z={z}' 2,重启kibana服务。 1 2 3 4 5 6 7 8 9 10 11 12 13 [root@localhostbin] #/usr/local/kibana/bin/kibana& [1]10631 [root@localhostbin] #ps-ef|grepkibana root1063177952110:52pts /0 00:00:02 /usr/local/kibana/bin/ .. /node/bin/node --no-warnings /usr/local/kibana/bin/ .. /src/cli root106437795010:52pts /0 00:00:00 grep --color=autokibana [root@localhostbin] #log[02:52:59.297][info][status][plugin:kibana@5.4.0]Statuschangedfromuninitializedtogreen-Ready log[02:52:59.445][info][status][plugin:elasticsearch@5.4.0]Statuschangedfromuninitializedtoyellow-Waiting for Elasticsearch log[02:52:59.482][info][status][plugin:console@5.4.0]Statuschangedfromuninitializedtogreen-Ready log[02:52:59.512][info][status][plugin:elasticsearch@5.4.0]Statuschangedfromyellowtogreen-Kibanaindexready log[02:52:59.513][info][status][plugin:metrics@5.4.0]Statuschangedfromuninitializedtogreen-Ready log[02:53:00.075][info][status][plugin:timelion@5.4.0]Statuschangedfromuninitializedtogreen-Ready log[02:53:00.080][info][listening]Serverrunningathttp: //192 .168.180.23:5601 log[02:53:00.081][info][status][uisettings]Statuschangedfromuninitializedtogreen-Ready 3,创建nginx的访问索引lostash-map*。具体步骤如下:ip:5601--->Management--Index Patterns--->+--->在Index name or pattern中添加logstash-map*--->create。具体如下图: 4,创建Visualize。具体步骤如下:Visalize--->+--->Maps(Tile Maps) 本文转自 lqbyz 51CTO博客,原文链接:http://blog.51cto.com/liqingbiao/1940469