首页 文章 精选 留言 我的

精选列表

搜索[k8s],共4074篇文章
优秀的个人博客,低调大师

K8S自己动手系列 - 1.1 - 集群搭建

准备 作为学习与实战的记录,笔者计划编写一系列实战系列文章,主要根据实际使用场景选取Kubernetes最常用的功能进行实验,并使用当前最流行的kubeadm安装集群。本文用到的所有实验环境均基于笔者个人工作站虚拟化多个VM而来,如果读者有一台性能尚可的工作站台式机,推荐读者参考本文操作过程实战演练一遍,有助于对Kubernetes各项概念及功能的理解。 前期准备: 两台VM,笔者安装的OS为ubuntu 16.04 保证两台VM网络互通,为了使网络拓扑尽可能简单,我使用的虚拟化软件为VirtualBox,宿主机为ubuntu 19.04,网络模式为Bridge 先解决网络问题 Ubuntu APT https://opsx.alibaba.com/mirror 搜索 ubuntu Kubernetes APT Repo https://opsx.alibaba.com/mirror 搜索 Kubernetes Docker Image Repo # 此过程需要主机先安装好docker-daemon,参考集群安装部分有说明 1. 安装/升级Docker客户端 推荐安装1.10.0以上版本的Docker客户端,参考文档 docker-ce 2. 配置镜像加速器 针对Docker客户端版本大于 1.10.0 的用户 您可以通过修改daemon配置文件/etc/docker/daemon.json来使用加速器 sudo mkdir -p /etc/docker sudo tee /etc/docker/daemon.json <<-'EOF' { "registry-mirrors": ["https://ft3ykfyc.mirror.aliyuncs.com"] } EOF sudo systemctl daemon-reload sudo systemctl restart docker 集群安装 kubelet kubeadm kubectl apt-get update apt-get install -y kubelet kubeadm kubectl docker # 参考 https://kubernetes.io/docs/setup/cri/ # Install Docker CE ## Set up the repository: ### Install packages to allow apt to use a repository over HTTPS apt-get update && apt-get install apt-transport-https ca-certificates curl software-properties-common ### Add Docker’s official GPG key curl -fsSL https://download.docker.com/linux/ubuntu/gpg | apt-key add - ### Add Docker apt repository. add-apt-repository \ "deb [arch=amd64] https://download.docker.com/linux/ubuntu \ $(lsb_release -cs) \ stable" ## Install Docker CE. apt-get update && apt-get install docker-ce=18.06.2~ce~3-0~ubuntu # Setup daemon. cat > /etc/docker/daemon.json <<EOF { "exec-opts": ["native.cgroupdriver=systemd"], "log-driver": "json-file", "log-opts": { "max-size": "100m" }, "storage-driver": "overlay2" } EOF mkdir -p /etc/systemd/system/docker.service.d # Restart docker. systemctl daemon-reload systemctl restart docker 初始化集群 确保swap关闭 swapoff -a vim /etc/fstab ... # comment this #UUID=2746cf1b-d1ab-41e2-8a31-8c1ed2cca910 none swap sw 0 0 kubeadm init ~ kubeadm init --pod-network-cidr=10.244.0.0/16 --kubernetes-version=stable I0608 11:05:15.863459 9577 version.go:96] could not fetch a Kubernetes version from the internet: unable to get URL "https://dl.k8s.io/release/stable.txt": Get https://dl.k8s.io/release/stable.txt: net/http: request canceled while waiting for connection (Client.Timeout exceeded while awaiting headers) I0608 11:05:15.863537 9577 version.go:97] falling back to the local client version: v1.14.3 [init] Using Kubernetes version: v1.14.3 [preflight] Running pre-flight checks [WARNING IsDockerSystemdCheck]: detected "cgroupfs" as the Docker cgroup driver. The recommended driver is "systemd". Please follow the guide at https://kubernetes.io/docs/setup/cri/ [preflight] Pulling images required for setting up a Kubernetes cluster [preflight] This might take a minute or two, depending on the speed of your internet connection [preflight] You can also perform this action in beforehand using 'kubeadm config images pull' 解决镜像拉取问题 上面的拉取特别慢,所以需要从镜像仓库手工拉取镜像,并打tag替代从官方库拉取 # 查看使用到的镜像 ~ kubeadm config images list k8s.gcr.io/kube-apiserver:v1.14.3 k8s.gcr.io/kube-controller-manager:v1.14.3 k8s.gcr.io/kube-scheduler:v1.14.3 k8s.gcr.io/kube-proxy:v1.14.3 k8s.gcr.io/pause:3.1 k8s.gcr.io/etcd:3.3.10 k8s.gcr.io/coredns:1.3.1 # 手工拉取镜像 docker pull docker.io/mirrorgooglecontainers/kube-apiserver:v1.14.3 docker pull docker.io/mirrorgooglecontainers/kube-controller-manager:v1.14.3 docker pull docker.io/mirrorgooglecontainers/kube-scheduler:v1.14.3 docker pull docker.io/mirrorgooglecontainers/kube-proxy:v1.14.3 docker pull docker.io/mirrorgooglecontainers/pause:3.1 docker pull docker.io/mirrorgooglecontainers/etcd:3.3.10 docker pull docker.io/coredns/coredns:1.3.1 # 手工打tag docker tag docker.io/mirrorgooglecontainers/kube-apiserver:v1.14.3 k8s.gcr.io/kube-apiserver:v1.14.3 docker tag docker.io/mirrorgooglecontainers/kube-controller-manager:v1.14.3 k8s.gcr.io/kube-controller-manager:v1.14.3 docker tag docker.io/mirrorgooglecontainers/kube-scheduler:v1.14.3 k8s.gcr.io/kube-scheduler:v1.14.3 docker tag docker.io/mirrorgooglecontainers/kube-proxy:v1.14.3 k8s.gcr.io/kube-proxy:v1.14.3 docker tag docker.io/mirrorgooglecontainers/pause:3.1 k8s.gcr.io/pause:3.1 docker tag docker.io/mirrorgooglecontainers/etcd:3.3.10 k8s.gcr.io/etcd:3.3.10 docker tag docker.io/coredns/coredns:1.3.1 k8s.gcr.io/coredns:1.3.1 再次执行,终于创建成功,输出如下: ~ kubeadm init --pod-network-cidr=10.244.0.0/16 --kubernetes-version=stable [init] Using Kubernetes version: v1.14.3 [preflight] Running pre-flight checks [WARNING IsDockerSystemdCheck]: detected "cgroupfs" as the Docker cgroup driver. The recommended driver is "systemd". Please follow the guide at https://kubernetes.io/docs/setup/cri/ [preflight] Pulling images required for setting up a Kubernetes cluster [preflight] This might take a minute or two, depending on the speed of your internet connection [preflight] You can also perform this action in beforehand using 'kubeadm config images pull' [kubelet-start] Writing kubelet environment file with flags to file "/var/lib/kubelet/kubeadm-flags.env" [kubelet-start] Writing kubelet configuration to file "/var/lib/kubelet/config.yaml" [kubelet-start] Activating the kubelet service [certs] Using certificateDir folder "/etc/kubernetes/pki" [certs] Generating "etcd/ca" certificate and key [certs] Generating "etcd/server" certificate and key [certs] etcd/server serving cert is signed for DNS names [worker01 localhost] and IPs [192.168.101.113 127.0.0.1 ::1] [certs] Generating "etcd/peer" certificate and key [certs] etcd/peer serving cert is signed for DNS names [worker01 localhost] and IPs [192.168.101.113 127.0.0.1 ::1] [certs] Generating "apiserver-etcd-client" certificate and key [certs] Generating "etcd/healthcheck-client" certificate and key [certs] Generating "ca" certificate and key [certs] Generating "apiserver" certificate and key [certs] apiserver serving cert is signed for DNS names [worker01 kubernetes kubernetes.default kubernetes.default.svc kubernetes.default.svc.cluster.local] and IPs [10.96.0.1 192.168.101.113] [certs] Generating "apiserver-kubelet-client" certificate and key [certs] Generating "front-proxy-ca" certificate and key [certs] Generating "front-proxy-client" certificate and key [certs] Generating "sa" key and public key [kubeconfig] Using kubeconfig folder "/etc/kubernetes" [kubeconfig] Writing "admin.conf" kubeconfig file [kubeconfig] Writing "kubelet.conf" kubeconfig file [kubeconfig] Writing "controller-manager.conf" kubeconfig file [kubeconfig] Writing "scheduler.conf" kubeconfig file [control-plane] Using manifest folder "/etc/kubernetes/manifests" [control-plane] Creating static Pod manifest for "kube-apiserver" [control-plane] Creating static Pod manifest for "kube-controller-manager" [control-plane] Creating static Pod manifest for "kube-scheduler" [etcd] Creating static Pod manifest for local etcd in "/etc/kubernetes/manifests" [wait-control-plane] Waiting for the kubelet to boot up the control plane as static Pods from directory "/etc/kubernetes/manifests". This can take up to 4m0s [apiclient] All control plane components are healthy after 18.005322 seconds [upload-config] storing the configuration used in ConfigMap "kubeadm-config" in the "kube-system" Namespace [kubelet] Creating a ConfigMap "kubelet-config-1.14" in namespace kube-system with the configuration for the kubelets in the cluster [upload-certs] Skipping phase. Please see --experimental-upload-certs [mark-control-plane] Marking the node worker01 as control-plane by adding the label "node-role.kubernetes.io/master=''" [mark-control-plane] Marking the node worker01 as control-plane by adding the taints [node-role.kubernetes.io/master:NoSchedule] [bootstrap-token] Using token: ss6flg.csw4u0ok134n2fy1 [bootstrap-token] Configuring bootstrap tokens, cluster-info ConfigMap, RBAC Roles [bootstrap-token] configured RBAC rules to allow Node Bootstrap tokens to post CSRs in order for nodes to get long term certificate credentials [bootstrap-token] configured RBAC rules to allow the csrapprover controller automatically approve CSRs from a Node Bootstrap Token [bootstrap-token] configured RBAC rules to allow certificate rotation for all node client certificates in the cluster [bootstrap-token] creating the "cluster-info" ConfigMap in the "kube-public" namespace [addons] Applied essential addon: CoreDNS [addons] Applied essential addon: kube-proxy Your Kubernetes control-plane has initialized successfully! To start using your cluster, you need to run the following as a regular user: mkdir -p $HOME/.kube sudo cp -i /etc/kubernetes/admin.conf $HOME/.kube/config sudo chown $(id -u):$(id -g) $HOME/.kube/config You should now deploy a pod network to the cluster. Run "kubectl apply -f [podnetwork].yaml" with one of the options listed at: https://kubernetes.io/docs/concepts/cluster-administration/addons/ Then you can join any number of worker nodes by running the following on each as root: kubeadm join 192.168.101.113:6443 --token ss6flg.csw4u0ok134n2fy1 \ --discovery-token-ca-cert-hash sha256:bac9a150228342b7cdedf39124ef2108653db1f083e9f547d251e08f03c41945 安装网络插件 For flannel to work correctly, you must pass --pod-network-cidr=10.244.0.0/16 to kubeadm init. Set /proc/sys/net/bridge/bridge-nf-call-iptables to 1 by running sysctl net.bridge.bridge-nf-call-iptables=1 to pass bridged IPv4 traffic to iptables’ chains. This is a requirement for some CNI plugins to work, for more information please see here. Make sure that your firewall rules allow UDP ports 8285 and 8472 traffic for all hosts participating in the overlay network. see here . Note that flannel works on amd64, arm, arm64, ppc64le and s390x under Linux. Windows (amd64) is claimed as supported in v0.11.0 but the usage is undocumented. kubectl apply -f https://raw.githubusercontent.com/coreos/flannel/62e44c867a2846fefb68bd5f178daf4da3095ccb/Documentation/kube-flannel.yml For more information about flannel, see the CoreOS flannel repository on GitHub . 安装完成后,查看所有组件已经成功运行 ~ kubectl get all --all-namespaces NAMESPACE NAME READY STATUS RESTARTS AGE kube-system pod/coredns-fb8b8dccf-vmdsj 1/1 Running 0 24m kube-system pod/coredns-fb8b8dccf-xrhrs 1/1 Running 0 24m kube-system pod/etcd-worker01 1/1 Running 0 23m kube-system pod/kube-apiserver-worker01 1/1 Running 0 23m kube-system pod/kube-controller-manager-worker01 1/1 Running 0 23m kube-system pod/kube-flannel-ds-amd64-cgnnz 1/1 Running 0 4m18s kube-system pod/kube-proxy-vfvkp 1/1 Running 0 24m kube-system pod/kube-scheduler-worker01 1/1 Running 0 23m NAMESPACE NAME TYPE CLUSTER-IP EXTERNAL-IP PORT(S) AGE default service/kubernetes ClusterIP 10.96.0.1 <none> 443/TCP 24m kube-system service/kube-dns ClusterIP 10.96.0.10 <none> 53/UDP,53/TCP,9153/TCP 24m NAMESPACE NAME DESIRED CURRENT READY UP-TO-DATE AVAILABLE NODE SELECTOR AGE kube-system daemonset.apps/kube-flannel-ds-amd64 1 1 1 1 1 beta.kubernetes.io/arch=amd64 4m18s kube-system daemonset.apps/kube-flannel-ds-arm 0 0 0 0 0 beta.kubernetes.io/arch=arm 4m18s kube-system daemonset.apps/kube-flannel-ds-arm64 0 0 0 0 0 beta.kubernetes.io/arch=arm64 4m18s kube-system daemonset.apps/kube-flannel-ds-ppc64le 0 0 0 0 0 beta.kubernetes.io/arch=ppc64le 4m18s kube-system daemonset.apps/kube-flannel-ds-s390x 0 0 0 0 0 beta.kubernetes.io/arch=s390x 4m18s kube-system daemonset.apps/kube-proxy 1 1 1 1 1 <none> 24m NAMESPACE NAME READY UP-TO-DATE AVAILABLE AGE kube-system deployment.apps/coredns 2/2 2 2 24m NAMESPACE NAME DESIRED CURRENT READY AGE kube-system replicaset.apps/coredns-fb8b8dccf 2 2 2 24m run a demo pod ~ kubectl create deployment nginx --image=nginx deployment.apps/nginx created ~ kubectl get deploy NAME READY UP-TO-DATE AVAILABLE AGE nginx 0/1 1 0 9s ~ kubectl get pod NAME READY STATUS RESTARTS AGE nginx-65f88748fd-95gkh 0/1 Pending 0 21s ~ kubectl describe pod/nginx-65f88748fd-95gkh Name: nginx-65f88748fd-95gkh Namespace: default Priority: 0 PriorityClassName: <none> Node: <none> Labels: app=nginx pod-template-hash=65f88748fd Annotations: <none> Status: Pending IP: Controlled By: ReplicaSet/nginx-65f88748fd Containers: nginx: Image: nginx Port: <none> Host Port: <none> Environment: <none> Mounts: /var/run/secrets/kubernetes.io/serviceaccount from default-token-5kf45 (ro) Conditions: Type Status PodScheduled False Volumes: default-token-5kf45: Type: Secret (a volume populated by a Secret) SecretName: default-token-5kf45 Optional: false QoS Class: BestEffort Node-Selectors: <none> Tolerations: node.kubernetes.io/not-ready:NoExecute for 300s node.kubernetes.io/unreachable:NoExecute for 300s Events: Type Reason Age From Message ---- ------ ---- ---- ------- Warning FailedScheduling 30s default-scheduler 0/1 nodes are available: 1 node(s) had taints that the pod didn't tolerate. 查看错误原因,写的很清楚,没有可用节点,是因为我们唯一的一个节点worker01是master节点,master节点默认含有taint(污点),默认不可以调度业务pod,我们来去除这个污点,让nginx可以调度上去 ~ kubectl describe node worker01 Name: worker01 Roles: master Labels: beta.kubernetes.io/arch=amd64 beta.kubernetes.io/os=linux kubernetes.io/arch=amd64 kubernetes.io/hostname=worker01 kubernetes.io/os=linux node-role.kubernetes.io/master= Annotations: flannel.alpha.coreos.com/backend-data: {"VtepMAC":"86:f6:8f:29:d7:c7"} flannel.alpha.coreos.com/backend-type: vxlan flannel.alpha.coreos.com/kube-subnet-manager: true flannel.alpha.coreos.com/public-ip: 192.168.101.113 kubeadm.alpha.kubernetes.io/cri-socket: /var/run/dockershim.sock node.alpha.kubernetes.io/ttl: 0 volumes.kubernetes.io/controller-managed-attach-detach: true CreationTimestamp: Sat, 08 Jun 2019 11:56:28 +0800 Taints: node-role.kubernetes.io/master:NoSchedule ... ~ kubectl taint nodes --all node-role.kubernetes.io/master- node/worker01 untainted ~ kubectl get pod -o wide NAME READY STATUS RESTARTS AGE IP NODE NOMINATED NODE READINESS GATES nginx-65f88748fd-95gkh 1/1 Running 0 4m11s 10.244.0.4 worker01 <none> <none> 可以看到pod已经是running状态了,测试一下 ~ curl 10.244.0.4 <!DOCTYPE html> <html> <head> <title>Welcome to nginx!</title> <style> body { width: 35em; margin: 0 auto; font-family: Tahoma, Verdana, Arial, sans-serif; } </style> </head> <body> <h1>Welcome to nginx!</h1> <p>If you see this page, the nginx web server is successfully installed and working. Further configuration is required.</p> <p>For online documentation and support please refer to <a href="http://nginx.org/">nginx.org</a>.<br/> Commercial support is available at <a href="http://nginx.com/">nginx.com</a>.</p> <p><em>Thank you for using nginx.</em></p> </body> </html> 成功!! 加入节点 在worker02上,执行: ~ kubeadm join 192.168.101.113:6443 --token ss6flg.csw4u0ok134n2fy1 \ --discovery-token-ca-cert-hash sha256:bac9a150228342b7cdedf39124ef2108653db1f083e9f547d251e08f03c41945 [preflight] Running pre-flight checks [WARNING IsDockerSystemdCheck]: detected "cgroupfs" as the Docker cgroup driver. The recommended driver is "systemd". Please follow the guide at https://kubernetes.io/docs/setup/cri/ [preflight] Reading configuration from the cluster... [preflight] FYI: You can look at this config file with 'kubectl -n kube-system get cm kubeadm-config -oyaml' [kubelet-start] Downloading configuration for the kubelet from the "kubelet-config-1.14" ConfigMap in the kube-system namespace [kubelet-start] Writing kubelet configuration to file "/var/lib/kubelet/config.yaml" [kubelet-start] Writing kubelet environment file with flags to file "/var/lib/kubelet/kubeadm-flags.env" [kubelet-start] Activating the kubelet service [kubelet-start] Waiting for the kubelet to perform the TLS Bootstrap... This node has joined the cluster: * Certificate signing request was sent to apiserver and a response was received. * The Kubelet was informed of the new secure connection details. Run 'kubectl get nodes' on the control-plane to see this node join the cluster. 查看 ~ kubectl get nodes NAME STATUS ROLES AGE VERSION worker01 Ready master 52m v1.14.3 worker02 Ready <none> 7m12s v1.14.3 将demo的replica设置为2 ~ kubectl scale deployment.v1.apps/nginx --replicas=2 deployment.apps/nginx scaled ~ kubectl get pod -o wide NAME READY STATUS RESTARTS AGE IP NODE NOMINATED NODE READINESS GATES nginx-7cffb9df96-8n884 1/1 Running 0 5m2s 10.244.0.6 worker01 <none> <none> nginx-7cffb9df96-rbvsr 1/1 Running 0 3s 10.244.1.10 worker02 <none> <none> ~ http 10.244.1.10 HTTP/1.1 200 OK Accept-Ranges: bytes Connection: keep-alive Content-Length: 612 Content-Type: text/html Date: Sat, 08 Jun 2019 05:03:57 GMT ETag: "5ce409fd-264" Last-Modified: Tue, 21 May 2019 14:23:57 GMT Server: nginx/1.17.0 <!DOCTYPE html> <html> <head> <title>Welcome to nginx!</title> <style> body { width: 35em; margin: 0 auto; font-family: Tahoma, Verdana, Arial, sans-serif; } </style> </head> <body> <h1>Welcome to nginx!</h1> <p>If you see this page, the nginx web server is successfully installed and working. Further configuration is required.</p> <p>For online documentation and support please refer to <a href="http://nginx.org/">nginx.org</a>.<br/> Commercial support is available at <a href="http://nginx.com/">nginx.com</a>.</p> <p><em>Thank you for using nginx.</em></p> </body> </html> 成功!至此我们安装好了两个节点的集群,并基于Flannel网络插件的方式,网络模式为VXLAN


优秀的个人博客,低调大师

K8S自己动手系列 - 1.2 - 节点管理

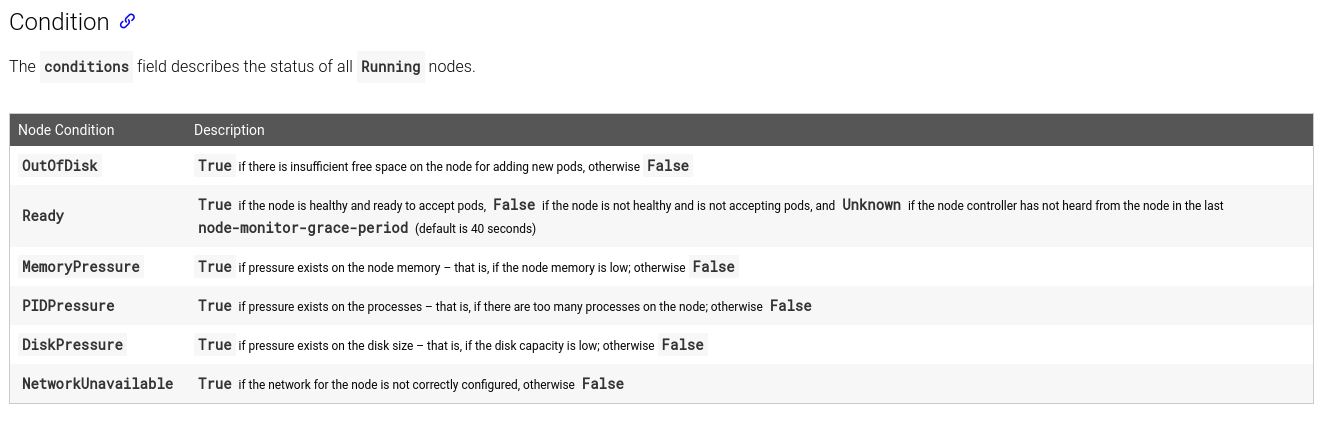
节点管理 节点状态 please refer: https://kubernetes.io/docs/concepts/architecture/nodes/#node-status这里我们重点关注下Condition部分如文档描述 节点失联 or 节点宕机 查看节点列表 ~ kubectl get node -o wide NAME STATUS ROLES AGE VERSION INTERNAL-IP EXTERNAL-IP OS-IMAGE KERNEL-VERSION CONTAINER-RUNTIME worker01 Ready master 21h v1.14.3 192.168.101.113 <none> Ubuntu 16.04.6 LTS 4.4.0-150-generic docker://18.9.5 worker02 Ready <none> 21h v1.14.3 192.168.100.117 <none> Ubuntu 16.04.6 LTS 4.4.0-150-generic docker://18.9.5 # 查看pod和其运行所在节点 ~ kubectl get pods -o wide NAME READY STATUS RESTARTS AGE IP NODE NOMINATED NODE READINESS GATES nginx-6657c9ffc-6q2pt 1/1 Running 1 19h 10.244.0.11 worker01 <none> <none> nginx-6657c9ffc-msd6t 1/1 Running 0 19h 10.244.1.17 worker02 <none> <none> 现在我们使worker02关机 ~ kubectl get pod -o wide NAME READY STATUS RESTARTS AGE IP NODE NOMINATED NODE READINESS GATES nginx-6657c9ffc-6q2pt 1/1 Running 1 20h 10.244.0.11 worker01 <none> <none> nginx-6657c9ffc-msd6t 1/1 Running 0 20h 10.244.1.17 worker02 <none> <none> ~ kubectl get node -o wide NAME STATUS ROLES AGE VERSION INTERNAL-IP EXTERNAL-IP OS-IMAGE KERNEL-VERSION CONTAINER-RUNTIME worker01 Ready master 22h v1.14.3 192.168.101.113 <none> Ubuntu 16.04.6 LTS 4.4.0-150-generic docker://18.9.5 worker02 Ready <none> 21h v1.14.3 192.168.100.117 <none> Ubuntu 16.04.6 LTS 4.4.0-150-generic docker://18.9.5 ~ ping 192.168.100.117 PING 192.168.100.117 (192.168.100.117) 56(84) bytes of data. ^C --- 192.168.100.117 ping statistics --- 2 packets transmitted, 0 received, 100% packet loss, time 1007ms 可以看到虽然查看状态还是正常,实际上节点已经无法ping通,再次查看,发现节点已经处于NotReady状态 ~ kubectl get node -o wide NAME STATUS ROLES AGE VERSION INTERNAL-IP EXTERNAL-IP OS-IMAGE KERNEL-VERSION CONTAINER-RUNTIME worker01 Ready master 22h v1.14.3 192.168.101.113 <none> Ubuntu 16.04.6 LTS 4.4.0-150-generic docker://18.9.5 worker02 NotReady <none> 21h v1.14.3 192.168.100.117 <none> Ubuntu 16.04.6 LTS 4.4.0-150-generic docker://18.9.5 ~ kubectl get pod -o wide NAME READY STATUS RESTARTS AGE IP NODE NOMINATED NODE READINESS GATES nginx-6657c9ffc-6q2pt 1/1 Running 1 20h 10.244.0.11 worker01 <none> <none> nginx-6657c9ffc-msd6t 1/1 Running 0 20h 10.244.1.17 worker02 <none> <none> 查看节点详情,发现节点已经被打上node.kubernetes.io/unreachable:NoExecute和node.kubernetes.io/unreachable:NoSchedule两个污点,conditions也随之变化 ~ kubectl describe node worker02 Name: worker02 Roles: <none> Labels: beta.kubernetes.io/arch=amd64 ... Annotations: flannel.alpha.coreos.com/backend-data: {"VtepMAC":"4e:0a:b4:88:0d:83"} ... CreationTimestamp: Sat, 08 Jun 2019 12:42:00 +0800 Taints: node.kubernetes.io/unreachable:NoExecute node.kubernetes.io/unreachable:NoSchedule Unschedulable: false Conditions: Type Status LastHeartbeatTime LastTransitionTime Reason Message ---- ------ ----------------- ------------------ ------ ------- MemoryPressure Unknown Sun, 09 Jun 2019 10:03:52 +0800 Sun, 09 Jun 2019 10:04:52 +0800 NodeStatusUnknown Kubelet stopped posting node status. DiskPressure Unknown Sun, 09 Jun 2019 10:03:52 +0800 Sun, 09 Jun 2019 10:04:52 +0800 NodeStatusUnknown Kubelet stopped posting node status. PIDPressure Unknown Sun, 09 Jun 2019 10:03:52 +0800 Sun, 09 Jun 2019 10:04:52 +0800 NodeStatusUnknown Kubelet stopped posting node status. Ready Unknown Sun, 09 Jun 2019 10:03:52 +0800 Sun, 09 Jun 2019 10:04:52 +0800 NodeStatusUnknown Kubelet stopped posting node status. 再次查看pod,发现已经被调度到其他节点 ~ kubectl get pods -o wide NAME READY STATUS RESTARTS AGE IP NODE NOMINATED NODE READINESS GATES nginx-6657c9ffc-6q2pt 1/1 Running 1 20h 10.244.0.11 worker01 <none> <none> nginx-6657c9ffc-msd6t 1/1 Terminating 0 20h 10.244.1.17 worker02 <none> <none> nginx-6657c9ffc-n9s4p 1/1 Running 0 71s 10.244.0.14 worker01 <none> <none> 查看正在terminating的pod状态: ~ kubectl describe pod/nginx-6657c9ffc-msd6t Name: nginx-6657c9ffc-msd6t Node: worker02/192.168.100.117 Status: Terminating (lasts 2m5s) Tolerations: node.kubernetes.io/not-ready:NoExecute for 300s node.kubernetes.io/unreachable:NoExecute for 300s Events: <none> 发现两个污点容忍tolerations选项,解释了为什么节点处于NotReady后,pod还是running状态一段时间后被terminate重建更多细节,please refer https://kubernetes.io/docs/concepts/architecture/nodes/#node-controller 移除节点 为了实验效果,先把pod扩容到10个 ~ kubectl scale --replicas=10 deployment/nginx deployment.extensions/nginx scaled ~ kubectl get pod -o wide NAME READY STATUS RESTARTS AGE IP NODE NOMINATED NODE READINESS GATES nginx-6657c9ffc-6lfbp 1/1 Running 0 8s 10.244.1.20 worker02 <none> <none> nginx-6657c9ffc-6q2pt 1/1 Running 1 20h 10.244.0.11 worker01 <none> <none> nginx-6657c9ffc-8cbpl 1/1 Running 0 8s 10.244.1.23 worker02 <none> <none> nginx-6657c9ffc-dbr7c 1/1 Running 0 8s 10.244.1.22 worker02 <none> <none> nginx-6657c9ffc-kk84d 1/1 Running 0 8s 10.244.1.21 worker02 <none> <none> nginx-6657c9ffc-kp64c 1/1 Running 0 8s 10.244.0.16 worker01 <none> <none> nginx-6657c9ffc-n9s4p 1/1 Running 0 40m 10.244.0.14 worker01 <none> <none> nginx-6657c9ffc-pxbs2 1/1 Running 0 8s 10.244.1.19 worker02 <none> <none> nginx-6657c9ffc-sb85v 1/1 Running 0 8s 10.244.1.18 worker02 <none> <none> nginx-6657c9ffc-sxb25 1/1 Running 0 8s 10.244.0.15 worker01 <none> <none> 使用drain放干节点,然后删除节点 ~ kubectl drain worker02 --force --grace-period=900 --ignore-daemonsets node/worker02 already cordoned WARNING: ignoring DaemonSet-managed Pods: kube-system/kube-flannel-ds-amd64-crq7k, kube-system/kube-proxy-x9h7m evicting pod "nginx-6657c9ffc-sb85v" evicting pod "nginx-6657c9ffc-dbr7c" evicting pod "nginx-6657c9ffc-6lfbp" evicting pod "nginx-6657c9ffc-8cbpl" evicting pod "nginx-6657c9ffc-kk84d" evicting pod "nginx-6657c9ffc-pxbs2" pod/nginx-6657c9ffc-kk84d evicted pod/nginx-6657c9ffc-dbr7c evicted pod/nginx-6657c9ffc-8cbpl evicted pod/nginx-6657c9ffc-pxbs2 evicted pod/nginx-6657c9ffc-sb85v evicted pod/nginx-6657c9ffc-6lfbp evicted node/worker02 evicted # 执行完后发现所有pod已经运行在worker01上了 ~ kubectl get pod -o wide NAME READY STATUS RESTARTS AGE IP NODE NOMINATED NODE READINESS GATES nginx-6657c9ffc-45svt 1/1 Running 0 63s 10.244.0.18 worker01 <none> <none> nginx-6657c9ffc-489zz 1/1 Running 0 63s 10.244.0.21 worker01 <none> <none> nginx-6657c9ffc-49vqv 1/1 Running 0 63s 10.244.0.20 worker01 <none> <none> nginx-6657c9ffc-6q2pt 1/1 Running 1 20h 10.244.0.11 worker01 <none> <none> nginx-6657c9ffc-fq7gg 1/1 Running 0 63s 10.244.0.22 worker01 <none> <none> nginx-6657c9ffc-kl6j9 1/1 Running 0 63s 10.244.0.19 worker01 <none> <none> nginx-6657c9ffc-kp64c 1/1 Running 0 4m31s 10.244.0.16 worker01 <none> <none> nginx-6657c9ffc-n9s4p 1/1 Running 0 44m 10.244.0.14 worker01 <none> <none> nginx-6657c9ffc-ssmph 1/1 Running 0 63s 10.244.0.17 worker01 <none> <none> nginx-6657c9ffc-sxb25 1/1 Running 0 4m31s 10.244.0.15 worker01 <none> <none> # 删除节点 ~ kubectl delete node worker02 node "worker02" deleted ~ kubectl get node NAME STATUS ROLES AGE VERSION worker01 Ready master 22h v1.14.3 更多详情 please refer https://kubernetes.io/docs/concepts/workloads/pods/disruptions/ 加入节点 使用kubeadm初始化master节点后,会有一段提示,说明如何加入新节点,那个务必要保存好接下来我们将刚刚被下线的worker02重置,然后重新加入集群 ~ kubeadm reset [reset] WARNING: Changes made to this host by 'kubeadm init' or 'kubeadm join' will be reverted. [reset] Are you sure you want to proceed? [y/N]: y [preflight] Running pre-flight checks W0609 11:00:23.206928 7376 reset.go:234] [reset] No kubeadm config, using etcd pod spec to get data directory [reset] No etcd config found. Assuming external etcd [reset] Please manually reset etcd to prevent further issues [reset] Stopping the kubelet service [reset] unmounting mounted directories in "/var/lib/kubelet" [reset] Deleting contents of stateful directories: [/var/lib/kubelet /etc/cni/net.d /var/lib/dockershim /var/run/kubernetes] [reset] Deleting contents of config directories: [/etc/kubernetes/manifests /etc/kubernetes/pki] [reset] Deleting files: [/etc/kubernetes/admin.conf /etc/kubernetes/kubelet.conf /etc/kubernetes/bootstrap-kubelet.conf /etc/kubernetes/controller-manager.conf /etc/kubernetes/scheduler.conf] The reset process does not reset or clean up iptables rules or IPVS tables. If you wish to reset iptables, you must do so manually. For example: iptables -F && iptables -t nat -F && iptables -t mangle -F && iptables -X If your cluster was setup to utilize IPVS, run ipvsadm --clear (or similar) to reset your system's IPVS tables. ~ iptables -F && iptables -t nat -F && iptables -t mangle -F && iptables -X 执行kubeadm join ~ kubeadm join 192.168.101.113:6443 --token ss6flg.csw4u0ok134n2fy1 \ --discovery-token-ca-cert-hash sha256:bac9a150228342b7cdedf39124ef2108653db1f083e9f547d251e08f03c41945 [preflight] Running pre-flight checks [WARNING IsDockerSystemdCheck]: detected "cgroupfs" as the Docker cgroup driver. The recommended driver is "systemd". Please follow the guide at https://kubernetes.io/docs/setup/cri/ [preflight] Reading configuration from the cluster... [preflight] FYI: You can look at this config file with 'kubectl -n kube-system get cm kubeadm-config -oyaml' [kubelet-start] Downloading configuration for the kubelet from the "kubelet-config-1.14" ConfigMap in the kube-system namespace [kubelet-start] Writing kubelet configuration to file "/var/lib/kubelet/config.yaml" [kubelet-start] Writing kubelet environment file with flags to file "/var/lib/kubelet/kubeadm-flags.env" [kubelet-start] Activating the kubelet service [kubelet-start] Waiting for the kubelet to perform the TLS Bootstrap... This node has joined the cluster: * Certificate signing request was sent to apiserver and a response was received. * The Kubelet was informed of the new secure connection details. Run 'kubectl get nodes' on the control-plane to see this node join the cluster. 查看节点,发现已经添加成功 ~ kubectl get node -o wide NAME STATUS ROLES AGE VERSION INTERNAL-IP EXTERNAL-IP OS-IMAGE KERNEL-VERSION CONTAINER-RUNTIME worker01 Ready master 23h v1.14.3 192.168.101.113 <none> Ubuntu 16.04.6 LTS 4.4.0-150-generic docker://18.9.5 worker02 Ready <none> 33s v1.14.3 192.168.100.117 <none> Ubuntu 16.04.6 LTS 4.4.0-150-generic docker://18.9.5

优秀的个人博客,低调大师

k8s ingress获取真实IP地址配置

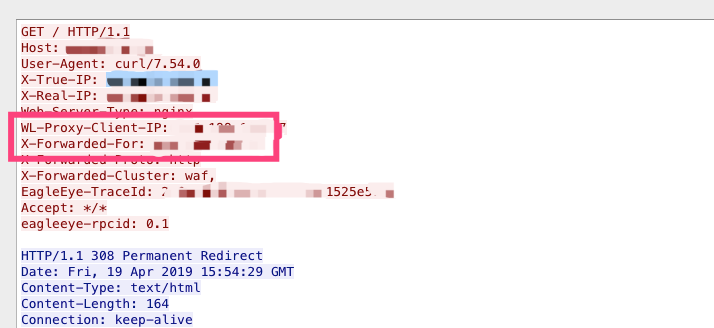
背景 业务架构:Client->WAF->LB->ECS->容器问题:在容器中获取不到真实的客户端公网IP 抓包分析 1.在ECS上的抓包分析,看到WAF已经将 真实客户端地址放到了 x-Forwarded-For 的字段中传给了ECS2.在容器中抓包,看到一个x-Forwarded-For的字段是错误的对应的IP为WAF的回源地址3.与容器同学确认 ingress的行为 将真实的客户端IP,放到了x-Original-Forwarded-For。而将WAF的回源地址放到了 x-Forwarded-For了。 处理方法 修改容器的配置文件配置文件:kube-system/nginx-configuration修改命令:kubectl -n kube-system edit cm nginx-configuration添

优秀的个人博客,低调大师

K8s 应用管理之道 - 升级篇(一)

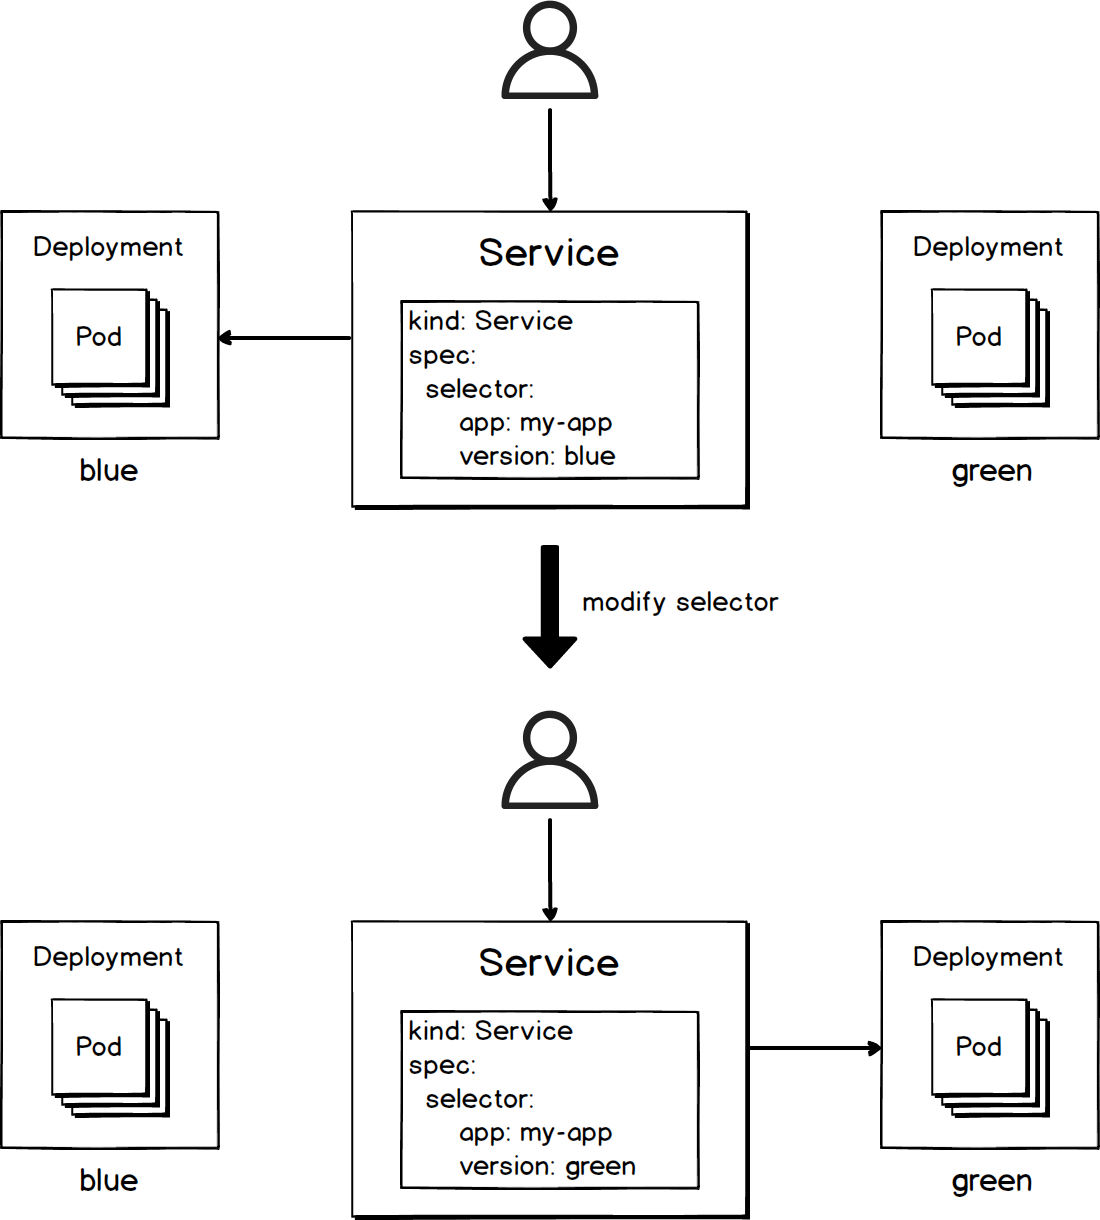
背景 随着小步快跑、快速迭代的开发模式被越来越多的互联网企业认同和采用,应用的变更、升级频率变得越来越频繁。为了应对不同的升级需求,保证升级过程平稳顺利地进行,诞生了一系列的部署发布模式。 停机发布 - 把老版的应用实例完全停止,再发布新的版本。这种发布模式主要为了解决新老版本互不兼容、无法共存的问题,缺点是一段时间内服务完全不可用。 蓝绿发布 - 在线上同时部署相同数量的新老版本应用实例。待新版本测试通过后,将流量一次性地切到新的服务实例上来。这种发布模式解决了停机发布中存在的服务完全不可用问题,但会造成比较大的资源消耗。 滚动发布 - 分批次逐步替换应用实例。这种发布模式不会中断服务,同时也不会消耗过多额外的资源,但由于新老版本实例同时在线,可能导致来自相同客户端的请求在新老版中切换而产生兼容性问题。 金丝雀发布 - 逐渐将流量从老版本

优秀的个人博客,低调大师

k8s与监控--prometheus的远端存储

前言 prometheus在容器云的领域实力毋庸置疑,越来越多的云原生组件直接提供prometheus的metrics接口,无需额外的exporter。所以采用prometheus作为整个集群的监控方案是合适的。但是metrics的存储这块,prometheus提供了本地 存储,即tsdb时序数据库。本地存储的优势就是运维简单,启动prometheus只需一个命令,下面两个启动参数指定了数据路径和保存时间。 storage.tsdb.path: tsdb数据库路径,默认 data/ storage.tsdb.retention: 数据保留时间,默认15天 缺点就是无法大量的metrics持久化。当然prometheus2.0以后压缩数据能力得到了很大的提升。 为了解决单节点存储的限制,prometheus没有自己实现集群存储,而是提供了远程读写的接口,让用户自己选择合适的时序数据库来实现prometheus的扩展性。 prometheus通过下面两张方式来实现与其他的远端存储系统对接 Prometheus 按照标准的格式将metrics写到远端存储 prometheus 按照标准格式从远端的url来读取metrics 下面我将重点剖析远端存储的方案 远端存储方案 配置文件 远程写 # The URL of the endpoint to send samples to. url: <string> # Timeout for requests to the remote write endpoint. [ remote_timeout: <duration> | default = 30s ] # List of remote write relabel configurations. write_relabel_configs: [ - <relabel_config> ... ] # Sets the `Authorization` header on every remote write request with the # configured username and password. # password and password_file are mutually exclusive. basic_auth: [ username: <string> ] [ password: <string> ] [ password_file: <string> ] # Sets the `Authorization` header on every remote write request with # the configured bearer token. It is mutually exclusive with `bearer_token_file`. [ bearer_token: <string> ] # Sets the `Authorization` header on every remote write request with the bearer token # read from the configured file. It is mutually exclusive with `bearer_token`. [ bearer_token_file: /path/to/bearer/token/file ] # Configures the remote write request's TLS settings. tls_config: [ <tls_config> ] # Optional proxy URL. [ proxy_url: <string> ] # Configures the queue used to write to remote storage. queue_config: # Number of samples to buffer per shard before we start dropping them. [ capacity: <int> | default = 100000 ] # Maximum number of shards, i.e. amount of concurrency. [ max_shards: <int> | default = 1000 ] # Maximum number of samples per send. [ max_samples_per_send: <int> | default = 100] # Maximum time a sample will wait in buffer. [ batch_send_deadline: <duration> | default = 5s ] # Maximum number of times to retry a batch on recoverable errors. [ max_retries: <int> | default = 10 ] # Initial retry delay. Gets doubled for every retry. [ min_backoff: <duration> | default = 30ms ] # Maximum retry delay. [ max_backoff: <duration> | default = 100ms ] 远程读 # The URL of the endpoint to query from. url: <string> # An optional list of equality matchers which have to be # present in a selector to query the remote read endpoint. required_matchers: [ <labelname>: <labelvalue> ... ] # Timeout for requests to the remote read endpoint. [ remote_timeout: <duration> | default = 1m ] # Whether reads should be made for queries for time ranges that # the local storage should have complete data for. [ read_recent: <boolean> | default = false ] # Sets the `Authorization` header on every remote read request with the # configured username and password. # password and password_file are mutually exclusive. basic_auth: [ username: <string> ] [ password: <string> ] [ password_file: <string> ] # Sets the `Authorization` header on every remote read request with # the configured bearer token. It is mutually exclusive with `bearer_token_file`. [ bearer_token: <string> ] # Sets the `Authorization` header on every remote read request with the bearer token # read from the configured file. It is mutually exclusive with `bearer_token`. [ bearer_token_file: /path/to/bearer/token/file ] # Configures the remote read request's TLS settings. tls_config: [ <tls_config> ] # Optional proxy URL. [ proxy_url: <string> ] PS 远程写配置中的write_relabel_configs 该配置项,充分利用了prometheus强大的relabel的功能。可以过滤需要写到远端存储的metrics。 例如:选择指定的metrics。 remote_write: - url: "http://prometheus-remote-storage-adapter-svc:9201/write" write_relabel_configs: - action: keep source_labels: [__name__] regex: container_network_receive_bytes_total|container_network_receive_packets_dropped_total global配置中external_labels,在prometheus的联邦和远程读写的可以考虑设置该配置项,从而区分各个集群。 global: scrape_interval: 20s # The labels to add to any time series or alerts when communicating with # external systems (federation, remote storage, Alertmanager). external_labels: cid: '9' 已有的远端存储的方案 现在社区已经实现了以下的远程存储方案 AppOptics: write Chronix: write Cortex: read and write CrateDB: read and write Elasticsearch: write Gnocchi: write Graphite: write InfluxDB: read and write OpenTSDB: write PostgreSQL/TimescaleDB: read and write SignalFx: write 上面有些存储是只支持写的。其实研读源码,能否支持远程读, 取决于该存储是否支持正则表达式的查询匹配。具体实现下一节,将会解读一下prometheus-postgresql-adapter和如何实现一个自己的adapter。 同时支持远程读写的 Cortex来源于weave公司,整个架构对prometheus做了上层的封装,用到了很多组件。稍微复杂。 InfluxDB 开源版不支持集群。对于metrics量比较大的,写入压力大,然后influxdb-relay方案并不是真正的高可用。当然饿了么开源了influxdb-proxy,有兴趣的可以尝试一下。 CrateDB 基于es。具体了解不多 TimescaleDB 个人比较中意该方案。传统运维对pgsql熟悉度高,运维靠谱。目前支持 streaming replication方案支持高可用。 后记 其实如果收集的metrics用于数据分析,可以考虑clickhouse数据库,集群方案和写入性能以及支持远程读写。这块正在研究中。待有了一定成果以后再专门写一篇文章解读。目前我们的持久化方案准备用TimescaleDB。 本文转自SegmentFault-k8s与监控--prometheus的远端存储

优秀的个人博客,低调大师

k8s RBAC 多租户权限控制实现

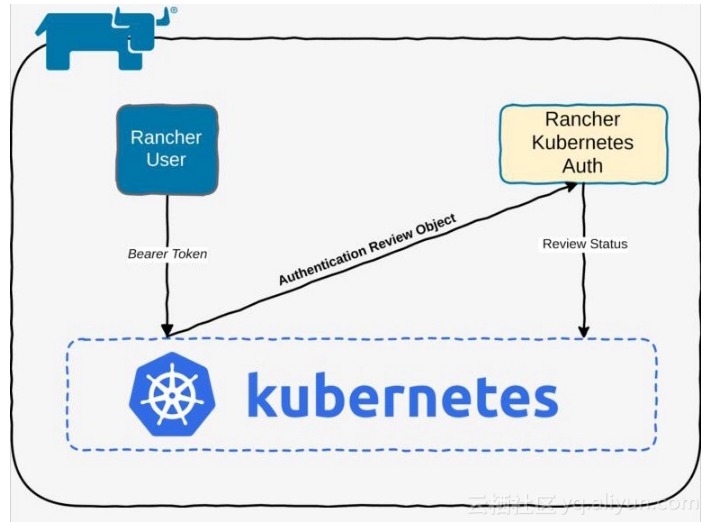
访问到权限分两部分 1.Authenticating认证授权配置由kube-apiserver管理 这里使用的是 Static Password File方式。apiserver启动yaml里配置basic-auth-file即可,容器 启动apiserver的话要注意这个文件需要是在容器内能访问到的。(可以通过挂载文件,或者在已经挂载的路径里增加配置文件)basic-auth-file文件格式见官方文档https://kubernetes.io/docs/admin/authentication/#static-password-file注意password在第一个,之前没注意被卡了很久。修改了文件以后需要重启apiserver才能生效。这里kubectldelete删除pod有问题,使用docker命令查看apiserver容器其实没有重启。解决方案是使用dockerkill杀掉容器。自动重启。 [root@tensorflow1 ~]# curl -u admin:admin "https://localhost:6443/api/v1/pods" -k { "kind": "Status", "apiVersion": "v1", "metadata": { }, "status": "Failure", "message": "pods is forbidden: User \"system:anonymous\" cannot list pods at the cluster scope", "reason": "Forbidden", "details": { "kind": "pods" }, "code": 403 } 这个就是没有通过认证的报错 2.Authorization授权 k8sRBAC授权规则https://kubernetes.io/docs/admin/authorization/rbac/ 简单来说就是 权限--角色--用户绑定需要配置两个文件一个是role/clusterRole,定义角色以及其权限一个是roleBinding/clusterRoleBinding,定义用户和角色的关系 { "kind": "Status", "apiVersion": "v1", "metadata": { }, "status": "Failure", "message": "pods is forbidden: User \"admin\" cannot list pods at the cluster scope", "reason": "Forbidden", "details": { "kind": "pods" }, "code": 403 } 这个就是没有权限访问,需要配置RBAC 文件如下:方案1:role + roleBinding kind: Role apiVersion: rbac.authorization.k8s.io/v1 metadata: namespace: user1 name: pod-reader rules: - apiGroups: [""] # "" indicates the core API group resources: ["pods"] verbs: ["*"] - apiGroups: [""] # "" indicates the core API group resources: ["namespaces"] verbs: ["*"] kind: RoleBinding apiVersion: rbac.authorization.k8s.io/v1 metadata: name: user1-rolebinding namespace: user1 subjects: - kind: User name: user1 # Name is case sensitive apiGroup: rbac.authorization.k8s.io roleRef: kind: ClusterRole name: myauth-user apiGroup: rbac.authorization.k8s.io 方案2:clusterRole + roleBinding (推荐) clusterRole定义全局权限,roleBinding将权限限制到namespace。clusterRole仅需要定义一次。 kind: ClusterRole apiVersion: rbac.authorization.k8s.io/v1 metadata: name: myauth-user rules: - apiGroups: [""] # "" indicates the core API group resources: ["pods"] verbs: ["*"] - apiGroups: [""] # "" indicates the core API group resources: ["namespaces"] verbs: ["*"] - apiGroups: [""] # "" indicates the core API group resources: ["resourcequotas"] verbs: ["*"] kind: RoleBinding apiVersion: rbac.authorization.k8s.io/v1 metadata: name: user2-rolebinding namespace: user2 subjects: - kind: User name: user2 # Name is case sensitive apiGroup: rbac.authorization.k8s.io roleRef: kind: ClusterRole name: myauth-user apiGroup: rbac.authorization.k8s.io kind: RoleBinding apiVersion: rbac.authorization.k8s.io/v1 metadata: name: user1-rolebinding namespace: user1 subjects: - kind: User name: user1 # Name is case sensitive apiGroup: rbac.authorization.k8s.io roleRef: kind: ClusterRole name: myauth-user apiGroup: rbac.authorization.k8s.io 3.配置 新建静态密码文件 # vi /etc/kubernetes/pki/basic_auth_file admin,admin,1004 jane2,jane,1005 user1,user1,1006 user2,user2,1007 修改apiserver配置修改/etc/kubernetes/manifests/kube-apiserver.yaml在一堆参数配置下面增加 --basic-auth-file=/etc/kubernetes/pki/basic_auth_file eg: - --etcd-servers=https://127.0.0.1:2379 - --etcd-cafile=/etc/kubernetes/pki/etcd/ca.crt - --etcd-certfile=/etc/kubernetes/pki/apiserver-etcd-client.crt - --etcd-keyfile=/etc/kubernetes/pki/apiserver-etcd-client.key - --basic-auth-file=/etc/kubernetes/pki/basic_auth_file 这里将静态文件放在/etc/kubernetes/pki/目录下的原因是,apiserver通过容器启动,这个路径已经挂载容器中了,可以被访问到。放在其他路径需要额外配置挂载路径。apiserver只会启动在master节点上,故仅需要在master节点上配置即可。 启动好以后在master机器上执行kubectlgetall,多半是执行不成功的,因为修改apiserver配置文件后,apiserver自动重启,然后启动失败,所以就无法访问集群了。使用dockerps查看发现k8s_kube-scheduler和k8s_kube-controller-manager重启了,但是apiserver没起来。执行systemctlrestartkubelet,再dockerps就能看到apiserver启动成功了。如果还没启动起来,那再看看上面哪里配置有问题。 应用 使用--username={username}--password={password}参数访问kubectl 参考https://kubernetes-v1-4.github.io/docs/user-guide/kubectl/kubectl_create/ kubectl get all -n user1 --username=user1 --password=user1 kubectl create -f tf1-rc.yaml --username=user1 --password=user1 使用 curl -u {username}:{password} `js"https://{masterIP}:6443/api/v1/" -k访问httprestfulapicurl -u jane:jane2 "https://localhost:6443/api/v1/namespaces/user1/pods" -kcurl -u jane:jane2 "https://localhost:6443/api/v1/namespaces/user1" -k curl -u user1:user1 "https://localhost:6443/api/v1/namespaces/user1" -kcurl -u user1:user1 "https://localhost:6443/api/v1/namespaces/user1/pods" -kcurl -u user1:user1 "https://localhost:6443/api/v1/namespaces/user1/resourcequotas/" -k curl -u user2:user2 "https://localhost:6443/api/v1/namespaces/user2" -kcurl -u user2:user2 "https://localhost:6443/api/v1/namespaces/user2/pods" -kcurl -u user2:user2 "https://localhost:6443/api/v1/namespaces/user2/resourcequotas/" -k

优秀的个人博客,低调大师

k8s自动伸缩那些事 资料下载

弹性伸缩是Kubernetes中非常吸引开发者的重要特性。随着应用类型的不断细分,弹性伸缩也有了更多概念上的延伸。Kubernetes社区中在弹性伸缩方面布局了多个组件,从不同的场景、不同的角度、不同的思路来实现极致的弹性。在本课程中,会带领大家认识Kubernetes中弹性伸缩的组件功能、原理与使用。另外也会和大家一起探讨如何通过组件的组合实现充满弹性的Kubernetes集群。下面是本次直播的所有资料,全部奉上~ 直播视频全程链接:https://yq.aliyun.com/live/653 PPT精彩内容预览 PPT下载地址:https://yq.aliyun.com/download/3135 Kubernetes社区大群欢迎你 进群方式:1.点击链接即可入群:https://dwz.cn/G2EELckH2.扫描下方二维码进群

优秀的个人博客,低调大师

K8S存储卷常见问题 - OSS

1. Pod挂载、卸载失败,日志中报Orphaned pod; 该问题为kubelet删除pod的bug,相关解决方法:链接 通过subpath挂载oss时候容器出现上述错误,目前不建议使用subpath方式。 2. 重启网络导致oss挂载不可用 升级集群、重启kubelet的时候,由于容器网络会重启,导致ossfs进程重启; ossfs重启会导致主机与容器目录映射失效,这时需要重启容器,或重建pod; 可以通过配置健康检查实现容器的重启,参考:OSS数据卷使用实践 2. oss挂载失败 检查使用的ak是否正确; 检查挂载使用的url是否网络可达

资源下载

更多资源
腾讯云软件源

腾讯云软件源

为解决软件依赖安装时官方源访问速度慢的问题,腾讯云为一些软件搭建了缓存服务。您可以通过使用腾讯云软件源站来提升依赖包的安装速度。为了方便用户自由搭建服务架构,目前腾讯云软件源站支持公网访问和内网访问。

Nacos

Nacos

Nacos /nɑ:kəʊs/ 是 Dynamic Naming and Configuration Service 的首字母简称,一个易于构建 AI Agent 应用的动态服务发现、配置管理和AI智能体管理平台。Nacos 致力于帮助您发现、配置和管理微服务及AI智能体应用。Nacos 提供了一组简单易用的特性集,帮助您快速实现动态服务发现、服务配置、服务元数据、流量管理。Nacos 帮助您更敏捷和容易地构建、交付和管理微服务平台。

Spring

Spring

Spring框架(Spring Framework)是由Rod Johnson于2002年提出的开源Java企业级应用框架,旨在通过使用JavaBean替代传统EJB实现方式降低企业级编程开发的复杂性。该框架基于简单性、可测试性和松耦合性设计理念,提供核心容器、应用上下文、数据访问集成等模块,支持整合Hibernate、Struts等第三方框架,其适用范围不仅限于服务器端开发,绝大多数Java应用均可从中受益。

Rocky Linux

Rocky Linux

Rocky Linux(中文名:洛基)是由Gregory Kurtzer于2020年12月发起的企业级Linux发行版,作为CentOS稳定版停止维护后与RHEL(Red Hat Enterprise Linux)完全兼容的开源替代方案,由社区拥有并管理,支持x86_64、aarch64等架构。其通过重新编译RHEL源代码提供长期稳定性,采用模块化包装和SELinux安全架构,默认包含GNOME桌面环境及XFS文件系统,支持十年生命周期更新。

用户登录
用户注册