首页 文章 精选 留言 我的

精选列表

搜索[SpringCloud],共1289篇文章
优秀的个人博客,低调大师

HYC 0.02 版本发布,基于 springcloud + antd 的低代码研发工具

更新内容: [新增] 产品管理,添加涉及接口、涉及模型、涉及仓库、涉及数据库、涉及字典功能。 [新增] 新增产品初始化脚本功能,运行完成系统涉及基础脚本运行。 [新增] 产品升级,添加在线升级脚本管理功能,包含升级文件,文件编译、一键发布等功能 [新增] 产品编译功能,监控每次升级任务编译记录。 [新增] 产品运行功能,查看系统运行时系统各组件记录。 [新增] 产品历史功能,每次升级备份脚本记录。 [新增] 页面设计-新增默认编译功能。 [新增] 接口设计-新增默认编译功能。 https://gitee.com/beijixiongwanjia/haiyuan-cloud-web https://gitee.com/beijixiongwanjia/haiyuan-cloud-server 如果觉得还不错,STAR 一下吧

优秀的个人博客,低调大师

SpringCloud技术专题】「Hystrix」(3)Command运作的原理和源码分析

# [每日一句] > **也许你度过了很糟糕的一天,但这并不代表你会因此度过糟糕的一生。** ### 构建一个Hystrix的Command模式 这里我们需要关注三点: - (模板构造器)**HystrixCommand构造函数当中的super** - (真正的执行者)**HystrixCommand定义的run,run其实就是真正执行命令的地方** - (触发启动)**new HelloWorldHystrixCommand("test").execute()中execute是发起执行的过程** ### 实现Demo ```java public class HelloWorldHystrixCommand extends HystrixCommand { private final String name; public HelloWorldHystrixCommand(String name) { super(HystrixCommandGroupKey.Factory.asKey("ExampleGroup")); this.name = name; } @Override protected String run() throws Exception { //Thread.sleep(100); return "hello"+name; } } public static void main(String[] args){ String result = new HelloWorldHystrixCommand("test").execute(); System.out.println(result); } ``` ### HystrixCommand初始化过程 > **HystrixCommand的类关系图下,这里我们只需要暂时关注HystrixCommand继承自AbstractCommand即可,其他的我也没仔细看**。 #### HystrixCommand类依赖图 ![](https://oscimg.oschina.net/oscnet/up-b51f34ca2c47b7b123b9ebd3507900d40c4.png) ##### 
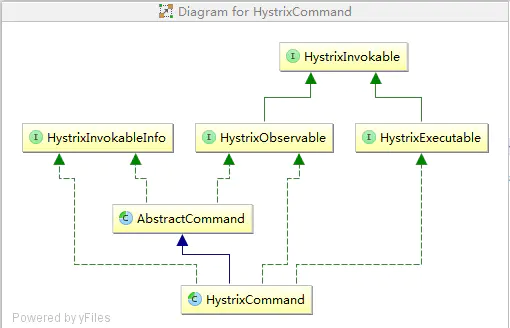
HelloWorldHystrixCommand的构造步骤如下: 1. **具体类HelloWorldHystrixCommand继承自HystrixCommand, 通过super()调用了HystrixCommand的构造函数** 2. **HystrixCommand通过super()命令调用AbstractCommand实现初始化** #### AbstractCommand类当中比较核心的几个对象如下: - metrics:统计指标 - circuitBreaker:熔断器变量 - threadPool:隔离的线程池 - concurrencyStrategy :并发策略 ```java protected HystrixCommand(HystrixCommandGroupKey group) { super(group, null, null, null, null, null, null, null, null, null, null, null); } protected AbstractCommand(HystrixCommandGroupKey group, HystrixCommandKey key, HystrixThreadPoolKey threadPoolKey, HystrixCircuitBreaker circuitBreaker, HystrixThreadPool threadPool,HystrixCommandProperties.Setter commandPropertiesDefaults, HystrixThreadPoolProperties.Setter threadPoolPropertiesDefaults, HystrixCommandMetrics metrics, TryableSemaphore fallbackSemaphore, TryableSemaphore executionSemaphore, HystrixPropertiesStrategy propertiesStrategy, HystrixCommandExecutionHook executionHook) { this.commandGroup = initGroupKey(group); this.commandKey = initCommandKey(key, getClass()); this.properties = initCommandProperties(this.commandKey, propertiesStrategy, commandPropertiesDefaults); this.threadPoolKey = initThreadPoolKey(threadPoolKey, this.commandGroup, this.properties.executionIsolationThreadPoolKeyOverride().get()); this.metrics = initMetrics(metrics, this.commandGroup, this.threadPoolKey, this.commandKey, this.properties); this.circuitBreaker = initCircuitBreaker(this.properties.circuitBreakerEnabled().get(), circuitBreaker, this.commandGroup, this.commandKey, this.properties, this.metrics); // 线程池相关配置,通过线程池进行隔离 this.threadPool = initThreadPool(threadPool, this.threadPoolKey, threadPoolPropertiesDefaults); //Strategies from plugins this.eventNotifier = HystrixPlugins.getInstance().getEventNotifier(); this.concurrencyStrategy = HystrixPlugins.getInstance().getConcurrencyStrategy(); HystrixMetricsPublisherFactory.createOrRetrievePublisherForCommand(this.commandKey, this.commandGroup, this.metrics, this.circuitBreaker, this.properties); this.executionHook = initExecutionHook(executionHook); this.requestCache = HystrixRequestCache.getInstance(this.commandKey, this.concurrencyStrategy); this.currentRequestLog = initRequestLog(this.properties.requestLogEnabled().get(), this.concurrencyStrategy); /* fallback semaphore override if applicable */ this.fallbackSemaphoreOverride = fallbackSemaphore; /* execution semaphore override if applicable */ this.executionSemaphoreOverride = executionSemaphore; } ``` ### Hystrix的执行 > **从Hystrix的整个执行的生命周期来看**,**可以分为两个阶段,阶段一主要是Observable的创建,阶段二主要是Observable的执行**。 - **两个过程的实际实现中运用了大量的RxJava的技能包,所以阅读起来有一点绕,我只能按照我粗浅的理解来尽量把整个过程讲解清楚。** - **切入详细的过程当中,大家需要带有两个疑问去看代码,只有找到能解答这两个疑问的代码才算看懂了主流程,两个疑问分别是:(1)如何分配执行线程;(2)如何判定超时。** #### Hystrix的Observable创建过程 Hystrix的创建过程比较复杂,大致核心流程如下: 1. **类HystrixCommand中execute方法开始执行,内部的queue()是实际执行整个过程,get()是获取执行的结果。** 2. **类HystrixCommand中queue方法,delegate = toObservable().toBlocking().toFuture(),toObservable负责创建Observable对象,toFuture负责执行任务(Future)。** 3. **类AbstractCommand中toObservable方法,hystrixObservable = `Observable.defer(applyHystrixSemantics)`负责关联applyHystrixSemantics。** 4. **类AbstractCommand中applyHystrixSemantics方法,executeCommandAndObserve(cmd)负责执行具体的AbstractCommand采用相关的Observable进行关联绑定。** 5. **类AbstractCommand中executeCommandAndObserve方法中,`executeCommandWithSpecifiedIsolation(cmd).lift(new HystrixObservableTimeoutOperator (_cmd))`负责关联执行_cmd并关联超时检测任务。** 6. **类AbstractCommand中executeCommandWithSpecifiedIsolation是执行的具体的命令,【HystrixObservableTimeoutOperator是超时检测任务】。** 7. **类AbstractCommand中executeCommandWithSpecifiedIsolation方法中,getUserExecutionObservable负责执行具体任务,同时通过`subscribeOn(threadPool.getScheduler(new Func0 ()))`关联threadPool隔离执行任务,关键的隔离任务的位置。** 8. **类HystrixCommand中getUserExecutionObservable方法中,`Observable.just(run())`负责执行任务,这个run方法就是HelloWorldHystrixCommand的run方法,也就是这里终于回调回了真正的run函数。** #### execute执行方法 ```java public R execute() { try { return queue().get(); } catch (Exception e) { throw Exceptions.sneakyThrow(decomposeException(e)); } } ``` #### 获取Observable获取相关的Future ```java public Future queue() { //todo ((Observable )that).single().subscribe(new Subscriber () //todo BlockingOperatorToFuture.toFuture里面真正执行任务 //todo toObservable内部是通过RxJava构建 final Future delegate = toObservable().toBlocking().toFuture(); final Future f = new Future () { @Override public boolean cancel(boolean mayInterruptIfRunning) { if (delegate.isCancelled()) { return false; } if (HystrixCommand.this.getProperties().executionIsolationThreadInterruptOnFutureCancel().get()) { interruptOnFutureCancel.compareAndSet(false, mayInterruptIfRunning); } final boolean res = delegate.cancel(interruptOnFutureCancel.get()); if (!isExecutionComplete() && interruptOnFutureCancel.get()) { final Thread t = executionThread.get(); if (t != null && !t.equals(Thread.currentThread())) { t.interrupt(); } } return res; } @Override public boolean isCancelled() { return delegate.isCancelled(); } @Override public boolean isDone() { return delegate.isDone(); } @Override public R get() throws InterruptedException, ExecutionException { return delegate.get(); } @Override public R get(long timeout, TimeUnit unit) throws InterruptedException, ExecutionException, TimeoutException { return delegate.get(timeout, unit); } }; if (f.isDone()) { try { f.get(); return f; } catch (Exception e) { Throwable t = decomposeException(e); if (t instanceof HystrixBadRequestException) { return f; } else if (t instanceof HystrixRuntimeException) { HystrixRuntimeException hre = (HystrixRuntimeException) t; switch (hre.getFailureType()) { case COMMAND_EXCEPTION: case TIMEOUT: return f; default: throw hre; } } else { throw Exceptions.sneakyThrow(t); } } } return f; } public Observable toObservable() { final AbstractCommand _cmd = this; final Action0 terminateCommandCleanup = new Action0() { @Override public void call() { if (_cmd.commandState.compareAndSet(CommandState.OBSERVABLE_CHAIN_CREATED, CommandState.TERMINAL)) { handleCommandEnd(false); //user code never ran } else if (_cmd.commandState.compareAndSet(CommandState.USER_CODE_EXECUTED, CommandState.TERMINAL)) { handleCommandEnd(true); //user code did run } } }; final Action0 unsubscribeCommandCleanup = new Action0() { @Override public void call() { circuitBreaker.markNonSuccess(); if (_cmd.commandState.compareAndSet(CommandState.OBSERVABLE_CHAIN_CREATED, CommandState.UNSUBSCRIBED)) { if (!_cmd.executionResult.containsTerminalEvent()) { _cmd.eventNotifier.markEvent(HystrixEventType.CANCELLED, _cmd.commandKey); try { executionHook.onUnsubscribe(_cmd); } catch (Throwable hookEx) { logger.warn("Error calling HystrixCommandExecutionHook.onUnsubscribe", hookEx); } _cmd.executionResultAtTimeOfCancellation = _cmd.executionResult .addEvent((int) (System.currentTimeMillis() - _cmd.commandStartTimestamp), HystrixEventType.CANCELLED); } handleCommandEnd(false); //user code never ran } else if (_cmd.commandState.compareAndSet(CommandState.USER_CODE_EXECUTED, CommandState.UNSUBSCRIBED)) { if (!_cmd.executionResult.containsTerminalEvent()) { _cmd.eventNotifier.markEvent(HystrixEventType.CANCELLED, _cmd.commandKey); try { executionHook.onUnsubscribe(_cmd); } catch (Throwable hookEx) { logger.warn("Error calling HystrixCommandExecutionHook.onUnsubscribe", hookEx); } _cmd.executionResultAtTimeOfCancellation = _cmd.executionResult .addEvent((int) (System.currentTimeMillis() - _cmd.commandStartTimestamp), HystrixEventType.CANCELLED); } handleCommandEnd(true); //user code did run } } }; final Func0 > applyHystrixSemantics = new Func0 >() { @Override public Observable call() { if (commandState.get().equals(CommandState.UNSUBSCRIBED)) { return Observable.never(); } return applyHystrixSemantics(_cmd); } }; final Func1 wrapWithAllOnNextHooks = new Func1 () { @Override public R call(R r) { R afterFirstApplication = r; try { afterFirstApplication = executionHook.onComplete(_cmd, r); } catch (Throwable hookEx) { logger.warn("Error calling HystrixCommandExecutionHook.onComplete", hookEx); } try { return executionHook.onEmit(_cmd, afterFirstApplication); } catch (Throwable hookEx) { logger.warn("Error calling HystrixCommandExecutionHook.onEmit", hookEx); return afterFirstApplication; } } }; final Action0 fireOnCompletedHook = new Action0() { @Override public void call() { try { executionHook.onSuccess(_cmd); } catch (Throwable hookEx) { logger.warn("Error calling HystrixCommandExecutionHook.onSuccess", hookEx); } } }; //defer在subscribe的时候会真正执行 return Observable.defer(new Func0 >() { @Override public Observable call() { /* this is a stateful object so can only be used once */ if (!commandState.compareAndSet(CommandState.NOT_STARTED, CommandState.OBSERVABLE_CHAIN_CREATED)) { IllegalStateException ex = new IllegalStateException(""); //TODO make a new error type for this throw new HystrixRuntimeException(FailureType.BAD_REQUEST_EXCEPTION, _cmd.getClass(), getLogMessagePrefix() + " ", ex, null); } commandStartTimestamp = System.currentTimeMillis(); if (properties.requestLogEnabled().get()) { if (currentRequestLog != null) { currentRequestLog.addExecutedCommand(_cmd); } } final boolean requestCacheEnabled = isRequestCachingEnabled(); final String cacheKey = getCacheKey(); /* try from cache first */ if (requestCacheEnabled) { HystrixCommandResponseFromCache fromCache = (HystrixCommandResponseFromCache ) requestCache.get(cacheKey); if (fromCache != null) { isResponseFromCache = true; return handleRequestCacheHitAndEmitValues(fromCache, _cmd); } } // todo 这里应该在会去执行applyHystrixSemantics方法 Observable hystrixObservable = Observable.defer(applyHystrixSemantics) .map(wrapWithAllOnNextHooks); Observable afterCache; // put in cache if (requestCacheEnabled && cacheKey != null) { // wrap it for caching HystrixCachedObservable toCache = HystrixCachedObservable.from(hystrixObservable, _cmd); HystrixCommandResponseFromCache fromCache = (HystrixCommandResponseFromCache ) requestCache.putIfAbsent(cacheKey, toCache); if (fromCache != null) { // another thread beat us so we'll use the cached value instead toCache.unsubscribe(); isResponseFromCache = true; return handleRequestCacheHitAndEmitValues(fromCache, _cmd); } else { // we just created an ObservableCommand so we cast and return it afterCache = toCache.toObservable(); } } else { afterCache = hystrixObservable; } //todo 关联逻辑 return afterCache .doOnTerminate(terminateCommandCleanup) .doOnUnsubscribe(unsubscribeCommandCleanup) .doOnCompleted(fireOnCompletedHook); } }); } // TODO: 2018/7/9 真正执行代码的地方在这里 private Observable applyHystrixSemantics(final AbstractCommand _cmd) { executionHook.onStart(_cmd); if (circuitBreaker.attemptExecution()) { final TryableSemaphore executionSemaphore = getExecutionSemaphore(); final AtomicBoolean semaphoreHasBeenReleased = new AtomicBoolean(false); final Action0 singleSemaphoreRelease = new Action0() { @Override public void call() { if (semaphoreHasBeenReleased.compareAndSet(false, true)) { executionSemaphore.release(); } } }; final Action1 markExceptionThrown = new Action1 () { @Override public void call(Throwable t) { eventNotifier.markEvent(HystrixEventType.EXCEPTION_THROWN, commandKey); } }; if (executionSemaphore.tryAcquire()) { try { executionResult = executionResult.setInvocationStartTime(System.currentTimeMillis()); // TODO: 2018/7/9 executeCommandAndObserve执行任务的地方 return executeCommandAndObserve(_cmd) .doOnError(markExceptionThrown) .doOnTerminate(singleSemaphoreRelease) .doOnUnsubscribe(singleSemaphoreRelease); } catch (RuntimeException e) { return Observable.error(e); } } else { return handleSemaphoreRejectionViaFallback(); } } else { return handleShortCircuitViaFallback(); } } private Observable executeCommandAndObserve(final AbstractCommand _cmd) { final HystrixRequestContext currentRequestContext = HystrixRequestContext.getContextForCurrentThread(); final Action1 markEmits = new Action1 () { @Override public void call(R r) { if (shouldOutputOnNextEvents()) { executionResult = executionResult.addEvent(HystrixEventType.EMIT); eventNotifier.markEvent(HystrixEventType.EMIT, commandKey); } if (commandIsScalar()) { long latency = System.currentTimeMillis() - executionResult.getStartTimestamp(); eventNotifier.markEvent(HystrixEventType.SUCCESS, commandKey); executionResult = executionResult.addEvent((int) latency, HystrixEventType.SUCCESS); eventNotifier.markCommandExecution(getCommandKey(), properties.executionIsolationStrategy().get(), (int) latency, executionResult.getOrderedList()); circuitBreaker.markSuccess(); } } }; final Action0 markOnCompleted = new Action0() { @Override public void call() { if (!commandIsScalar()) { long latency = System.currentTimeMillis() - executionResult.getStartTimestamp(); eventNotifier.markEvent(HystrixEventType.SUCCESS, commandKey); executionResult = executionResult.addEvent((int) latency, HystrixEventType.SUCCESS); eventNotifier.markCommandExecution(getCommandKey(), properties.executionIsolationStrategy().get(), (int) latency, executionResult.getOrderedList()); circuitBreaker.markSuccess(); } } }; final Func1 > handleFallback = new Func1 >() { @Override public Observable call(Throwable t) { circuitBreaker.markNonSuccess(); Exception e = getExceptionFromThrowable(t); executionResult = executionResult.setExecutionException(e); if (e instanceof RejectedExecutionException) { return handleThreadPoolRejectionViaFallback(e); } else if (t instanceof HystrixTimeoutException) { return handleTimeoutViaFallback(); } else if (t instanceof HystrixBadRequestException) { return handleBadRequestByEmittingError(e); } else { /* * Treat HystrixBadRequestException from ExecutionHook like a plain HystrixBadRequestException. */ if (e instanceof HystrixBadRequestException) { eventNotifier.markEvent(HystrixEventType.BAD_REQUEST, commandKey); return Observable.error(e); } return handleFailureViaFallback(e); } } }; final Action1 > setRequestContext = new Action1 >() { @Override public void call(Notification rNotification) { setRequestContextIfNeeded(currentRequestContext); } }; //todo 这里是否执行超时动作,executeCommandWithSpecifiedIsolation这个函数非常重要 Observable execution; if (properties.executionTimeoutEnabled().get()) { execution = executeCommandWithSpecifiedIsolation(_cmd) .lift(new HystrixObservableTimeoutOperator (_cmd)); //todo HystrixObservableTimeoutOperator负责执行超时动作 } else { execution = executeCommandWithSpecifiedIsolation(_cmd); } return execution.doOnNext(markEmits) .doOnCompleted(markOnCompleted) .onErrorResumeNext(handleFallback) .doOnEach(setRequestContext); } private Observable executeCommandWithSpecifiedIsolation(final AbstractCommand _cmd) { if (properties.executionIsolationStrategy().get() == ExecutionIsolationStrategy.THREAD) { return Observable.defer(new Func0 >() { @Override public Observable call() { executionResult = executionResult.setExecutionOccurred(); if (!commandState.compareAndSet(CommandState.OBSERVABLE_CHAIN_CREATED, CommandState.USER_CODE_EXECUTED)) { return Observable.error(new IllegalStateException( "execution attempted while in state : " + commandState.get().name())); } metrics.markCommandStart(commandKey, threadPoolKey, ExecutionIsolationStrategy.THREAD); if (isCommandTimedOut.get() == TimedOutStatus.TIMED_OUT) { // the command timed out in the wrapping thread so we will return immediately // and not increment any of the counters below or other such logic return Observable.error(new RuntimeException("timed out before executing run()")); } if (threadState.compareAndSet(ThreadState.NOT_USING_THREAD, ThreadState.STARTED)) { //we have not been unsubscribed, so should proceed HystrixCounters.incrementGlobalConcurrentThreads(); threadPool.markThreadExecution(); // store the command that is being run endCurrentThreadExecutingCommand = Hystrix.startCurrentThreadExecutingCommand(getCommandKey()); executionResult = executionResult.setExecutedInThread(); try { //todo 估计是前置依赖吧 executionHook.onThreadStart(_cmd); executionHook.onRunStart(_cmd); executionHook.onExecutionStart(_cmd); //todo 真正执行的地方 return getUserExecutionObservable(_cmd); } catch (Throwable ex) { return Observable.error(ex); } } else { //command has already been unsubscribed, so return immediately return Observable.empty(); } } }).doOnTerminate(new Action0() { @Override public void call() { if (threadState.compareAndSet(ThreadState.STARTED, ThreadState.TERMINAL)) { handleThreadEnd(_cmd); } if (threadState.compareAndSet(ThreadState.NOT_USING_THREAD, ThreadState.TERMINAL)) { } } }).doOnUnsubscribe(new Action0() { @Override public void call() { if (threadState.compareAndSet(ThreadState.STARTED, ThreadState.UNSUBSCRIBED)) { handleThreadEnd(_cmd); } if (threadState.compareAndSet(ThreadState.NOT_USING_THREAD, ThreadState.UNSUBSCRIBED)) { //if it was never started and was cancelled, then no need to clean up } //if it was terminal, then other cleanup handled it } }).subscribeOn(threadPool.getScheduler(new Func0 () { //todo subscribeOn 据说获取线程的地方???? @Override public Boolean call() { return properties.executionIsolationThreadInterruptOnTimeout().get() && _cmd.isCommandTimedOut.get() == TimedOutStatus.TIMED_OUT; } })); } else { return Observable.defer(new Func0 >() { @Override public Observable call() { executionResult = executionResult.setExecutionOccurred(); if (!commandState.compareAndSet(CommandState.OBSERVABLE_CHAIN_CREATED, CommandState.USER_CODE_EXECUTED)) { return Observable.error(new IllegalStateException( "execution attempted while in state : " + commandState.get().name())); } metrics.markCommandStart(commandKey, threadPoolKey, ExecutionIsolationStrategy.SEMAPHORE); // semaphore isolated // store the command that is being run endCurrentThreadExecutingCommand = Hystrix.startCurrentThreadExecutingCommand(getCommandKey()); try { executionHook.onRunStart(_cmd); executionHook.onExecutionStart(_cmd); return getUserExecutionObservable(_cmd); } catch (Throwable ex) { return Observable.error(ex); } } }); } } private Observable getUserExecutionObservable(final AbstractCommand _cmd) { Observable userObservable; try { userObservable = getExecutionObservable(); } catch (Throwable ex) { // the run() method is a user provided implementation so can throw instead of using Observable.onError // so we catch it here and turn it into Observable.error userObservable = Observable.error(ex); } return userObservable .lift(new ExecutionHookApplication(_cmd)) .lift(new DeprecatedOnRunHookApplication(_cmd)); } // 真正执行run的位置 final protected Observable getExecutionObservable() { return Observable.defer(new Func0 >() { @Override public Observable call() { try { return Observable.just(run()); } catch (Throwable ex) { return Observable.error(ex); } } }).doOnSubscribe(new Action0() { @Override public void call() { // Save thread on which we get subscribed so that we can interrupt it later if needed executionThread.set(Thread.currentThread()); } }); } ``` ### Hystrix的执行过程 > toFuture过程中真正触发构建的Observable的的代码在((Observable )that).single().subscribe()当中,关注几个方法: onCompleted负责设置完成标记。 onNext负责设置结果。 ```java public static Future toFuture(Observable that) { final CountDownLatch finished = new CountDownLatch(1); final AtomicReference value = new AtomicReference (); final AtomicReference error = new AtomicReference (); @SuppressWarnings("unchecked") final Subscription s = ((Observable )that).single().subscribe(new Subscriber (){ @Override public void onCompleted() { finished.countDown(); } @Override public void onError(Throwable e) { error.compareAndSet(null, e); finished.countDown(); } @Override public void onNext(T v) { // "single" guarantees there is only one "onNext" value.set(v); } }); return new Future () { private volatile boolean cancelled; @Override public boolean cancel(boolean mayInterruptIfRunning) { if (finished.getCount() > 0) { cancelled = true; s.unsubscribe(); // release the latch (a race condition may have already released it by now) finished.countDown(); return true; } else { // can't cancel return false; } } @Override public boolean isCancelled() { return cancelled; } @Override public boolean isDone() { return finished.getCount() == 0; } @Override public T get() throws InterruptedException, ExecutionException { finished.await(); return getValue(); } @Override public T get(long timeout, TimeUnit unit) throws InterruptedException, ExecutionException, TimeoutException { if (finished.await(timeout, unit)) { return getValue(); } else { throw new TimeoutException("Timed out after " + unit.toMillis(timeout) + "ms waiting for underlying Observable."); } } private T getValue() throws ExecutionException { final Throwable throwable = error.get(); if (throwable != null) { throw new ExecutionException("Observable onError", throwable); } else if (cancelled) { // Contract of Future.get() requires us to throw this: throw new CancellationException("Subscription unsubscribed"); } else { return value.get(); } } }; } ```

优秀的个人博客,低调大师

SpringCloud技术专题】「Hystrix」(3)超时机制的原理和实现

[每日一句] 也许你度过了很糟糕的一天,但这并不代表你会因此度过糟糕的一生。 [温馨提示] 承接上一篇文章🏹「Hystrix」(2)参数配置的详细介绍 在这里推荐给大家martinfowler的熔断器介绍和权威指南,有兴趣的小伙伴们可以研究一下哈。 主要介绍相关:官网说明 关于 【Hystrix如何运行的介绍】的介绍 [背景介绍] 分布式系统的规模和复杂度不断增加,随着而来的是对分布式系统可用性的要求越来越高。在各种高可用设计模式中,【熔断、隔离、降级、限流】是经常被使用的。而相关的技术,Hystrix本身早已算不上什么新技术,但它却是最经典的技术体系!。 Hystrix以实现熔断降级的设计,从而提高了系统的可用性。 Hystrix是一个在调用端上,实现断路器模式,以及隔舱模式,通过避免级联故障,提高系统容错能力,从而实现高可用设计的一个Java服务组件库。 Hystrix实现了资源隔离机制 前提介绍 Hystrix的超时检测本质上通过启动单独线程去检测的,线程的执行的时间刚好就是任务超时的时间,本质上就是这么个简单的逻辑。 Hystrix超时后会抛出一个HystrixTimeoutException的异常。 超时检测逻辑 Hystrix的超时包括注册过程和执行过程两个,注册过程如下: 执行lift(new HystrixObservableTimeoutOperator<R>(_cmd))关联超时检测任务。 在HystrixObservableTimeoutOperator类中,new TimerListener()负责创建检测任务,HystrixTimer.getInstance().addTimerListener(listener)负责关联定时任务。 在HystrixObservableTimeoutOperator类中,addTimerListener通过java的定时任务服务scheduleAtFixedRate在延迟超时时间后执行。 Hystrix的超时执行过程如下: 在超时后执行listener.tick()方法后执行类TimerListener的tick方法 在TimerListener类的tick方法中执行timeoutRunnable.run()后执行HystrixContextRunnable的run方法 在HystrixContextRunnable类run方法中执行child.onError(new HystrixTimeoutException())实现超时。 executeCommandWithSpecifiedIsolation(_cmd).lift(new HystrixObservableTimeoutOperator<R>(_cmd)); private static class HystrixObservableTimeoutOperator<R> implements Operator<R, R> { final AbstractCommand<R> originalCommand; public HystrixObservableTimeoutOperator(final AbstractCommand<R> originalCommand) { this.originalCommand = originalCommand; } @Override public Subscriber<? super R> call(final Subscriber<? super R> child) { final CompositeSubscription s = new CompositeSubscription(); // if the child unsubscribes we unsubscribe our parent as well child.add(s); //capture the HystrixRequestContext upfront so that we can use it in the timeout thread later final HystrixRequestContext hystrixRequestContext = HystrixRequestContext.getContextForCurrentThread(); TimerListener listener = new TimerListener() { @Override public void tick() { if(originalCommand.isCommandTimedOut .compareAndSet(TimedOutStatus.NOT_EXECUTED, TimedOutStatus.TIMED_OUT)) { // report timeout failure originalCommand.eventNotifier.markEvent(HystrixEventType.TIMEOUT, originalCommand.commandKey); // shut down the original request s.unsubscribe(); final HystrixContextRunnable timeoutRunnable = new HystrixContextRunnable( originalCommand.concurrencyStrategy, hystrixRequestContext, new Runnable() { @Override public void run() { child.onError(new HystrixTimeoutException()); } }); timeoutRunnable.run(); } } @Override public int getIntervalTimeInMilliseconds() { return originalCommand.properties.executionTimeoutInMilliseconds().get(); } }; final Reference<TimerListener> tl = HystrixTimer.getInstance().addTimerListener(listener); // set externally so execute/queue can see this originalCommand.timeoutTimer.set(tl); /** * If this subscriber receives values it means the parent succeeded/completed */ Subscriber<R> parent = new Subscriber<R>() { @Override public void onCompleted() { if (isNotTimedOut()) { // stop timer and pass notification through tl.clear(); child.onCompleted(); } } @Override public void onError(Throwable e) { if (isNotTimedOut()) { // stop timer and pass notification through tl.clear(); child.onError(e); } } @Override public void onNext(R v) { if (isNotTimedOut()) { child.onNext(v); } } private boolean isNotTimedOut() { // if already marked COMPLETED (by onNext) or succeeds in setting to COMPLETED return originalCommand.isCommandTimedOut.get() == TimedOutStatus.COMPLETED || originalCommand.isCommandTimedOut.compareAndSet(TimedOutStatus.NOT_EXECUTED, TimedOutStatus.COMPLETED); } }; // if s is unsubscribed we want to unsubscribe the parent s.add(parent); return parent; } } public Reference<TimerListener> addTimerListener(final TimerListener listener) { startThreadIfNeeded(); // add the listener Runnable r = new Runnable() { @Override public void run() { try { listener.tick(); } catch (Exception e) { logger.error("Failed while ticking TimerListener", e); } } }; //这里直接简单粗暴的scheduleAtFixedRate以超时时间作为周期去判断是否执行完成 ScheduledFuture<?> f = executor.get().getThreadPool().scheduleAtFixedRate(r, listener.getIntervalTimeInMilliseconds(), listener.getIntervalTimeInMilliseconds(), TimeUnit.MILLISECONDS); return new TimerReference(listener, f); } public class HystrixContextRunnable implements Runnable { private final Callable<Void> actual; private final HystrixRequestContext parentThreadState; public HystrixContextRunnable(Runnable actual) { this(HystrixPlugins.getInstance().getConcurrencyStrategy(), actual); } public HystrixContextRunnable(HystrixConcurrencyStrategy concurrencyStrategy, final Runnable actual) { this(concurrencyStrategy, HystrixRequestContext.getContextForCurrentThread(), actual); } public HystrixContextRunnable(final HystrixConcurrencyStrategy concurrencyStrategy, final HystrixRequestContext hystrixRequestContext, final Runnable actual) { this.actual = concurrencyStrategy.wrapCallable(new Callable<Void>() { @Override public Void call() throws Exception { actual.run(); return null; } }); this.parentThreadState = hystrixRequestContext; } @Override public void run() { HystrixRequestContext existingState = HystrixRequestContext.getContextForCurrentThread(); try { // set the state of this thread to that of its parent HystrixRequestContext.setContextOnCurrentThread(parentThreadState); // execute actual Callable with the state of the parent try { actual.call(); } catch (Exception e) { throw new RuntimeException(e); } } finally { // restore this thread back to its original state HystrixRequestContext.setContextOnCurrentThread(existingState); } } }

优秀的个人博客,低调大师

Spring Cloud 2.x系列之springcloud整合lettuce使用redis

Redis是一种nosql数据库,以键值对<key,value>的形式存储数据,其速度相比于MySQL之类的数据库,相当于内存读写与硬盘读写的差别,所以常常用作缓存,用于少写多读的场景下,直接从缓存拿数据比从数据库(数据库要I/O操作)拿要快得多。Redis目前几乎无处不在,大公司小公司都在用。 Spring cloud 2.x版本后默认Redis客户端连接池类型使用的是lettuce,而Sping cloud 1.5.x使用的jedis。Lettuce和Jedis的都是连接Redis Server的客户端程序。Jedis在实现上是直连redis server,多线程环境下非线程安全,除非使用连接池,为每个Jedis实例增加物理连接;Lettuce基于Netty的连接实例(StatefulRedisConnection),可以在多个线程间并发访问,且线程安全,满足多线程环境下的并发访问,同时它是可伸缩的设计,一个连接实例不够的情况也可以按需增加连接实例。 1、新建项目sc-redis,对应的pom.xml文件如下 <project xmlns="http://maven.apache.org/POM/4.0.0" xmlns:xsi="http://www.w3.org/2001/XMLSchema-instance" xsi:schemaLocation="http://maven.apache.org/POM/4.0.0http://maven.apache.org/xsd/maven-4.0.0.xsd"> <modelVersion>4.0.0</modelVersion> <groupId>spring-cloud</groupId> <artifactId>sc-redis</artifactId> <version>0.0.1-SNAPSHOT</version> <packaging>jar</packaging> <name>sc-redis</name> <url>http://maven.apache.org</url> <parent> <groupId>org.springframework.boot</groupId> <artifactId>spring-boot-starter-parent</artifactId> <version>2.0.4.RELEASE</version> </parent> <dependencyManagement> <dependencies> <dependency> <groupId>org.springframework.cloud</groupId> <artifactId>spring-cloud-dependencies</artifactId> <version>Finchley.RELEASE</version> <type>pom</type> <scope>import</scope> </dependency> </dependencies> </dependencyManagement> <properties> <project.build.sourceEncoding>UTF-8</project.build.sourceEncoding> <maven.compiler.source>1.8</maven.compiler.source> <maven.compiler.target>1.8</maven.compiler.target> </properties> <dependencies> <dependency> <groupId>org.springframework.boot</groupId> <artifactId>spring-boot-starter-data-redis</artifactId> </dependency> <dependency> <groupId>org.apache.commons</groupId> <artifactId>commons-pool2</artifactId> </dependency> <dependency> <groupId>org.springframework.boot</groupId> <artifactId>spring-boot-starter-web</artifactId> </dependency> </dependencies> </project> 2、新建spring boot启动类 package sc.redis; import org.springframework.boot.SpringApplication; import org.springframework.boot.autoconfigure.SpringBootApplication; @SpringBootApplication public class RedisApplication { public static void main(String[] args) { SpringApplication.run(RedisApplication.class,args); } } 3、新建配置文件application.yml server: port: 9004 spring: application: name: sc-redis redis: host: 127.0.0.1 password: port: 6379 timeout: 10000 # 连接超时时间(毫秒) database: 0 # Redis默认情况下有16个分片,这里配置具体使用的分片,默认是0 lettuce: pool: max-active: 8 # 连接池最大连接数(使用负值表示没有限制)默认 8 max-wait: -1 # 连接池最大阻塞等待时间(使用负值表示没有限制)默认 -1 max-idle: 8 # 连接池中的最大空闲连接默认 8 min-idle: 0 # 连接池中的最小空闲连接默认 0 备注:reids对用的所有配置项可以在以下类查看 org.springframework.boot.autoconfigure.data.redis.RedisProperties 4、自定义Reids的Template 默认情况下的模板只能支持RedisTemplate<String, String>,也就是只能存入字符串,这在开发中是不友好的,所以自定义模板是很有必要的,当自定义了模板又想使用String存储这时候就可以使用StringRedisTemplate的方式,它们之间并不冲突。 package sc.redis.config; import java.io.Serializable; import org.springframework.boot.autoconfigure.AutoConfigureAfter; import org.springframework.boot.autoconfigure.data.redis.RedisAutoConfiguration; import org.springframework.context.annotation.Bean; import org.springframework.context.annotation.Configuration; import org.springframework.data.redis.connection.lettuce.LettuceConnectionFactory; import org.springframework.data.redis.core.RedisTemplate; import org.springframework.data.redis.serializer.GenericJackson2JsonRedisSerializer; import org.springframework.data.redis.serializer.StringRedisSerializer; @Configuration @AutoConfigureAfter(RedisAutoConfiguration.class) public class RedisCacheAutoConfiguration { @Bean public RedisTemplate<String, Serializable> redisCacheTemplate(LettuceConnectionFactoryredisConnectionFactory) { RedisTemplate<String, Serializable> template = newRedisTemplate<>(); //键的序列化方式 template.setKeySerializer(newStringRedisSerializer()); //值的序列化方式 template.setValueSerializer(newGenericJackson2JsonRedisSerializer()); template.setConnectionFactory(redisConnectionFactory); returntemplate; } } 5、新建一个模拟的Controller类 packagesc.redis.config; import java.io.Serializable; import java.util.HashMap; import java.util.Map; import org.springframework.beans.factory.annotation.Autowired; import org.springframework.data.redis.core.RedisTemplate; import org.springframework.web.bind.annotation.GetMapping; import org.springframework.web.bind.annotation.PathVariable; import org.springframework.web.bind.annotation.ResponseBody; import org.springframework.web.bind.annotation.RestController; import sc.redis.model.User; @RestController publicclassUserCacheController { //@Autowired //private StringRedisTemplate stringRedisTemplate; @Autowired privateRedisTemplate<String, Serializable> redisCacheTemplate; @GetMapping(value = "/cache/user/cacheUser") @ResponseBody public Map<String, Object> cacheUser() { Map<String,Object> result = new HashMap<String, Object>(); result.put("code", "000000"); result.put("msg", "success"); User u = new User(); u.setId(1L); u.setAge(23); u.setUserName("huangjinjin"); u.setPosition("cto"); result.put("body", u); redisCacheTemplate.opsForValue().set(String.valueOf(u.getId()), u); returnresult; } /** * 获取缓存信息 * @param id * @return */ @GetMapping(value = "/cache/user/getCacheUser/{id}") @ResponseBody public Map<String, Object> getCacheUser(@PathVariable Long id) { Map<String,Object> result = new HashMap<String, Object>(); result.put("code", "000000"); result.put("msg", "success"); User u = (User) redisCacheTemplate.opsForValue().get(String.valueOf(1)); System.out.println(u.getUserName()); result.put("body", u); returnresult; } } 6、启动sc-redis项目,并验证是否启动成功 7、使用postman访问接口 (1)存储值到redis http://127.0.0.1:9004/cache/user/cacheUser (2)从redis获取存贮的值 http://127.0.0.1:9004/cache/user/getCacheUser/1 使用redis客户端redis-cli查看是否把相关数据存贮到redis 下列的就是Redis其它类型所对应的操作方式: opsForValue:对应 String(字符串) opsForZSet:对应 ZSet(有序集合) opsForHash:对应 Hash(哈希) opsForList:对应 List(列表) opsForSet:对应 Set(集合) opsForGeo:对应 GEO(地理位置) 源码: https://gitee.com/hjj520/spring-cloud-2.x 原文发布时间:2018-9-24 本文作者:java乐园 本文来自云栖社区合作伙伴“java乐园”,了解相关信息可以关注“java乐园”

优秀的个人博客,低调大师

springCloud Finchley 实战入门(基于springBoot 2.0.3)【五 Hystrix 服务容错保护】

服务容错保护 在微服务的架构中,存在着那么多单元服务,若一个单元出现故障,就很容易因依赖关系二引发故障的蔓延,最终导致整个系统的瘫痪。这样的架构相比较传统的架构更加不稳定。为了解决这个问题,产生了断路器等一系列的服务保护机制。 spring Cloud Hystrix实现了断路器、线程隔离等一系列服务保护功能。它也是基于Netflix的开源框架Hystrix实现的。,该框架的目标在于通过控制那些访问远程系统、服务和第三方库的节点,从而对延时和故障提供更加强大的容错能力。 快速入门 我们以之前的内容作为基础,针对"service-user-ribbon"进行配置。 在"service-user-ribbon"的pom.xml配置文件添加Hystrix依赖 <!--添加Hystrix依赖 断路器容错保护--> <dependency> <groupId>org.springframework.cloud</groupId> <artifactId>spring-cloud-starter-netflix-hystrix</artifactId> </dependency> 完整的pom.xml <?xml version="1.0" encoding="UTF-8"?> <project xmlns="http://maven.apache.org/POM/4.0.0" xmlns:xsi="http://www.w3.org/2001/XMLSchema-instance" xsi:schemaLocation="http://maven.apache.org/POM/4.0.0 http://maven.apache.org/xsd/maven-4.0.0.xsd"> <modelVersion>4.0.0</modelVersion> <groupId>com.example</groupId> <artifactId>eureka-bussniss-service-user-client-ribbon</artifactId> <version>0.0.1-SNAPSHOT</version> <packaging>jar</packaging> <name>eureka-bussniss-service-user-client-ribbon</name> <description>Demo project for Spring Boot</description> <parent> <groupId>org.springframework.boot</groupId> <artifactId>spring-boot-starter-parent</artifactId> <version>2.0.3.RELEASE</version> <relativePath/> <!-- lookup parent from repository --> </parent> <properties> <project.build.sourceEncoding>UTF-8</project.build.sourceEncoding> <project.reporting.outputEncoding>UTF-8</project.reporting.outputEncoding> <java.version>1.8</java.version> <spring-cloud.version>Finchley.RELEASE</spring-cloud.version> </properties> <dependencies> <dependency> <groupId>org.springframework.cloud</groupId> <artifactId>spring-cloud-starter-netflix-eureka-server</artifactId> </dependency> <dependency> <groupId>org.springframework.cloud</groupId> <artifactId>spring-cloud-starter-netflix-ribbon</artifactId> </dependency> <!--添加Hystrix依赖 断路器容错保护--> <dependency> <groupId>org.springframework.cloud</groupId> <artifactId>spring-cloud-starter-netflix-hystrix</artifactId> </dependency> <dependency> <groupId>org.projectlombok</groupId> <artifactId>lombok</artifactId> </dependency> <dependency> <groupId>org.springframework.boot</groupId> <artifactId>spring-boot-starter-test</artifactId> <scope>test</scope> </dependency> </dependencies> <dependencyManagement> <dependencies> <dependency> <groupId>org.springframework.cloud</groupId> <artifactId>spring-cloud-dependencies</artifactId> <version>${spring-cloud.version}</version> <type>pom</type> <scope>import</scope> </dependency> </dependencies> </dependencyManagement> <build> <plugins> <plugin> <groupId>org.springframework.boot</groupId> <artifactId>spring-boot-maven-plugin</artifactId> </plugin> </plugins> </build> </project> 然后在主类EurekaBussnissServiceUserClientRibbonApplication中使用@EnableHystrix 注解以开启 Hystrix 特性 @SpringBootApplication @EnableEurekaClient @EnableHystrix public class EurekaBussnissServiceUserClientRibbonApplication { public static void main(String[] args) { SpringApplication.run(EurekaBussnissServiceUserClientRibbonApplication.class, args); } @Bean @LoadBalanced //开启客户端负载均衡 RestTemplate restTemplate() { return new RestTemplate(); } } 接下来修改服务消费方式,在UserManagementRibbonClient类的接口方法:ListUsersByRibbon增加@HystrixCommand并且指定fallbackMethod名,再实现该方法。具体的代码如下: /** * 使用 @HystrixCommand 注解的 fallbackMethod 指定失败方法,并实现该方法 * * @return */ @GetMapping("/listUsersByRibbon") @HystrixCommand(fallbackMethod = "listUsersByRibbonFallback") public String ListUsersByRibbon() { /** * hystrix 断路器的默认的超时时间为2000毫秒 * 这里测试的在3000毫秒的随机出现的超时概率出发断路器 对应的代码逻辑见service-user项目的listUsers接口 */ long start = System.currentTimeMillis(); String result = this.restTemplate.getForObject("http://service-user/listUsers", String.class); long end = System.currentTimeMillis(); log.info("Spend Time :"+(end-start)); return result; } public String listUsersByRibbonFallback() { return "listUsersByRibbon异常,端口:" + port; } 配置完成重启项目,在8802和8803服务正常的情况下服务调用正常。 当我们把其中一个service-user服务停掉。例如:把8802停掉,只剩下8803服务,我们重新访问http://localhost:8901/listUsersByRibbon地址,当我们一开始访问到8802服务时,因为此时服务已经挂了,所以我们会看到下面的响应: 1532500404150.png 过了几秒后,继续访问我们会发现请求总是负载到了8803的端口了,不会再去请求8802 1532500486184.png 接下来我们重新把8802的服务启动后,继续访问http://localhost:8901/listUsersByRibbon这时我们会发现请求接口又被一轮询的方式负载到8802和8803了 1532500622445.png 1532500630124.png 这样我们就实现了基础的分布式微服务的容错保护了。github 项目源码 接下来我们会再研究一下,Hystrix框架针对单个应用实例和集群提供的监控功能。

优秀的个人博客,低调大师

每天学点SpringCloud(七):路由器和过滤器-Zuul

版权声明:本文为博主原创文章,未经博主允许不得转载。博客源地址为zhixiang.org.cn https://blog.csdn.net/myFirstCN/article/details/81055026 为什么要使用Zuul 先来看一下下方这个图 假如现在我们具有四个微服务,分别是用户、订单、支付、催收微服务,它们的调用方式分别是使用http、restful、thrift、kafka。这个时候如果我们在客户端直接调用的话感觉是不是太费劲了,客户端需要维护这几种调用方式的客户端,如果后期新增微服务或者减少或者更换调用方式等,都需要修改客户端。那么我们来看一下加入Zuul以后是什么样子的呢 Zuul呢就负责了所有的调用,解耦了客户端和微服务。也符合我们设计的单一职责原则。 使用Zuul 首先呢,我们在原先的父项目下新增一个cloud-demo-zuul模块,引入依赖 <dependency> <groupId>org.springframework.cloud</groupId> <artifactId>spring-cloud-starter-netflix-eureka-server</artifactId> </dependency> <dependency> <groupId>org.springframework.cloud</groupId> <artifactId>spring-cloud-starter-netflix-zuul</artifactId> </dependency> <groupId>org.springframework.cloud</groupId> <artifactId>spring-cloud-starter-netflix-eureka-server</artifactId> </dependency> <dependency> <groupId>org.springframework.cloud</groupId> <artifactId>spring-cloud-starter-netflix-zuul</artifactId> </dependency> 创建包cn.org.zhixiang,在此包下新建启动类CloudDemoZuulApplication @SpringBootApplication @EnableZuulProxy public class CloudDemoZuulApplication { public static void main(String[] args) { SpringApplication.run(CloudDemoZuulApplication.class, args); } } @EnableZuulProxy public class CloudDemoZuulApplication { public static void main(String[] args) { SpringApplication.run(CloudDemoZuulApplication.class, args); } } @EnableZuulProxy就是开启Zuul的注解 接下来看一下application.yml spring: application: name: zuul-demo server: port: 8093 eureka: client: register-with-eureka: true service-url: defaultZone: http://root:root@localhost:8761/eureka application: name: zuul-demo server: port: 8093 eureka: client: register-with-eureka: true service-url: defaultZone: http://root:root@localhost:8761/eureka 这个配置其实是跟我们以往的服务消费者的配置是一样的,为什么要这样配置呢,因为在这个之前我们需要先复习一下以往的知识点,没有看过以往博客的小伙伴可以先参考这个:https://zhixiang.org.cn 首先启动我们的Eureka服务,然后启动一个提供者cloud-demo-provider。我们知道这个时候我们直接访问http://localhost:8078/user/getUser/2是可以获得数据的对吧,那么我的Zuul是怎么使用的呢。我们启动一下我们的Zuul。 这个时候我们访问http://localhost:8093/provider-demo/user/getUser/2获得的数据是一样的,也就是说我们的Zuul做了一个路由转发。我们可以看到这个url中有一个provider-demo,这个呢是提供者的spring.application.name的值,那么如果我们不想使用这个呢,比如说现在我知道这是user微服务,我就想如果访问user微服务我就使用http://localhost:8093/user/user/getUser/2怎么办呢。 配置 我们需要在yml中加上一个配置。 zuul: routes: provider-demo: /user/** routes: provider-demo: /user/** 这个配置呢就是把服务id为provider-demo的微服务项目地址映射为/user/**.注意最后是两个*,为什么是两个呢,如果是一个*只能匹配/user/a,/user/b这种路径,而匹配不了/user/a/b这种。而我们配两个*的话不仅可以匹配/user/a/b,还能匹配/user/a/b/c/d等。 这个时候我们访问http://localhost:8093/user/user/getUser/2的时候就可以得到数据了。 其实还有别的写法。我们来看一下 1. zuul: routes: demo: path: /user/** serviceId: provider-demo routes: demo: path: /user/** serviceId: provider-demo 2. zuul: routes: demo: path: /user/** url: http://localhost:8078/ routes: demo: path: /user/** url: http://localhost:8078/ 上方这两种方式都是可以的,那个demo呢其实是自定义的,只要不是重复就行。然后path呢就是网页上我们访问的url。这两种方式就是分别将这哥path映射到serviceId或者一个url。 负载均衡 刚才我们探讨的一直都是单个服务的情况,那么当我们有多个微服务的时候应该怎么操作呢 zuul: routes: demo: path: /user/** serviceId: provider-demo provider-demo: ribbon: listOfServers: http://localhost:8078,http://localhost:8079 routes: demo: path: /user/** serviceId: provider-demo provider-demo: ribbon: listOfServers: http://localhost:8078,http://localhost:8079 使用这种方式以后,我们再启动一下我们原先的cloud-demo-provider-2项目,然后启动Zuul访问时会发现已经实现了负载均衡 文件上传 我们使用zuul做路由的时候可能会碰到上传文件的需求,上传小文件到是没事,但是如果大文件的话是无法上传呢,这儿呢就有一个办法来绕过SpringMVC的DispatchServlet。 例如我们上传文件的接口为http://localhost:8093/user/user/uploadFile 那么我们在上传的时候就可以访问http://localhost:8093/zuul/user/user/uploadFile来实现上传大文件 GitHub:https://github.com/2388386839/spring-cloud-demo 码云:https://gitee.com/zhixiang_blog/spring-cloud-demo 如果对您有所帮助,请记得帮忙点一个star哦 本文出自https://zhixiang.org.cn,转载请保留。

优秀的个人博客,低调大师

阿里云Kubernetes SpringCloud 实践进行时(3): API网关服务Zuul

简介 为了更好地支撑日益增长的庞大业务量,我们常常需要把服务进行整合、拆分,使我们的服务不仅能通过集群部署抵挡流量的冲击,又能根据业务在其上进行灵活的扩展。随着分布式的普及、服务的快速增长与云计算技术的进步,微服务架构也因其特有的优势而备受关注。微服务架构的本质,是把整体的业务拆分成很多有特定明确功能的服务,通过很多分散的小服务之间的配合,去解决更大,更复杂的问题。对被拆分后的服务进行分类和管理,彼此之间使用统一的接口来进行交互。 本系列讲述了在阿里云Kubernetes容器服务基础之上,如何快速搭建基于Spring Cloud的微服务架构中的基础设施: 第一篇:分布式服务注册与发现系统 第二篇:分布式配置管理系统 第三篇:API网关服务Zuul 系统 第四篇:分布式追踪系统 第五篇:分布式弹性服务与容错处理框架Hystrix及其监控仪表板 第六

优秀的个人博客,低调大师

springCloud(5):Eureka的元数据与Eureka Server的rest端点

一、Eureka的元数据 1.1、简介 Eureka的元数据有两种:标准元数据和自定义元数据。 标准元数据指的是主机名、IP地址、端口号、状态页和健康检查等信息,这些信息都会被发布在服务注册表中,用于服务之间的调用。 自定义元数据可以使用eureka.instance.metadata-map配置,这些元数据可以在远程客户端中访问,但一般不会改变客户端的行为,除非客户端知道该元数据的含义。 1.2、操作 如下图: 1.2.1、修改demo2的application.properties配置 1 2 3 4 5 6 7 8 server.port=9093 spring.application.name=demo2 eureka.client.service-url.defaultZone=http://liuy1:9090/eureka/ eureka.instance.prefer-ip-address=true #显示指定IP eureka.instance.instance-id:${spring.cloud.client.ipAddress}:${server.port} #元数据 eureka.instance.metadata- map . my -metada=zhangsan 1.2.2、在demo1中访问 1 2 3 4 5 6 7 8 9 10 11 12 13 /** *查询DEMO2服务的信息 *@description查询DEMO2服务的信息 *@return *@throwsException *@author我爱大金子 *@version1.0 *@date:2017年6月24日下午4:25:15 */ @GetMapping ( "/demo-instance" ) public List<ServiceInstance>showInfo() throws Exception{ return discoveryClient.getInstances( "demo2" ); } 1.2.3、测试 访问:http://localhost:9092/demo-instance 二、Eureka Server的rest端点 非JVM的微服务可使用REST端点操作Eu-reka,从而实现注册与发现。此处不举例说明,详情请参考http://projects.spring.io/spring-cloud/ 本文转自我爱大金子博客51CTO博客,原文链接http://blog.51cto.com/1754966750/1941647如需转载请自行联系原作者 我爱大金子

资源下载

更多资源
优质分享App

优质分享App

近一个月的开发和优化,本站点的第一个app全新上线。该app采用极致压缩,本体才4.36MB。系统里面做了大量数据访问、缓存优化。方便用户在手机上查看文章。后续会推出HarmonyOS的适配版本。

Mario

Mario

马里奥是站在游戏界顶峰的超人气多面角色。马里奥靠吃蘑菇成长,特征是大鼻子、头戴帽子、身穿背带裤,还留着胡子。与他的双胞胎兄弟路易基一起,长年担任任天堂的招牌角色。

腾讯云软件源

腾讯云软件源

为解决软件依赖安装时官方源访问速度慢的问题,腾讯云为一些软件搭建了缓存服务。您可以通过使用腾讯云软件源站来提升依赖包的安装速度。为了方便用户自由搭建服务架构,目前腾讯云软件源站支持公网访问和内网访问。

Sublime Text

Sublime Text

Sublime Text具有漂亮的用户界面和强大的功能,例如代码缩略图,Python的插件,代码段等。还可自定义键绑定,菜单和工具栏。Sublime Text 的主要功能包括:拼写检查,书签,完整的 Python API , Goto 功能,即时项目切换,多选择,多窗口等等。Sublime Text 是一个跨平台的编辑器,同时支持Windows、Linux、Mac OS X等操作系统。

用户登录
用户注册