首页 文章 精选 留言 我的

精选列表

搜索[快速],共10000篇文章
优秀的个人博客,低调大师

spring-boot-plus后台快速开发脚手架之代码生成器使用

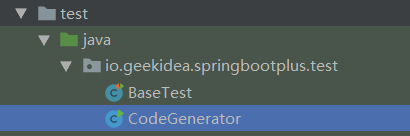
Generator 代码生成 代码生成内容 spring-boot-plus在mybatis-plus基础上,新增param/vo等模板拓展controller/service/mapper/xml方法 Purpose 数据库新建表,即可生成后台CRUD/分页基础代码,还有swagger! 官网地址:springboot.plus GITHUB:https://github.com/geekidea/spring-boot-plus GITEE:https://gitee.com/geekidea/spring-boot-plus _ _ _ _ (_) | | | | | | ___ _ __ _ __ _ _ __ __ _ ______| |__ ___ ___ | |_ ______ _ __ | |_ _ ___ / __| '_ \| '__| | '_ \ / _` |______| '_ \ / _ \ / _ \| __|______| '_ \| | | | / __| \__ \ |_) | | | | | | | (_| | | |_) | (_) | (_) | |_ | |_) | | |_| \__ \ |___/ .__/|_| |_|_| |_|\__, | |_.__/ \___/ \___/ \__| | .__/|_|\__,_|___/ | | __/ | | | |_| |___/ |_| :: Spring Boot :: (v2.1.6.RELEASE) :: Spring Boot Plus :: (v1.0.0.RELEASE) 代码生成步骤 创建数据库表,例如:sys_log 注意:记得加上表注释,字段列注释,方便生成类注释、swagger注释 -- ---------------------------- -- Table structure for sys_log -- ---------------------------- DROP TABLE IF EXISTS `sys_log`; CREATE TABLE `sys_log` ( `log_id` bigint(18) NOT NULL COMMENT '主键', `type` tinyint(1) NULL DEFAULT NULL COMMENT '类型', `content` varchar(255) CHARACTER SET utf8 COLLATE utf8_general_ci NULL DEFAULT NULL COMMENT '内容', `create_id` bigint(18) NULL DEFAULT NULL COMMENT '创建人ID', `create_time` datetime(0) NULL DEFAULT CURRENT_TIMESTAMP COMMENT '创建时间', PRIMARY KEY (`log_id`) USING BTREE ) ENGINE = InnoDB CHARACTER SET = utf8 COLLATE = utf8_general_ci COMMENT = '系统日志' ROW_FORMAT = Dynamic; 代码生成配置 spring-boot-plus/src/test/java/io/geekidea/springbootplus/test/CodeGenerator.java 2.1 修改数据库连接配置 private static final String USER_NAME = "root"; private static final String PASSWORD = "rootroot"; private static final String DRIVER_NAME = "com.mysql.jdbc.Driver"; private static final String DRIVER_URL = "jdbc:mysql://localhost:3306/spring_boot_plus?useUnicode=true&characterEncoding=UTF-8&useSSL=false"; 2.2 修改模块、表、作者等配置 // ############################ 配置部分 start ############################ // 模块名称 private static final String MODULE_NAME = "system"; // 作者 private static final String AUTHOR = "geekidea"; // 生成的表名称 private static final String TABLE_NAME = "sys_log"; // 主键数据库列名称 private static final String PK_ID_COLUMN_NAME = "id"; // ############################ 配置部分 end ############################ MODULE_NAME 模块名称,在目前项目上以单独的文件夹形式体现 AUTHOR 作者名称,在类的注释上体现 TABLE_NAME 表名称,当前需要生成的表名称,关联实体类等 PK_ID_COLUMN_NAME 主键列名称,默认是id,如果是其它名称,可在这里配置 运行CodeGenerator.java 3.1 控制台输出生成日志 11:33:43.442 [main] DEBUG com.baomidou.mybatisplus.generator.AutoGenerator - ==========================准备生成文件...========================== 11:33:44.167 [main] DEBUG com.baomidou.mybatisplus.generator.engine.AbstractTemplateEngine - 创建目录: [E:\github\spring-boot-plus/src/main/java\io\geekidea\springbootplus\system\entity] 11:33:44.169 [main] DEBUG com.baomidou.mybatisplus.generator.engine.AbstractTemplateEngine - 创建目录: [E:\github\spring-boot-plus/src/main/java\io\geekidea\springbootplus\system\web\controller] 11:33:44.170 [main] DEBUG com.baomidou.mybatisplus.generator.engine.AbstractTemplateEngine - 创建目录: [E:\github\spring-boot-plus/src/main/java\io\geekidea\springbootplus\system\service] 11:33:44.170 [main] DEBUG com.baomidou.mybatisplus.generator.engine.AbstractTemplateEngine - 创建目录: [E:\github\spring-boot-plus/src/main/java\io\geekidea\springbootplus\system\mapper] 11:33:44.171 [main] DEBUG com.baomidou.mybatisplus.generator.engine.AbstractTemplateEngine - 创建目录: [E:\github\spring-boot-plus/src/main/java\io\geekidea\springbootplus\system\service\impl] ... 11:33:44.294 [main] DEBUG org.apache.velocity - ResourceManager : found /templates/mapper.xml.vm with loader org.apache.velocity.runtime.resource.loader.ClasspathResourceLoader 11:33:44.308 [main] DEBUG com.baomidou.mybatisplus.generator.engine.AbstractTemplateEngine - 模板:/templates/mapper.xml.vm; 文件:E:\github\spring-boot-plus/src/main/resources/mapper/system/SysLogMapper.xml 11:33:44.313 [main] DEBUG org.apache.velocity - ResourceManager : found /templates/queryParam.java.vm with loader org.apache.velocity.runtime.resource.loader.ClasspathResourceLoader 11:33:44.314 [main] DEBUG com.baomidou.mybatisplus.generator.engine.AbstractTemplateEngine - 模板:/templates/queryParam.java.vm; 文件:E:\github\spring-boot-plus/src/main/java/io/geekidea/springbootplus/system/web/param/SysLogQueryParam.java 11:33:44.332 [main] DEBUG org.apache.velocity - ResourceManager : found /templates/queryVo.java.vm with loader org.apache.velocity.runtime.resource.loader.ClasspathResourceLoader 11:33:44.337 [main] DEBUG com.baomidou.mybatisplus.generator.engine.AbstractTemplateEngine - 模板:/templates/queryVo.java.vm; 文件:E:\github\spring-boot-plus/src/main/java/io/geekidea/springbootplus/system/web/vo/SysLogQueryVo.java 11:33:44.347 [main] DEBUG org.apache.velocity - ResourceManager : found /templates/entity.java.vm with loader org.apache.velocity.runtime.resource.loader.ClasspathResourceLoader 11:33:44.357 [main] DEBUG com.baomidou.mybatisplus.generator.engine.AbstractTemplateEngine - 模板:/templates/entity.java.vm; 文件:E:\github\spring-boot-plus/src/main/java\io\geekidea\springbootplus\system\entity\SysLog.java 11:33:44.359 [main] DEBUG org.apache.velocity - ResourceManager : found /templates/mapper.java.vm with loader org.apache.velocity.runtime.resource.loader.ClasspathResourceLoader 11:33:44.360 [main] DEBUG com.baomidou.mybatisplus.generator.engine.AbstractTemplateEngine - 模板:/templates/mapper.java.vm; 文件:E:\github\spring-boot-plus/src/main/java\io\geekidea\springbootplus\system\mapper\SysLogMapper.java 11:33:44.362 [main] DEBUG org.apache.velocity - ResourceManager : found /templates/service.java.vm with loader org.apache.velocity.runtime.resource.loader.ClasspathResourceLoader 11:33:44.364 [main] DEBUG com.baomidou.mybatisplus.generator.engine.AbstractTemplateEngine - 模板:/templates/service.java.vm; 文件:E:\github\spring-boot-plus/src/main/java\io\geekidea\springbootplus\system\service\SysLogService.java 11:33:44.367 [main] DEBUG org.apache.velocity - ResourceManager : found /templates/serviceImpl.java.vm with loader org.apache.velocity.runtime.resource.loader.ClasspathResourceLoader 11:33:44.369 [main] DEBUG com.baomidou.mybatisplus.generator.engine.AbstractTemplateEngine - 模板:/templates/serviceImpl.java.vm; 文件:E:\github\spring-boot-plus/src/main/java\io\geekidea\springbootplus\system\service\impl\SysLogServiceImpl.java 11:33:44.373 [main] DEBUG org.apache.velocity - ResourceManager : found /templates/controller.java.vm with loader org.apache.velocity.runtime.resource.loader.ClasspathResourceLoader 11:33:44.376 [main] DEBUG com.baomidou.mybatisplus.generator.engine.AbstractTemplateEngine - 模板:/templates/controller.java.vm; 文件:E:\github\spring-boot-plus/src/main/java\io\geekidea\springbootplus\system\web\controller\SysLogController.java 11:33:44.376 [main] DEBUG com.baomidou.mybatisplus.generator.AutoGenerator - ==========================文件生成完成!!!========================== Process finished with exit code 0 3.2 生成的模块和包结构 ├─system 模块包 │ ├─entity 实体类包 │ ├─mapper mybatis mapper接口包 │ ├─service 服务接口包 │ │ └─impl 服务实现包 │ └─web 提供前端结果相关包 │ ├─controller 控制器包 │ ├─param 参数包 │ └─vo 值对象,响应结果包 3.3 生成的包及相关的类 ├─system │ ├─entity │ │ SysLog.java 实体类,已生成swagger注释 │ ├─mapper │ │ SysLogMapper.java mapper接口 │ ├─service │ │ │ SysLogService.java 服务接口,已继承公共service │ │ └─impl │ │ SysLogServiceImpl.java 服务实现类,已继承公共service impl │ └─web │ ├─controller │ │ SysLogController.java 控制器类,已生成CRUD,分页controller方法,已生成swagger文档 │ ├─param │ │ SysLogQueryParam.java 请求参数类,用于条件分页查询等 │ └─vo │ SysLogQueryVo.java 响应结果类,用于自定义查询响应结果等 3.4 启动项目 SpringBootPlusApplication.java 2019-07-27 12:11:45.298 INFO 21856 --- [ main] o.s.b.w.embedded.tomcat.TomcatWebServer : Tomcat started on port(s): 8888 (http) with context path '' 2019-07-27 12:11:45.301 INFO 21856 --- [ main] i.g.s.SpringBootPlusApplication : Started SpringBootPlusApplication in 9.66 seconds (JVM running for 10.988) 2019-07-27 12:11:45.304 INFO 21856 --- [ main] i.g.s.util.PrintApplicationInfo : projectFinalName : spring-boot-plus 2019-07-27 12:11:45.305 INFO 21856 --- [ main] i.g.s.util.PrintApplicationInfo : projectVersion : 1.0.0.RELEASE 2019-07-27 12:11:45.305 INFO 21856 --- [ main] i.g.s.util.PrintApplicationInfo : profileActive : local 2019-07-27 12:11:45.305 INFO 21856 --- [ main] i.g.s.util.PrintApplicationInfo : contextPath : / 2019-07-27 12:11:45.305 INFO 21856 --- [ main] i.g.s.util.PrintApplicationInfo : port : 8888 2019-07-27 12:11:45.308 INFO 21856 --- [ main] i.g.s.util.PrintApplicationInfo : home:http://192.168.1.168:8888/ 2019-07-27 12:11:45.308 INFO 21856 --- [ main] i.g.s.util.PrintApplicationInfo : docs:http://192.168.1.168:8888/docs 2019-07-27 12:11:45.308 INFO 21856 --- [ main] i.g.s.util.PrintApplicationInfo : spring-boot-plus project start success........... 2019-07-27 12:11:45.309 INFO 21856 --- [ main] i.g.s.util.PrintApplicationInfo : ____ __ __ ____ /\ _`\ /\ \__ /\ \__ /\ _`\ \ \,\L\_\ \ ,_\ __ _ __\ \ ,_\ \ \,\L\_\ __ __ ___ ___ __ ____ ____ \/_\__ \\ \ \/ /'__`\ /\`'__\ \ \/ \/_\__ \ /\ \/\ \ /'___\ /'___\ /'__`\ /',__\ /',__\ /\ \L\ \ \ \_/\ \L\.\_\ \ \/ \ \ \_ /\ \L\ \ \ \_\ \/\ \__//\ \__//\ __//\__, `\/\__, `\ \ `\____\ \__\ \__/.\_\\ \_\ \ \__\ \ `\____\ \____/\ \____\ \____\ \____\/\____/\/\____/ \/_____/\/__/\/__/\/_/ \/_/ \/__/ \/_____/\/___/ \/____/\/____/\/____/\/___/ \/___/ 3.5 访问项目 自动生成swagger CRUD、分页接口文档 add 添加接口swagger delete 删除接口swagger getPageList 分页接口swagger info 详情接口swagger update 修改接口swagger 官网地址:springboot.plus

优秀的个人博客,低调大师

21、 Python快速开发分布式搜索引擎Scrapy精讲—爬虫数据保存

注意:数据保存的操作都是在pipelines.py文件里操作的 将数据保存为json文件 spider是一个信号检测 #-*-coding:utf-8-*- #Defineyouritempipelineshere # #Don'tforgettoaddyourpipelinetotheITEM_PIPELINESsetting #See:http://doc.scrapy.org/en/latest/topics/item-pipeline.html fromscrapy.pipelines.imagesimportImagesPipeline#导入图片下载器模块 importcodecs importjson classAdcPipeline(object):#定义数据处理类,必须继承object def__init__(self): self.file=codecs.open('shuju.json','w',encoding='utf-8')#初始化时打开json文件 defprocess_item(self,item,spider):#process_item(item)为数据处理函数,接收一个item,item里就是爬虫最后yielditem来的数据对象 #print('文章标题是:'+item['title'][0]) #print('文章缩略图url是:'+item['img'][0]) #print('文章缩略图保存路径是:'+item['img_tplj'])#接收图片下载器填充的,图片下载后的路径 #将数据保存为json文件 lines=json.dumps(dict(item),ensure_ascii=False)+'\n'#将数据对象转换成json格式 self.file.write(lines)#将json格式数据写入文件 returnitem defspider_closed(self,spider):#创建一个方法继承spider,spider是一个信号,当前数据操作完成后触发这个方法 self.file.close()#关闭打开文件 classimgPipeline(ImagesPipeline):#自定义一个图片下载内,继承crapy内置的ImagesPipeline图片下载器类 defitem_completed(self,results,item,info):#使用ImagesPipeline类里的item_completed()方法获取到图片下载后的保存路径 forok,valueinresults: img_lj=value['path']#接收图片保存路径 #print(ok) item['img_tplj']=img_lj#将图片保存路径填充到items.py里的字段里 returnitem#将item给items.py文件的容器函数 #注意:自定义图片下载器设置好后,需要在 将数据保存到数据库 我们使用一个ORM框架sqlalchemy模块,保存数据 数据库操作文件 #!/usr/bin/envpython #-*-coding:utf-8-*- fromsqlalchemy.ext.declarativeimportdeclarative_base fromsqlalchemyimportColumn fromsqlalchemyimportInteger,String,TIMESTAMP fromsqlalchemyimportForeignKey,UniqueConstraint,Index fromsqlalchemy.ormimportsessionmaker,relationship fromsqlalchemyimportcreate_engine #配置数据库引擎信息 ENGINE=create_engine("mysql+pymysql://root:279819@127.0.0.1:3306/cshi?charset=utf8",max_overflow=10,echo=True) Base=declarative_base()#创建一个SQLORM基类 classSendMsg(Base):#设计表 __tablename__='sendmsg' id=Column(Integer,primary_key=True,autoincrement=True) title=Column(String(300)) img_tplj=Column(String(300)) definit_db(): Base.metadata.create_all(ENGINE)#向数据库创建指定表 defdrop_db(): Base.metadata.drop_all(ENGINE)#向数据库删除指定表 defsession(): cls=sessionmaker(bind=ENGINE)#创建sessionmaker类,操作表 returncls() #drop_db()#删除表 #init_db()#创建表 pipelines.py文件 #-*-coding:utf-8-*- #Defineyouritempipelineshere # #Don'tforgettoaddyourpipelinetotheITEM_PIPELINESsetting #See:http://doc.scrapy.org/en/latest/topics/item-pipeline.html fromscrapy.pipelines.imagesimportImagesPipeline#导入图片下载器模块 fromadcimportshujukuasORM#导入数据库文件 classAdcPipeline(object):#定义数据处理类,必须继承object def__init__(self): ORM.init_db()#创建数据库表 defprocess_item(self,item,spider):#process_item(item)为数据处理函数,接收一个item,item里就是爬虫最后yielditem来的数据对象 print('文章标题是:'+item['title'][0]) print('文章缩略图url是:'+item['img'][0]) print('文章缩略图保存路径是:'+item['img_tplj'])#接收图片下载器填充的,图片下载后的路径 mysq=ORM.session() shuju=ORM.SendMsg(title=item['title'][0],img_tplj=item['img_tplj']) mysq.add(shuju) mysq.commit() returnitem classimgPipeline(ImagesPipeline):#自定义一个图片下载内,继承crapy内置的ImagesPipeline图片下载器类 defitem_completed(self,results,item,info):#使用ImagesPipeline类里的item_completed()方法获取到图片下载后的保存路径 forok,valueinresults: img_lj=value['path']#接收图片保存路径 #print(ok) item['img_tplj']=img_lj#将图片保存路径填充到items.py里的字段里 returnitem#将item给items.py文件的容器函数 #注意:自定义图片下载器设置好后,需要在 【转载自:http://www.lqkweb.com】

优秀的个人博客,低调大师

ACK容器服务发布virtual node addon,快速部署虚拟节点提升集群弹性能力

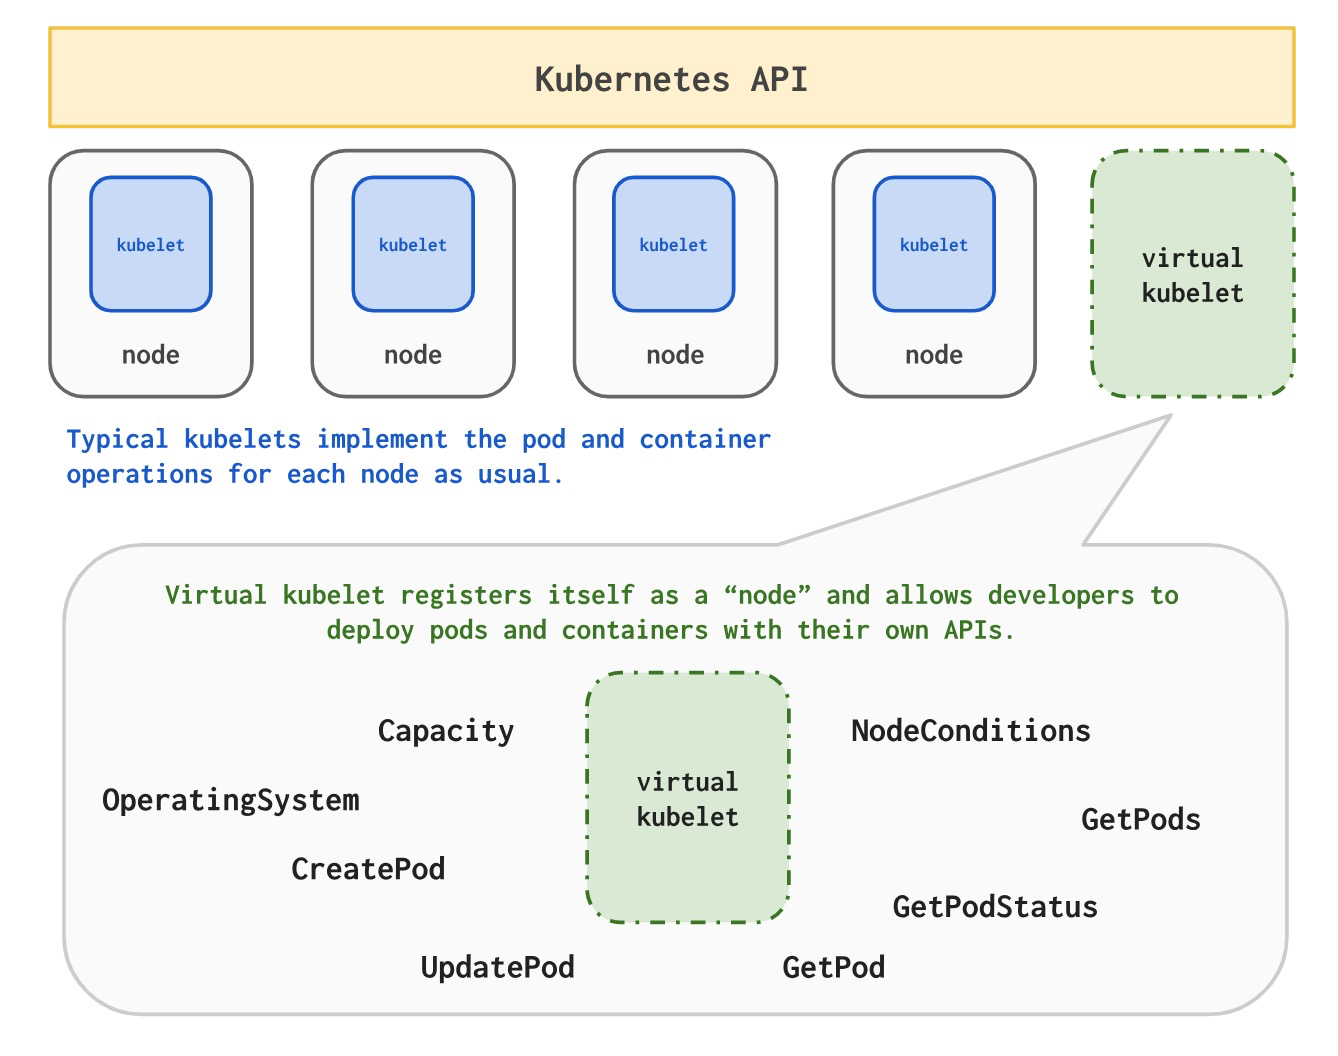
在上一篇博文中(https://yq.aliyun.com/articles/647119),我们展示了如何手动执行yaml文件给Kubernetes集群添加虚拟节点,然而,手动执行的方式用户体验并不友好,也无法以组件的方式持续升级和管理。现在我们已经可以通过Helm的方式,让ack-virtual-node的部署和管理变得更加简单。首先,让我们简单回顾一下虚拟节点Virtual Node是如何运行的。 虚拟节点Virtual Node 虚拟节点来源于社区的virtual kubelet技术,其实现了kubernetes与弹性容器实例ECI的无缝连接,让kubernetes集群轻松获得极大的弹性能力,而不必受限于集群的节点计算容量。 基于ECI的虚拟节点支持多种功能,其不仅增强了kubernetes集群的弹性,同时提供了丰富的能力扩展,

优秀的个人博客,低调大师

从采集方面分析如何快速的开发一个完整的iOS直播app源码

开发一款直播app源码,首先需要采集主播的视频和音频,然后传入流媒体服务器,本篇主要讲解如何采集主播的视频和音频,当前可以切换前置后置摄像头和焦点光标,但是美颜功能还没做,可以看见素颜的你。 基本知识介绍 AVFoundation: 音视频数据采集需要用AVFoundation框架.AVCaptureDevice:硬件设备,包括麦克风、摄像头,通过该对象可以设置物理设备的一些属性(例如相机聚焦、白平衡等) AVCaptureDeviceInput:硬件输入对象,可以根据AVCaptureDevice创建对应的AVCaptureDeviceInput对象,用于管理硬件输入数据。 AVCaptureOutput:硬件输出对象,用于接收各类输出数据,通常使用对应的子类AVCaptureAudioDataOutput(声音数据输出对象)、AVCaptureVideoDataOutput(视频数据输出对象) AVCaptionConnection:当把一个输入和输出添加到AVCaptureSession之后,AVCaptureSession就会在输入、输出设备之间建立连接,而且通过AVCaptureOutput可以获取这个连接对象。 AVCaptureVideoPreviewLayer:相机拍摄预览图层,能实时查看拍照或视频录制效果,创建该对象需要指定对应的AVCaptureSession对象,因为AVCaptureSession包含视频输入数据,有视频数据才能展示。 AVCaptureSession: 协调输入与输出之间传输数据 系统作用:可以操作硬件设备工作原理:让App与系统之间产生一个捕获会话,相当于App与硬件设备有联系了, 我们只需要把硬件输入对象和输出对象添加到会话中,会话就会自动把硬件输入对象和输出产生连接,这样硬件输入与输出设备就能传输音视频数据。 捕获音视频步骤: 1.创建AVCaptureSession对象 2.获取AVCaptureDevicel录像设备(摄像头),录音设备(麦克风),注意不具备输入数据功能,只是用来调节硬件设备的配置。 3.根据音频/视频硬件设备(AVCaptureDevice)创建音频/视频硬件输入数据对象(AVCaptureDeviceInput),专门管理数据输入。 4.创建视频输出数据管理对象(AVCaptureVideoDataOutput),并且设置样品缓存代理(setSampleBufferDelegate)就可以通过它拿到采集到的视频数据 5.创建音频输出数据管理对象(AVCaptureAudioDataOutput),并且设置样品缓存代理(setSampleBufferDelegate)就可以通过它拿到采集到的音频数据 6.将数据输入对象AVCaptureDeviceInput、数据输出对象AVCaptureOutput添加到媒体会话管理对象AVCaptureSession中,就会自动让音频输入与输出和视频输入与输出产生连接. 7.创建视频预览图层AVCaptureVideoPreviewLayer并指定媒体会话,添加图层到显示容器layer中 8.启动AVCaptureSession,只有开启,才会开始输入到输出数据流传输。视频采集额外功能一(切换摄像头) 切换摄像头步骤 1.获取当前视频设备输入对象 2.判断当前视频设备是前置还是后置 3.确定切换摄像头的方向 4.根据摄像头方向获取对应的摄像头设备5.创建对应的摄像头输入对象 6.从会话中移除之前的视频输入对象 7.添加新的视频输入对象到会话中。视频采集额外功能二(聚焦光标) 聚焦光标步骤 1.监听屏幕的点击 2.获取点击的点位置,转换为摄像头上的点,必须通过视频预览图层(AVCaptureVideoPreviewLayer)转 3.设置聚焦光标图片的位置,并做动画 4.设置摄像头设备聚焦模式和曝光模式(注意:这里设置一定要锁定配置lockForConfiguration,否则报错)

优秀的个人博客,低调大师

[雪峰磁针石博客]数据分析工具pandas快速入门教程4-数据汇聚

我们需要的所有信息可能记录在单独的文件和数据帧中。例如,可能有一个公司信息单独表和股票价格表,数据被分成独立的表格以减少冗余信息。 连接 添加行 4-1.py import pandas as pd df1 = pd.read_csv('data/concat_1.csv') df2 = pd.read_csv('data/concat_2.csv') df3 = pd.read_csv('data/concat_3.csv') print(df1) print(df2) print(df3) row_concat = pd.concat([df1, df2, df3]) print(row_concat) print(row_concat.iloc[3, ]) new_row_series = pd.Series(['n1', 'n2', 'n3', 'n4']) print(pd.concat([df1, new_row_series])) new_row_df = pd.DataFrame([['n1', 'n2', 'n3', 'n4']], columns=['A', 'B', 'C', 'D']) print(new_row_df) print(pd.concat([df1, new_row_df])) print(df1.append(df2)) print(df1.append(new_row_df)) data_dict = {'A': 'n1', 'B': 'n2', 'C': 'n3', 'D': 'n4'} print(df1.append(data_dict, ignore_index=True)) row_concat_i = pd.concat([df1, df2, df3], ignore_index=True) print(row_concat_i) 执行结果 $ python3 4-1.py A B C D 0 a0 b0 c0 d0 1 a1 b1 c1 d1 2 a2 b2 c2 d2 3 a3 b3 c3 d3 A B C D 0 a4 b4 c4 d4 1 a5 b5 c5 d5 2 a6 b6 c6 d6 3 a7 b7 c7 d7 A B C D 0 a8 b8 c8 d8 1 a9 b9 c9 d9 2 a10 b10 c10 d10 3 a11 b11 c11 d11 A B C D 0 a0 b0 c0 d0 1 a1 b1 c1 d1 2 a2 b2 c2 d2 3 a3 b3 c3 d3 0 a4 b4 c4 d4 1 a5 b5 c5 d5 2 a6 b6 c6 d6 3 a7 b7 c7 d7 0 a8 b8 c8 d8 1 a9 b9 c9 d9 2 a10 b10 c10 d10 3 a11 b11 c11 d11 A a3 B b3 C c3 D d3 Name: 3, dtype: object A B C D 0 0 a0 b0 c0 d0 NaN 1 a1 b1 c1 d1 NaN 2 a2 b2 c2 d2 NaN 3 a3 b3 c3 d3 NaN 0 NaN NaN NaN NaN n1 1 NaN NaN NaN NaN n2 2 NaN NaN NaN NaN n3 3 NaN NaN NaN NaN n4 A B C D 0 n1 n2 n3 n4 A B C D 0 a0 b0 c0 d0 1 a1 b1 c1 d1 2 a2 b2 c2 d2 3 a3 b3 c3 d3 0 n1 n2 n3 n4 A B C D 0 a0 b0 c0 d0 1 a1 b1 c1 d1 2 a2 b2 c2 d2 3 a3 b3 c3 d3 0 a4 b4 c4 d4 1 a5 b5 c5 d5 2 a6 b6 c6 d6 3 a7 b7 c7 d7 A B C D 0 a0 b0 c0 d0 1 a1 b1 c1 d1 2 a2 b2 c2 d2 3 a3 b3 c3 d3 0 n1 n2 n3 n4 A B C D 0 a0 b0 c0 d0 1 a1 b1 c1 d1 2 a2 b2 c2 d2 3 a3 b3 c3 d3 4 n1 n2 n3 n4 A B C D 0 a0 b0 c0 d0 1 a1 b1 c1 d1 2 a2 b2 c2 d2 3 a3 b3 c3 d3 4 a4 b4 c4 d4 5 a5 b5 c5 d5 6 a6 b6 c6 d6 7 a7 b7 c7 d7 8 a8 b8 c8 d8 9 a9 b9 c9 d9 10 a10 b10 c10 d10 11 a11 b11 c11 d11 添加列 4-2.py In [1]: from numpy import NaN, NAN, nan In [2]: print(NaN == True, NaN == False, NaN == 0, NaN == '', sep='|') False|False|False|False In [3]: print(NaN == NaN, NaN == nan, NaN == NAN, nan == NAN, sep='|') False|False|False|False In [4]: import pandas as pd In [5]: print(pd.isnull(NaN), pd.isnull(nan), pd.isnull(NAN), sep='|') True|True|True In [6]: print(pd.notnull(NaN), pd.notnull(99), pd.notnull("https://china-testing.github.io"), sep='|') False|True|True 执行结果 $ python3 4-2.py A B C D A B C D A B C D 0 a0 b0 c0 d0 a4 b4 c4 d4 a8 b8 c8 d8 1 a1 b1 c1 d1 a5 b5 c5 d5 a9 b9 c9 d9 2 a2 b2 c2 d2 a6 b6 c6 d6 a10 b10 c10 d10 3 a3 b3 c3 d3 a7 b7 c7 d7 a11 b11 c11 d11 A A A 0 a0 a4 a8 1 a1 a5 a9 2 a2 a6 a10 3 a3 a7 a11 A B C D A B C D A B C D new_col_list 0 a0 b0 c0 d0 a4 b4 c4 d4 a8 b8 c8 d8 n1 1 a1 b1 c1 d1 a5 b5 c5 d5 a9 b9 c9 d9 n2 2 a2 b2 c2 d2 a6 b6 c6 d6 a10 b10 c10 d10 n3 3 a3 b3 c3 d3 a7 b7 c7 d7 a11 b11 c11 d11 n4 A B C D A B C D A B C D new_col_list \ 0 a0 b0 c0 d0 a4 b4 c4 d4 a8 b8 c8 d8 n1 1 a1 b1 c1 d1 a5 b5 c5 d5 a9 b9 c9 d9 n2 2 a2 b2 c2 d2 a6 b6 c6 d6 a10 b10 c10 d10 n3 3 a3 b3 c3 d3 a7 b7 c7 d7 a11 b11 c11 d11 n4 new_col_series 0 n1 1 n2 2 n3 3 n4 0 1 2 3 4 5 6 7 8 9 10 11 0 a0 b0 c0 d0 a4 b4 c4 d4 a8 b8 c8 d8 1 a1 b1 c1 d1 a5 b5 c5 d5 a9 b9 c9 d9 2 a2 b2 c2 d2 a6 b6 c6 d6 a10 b10 c10 d10 3 a3 b3 c3 d3 a7 b7 c7 d7 a11 b11 c11 d11 合并不同区间 4-3.py import pandas as pd df1 = pd.read_csv('data/concat_1.csv') df2 = pd.read_csv('data/concat_2.csv') df3 = pd.read_csv('data/concat_3.csv') df1.columns = ['A', 'B', 'C', 'D'] df2.columns = ['E', 'F', 'G', 'H'] df3.columns = ['A', 'C', 'F', 'H'] print(df1) print(df2) print(df3) row_concat = pd.concat([df1, df2, df3]) print(row_concat) print(pd.concat([df1, df2, df3], join='inner')) print(pd.concat([df1,df3], ignore_index=False, join='inner')) df1.index = [0, 1, 2, 3] df2.index = [4, 5, 6, 7] df3.index = [0, 2, 5, 7] print(df1) print(df2) print(df3) col_concat = pd.concat([df1, df2, df3], axis=1) print(col_concat) print(pd.concat([df1, df3], axis=1, join='inner')) 执行结果 $ python3 4-3.py A B C D 0 a0 b0 c0 d0 1 a1 b1 c1 d1 2 a2 b2 c2 d2 3 a3 b3 c3 d3 E F G H 0 a4 b4 c4 d4 1 a5 b5 c5 d5 2 a6 b6 c6 d6 3 a7 b7 c7 d7 A C F H 0 a8 b8 c8 d8 1 a9 b9 c9 d9 2 a10 b10 c10 d10 3 a11 b11 c11 d11 A B C D E F G H 0 a0 b0 c0 d0 NaN NaN NaN NaN 1 a1 b1 c1 d1 NaN NaN NaN NaN 2 a2 b2 c2 d2 NaN NaN NaN NaN 3 a3 b3 c3 d3 NaN NaN NaN NaN 0 NaN NaN NaN NaN a4 b4 c4 d4 1 NaN NaN NaN NaN a5 b5 c5 d5 2 NaN NaN NaN NaN a6 b6 c6 d6 3 NaN NaN NaN NaN a7 b7 c7 d7 0 a8 NaN b8 NaN NaN c8 NaN d8 1 a9 NaN b9 NaN NaN c9 NaN d9 2 a10 NaN b10 NaN NaN c10 NaN d10 3 a11 NaN b11 NaN NaN c11 NaN d11 Empty DataFrame Columns: [] Index: [0, 1, 2, 3, 0, 1, 2, 3, 0, 1, 2, 3] A C 0 a0 c0 1 a1 c1 2 a2 c2 3 a3 c3 0 a8 b8 1 a9 b9 2 a10 b10 3 a11 b11 A B C D 0 a0 b0 c0 d0 1 a1 b1 c1 d1 2 a2 b2 c2 d2 3 a3 b3 c3 d3 E F G H 4 a4 b4 c4 d4 5 a5 b5 c5 d5 6 a6 b6 c6 d6 7 a7 b7 c7 d7 A C F H 0 a8 b8 c8 d8 2 a9 b9 c9 d9 5 a10 b10 c10 d10 7 a11 b11 c11 d11 A B C D E F G H A C F H 0 a0 b0 c0 d0 NaN NaN NaN NaN a8 b8 c8 d8 1 a1 b1 c1 d1 NaN NaN NaN NaN NaN NaN NaN NaN 2 a2 b2 c2 d2 NaN NaN NaN NaN a9 b9 c9 d9 3 a3 b3 c3 d3 NaN NaN NaN NaN NaN NaN NaN NaN 4 NaN NaN NaN NaN a4 b4 c4 d4 NaN NaN NaN NaN 5 NaN NaN NaN NaN a5 b5 c5 d5 a10 b10 c10 d10 6 NaN NaN NaN NaN a6 b6 c6 d6 NaN NaN NaN NaN 7 NaN NaN NaN NaN a7 b7 c7 d7 a11 b11 c11 d11 A B C D A C F H 0 a0 b0 c0 d0 a8 b8 c8 d8 2 a2 b2 c2 d2 a9 b9 c9 d9 合并多个数据集 4-4.py import pandas as pd person = pd.read_csv('data/survey_person.csv') site = pd.read_csv('data/survey_site.csv') survey = pd.read_csv('data/survey_survey.csv') visited = pd.read_csv('data/survey_visited.csv') print(person) print(site) print(survey) print(visited) visited_subset = visited.iloc[[0, 2, 6], ] o2o_merge = site.merge(visited_subset, left_on='name', right_on='site') print(o2o_merge) m2o_merge = site.merge(visited, left_on='name', right_on='site') print(m2o_merge) ps = person.merge(survey, left_on='ident', right_on='person') vs = visited.merge(survey, left_on='ident', right_on='taken') print(ps) print(vs) 执行结果 $ python3 4-4.py ident personal family 0 dyer William Dyer 1 pb Frank Pabodie 2 lake Anderson Lake 3 roe Valentina Roerich 4 danforth Frank Danforth name lat long 0 DR-1 -49.85 -128.57 1 DR-3 -47.15 -126.72 2 MSK-4 -48.87 -123.40 taken person quant reading 0 619 dyer rad 9.82 1 619 dyer sal 0.13 2 622 dyer rad 7.80 3 622 dyer sal 0.09 4 734 pb rad 8.41 5 734 lake sal 0.05 6 734 pb temp -21.50 7 735 pb rad 7.22 8 735 NaN sal 0.06 9 735 NaN temp -26.00 10 751 pb rad 4.35 11 751 pb temp -18.50 12 751 lake sal 0.10 13 752 lake rad 2.19 14 752 lake sal 0.09 15 752 lake temp -16.00 16 752 roe sal 41.60 17 837 lake rad 1.46 18 837 lake sal 0.21 19 837 roe sal 22.50 20 844 roe rad 11.25 ident site dated 0 619 DR-1 1927-02-08 1 622 DR-1 1927-02-10 2 734 DR-3 1939-01-07 3 735 DR-3 1930-01-12 4 751 DR-3 1930-02-26 5 752 DR-3 NaN 6 837 MSK-4 1932-01-14 7 844 DR-1 1932-03-22 name lat long ident site dated 0 DR-1 -49.85 -128.57 619 DR-1 1927-02-08 1 DR-3 -47.15 -126.72 734 DR-3 1939-01-07 2 MSK-4 -48.87 -123.40 837 MSK-4 1932-01-14 name lat long ident site dated 0 DR-1 -49.85 -128.57 619 DR-1 1927-02-08 1 DR-1 -49.85 -128.57 622 DR-1 1927-02-10 2 DR-1 -49.85 -128.57 844 DR-1 1932-03-22 3 DR-3 -47.15 -126.72 734 DR-3 1939-01-07 4 DR-3 -47.15 -126.72 735 DR-3 1930-01-12 5 DR-3 -47.15 -126.72 751 DR-3 1930-02-26 6 DR-3 -47.15 -126.72 752 DR-3 NaN 7 MSK-4 -48.87 -123.40 837 MSK-4 1932-01-14 ident personal family taken person quant reading 0 dyer William Dyer 619 dyer rad 9.82 1 dyer William Dyer 619 dyer sal 0.13 2 dyer William Dyer 622 dyer rad 7.80 3 dyer William Dyer 622 dyer sal 0.09 4 pb Frank Pabodie 734 pb rad 8.41 5 pb Frank Pabodie 734 pb temp -21.50 6 pb Frank Pabodie 735 pb rad 7.22 7 pb Frank Pabodie 751 pb rad 4.35 8 pb Frank Pabodie 751 pb temp -18.50 9 lake Anderson Lake 734 lake sal 0.05 10 lake Anderson Lake 751 lake sal 0.10 11 lake Anderson Lake 752 lake rad 2.19 12 lake Anderson Lake 752 lake sal 0.09 13 lake Anderson Lake 752 lake temp -16.00 14 lake Anderson Lake 837 lake rad 1.46 15 lake Anderson Lake 837 lake sal 0.21 16 roe Valentina Roerich 752 roe sal 41.60 17 roe Valentina Roerich 837 roe sal 22.50 18 roe Valentina Roerich 844 roe rad 11.25 ident site dated taken person quant reading 0 619 DR-1 1927-02-08 619 dyer rad 9.82 1 619 DR-1 1927-02-08 619 dyer sal 0.13 2 622 DR-1 1927-02-10 622 dyer rad 7.80 3 622 DR-1 1927-02-10 622 dyer sal 0.09 4 734 DR-3 1939-01-07 734 pb rad 8.41 5 734 DR-3 1939-01-07 734 lake sal 0.05 6 734 DR-3 1939-01-07 734 pb temp -21.50 7 735 DR-3 1930-01-12 735 pb rad 7.22 8 735 DR-3 1930-01-12 735 NaN sal 0.06 9 735 DR-3 1930-01-12 735 NaN temp -26.00 10 751 DR-3 1930-02-26 751 pb rad 4.35 11 751 DR-3 1930-02-26 751 pb temp -18.50 12 751 DR-3 1930-02-26 751 lake sal 0.10 13 752 DR-3 NaN 752 lake rad 2.19 14 752 DR-3 NaN 752 lake sal 0.09 15 752 DR-3 NaN 752 lake temp -16.00 16 752 DR-3 NaN 752 roe sal 41.60 17 837 MSK-4 1932-01-14 837 lake rad 1.46 18 837 MSK-4 1932-01-14 837 lake sal 0.21 19 837 MSK-4 1932-01-14 837 roe sal 22.50 20 844 DR-1 1932-03-22 844 roe rad 11.25 参考资料 技术支持qq群144081101 591302926 567351477 钉钉免费群21745728 本文最新版本地址 本文涉及的python测试开发库 谢谢点赞! 本文相关海量书籍下载 源码下载 本文英文版书籍下载


资源下载

更多资源
腾讯云软件源

腾讯云软件源

为解决软件依赖安装时官方源访问速度慢的问题,腾讯云为一些软件搭建了缓存服务。您可以通过使用腾讯云软件源站来提升依赖包的安装速度。为了方便用户自由搭建服务架构,目前腾讯云软件源站支持公网访问和内网访问。

Rocky Linux

Rocky Linux

Rocky Linux(中文名:洛基)是由Gregory Kurtzer于2020年12月发起的企业级Linux发行版,作为CentOS稳定版停止维护后与RHEL(Red Hat Enterprise Linux)完全兼容的开源替代方案,由社区拥有并管理,支持x86_64、aarch64等架构。其通过重新编译RHEL源代码提供长期稳定性,采用模块化包装和SELinux安全架构,默认包含GNOME桌面环境及XFS文件系统,支持十年生命周期更新。

Sublime Text

Sublime Text

Sublime Text具有漂亮的用户界面和强大的功能,例如代码缩略图,Python的插件,代码段等。还可自定义键绑定,菜单和工具栏。Sublime Text 的主要功能包括:拼写检查,书签,完整的 Python API , Goto 功能,即时项目切换,多选择,多窗口等等。Sublime Text 是一个跨平台的编辑器,同时支持Windows、Linux、Mac OS X等操作系统。

WebStorm

WebStorm

WebStorm 是jetbrains公司旗下一款JavaScript 开发工具。目前已经被广大中国JS开发者誉为“Web前端开发神器”、“最强大的HTML5编辑器”、“最智能的JavaScript IDE”等。与IntelliJ IDEA同源,继承了IntelliJ IDEA强大的JS部分的功能。

用户登录
用户注册