首页 文章 精选 留言 我的

精选列表

搜索[AI编程],共10000篇文章
优秀的个人博客,低调大师

Java并发编程 -- 单例模式线程安全问题

单例模式是指对一个对象进行一次实例化,然后全局都可以调用该实例化对象来完成项目的开发。 在计算机系统中,线程池、缓存、日志对象、对话框、打印机、显卡的驱动程序对象常被设计成单例。这些应用都或多或少具有资源管理器的功能。每台计算机可以有若干个打印机,但只能有一个Printer Spooler,以避免两个打印作业同时输出到打印机中。每台计算机可以有若干通信端口,系统应当集中管理这些通信端口,以避免一个通信端口同时被两个请求同时调用。总之,选择单例模式就是为了避免不一致状态,避免政出多头。 实现单例的不同方式 饿汉式单例 饿汉式单例是指在方法调用前,实例就已经创建好了。下面是实现代码: package com.thread.singleton; /** * 单例模式-- 饿汉式 * Created by Fant.J. * 2018/2/25 19:24 */ public class Singleton1 { /** 私有化构造方法,在外部不能实例化对象 */ private Singleton1(){} /** 在这里实例化 静态对象 (优点:不存在线程安全问题。 缺点:每次调用都实例化,占用空间) */ private static Singleton1 singleton1 = new Singleton1(); public static Singleton1 getInstance(){ return singleton1; } } 优点:不存在线程安全问题。 缺点:每次调用都实例化,占用空间 懒汉式单例 懒汉式单例是指在方法调用获取实例时才创建实例,因为相对饿汉式显得“不急迫”,所以被叫做“懒汉模式”。下面是实现代码: package com.thread.singleton; /** * 单例模式 -- 懒汉式 * Created by Fant.J. * 2018/2/25 19:30 */ public class Singleton2 { private Singleton2(){} private static Singleton2 instance; public synchronized static Singleton2 getInstance() { /* 下面这段代码 不是原子性操作 会出现线程安全问题 。**/ if (instance == null) { instance = new Singleton2(); } return instance; } } 在这段代码中,在if语句里面,就可能跑有多个线程同步判断和同步new。会产生线程安全问题。 解决方法: 给方法加上synchronized(变成单线程,影响性能) 给代码块加synchronized(双重检查加锁) 虽然2方法解决了性能问题, 但是还会有问题 。 问题来自 jvm 的优化:指令重排序(有兴趣了解) 我们可以在对象中添加volatile 关键字来 不让jvm对该 对象做优化 完善后的代码如下: package com.thread.singleton; /** * 单例模式 -- 懒汉式 * Created by Fant.J. * 2018/2/25 19:30 */ public class Singleton2 { private Singleton2(){} private static Singleton2 instance; public synchronized static Singleton2 getInstance() { /* 下面这段代码 不是原子性操作 会出现线程安全问题 。 解决方法:1.给方法加上synchronized(变成单线程,影响性能) 2.给代码块加synchronized(双重检查加锁) 虽然2方法解决了性能问题, 但是还会有问题 。 问题来自 jvm 的优化:指令重排序(有兴趣了解) 我们可以在对象中添加volatile 关键字来 不让jvm对该 对象做优化 **/ if (instance == null) { synchronized (Singleton2.class){ if (instance == null){ instance = new Singleton2(); } } } return instance; } }

优秀的个人博客,低调大师

Java并发编程实战系列7之取消与关闭

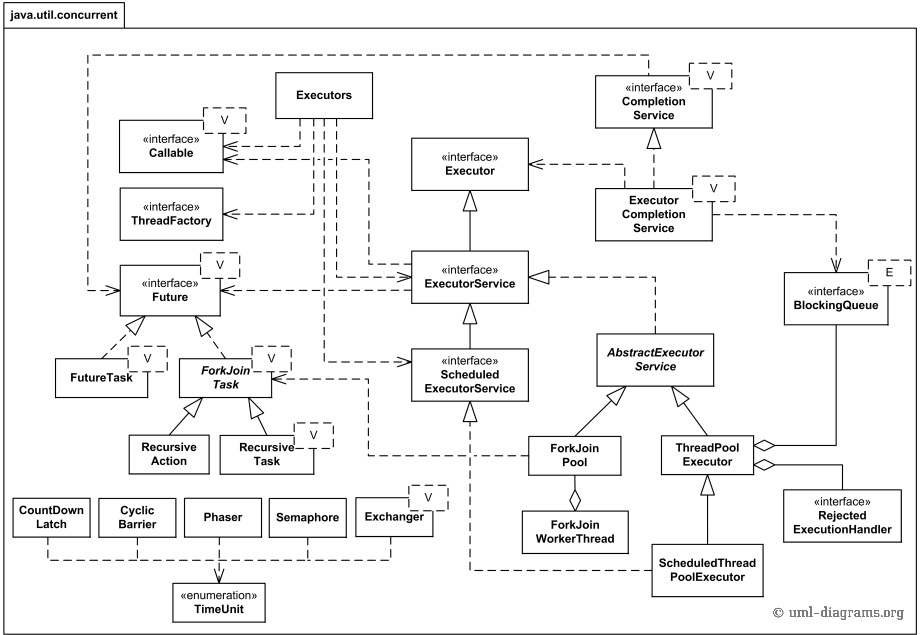
JAVA媒体提供任务机制来安全的终止线程。但是它提供了中断(interruption),这是一种写作机制,能够使一个线程终止另外一个线程。 一般来说没人希望立即终止,因为必要时总要先清理再终止。 开发一个应用能够妥善处理失败、关闭、取消等过程非常重要也有挑战。 7.1 任务取消 一定不要使用Thread.stop和suspend这些机制。 一种协作机制就是“标记位”。例如使用volatile类型的field来保存取消状态。 @ThreadSafe public class PrimeGenerator implements Runnable { private static ExecutorService exec = Executors.newCachedThreadPool(); @GuardedBy("this") private final List<BigInteger> primes = new ArrayList<BigInteger>(); private volatile boolean cancelled; public void run() { BigInteger p = BigInteger.ONE; while (!cancelled) { p = p.nextProbablePrime(); synchronized (this) { primes.add(p); } } } public void cancel() { cancelled = true; } public synchronized List<BigInteger> get() { return new ArrayList<BigInteger>(primes); } static List<BigInteger> aSecondOfPrimes() throws InterruptedException { PrimeGenerator generator = new PrimeGenerator(); exec.execute(generator); try { SECONDS.sleep(1); } finally { generator.cancel(); } return generator.get(); } } 1.1 中断 下面的例子会出现死锁,线程根本不会停止 class BrokenPrimeProducer extends Thread { private final BlockingQueue<BigInteger> queue; private volatile boolean cancelled = false; BrokenPrimeProducer(BlockingQueue<BigInteger> queue) { this.queue = queue; } public void run() { try { BigInteger p = BigInteger.ONE; while (!cancelled) queue.put(p = p.nextProbablePrime()); } catch (InterruptedException consumed) { } } public void cancel() { cancelled = true; } } interrupt 方法:中断目标线程。isInterrupted:返回目标线程的中断状态。静态的 interrupted方法:清除当前线程的中断状态,并返回它之前的值。大多数可中断的阻塞方法会在入口处检查中断状态 对中断操作(调用interrupt)的正确理解 他并不会真正的中断一个正在运行的线程,而只是发出中断请求,然后由线程在下一个合适的时候中断自己。比如,wait、sleep、 join等方法,当他们收到中断请求或开始执行时,发现某个已经被设置好的中断状态,则抛出异常interruptedException。 每个线程都有一个boolean类型的中断状态。当调用Thread.interrupt方法时,该值被设置为true,Thread.interruptted可以恢复中断。 阻塞库方法,例如sleep和wait、join都会检查中断,并且发现中断则提前返回,他们会清楚中断状态,并抛出InterruptedException。 但是对于其他方法interrupt仅仅是传递了中断的请求消息,并不会使线程中断,需要由线程在下一个合适的时刻中断自己。 通常,用中断是取消的最合理的实现方式。 上面的例子的改进方法就是 public class PrimeProducer extends Thread { private final BlockingQueue<BigInteger> queue; PrimeProducer(BlockingQueue<BigInteger> queue) { this.queue = queue; } public void run() { try { BigInteger p = BigInteger.ONE; while (!Thread.currentThread().isInterrupted()) queue.put(p = p.nextProbablePrime()); } catch (InterruptedException consumed) { /* Allow thread to exit */ } } public void cancel() { interrupt(); } } 7.1.2 中断策略 发生了中断,需要尽快退出执行流程,并把中断信息传递给调用者,从而使调用栈中的上层代码可以采取进一步的操作。当然任务也可以不需要放弃所有操作,可以推迟处理中断清楚,知道某个时机。 7.1.3 响应中断 传递异常 回复中断状态 public class NoncancelableTask { public Task getNextTask(BlockingQueue<Task> queue) { boolean interrupted = false; try { while (true) { try { return queue.take(); } catch (InterruptedException e) { interrupted = true; // fall through and retry } } } finally { if (interrupted) Thread.currentThread().interrupt(); } } interface Task { } } 7.1.6 处理不可中断的阻塞 例如Socket I/O或者内置锁都不能响应中断,这时候该如何做才能终止他们呢?可以通过重写Thread.interrupt方法,例如加入close的逻辑。 7.2 停止基于线程的服务 7.2.1 示例:日志服务 7.2.2 关闭ExecutorService 7.2.3 Poison Pill 例如CloseEvent机制或者POISON对象,来做特殊的识别,从而让程序自己处理停止操作,退出线程。 7.3 处理非正常的线程终止 7.4 JVM关闭 第8章 线程池的使用 一个很好的ThreadPoolExecutor源码分析文档 ThreadPoolExecutor UML图: image image image

优秀的个人博客,低调大师

Java编程思想学习录(连载之:内部类)

用thinkpad打字确实很爽啊! 内部类基本概念 可将一个类的定义置于另一个类定义的内部 内部类允许将逻辑相关的类组织在一起,并控制位于内部的类的可见性 甚至可将内部类定义于一个方法或者任意作用域内! 当然,内部类 ≠ 组合 内部类拥有其外围类 所有元素的 访问权 更有甚,嵌套多层的内部类能透明地访问所有它所嵌入的外围类的所有成员 一个典型的例子:利用 Java内部类 实现的 迭代器模式 // 接口 ------------------------------------------------------------- public interface Selector { boolean end(); Object current(); void next(); } // 外部类(集合类) + 内部类(迭代器类) ------------------------------------------------------------- public class Sequence { // 外部类(代表一个集合类) private Object[] items; private int next = 0; public Sequence( int size ) { items = new Object[size]; } public void add( Object x ) { if( next < items.length ) items[next++] = x; } // 迭代器类:实现了 Selector接口的 内部类 private class SequenceSelector implements Selector { private int i = 0; public boolean end() { return i == items.length; } public Object current() { return items[i]; } public void next() { if( i<items.length ) ++i; } } public Selector selector() { // 该函数也表明了:内部类也可以向上转型,这样在外部就隐藏了实现细节! return new SequenceSelector(); } public static void main( String[] args ) { Sequence sequence = new Sequence(10); for( int i=0; i<10; ++i ) { // 装填元素 sequence.add( Integer.toString(i) ); } Selector selector = sequence.selector(); // 获取iterator! while( !selector.end() ) { print( selector.current() + " " ); selector.next(); } } } // 输出 ------------------------------------------------------------- 0 1 2 3 4 5 6 7 8 9 .this 与 .new 的使用场景 .this用于在内部类中生成对其外部类对象的引用之时,举例: public class DotThis { void f() { print("DotThis.f()"); } public class Inner { // 内部类 public DotThis outer() { // 返回外部类对象的引用 return DotThis.this; // 若直接返回this,那指的便是内部类自身 } } public Inner inner() { return new Inner(); } public static void main( String[] args ) { DotThis dt = new DotThis(); DotThis.Inner dti = dt.inner(); dti.outer().f(); // 输出 DotThis.f() } } .new用于直接创建内部类的对象之时,距离: public class DotNew { public class Inner { } // 空内部类 public static void main( String[] args ) { DotNew dn = new DotNew(); DotNew.Inner dni = dn.new Inner(); //注意此处必须使用外部类的对象,而不能直接 DotNew.Inner dni = new DotNew.Inner() } } 嵌套类(static类型的内部类) 嵌套类是无需依赖其外部类的对象的。非static内部类通过一个特殊的this链接到其外围类的对象,而static类型的内部类无此this引用。 接口与内部类有着很有趣的关系:放到接口中的任何类自动都是public且static,即接口中的任何类都是嵌套类,我们甚至可以在接口的内部类中去实现其外围接口,举例: public interface ClassInInterface { void howdy(); class Test implements ClassInInterface { // 类Test默认static,所以是嵌套类 public void howdy() { print("Howdy!"); } public static void main( String[] args ) { new Test().howdy(); } } } 在 方法 和 作用域 内的内部类 可以称这类为 局部内部类! 方法中定义的内部类只能在方法内被使用,方法之外不可访问,举例: public class Parcel { // parcel是“包裹”之意 public Destination destination( String s ) { class PDestination implements Destination { // 方法中定义的内部类 private String label; private PDestination( String whereTo ) { label = whereTo; } public String readLabel() { return label; } } return new PDestination( s ); // 只有在方法中才能访问内部类PDestination } public static void main( String[] args ) { Parcel p = new Parcel(); Destination d = p.destination( "Hello" ); ... } } 更进一步,可在任意作用域内定义内部类,举例: public class Parcel { private void internalTracking( boolean b ) { if( b ) { // 局部作用域中定义了内部类,作用域之外不可访问! class TrackingSlip { private String id; TrackingSlip( String s ) { id = s; } String getSlip() { return id; } } } } public void track() { interTracking( true ); } public static void main( String[] args ) { Parcel p = new Parcel(); p.track(); } } 匿名内部类 直观上看,这种内部类没有“名字”,举例: public class Parcel { public Contents contents() { return new Contents() { // 此即匿名内部类!!! private int i = 11; public int value() { return i; } }; // !!!注意这里必须要加分号!!! } public static void main( String[] args ) { Parcel p = new Parcel(); Contents c = p.contents(); } } 若想将外部的参数传到匿名内部类中(典型的如将外部参数用于对匿名内部类中的定义字段进行初始化时)使用的话,该参数必须final,举例: public class Parcel { public Destination destination( final String s ) { // final必须! return new Destination() { private String label = s; public String readLabel() { return label; } }; // 分号必须! } public static void mian( String[] args ) { Parcel p = new Parcel(); Destination d = p.destination("Hello"); } } 匿名内部类中不可能有命名的显式构造器,此时只能使用实例初始化的方式来模仿,举例(当然下面这个例子还反映了匿名内部类如何参与继承): // 基类 --------------------------------------------- abstact class Base() { public Base( int i ) { print( "Base ctor, i = " + i ); } public abstract void f(); } //主类(其中包含了继承上面Base的派生匿名内部类!) ---------------------------------------------- public class AnonymousConstructor { public static Base getBase( int i ) { // 该处参数无需final,因为并未在下面的内部类中直接使用! return new Base(i){ // 匿名内部类 { // 实例初始化语法!!! print("Inside instance initializer"); } public void f() { print( "In anonymous f()" ); } }; // 分号必须! } public static void main( String[] args ) { Base base = getBase(47); base.f(); } } // 输出 ------------------------------------------ Base ctor, i = 47 // 先基类 Inside instance initializer // 再打印派生类 In anonymous f() 匿名内部类 + 工厂模式 = 更加简洁易懂: // Service接口 --------------------------------------------------- interface Service { void method1(); void method2(); } // ServiceFactory接口 --------------------------------------------------- interface ServiceFactory { Service getService(); } // Service接口的实现 --------------------------------------------------- class Implementation1 implements Service { private Implementation1() {} // 构造函数私有 public void method1() { print("Implementation1 method1"); } public void method2() { print("Implementation1 method2"); } public static ServiceFactory factory = new ServiceFactory() { public Service getService() { return new Implementation1(); } }; // 分号必须!!! } class Implementation2 implements Service { private Implementation2() {} public void method1() { print("Implementation2 method1"); } public void method2() { print("Implementation2 method2"); } public static ServiceFactory factory = new ServiceFactory() { public Service getService() { return new Implementation2(); } }; // 分号必须!!! } // 客户端代码 ---------------------------------------------------- public class Factories { public static void serviceConsumer( ServiceFactory fact ) { Service s = fact.getService(); s.method1(); s.method2(); } public static void main( String[] args ) { serviceComsumer( Implementation1.factory ); serviceComsumer( Implementation2.factory ); } } 总结:为什么需要内部类 内部类可以独立地继承自一个接口或者类而无需关注其外围类的实现,这使得扩展类或者接口更加灵活,控制的粒度也可以更细! 注意Java中还有一个细节:虽然Java中一个接口可以继承多个接口,但是一个类是不能继承多个类的!要想完成该特性,此时除了使用内部类来“扩充多重继承机制”,你可能别无选择,举例: class D { } // 普通类 abstract class E { } // 抽象类 class Z extend D { // 外围类显式地完成一部分继承 E makeE() { return new E() { }; // 内部类隐式地完成一部分继承 } } public class MultiImplementation { static void takesD( D d ) { } static void takesE( E e ) { } public static void main( String[] args ) { Z z = new Z(); takesD( z ); takesE( z.makeE() ); } }

优秀的个人博客,低调大师

Hadoop MapReduce编程 API入门系列之FOF(Fund of Fund)

代码 package zhouls.bigdata.myMapReduce.friend; import org.apache.hadoop.io.Text; public class Fof extends Text{//自定义Fof,表示f1和f2关系 public Fof(){//无参构造 super(); } public Fof(String a,String b){//有参构造 super(getFof(a, b)); } public static String getFof(String a,String b){ int r =a.compareTo(b); if(r<0){ return a+"\t"+b; }else{ return b+"\t"+a; } } } package zhouls.bigdata.myMapReduce.friend; import java.io.DataInput; import java.io.DataOutput; import java.io.IOException; import org.apache.hadoop.io.WritableComparable; public class User implements WritableComparable<User>{ //WritableComparable,实现这个方法,要多很多 //readFields是读入,write是写出 private String uname; private int friendsCount; public String getUname() { return uname; } public void setUname(String uname) { this.uname = uname; } public int getFriendsCount() { return friendsCount; } public void setFriendsCount(int friendsCount) { this.friendsCount = friendsCount; }//这一大段的get和set,可以右键,source,产生get和set,自动生成。 public User() {//无参构造 } public User(String uname,int friendsCount){//有参构造 this.uname=uname; this.friendsCount=friendsCount; } public void write(DataOutput out) throws IOException { //序列化 out.writeUTF(uname); out.writeInt(friendsCount); } public void readFields(DataInput in) throws IOException {//反序列化 this.uname=in.readUTF(); this.friendsCount=in.readInt(); } public int compareTo(User o) {//核心 int result = this.uname.compareTo(o.getUname()); if(result==0){ return Integer.compare(this.friendsCount, o.getFriendsCount()); } return result; } } package zhouls.bigdata.myMapReduce.friend; import org.apache.hadoop.io.WritableComparable; import org.apache.hadoop.io.WritableComparator; public class FoFSort extends WritableComparator{ public FoFSort() {//把自定义的User,传进了 super(User.class,true); } public int compare(WritableComparable a, WritableComparable b) {//排序核心 User u1 =(User) a; User u2=(User) b; int result =u1.getUname().compareTo(u2.getUname()); if(result==0){ return -Integer.compare(u1.getFriendsCount(), u2.getFriendsCount()); } return result; } } package zhouls.bigdata.myMapReduce.friend; import org.apache.hadoop.io.WritableComparable; import org.apache.hadoop.io.WritableComparator; public class FoFGroup extends WritableComparator{ public FoFGroup() {//把自定义的User,传进了 super(User.class,true); } public int compare(WritableComparable a, WritableComparable b) {//分组核心 User u1 =(User) a; User u2=(User) b; return u1.getUname().compareTo(u2.getUname()); } } package zhouls.bigdata.myMapReduce.friend; import java.io.IOException; import java.text.SimpleDateFormat; import java.util.Calendar; import java.util.Date; import org.apache.hadoop.conf.Configuration; import org.apache.hadoop.fs.FileSystem; import org.apache.hadoop.fs.Path; import org.apache.hadoop.io.DoubleWritable; import org.apache.hadoop.io.IntWritable; import org.apache.hadoop.io.NullWritable; import org.apache.hadoop.io.Text; import org.apache.hadoop.mapreduce.Job; import org.apache.hadoop.mapreduce.Mapper; import org.apache.hadoop.mapreduce.Reducer; import org.apache.hadoop.mapreduce.lib.input.FileInputFormat; import org.apache.hadoop.mapreduce.lib.input.KeyValueTextInputFormat; import org.apache.hadoop.mapreduce.lib.output.FileOutputFormat; import org.apache.hadoop.util.StringUtils; public class RunJob { // 小明 老王 如花 林志玲 // 老王 小明 凤姐 排序在FoFSort.java // 如花 小明 李刚 凤姐 // 林志玲 小明 李刚 凤姐 郭美美 分组在FoFGroup.java // 李刚 如花 凤姐 林志玲 // 郭美美 凤姐 林志玲 // 凤姐 如花 老王 林志玲 郭美美 public static void main(String[] args) { Configuration config =new Configuration(); // config.set("fs.defaultFS", "hdfs://HadoopMaster:9000"); // config.set("yarn.resourcemanager.hostname", "HadoopMaster"); // config.set("mapred.jar", "C:\\Users\\Administrator\\Desktop\\wc.jar"); // config.set("mapreduce.input.keyvaluelinerecordreader.key.value.separator", ",");//默认分隔符是制表符"\t",这里自定义,如"," if(run1(config)){ run2(config);//设置两个run,即两个mr。 } } public static void run2(Configuration config) { try { FileSystem fs =FileSystem.get(config); Job job =Job.getInstance(config); job.setJarByClass(RunJob.class); job.setJobName("fof2"); job.setMapperClass(SortMapper.class); job.setReducerClass(SortReducer.class); job.setSortComparatorClass(FoFSort.class); job.setGroupingComparatorClass(FoFGroup.class); job.setMapOutputKeyClass(User.class); job.setMapOutputValueClass(User.class); job.setInputFormatClass(KeyValueTextInputFormat.class); // //设置MR执行的输入文件 // FileInputFormat.addInputPath(job, new Path("hdfs://HadoopMaster:9000/f1")); // // //该目录表示MR执行之后的结果数据所在目录,必须不能存在 // Path outputPath=new Path("hdfs://HadoopMaster:9000/out/f2"); //设置MR执行的输入文件 FileInputFormat.addInputPath(job, new Path("./out/f1")); //该目录表示MR执行之后的结果数据所在目录,必须不能存在 Path outputPath=new Path("./out/f2"); if(fs.exists(outputPath)){ fs.delete(outputPath, true); } FileOutputFormat.setOutputPath(job, outputPath); boolean f =job.waitForCompletion(true); if(f){ System.out.println("job 成功执行"); } } catch (Exception e) { e.printStackTrace(); } } public static boolean run1(Configuration config) { try { FileSystem fs =FileSystem.get(config); Job job =Job.getInstance(config); job.setJarByClass(RunJob.class); job.setJobName("friend"); job.setMapperClass(FofMapper.class); job.setReducerClass(FofReducer.class); job.setMapOutputKeyClass(Fof.class); job.setMapOutputValueClass(IntWritable.class); job.setInputFormatClass(KeyValueTextInputFormat.class); // FileInputFormat.addInputPath(job, new Path("hdfs://HadoopMaster:9000/friend/friend.txt"));//下有friend.txt // // Path outpath =new Path("hdfs://HadoopMaster:9000/out/f1"); FileInputFormat.addInputPath(job, new Path("./data/friend/friend.txt"));//下有friend.txt Path outpath =new Path("./out/f1"); if(fs.exists(outpath)){ fs.delete(outpath, true); } FileOutputFormat.setOutputPath(job, outpath); boolean f= job.waitForCompletion(true); return f; } catch (Exception e) { e.printStackTrace(); } return false; } static class FofMapper extends Mapper<Text, Text, Fof, IntWritable>{ protected void map(Text key, Text value, Context context) throws IOException, InterruptedException { String user =key.toString(); String[] friends =StringUtils.split(value.toString(), '\t'); for (int i = 0; i < friends.length; i++) { String f1 = friends[i]; Fof ofof =new Fof(user, f1); context.write(ofof, new IntWritable(0)); for (int j = i+1; j < friends.length; j++) { String f2 = friends[j]; Fof fof =new Fof(f1, f2); context.write(fof, new IntWritable(1)); } } } } static class FofReducer extends Reducer<Fof, IntWritable, Fof, IntWritable>{ protected void reduce(Fof arg0, Iterable<IntWritable> arg1, Context arg2) throws IOException, InterruptedException { int sum =0; boolean f =true; for(IntWritable i: arg1){ if(i.get()==0){ f=false; break; }else{ sum=sum+i.get(); } } if(f){ arg2.write(arg0, new IntWritable(sum)); } } } static class SortMapper extends Mapper<Text, Text, User, User>{ protected void map(Text key, Text value, Context context) throws IOException, InterruptedException { String[] args=StringUtils.split(value.toString(),'\t'); String other=args[0]; int friendsCount =Integer.parseInt(args[1]); context.write(new User(key.toString(),friendsCount), new User(other,friendsCount)); context.write(new User(other,friendsCount), new User(key.toString(),friendsCount)); } } static class SortReducer extends Reducer<User, User, Text, Text>{ protected void reduce(User arg0, Iterable<User> arg1, Context arg2) throws IOException, InterruptedException { String user =arg0.getUname(); StringBuffer sb =new StringBuffer(); for(User u: arg1 ){ sb.append(u.getUname()+":"+u.getFriendsCount()); sb.append(","); } arg2.write(new Text(user), new Text(sb.toString())); } } 本文转自大数据躺过的坑博客园博客,原文链接:http://www.cnblogs.com/zlslch/p/6166095.html,如需转载请自行联系原作者

优秀的个人博客,低调大师

iOS编程上获取本地时间以及星期几时间

本文回复一位网友关于获取时间的问题:http://blog.csdn.net/duxinfeng2010/article/details/8653411#reply - (void)viewDidLoad { [super viewDidLoad]; NSInteger year,month,day,hour,min,sec,week; NSString *weekStr=nil; NSCalendar *calendar = [[NSCalendar alloc] initWithCalendarIdentifier:NSGregorianCalendar]; NSDate *now = [NSDate date];; NSDateComponents *comps = [[NSDateComponents alloc] init]; NSInteger unitFlags = NSYearCalendarUnit | NSMonthCalendarUnit | NSDayCalendarUnit | NSWeekdayCalendarUnit | NSHourCalendarUnit | NSMinuteCalendarUnit | NSSecondCalendarUnit; comps = [calendar components:unitFlags fromDate:now]; year = [comps year]; week = [comps weekday]; month = [comps month]; day = [comps day]; hour = [comps hour]; min = [comps minute]; sec = [comps second]; if(week==1) { weekStr=@"星期天"; }else if(week==2){ weekStr=@"星期一"; }else if(week==3){ weekStr=@"星期二"; }else if(week==4){ weekStr=@"星期三"; }else if(week==5){ weekStr=@"星期四"; }else if(week==6){ weekStr=@"星期五"; }else if(week==7){ weekStr=@"星期六"; } else { NSLog(@"error!"); } NSLog(@"现在是:%d年%d月%d日 %d时%d分%d秒 %@",year,month,day,hour,min,sec,weekStr); NSInteger Monday = day - week+1+1; for (int i=1; i<=7; i++) { NSLog(@"本周 星期%d :%d年%d月%d日 ",i,year,month,Monday); Monday=Monday+1; } } 注:最后打印本周日期算是取得特殊值,还要考虑每个月份天数不同情况,以及某一周跨月情况处理; 运行结果: 本文转自新风作浪 51CTO博客,原文链接:http://blog.51cto.com/duxinfeng/1208676,如需转载请自行联系原作者

资源下载

更多资源
Mario

Mario

马里奥是站在游戏界顶峰的超人气多面角色。马里奥靠吃蘑菇成长,特征是大鼻子、头戴帽子、身穿背带裤,还留着胡子。与他的双胞胎兄弟路易基一起,长年担任任天堂的招牌角色。

腾讯云软件源

腾讯云软件源

为解决软件依赖安装时官方源访问速度慢的问题,腾讯云为一些软件搭建了缓存服务。您可以通过使用腾讯云软件源站来提升依赖包的安装速度。为了方便用户自由搭建服务架构,目前腾讯云软件源站支持公网访问和内网访问。

Sublime Text

Sublime Text

Sublime Text具有漂亮的用户界面和强大的功能,例如代码缩略图,Python的插件,代码段等。还可自定义键绑定,菜单和工具栏。Sublime Text 的主要功能包括:拼写检查,书签,完整的 Python API , Goto 功能,即时项目切换,多选择,多窗口等等。Sublime Text 是一个跨平台的编辑器,同时支持Windows、Linux、Mac OS X等操作系统。

WebStorm

WebStorm

WebStorm 是jetbrains公司旗下一款JavaScript 开发工具。目前已经被广大中国JS开发者誉为“Web前端开发神器”、“最强大的HTML5编辑器”、“最智能的JavaScript IDE”等。与IntelliJ IDEA同源,继承了IntelliJ IDEA强大的JS部分的功能。

用户登录
用户注册