首页 文章 精选 留言 我的

精选列表

搜索[demo],共9481篇文章
优秀的个人博客,低调大师

阿里云物联网平台物模型功能测试示例Demo

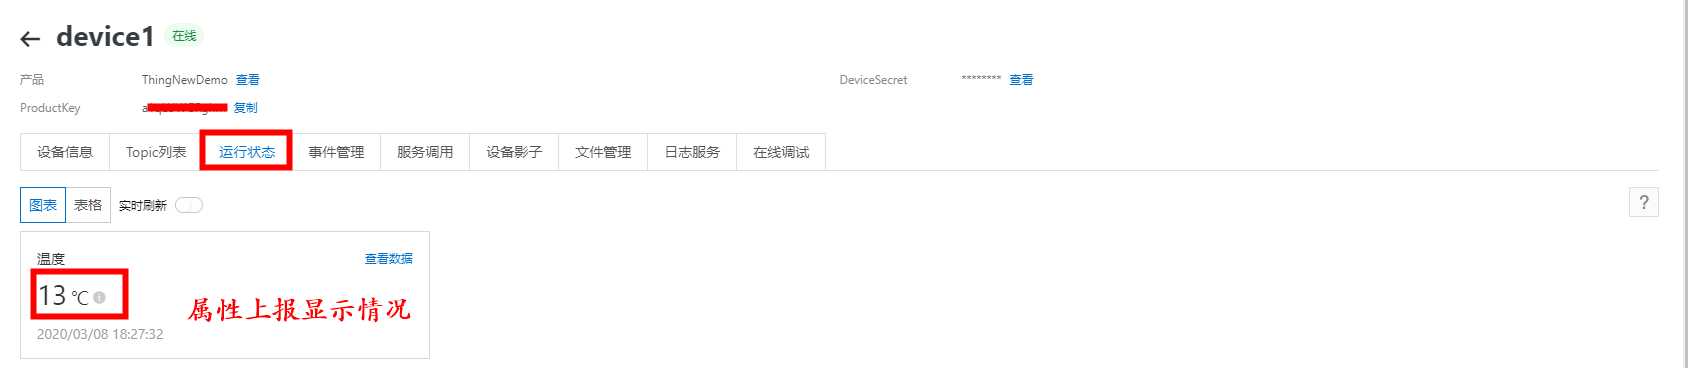
概述 物模型指将物理空间中的实体数字化,并在云端构建该实体的数据模型。在物联网平台中,定义物模型即定义产品功能。完成功能定义后,系统将自动生成该产品的物模型。物模型描述产品是什么,能做什么,可以对外提供哪些服务。物模型将产品功能类型分为三类:属性、服务、和事件。定义了这三类功能,即完成了物模型的定义。 功能类型 说明 属性(Property) 一般用于描述设备运行时的状态,如环境监测设备所读取的当前环境温度等。属性支持GET和SET请求方式。应用系统可发起对属性的读取和设置请求。 服务(Service) 设备可被外部调用的能力或方法,可设置输入参数和输出参数。相比于属性,服务可通过一条指令实现更复杂的业务逻辑,如执行某项特定的任务。 事件(Event) 设备运行时的事件。事件一般包含需要被外部感知和处理的通知信息,可包含多个输出参数。如,某项任务完成的信息,或者设备发生故障或告警时的温度等,事件可以被订阅和推送。 使用: 设备端可以上报属性和事件;云端可以向设备端发送设置属性和调用服务的指令。 Step By Step 1、产品物模型model.json(替换产品productKey导入即可) { "schema":"https://iotx-tsl.oss-ap-southeast-1.aliyuncs.com/schema.json", "profile":{ "productKey":"a1qLU******" }, "properties":[ { "identifier":"Temperature", "name":"温度", "accessMode":"rw", "desc":"电机工作温度", "required":false, "dataType":{ "type":"float", "specs":{ "min":"-55", "max":"200", "unit":"℃", "step":"0.1" } } } ], "events":[ { "identifier":"post", "name":"post", "type":"info", "required":true, "desc":"属性上报", "method":"thing.event.property.post", "outputData":[ { "identifier":"Temperature", "name":"温度", "dataType":{ "type":"float", "specs":{ "min":"-55", "max":"200", "unit":"℃", "step":"0.1" } } } ] }, { "identifier":"event1", "name":"异常事件", "type":"info", "required":false, "method":"thing.event.event1.post", "outputData":[ { "identifier":"event1", "name":"事件参数1", "dataType":{ "type":"int", "specs":{ "min":"1", "max":"100", "step":"1" } } } ] } ], "services":[ { "identifier":"set", "name":"set", "required":true, "callType":"async", "desc":"属性设置", "method":"thing.service.property.set", "inputData":[ { "identifier":"Temperature", "name":"温度", "dataType":{ "type":"float", "specs":{ "min":"-55", "max":"200", "unit":"℃", "step":"0.1" } } } ], "outputData":[ ] }, { "identifier":"get", "name":"get", "required":true, "callType":"async", "desc":"属性获取", "method":"thing.service.property.get", "inputData":[ "Temperature" ], "outputData":[ { "identifier":"Temperature", "name":"温度", "dataType":{ "type":"float", "specs":{ "min":"-55", "max":"200", "unit":"℃", "step":"0.1" } } } ] }, { "identifier":"addFuctionServiceAsync", "name":"异步加法服务", "required":false, "callType":"async", "method":"thing.service.addFuctionServiceAsync", "inputData":[ { "identifier":"add1", "name":"加数1", "dataType":{ "type":"int", "specs":{ "min":"1", "max":"100", "step":"1" } } }, { "identifier":"add2", "name":"加数2", "dataType":{ "type":"int", "specs":{ "min":"1", "max":"100", "step":"1" } } } ], "outputData":[ { "identifier":"result", "name":"结果", "dataType":{ "type":"int", "specs":{ "min":"1", "max":"200", "step":"1" } } } ] }, { "identifier":"addFuctionServiceSync", "name":"加法服务", "required":false, "callType":"sync", "desc":"同步功能", "method":"thing.service.addFuctionServiceSync", "inputData":[ { "identifier":"add2", "name":"加数2", "dataType":{ "type":"int", "specs":{ "min":"1", "max":"100", "step":"1" } } }, { "identifier":"add1", "name":"加数1", "dataType":{ "type":"int", "specs":{ "min":"1", "max":"100", "step":"1" } } } ], "outputData":[ { "identifier":"result", "name":"计算结果", "dataType":{ "type":"int", "specs":{ "min":"1", "max":"200", "step":"1" } } } ] } ] } 2、设备端Code Sample(基于开源Java MQTT Client) import com.alibaba.fastjson.JSONObject; import com.alibaba.taro.AliyunIoTSignUtil; import org.eclipse.paho.client.mqttv3.*; import org.eclipse.paho.client.mqttv3.persist.MemoryPersistence; import java.util.HashMap; import java.util.Map; public class IoTThingTest { public static String productKey = "a1qLU******"; public static String deviceName = "device1"; public static String deviceSecret = "cA9wzIM6bL2QI6DgAaSO0FPg********"; public static String regionId = "cn-shanghai"; // 物模型-属性上报topic private static String pubTopic = "/sys/" + productKey + "/" + deviceName + "/thing/event/property/post"; // 物模型-属性响应topic private static String subTopic = "/sys/" + productKey + "/" + deviceName + "/thing/event/property/post_reply"; // 物模型-事件上报topic private static String eventPubTopic = "/sys/" + productKey + "/" + deviceName + "/thing/event/event1/post"; // 物模型-事件上报响应topic private static String eventSubTopic = "/sys/" + productKey + "/" + deviceName + "/thing/event/event1/post_reply"; private static MqttClient mqttClient; public static void main(String [] args){ // 初始化Client initAliyunIoTClient(); try { mqttClient.subscribe(subTopic); // 订阅Topic mqttClient.subscribe(eventSubTopic); } catch (MqttException e) { System.out.println("error:" + e.getMessage()); e.printStackTrace(); } // 设置订阅监听 mqttClient.setCallback(new MqttCallback() { @Override public void connectionLost(Throwable throwable) { System.out.println("connection Lost"); } @Override public void messageArrived(String s, MqttMessage mqttMessage) throws Exception { System.out.println("Sub message"); System.out.println("Topic : " + s); System.out.println(new String(mqttMessage.getPayload())); //打印输出消息payLoad // 服务调用处理 if (s.contains("Async") || s.contains("rrpc")) { String content = new String((byte[]) mqttMessage.getPayload()); System.out.println("服务请求Topic:" + s); System.out.println("服务指令:" + content); JSONObject request = JSONObject.parseObject(content); JSONObject params = request.getJSONObject("params"); if (!params.containsKey("add1")) { // 检查入参 System.out.println("不包含参数add1"); return; } Integer input1 = params.getInteger("add1"); // 获取入参 Integer input2 = params.getInteger("add2"); // 获取入参 JSONObject response = new JSONObject(); JSONObject data = new JSONObject(); data.put("result", input1 + input2); response.put("id", request.get("id")); response.put("code", 200); response.put("data", data); String responseTopic = s; // 服务响应 if (s.contains("rrpc")) { // 同步服务调用响应Topic responseTopic = s.replace("request", "response"); } else { // 异步服务调用响应Topic responseTopic = responseTopic + "_reply"; } MqttMessage message1 = new MqttMessage(response.toString().getBytes("utf-8")); System.out.println("responseTopic: " + responseTopic); mqttClient.publish(responseTopic, message1); } } @Override public void deliveryComplete(IMqttDeliveryToken iMqttDeliveryToken) { } }); // 属性上报 postDeviceProperties(); // 事件上报 postDeviceEvent(); } /** * 初始化 Client 对象 */ private static void initAliyunIoTClient() { try { // 构造连接需要的参数 String clientId = "java" + System.currentTimeMillis(); Map<String, String> params = new HashMap<>(16); params.put("productKey", productKey); params.put("deviceName", deviceName); params.put("clientId", clientId); String timestamp = String.valueOf(System.currentTimeMillis()); params.put("timestamp", timestamp); // cn-shanghai String targetServer = "tcp://" + productKey + ".iot-as-mqtt."+regionId+".aliyuncs.com:1883"; String mqttclientId = clientId + "|securemode=3,signmethod=hmacsha1,timestamp=" + timestamp + "|"; String mqttUsername = deviceName + "&" + productKey; String mqttPassword = AliyunIoTSignUtil.sign(params, deviceSecret, "hmacsha1"); connectMqtt(targetServer, mqttclientId, mqttUsername, mqttPassword); } catch (Exception e) { System.out.println("initAliyunIoTClient error " + e.getMessage()); } } public static void connectMqtt(String url, String clientId, String mqttUsername, String mqttPassword) throws Exception { MemoryPersistence persistence = new MemoryPersistence(); mqttClient = new MqttClient(url, clientId, persistence); MqttConnectOptions connOpts = new MqttConnectOptions(); // MQTT 3.1.1 connOpts.setMqttVersion(4); connOpts.setAutomaticReconnect(false); connOpts.setConnectionTimeout(10); // connOpts.setCleanSession(true); connOpts.setCleanSession(false); connOpts.setUserName(mqttUsername); connOpts.setPassword(mqttPassword.toCharArray()); connOpts.setKeepAliveInterval(60); mqttClient.connect(connOpts); } /** * 事件上报 */ private static void postDeviceEvent() { try { //上报数据 //高级版 物模型-属性上报payload System.out.println("事件上报"); String payloadJson = "{\"params\":{\"event1\":23}}"; MqttMessage message = new MqttMessage(payloadJson.getBytes("utf-8")); message.setQos(1); mqttClient.publish(eventPubTopic, message); } catch (Exception e) { System.out.println(e.getMessage()); } } /** * 汇报属性 */ private static void postDeviceProperties() { try { //上报数据 //高级版 物模型-属性上报payload System.out.println("上报属性值"); String payloadJson = "{\"params\":{\"Temperature\":13}}"; MqttMessage message = new MqttMessage(payloadJson.getBytes("utf-8")); message.setQos(1); mqttClient.publish(pubTopic, message); } catch (Exception e) { System.out.println(e.getMessage()); } } } 参考链接:基于开源JAVA MQTT Client连接阿里云IoT 3、启动设备查看属性及事件上报情况 3.1 服务端情况 3.2 设备端reply情况 上报属性值 事件上报 Sub message Topic : /sys/a1qLU******/device1/thing/event/property/post_reply {"code":200,"data":{},"id":"null","message":"success","method":"thing.event.property.post","version":"1.0"} Sub message Topic : /sys/a1qLU******/device1/thing/event/event1/post_reply {"code":200,"data":{},"id":"null","message":"success","method":"thing.event.event1.post","version":"1.0"} 4、异步服务调用 4.1 说明 通过InvokeThingService或InvokeThingsService接口调用服务,物联网平台采用异步方式下行推送请求,设备也采用异步方式返回结果。 此时,服务选择为异步调用方式,物联网平台订阅此处的异步响应Topic。异步调用的结果,可以使用规则引擎数据流转功能获取,也可以使用服务端订阅获取。 4.2 Open API InvokeThingService 4.3 设备端日志 Sub message Topic : /sys/a1qLU******/device1/thing/service/addFuctionServiceAsync {"method":"thing.service.addFuctionServiceAsync","id":"2015524670","params":{"add2":2,"add1":2},"version":"1.0.0"} 服务请求Topic:/sys/a1qLU******/device1/thing/service/addFuctionServiceAsync 服务指令:{"method":"thing.service.addFuctionServiceAsync","id":"2015524670","params":{"add2":2,"add1":2},"version":"1.0.0"} responseTopic: /sys/a1qLU******/device1/thing/service/addFuctionServiceAsync_reply 4.4 控制台日志 4.5 AMQP 服务端订阅获取的服务响应 Content:{"iotId":"*******","code":200,"data":{"result":4},"requestId":"2009566194","topic":"/sys/*******/device1/thing/service/addFuctionServiceAsync_reply","source":"DEVICE","gmtCreate":1583658474852,"productKey":"a1qLU******","deviceName":"device1"} 5、同步服务调用 5.1 说明 通过InvokeThingService或InvokeThingsService接口调用服务,物联网平台直接使用RRPC同步方式下行推送请求。此时,服务选择为同步调用方式,物联网平台订阅RRPC对应Topic。 5.2 Open API InvokeThingService 5.3 设备端日志 Sub message Topic : /sys/a1qLU******/device1/rrpc/request/1236608506958775809 {"method":"thing.service.addFuctionServiceSync","id":"2015301903","params":{"add2":2,"add1":2},"version":"1.0.0"} 服务请求Topic:/sys/a1qLU******/device1/rrpc/request/1236608506958775809 服务指令:{"method":"thing.service.addFuctionServiceSync","id":"2015301903","params":{"add2":2,"add1":2},"version":"1.0.0"} responseTopic: /sys/a1qLU******/device1/rrpc/response/1236608506958775809 5.4 控制台日志 更多参考 设备属性、事件、服务同步服务调用基于开源Java MQTT Client的阿里云物联网平台RRPC功能测试阿里云物联网平台规则引擎综述
优秀的个人博客,低调大师

阿里云IoT Studio服务开发定时关灯功能示例Demo

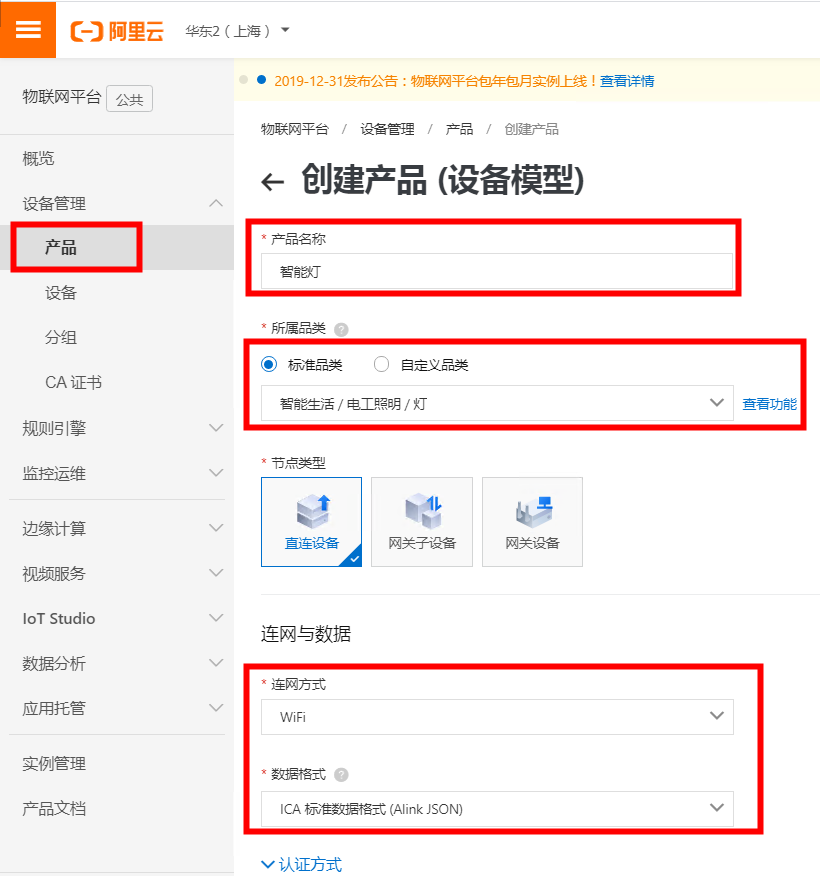
概述 IoT Studio服务开发是一个物联网业务逻辑的开发工具,通过编排服务节点的方式快速完成简单的物联网业务逻辑的设计。本文主要使用:定时触发、设备和钉钉机器人节点实现对灯泡的定时控制,并将控制后的结果发送给钉钉机器人。本文以官方文档:定时关灯为基础,针对文档中缺少设备属性上报,钉钉机器人配置参考较老等问题,逐一介绍整个链路的完整实现。 Step By Step 1、创建产品和设备,使用Code完成属性上报 1.1 创建产品和设备 1.2 使用开源Java MQTT SDK上报属性,参考链接:基于开源JAVA MQTT Client连接阿里云IoT import com.alibaba.taro.AliyunIoTSignUtil; import org.eclipse.paho.client.mqttv3.*; import org.eclipse.paho.client.mqttv3.persist.MemoryPersistence; import java.util.HashMap; import java.util.Map; public class IoTDemoPubSubDemo { public static String productKey = "a1Agp******"; public static String deviceName = "LightDevice1"; public static String deviceSecret = "RLHDiBljxC7YQE7opM**************"; public static String regionId = "cn-shanghai"; // 物模型-属性上报topic private static String pubTopic = "/sys/" + productKey + "/" + deviceName + "/thing/event/property/post"; // 物模型-属性订阅topic private static String subTopic = "/sys/" + productKey + "/" + deviceName + "/thing/service/property/set"; private static MqttClient mqttClient; public static void main(String [] args){ initAliyunIoTClient(); postDeviceProperties(); try { mqttClient.unsubscribe(pubTopic); //取消订阅 mqttClient.subscribe(subTopic); // 订阅Topic } catch (MqttException e) { System.out.println("error:" + e.getMessage()); e.printStackTrace(); } // 设置订阅监听 mqttClient.setCallback(new MqttCallback() { @Override public void connectionLost(Throwable throwable) { System.out.println("connection Lost"); } @Override public void messageArrived(String s, MqttMessage mqttMessage) throws Exception { System.out.println("Sub message"); System.out.println("Topic : " + s); System.out.println(new String(mqttMessage.getPayload())); //打印输出消息payLoad // 订阅到消息后即刻汇报 System.out.println("收到云端下发指令后向平台上行消息"); mqttClient.publish(pubTopic, new MqttMessage((new String(mqttMessage.getPayload())).getBytes("utf-8"))); } @Override public void deliveryComplete(IMqttDeliveryToken iMqttDeliveryToken) { } }); } /** * 初始化 Client 对象 */ private static void initAliyunIoTClient() { try { // 构造连接需要的参数 String clientId = "java" + System.currentTimeMillis(); Map<String, String> params = new HashMap<>(16); params.put("productKey", productKey); params.put("deviceName", deviceName); params.put("clientId", clientId); String timestamp = String.valueOf(System.currentTimeMillis()); params.put("timestamp", timestamp); // cn-shanghai String targetServer = "tcp://" + productKey + ".iot-as-mqtt."+regionId+".aliyuncs.com:1883"; String mqttclientId = clientId + "|securemode=3,signmethod=hmacsha1,timestamp=" + timestamp + "|"; String mqttUsername = deviceName + "&" + productKey; String mqttPassword = AliyunIoTSignUtil.sign(params, deviceSecret, "hmacsha1"); connectMqtt(targetServer, mqttclientId, mqttUsername, mqttPassword); } catch (Exception e) { System.out.println("initAliyunIoTClient error " + e.getMessage()); } } public static void connectMqtt(String url, String clientId, String mqttUsername, String mqttPassword) throws Exception { MemoryPersistence persistence = new MemoryPersistence(); mqttClient = new MqttClient(url, clientId, persistence); MqttConnectOptions connOpts = new MqttConnectOptions(); // MQTT 3.1.1 connOpts.setMqttVersion(4); connOpts.setAutomaticReconnect(true); // connOpts.setCleanSession(true); connOpts.setCleanSession(false); connOpts.setUserName(mqttUsername); connOpts.setPassword(mqttPassword.toCharArray()); connOpts.setKeepAliveInterval(60); mqttClient.connect(connOpts); } /** * 汇报属性 */ private static void postDeviceProperties() { try { //上报数据 //高级版 物模型-属性上报payload System.out.println("上报属性值"); String payloadJson = "{\"params\":{\"LightSwitch\":1}}"; MqttMessage message = new MqttMessage(payloadJson.getBytes("utf-8")); message.setQos(0); mqttClient.publish(pubTopic, message); } catch (Exception e) { System.out.println(e.getMessage()); } } } 1.3 设备状态查看 2、IoT Studio中进行产品和设备绑定,完整服务开发模块搭建 2.1 绑定产品和设备 2.2 创建服务开发 2.3 钉钉机器人Webhook获取 2.4 部署启动定时任务 3 测试效果 3.1 钉钉群消息 3.2 程序运行日志 Sub message Topic : /sys/a1Agp******/LightDevice1/thing/service/property/set {"method":"thing.service.property.set","id":"50505571","params":{"LightSwitch":0},"version":"1.0.0"} 收到云端下发指令后向平台上行消息 参考链接 什么是IoT Studio定时关灯

优秀的个人博客,低调大师

一个包含了多个 Demo 示例的 flutter 项目

flutter_do Basic Flutter apps, for flutter devs. 一个帮助开发者加深了解 Flutter 的项目,提供了 N 多个常用 Widget 和自定义 Widget 的使用及实现方法,涵盖了系统 Widget 、布局容器、动画、高阶功能、自定义 Widget 等内容,即包含如下几个大分类: widget container animation fun customWidget 项目主页:flutter do 点击下载 apk 体验:flutter_do 或者扫码下载: 正在密集更新中……

优秀的个人博客,低调大师

java开发Demo~微信扫码支付,java开发示例

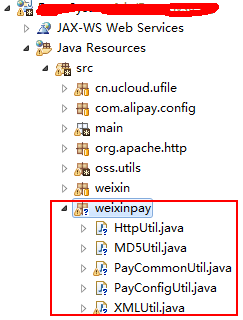
开发所需工具类 开发所需jar 具体的代码不贴了,说明下PayConfigUtil中的参数 APP_ID和APP_SECRET在公众平台 MCH_ID和API_KEY在商户平台,其中API_KEY是自己设置的,并不是自动生成的。 Controller 通过此方法,前往可以生成二维码的页面 //微信前往支付页面 @RequestMapping(value = "towxPay") public ModelAndView towxPay(ModelMap map,HttpServletRequest request,String chapterId,String chapterName,String price) throws IOException{ ModelAndView mav = new ModelAndView(); mav.setViewName("jsp/pay/weixinpayma"); HttpSession session = request.getSession(); session.setAttribute("chapterId", chapterId); session.setAttribute("chapterName", chapterName); session.setAttribute("price", price); return mav; } 返回的页面如下 <%@ page language="java" contentType="text/html; charset=UTF-8" pageEncoding="UTF-8"%> <%@ taglib uri="http://java.sun.com/jsp/jstl/core" prefix="c"%> <% String path = request.getContextPath(); String basePath = request.getScheme() + "://" + request.getServerName() + ":" + request.getServerPort() + path + "/"; %> Insert title here index/payImg style="min-height:null;min-width:null;" width=null height=null /> /* ajax轮回,不停的访问Controller,直到wxPayType=1时,付款成功 */ var num = 0; $(function(){ panduanWXPay(); }); function panduanWXPay(){ $.post("<%=basePath%>index/panduanPay",function(data){ var wxPayType = data.wxPayType; if(wxPayType==1){ /* 成功 */ window.location.href='<%=basePath%>index/gouMai'; }else if(wxPayType==0 && num!=400){ num++; panduanWXPay(); }else{ alert("支付超时"); } }); } payImg方法 //微信支付,生成二维码 @RequestMapping(value = "payImg") public void payImg(HttpServletRequest request, HttpServletResponse response) throws IOException{ HttpSession session = request.getSession(); String chapterName=(String)session.getAttribute("chapterName"); String price=(String)session.getAttribute("price"); int defaultWidthAndHeight=200; String nonce_str = PayCommonUtil.getNonce_str(); long time_stamp = System.currentTimeMillis() / 1000; String product_id = chapterName+"*"+price;//订单名字和价钱,拼到了一起,后面用到的时候再拆 String key = PayConfigUtil.API_KEY; // key SortedMap packageParams = new TreeMap(); packageParams.put("appid", PayConfigUtil.APP_ID); packageParams.put("mch_id", PayConfigUtil.MCH_ID); packageParams.put("time_stamp", String.valueOf(time_stamp)); packageParams.put("nonce_str", nonce_str); packageParams.put("product_id", product_id); // packageParams.put("chapterId", chapterId); // packageParams.put("price", price); String sign = PayCommonUtil.createSign("UTF-8", packageParams,key);//MD5哈希 packageParams.put("sign", sign); //生成参数 String str = ToUrlParams(packageParams); String payurl = "weixin://wxpay/bizpayurl?" + str; // logger.info("payurl:"+payurl); //生成二维码 Map hints=new HashMap(); // 指定纠错等级 hints.put(EncodeHintType.ERROR_CORRECTION, ErrorCorrectionLevel.L); // 指定编码格式 hints.put(EncodeHintType.CHARACTER_SET, "UTF-8"); hints.put(EncodeHintType.MARGIN, 1); try { BitMatrix bitMatrix = new MultiFormatWriter().encode(payurl,BarcodeFormat.QR_CODE, defaultWidthAndHeight, defaultWidthAndHeight, hints); OutputStream out = response.getOutputStream(); MatrixToImageWriter.writeToStream(bitMatrix, "png", out);//输出二维码 out.flush(); out.close(); } catch (WriterException e) { // TODO Auto-generated catch block e.printStackTrace(); } } public String ToUrlParams(SortedMap packageParams){ //实际可以不排序 StringBuffer sb = new StringBuffer(); Set es = packageParams.entrySet(); Iterator it = es.iterator(); while (it.hasNext()) { Map.Entry entry = (Map.Entry) it.next(); String k = (String) entry.getKey(); String v = (String) entry.getValue(); if (null != v && !"".equals(v)) { sb.append(k + "=" + v + "&"); } } sb.deleteCharAt(sb.length()-1);//删掉最后一个& return sb.toString(); } 扫码时触动此方法,会在手机端显示付款信息 要将此方法的路径配置到回调url里,微信公众平台–>微信支付–>开发配置 //微信扫码的时候,触发此方法 @RequestMapping(value = "Re_notify") public void Re_notify(HttpServletRequest request, HttpServletResponse response) throws IOException{ HttpSession session = request.getSession(); String chapterId=(String)session.getAttribute("chapterId"); String chapterName=(String)session.getAttribute("chapterName"); String price=(String)session.getAttribute("price"); System.out.println(chapterId+":"+chapterName+":"+price); // 读取xml InputStream inputStream; StringBuffer sb = new StringBuffer(); inputStream = request.getInputStream(); String s; BufferedReader in = new BufferedReader(new InputStreamReader(inputStream, "UTF-8")); while ((s = in.readLine()) != null) { sb.append(s); } in.close(); inputStream.close(); SortedMap packageParams = PayCommonUtil.xmlConvertToMap(sb.toString()); // logger.info(packageParams); // 账号信息 String key = PayConfigUtil.API_KEY; // key String resXml="";//反馈给微信服务器 // 验签 if (PayCommonUtil.isTenpaySign("UTF-8", packageParams, key)) { //appid openid mch_id is_subscribe nonce_str product_id sign //统一下单 String openid = (String)packageParams.get("openid"); String product_id = (String)packageParams.get("product_id"); //解析product_id,计算价格等 String thePricce = product_id.substring(product_id.lastIndexOf("*")+1); String newProductId = product_id.substring(0, product_id.indexOf("*")); String out_trade_no = String.valueOf(System.currentTimeMillis()); // 订单号 String order_price = thePricce; // 价格"1" 注意:价格的单位是分 String body = newProductId; // 商品名称product_id 这里设置为product_id String attach = "十倍课"; //附加数据 String nonce_str0 = PayCommonUtil.getNonce_str(); // 获取发起电脑 ip String spbill_create_ip = PayConfigUtil.CREATE_IP; String trade_type = "NATIVE"; SortedMap unifiedParams = new TreeMap(); unifiedParams.put("appid", PayConfigUtil.APP_ID); // 必须 unifiedParams.put("mch_id", PayConfigUtil.MCH_ID); // 必须 unifiedParams.put("out_trade_no", out_trade_no); // 必须 unifiedParams.put("product_id", product_id); unifiedParams.put("body", body); // 必须 unifiedParams.put("attach", attach); unifiedParams.put("total_fee", order_price); // 必须 unifiedParams.put("nonce_str", nonce_str0); // 必须 unifiedParams.put("spbill_create_ip", spbill_create_ip); // 必须 unifiedParams.put("trade_type", trade_type); // 必须 unifiedParams.put("openid", openid); unifiedParams.put("notify_url", PayConfigUtil.NOTIFY_URL);//异步通知url String sign0 = PayCommonUtil.createSign("UTF-8", unifiedParams,key); unifiedParams.put("sign", sign0); //签名 String requestXML = PayCommonUtil.getRequestXml(unifiedParams); // logger.info(requestXML); //统一下单接口 String rXml = HttpUtil.postData(PayConfigUtil.UFDODER_URL, requestXML); //统一下单响应 SortedMap reParams = PayCommonUtil.xmlConvertToMap(rXml); // logger.info(reParams); //验签 if (PayCommonUtil.isTenpaySign("UTF-8", reParams, key)) { // 统一下单返回的参数 String prepay_id = (String)reParams.get("prepay_id");//交易会话标识 2小时内有效 String nonce_str1 = PayCommonUtil.getNonce_str(); SortedMap resParams = new TreeMap(); resParams.put("return_code", "SUCCESS"); // 必须 resParams.put("return_msg", "OK"); resParams.put("appid", PayConfigUtil.APP_ID); // 必须 resParams.put("mch_id", PayConfigUtil.MCH_ID); resParams.put("nonce_str", nonce_str1); // 必须 resParams.put("prepay_id", prepay_id); // 必须 resParams.put("result_code", "SUCCESS"); // 必须 resParams.put("err_code_des", "OK"); String sign1 = PayCommonUtil.createSign("UTF-8", resParams,key); resParams.put("sign", sign1); //签名 resXml = PayCommonUtil.getRequestXml(resParams); // logger.info(resXml); }else{ // logger.info("签名验证错误"); resXml = "" + "" + "" + " "; } }else{ // logger.info("签名验证错误"); resXml = "" + "" + "" + " "; } //------------------------------ //处理业务完毕 //------------------------------ BufferedOutputStream out = new BufferedOutputStream( response.getOutputStream()); out.write(resXml.getBytes()); out.flush(); out.close(); } 微信支付成功时访问的方法 密码错误等未支付成功的情况下,不会访问。 此路径是PayConfigUtil中配置的 int wxPayType = 0; //微信扫码支付回调 @RequestMapping(value = "Notify1") public void Notify1(HttpServletRequest request, HttpServletResponse response) throws IOException{ InputStream inputStream; StringBuffer sb = new StringBuffer(); inputStream = request.getInputStream(); String s; BufferedReader in = new BufferedReader(new InputStreamReader(inputStream, "UTF-8")); while ((s = in.readLine()) != null) { sb.append(s); } in.close(); inputStream.close(); SortedMap packageParams = PayCommonUtil.xmlConvertToMap(sb.toString()); // logger.info(packageParams); // 账号信息 String key = PayConfigUtil.API_KEY; // key String resXml = ""; // 反馈给微信服务器 // 判断签名是否正确 if (PayCommonUtil.isTenpaySign("UTF-8", packageParams, key)) { // ------------------------------ // 处理业务开始 // ------------------------------ if ("SUCCESS".equals((String) packageParams.get("result_code"))) { // 这里是支付成功 ////////// 执行自己的业务逻辑//////////////// String mch_id = (String) packageParams.get("mch_id"); String openid = (String) packageParams.get("openid"); String is_subscribe = (String) packageParams.get("is_subscribe"); String out_trade_no = (String) packageParams.get("out_trade_no"); String total_fee = (String) packageParams.get("total_fee"); //// 将用于标记是否成功的全局变量wxPayType设置为1,ajax轮回时,可以获取到其变化,从而进行页面跳转//// wxPayType=1; System.out.println("33333333333333333333333333333:"+wxPayType); // "支付成功" // 通知微信.异步确认成功.必写.不然会一直通知后台.八次之后就认为交易失败了. resXml = "" + "" + "" + " "; } else { // logger.info("支付失败,错误信息:" + packageParams.get("err_code")); resXml = "" + "" + "" + " "; } } else { // logger.info("签名验证错误"); resXml = "" + "" + "" + " "; } // ------------------------------ // 处理业务完毕 // ------------------------------ BufferedOutputStream out = new BufferedOutputStream(response.getOutputStream()); out.write(resXml.getBytes()); out.flush(); out.close(); } ajax不停轮回,判断是否登录成功的方法 @RequestMapping(value = "panduanPay") @ResponseBody public Map panduanPay(HttpServletRequest request) throws IOException{ Map map = new HashMap(); try { Thread.sleep(500); } catch (InterruptedException e) { // TODO Auto-generated catch block e.printStackTrace(); } //给页面返回wxPayType值,成功是返回的是1;还未支付成功,返回的是初始值0 map.put("wxPayType",wxPayType); return map; } 成功后页面跳转的方法 //购买成功,存入购买表中 @RequestMapping(value="gouMai") @ResponseBody public ModelAndView gouMai(HttpServletRequest req,String a,String urlName,String couName,ModelMap map){ ModelAndView mav = new ModelAndView(); Map mapp1 = new HashMap(); // SysUserTab login_user = sysuserService.getSysUserById(userId); HttpSession session = req.getSession(); SysUserTab login_user1 = (SysUserTab) session.getAttribute("login_user"); String userId = login_user1.getUserId(); // session.setAttribute("login_user", login_user); String chapterId = (String) session.getAttribute("chapterId"); mapp1.put("userId", userId); mapp1.put("chapterId", chapterId); int num = sysBuyService.getBuyCount(mapp1); if(num==0){ mapp1.put("buyId", UUID.randomUUID().toString().replace("-", "")); sysBuyService.insertBuy(mapp1); } Java高架构师、分布式架构、高可扩展、高性能、高并发、性能优化、Spring boot、Redis、ActiveMQ、Nginx、Mycat、Netty、Jvm大型分布式项目实战学习架构师视频免费学习加群:835638062 点击链接加入群聊【Java高级架构】:https://jq.qq.com/?_wv=1027&k=5S3kL3v

优秀的个人博客,低调大师

【Android Demo】自定义Activity的标题栏(Titlebar)

缺省的情况下,通常见到Activity的标题栏(Titlebar)是这样的(红色框内): HandleContacts是Activity的标题。有时候,我们希望能改变一下这样单调的状况。比如,要在标题栏中增加一个用于美化界面的图标、增一个输入框或按钮之类的,怎样才能做到这一点呢?我们不妨来看一个实际的例子。1.首先如下创建一个Android项目 2.将图片magnifier.png拖入该项目的res/drawable-mdpi文件夹下。magnifier.png图片的样子是这样的: 3.在该项目的res/layout文件夹下,创建一个布局titlebar.xml,这个布局将用于定制Activity的标题栏 编辑titlebar.xml,使其内容如下: <?xmlversion="1.0" encoding="utf-8"?> <LinearLayout xmlns:android="http://schemas.android.com/apk/res/android" android:orientation="horizontal" android:layout_width="fill_parent" android:layout_height="wrap_content"> <ImageView android:layout_width="wrap_content" android:layout_height="wrap_content" android:src="@drawable/magnifier" android:gravity="bottom" /> <TextView android:layout_width="wrap_content" android:layout_height="38dip" android:text="@string/app_name" android:textColor="#FFFFFFFF" android:textSize="14dip" android:paddingTop="1dip" /> <EditText android:id="@+id/searchparameter" android:layout_width="wrap_content" android:layout_height="38dip" android:text="ABCDEFGHIJ" android:textSize="14dip" android:layout_margin="1dip" /> <Button android:id="@+id/button" android:layout_width="wrap_content" android:layout_height="38dip" android:text="OK" android:textSize="14dip" /> </LinearLayout> 在上面的LinearLayout中,增加了以下控件: 一个ImageView,用于显示一个图标 一个TextView,用于显示应用的名称 一个EditText,用于接收输入 一个Button,用于测试 4.修改CustomizeTitlebar.java,使之如下: public class CustomizeTitlebar extends Activity { @Overridepublic void onCreate(Bundle savedInstanceState) {super.onCreate(savedInstanceState);requestWindowFeature(Window.FEATURE_CUSTOM_TITLE); setContentView(R.layout.main);getWindow().setFeatureInt(Window.FEATURE_CUSTOM_TITLE, R.layout.titlebar); } } 以上加粗的两行很重要,而且必须要严格按照上面那样的顺序出现在代码中。即: requestWindowFeature(Window.FEATURE_CUSTOM_TITLE);必须出现在super.onCreate(savedInstanceState);之后,setContentView(R.layout.main);之前。其意思就是告诉系统,本程序要自己定义Titlebar; getWindow().setFeatureInt(Window.FEATURE_CUSTOM_TITLE,R.layout.titlebar); 则必须出现在setContentView之后,其意思就是告诉系统,自定义的布局是R.layout.titlebar(即,我们前面编写的titlebar.xml) 到这里,不妨来运行一下,看看结果如何: 我们看到,Titlebar基本上按照我们的意思进行了改变,但也存在着一个缺陷:Titlebar太窄了,那么怎样改变Titlebar的高度呢? 5. 要改变Titlebar的高度,我们得先创建styles.xml: 编辑styles.xml,使其内容如下: <?xmlversion="1.0" encoding="utf-8"?> <resources> <style name="titlebarstyle"parent="android:Theme"> <item name="android:windowTitleSize">38dip</item> </style> </resources> 上面<item name="android:windowTitleSize">39dip</item>这一句,就是用来设定Titlebar的高度的。 6.在上面的基础上,我们需要修改AndroidManifest.xml中,相应Activity的属性。如下: <?xmlversion="1.0" encoding="utf-8"?> <manifestxmlns:android="http://schemas.android.com/apk/res/android"package="com.pat.customizetitlebar" android:versionCode="1" android:versionName="1.0"> <application android:icon="@drawable/icon"android:label="@string/app_name"> <activity android:name=".CustomizeTitlebar" android:label="@string/app_name" android:theme="@style/titlebarstyle"> <intent-filter> <action android:name="android.intent.action.MAIN"/> <category android:name="android.intent.category.LAUNCHER"/> </intent-filter> </activity> </application> <uses-sdk android:minSdkVersion="8"/> </manifest> 注意粗体字是新增上去的,其中的titlebar是在第5步中增加的。现在来看看运行结果: 可以看到结果完全符合了我们的要求。 7.我们还可以改变Titlebar的背景颜色。为此我们修改前面的styles.xml,使之如下: <?xml version="1.0" encoding="utf-8"?> <resources><style name="CustomizedWindowTitleBackgroundColor"> <item name="android:background">#047BF0</item></style> <style name="titlebarstyle" parent="android:Theme"> <item name="android:windowTitleSize">38dip</item> <item name="android:windowTitleBackgroundStyle">@style/CustomizedWindowTitleBackgroundColor</item></style> </resources> 注意,其中的粗体字是新增加的。 项目其他文件,均无需变动。运行结果如下: 8.最后,我们以OK按钮为例来测试Titlebar上的控件的事件响应。为此,修改CustomizeTitlebar.java,使之如下: public class CustomizeTitlebar extends Activity implements OnClickListener{ private Button button; @Overridepublic void onCreate(Bundle savedInstanceState) {super.onCreate(savedInstanceState); requestWindowFeature(Window.FEATURE_CUSTOM_TITLE); setContentView(R.layout.main); getWindow().setFeatureInt(Window.FEATURE_CUSTOM_TITLE, R.layout.titlebar); button = (Button)findViewById(R.id.button); button.setOnClickListener(this); } public voidonClick(View v) { if(v.getId() == R.id.button) { Toast.makeText(this, "OK button in Titlebar clicked...", Toast.LENGTH_LONG).show(); } } } 粗体字部分是新增加的代码。重新运行本项目,等界面出来后,点击Titlebar上的OK按钮,将出现: 这说明,Titlebar上自己增加上去的控件,可以很好地响应相关的事件。 本文转自叶超Luka博客园博客,原文链接:http://www.cnblogs.com/yc-755909659/archive/2012/04/04/2431962.html,如需转载请自行联系原作者

优秀的个人博客,低调大师

【Android Demo】让Android支持自定义的ttf字体

所谓无图无真相,先看效果图: Java代码如下: package yc.android.fonts;import android.app.Activity;import android.graphics.Typeface;import android.os.Bundle;import android.widget.TextView;public class Y_fonts extends Activity {/** Called when the activity is first created. */ @Overridepublic void onCreate(Bundle savedInstanceState) {super.onCreate(savedInstanceState); setContentView(R.layout.main);/* * 必须事先在assets底下创建一fonts文件夹 并放入要使用的字体文件(.ttf) * 并提供相对路径给creatFromAsset()来创建Typeface对象*/ Typeface fontFace = Typeface.createFromAsset(getAssets(), "fonts/STXINGKA.TTF");// 字体文件必须是true type font的格式(ttf);// 当使用外部字体却又发现字体没有变化的时候(以 Droid Sans代替),通常是因为// 这个字体android没有支持,而非你的程序发生了错误 TextView text = (TextView) findViewById(R.id.ttf); text.setTypeface(fontFace); } } PS: 我使用的字体是华文行楷 由于Android系统对字体文件的支持问题,该字体文件2.3.3版本以上有效,2.2版本不支持。 本文转自叶超Luka博客园博客,原文链接:http://www.cnblogs.com/yc-755909659/archive/2012/04/01/2429363.html,如需转载请自行联系原作者

资源下载

更多资源
Nacos

Nacos

Nacos /nɑ:kəʊs/ 是 Dynamic Naming and Configuration Service 的首字母简称,一个易于构建 AI Agent 应用的动态服务发现、配置管理和AI智能体管理平台。Nacos 致力于帮助您发现、配置和管理微服务及AI智能体应用。Nacos 提供了一组简单易用的特性集,帮助您快速实现动态服务发现、服务配置、服务元数据、流量管理。Nacos 帮助您更敏捷和容易地构建、交付和管理微服务平台。

Spring

Spring

Spring框架(Spring Framework)是由Rod Johnson于2002年提出的开源Java企业级应用框架,旨在通过使用JavaBean替代传统EJB实现方式降低企业级编程开发的复杂性。该框架基于简单性、可测试性和松耦合性设计理念,提供核心容器、应用上下文、数据访问集成等模块,支持整合Hibernate、Struts等第三方框架,其适用范围不仅限于服务器端开发,绝大多数Java应用均可从中受益。

Rocky Linux

Rocky Linux

Rocky Linux(中文名:洛基)是由Gregory Kurtzer于2020年12月发起的企业级Linux发行版,作为CentOS稳定版停止维护后与RHEL(Red Hat Enterprise Linux)完全兼容的开源替代方案,由社区拥有并管理,支持x86_64、aarch64等架构。其通过重新编译RHEL源代码提供长期稳定性,采用模块化包装和SELinux安全架构,默认包含GNOME桌面环境及XFS文件系统,支持十年生命周期更新。

Sublime Text

Sublime Text

Sublime Text具有漂亮的用户界面和强大的功能,例如代码缩略图,Python的插件,代码段等。还可自定义键绑定,菜单和工具栏。Sublime Text 的主要功能包括:拼写检查,书签,完整的 Python API , Goto 功能,即时项目切换,多选择,多窗口等等。Sublime Text 是一个跨平台的编辑器,同时支持Windows、Linux、Mac OS X等操作系统。

用户登录
用户注册