首页 文章 精选 留言 我的

精选列表

搜索[ios],共10000篇文章
优秀的个人博客,低调大师

iOS开发zhiATM机的设计与实现

// // main.m // ATM // #import <Foundation/Foundation.h> #import "ATM.h" #import "Money.h" #import "BankCard.h" int main(int argc, const char * argv[]) { ATM * atm = [[ATM alloc]init]; //atm->_saveMoneyCount = 1000; BankCard * card = [BankCard alloc]; // [card set_cardNumber:@"12345678"]; // [card set_userName:@"张三"]; [atm tellMoney:TypeOfMoneyFake]; [card showCardNumber:@"12345678"]; [card showUserName:@"李四"]; NSLog(@"%@",card); [atm saveMoney:10000]; NSLog(@"%@",atm); [atm getMoney:5000]; NSLog(@"%@",atm); return 0; } #import <Foundation/Foundation.h> #import "BankCard.h" #import "Money.h" @interface ATM : NSObject { //用来记录钱的总数 int _countOfMoney; //存钱数目 int _saveMoneyCount; //取钱数目 int _getMoneyCount; } @property int _countOfMoney; @property int _saveMoneyCount; @property int _getMoneyCount; -(void)saveMoney:(int)saveMoney; -(void)getMoney:(int)getMoney; -(void)tellMoney:(TypeOfMoney)typeOfMoney; @end #import "ATM.h" @implementation ATM @synthesize _countOfMoney = countOfMoney; @synthesize _saveMoneyCount = saveMoneyCount; @synthesize _getMoneyCount = getMoneyCount; -(void)saveMoney:(int)saveMoney { //这里參数名称的命名最好不好和实例变量的名称同样 //假设这样做会发生将实例变量隐藏 不影响执行,可是会有警告 _saveMoneyCount = saveMoney; _countOfMoney = _saveMoneyCount; NSLog(@"%d",_saveMoneyCount); } -(void)getMoney:(int)getMoney { _getMoneyCount = getMoney; _saveMoneyCount -= getMoneyCount; NSLog(@"%d",_getMoneyCount); } -(void)tellMoney:(TypeOfMoney)typeOfMoney { switch (typeOfMoney) { case TypeOfMoneyReal: NSLog(@"真币"); break; case TypeOfMoneyFake: NSLog(@"假币"); break; default: break; } } -(NSString *)description { return [NSString stringWithFormat:@"银行卡结余=%d 存入钱数=%d 取出钱数=%d ",_countOfMoney,_saveMoneyCount,_getMoneyCount]; } @end #import <Foundation/Foundation.h> enum TypeOfMoney { TypeOfMoneyReal,//真币 TypeOfMoneyFake//假币 }; typedef enum TypeOfMoney TypeOfMoney; @interface Money : NSObject @end #import "Money.h" @implementation Money { } @end #import <Foundation/Foundation.h> @interface BankCard : NSObject { /**用来存储银行卡账号*/ NSString * _cardNumber; /**用来存储银行卡使用者姓名*/ NSString * _userName; } -(void)showCardNumber:(NSString *)number; -(void)showUserName:(NSString *)name; @property NSString * _cardNumber; @property NSString * _userName; @end #import "BankCard.h" @implementation BankCard @synthesize _cardNumber = carNumber; @synthesize _userName = userName; -(void)showCardNumber:(NSString *)number { //这里忘记了传參数!!! _cardNumber = number; NSLog(@"%@",_cardNumber); } -(void)showUserName:(NSString *)name { _userName = name; NSLog(@"%@",_userName); } -(NSString *)description { return [NSString stringWithFormat:@"账号:%@ username:%@",_cardNumber,_userName]; } @end 本文转自mfrbuaa博客园博客,原文链接:http://www.cnblogs.com/mfrbuaa/p/5284583.html,如需转载请自行联系原作者

优秀的个人博客,低调大师

疯狂ios讲义之实例:贪吃蛇

实例:贪食蛇 轻扫手势处理器在游戏中的应用十分广泛,比如在经典的贪食蛇游戏中,可以让用户通过轻扫手势处理器来改变蛇的移动方向。 贪食蛇的关键数据就是记录蛇的身体,蛇身包含多个点,多个点的数据用于确定蛇身的位置,由于蛇身的长度会动态改变,因此程序将会使用NSMutableArray来记录蛇身的每个点。 除此之外,贪食蛇只有两个需要处理的逻辑。 蛇的移动:程序使用一个定时器控制蛇身的移动。对于蛇身的移动来说,蛇头受移动方向的控制,当移动方向为向左时,代表蛇头的点的X坐标减1;当移动方向为向右时,代表蛇头的点的X坐标加1;当移动方向为向上时,代表蛇头的点的Y坐标减1;当移动方向为向下时,代表蛇头的点的Y坐标加1。除此之外,蛇身的其他点总是去“追逐”前一个点,也就是将第i个点的坐标设置为第i+1个点的坐标。 蛇的方向改变:通过轻扫手势处理器检测用户的轻扫手势,根据轻扫手势的方向来改变蛇的移动方向。 创建一个SingleView Application,该应用将会包含一个应用程序委托类和一个视图控制器类,但程序还需要一个自定义UIView控件类,该控件类负责绘制贪食蛇的游戏界面。 下面是自定义的FKSnakeView类(该类继承了UIView)的接口代码。 程序清单:codes/01/1.3/Snake/Snake/FKSnakeView.h //记录地图上的宽和高有多少个格子 #define WIDTH 15 #define HEIGHT 22 //定义每个格子的大小 #define CELL_SIZE 20 typedefenum { kDown = 0, kLeft, kRight, kUp } Orient; @interface FKSnakeView : UIView<UIAlertViewDelegate> //定义蛇的移动方向 @property (nonatomic , assign) Orient orient; @end 上面接口部分定义了一些宏变量,并使用了一个枚举类型,该枚举类型用于定义蛇的移动方向。 程序清单:codes/01/1.3/Snake/Snake/FKSnakeView.m @implementation FKSnakeView //记录蛇的点,最后一个点代表蛇头 NSMutableArray* snakeData; //定义食物所在的点 FKPoint* foodPos; NSTimer* timer; UIColor* bgColor; UIImage* cherryImage; UIAlertView * overAlert; //代表游戏音效变量 SystemSoundID gu; SystemSoundID crash; @synthesize orient; - (id)initWithFrame:(CGRect)frame { self =[super initWithFrame:frame]; if(self) { //加载食物图片 cherryImage = [UIImage imageNamed:@"cherry.png"]; //加载游戏背景图片,并将背景图片转换为平铺形式的颜色 bgColor = [UIColor colorWithPatternImage: [UIImage imageNamed:@"grass.png"]]; //获取两个音效文件的URL NSURL* guUrl = [[NSBundle mainBundle] URLForResource:@"gu" withExtension:@"mp3"]; NSURL* crashUrl = [[NSBundle mainBundle] URLForResource:@"crash" withExtension:@"wav"]; //加载两个音效文件 AudioServicesCreateSystemSoundID((__bridge CFURLRef)guUrl , &gu); AudioServicesCreateSystemSoundID((__bridgeCFURLRef)crashUrl , &crash); overAlert = [[UIAlertView alloc] initWithTitle:@"游戏结束" message:@"您输了,是否重新再来?" delegate:self cancelButtonTitle:@"不来了"otherButtonTitles:@"再来一盘!", nil]; [self startGame]; } returnself; } - (void) startGame { //FKPoint的第1个参数控制位于水平第几格,第2个参数控制位于垂直第几格 snakeData = [NSMutableArray arrayWithObjects: [[FKPoint alloc] initWithX:1 y:0], [[FKPoint alloc] initWithX:2 y:0], [[FKPoint alloc] initWithX:3 y:0], [[FKPoint alloc] initWithX:4 y:0], [[FKPoint alloc] initWithX:5 y:0],nil]; //定义蛇的初始移动方向 orient =kRight; timer = [NSTimerscheduledTimerWithTimeInterval:0.3 target:self selector:@selector(move) userInfo:nilrepeats:YES]; //① } - (void) move { //除了蛇头受方向控制之外,其他点都是占它的前一个点 //获取最后一个点,作为蛇头 FKPoint*first = [snakeData objectAtIndex: snakeData.count - 1]; FKPoint*head = [[FKPoint alloc] initWithX:first.x y:first.y]; switch(orient) { case kDown: //代表向下 //新蛇头的位置 head.y = head.y + 1; break; case kLeft: //代表向左 //新蛇头的位置 head.x = head.x - 1; break; case kRight: //代表向右 //新蛇头的位置 head.x = head.x + 1; break; case kUp: //代表向上 //新蛇头的位置 head.y = head.y - 1; break; } //如果移动后蛇头超出界面或与蛇身碰撞,则游戏结束 if(head.x < 0 || head.x > WIDTH - 1 ||head.y < 0 || head.y > HEIGHT - 1 ||[snakeData containsObject:head]) { //播放碰撞的音效 AudioServicesPlaySystemSound(crash); [overAlert show]; [timer invalidate]; }; //表明蛇头与食物点重合 if([headisEqual:foodPos]) { //播放吃食物的音效 AudioServicesPlaySystemSound(gu); //将食物点添加成新的蛇头 [snakeData addObject:foodPos]; //食物清空 foodPos = nil; } else { //从第1个点开始,控制蛇身向前 for (int i = 0 ; i < snakeData.count- 1; i++) { //将第i个点的坐标设置为第i+1个点的坐标 FKPoint* curPt = [snakeDataobjectAtIndex:i]; FKPoint* nextPt = [snakeDataobjectAtIndex:i + 1]; curPt.x = nextPt.x; curPt.y = nextPt.y; } //重新设置蛇头坐标 [snakeData setObject:headatIndexedSubscript:(snakeData.count - 1)]; } if(foodPos == nil) { while(true) { FKPoint* newFoodPos = [[FKPoint alloc] initWithX:arc4random() % WIDTH y:arc4random() % HEIGHT]; //如果新产生的食物点没有位于蛇身上 if(![snakeData containsObject:newFoodPos]) { foodPos = newFoodPos; break; //成功生成了食物的位置,跳出循环 } } } [selfsetNeedsDisplay]; } //定义绘制蛇头的方法 - (void) drawHeadInRect:(CGRect)rectcontext:(CGContextRef)ctx { CGContextBeginPath(ctx); //根据蛇头的方向,决定开口的角度 CGFloatstartAngle; switch(orient) { casekUp: startAngle = M_PI * 7 / 4; break; casekDown: startAngle = M_PI * 3 / 4; break; casekLeft: startAngle = M_PI * 5 / 4; break; casekRight: startAngle = M_PI * 1 / 4; break; default: break; } //添加一段弧作为路径 CGContextAddArc(ctx, CGRectGetMidX(rect), CGRectGetMidY(rect) ,CELL_SIZE / 2, startAngle, M_PI * 1.5 + startAngle, 0); //将绘制点移动到中心 CGContextAddLineToPoint(ctx, CGRectGetMidX(rect), CGRectGetMidY(rect)); //关闭路径 CGContextClosePath(ctx); CGContextFillPath(ctx); } - (void)drawRect:(CGRect)rect { //获取绘图API CGContextRef ctx = UIGraphicsGetCurrentContext(); CGContextSetFillColorWithColor(ctx, [bgColor CGColor]); //绘制背景 CGContextFillRect(ctx, CGRectMake(0 , 0 ,WIDTH * CELL_SIZE , HEIGHT * CELL_SIZE)); //绘制文字 [@"疯狂贪食蛇" drawAtPoint:CGPointMake(50,20) withAttributes:[NSDictionary dictionaryWithObjectsAndKeys: [UIFont fontWithName:@"Heiti SC" size: 40] , NSFontAttributeName, [UIColor colorWithRed:1 green:0 blue:1 alpha:.4], NSForegroundColorAttributeName,nil]]; [@"www.fkjava.org" drawAtPoint:CGPointMake(50 ,60) withAttributes:[NSDictionary dictionaryWithObjectsAndKeys: [UIFont fontWithName:@"Heiti SC" size: 26] ,NSFontAttributeName, [UIColor colorWithRed:1 green:0 blue:1 alpha:.4], NSForegroundColorAttributeName, nil]]; //设置绘制蛇的填充颜色 CGContextSetRGBFillColor(ctx, 1, 1, 0, 1); //遍历蛇的数据,绘制蛇的数据 for (int i = 0 ; i < snakeData.count ;i++ ) { //为每个蛇的点(记录的是在数组中的位置),在屏幕上绘制一个圆点 FKPoint* cp = [snakeDataobjectAtIndex:i]; //定义将要绘制蛇身点的矩形 CGRect rect = CGRectMake(cp.x * CELL_SIZE, cp.y * CELL_SIZE , CELL_SIZE , CELL_SIZE); //绘制蛇尾巴,让蛇的尾巴小一些 if(i < 4) { CGFloat inset =(4 - i); CGContextFillEllipseInRect(ctx,CGRectInset(rect,inset, inset)); } //如果是最后一个元素,代表蛇头,绘制蛇头 else if (i == snakeData.count - 1) { [self drawHeadInRect:rectcontext:ctx]; } else { CGContextFillEllipseInRect(ctx,rect); } } //绘制“食物”图片 [cherryImage drawAtPoint:CGPointMake(foodPos.x * CELL_SIZE ,foodPos.y * CELL_SIZE)]; } -(void)alertView:(UIAlertView *)alertView clickedButtonAtIndex:(NSInteger)buttonIndex { //如果用户单击了第2个按钮,则重新开始游戏 if(buttonIndex== 1) [self startGame]; } @end 上面程序中,move方法中第1段粗体字代码负责根据移动方向控制蛇头的移动;move方法中第2段粗体字代码采用循环将第i个点的坐标设置为第i+1个点的坐标。 该自定义类还在①号粗体字代码处启动了定时器,该定时器会控制程序每隔0.3秒执行一次move方法,move方法负责控制蛇身的移动,并在蛇身移动完成后通知FKSnakeView重绘自身。 接下来只要在视图控制器中创建并添加FKSnakeView控件即可,除此之外,还需要在视图控制器中使用轻扫手势处理器来改变蛇的移动方向。下面是视图控制器类的实现代码(接口部分几乎是空的)。 程序清单:codes/01/1.3/Snake/Snake/FKViewController.m @implementation FKViewController FKSnakeView* snakeView; - (void)viewDidLoad { [super viewDidLoad]; //创建FKSnakeView控件 snakeView = [[FKSnakeView alloc] initWithFrame: CGRectMake(10, 10, WIDTH*CELL_SIZE , HEIGHT * CELL_SIZE)]; //为snakeView控件设置边框和圆角 snakeView.layer.borderWidth = 3; snakeView.layer.borderColor = [[UIColor redColor] CGColor]; snakeView.layer.cornerRadius = 6; snakeView.layer.masksToBounds = YES; //设置self.view控件支持用户交互 self.view.userInteractionEnabled = YES; //设置self.view控件支持多点触碰 self.view.multipleTouchEnabled = YES; for(int i = 0 ; i < 4 ; i++) { //创建手势处理器,指定使用该控制器的handleSwipe:方法处理轻扫手势 UISwipeGestureRecognizer*gesture = [[UISwipeGestureRecognizer alloc] initWithTarget:selfaction:@selector(handleSwipe:)]; //设置该手势处理器只处理i个手指的轻扫手势 gesture.numberOfTouchesRequired = 1; //指定该手势处理器只处理1<< i方向的轻扫手势 gesture.direction = 1 << i; //为self.view控件添加手势处理器 [self.viewaddGestureRecognizer:gesture]; } [self.view addSubview:snakeView]; } //实现手势处理器的方法,该方法应该声明一个形参 //当该方法被激发时,手势处理器会作为参数传给该方法的参数 - (void)handleSwipe:(UISwipeGestureRecognizer*)gesture { //获取轻扫手势的方向 NSUInteger direction = gesture.direction; switch (direction) { caseUISwipeGestureRecognizerDirectionLeft: if(snakeView.orient!= kRight) //只要不是向右,即可改变方向 snakeView.orient = kLeft; break; caseUISwipeGestureRecognizerDirectionUp: if(snakeView.orient!= kDown) //只要不是向下,即可改变方向 snakeView.orient = kUp; break; caseUISwipeGestureRecognizerDirectionDown: if(snakeView.orient != kUp) //只要不是向上,即可改变方向 snakeView.orient = kDown; break; caseUISwipeGestureRecognizerDirectionRight: if(snakeView.orient!= kLeft) //只要不是向左,即可改变方向 snakeView.orient = kRight; break; } } @end 上面程序中第1段粗体字代码为该控制器的UIView(即整个界面)注册了4个方向的手势处理器,第2段粗体字代码位于手势处理方法中,这些粗体字代码会根据轻扫方向改变蛇的移动方向。编译、运行该程序,即可看到如图1.7所示的游戏界面。 图1.7 贪食蛇游戏界面 本文转自fkJava李刚51CTO博客,原文链接:http://blog.51cto.com/javaligang/1388754,如需转载请自行联系原作者

优秀的个人博客,低调大师

iOS 使用 UIMenuController 且不隐藏键盘的方法

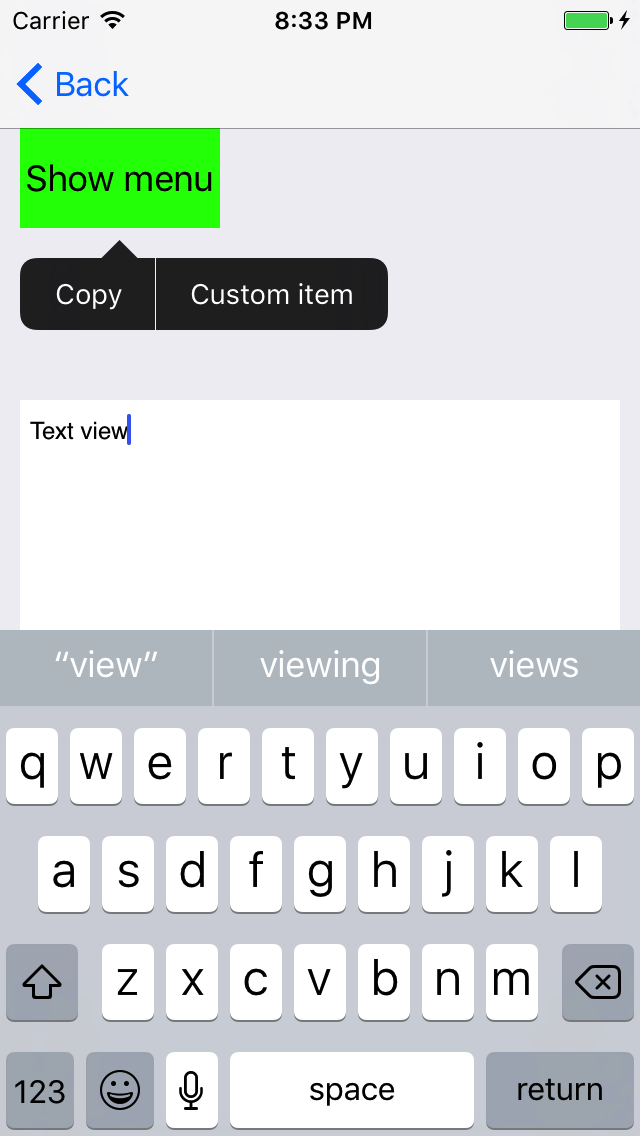
在键盘显示的时候使用 UIMenuController 弹出菜单,保持键盘显示且可输入的状态。 实现方法有 修改响应链(推荐) 遵循 UIKeyInput 协议 自定义 Menu controller 前两种方法的代码已上传 GitHub:https://github.com/Silence-GitHub/MenuControllerDemo 第 3 种方法的 GitHub 链接:https://github.com/Silence-GitHub/SWMenuController 在此之前,介绍 UIMenuController 的使用方法,以及键盘会隐藏的原因。 如果只要实现功能,看第 1 种方法的代码就可以,正文基本不用看。如果要理解响应链(Responder chain)相关的原理,先看 Apple 的文档Understanding Responders and the Responder Chain UIMenuController 的使用方法 自定义一个需要显示 UIMenuController 的视图,以 UIButton 为例,自定义类 ShowMenuButton classShowMenuButton:UIButton{//Returntruesothatmenucontrollercandisplay overridevarcanBecomeFirstResponder:Bool{returntrue} //Returntruetoshowmenuforgivenaction //ActionisinUIResponderStandardEditActions overridefunccanPerformAction(_action:Selector,withSendersender:Any?)->Bool{returnaction==#selector(copy(_:)) } overridefunccopy(_sender:Any?){print(#function) } } ShowMenuButton 必须重载 canBecomeFirstResponder 属性,返回 true 才能显示菜单(UIMenuController)。第一响应者(First responder)才能处理菜单,如果 canBecomeFirstResponder 返回 false,不能成为第一响应者,菜单不会显示。 重载 canPerformAction(_:withSender:) 方法,过滤需要显示的菜单按钮(UIMenuItem)。参数 action 有 copy(_:)、paste(_:) 等 UIResponderStandardEditActions 协议的方法。对需要进行的操作返回 true,显示菜单按钮(以上代码显示“Copy”菜单按钮);对不需要的操作返回 false,尝试隐藏菜单按钮(菜单按钮不一定隐藏,如果响应链中有其他响应者返回 true,此菜单按钮仍然会显示)。此方法在默认情况下(没有实现此方法的时候),如果当前类实现了相应的 action,就会返回 true;如果没有实现相应的 action,则调用下一个响应者的此方法。如果不实现此方法(或此方法返回 false),响应链上有响应者也没实现此方法(或此方法返回 true)但实现了 copy(_:) 方法,则“Copy”菜单按钮会显示。建议实现此方法,至少在响应链的这一层控制菜单按钮。 实现与需要显示的菜单按钮对应的 action 方法,以上代码为 copy(_:) 方法。当菜单按钮被点击,action 方法会被发送。如果没有实现 canPerformAction(_:withSender:) 方法,UIKit 会沿着响应链寻找实现 action 的响应者,把 action 方法发给实现 action 的响应者。一旦实现了 canPerformAction(_:withSender:) 方法且返回 true,action 方法就会发送给当前响应者,不会沿着响应链去找实现 action 的响应者,所以必须实现相应的 action 方法。 在控制器(UIViewController)中,让自定义的 ShowMenuButton 监听点击事件 button.addTarget(self,action:#selector(showMenuButtonClicked(_:)),for:.touchUpInside) 点击 button 弹出菜单 @objcprivatefuncshowMenuButtonClicked(_button:UIButton){//Letbuttonbecomefirstrespondersothatmenucandisplay button.becomeFirstResponder()//OnlyoneUIMenuControllerinstance letmenu=UIMenuController.shared//Custommenuitemcanperformcustomaction letcustomItem=UIMenuItem(title:"Customitem",action:#selector(customItemDidSelect))//Setcustommenuitem menu.menuItems=[customItem]//Setstheareainaviewaboveorbelowwhichtheeditingmenuispositioned menu.setTargetRect(button.frame,in:view)//Showmenu menu.setMenuVisible(true,animated:true) }//CustommenuitemactionfunccustomItemDidSelect(){print(#function) } 在使用 UIMenuController 之前,使 button 成为第一响应者,菜单才能显示。 控制器没有实现 canPerformAction(_:withSender:) 方法,实现了 customItemDidSelect,从 button 开始沿着响应链可以找到当前控制器,因此自定义菜单按钮可以显示。如果控制器实现 canPerformAction(_:withSender:) 方法且返回 false,则自定义菜单按钮不会显示。 如有需要,隐藏菜单 UIMenuController.shared.setMenuVisible(false,animated:true) 注意,UIMenuController 只有一个实例,隐藏后 menuItems 还保留显示时的值,下次在其他地方显示还会出现旧的自定义菜单按钮,因此要在适当的时候更新 menuItems 属性。 UITextView、UITextField 成为第一响应者(点击输入框,准备输入),键盘会显示。输入框不是第一响应者,键盘会隐藏。由于要显示菜单的自定义控件调用 becomeFirstResponder() 方法,成为第一响应者,则输入框就不是第一响应者,所以键盘隐藏。 不隐藏键盘的方法 修改响应链(推荐) 这是目前最好的方法,代码量最少。可以正常使用 UIMenuController,并且键盘能正常显示、输入,输入框的光标仍然闪烁。 方法思路来自:http://stackoverflow.com/questions/13601643/uimenucontroller-hides-the-keyboard 然而,那些代码还有 bug,这里会解决。既然输入框失去第一响应者,键盘会隐藏,那就让输入框保持第一响应者。通过改变响应链,让菜单事件传递给能处理的响应者。 以 UITextView 为例,自定义类 CustomResponderTextView classCustomResponderTextView:UITextView{weakvaroverrideNext:UIResponder? overridevarnext:UIResponder?{ifletresponder=overrideNext{returnresponder}returnsuper.next } overridefunccanPerformAction(_action:Selector,withSendersender:Any?)->Bool{ifoverrideNext!=nil{returnfalse}returnsuper.canPerformAction(action,withSender:sender) } } 重载 next 属性,改变响应链。重载 canPerformAction(_:withSender:) 方法,在响应链改变时都返回 false。 控制器的代码需要修改 //InittextviewwhenviewdidloadvartextView:CustomResponderTextView!@objcprivatefuncshowMenuButtonClicked(_button:UIButton){iftextView.isFirstResponder{//Changeresponderchain textView.overrideNext=button//Observe"willhide"todosomecleanup //Donotuse"didhide"whichisnotfastenough NotificationCenter.default.addObserver(self,selector:#selector(menuControllerWillHide),name:Notification.Name.UIMenuControllerWillHideMenu,object:nil) }else{ button.becomeFirstResponder() }letmenu=UIMenuController.sharedletcustomItem=UIMenuItem(title:"Customitem",action:#selector(customItemDidSelect)) menu.menuItems=[customItem] menu.setTargetRect(button.frame,in:view) menu.setMenuVisible(true,animated:true) } funccustomItemDidSelect(){print(#function) } @objcprivatefuncmenuControllerWillHide(){//Changeresponderchainback textView.overrideNext=nil //Preventcustommenuitemsfromdisplayingintextview UIMenuController.shared.menuItems=nil //Removenotificationobserver NotificationCenter.default.removeObserver(self,name:Notification.Name.UIMenuControllerWillHideMenu,object:nil) } 如果 text view 不是第一响应者,键盘没显示,和原来一样。如果 text view 是第一响应者,改变响应链,让输入框的下一个响应者(next)成为 button。菜单要显示哪些按钮,从第一响应者 text view 开始,沿着响应链,通过 canPerformAction(_:withSender:) 方法判断。虽然 text view 的 canPerformAction(_:withSender:) 方法返回 false,但 button 的 canPerformAction(_:withSender:) 方法对 copy(_:) 方法返回 true,所以会显示“Copy”菜单按钮。点击“Copy”菜单按钮,button会执行 copy(_:) 方法。控制器也在这条响应链上,实现了 customItemDidSelect 方法,没实现 canPerformAction(_:withSender:) 方法,则 canPerformAction(_:withSender:) 方法默认对 customItemDidSelect 方法返回 true,所以会显示自定义菜单按钮。点击自定义菜单按钮,控制器会执行 customItemDidSelect 方法。 监听菜单消失,在将要消失时,恢复响应链,清除自定义菜单按钮,移除通知监听。 输入框自己也可以显示菜单。如果先点击 button,然后点击 text view,让 text view 显示菜单,自定义菜单按钮仍然显示。因为还没有监听菜单消失,所以没有清除自定义菜单按钮。因此,监听键盘显示 NotificationCenter.default.addObserver(self,selector:#selector(keyboardWillShow),name:Notification.Name.UIKeyboardWillShow,object:nil) 在键盘将要显示时清除自定义菜单按钮,在控制器释放前移除通知监听 @objcprivatefunckeyboardWillShow(){//Preventcustommenuitemfromdisplayingintextview UIMenuController.shared.menuItems=nil}deinit{NotificationCenter.default.removeObserver(self) } 遵循 UIKeyInput 协议 这个方法一定会显示键盘,不能隐藏键盘。同时,输入框的光标不闪烁。一般情况下能正常输入,但系统中文输入法只响应部分按键(回车、空格等)。 方法思路来自:http://stackoverflow.com/questions/4282964/becomefirstresponder-without-hiding-keyboard/4284675#4284675 在 GitHub 上也有这个方法的代码示例:https://github.com/jaredsinclair/UIMenuControllerTest 虽然这里会修复那些代码的 bug,但输入框光标不闪烁等问题依然存在。遵循 UIKeyInput 协议的 UIResponder 成为第一响应者,键盘就会弹出。 以 UIButton 为例,自定义类 KeyInputButton protocolKeyInputButtonDelegate:class{funckeyInputButtonHasText(_button:KeyInputButton)->Bool funckeyInputButton(_button:KeyInputButton,didInsertTexttext:String) funckeyInputButtonDidDeleteBackward(_button:KeyInputButton)}classKeyInputButton:UIButton,UIKeyInput{//Returntruesothatmenucontrollercandisplay overridevarcanBecomeFirstResponder:Bool{returntrue} //Returntruetoshowmenuforgivenaction //ActionisinUIResponderStandardEditActions overridefunccanPerformAction(_action:Selector,withSendersender:Any?)->Bool{returnaction==#selector(copy(_:)) } overridefunccopy(_sender:Any?){print(#function) } //MARK:-UIKeyInput weakvardelegate:KeyInputButtonDelegate? varhasText:Bool{ifletd=delegate{returnd.keyInputButtonHasText(self) }returnfalse } //SOGOU,systemEnglish,systememojiinputmethodwork //SystemChineseinputmethodtypingsomecharactersdosenotcallthismethod(butsomecharacterscall,e.g"\n"and"") funcinsertText(_text:String){ delegate?.keyInputButton(self,didInsertText:text) } funcdeleteBackward(){ delegate?.keyInputButtonDidDeleteBackward(self) } } UIKeyInput 协议的方法与键盘输入相关。hasText 方法表示有没有文本。deleteBackward 方法当键盘的删除键点击时调用。insertText(_:) 方法在键盘输入时调用。让控制器成为 button 的 delegate,把这些方法传给 text view (UITextView,不用自定义) funckeyInputButtonHasText(_button:KeyInputButton)->Bool{returntextView.hasText }funckeyInputButton(_button:KeyInputButton,didInsertTexttext:String){ textView.insertText(text) }funckeyInputButtonDidDeleteBackward(_button:KeyInputButton){ textView.deleteBackward() } 点击显示菜单 @objcprivatefuncshowMenuButtonClicked(_button:UIButton){ button.becomeFirstResponder() NotificationCenter.default.addObserver(self,selector:#selector(menuControllerWillHide),name:Notification.Name.UIMenuControllerWillHideMenu,object:nil) letmenu=UIMenuController.sharedletcustomItem=UIMenuItem(title:"Customitem",action:#selector(customItemDidSelect)) menu.menuItems=[customItem] menu.setTargetRect(button.frame,in:view)//Displayimmediatelymaydisappearsoon,sodisplayafteralittletime DispatchQueue.main.asyncAfter(deadline:.now()+0.1){ menu.setMenuVisible(true,animated:true) } } funccustomItemDidSelect(){print(#function) }@objcprivatefuncmenuControllerWillHide(){//Preventcustommenuitemsfromdisplayingintextview UIMenuController.shared.menuItems=nil NotificationCenter.default.removeObserver(self,name:Notification.Name.UIMenuControllerWillHideMenu,object:nil) } 由于 button 成为第一响应者时键盘一定会显示,所以每次都可以让 button 调用 becomeFirstResponder 方法。 依然要监听菜单消失,清除自定义菜单按钮,移除通知监听。 需要注意的是,UIMenuController 的 setMenuVisible(_:animated:) 方法要延迟调用,否则菜单可能刚出现就消失。 自定义 Menu controller 由于之前尝试其他方法不满意(当时修改响应链的方法还有问题),于是查找自定义的菜单。找到一个:https://github.com/camelcc/MenuPopOverView 自己也写了一个:https://github.com/Silence-GitHub/SWMenuController 以下介绍自己写的 SWMenuController,先看效果图 基本够用,但是和 UIMenuController 还是有差距(例如动画效果、自动调整字体大小等)。 实现原理是,继承 UIView,添加 UIButton 作为菜单按钮,添加到 window 来显示。 与 UIMenuController 相似,但所有菜单按钮都要自定义,传入菜单按钮标题的数组 letmenu=SWMenuController() menu.delegate=selfmenu.menuItems=["Copy","Paste","Select","Selectall","Lookup","Search","Delete"] menu.setTargetRect(frame,in:view) menu.setMenuVisible(true,animated:true) 实现 SWMenuControllerDelegate 方法,处理第 index 个菜单按钮的点击事件(index 从 0 开始) funcmenuController(_menu:SWMenuController,didSelectedindex:Int){print(menu.menuItems[index])//Dosomethingformenuatindex} 本文转自xmgdc51CTO博客,原文链接:http://blog.51cto.com/12953214/1940550 ,如需转载请自行联系原作者

优秀的个人博客,低调大师

IOS登陆+注册+抽奖+排行榜

要求:三个页面(登录页面,pickerView页面,排行榜页面),pickerView页面是三个组件,每个组件显示0-9,点击按钮进行随机,获得的值存入排行榜,排行榜显示大于500的最高的10个分数和对应的用户名,切换页面可以用任何方法(0-9循环显示,登录注销[可以有不同的用户],判断用户名是否为邮箱[正则表达式]) 说明: 1.要修改xml文件到当前系统桌面,dic.xml保存的是用户名和密码,array.xml是保存的积分榜 2.正则表达式用在注册页面,在注册用户的时候用户名需要经过正则表达式的验证,判断是否是邮箱 3.有一个默认的admin,admin账户 4.排行榜显示是用的tableView显示的疑惑:1.如何创建文件在当前项目下2.为什么view之间传数组传不了,我知道数组要先初始化3.数组排序,用内置的排序方法,compare:,从大到小用什么参数4.如何让tableView中的table随array的改变而刷新 项目源码:http://download.csdn.net/detail/s10141303/5970243 步骤: 注册view RegistViewController.h: #import <UIKit/UIKit.h> @class LoginViewController; @interface RegistViewController : UIViewController - (IBAction)click:(id)sender; @property (retain, nonatomic) IBOutlet UITextField *txtName; @property (retain, nonatomic) IBOutlet UITextField *txtpassword; @property (retain, nonatomic) IBOutlet UITextField *txtConfirmPassword; @property(retain,nonatomic) NSMutableDictionary *dic; @property(retain,nonatomic) LoginViewController *loginView; @end RegistViewController.m: #import "RegistViewController.h" #import "info.h" #import "LoginViewController.h" #define OK_BUTTON 0 //登陆按钮 #define CANCEL_BUTTON 1 //取消按钮 #define BOARD 2 //键盘点击 #define RETURN_BUTTON 3 //返回登陆界面 @interface RegistViewController () @end @implementation RegistViewController - (id)initWithNibName:(NSString *)nibNameOrNil bundle:(NSBundle *)nibBundleOrNil { self = [super initWithNibName:nibNameOrNil bundle:nibBundleOrNil]; if (self) { } return self; } - (void)viewDidLoad { [super viewDidLoad]; self.dic = [[[NSMutableDictionary alloc] init] autorelease]; [self.dic setObject:@"admin" forKey:@"admin"]; } - (IBAction)click:(id)sender { UIButton *button = (UIButton*)sender; //登陆按钮 if (button.tag == OK_BUTTON) { //[[info getInfo] initDic];//初始化dic,包含了admin账号 NSString *path = @"Users/zl201/Desktop/dic.xml"; NSMutableDictionary *dicc = [NSMutableDictionary dictionaryWithContentsOfFile:path]; NSLog(@"文件读取成功"); NSLog(@"%@",dicc); //如果为空 if([self.txtName.text isEqualToString:@""]||[self.txtpassword.text isEqualToString:@""]||[self.txtConfirmPassword.text isEqualToString:@""]) { UIAlertView * a = [[UIAlertView alloc] initWithTitle:@"友情提醒" message:@"输入不能为空" delegate:nil cancelButtonTitle:@"重试" otherButtonTitles:nil]; [a show]; } else { //检测注册是是否是邮箱 if ([[info getInfo] isValidateEmail:self.txtName.text]) { [self.txtName resignFirstResponder]; [self.txtpassword resignFirstResponder]; [self.txtConfirmPassword resignFirstResponder]; //看是否包含某个键 if ([[dicc allKeys] containsObject:self.txtName.text]) { UIAlertView * a = [[UIAlertView alloc] initWithTitle:@"友情提醒" message:@"该用户已经存在,请重新注册新用户名!" delegate:nil cancelButtonTitle:@"重试" otherButtonTitles:nil]; [a show]; self.txtName.text = @""; self.txtpassword.text = @""; self.txtConfirmPassword.text = @""; } else { //查看是否两次密码不一样 if (![self.txtConfirmPassword.text isEqualToString:self.txtpassword.text]) { UIAlertView * a = [[UIAlertView alloc] initWithTitle:@"友情提醒" message:@"两次输入密码不一样" delegate:nil cancelButtonTitle:@"重试" otherButtonTitles:nil]; [a show]; self.txtConfirmPassword.text = @""; } //注册成功 else{ UIAlertView * a = [[UIAlertView alloc] initWithTitle:@"" message:@"恭喜注册成功,请点击返回登陆界面按钮!" delegate:nil cancelButtonTitle:@"确认" otherButtonTitles:nil]; [a show]; [info getInfo].name = self.txtName.text; [info getInfo].password = self.txtpassword.text; NSLog(@"%@,%@",[info getInfo].name,[info getInfo].password); //写入文件 [self.dic setObject:self.txtpassword.text forKey:self.txtName.text]; NSLog(@"%@",self.dic); NSString *path = @"Users/zl201/Desktop/dic.xml"; [self.dic writeToFile:path atomically:YES]; NSLog(@"文件写入成功"); self.txtConfirmPassword.text = @""; self.txtpassword.text = @""; self.txtName.text = @""; } } } else //不是邮箱 { UIAlertView *aa = [[UIAlertView alloc] initWithTitle:@"友情提醒" message:@"用户名必须是邮箱" delegate:nil cancelButtonTitle:@"确定" otherButtonTitles:nil]; [aa show]; } } } //取消按钮 else if (button.tag == CANCEL_BUTTON) { self.txtName.text = @""; self.txtpassword.text = @""; self.txtConfirmPassword.text = @""; [self.txtName resignFirstResponder]; [self.txtpassword resignFirstResponder]; [self.txtConfirmPassword resignFirstResponder]; } //面板触发退出键盘 else if(button.tag == BOARD) { [self.txtName resignFirstResponder]; [self.txtpassword resignFirstResponder]; [self.txtConfirmPassword resignFirstResponder]; } //返回登陆界面 else if(button.tag == RETURN_BUTTON) { [self.loginView.view removeFromSuperview]; self.loginView = [[[LoginViewController alloc]initWithNibName:@"LoginViewController"bundle:nil]autorelease]; [self.view insertSubview:self.loginView.view atIndex:10]; } } - (void)dealloc { [_txtName release]; [_txtpassword release]; [_txtConfirmPassword release]; [_dic release]; [super dealloc]; } @end 登陆View LoginViewController.h: #import <UIKit/UIKit.h> @class RegistViewController; @class SecondViewController; @interface LoginViewController : UIViewController @property (retain, nonatomic) IBOutlet UITextField *txtName; @property (retain, nonatomic) IBOutlet UITextField *txtPassword; @property (retain,nonatomic)RegistViewController *registView; @property(retain,nonatomic)SecondViewController *secondView; - (IBAction)click:(id)sender; //接受保存当前登陆的账户和密码 @property(retain,nonatomic) NSString *name; @property(retain,nonatomic) NSString *password; @end LoginViewController.m: #import "LoginViewController.h" #import "info.h" #import "RegistViewController.h" #import "SecondViewController.h" #define OK_BUTTON 0 //登陆按钮 #define CANCEL_BUTTON 1 //退出系统 #define BOARD 2 //键盘点击 #define RESIGN_BUTTON 3 //注销按钮 #define REGISTER_BUTTON 4 //注册按钮 @interface LoginViewController () @end @implementation LoginViewController - (id)initWithNibName:(NSString *)nibNameOrNil bundle:(NSBundle *)nibBundleOrNil { self = [super initWithNibName:nibNameOrNil bundle:nibBundleOrNil]; if (self) { // Custom initialization } return self; } - (void)viewDidLoad { [super viewDidLoad]; } -(void)viewDidAppear:(BOOL)animated { NSLog(@"%@",[info getInfo].name); NSLog(@"%@",[info getInfo].password); if ([info getInfo].name != NULL&&[info getInfo].password != NULL) { self.txtName.text = [info getInfo].name; self.txtPassword.text = [info getInfo].password; } } - (void)dealloc { [_txtName release]; [_txtPassword release]; [_registView release]; [_secondView release]; [_name release]; [_password release]; [super dealloc]; } - (IBAction)click:(id)sender { UIButton *button = (UIButton*)sender; //登陆按钮 if (button.tag == OK_BUTTON) { [self.txtName resignFirstResponder]; [self.txtPassword resignFirstResponder]; //读取xml文件 NSString *path = @"Users/zl201/Desktop/dic.xml"; NSMutableDictionary *dic = [NSMutableDictionary dictionaryWithContentsOfFile:path]; NSLog(@"文件读取成功"); NSLog(@"%@",dic); NSString *s =[dic objectForKey:self.txtName.text]; if ([s isEqualToString:self.txtPassword.text]) { [info getInfo].name = self.txtName.text; [info getInfo].password=self.txtPassword.text; UIAlertView * a = [[UIAlertView alloc] initWithTitle:@"登陆状态" message:@"恭喜登陆成功" delegate:nil cancelButtonTitle:@"确认" otherButtonTitles:nil]; [a show]; } else { UIAlertView * a = [[UIAlertView alloc] initWithTitle:@"登陆状态" message:@"登陆失败" delegate:nil cancelButtonTitle:@"重试" otherButtonTitles:nil]; [a show]; self.txtName.text = @""; self.txtPassword.text = @""; } } //系统退出 else if (button.tag == CANCEL_BUTTON) { exit(0); } //面板触发退出键盘 else if(button.tag == BOARD) { [self.txtName resignFirstResponder]; [self.txtPassword resignFirstResponder]; } //注销按钮 else if(button.tag == RESIGN_BUTTON) { [info getInfo].name=@""; [info getInfo].password=@""; self.txtName.text = @""; self.txtPassword.text = @""; [self.txtName resignFirstResponder]; [self.txtPassword resignFirstResponder]; } //注册按钮 else if(button.tag == REGISTER_BUTTON) { [self.registView.view removeFromSuperview]; self.registView = [[[RegistViewController alloc]initWithNibName:@"RegistViewController" bundle:nil]autorelease]; [self.view insertSubview:self.registView.view atIndex:10]; } } @end 抽奖view ViewController.h: #import <UIKit/UIKit.h> @class ShowViewController; @interface SecondViewController : UIViewController<UIPickerViewDataSource,UIPickerViewDelegate> @property (retain, nonatomic) IBOutlet UIPickerView *picker; - (IBAction)click:(id)sender; - (IBAction)OK:(id)sender; @property(nonatomic,retain)NSArray *images; @property(nonatomic,retain)NSArray *column1; @property(nonatomic,retain)NSArray *column2; @property(nonatomic,retain)NSArray *column3; @property(nonatomic,retain)NSArray *column4; @property(nonatomic,retain)NSArray *column5; @property(nonatomic,assign)long num; @property (retain, nonatomic) IBOutlet UILabel *lblShow; @property(nonatomic,retain)ShowViewController *showView; @property(nonatomic,retain)NSMutableArray *array;//记录分数 @end ViewController.m: #import "SecondViewController.h" #import <AudioToolbox/AudioToolbox.h> #import "info.h" @interface SecondViewController () @end @implementation SecondViewController - (id)initWithNibName:(NSString *)nibNameOrNil bundle:(NSBundle *)nibBundleOrNil { self = [super initWithNibName:nibNameOrNil bundle:nibBundleOrNil]; if (self) { // Custom initialization } return self; } - (void)viewDidLoad { [super viewDidLoad]; self.array = [[NSMutableArray alloc] init]; UIImage *image1 = [UIImage imageNamed:@"apple.png"]; UIImage *image2 = [UIImage imageNamed:@"bar.png"]; UIImage *image3 = [UIImage imageNamed:@"cherry.png"]; UIImage *image4 = [UIImage imageNamed:@"crown.png"]; UIImage *image5 = [UIImage imageNamed:@"lemon.png"]; UIImage *image6 = [UIImage imageNamed:@"seven.png"]; self.images = @[image1,image2,image3,image4,image5,image6]; //创建30个ImageView for (int i=0; i<5; i++) { UIImageView *imageView1 = [[UIImageView alloc] initWithImage:image1]; UIImageView *imageView2 = [[UIImageView alloc] initWithImage:image2]; UIImageView *imageView3 = [[UIImageView alloc] initWithImage:image3]; UIImageView *imageView4 = [[UIImageView alloc] initWithImage:image4]; UIImageView *imageView5 = [[UIImageView alloc] initWithImage:image5]; UIImageView *imageView6 = [[UIImageView alloc] initWithImage:image6]; NSArray *arr = @[imageView1,imageView2,imageView3,imageView4,imageView5,imageView6]; NSString *str = [NSString stringWithFormat:@"column%d",i+1]; //OC特有方法,对一个可能存在可能不存在的变量赋值,本来是一个变量,可以转化成字符串,这样就可以改变字符串了 [self setValue:arr forKey:str]; //KVC [imageView1 release]; [imageView2 release]; [imageView3 release]; [imageView4 release]; [imageView5 release]; [imageView6 release]; } srandom(time(NULL)); //默认选择在第5000行 for (int i=0; i<5; i++) { [self.picker selectRow:5000 inComponent:i animated:NO]; } } -(NSInteger)numberOfComponentsInPickerView:(UIPickerView *)pickerView { return 5; } -(NSInteger)pickerView:(UIPickerView *)pickerView numberOfRowsInComponent:(NSInteger)component { return [self.images count]*10000; } -(UIView *)pickerView:(UIPickerView *)pickerView viewForRow:(NSInteger)row forComponent:(NSInteger)component reusingView:(UIView *)view { //这种写法非常消耗内存 // UIImageView *imageView = [[UIImage alloc] initWithImage:[self.images objectAtIndex:row]]; // return imageView; NSString * str = [NSString stringWithFormat:@"column%d",component+1]; NSArray *arr = [self valueForKey:str]; return [arr objectAtIndex:row%6]; } - (void)dealloc { [_picker release]; [_images release]; [_column1 release]; [_column2 release]; [_column3 release]; [_column4 release]; [_column5 release]; [_showView release]; [_lblShow release]; [super dealloc]; } //退出 - (IBAction)click:(id)sender { // NSLog(@"%@",srandom(time(nil))); exit(0); } //确定 - (IBAction)OK:(id)sender { int a[5]; bool f=false; for (int i=0; i<5; i++) { int row = random() % [self.column1 count]; int n = random() % 35; int j = row *n; [self.picker selectRow:j inComponent:i animated:YES]; a[i]=j%6; } int sum=0; for (int i=0; i<5; i++) { sum = 1; if (f==false) { for (int j=i+1; j<5; j++) { if (a[i] == a[j]) { sum++; } if (sum>=3) { f=true; break; } } } else { break; } } if (f) { // UIAlertView *a = [[UIAlertView alloc] initWithTitle:@"我中了" message:@"中了500万" delegate:self cancelButtonTitle:@"取消" otherButtonTitles:nil]; // [a show]; //[self playMusic:@"win"];//调用播放音乐 } [self playMusic:@"crunch"]; self.num = a[0]*10000+a[1]*1000+a[2]*100+a[3]*10+a[4]; [info getInfo].number = self.num; NSLog(@"%d",self.num); NSLog(@"%@",[info getInfo].name); //self.lblScore.text = [NSString stringWithFormat:"当前得分:%d",self.num]; self.lblShow.text = @""; NSLog(@"%@",[info getInfo].name); if ([info getInfo].name!=NULL&&self.num>=4000) { NSString *str = [NSString stringWithFormat:@"恭喜%@获得%d的高分上榜了",[info getInfo].name,self.num]; self.lblShow.text = str; CGSize size = [self.lblShow.text sizeWithFont:self.lblShow.font]; CGRect frame = CGRectMake(self.lblShow.frame.origin.x, self.lblShow.frame.origin.y, size.width, self.lblShow.frame.size.height); self.lblShow.frame = frame; NSLog(@"恭喜获得4000以上的高分"); [self.array addObject:[NSString stringWithFormat:@"%@ %d",[info getInfo].name,self.num]]; NSLog(@"%@",self.array); NSString *path = @"Users/zl201/Desktop/array.xml"; [self.array writeToFile:path atomically:YES]; NSLog(@"文件写入成功"); } else if ([info getInfo].name!=NULL&&self.num<4000) { NSString *str = [NSString stringWithFormat:@"%@,很遗憾只有%d分,不足4000,加油",[info getInfo].name,self.num]; self.lblShow.text = str; CGSize size = [self.lblShow.text sizeWithFont:self.lblShow.font]; CGRect frame = CGRectMake(self.lblShow.frame.origin.x, self.lblShow.frame.origin.y, size.width, self.lblShow.frame.size.height); self.lblShow.frame = frame; } } -(void)playMusic:(NSString*)s { //通过NSBundle来获得音频文件的url地址 NSURL *url = [[NSBundle mainBundle] URLForResource:s withExtension:@"wav"]; SystemSoundID winSound;//整形类型的id //用音频服务,为音频文件绑定soundID AudioServicesCreateSystemSoundID((CFURLRef)url, &winSound); //通过绑定的soundId来播放音乐 AudioServicesPlayAlertSound(winSound); }@end 排行榜View ShowViewController.h: #import <UIKit/UIKit.h> @class SecondViewController; @interface ShowViewController : UIViewController<UITableViewDataSource, UITableViewDelegate> @property (retain, nonatomic) IBOutlet UITableView *tableView; @property(nonatomic,retain)NSMutableArray *array;//加上头行显示给tableView @property(nonatomic,retain)NSMutableArray *array1;//记录分数 @property(nonatomic,retain)SecondViewController *secView; @end ShowViewController.m: #import "ShowViewController.h" #import "SecondViewController.h" @interface ShowViewController () @end @implementation ShowViewController - (id)initWithNibName:(NSString *)nibNameOrNil bundle:(NSBundle *)nibBundleOrNil { self = [super initWithNibName:nibNameOrNil bundle:nibBundleOrNil]; if (self) { // Custom initialization } return self; } - (void)viewDidLoad { [super viewDidLoad]; NSString *path = @"Users/zl201/Desktop/array.xml"; self.array1 = [NSArray arrayWithContentsOfFile:path]; NSLog(@"文件读入成功"); NSLog(@"%@",self.array1); [self.array1 sortUsingSelector:@selector(compare:options:)]; //如何倒序 NSLog(@"%@",self.array1); self.array = [NSMutableArray arrayWithObject:@"积分排行榜(>=4000):"]; [self.array addObjectsFromArray:self.array1]; } - (void)didReceiveMemoryWarning { [super didReceiveMemoryWarning]; // Dispose of any resources that can be recreated. } - (NSInteger)numberOfSectionsInTableView:(UITableView *)tableView { return 1; } - (NSInteger)tableView:(UITableView *)tableView numberOfRowsInSection:(NSInteger)section { return [self.array count]; } - (UITableViewCell*)tableView:(UITableView *)tableView cellForRowAtIndexPath:(NSIndexPath *)indexPath { NSString *MyIdentifier = @"MyIdentifier"; UITableViewCell *cell = [tableView dequeueReusableCellWithIdentifier:MyIdentifier]; if (cell == nil) { cell = [[UITableViewCell alloc] initWithStyle:UITableViewCellStyleDefault reuseIdentifier:MyIdentifier]; } NSString *titleStr = [self.array objectAtIndex:indexPath.row]; cell.textLabel.text = titleStr; return cell; } -(void)dealloc { [_array release]; [_tableView release]; [super dealloc]; } @end 本文转蓬莱仙羽51CTO博客,原文链接:http://blog.51cto.com/dingxiaowei/1366561,如需转载请自行联系原作者

优秀的个人博客,低调大师

iOS:判断引导页首次出现、版本更新

判断引导页首次出现方式: //选择根控制器 +(void)chooseRootViewController{ //初始化Window窗口 [AppDelegate Delegate].window = [[UIWindow alloc]initWithFrame:[UIScreen mainScreen].bounds]; [AppDelegate Delegate].window.backgroundColor = [UIColor whiteColor]; [[AppDelegate Delegate].window makeKeyAndVisible]; //取出沙盒中存储的上次使用软件的版本号 NSString *key = @"CFBundleVersion"; NSString *lastVersion = [defaluts stringForKey:key]; //获取当前软件的版本号 NSString *currentVersion = [NSBundle mainBundle].infoDictionary[key]; if ([currentVersion isEqualToString:lastVersion]) { if ([ToolManager maitchWithAccountNumAndPassword] && [ToolManager IsOrNoAutoLogin]== YES) { //登录成功,进入主控制器 [AppDelegate Delegate].window.rootViewController = [[KJTabViewController alloc]init]; }else{ //用户已经注册过,进入登陆控制器 [self setLoginVC]; } }else{ //用户初次使用,进入引导页控制器 [AppDelegate Delegate].window.rootViewController = [[KJGuidePageController alloc]init]; //存储新的版本号 [defaluts setObject:currentVersion forKey:key]; [defaluts synchronize]; } } 版本更新方式:http://www.cnblogs.com/jys509/p/5390505.html 1.获取当前项目APP版本号 2.拿到AppStore项目版本号 3.对比版本号,实现更新功能 第一种方式: /** * 检测app更新 */ -(void)hsUpdateApp { //1.先获取当前工程项目版本号 NSDictionary *infoDic=[[NSBundle mainBundle] infoDictionary]; NSString *currentVersion=infoDic[@"CFBundleShortVersionString"]; //2.从网络获取appStore版本号 NSError *error; NSData *response = [NSURLConnection sendSynchronousRequest:[NSURLRequest requestWithURL:[NSURL URLWithString:[NSString stringWithFormat:@"http://itunes.apple.com/cn/lookup?id=%@",STOREAPPID]]] returningResponse:nil error:nil]; if (response == nil) { NSLog(@"你没有连接网络哦"); return; } NSDictionary *appInfoDic = [NSJSONSerialization JSONObjectWithData:response options:NSJSONReadingMutableLeaves error:&error]; if (error) { NSLog(@"hsUpdateAppError:%@",error); return; } NSArray *array = appInfoDic[@"results"]; NSDictionary *dic = array[0]; NSString *appStoreVersion = dic[@"version"]; //3.打印版本号 NSLog(@"当前版本号:%@\n商店版本号:%@",currentVersion,appStoreVersion); //4当前版本号小于商店版本号,就更新 if([currentVersion floatValue] < [appStoreVersion floatValue]) { UIAlertView *alert = [[UIAlertView alloc] initWithTitle:@"版本有更新" message:[NSString stringWithFormat:@"检测到新版本(%@),是否更新?",appStoreVersion] delegate:self cancelButtonTitle:@"取消"otherButtonTitles:@"更新",nil]; [alert show]; }else{ NSLog(@"版本号好像比商店大噢!检测到不需要更新"); } } - (void)alertView:(UIAlertView*)alertView clickedButtonAtIndex:(NSInteger)buttonIndex { //5.实现跳转到应用商店进行更新 if(buttonIndex==1) { //6.此处加入应用在app store的地址,方便用户去更新,一种实现方式如下: NSURL *url = [NSURL URLWithString:[NSString stringWithFormat:@"https://itunes.apple.com/us/app/id%@?ls=1&mt=8", STOREAPPID]]; [[UIApplication sharedApplication] openURL:url]; } } 第二种方式: #pragma mark - 版本判断 /** * 专用检测app更新 */ -(void)judgeVersionUpdate { NSString *urlStr = [NSString stringWithFormat:@"http://itunes.apple.com/cn/lookup?id=%@",STOREAPPID]; NSURL *url = [NSURL URLWithString:urlStr]; NSURLRequest *req = [NSURLRequest requestWithURL:url]; [NSURLConnection connectionWithRequest:req delegate:self]; } -(void)connection:(NSURLConnection *)connection didReceiveData:(NSData *)data{ NSError *error; id jsonObject = [NSJSONSerialization JSONObjectWithData:data options:NSJSONReadingAllowFragments error:&error]; NSDictionary *appInfo = (NSDictionary *)jsonObject; NSArray *infoContent = [appInfo objectForKey:@"results"]; NSString *appStoreVersion = [[infoContent objectAtIndex:0] objectForKey:@"version"]; KJLog(@"商店的版本是:%@",appStoreVersion); NSDictionary *infoDic = [[NSBundle mainBundle] infoDictionary]; NSString *currentVersion = [infoDic objectForKey:@"CFBundleShortVersionString"]; KJLog(@"当前的版本是:%@",currentVersion); if (![appStoreVersion isEqualToString:currentVersion]) { UIAlertView *alert = [[UIAlertView alloc] initWithTitle:@"版本有更新" message:[NSString stringWithFormat:@"检测到新版本(%@),是否更新?",appStoreVersion] delegate:self cancelButtonTitle:@"取消"otherButtonTitles:@"更新",nil]; [alert show]; } } - (void)alertView:(UIAlertView*)alertView clickedButtonAtIndex:(NSInteger)buttonIndex { if(buttonIndex==1) { //此处加入应用在app store的地址,方便用户去更新 NSString *iTunesLink = [NSString stringWithFormat:@"itms-apps://phobos.apple.com/WebObjects/MZStore.woa/wa/viewSoftwareUpdate?id=%@&mt=8",STOREAPPID]; [[UIApplication sharedApplication] openURL:[NSURL URLWithString:iTunesLink]]; } } 程序猿神奇的手,每时每刻,这双手都在改变着世界的交互方式! 本文转自当天真遇到现实博客园博客,原文链接:http://www.cnblogs.com/XYQ-208910/p/5611107.html ,如需转载请自行联系原作者

优秀的个人博客,低调大师

IOS UI 2013-8-9学习笔录

1.设置控件属性: 按住鼠标右键,然后拖放到controller.h,如果设置成 @property(retain,nonatomic)IBOutletUILabel*label; @property(retain,nonatomic)IBOutletUIButton*leftButton; 就是该ViewController的属性,可以在.m文件中使用self.label获取到该控件; 例如: [self.leftButtonsetTitle:@"LOVE"forState:UIControlStateHighlighted]; 就是点击按住按钮不放,然后按钮中文本会编程LOVE,但松手之后还会复原。 2.设置控件方法 按住鼠标右键,然后拖放到controller.h,如果选择IBAction的话就设置的是方法属性 - (IBAction)leftClick:(id)sender; - (IBAction)rightClick:(id)sender; 可以在.m文件中在自动生成的点击方法里面添加逻辑代码: 例如: - (IBAction)rightClick:(id)sender { self.label.text=@"right"; } 3.处理两个按钮同时拥有同一个事件,怎么区分? 如果两个按钮同时指向拥有一个同一个click方法,但我们要知道是哪个按钮点击了该方法,那我们就要通过方法的click:(id)sender这个参数来识别是哪个按钮触发了该事件,最好是给每一个按钮设置一个tag来唯一标识每个按钮,然后在.m文件中通过宏定义来设置这些tag 例如: #define LEFT_BUTTON_Tag 1 #define RIGHT_BUTTON_Tag 2 -(IBAction)click:(id)sender { UIButton *button = (UIButton *)sender; if(button.tag == LEFT_Button_Tag) { self.Label.text = @"Left click"; } } 常用函数: -(void)removeFromSuperview; -(void)insertSubview:(UIView *)view atIndex:(NSInteger)index; -(void)exchangeSubviewAtIndex:(NSInterger)index1 withSubviewAtIndex:(NSInteger)index2; -(void)addSubview:(UIView *)view; -(UIView *)viewWithTag:(NSInteger)tag; 4.通过代码重新设置Lable大小: CGRect frame = CGRectMake(100,100,200,100); //测试之前先将Use Autolayout的功能不选,让我们自己来对label大小适合文字布局 //求字体大小 //在原来的基础上添加 self.label.text = str; //求字体的长度大小,隐藏在CGSize的分类方法中 CGSize size = [str sizeWithFont:self.label.font]; //自定义长方形大小 CGRect frame = CGRectMake(self.label.frame.origin.x,self.label.frame.origin.y,size.width,self.label.frame.size.height); //通过自己设置的frame大小来改变当前label长度的大小 self.lable.frame = frame; 额外方法: CGSize labelSize = [s sizeWithFont:font constrainedToSize:size lineBreakMode:UILineBreakModeWordWrap]; 意思就是:把字符串s当成font字体时候,在区间size内使用这行的情况下那么s应该有的大小,也就是s在最大size范围内的宽和高 将一个view添加到另外一个view中 [self.view addSubview:label2];//添加了之后计数器加1,要释放 [label2 release]; 本文转蓬莱仙羽51CTO博客,原文链接:http://blog.51cto.com/dingxiaowei/1366441,如需转载请自行联系原作者

资源下载

更多资源
优质分享App

优质分享App

近一个月的开发和优化,本站点的第一个app全新上线。该app采用极致压缩,本体才4.36MB。系统里面做了大量数据访问、缓存优化。方便用户在手机上查看文章。后续会推出HarmonyOS的适配版本。

腾讯云软件源

腾讯云软件源

为解决软件依赖安装时官方源访问速度慢的问题,腾讯云为一些软件搭建了缓存服务。您可以通过使用腾讯云软件源站来提升依赖包的安装速度。为了方便用户自由搭建服务架构,目前腾讯云软件源站支持公网访问和内网访问。

Nacos

Nacos

Nacos /nɑ:kəʊs/ 是 Dynamic Naming and Configuration Service 的首字母简称,一个易于构建 AI Agent 应用的动态服务发现、配置管理和AI智能体管理平台。Nacos 致力于帮助您发现、配置和管理微服务及AI智能体应用。Nacos 提供了一组简单易用的特性集,帮助您快速实现动态服务发现、服务配置、服务元数据、流量管理。Nacos 帮助您更敏捷和容易地构建、交付和管理微服务平台。

Sublime Text

Sublime Text

Sublime Text具有漂亮的用户界面和强大的功能,例如代码缩略图,Python的插件,代码段等。还可自定义键绑定,菜单和工具栏。Sublime Text 的主要功能包括:拼写检查,书签,完整的 Python API , Goto 功能,即时项目切换,多选择,多窗口等等。Sublime Text 是一个跨平台的编辑器,同时支持Windows、Linux、Mac OS X等操作系统。

用户登录
用户注册
修改密码
忘记密码