SpringBoot+MyBatis开发环境搭建并实现登录权限过滤
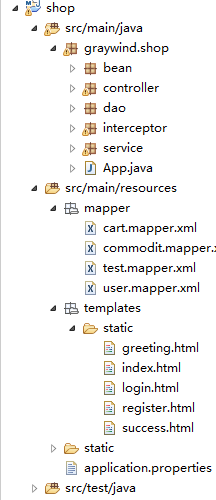
最近尝试了一下SpringBoot,发现在controller和service数量相同的时候,比之前用Tomcat启动SpringMVC快了一大半,配置也更少了,很多东西不去重新覆盖设置的话直接会以默认配置启动。 首先搭建一个同时支持RESTful和传统MVC的服务。完成后的项目目录结构如下: 建一个默认Maven工程,新建src/main/resources目录,并添加到classpath。修改pom.xml,这里说明一下,以下设定是基于1.5.X版本的,由于2.0.0版本开始使用的是Spring5,设置会不一样。SpringBoot不建议使用JSP,thymeleaf模板是SpringBoot使用的一种前端静态模板,当然也可以不要前端模板,直接通过前端框架搭建一个。 <properties> <project.build.sourceEncoding>UTF-8</project.build.sourceEncoding> <java.version>1.8</java.version> <mybatis-spring-boot>1.2.0</mybatis-spring-boot> <mysql-connector>5.1.39</mysql-connector> </properties> <!-- Spring Boot 启动父依赖 --> <parent> <groupId>org.springframework.boot</groupId> <artifactId>spring-boot-starter-parent</artifactId> <version>1.5.1.RELEASE</version> </parent> <dependencies> <!-- Spring Boot Web 依赖 --> <dependency> <groupId>org.springframework.boot</groupId> <artifactId>spring-boot-starter-web</artifactId> </dependency> <!-- Spring Boot Test 依赖 --> <dependency> <groupId>org.springframework.boot</groupId> <artifactId>spring-boot-starter-test</artifactId> <scope>test</scope> </dependency> <!-- thymeleaf模板 --> <dependency> <groupId>org.springframework.boot</groupId> <artifactId>spring-boot-starter-thymeleaf</artifactId> </dependency> <!-- Spring Boot Mybatis 依赖 --> <dependency> <groupId>org.mybatis.spring.boot</groupId> <artifactId>mybatis-spring-boot-starter</artifactId> <version>${mybatis-spring-boot}</version> </dependency> <!-- MySQL 连接驱动依赖 --> <dependency> <groupId>mysql</groupId> <artifactId>mysql-connector-java</artifactId> </dependency> </dependencies> SpringBoot默认会使用Tomcat容器启动,要设置一个启动类 1 //Spring Boot 应用的标识 2 @SpringBootApplication 3 public class App { 4 public static void main(String[] args) { 5 SpringApplication.run(App.class, args); 6 } 7 } 然后是controller层,同样的如果@RestController则所有请求会自动返回json对象,如果是@Controller则默认会返回页面模板,如果再加上@ResponseBody则是json对象。 1 @RestController 2 public class HelloController { 3 4 @RequestMapping("/HelloWorld") 5 public String hello() { 6 return "Hello World!"; 7 } 8 9 @RequestMapping("/HelloBean") 10 public HelloBean hellobean() { 11 HelloBean hello = new HelloBean(); 12 hello.setId("123"); 13 hello.setPassword("456"); 14 hello.setName("小明"); 15 return hello; 16 } 17 18 @RequestMapping("/HelloBean/{id}") 19 public HelloBean hellobean(@PathVariable("id") String id) { 20 HelloBean hello = new HelloBean(); 21 hello.setId(id); 22 hello.setPassword("456"); 23 hello.setName("小明"); 24 return hello; 25 } 26 } 1 @Controller 2 public class HtmlController { 3 4 @GetMapping("/login") 5 public String login(Model model) { 6 model.addAttribute("success", true); 7 return "static/login"; 8 } 9 10 @GetMapping("/register") 11 public String register(Model model) { 12 return "static/register"; 13 } 14 } thymeleaf模板的默认路径是src/main/resources/templates,而首页会自动设置为/static/index,所以我把所有模板放在了static目录下,上面controller返回的路径也就是static/login这样的格式。添加login.html 1 <!DOCTYPE HTML> 2 <html xmlns:th="http://www.thymeleaf.org"> 3 <head> 4 <title>Login</title> 5 <meta http-equiv="Content-Type" content="text/html; charset=UTF-8" /> 6 </head> 7 <body> 8 <form class="form-signin" role="form" th:action="@{/user/login}" 9 th:method="post"> 10 <input type="text" class="form-control" placeholder="用户名" 11 required="required" name="username" /> <input type="password" 12 class="form-control" placeholder="密码" required="required" 13 name="password" /> 14 <button class="btn btn-lg btn-warning btn-block" type="submit">登录</button> 15 <label class="checkbox"> <input type="checkbox" 16 value="remember-me" /> 记住我 17 </label> 18 </form> 19 <a href="/register">注册</a> 20 <p th:if="${success} == false">登录失败</p> 21 <p th:text="${info}" /> 22 </body> 23 </html> 因为默认设置下模板是不能热修改启动的,所以要把它打开,recources目录下添加文件application.properties ## 页面动态编译 spring.thymeleaf.cache=false 直接对启动类运行启动,效果如下: 然后是MyBatis的集成。application.properties再添加设置如下,mybatis.mapperLocations是xml文件在recources目录下的路径 ## 数据源配置 spring.datasource.url=jdbc:mysql://localhost:3306/demo?useUnicode=true&characterEncoding=utf8 spring.datasource.username=root spring.datasource.password=123456 spring.datasource.driver-class-name=com.mysql.jdbc.Driver ## Mybatis 配置 mybatis.typeAliasesPackage=org.spring.springboot.domain mybatis.mapperLocations=classpath:mapper/*.xml 启动类添加对dao层的扫描 1 //Spring Boot 应用的标识 2 @SpringBootApplication 3 //mapper 接口类扫描包配置 4 @MapperScan("graywind.shop.dao") 5 public class App { 6 public static void main(String[] args) { 7 SpringApplication.run(App.class, args); 8 } 9 } 添加Mapper类和Bean类,以及xml文件 1 package graywind.shop.dao; 2 3 import java.util.List; 4 5 import graywind.shop.bean.TestBean; 6 7 public interface TestMapper { 8 public List<TestBean> getTest(); 9 } 1 package graywind.shop.bean; 2 3 public class TestBean { 4 private String id; 5 private String txt; 6 7 public String getId() { 8 return id; 9 } 10 11 public void setId(String id) { 12 this.id = id; 13 } 14 15 public String getTxt() { 16 return txt; 17 } 18 19 public void setTxt(String txt) { 20 this.txt = txt; 21 } 22 } <?xml version="1.0" encoding="UTF-8" ?> <!DOCTYPE mapper PUBLIC "-//mybatis.org//DTD Mapper 3.0//EN" "http://mybatis.org/dtd/mybatis-3-mapper.dtd"> <mapper namespace="graywind.shop.dao.TestMapper"> <select id="getTest" resultType="graywind.shop.bean.TestBean"> select id,txt from test </select> </mapper> 然后就和以前一样注入使用 @Autowired private TestMapper testMapper; @Override public void test() { List<TestBean> list = testMapper.getTest(); } 接下来做一个权限过滤,我们希望某些页面是登录后才能查看的,需要用到过滤器。首先定义@Auth,在类或方法上添加该注解之后,就会被过滤器拦截验证。 package graywind.shop.interceptor; import java.lang.annotation.Documented; import java.lang.annotation.ElementType; import java.lang.annotation.Retention; import java.lang.annotation.RetentionPolicy; import java.lang.annotation.Target; /** * 在类或方法上添加@Auth就验证登录 * @author Administrator * */ @Target({ElementType.TYPE, ElementType.METHOD}) @Retention(RetentionPolicy.RUNTIME) @Documented public @interface Auth { } 然后添加过滤器LoginInterceptor和一些辅助类,这里拦截之后会进入preHandle方法,如果返回true,则页面会继续执行,否则会被重定向到login页面。验证通过的方法是session里面有username信息,后续可以扩展成通过从缓存中取session信息验证达到分布式服务登录验证。 1 package graywind.shop.interceptor; 2 3 import org.springframework.beans.factory.annotation.Autowired; 4 import org.springframework.stereotype.Component; 5 import org.springframework.web.method.HandlerMethod; 6 import org.springframework.web.servlet.handler.HandlerInterceptorAdapter; 7 8 import graywind.shop.bean.SessionData; 9 import graywind.shop.service.UserService; 10 11 import javax.servlet.http.HttpServletRequest; 12 import javax.servlet.http.HttpServletResponse; 13 import java.lang.reflect.Method; 14 import java.util.Optional; 15 16 import static graywind.shop.interceptor.Constants.MOBILE_NUMBER_SESSION_KEY; 17 import static graywind.shop.interceptor.Constants.SESSION_KEY; 18 import static graywind.shop.interceptor.Constants.USER_CODE_SESSION_KEY; 19 20 @Component 21 public class LoginInterceptor extends HandlerInterceptorAdapter { 22 private final static String SESSION_KEY_PREFIX = "session:"; 23 24 @Autowired 25 private UserService userSvc; 26 27 public boolean preHandle(HttpServletRequest request, HttpServletResponse response, Object handler) 28 throws Exception { 29 String username = (String) request.getSession().getAttribute("username"); 30 if (Optional.ofNullable(username).map(String::length).orElse(0) > 0) { 31 return true; 32 } 33 34 if (!handler.getClass().isAssignableFrom(HandlerMethod.class)) { 35 return true; 36 } 37 38 final HandlerMethod handlerMethod = (HandlerMethod) handler; 39 final Method method = handlerMethod.getMethod(); 40 final Class<?> clazz = method.getDeclaringClass(); 41 if (clazz.isAnnotationPresent(Auth.class) || method.isAnnotationPresent(Auth.class)) { 42 if (request.getAttribute(USER_CODE_SESSION_KEY) == null) { 43 response.sendRedirect(request.getContextPath() + "/login"); 44 return false; 45 } else { 46 return true; 47 } 48 } 49 return true; 50 } 51 } package graywind.shop.interceptor; public interface Constants { int MAX_FILE_UPLOAD_SIZE = 5242880; String MOBILE_NUMBER_SESSION_KEY = "sessionMobileNumber"; String USER_CODE_SESSION_KEY = "userCode"; String SESSION_KEY = "sessionId"; } package graywind.shop.bean; public class SessionData { private Integer userCode; private String mobileNumber; public Integer getUserCode() { return userCode; } public void setUserCode(Integer userCode) { this.userCode = userCode; } public String getMobileNumber() { return mobileNumber; } public void setMobileNumber(String mobileNumber) { this.mobileNumber = mobileNumber; } } 最后添加一个MVC设置,代替原先的web.xml 1 package graywind.shop.interceptor; 2 3 import org.slf4j.Logger; 4 import org.slf4j.LoggerFactory; 5 import org.springframework.beans.factory.annotation.Autowired; 6 import org.springframework.context.annotation.ComponentScan; 7 import org.springframework.context.annotation.Configuration; 8 import org.springframework.context.annotation.PropertySource; 9 import org.springframework.web.servlet.config.annotation.CorsRegistry; 10 import org.springframework.web.servlet.config.annotation.EnableWebMvc; 11 import org.springframework.web.servlet.config.annotation.InterceptorRegistry; 12 import org.springframework.web.servlet.config.annotation.WebMvcConfigurerAdapter; 13 14 @Configuration 15 @EnableWebMvc 16 @ComponentScan(basePackages = "graywind.shop.controller") 17 @PropertySource(value = "classpath:application.properties", 18 ignoreResourceNotFound = true,encoding = "UTF-8") 19 public class MvcConfig extends WebMvcConfigurerAdapter { 20 private static final Logger logger = LoggerFactory.getLogger(MvcConfig.class); 21 22 @Autowired 23 LoginInterceptor loginInterceptor; 24 25 @Override 26 public void addInterceptors(InterceptorRegistry registry) { 27 // 注册监控拦截器 28 registry.addInterceptor(loginInterceptor) 29 .addPathPatterns("/**") 30 .excludePathPatterns("/configuration/ui"); 31 32 } 33 34 @Override 35 public void addCorsMappings(CorsRegistry registry) { 36 registry.addMapping("/**") 37 .allowedOrigins("*") 38 .allowedHeaders("*/*") 39 .allowedMethods("*") 40 .maxAge(120); 41 } 42 } 现在就可以在controller层通过@Auth注解来控制权限。最后还要在登录验证成功之后将用户信息写入到session里面,这个比较常规就不写了。个人GitHub地址: https://github.com/GrayWind33