首页 文章 精选 留言 我的

精选列表

搜索[指标分析],共10000篇文章
优秀的个人博客,低调大师

koa-router源码分析

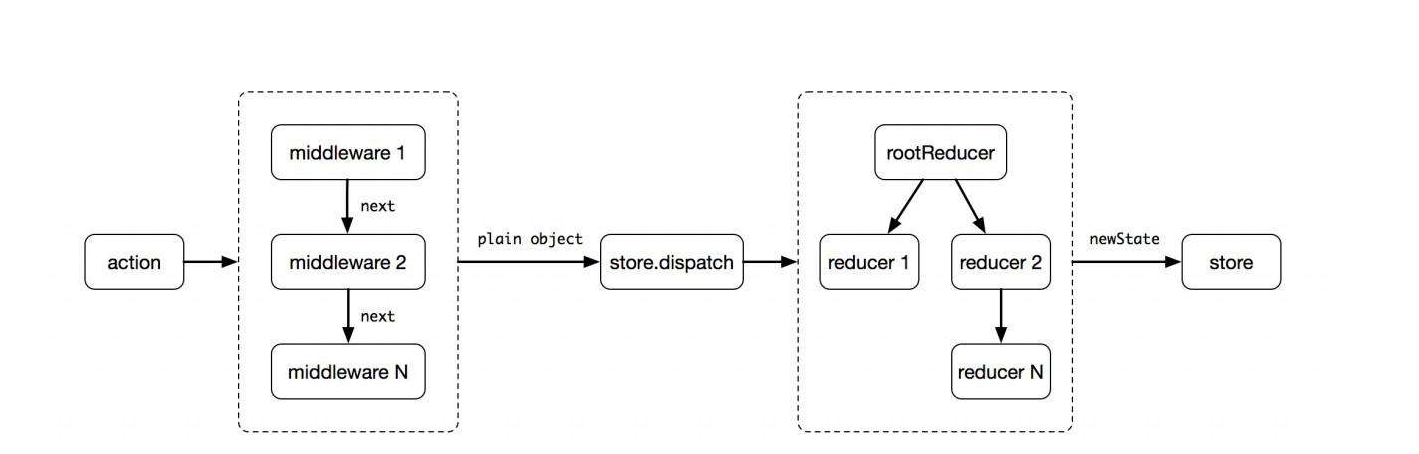
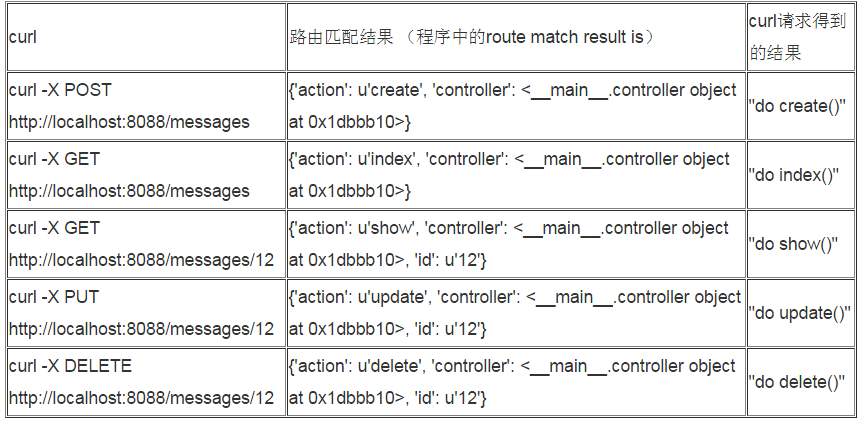
koa-router源码地址是 koa-router 当前解读版本为7.2.1 关系图 代码结构图执行流程图关系对应图 Router方法和属性浅析 methods.forEach 注册注册路由的方法,结果就是Router的原型上面多了get,post,delete,del等注册路由的方法 代码使用的时候 r1.get就是这么来的 r1.get('/test1/:id', function (ctx, next) { console.log('test1 :1') next() }, function (ctx, next) { console.log('test1:2') }) Router.prototype.del 等同于 Router.prototype.delete Router.prototype.use 注册中间件,支持形式多种多样 看着这么多,其实就两种中间件, 普通中间件 router.routes()返回的中间件 重点就是router.routes()返回的这种件,需要的前缀,参数验中间件做一些处理 router.use(function (ctx, next) { ctx.foo = 'baz'; return next(); }); router.use('/foo/bar', function (ctx, next) { ctx.foo = 'foo'; return next(); }); router.use('/foo', subrouter.routes()); router.use(['/foo', '/bar'], function (ctx, next) { ctx.foo = 'foo'; ctx.bar = 'bar'; return next(); }); parentRouter.use('/parent-route', function (ctx, next) { ctx.n = ctx.n ? (ctx.n + 1) : 1; return next(); }, nestedRouter.routes()); Router.prototype.prefix 给router实例添加前缀,前缀可以是包含参数的 router.prefix('/things/:thing_id') Router.prototype.routes = Router.prototype.middleware 返回中间件, 中间执行的时候,会根据path获取满足匹配条件的路由(Layer),然后根据每个Layer生成一个解析参数值的中间,这就是为什么我们在ctx.params能得到参数值 最核心的代码如下 layerChain = matchedLayers.reduce(function(memo, layer) { memo.push(function(ctx, next) { ctx.captures = layer.captures(path, ctx.captures); ctx.params = layer.params(path, ctx.captures, ctx.params); return next(); }); return memo.concat(layer.stack); }, []); return compose(layerChain)(ctx, next); matchedLayers是匹配的Layer或者说一条路由信息,同一个路径同样的方法也是会生成两条记录的,如下同样的注册,会生成两个不同路由(Layer),哪怕信息一模一样 r1.get('/test1', function (ctx, next) { console.log('test1 :1') next() }) r1.get('/test1', function (ctx, next) { console.log('test1 :2') next() }) matchedLayers.reduce没执行一次,是生成两个中间件, 一个是参数解析的中间件,这就是为什么你可以通过ctx.params取值到路由参数了 function(ctx, next) { ctx.captures = layer.captures(path, ctx.captures); ctx.params = layer.params(path, ctx.captures, ctx.params); return next(); } 另外一个才是实际路由匹配的执行方法,上面的demo就是 function (ctx, next) { console.log('test1 :1') next() } Router.prototype.allowedMethods 此方法执行很靠后,在他后面注册的中间件执行完毕后才执行 生成一个中间件,作用是定义路由没匹配到,方法未允许,方法未实现等的返回信息 app.use(router.routes()); app.use(router.allowedMethods({ throw: true, notImplemented: () => new Boom.notImplemented(), methodNotAllowed: () => new Boom.methodNotAllowed() })); Router.prototype.all 注册一个路由,允许所有的get,post等方法访问 Router.prototype.redirect 跳转,原理就是注册了一个路由,用ctx.redirect来实现跳转 router.redirect('/login', 'sign-in'); 等同于 router.all('/login', function (ctx) { ctx.redirect('/sign-in'); ctx.status = 301; }); Router.prototype.register 核心方法之一,注册中间件 Router.prototype.all,methods.forEach等底层都是调用这个家伙实现的 Router.prototype.use也依据情况会调用 Router.prototype.route 查找具名的route(Layer) Router.prototype.url 生成url,可以传参 router.get('user', '/users/:id', function (ctx, next) { // ... }); router.url('user', 3); // => "/users/3" router.url('user', { id: 3 }); // => "/users/3" router.use(function (ctx, next) { // redirect to named route ctx.redirect(ctx.router.url('sign-in')); }) Router.prototype.match 获得匹配的路由(Layer),以path和method来过滤的 router.routes返回的中间件底层就是通过他来确认请求应该进入哪些路由的 Router.prototype.param 添加参数验证中间件,这个需要结合Layer.prototype.param 一起来理解 Router.prototype.param = function (param, middleware) { this.params[param] = middleware; this.stack.forEach(function (route) { route.param(param, middleware); }); return this; }; Layer.prototype.param = function (param, fn) { var stack = this.stack; var params = this.paramNames; // 构建参数验证中间件 var middleware = function (ctx, next) { return fn.call(this, ctx.params[param], ctx, next); }; middleware.param = param; var names = params.map(function (p) { return p.name; }); var x = names.indexOf(param); if (x > -1) { // iterate through the stack, to figure out where to place the handler fn stack.some(function (fn, i) { // param handlers are always first, so when we find an fn w/o a param property, stop here // if the param handler at this part of the stack comes after the one we are adding, stop here // fn.param 作为判断是不是参数验证中间件的标志 // 如果不是参数验证中间件,或者参数验证中间件需要验证的参数在我之后,插入参数验证中间件 // 比如说path是这样的 /user/:id/posts/:postid, 那么id参数验证中间件应该在postid参数之前 // 简单说,确保参数按照顺序被验证 if (!fn.param || names.indexOf(fn.param) > x) { // inject this param handler right before the current item stack.splice(i, 0, middleware); return true; // then break the loop } }); } return this; }; Layer方法和属性浅析 Layer.prototype.match path是否匹配路由 Layer.prototype.params 获得路由参数键值对 Layer.prototype.captures 获得路由参数的值 Layer.prototype.url 用参数构建URL,params参数可视是对象也可是数组 Layer.prototype.param 添加参数验证中间件 Layer.prototype.setPrefix 设置前缀 safeDecodeURIComponent decodeURIComponent错误时返回原值 更多细节请直接看带备注的源码吧,写东西真累啊!RouterLayer koa-router 源码解析 - segmentfault解析Koa-Router,迈入Web次时代第一步(上)Koa-Router 源码解析下 -CNodekoa-router源码解读 Koa-router 优先级问题 Path-to-RegExp 使用

优秀的个人博客,低调大师

网络框架分析 – 全是套路

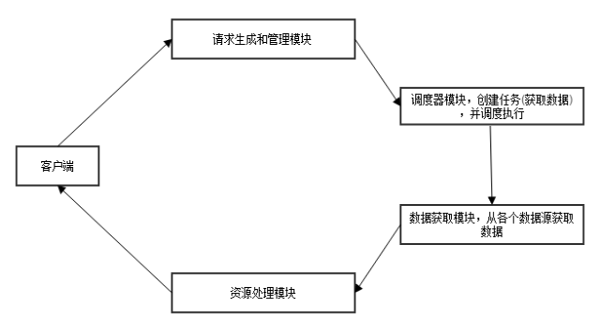
前言 这几天抽时间啃完了Volley和Picasso的源码,收获颇多,所以在这里跟大家分享一下。 对于网络请求框架或者图片加载框架来说,我们的理想型大体应该是这样的: 简单:框架的出现当然是为了提升我们的开发效率,使我们的开发变得简单,所以在保证质量的情况下简单是第一位的 可配置:天底下没有完全相同的两片树叶,也没有完全相同的两个项目,所以某些差异应该是可配置的,比如缓存位置、缓存大小、缓存策略等等 方便扩展:框架在设计的时候就要考虑到变化,并且封装起来。举个例子,比如有了更好的Http客户端,我们应该能很方便的修改并且不能对我们之前的代码产生太大影响 但万变不离其宗,这些框架的骨架其实基本上都是一样的,今天我们就来讨论下这些框架中的套路。 基本模块 既然我们说这些框架的结构其实基本上都是一样的,那么我们就先来看看它们之间类似的模块结构。 整体流程大概是这样的: 客户端请求->生成框架封装的请求类型->调度器开始处理任务->调用数据获取模块->对获取的数据进行处理->回调给客户端 生产者消费者模型 框架中请求管理和任务调度模块一般会用到生产者消费者模型。 为什么会有生产者消费者模型 在线程世界里,生产者就是生产数据的线程,消费者就是消费数据的线程。在多线程开发当中,如果生产者处理速度很快,而消费者处理速度很慢,那么生产者就必须等待消费者处理完,才能继续生产数据。同样的道理,如果消费者的处理能力大于生产者,那么消费者就必须等待生产者。为了解决这个问题于是引入了生产者和消费者模型。 什么是生产者消费者模型 生产者消费者模式是通过一个容器来解决生产者和消费者的强耦合问题。生产者和消费者彼此之间不直接通讯,而通过阻塞队列来进行通讯,所以生产者生产完数据之后不用等待消费者处理,直接扔给阻塞队列,消费者不找生产者要数据,而是直接从阻塞队列里取,阻塞队列就相当于一个缓冲区,平衡了生产者和消费者的处理能力。 生产者消费者模型的使用场景 Java中的线程池类其实就是一种生产者和消费者模式的实现方式,但是实现方法更高明。生产者把任务丢给线程池,线程池创建线程并处理任务,如果将要运行的任务数大于线程池的基本线程数就把任务扔到阻塞队列里,这种做法比只使用一个阻塞队列来实现生产者和消费者模型显然要高明很多,因为消费者能够处理直接就处理掉了,这样速度更快,而生产者先存,消费者再取这种方式显然慢一些。 框架中的应用 对于上述的使用场景我们分别可以在框架中找到实现。 Volley源码中实现方式是用一个优先级阻塞队列来实现生产者消费者模型。生产者是往队列里添加数据的线程,消费者是一个默认4个元素的线程数组(不包括处理缓存的线程),来不停的取出消息处理。 而Picssso是一个比较典型的线程池实现的生产者消费者模型,这里就不做过多介绍了。 这两个框架使用的数据结构都是PriorityBlockingQueue(优先级阻塞队列),目的是为了做排序,保证优先级高的请求先被处理。 顺便说一下Android的消息处理机制其实也是一个生产者消费者模型。 一个小问题 这里博主当时想到了一个小问题:那就是唤醒消费者的时候唤醒的顺序是怎样的? 这里涉及到一个概念叫公平访问队列,所谓公平访问队列是指所有阻塞的生产者线程或者消费者线程,当队列可用是,可以按照阻塞的先后顺序访问队列,即先阻塞的生产者线程,可以先往队列里插入元素,先阻塞的消费者线程,可以先从队列里获取元素。通常情况下为了保证公平性会降低吞吐量。 缓存 Android缓存分为内存缓存和文件缓存(磁盘缓存)。 一般网络框架是不需要处理内存缓存的,但是图片加载框架需要。在Android3.1以后,Android推出了LruCache这个内存缓存类,LruCache中的对象是强引用的。Picasso的内存缓存就是使用的LruCache实现的。对于磁盘缓存,Google提供的一种解决方案是使用DiskLruCache(DiskLruCache并没有集成到Android源码中,在Android Doc的例子中有讲解)。Picasso的磁盘缓存是基于okhttp的,使用了DiskLruCache。而Volley的磁盘缓存是在DiskBasedCache中实现得,也是基于Lru算法的。 至于其他缓存算法、缓存命中率等等概念这里我就不做过多介绍了。 异步的处理 我们知道Android是单线程模型,我们应该避免在UI线程中进行耗时操作,网络请求算是一个比较典型的耗时操作,所以网络相关的框架中都会对异步操作进行一些封装。 其实这里没什么复杂的地方,无非就是利用Handler进行线程间通信,然后配合回调机制,把结果返回到主线程里。这里可以参考我之前的文章《Android Handler 消息机制(解惑篇)》和《当观察者模式和回调机制遇上Android源码》。 我们以Volley为例来简单看一下,ExecutorDelivery类的职责是分发子线程产生的responses数据或者错误信息。初始化是在RequestQueue类里。 publicRequestQueue(Cachecache,Networknetwork,intthreadPoolSize){ this(cache,network,threadPoolSize, newExecutorDelivery(newHandler(Looper.getMainLooper()))); } 这里传入的是主线程的Handler对象,而这个ExecutorDelivery对象会被传入到NetworkDispatcher和CacheDispatcher中,这两个类是继承于Thread的,负责处理队列中的请求。所以处理请求的操作是发生在子线程的。 然后我们看下ExecutorDelivery类的构造方法 publicExecutorDelivery(finalHandlerhandler){ //MakeanExecutorthatjustwrapsthehandler. mResponsePoster=newExecutor(){ @Override publicvoidexecute(Runnablecommand){ handler.post(command); } }; } 这里用Executor对Handler进行了一层包装。Volley中的responses数据或者错误信息都会通过Executor发送出去,这样消息就到了主线程中。 Picasso比Volley要稍稍复杂了一点,由Picasso会对图片进行变换等操作,属于耗时操作,所以在Picasso中请求的分发和结果的处理会单独放到一个线程中。这个线程是一个带有消息队列的线程,用来执行循环性任务,即对获取到的数据进行处理。当它对结果处理完成之后,才会通过主线程的Handler把结果发送回主线程进行显示等操作。 设计模式 优秀的框架会合理的利用设计模式,使代码易于扩展和后期的维护。这里有一些出现频率比较高的设计模式。 静态工厂方法:由一个工厂对象决定创建出哪一种产品类的实例 单例模式:确保有且只有一个对象被创建 建造者模式:将一个复杂对象的构建与它的表示分离,使得同样的构建过程可以创建不同的表示 外观模式:简化一群类的接口 命令模式:封装请求成为对象 策略模式:封装可以互选的行为,并使用委托来决定使用哪一个 框架入口 一般框架为了调用简洁,并不会让客户端直接通过new实例化一个入口对象。这里就需要用到创建型模式。 Volley的入口使用的是静态工厂方法,与Android源码中Bitmap的实例化类似,具体可以参考《Android源码中的静态工厂方法》 /** *Createsadefaultinstanceoftheworkerpoolandcalls{@linkRequestQueue#start()}onit. * *@paramcontextA{@linkContext}touseforcreatingthecachedir. *@returnAstarted{@linkRequestQueue}instance. */ publicstaticRequestQueuenewRequestQueue(Contextcontext){ returnnewRequestQueue(context,null); } Picasso的入口方法则用到了双重锁的单例模式 staticvolatilePicassosingleton=null; publicstaticPicassowith(Contextcontext){ if(singleton==null){ synchronized(Picasso.class){ if(singleton==null){ singleton=newBuilder(context).build(); } } } returnsingleton; } 同时由于可配置项太多,所以Picasso还使用了Builder模式。 同时一些框架为了给给客户端提供一个简洁的的API,会使用外观模式定义一个高层接口,使得框架中的各个模块更加容易使用。外观模式是一种结构型模式。 外观模式可以参考《Android源码中的外观模式》 命令模式 命令模式的定义是将一个请求封装成一个对象,从而使你可用不同的请求对客户进行参数化,对请求排队或记录请求日志,以及支持可撤销的操作。在网络请求框架中都会将请求做一个封装成对象,方便传递和使用。比如Volley中的Request,Picasso中的Request和Action。 命令模式可以参考《Android源码中的命令模式》 策略模式 策略模式也是大部分框架都会用到的一个模式 ,作用是封装可以互选的行为,并使用委托来决定使用哪一个。 Volley中就大量使用了面向接口编程的编程思想。这里我们看下Volley的入口方法 publicstaticRequestQueuenewRequestQueue(Contextcontext,HttpStackstack,intmaxDiskCacheBytes){ //~省略部分无关代码~ if(stack==null){ if(Build.VERSION.SDK_INT>=9){ stack=newHurlStack(); }else{ //PriortoGingerbread,HttpUrlConnectionwasunreliable. //See:http://android-developers.blogspot.com/2011/09/androids-http-clients.html stack=newHttpClientStack(AndroidHttpClient.newInstance(userAgent)); } } Networknetwork=newBasicNetwork(stack); //~省略部分无关代码~ } 这里会根据API版本选择不同的Http客户端,它们实现了一个共同的接口 /** *AnHTTPstackabstraction. */ publicinterfaceHttpStack{ /** *PerformsanHTTPrequestwiththegivenparameters. * *<p>AGETrequestissentifrequest.getPostBody()==null.APOSTrequestissentotherwise, *andtheContent-Typeheaderissettorequest.getPostBodyContentType().</p> * *@paramrequesttherequesttoperform *@paramadditionalHeadersadditionalheaderstobesenttogetherwith *{@linkRequest#getHeaders()} *@returntheHTTPresponse */ publicHttpResponseperformRequest(Request<?>request,Map<String,String>additionalHeaders) throwsIOException,AuthFailureError; } 当然我们也可以自己实现这个接口,然后把Http客户端换成okhttp。 后记 网络相关的框架套路基本上就这些了,具体细节大家可以去自己看下相关源码。如果有什么不完善或者不对的地方也请大家多指教。 本文作者:佚名 来源:51CTO

优秀的个人博客,低调大师

hbase region split源码分析

hbase region split : split执行调用流程: 1.HbaseAdmin发起split:### 2.RSRpcServices实现类执行split(Implements the regionserver RPC services.)### 3.CompactSplitThread类与SplitRequest类用来执行region切割:### 4.splitRequest执行doSplitting操作### 4.1初始化两个子region### 4.2执行切割#### 4.2.1:(创建子region。stepsBeforePONR函数)##### 4.2.2:子region执行:stepsAfterPONR函数执行(包含openDaughters函数):##### 4.2.3:HRegionServer添加子region到meta表,加入RegionServer##### 4.3等待region切分完成,修改meta表信息,报告master#### 1.HbaseAdmin发起split: public void split(final TableName tableName) throws IOException { split(tableName, null); } public void split(final ServerName sn, final HRegionInfo hri, byte[] splitPoint) throws IOException { if (hri.getStartKey() != null && splitPoint != null && Bytes.compareTo(hri.getStartKey(), splitPoint) == 0) { throw new IOException("should not give a splitkey which equals to startkey!"); } // TODO: There is no timeout on this controller. Set one! HBaseRpcController controller = rpcControllerFactory.newController(); controller.setPriority(hri.getTable()); // TODO: this does not do retries, it should. Set priority and timeout in controller AdminService.BlockingInterface admin = this.connection.getAdmin(sn); //hbase中split调用请求通过protobuf(AdminProtos)实现 ProtobufUtil.split(controller, admin, hri, splitPoint); 实现代码: try { admin.splitRegion(controller, request); } 2.RSRpcServices实现类执行split(Implements the regionserver RPC services.) 代码: try { checkOpen(); requestCount.increment(); Region region = getRegion(request.getRegion()); region.startRegionOperation(Operation.SPLIT_REGION); if (region.getRegionInfo().getReplicaId() != HRegionInfo.DEFAULT_REPLICA_ID) { throw new IOException("Can't split replicas directly. " + "Replicas are auto-split when their primary is split."); } LOG.info("Splitting " + region.getRegionInfo().getRegionNameAsString()); region.flush(true); byte[] splitPoint = null; if (request.hasSplitPoint()) { //确定切割点splitpoint splitPoint = request.getSplitPoint().toByteArray(); } ((HRegion)region).forceSplit(splitPoint); //请求region切割 regionServer.compactSplitThread.requestSplit(region, ((HRegion)region).checkSplit(), RpcServer.getRequestUser()); return SplitRegionResponse.newBuilder().build(); } 3.CompactSplitThread类与SplitRequest类用来执行region切割: 代码: try { this.splits.execute(new SplitRequest(r, midKey, this.server, user)); if (LOG.isDebugEnabled()) { LOG.debug("Split requested for " + r + ". " + this); } } try { //acquire a shared read lock on the table, so that table schema modifications //do not happen concurrently //获取table的读锁。。 tableLock = server.getTableLockManager().readLock(parent.getTableDesc().getTableName() , "SPLIT_REGION:" + parent.getRegionInfo().getRegionNameAsString()); try { tableLock.acquire(); } 4.splitRequest执行doSplitting操作 4.1### //初始化两个子region信息 this.hri_a = new HRegionInfo(hri.getTable(), startKey, this.splitrow, false, rid); this.hri_b = new HRegionInfo(hri.getTable(), this.splitrow, endKey, false, rid); 4.2### //执行切割 st.execute(this.server, this.server, user); 4.2.1:(创建子region。stepsBeforePONR函数)#### //创建两个子region PairOfSameType<Region> regions = createDaughters(server, services, user); 4.2.2:stepsAfterPONR函数执行(openDaughters):#### // 两个子region DaughterOpener线程 start DaughterOpener aOpener = new DaughterOpener(server, (HRegion)a); DaughterOpener bOpener = new DaughterOpener(server, (HRegion)b); //向hdfs上写入.regionInfo文件以便meta挂掉以便恢复 writeRegionInfoOnFilesystem(content, true); //初始化所有的hstore initializeStores(reporter, status); //LoadStoreFiles函数执行: if (files == null || files.size() == 0) { return new ArrayList<StoreFile>(); } // initialize the thread pool for opening store files in parallel.. ThreadPoolExecutor storeFileOpenerThreadPool = this.region.getStoreFileOpenAndCloseThreadPool("StoreFileOpenerThread-" + this.getColumnFamilyName()); CompletionService<StoreFile> completionService = new ExecutorCompletionService<StoreFile>(storeFileOpenerThreadPool); int totalValidStoreFile = 0; for (final StoreFileInfo storeFileInfo: files) { //HDFS上对应的路径和文件 completionService.submit(new Callable<StoreFile>() { @Override public StoreFile call() throws IOException { //每个文件创建一个StoreFile对象,对每个storefile对象会读取文件上的内容创建一个 HalfStoreFileReader读对象来操作该region的父region上的相应的文件,及该 region上目前存储的是引用文件,其指向的是其父region上的相应的文件,对该 region的所有读或写都将关联到父region上 StoreFile storeFile = createStoreFileAndReader(storeFileInfo); return storeFile; } }); totalValidStoreFile++; } //将子Region添加到rs的online region列表上,并添加到meta表上 { if (useZKForAssignment) { // add 2nd daughter first (see HBASE-4335) services.postOpenDeployTasks(b); } else if (!services.reportRegionStateTransition(TransitionCode.SPLIT, parent.getRegionInfo(), hri_a, hri_b)) { throw new IOException("Failed to report split region to master: " + parent.getRegionInfo().getShortNameToLog()); } // Should add it to OnlineRegions services.addToOnlineRegions(b); if (useZKForAssignment) { services.postOpenDeployTasks(a); } services.addToOnlineRegions(a); } 参考文章:http://blog.csdn.net/Pun_C/article/details/47173453

优秀的个人博客,低调大师

Storm-源码分析- metric

首先定义一系列metric相关的interface, IMetric, IReducer, ICombiner (backtype.storm.metric.api) 在task中, 创建一系列builtin-metrics, (backtype.storm.daemon.builtin-metrics), 并注册到topology context里面 task会不断的利用如spout-acked-tuple!的functions去更新这些builtin-metrics task会定期将builtin-metrics里面的统计数据通过METRICS-STREAM发送给metric-bolt (backtype.storm.metric.MetricsConsumerBolt, 该bolt会创建实现backtype.storm.metric.api.IMetricsConsumer的对象, 用于计算出metrics) 然后如何使用这些metrics? 由于这是builtin metrics, 是不会被外界使用的 如果处理这些metrics, 取决于_metricsConsumer.handleDataPoints, 这里的_metricsConsumer是通过topology's configuration配置的 比如backtype.storm.metric.LoggingMetricsConsumer, 如果使用这个consumer就会将metrics写入log中 1. backtype.storm.metric.api IMetric package backtype.storm.metric.api; public interface IMetric { public Object getValueAndReset(); ;;取得当前值并恢复初始状态 } CountMetric, 计数, reset时清零 AssignableMetric, 赋值, 不用reset MultiCountMetric, 使用hashmap记录多个count, reset时分别对每个count对象调用getValueAndReset public class CountMetric implements IMetric { long _value = 0; public CountMetric() { } public void incr() { _value++; } public void incrBy(long incrementBy) { _value += incrementBy; } public Object getValueAndReset() { long ret = _value; _value = 0; return ret; } } ICombiner public interface ICombiner<T> { public T identity(); public T combine(T a, T b); } CombinedMetric, 结合ICombiner和IMetric public class CombinedMetric implements IMetric { private final ICombiner _combiner; private Object _value; public CombinedMetric(ICombiner combiner) { _combiner = combiner; _value = _combiner.identity(); } public void update(Object value) { _value = _combiner.combine(_value, value); } public Object getValueAndReset() { Object ret = _value; _value = _combiner.identity(); return ret; } } IReducer publicinterfaceIReducer<T> { T init(); T reduce(T accumulator, Object input); Object extractResult(T accumulator); } 实现IReducer接口, 实现平均数Reducer, reduce里面累加和计数, extractResult里面acc/count求平均数 class MeanReducerState { public int count = 0; public double sum = 0.0; } public class MeanReducer implements IReducer<MeanReducerState> { public MeanReducerState init() { return new MeanReducerState(); } public MeanReducerState reduce(MeanReducerState acc, Object input) { acc.count++; if(input instanceof Double) { acc.sum += (Double)input; } else if(input instanceof Long) { acc.sum += ((Long)input).doubleValue(); } else if(input instanceof Integer) { acc.sum += ((Integer)input).doubleValue(); } else { throw new RuntimeException( "MeanReducer::reduce called with unsupported input type `" + input.getClass() + "`. Supported types are Double, Long, Integer."); } return acc; } public Object extractResult(MeanReducerState acc) { if(acc.count > 0) { return new Double(acc.sum / (double)acc.count); } else { return null; } } } ReducedMetric 结合IReducer和IMetric public class ReducedMetric implements IMetric { private final IReducer _reducer; private Object _accumulator; public ReducedMetric(IReducer reducer) { _reducer = reducer; _accumulator = _reducer.init(); } public void update(Object value) { _accumulator = _reducer.reduce(_accumulator, value); } public Object getValueAndReset() { Object ret = _reducer.extractResult(_accumulator); _accumulator = _reducer.init(); return ret; } } IMetricsConsumer 这个interface, 内嵌TaskInfo和DataPoint类 handleDataPoints, 添加逻辑以处理task对应的一系列DataPoint public interface IMetricsConsumer { public static class TaskInfo { public TaskInfo() {} public TaskInfo(String srcWorkerHost, int srcWorkerPort, String srcComponentId, int srcTaskId, long timestamp, int updateIntervalSecs) { this.srcWorkerHost = srcWorkerHost; this.srcWorkerPort = srcWorkerPort; this.srcComponentId = srcComponentId; this.srcTaskId = srcTaskId; this.timestamp = timestamp; this.updateIntervalSecs = updateIntervalSecs; } public String srcWorkerHost; public int srcWorkerPort; public String srcComponentId; public int srcTaskId; public long timestamp; public int updateIntervalSecs; } public static class DataPoint { public DataPoint() {} public DataPoint(String name, Object value) { this.name = name; this.value = value; } @Override public String toString() { return "[" + name + " = " + value + "]"; } public String name; public Object value; } void prepare(Map stormConf, Object registrationArgument, TopologyContext context, IErrorReporter errorReporter); void handleDataPoints(TaskInfo taskInfo, Collection<DataPoint> dataPoints); void cleanup(); } 2. backtype.storm.daemon.builtin-metrics 定义Spout和Bolt所需要的一些metric, 主要两个record, BuiltinSpoutMetrics和BuiltinBoltMetrics, [metric-name, metric-object]的hashmap (defrecord BuiltinSpoutMetrics [^MultiCountMetric ack-count ^MultiReducedMetric complete-latency ^MultiCountMetric fail-count ^MultiCountMetric emit-count ^MultiCountMetric transfer-count]) (defrecord BuiltinBoltMetrics [^MultiCountMetric ack-count ^MultiReducedMetric process-latency ^MultiCountMetric fail-count ^MultiCountMetric execute-count ^MultiReducedMetric execute-latency ^MultiCountMetric emit-count ^MultiCountMetric transfer-count]) (defn make-data [executor-type] (condp = executor-type :spout (BuiltinSpoutMetrics. (MultiCountMetric.) (MultiReducedMetric. (MeanReducer.)) (MultiCountMetric.) (MultiCountMetric.) (MultiCountMetric.)) :bolt (BuiltinBoltMetrics. (MultiCountMetric.) (MultiReducedMetric. (MeanReducer.)) (MultiCountMetric.) (MultiCountMetric.) (MultiReducedMetric. (MeanReducer.)) (MultiCountMetric.) (MultiCountMetric.)))) (defn register-all [builtin-metrics storm-conf topology-context] (doseq [[kw imetric] builtin-metrics] (.registerMetric topology-context (str "__" (name kw)) imetric (int (get storm-conf Config/TOPOLOGY_BUILTIN_METRICS_BUCKET_SIZE_SECS))))) 在mk-task-data的时候, 调用make-data来创建相应的metrics, :builtin-metrics (builtin-metrics/make-data (:type executor-data)) 并在executor的mk-threads中, 会将这些builtin-metrics注册到topologycontext中去, (builtin-metrics/register-all (:builtin-metrics task-data) storm-conf (:user-context task-data)) 上面完成的builtin-metrics的创建和注册, 接着定义了一系列用于更新metrics的functions, 以spout-acked-tuple!为例, 需要更新MultiCountMetric ack-count和MultiReducedMetric complete-latency .scope从MultiCountMetric取出某个CountMetric, 然后incrBy来将stats的rate增加到count上 (defn spout-acked-tuple! [^BuiltinSpoutMetrics m stats stream latency-ms] (-> m .ack-count (.scope stream) (.incrBy (stats-rate stats))) (-> m .complete-latency (.scope stream) (.update latency-ms))) 3. backtype.storm.metric MetricsConsumerBolt 创建实现IMetricsConsumer的对象, 并在execute里面调用handleDataPoints package backtype.storm.metric; public class MetricsConsumerBolt implements IBolt { IMetricsConsumer _metricsConsumer; String _consumerClassName; OutputCollector _collector; Object _registrationArgument; public MetricsConsumerBolt(String consumerClassName, Object registrationArgument) { _consumerClassName = consumerClassName; _registrationArgument = registrationArgument; } @Override public void prepare(Map stormConf, TopologyContext context, OutputCollector collector) { try { _metricsConsumer = (IMetricsConsumer)Class.forName(_consumerClassName).newInstance(); } catch (Exception e) { throw new RuntimeException("Could not instantiate a class listed in config under section " + Config.TOPOLOGY_METRICS_CONSUMER_REGISTER + " with fully qualified name " + _consumerClassName, e); } _metricsConsumer.prepare(stormConf, _registrationArgument, context, (IErrorReporter)collector); _collector = collector; } @Override public void execute(Tuple input) { _metricsConsumer.handleDataPoints((IMetricsConsumer.TaskInfo)input.getValue(0), (Collection)input.getValue(1)); _collector.ack(input); } @Override public void cleanup() { _metricsConsumer.cleanup(); } } SystemBolt SystemBolt, 根据comments里面说的, 每个worker都有一个, taskid=-1 定义些system相关的metric, 并注册到topologycontext里面 需要使用Java调用clojure, 所以需要import下面的package import clojure.lang.AFn; import clojure.lang.IFn; //funtion import clojure.lang.RT; //run-time 并且用到些用于监控memory和JVM的java package java.lang.management.MemoryUsage, 表示内存使用量快照的MemoryUsage对象 java.lang.management.GarbageCollectorMXBean, 用于Java虚拟机的垃圾回收的管理接口, 比如发生的回收的总次数, 和累计回收时间 java.lang.management.RuntimeMXBean, 用于Java 虚拟机的运行时系统的管理接口 这个bolt的特点是, 只有prepare实现了逻辑, 并且通过_prepareWasCalled保证prepare只被执行一次 prepare中的逻辑, 主要就是定义各种metric, 并且通过registerMetric注册到TopologyContext中 metic包含, JVM的运行时间, 开始时间, memory情况, 和每个GarbageCollector的情况 注册的这些system metrics也会一起被发送到MetricsConsumerBolt进行处理 这应该用spout实现, 为啥用bolt实现? // There is one task inside one executor for each worker of the topology. // TaskID is always -1, therefore you can only send-unanchored tuples to co-located SystemBolt. // This bolt was conceived to export worker stats via metrics api. public class SystemBolt implements IBolt { private static Logger LOG = LoggerFactory.getLogger(SystemBolt.class); private static boolean _prepareWasCalled = false; private static class MemoryUsageMetric implements IMetric { IFn _getUsage; public MemoryUsageMetric(IFn getUsage) { _getUsage = getUsage; } @Override public Object getValueAndReset() { MemoryUsage memUsage = (MemoryUsage)_getUsage.invoke(); HashMap m = new HashMap(); m.put("maxBytes", memUsage.getMax()); m.put("committedBytes", memUsage.getCommitted()); m.put("initBytes", memUsage.getInit()); m.put("usedBytes", memUsage.getUsed()); m.put("virtualFreeBytes", memUsage.getMax() - memUsage.getUsed()); m.put("unusedBytes", memUsage.getCommitted() - memUsage.getUsed()); return m; } } // canonically the metrics data exported is time bucketed when doing counts. // convert the absolute values here into time buckets. private static class GarbageCollectorMetric implements IMetric { GarbageCollectorMXBean _gcBean; Long _collectionCount; Long _collectionTime; public GarbageCollectorMetric(GarbageCollectorMXBean gcBean) { _gcBean = gcBean; } @Override public Object getValueAndReset() { Long collectionCountP = _gcBean.getCollectionCount(); Long collectionTimeP = _gcBean.getCollectionTime(); Map ret = null; if(_collectionCount!=null && _collectionTime!=null) { ret = new HashMap(); ret.put("count", collectionCountP - _collectionCount); ret.put("timeMs", collectionTimeP - _collectionTime); } _collectionCount = collectionCountP; _collectionTime = collectionTimeP; return ret; } } @Override public void prepare(final Map stormConf, TopologyContext context, OutputCollector collector) { if(_prepareWasCalled && stormConf.get(Config.STORM_CLUSTER_MODE) != "local") { throw new RuntimeException("A single worker should have 1 SystemBolt instance."); } _prepareWasCalled = true; int bucketSize = RT.intCast(stormConf.get(Config.TOPOLOGY_BUILTIN_METRICS_BUCKET_SIZE_SECS)); final RuntimeMXBean jvmRT = ManagementFactory.getRuntimeMXBean(); context.registerMetric("uptimeSecs", new IMetric() { @Override public Object getValueAndReset() { return jvmRT.getUptime()/1000.0; } }, bucketSize); context.registerMetric("startTimeSecs", new IMetric() { @Override public Object getValueAndReset() { return jvmRT.getStartTime()/1000.0; } }, bucketSize); context.registerMetric("newWorkerEvent", new IMetric() { boolean doEvent = true; @Override public Object getValueAndReset() { if (doEvent) { doEvent = false; return 1; } else return 0; } }, bucketSize); final MemoryMXBean jvmMemRT = ManagementFactory.getMemoryMXBean(); context.registerMetric("memory/heap", new MemoryUsageMetric(new AFn() { public Object invoke() { return jvmMemRT.getHeapMemoryUsage(); } }), bucketSize); context.registerMetric("memory/nonHeap", new MemoryUsageMetric(new AFn() { public Object invoke() { return jvmMemRT.getNonHeapMemoryUsage(); } }), bucketSize); for(GarbageCollectorMXBean b : ManagementFactory.getGarbageCollectorMXBeans()) { context.registerMetric("GC/" + b.getName().replaceAll("\\W", ""), new GarbageCollectorMetric(b), bucketSize); } } @Override public void execute(Tuple input) { throw new RuntimeException("Non-system tuples should never be sent to __system bolt."); } @Override public void cleanup() { } } 4. system-topology! 这里会动态的往topology里面, 加入metric-component (MetricsConsumerBolt) 和system-component (SystemBolt), 以及相应的steam信息 system-topology!会往topology加上些东西 1. acker, 后面再说 2. metric-bolt, input是所有component的tasks发来的METRICS-STREAM, 没有output 3. system-bolt, 没有input, output是两个TICK-STREAM 4. 给所有component, 增加额外的输出metrics-stream, system-stream (defn system-topology! [storm-conf ^StormTopology topology] (validate-basic! topology) (let [ret (.deepCopy topology)] (add-acker! storm-conf ret) (add-metric-components! storm-conf ret) (add-system-components! storm-conf ret) (add-metric-streams! ret) (add-system-streams! ret) (validate-structure! ret) ret )) 4.1 增加component 看下thrift中的定义, 往topology里面增加一个blot component, 其实就是往hashmap中增加一组[string, Bolt] 关键就是看看如何使用thrift/mk-bolt-spec*来创建blot spec struct StormTopology { 1: required map<string, SpoutSpec> spouts; 2: required map<string, Bolt> bolts; 3: required map<string, StateSpoutSpec> state_spouts; } struct Bolt { 1: required ComponentObject bolt_object; 2: required ComponentCommon common; } struct ComponentCommon { 1: required map<GlobalStreamId, Grouping> inputs; 2: required map<string, StreamInfo> streams; //key is stream id, outputs 3: optional i32 parallelism_hint; //how many threads across the cluster should be dedicated to this component 4: optional string json_conf; } struct StreamInfo { 1: required list<string> output_fields; 2: required bool direct; } (defn add-metric-components! [storm-conf ^StormTopology topology] (doseq [[comp-id bolt-spec] (metrics-consumer-bolt-specs storm-conf topology)] ;;从metrics-consumer-bolt-specs中可以看出该bolt会以METRICS-STREAM-ID为输入, 且没有输出 (.put_to_bolts topology comp-id bolt-spec))) (defn add-system-components! [conf ^StormTopology topology] (let [system-bolt-spec (thrift/mk-bolt-spec* {} ;;input为空, 没有输入 (SystemBolt.) ;;object {SYSTEM-TICK-STREAM-ID (thrift/output-fields ["rate_secs"]) METRICS-TICK-STREAM-ID (thrift/output-fields ["interval"])} ;;output, 定义两个output streams, 但代码中并没有emit :p 0 :conf {TOPOLOGY-TASKS 0})] (.put_to_bolts topology SYSTEM-COMPONENT-ID system-bolt-spec))) metric-components 首先, topology里面所有的component(包含system component), 都需要往metics-bolt发送统计数据, 所以component-ids-that-emit-metrics就是all-components-ids+SYSTEM-COMPONENT-ID 那么对于任意一个comp, 都会对metics-bolt产生如下输入, {[comp-id METRICS-STREAM-ID] :shuffle} (采用:suffle grouping方式) 然后, 用thrift/mk-bolt-spec*来定义创建bolt的fn, mk-bolt-spec 最后, 调用mk-bolt-spec来创建metics-bolt的spec, 参考上面的定义 关键就是, 创建MetricsConsumerBolt对象, 需要从storm-conf里面读出, MetricsConsumer的实现类和参数 这个bolt负责, 将从各个task接收到的数据, 调用handleDataPoints生成metircs, 参考前面的定义 (defn metrics-consumer-bolt-specs [storm-conf topology] (let [component-ids-that-emit-metrics (cons SYSTEM-COMPONENT-ID (keys (all-components topology))) inputs (->> (for [comp-id component-ids-that-emit-metrics] {[comp-id METRICS-STREAM-ID] :shuffle}) (into {})) mk-bolt-spec (fn [class arg p] (thrift/mk-bolt-spec* inputs ;;inputs集合 (backtype.storm.metric.MetricsConsumerBolt. class arg) ;;object {} ;;output为空 :p p :conf {TOPOLOGY-TASKS p}))] (map (fn [component-id register] [component-id (mk-bolt-spec (get register "class") (get register "argument") (or (get register "parallelism.hint") 1))]) (metrics-consumer-register-ids storm-conf) (get storm-conf TOPOLOGY-METRICS-CONSUMER-REGISTER)))) 4.2 增加stream 给每个component增加两个output stream METRICS-STREAM-ID, 发送给metric-blot, 数据结构为output-fields ["task-info" "data-points"] SYSTEM-STREAM-ID, ,数据结构为output-fields ["event"] (defn add-metric-streams! [^StormTopology topology] (doseq [[_ component] (all-components topology) :let [common (.get_common component)]] (.put_to_streams common METRICS-STREAM-ID (thrift/output-fields ["task-info" "data-points"])))) (defn add-system-streams! [^StormTopology topology] (doseq [[_ component] (all-components topology) :let [common (.get_common component)]] (.put_to_streams common SYSTEM-STREAM-ID (thrift/output-fields ["event"])))) 本文章摘自博客园,原文发布日期:2013-07-30

优秀的个人博客,低调大师

Spark计算过程分析

基本概念 Spark是一个分布式的内存计算框架,其特点是能处理大规模数据,计算速度快。Spark延续了Hadoop的MapReduce计算模型,相比之下Spark的计算过程保持在内存中,减少了硬盘读写,能够将多个操作进行合并后计算,因此提升了计算速度。同时Spark也提供了更丰富的计算API。 MapReduce是Hadoop和Spark的计算模型,其特点是Map和Reduce过程高度可并行化;过程间耦合度低,单个过程的失败后可以重新计算,而不会导致整体失败;最重要的是数据处理中的计算逻辑可以很好的转换为Map和Reduce操作。对于一个数据集来说,Map对每条数据做相同的转换操作,Reduce可以按条件对数据分组,然后在分组上做操作。除了Map和Reduce操作之外,Spark还延伸出了如filter,flatMap,count,d

优秀的个人博客,低调大师

Android动画深入原理分析

动画分类 Android动画可以分3种:View动画,帧动画和属性动画;属性动画为API11的新特性,在低版本是无法直接使用属性动画的,但可以用nineoldAndroids来实现(但是本质还是viiew动画)。学习本篇内容主要掌握以下知识: 1,View动画以及自定义View动画。 2,View动画的一些特殊使用场景。 3,对属性动画做了一个全面的介绍。 4,使用动画的一些注意事项。 view动画 View动画的四种变换效果对应着Animation的四个子类:TranslateAnimation(平移动画)、ScaleAnimation(缩放动画)、RotateAnimation(旋转动画)和AlphaAnimation(透明度动画),他们即可以用代码来动态创建也可以用XML来定义,推荐使用可读性更好的XML来定义。 <set>标签表示动画集合,对应AnimationSet类,它可以包含若干个动画,并且他的内部也可以嵌套其他动画集合。android:interpolator 表示动画集合所采用的插值器,插值器影响动画速度,比如非匀速动画就需要通过插值器来控制动画的播放过程。 android:shareInterpolator表示集合中的动画是否和集合共享同一个插值器,如果集合不指定插值器,那么子动画就需要单独指定所需的插值器或默认值。 Animation通过setAnimationListener方法可以给View动画添加过程监听。 自定义View动画只需要继承Animation这个抽象类,并重写initialize和applyTransformation方法,在initialize方法中做一些初始化工作,在applyTransformation中进行相应的矩形变换,很多时候需要采用Camera来简化矩形变换过程。 帧动画是顺序播放一组预先定义好的图片,类似电影播放;使用简单但容易引发OOM,尽量避免使用过多尺寸较大的图片。 view动画应用场景 LayoutAnimation作用于ViewGroup,为ViewGroup指定一个动画,当他的子元素出场的时候都会具有这种动画,ListView上用的多,LayoutAnimation也是一个View动画。 代码实现: [html] view plain copy print ? <?xmlversion="1.0"encoding="utf-8"?> <layoutAnimationxmlns:android="http://schemas.android.com/apk/res/android" android:animationOrder="normal" android:delay="0.3"android:animation="@anim/anim_item"/> //---animationOrder表示子元素的动画的顺序,有三种选项: //normal(顺序显示)、reverse(逆序显示)和random(随机显示)。 <?xmlversion="1.0"encoding="utf-8"?> <setxmlns:android="http://schemas.android.com/apk/res/android" android:duration="300" android:shareInterpolator="true"> <alpha android:fromAlpha="0.0" android:toAlpha="1.0"/> <translate android:fromXDelta="300" android:toXDelta="0"/> </set> 第一种,在布局中引用LayoutAnimation [html] view plain copy print ? <ListView android:id="@+id/lv" android:layout_width="match_parent" android:layout_height="0dp" android:layout_weight="1" android:layoutAnimation="@anim/anim_layout"/> 第二种,代码种使用 [html] view plain copy print ? Animationanimation=AnimationUtils.loadAnimation(this,R.anim.anim_item); LayoutAnimationControllercontroller=newLayoutAnimationController(animation); controller.setDelay(0.5f); controller.setOrder(LayoutAnimationController.ORDER_NORMAL); listview.setLayoutAnimation(controller); 帧动画 逐帧动画(Frame-by-frame Animations)从字面上理解就是一帧挨着一帧的播放图片,类似于播放电影的效果。不同于View动画,Android系统提供了一个类AnimationDrawable来实现帧动画,帧动画比较简单,我们看一个例子就行了。 [html] view plain copy print ? <?xmlversion="1.0"encoding="utf-8"?> <animation-listxmlns:android="http://schemas.android.com/apk/res/android" android:oneshot="false"> <item android:drawable="@mipmap/lottery_1" android:duration="200"/> //...省略很多 <item android:drawable="@mipmap/lottery_6" android:duration="200"/> </animation-list> 然后 [html] view plain copy print ? imageView.setImageResource(R.drawable.frame_anim); AnimationDrawableanimationDrawable=(AnimationDrawable)imageView.getDrawable(); animationDrawable.start();//启动start,关闭stop 属性动画 属性动画是Android 3.0新加入(api 11)的功能,不同于之前的view动画(看过的都知道,view动画比如实现的位移其实不是真正的位置移动,只是实现了一些简单的视觉效果)。属性动画对之前的动画做了很大的拓展,毫不夸张的说,属性动画可以实现任何动画效果,因为在作用的对象是属性(对象),属性动画中有几个概念需要我们注意下, ValueAnimator、ObjectAnimator、AnimatorSet等。 属性动画作用属性 1,属性动画可以对任意对象的属性进行动画而不仅仅是View,属性动画默认间隔300ms,默认帧率10ms/帧。 2,看一段代码 [html] view plain copy print ? <set android:ordering=["together"|"sequentially"]> <objectAnimator android:propertyName="string" android:duration="int" android:valueFrom="float|int|color" android:valueTo="float|int|color" android:startOffset="int" android:repeatCount="int" android:repeatMode=["repeat"|"reverse"] android:valueType=["intType"|"floatType"]/> <animator android:duration="int" android:valueFrom="float|int|color" android:valueTo="float|int|color" android:startOffset="int" android:repeatCount="int" android:repeatMode=["repeat"|"reverse"] android:valueType=["intType"|"floatType"]/> <set> ... </set> </set> <set> 它代表的就是一个AnimatorSet对象。里面有一个ordering属性,主要是指定动画的播放顺序。 <objectAnimator> 它表示一个ObjectAnimator对象。它里面有很多属性,我们重点需要了解的也是它。 android:propertyName -------属性名称,例如一个view对象的”alpha”和”backgroundColor”。 android:valueFrom --------变化开始值 android:valueTo ------------变化结束值 android:valueType -------变化值类型 ,它有两种值:intType和floatType,默认值floatType。 android:duration ---------持续时间 android:startOffset ---------动画开始延迟时间 android:repeatCount --------重复次数,-1表示无限重复,默认为-1 android:repeatMode重复模式,前提是android:repeatCount为-1 ,它有两种值:”reverse”和”repeat”,分别表示反向和顺序方向。 <animator> 它对应的就是ValueAnimator对象。它主要有以下属性。 android:valueFrom android:valueTo android:duration android:startOffset android:repeatCount android:repeatMode android:valueType 定义了一组动画之后,我们怎么让它运行起来呢? [html] view plain copy print ? AnimatorSetset=(AnimatorSet)AnimatorInflater.loadAnimator(myContext, R.anim.property_animator); set.setTarget(myObject);//myObject表示作用的对象 set.start(); 插值器和估值器 时间插值器(TimeInterpolator)的作用是根据时间流逝的百分比来计算出当前属性值改变的百分比,系统预置的有LinearInterpolator(线性插值器:匀速动画),AccelerateDecelerateInterpolator(加速减速插值器:动画两头慢中间快),DecelerateInterpolator(减速插值器:动画越来越慢)。 注:这里的插值器很多,可以翻看我之前关于插值器的讲解。 估值器(TypeEvaluator)的作用是根据当前属性改变的百分比来计算改变后的属性值。系统预置有IntEvaluator 、FloatEvaluator 、ArgbEvaluator。 举个简单的例子吧 [html] view plain copy print ? publicclassIntEvaluatorimplementsTypeEvaluator<Integer>{ publicIntegerevaluate(floatfraction,IntegerstartValue,IntegerendValue){ intstartInt=startValue; return(int)(startInt+fraction*(endValue-startInt)); } } 上述代码就是计算当前属性所占总共的百分百。 插值器和估值器除了系统提供之外,我们还可以自定义实现,自定义插值器需要实现Interpolator或者TimeInterpolator;自定义估值器算法需要实现TypeEvaluator。 属性动画监听器 属性动画监听器用于监听动画的播放过程,主要有两个接口:AnimatorUpdateListener和AnimatorListener 。 AnimatorListener [html] view plain copy print ? publicstaticinterfaceAnimatorListener{ voidonAnimationStart(Animatoranimation);//动画开始 voidonAnimationEnd(Animatoranimation);//动画结束 voidonAnimationCancel(Animatoranimation);//动画取消 voidonAnimationRepeat(Animatoranimation);//动画重复播放 } AnimatorUpdateListener [html] view plain copy print ? publicstaticinterfaceAnimatorUpdateListener{ voidonAnimationUpdate(ValueAnimatoranimator); } 应用场景 这里我们先提一个问题:给Button加一个动画,让Button在2秒内将宽带从当前宽度增加到500dp,也行你会说,很简单啊,直接用view动画就可以实现,view动画不是有个缩放动画,但是你可以试试,view动画是不支持对宽度和高度进行改变的。Button继承自TextView,setWidth是对TextView的,所以直接对Button做setWidth是不行的。那么要怎么做呢? 针对上面的问题,官网api给出了如下的方案: 给你的对象加上get和set方法,如果你有权限的话 用一个类来包装原始对象,间接提高get和set方法 采用ValueAnimator,监听动画执行过程,实现属性的改变 有了上面的说明,我们大致明白了,要实现开始说的这个问题的效果,我们需要用一个间接的类来实现get和set方法或者自己实现一个ValueAnimator。 第一种,自己封装一个类实现get和set方法,这也是我们常用的,拓展性强 [html] view plain copy print ? publicclassViewWrapper{ privateViewtarget; publicViewWrapper(Viewtarget){ this.target=target; } publicintgetWidth(){ returntarget.getLayoutParams().width; } publicvoidsetWidth(intwidth){ target.getLayoutParams().width=width; target.requestLayout(); } } 第二种,采用ValueAnimator,监听动画过程。 [html] view plain copy print ? privatevoidstartValueAnimator(finalViewtarget,finalintstart,finalintend){ ValueAnimatorvalueAnimator=ValueAnimator.ofInt(1,100); valueAnimator.addUpdateListener(newValueAnimator.AnimatorUpdateListener(){ privateIntEvaluatormEvaluation=newIntEvaluator();//新建一个整形估值器作为临时变量 @Override publicvoidonAnimationUpdate(ValueAnimatoranimation){ //获得当前动画的进度值1~100之间 intcurrentValue=(int)animation.getAnimatedValue(); //获得当前进度占整个动画过程的比例,浮点型,0~1之间 floatfraction=animation.getAnimatedFraction(); //调用估值器,通过比例计算出宽度 inttargetWidth=mEvaluation.evaluate(fraction,start,end); target.getLayoutParams().width=targetWidth; //设置给作用的对象,刷新页面 target.requestLayout(); } }); } 属性动画的工作原理 属性动画的工作原理,主要是对作用的对象不断的调用get/set方法来改变初始值和最终值,然后set到动画属性上即可。然后通过消息机制(Handler(不过这里的Handler不是我们常用的handler,而是AnimationHandler,它其实本质就是一个Runable)和Looper去将动画执行出来),通过代码我们发现它调了JNI的代码,不过这个我们不用关心,我们直接看ObjectAnimator.start() [html] view plain copy print ? privatevoidstart(booleanplayBackwards){ if(Looper.myLooper()==null){ thrownewAndroidRuntimeException("AnimatorsmayonlyberunonLooperthreads"); }else{ this.mPlayingBackwards=playBackwards; this.mCurrentIteration=0; this.mPlayingState=0; this.mStarted=true; this.mStartedDelay=false; ((ArrayList)sPendingAnimations.get()).add(this); if(this.mStartDelay==0L){ this.setCurrentPlayTime(this.getCurrentPlayTime()); this.mPlayingState=0; this.mRunning=true; if(this.mListeners!=null){ ArrayListanimationHandler=(ArrayList)this.mListeners.clone(); intnumListeners=animationHandler.size(); for(inti=0;i<numListeners;++i){ ((AnimatorListener)animationHandler.get(i)).onAnimationStart(this); } } } ValueAnimator.AnimationHandlervar5=(ValueAnimator.AnimationHandler)sAnimationHandler.get(); if(var5==null){ var5=newValueAnimator.AnimationHandler(null); sAnimationHandler.set(var5); } var5.sendEmptyMessage(0); } } [html] view plain copy print ? privatestaticfinalThreadLocal<ArrayList<ValueAnimator>>sAnimations=newThreadLocal(){ protectedArrayList<ValueAnimator>initialValue(){ returnnewArrayList(); } }; privatestaticfinalThreadLocal<ArrayList<ValueAnimator>>sPendingAnimations=newThreadLocal(){ protectedArrayList<ValueAnimator>initialValue(){ returnnewArrayList(); } }; privatestaticfinalThreadLocal<ArrayList<ValueAnimator>>sDelayedAnims=newThreadLocal(){ protectedArrayList<ValueAnimator>initialValue(){ returnnewArrayList(); } }; privatestaticfinalThreadLocal<ArrayList<ValueAnimator>>sEndingAnims=newThreadLocal(){ protectedArrayList<ValueAnimator>initialValue(){ returnnewArrayList(); } }; privatestaticfinalThreadLocal<ArrayList<ValueAnimator>>sReadyAnims=newThreadLocal(){ protectedArrayList<ValueAnimator>initialValue(){ returnnewArrayList(); } }; 这里系统怎么计算每一帧的动画的呢,看看下面的代码 [html] view plain copy print ? voidanimateValue(floatfraction){ fraction=this.mInterpolator.getInterpolation(fraction); this.mCurrentFraction=fraction; intnumValues=this.mValues.length; intnumListeners; for(numListeners=0;numListeners<numValues;++numListeners){ this.mValues[numListeners].calculateValue(fraction); } if(this.mUpdateListeners!=null){ numListeners=this.mUpdateListeners.size(); for(inti=0;i<numListeners;++i){ ((ValueAnimator.AnimatorUpdateListener)this.mUpdateListeners.get(i)).onAnimationUpdate(this); } } } 不过我们知道要改变动画,一定调用了get/set方法,那我们重点看下这相关的代码。这段代码在setProperty方法里面 [html] view plain copy print ? publicvoidsetProperty(Propertyproperty){ if(this.mValues!=null){ PropertyValuesHoldervaluesHolder=this.mValues[0]; StringoldName=valuesHolder.getPropertyName(); valuesHolder.setProperty(property); this.mValuesMap.remove(oldName); this.mValuesMap.put(this.mPropertyName,valuesHolder); } if(this.mProperty!=null){ this.mPropertyName=property.getName(); } this.mProperty=property; this.mInitialized=false; } 这里有一个PropertyValuesHolder,顾名思义这是一个操作数据的类,和我们的adapter的Holder差不多,该方法的get方法主要用到了反射。 [html] view plain copy print ? privatevoidsetupValue(Objecttarget,Keyframekf){ if(this.mProperty!=null){ kf.setValue(this.mProperty.get(target)); } try{ if(this.mGetter==null){ Classe=target.getClass(); this.setupGetter(e); } kf.setValue(this.mGetter.invoke(target,newObject[0])); }catch(InvocationTargetExceptionvar4){ Log.e("PropertyValuesHolder",var4.toString()); }catch(IllegalAccessExceptionvar5){ Log.e("PropertyValuesHolder",var5.toString()); } } 代码就看到这,有兴趣的可以去看下源码 使用属性动画需要注意的事项 使用帧动画时,当图片数量较多且图片分辨率较大的时候容易出现 OOM,需注意,尽量避免使用帧动画。 使用无限循环的属性动画时,在Activity退出时即使停止,否则将导致Activity无法释放从而造成 内存泄露。 View动画是对View的影像做动画,并不是真正的改变了View的状态,因此有时候会出现动画完成后View无法隐藏(setVisibility(View.GONE)失效),这时候调用view.clearAnimation()清理View动画即可解决。 不要使用px,使用px会导致不同设备上有不同的效果。 View动画是对View的影像做动画,View的真实位置没有变动,也就导致点击View动画后的位置触摸事件不会响应,属性动画不存在这个问题。 使用动画的过程中,使用硬件加速可以提高动画的流畅度。 动画在3.0以下的系统存在兼容性问题,特殊场景可能无法正常工作,需做好适配工作。

优秀的个人博客,低调大师

Android动画深入分析

动画分类 Android动画可以分3种:View动画,帧动画和属性动画;属性动画为API11的新特性,在低版本是无法直接使用属性动画的,但可以用nineoldAndroids来实现(但是本质还是viiew动画)。学习本篇内容主要掌握以下知识: 1,View动画以及自定义View动画。2,View动画的一些特殊使用场景。3,对属性动画做了一个全面的介绍。4,使用动画的一些注意事项。 view动画 View动画的四种变换效果对应着Animation的四个子类:TranslateAnimation(平移动画)、ScaleAnimation(缩放动画)、RotateAnimation(旋转动画)和AlphaAnimation(透明度动画),他们即可以用代码来动态创建也可以用XML来定义,推荐使用可读性更好的XML来定义。 <set>标签表示动画集合,对应AnimationSet类,它可以包含若干个动画,并且他的内部也可以嵌套其他动画集合。android:interpolator 表示动画集合所采用的插值器,插值器影响动画速度,比如非匀速动画就需要通过插值器来控制动画的播放过程。 android:shareInterpolator表示集合中的动画是否和集合共享同一个插值器,如果集合不指定插值器,那么子动画就需要单独指定所需的插值器或默认值。 Animation通过setAnimationListener方法可以给View动画添加过程监听。 自定义View动画只需要继承Animation这个抽象类,并重写initialize和applyTransformation方法,在initialize方法中做一些初始化工作,在applyTransformation中进行相应的矩形变换,很多时候需要采用Camera来简化矩形变换过程。 帧动画是顺序播放一组预先定义好的图片,类似电影播放;使用简单但容易引发OOM,尽量避免使用过多尺寸较大的图片。 view动画应用场景 LayoutAnimation作用于ViewGroup,为ViewGroup指定一个动画,当他的子元素出场的时候都会具有这种动画,ListView上用的多,LayoutAnimation也是一个View动画。 代码实现: <?xml version="1.0" encoding="utf-8"?> <layoutAnimation xmlns:android="http://schemas.android.com/apk/res/android" android:animationOrder="normal" android:delay="0.3" android:animation="@anim/anim_item"/> //--- animationOrder 表示子元素的动画的顺序,有三种选项: //normal(顺序显示)、reverse(逆序显示)和random(随机显示)。 <?xml version="1.0" encoding="utf-8"?> <set xmlns:android="http://schemas.android.com/apk/res/android" android:duration="300" android:shareInterpolator="true"> <alpha android:fromAlpha="0.0" android:toAlpha="1.0" /> <translate android:fromXDelta="300" android:toXDelta="0" /> </set>第一种,在布局中引用LayoutAnimation <ListView android:id="@+id/lv" android:layout_width="match_parent" android:layout_height="0dp" android:layout_weight="1" android:layoutAnimation="@anim/anim_layout"/>第二种,代码种使用 Animation animation = AnimationUtils.loadAnimation(this, R.anim.anim_item); LayoutAnimationController controller = new LayoutAnimationController(animation); controller.setDelay(0.5f); controller.setOrder(LayoutAnimationController.ORDER_NORMAL); listview.setLayoutAnimation(controller); 帧动画 逐帧动画(Frame-by-frame Animations)从字面上理解就是一帧挨着一帧的播放图片,类似于播放电影的效果。不同于View动画,Android系统提供了一个类AnimationDrawable来实现帧动画,帧动画比较简单,我们看一个例子就行了。 <?xml version="1.0" encoding="utf-8"?> <animation-list xmlns:android="http://schemas.android.com/apk/res/android" android:oneshot="false"> <item android:drawable="@mipmap/lottery_1" android:duration="200" /> // ...省略很多 <item android:drawable="@mipmap/lottery_6" android:duration="200" /> </animation-list> 然后 imageView.setImageResource(R.drawable.frame_anim); AnimationDrawable animationDrawable = (AnimationDrawable) imageView.getDrawable(); animationDrawable.start();//启动start,关闭stop 属性动画 属性动画是Android 3.0新加入(api 11)的功能,不同于之前的view动画(看过的都知道,view动画比如实现的位移其实不是真正的位置移动,只是实现了一些简单的视觉效果)。属性动画对之前的动画做了很大的拓展,毫不夸张的说,属性动画可以实现任何动画效果,因为在作用的对象是属性(对象),属性动画中有几个概念需要我们注意下, ValueAnimator、ObjectAnimator、AnimatorSet等。 属性动画作用属性 1,属性动画可以对任意对象的属性进行动画而不仅仅是View,属性动画默认间隔300ms,默认帧率10ms/帧。 2,看一段代码 <set android:ordering=["together" | "sequentially"]> <objectAnimator android:propertyName="string" android:duration="int" android:valueFrom="float | int | color" android:valueTo="float | int | color" android:startOffset="int" android:repeatCount="int" android:repeatMode=["repeat" | "reverse"] android:valueType=["intType" | "floatType"]/> <animator android:duration="int" android:valueFrom="float | int | color" android:valueTo="float | int | color" android:startOffset="int" android:repeatCount="int" android:repeatMode=["repeat" | "reverse"] android:valueType=["intType" | "floatType"]/> <set> ... </set> </set> <set> 它代表的就是一个AnimatorSet对象。里面有一个ordering属性,主要是指定动画的播放顺序。 <objectAnimator> 它表示一个ObjectAnimator对象。它里面有很多属性,我们重点需要了解的也是它。 android:propertyName -------属性名称,例如一个view对象的”alpha”和”backgroundColor”。 android:valueFrom --------变化开始值 android:valueTo ------------变化结束值 android:valueType -------变化值类型 ,它有两种值:intType和floatType,默认值floatType。 android:duration ---------持续时间 android:startOffset ---------动画开始延迟时间 android:repeatCount --------重复次数,-1表示无限重复,默认为-1 android:repeatMode重复模式,前提是android:repeatCount为-1 ,它有两种值:”reverse”和”repeat”,分别表示反向和顺序方向。 <animator> 它对应的就是ValueAnimator对象。它主要有以下属性。 android:valueFrom android:valueTo android:duration android:startOffset android:repeatCount android:repeatMode android:valueType 定义了一组动画之后,我们怎么让它运行起来呢? AnimatorSet set = (AnimatorSet) AnimatorInflater.loadAnimator(myContext, R.anim.property_animator); set.setTarget(myObject);//myObject表示作用的对象 set.start(); 插值器和估值器 时间插值器(TimeInterpolator)的作用是根据时间流逝的百分比来计算出当前属性值改变的百分比,系统预置的有LinearInterpolator(线性插值器:匀速动画),AccelerateDecelerateInterpolator(加速减速插值器:动画两头慢中间快),DecelerateInterpolator(减速插值器:动画越来越慢)。 注:这里的插值器很多,可以翻看我之前关于插值器的讲解。 估值器(TypeEvaluator)的作用是根据当前属性改变的百分比来计算改变后的属性值。系统预置有IntEvaluator 、FloatEvaluator 、ArgbEvaluator。 举个简单的例子吧 public class IntEvaluator implements TypeEvaluator<Integer> { public Integer evaluate(float fraction, Integer startValue, Integer endValue) { int startInt = startValue; return (int)(startInt + fraction * (endValue - startInt)); } }上述代码就是计算当前属性所占总共的百分百。 插值器和估值器除了系统提供之外,我们还可以自定义实现,自定义插值器需要实现Interpolator或者TimeInterpolator;自定义估值器算法需要实现TypeEvaluator。 属性动画监听器 属性动画监听器用于监听动画的播放过程,主要有两个接口:AnimatorUpdateListener和AnimatorListener 。 AnimatorListener public static interface AnimatorListener { void onAnimationStart(Animator animation); //动画开始 void onAnimationEnd(Animator animation); //动画结束 void onAnimationCancel(Animator animation); //动画取消 void onAnimationRepeat(Animator animation); //动画重复播放 }AnimatorUpdateListener public static interface AnimatorUpdateListener { void onAnimationUpdate(ValueAnimator animator); } 应用场景 这里我们先提一个问题:给Button加一个动画,让Button在2秒内将宽带从当前宽度增加到500dp,也行你会说,很简单啊,直接用view动画就可以实现,view动画不是有个缩放动画,但是你可以试试,view动画是不支持对宽度和高度进行改变的。Button继承自TextView,setWidth是对TextView的,所以直接对Button做setWidth是不行的。那么要怎么做呢? 针对上面的问题,官网api给出了如下的方案: 给你的对象加上get和set方法,如果你有权限的话 用一个类来包装原始对象,间接提高get和set方法 采用ValueAnimator,监听动画执行过程,实现属性的改变 有了上面的说明,我们大致明白了,要实现开始说的这个问题的效果,我们需要用一个间接的类来实现get和set方法或者自己实现一个ValueAnimator。 第一种,自己封装一个类实现get和set方法,这也是我们常用的,拓展性强 public class ViewWrapper { private View target; public ViewWrapper(View target) { this.target = target; } public int getWidth() { return target.getLayoutParams().width; } public void setWidth(int width) { target.getLayoutParams().width = width; target.requestLayout(); } } 第二种,采用ValueAnimator,监听动画过程。 private void startValueAnimator(final View target, final int start, final int end) { ValueAnimator valueAnimator = ValueAnimator.ofInt(1, 100); valueAnimator.addUpdateListener(new ValueAnimator.AnimatorUpdateListener() { private IntEvaluator mEvaluation = new IntEvaluator();//新建一个整形估值器作为临时变量 @Override public void onAnimationUpdate(ValueAnimator animation) { //获得当前动画的进度值 1~100之间 int currentValue = (int) animation.getAnimatedValue(); //获得当前进度占整个动画过程的比例,浮点型,0~1之间 float fraction = animation.getAnimatedFraction(); //调用估值器,通过比例计算出宽度 int targetWidth = mEvaluation.evaluate(fraction, start, end); target.getLayoutParams().width = targetWidth; //设置给作用的对象,刷新页面 target.requestLayout(); } }); } 属性动画的工作原理 属性动画的工作原理,主要是对作用的对象不断的调用get/set方法来改变初始值和最终值,然后set到动画属性上即可。然后通过消息机制(Handler(不过这里的Handler不是我们常用的handler,而是AnimationHandler,它其实本质就是一个Runable)和Looper去将动画执行出来),通过代码我们发现它调了JNI的代码,不过这个我们不用关心,我们直接看ObjectAnimator.start() private void start(boolean playBackwards) { if(Looper.myLooper() == null) { throw new AndroidRuntimeException("Animators may only be run on Looper threads"); } else { this.mPlayingBackwards = playBackwards; this.mCurrentIteration = 0; this.mPlayingState = 0; this.mStarted = true; this.mStartedDelay = false; ((ArrayList)sPendingAnimations.get()).add(this); if(this.mStartDelay == 0L) { this.setCurrentPlayTime(this.getCurrentPlayTime()); this.mPlayingState = 0; this.mRunning = true; if(this.mListeners != null) { ArrayList animationHandler = (ArrayList)this.mListeners.clone(); int numListeners = animationHandler.size(); for(int i = 0; i < numListeners; ++i) { ((AnimatorListener)animationHandler.get(i)).onAnimationStart(this); } } } ValueAnimator.AnimationHandler var5 = (ValueAnimator.AnimationHandler)sAnimationHandler.get(); if(var5 == null) { var5 = new ValueAnimator.AnimationHandler(null); sAnimationHandler.set(var5); } var5.sendEmptyMessage(0); } } private static final ThreadLocal<ArrayList<ValueAnimator>> sAnimations = new ThreadLocal() { protected ArrayList<ValueAnimator> initialValue() { return new ArrayList(); } }; private static final ThreadLocal<ArrayList<ValueAnimator>> sPendingAnimations = new ThreadLocal() { protected ArrayList<ValueAnimator> initialValue() { return new ArrayList(); } }; private static final ThreadLocal<ArrayList<ValueAnimator>> sDelayedAnims = new ThreadLocal() { protected ArrayList<ValueAnimator> initialValue() { return new ArrayList(); } }; private static final ThreadLocal<ArrayList<ValueAnimator>> sEndingAnims = new ThreadLocal() { protected ArrayList<ValueAnimator> initialValue() { return new ArrayList(); } }; private static final ThreadLocal<ArrayList<ValueAnimator>> sReadyAnims = new ThreadLocal() { protected ArrayList<ValueAnimator> initialValue() { return new ArrayList(); } }; 这里系统怎么计算每一帧的动画的呢,看看下面的代码 void animateValue(float fraction) { fraction = this.mInterpolator.getInterpolation(fraction); this.mCurrentFraction = fraction; int numValues = this.mValues.length; int numListeners; for(numListeners = 0; numListeners < numValues; ++numListeners) { this.mValues[numListeners].calculateValue(fraction); } if(this.mUpdateListeners != null) { numListeners = this.mUpdateListeners.size(); for(int i = 0; i < numListeners; ++i) { ((ValueAnimator.AnimatorUpdateListener)this.mUpdateListeners.get(i)).onAnimationUpdate(this); } } } 不过我们知道要改变动画,一定调用了get/set方法,那我们重点看下这相关的代码。这段代码在setProperty方法里面 public void setProperty(Property property) { if(this.mValues != null) { PropertyValuesHolder valuesHolder = this.mValues[0]; String oldName = valuesHolder.getPropertyName(); valuesHolder.setProperty(property); this.mValuesMap.remove(oldName); this.mValuesMap.put(this.mPropertyName, valuesHolder); } if(this.mProperty != null) { this.mPropertyName = property.getName(); } this.mProperty = property; this.mInitialized = false; }这里有一个PropertyValuesHolder,顾名思义这是一个操作数据的类,和我们的adapter的Holder差不多,该方法的get方法主要用到了反射。 private void setupValue(Object target, Keyframe kf) { if(this.mProperty != null) { kf.setValue(this.mProperty.get(target)); } try { if(this.mGetter == null) { Class e = target.getClass(); this.setupGetter(e); } kf.setValue(this.mGetter.invoke(target, new Object[0])); } catch (InvocationTargetException var4) { Log.e("PropertyValuesHolder", var4.toString()); } catch (IllegalAccessException var5) { Log.e("PropertyValuesHolder", var5.toString()); } } 代码就看到这,有兴趣的可以去看下源码 使用属性动画需要注意的事项 使用帧动画时,当图片数量较多且图片分辨率较大的时候容易出现 OOM,需注意,尽量避免使用帧动画。 使用无限循环的属性动画时,在Activity退出时即使停止,否则将导致Activity无法释放从而造成 内存泄露。 View动画是对View的影像做动画,并不是真正的改变了View的状态,因此有时候会出现动画完成后View无法隐藏(setVisibility(View.GONE)失效),这时候调用view.clearAnimation()清理View动画即可解决。 不要使用px,使用px会导致不同设备上有不同的效果。 View动画是对View的影像做动画,View的真实位置没有变动,也就导致点击View动画后的位置触摸事件不会响应,属性动画不存在这个问题。 使用动画的过程中,使用硬件加速可以提高动画的流畅度。 动画在3.0以下的系统存在兼容性问题,特殊场景可能无法正常工作,需做好适配工作。

资源下载

更多资源
Mario

Mario

马里奥是站在游戏界顶峰的超人气多面角色。马里奥靠吃蘑菇成长,特征是大鼻子、头戴帽子、身穿背带裤,还留着胡子。与他的双胞胎兄弟路易基一起,长年担任任天堂的招牌角色。

Nacos

Nacos

Nacos /nɑ:kəʊs/ 是 Dynamic Naming and Configuration Service 的首字母简称,一个易于构建 AI Agent 应用的动态服务发现、配置管理和AI智能体管理平台。Nacos 致力于帮助您发现、配置和管理微服务及AI智能体应用。Nacos 提供了一组简单易用的特性集,帮助您快速实现动态服务发现、服务配置、服务元数据、流量管理。Nacos 帮助您更敏捷和容易地构建、交付和管理微服务平台。

Rocky Linux

Rocky Linux

Rocky Linux(中文名:洛基)是由Gregory Kurtzer于2020年12月发起的企业级Linux发行版,作为CentOS稳定版停止维护后与RHEL(Red Hat Enterprise Linux)完全兼容的开源替代方案,由社区拥有并管理,支持x86_64、aarch64等架构。其通过重新编译RHEL源代码提供长期稳定性,采用模块化包装和SELinux安全架构,默认包含GNOME桌面环境及XFS文件系统,支持十年生命周期更新。

Sublime Text

Sublime Text

Sublime Text具有漂亮的用户界面和强大的功能,例如代码缩略图,Python的插件,代码段等。还可自定义键绑定,菜单和工具栏。Sublime Text 的主要功能包括:拼写检查,书签,完整的 Python API , Goto 功能,即时项目切换,多选择,多窗口等等。Sublime Text 是一个跨平台的编辑器,同时支持Windows、Linux、Mac OS X等操作系统。

用户登录
用户注册