c语言基础学习11_项目实战:IDE(集成开发环境)
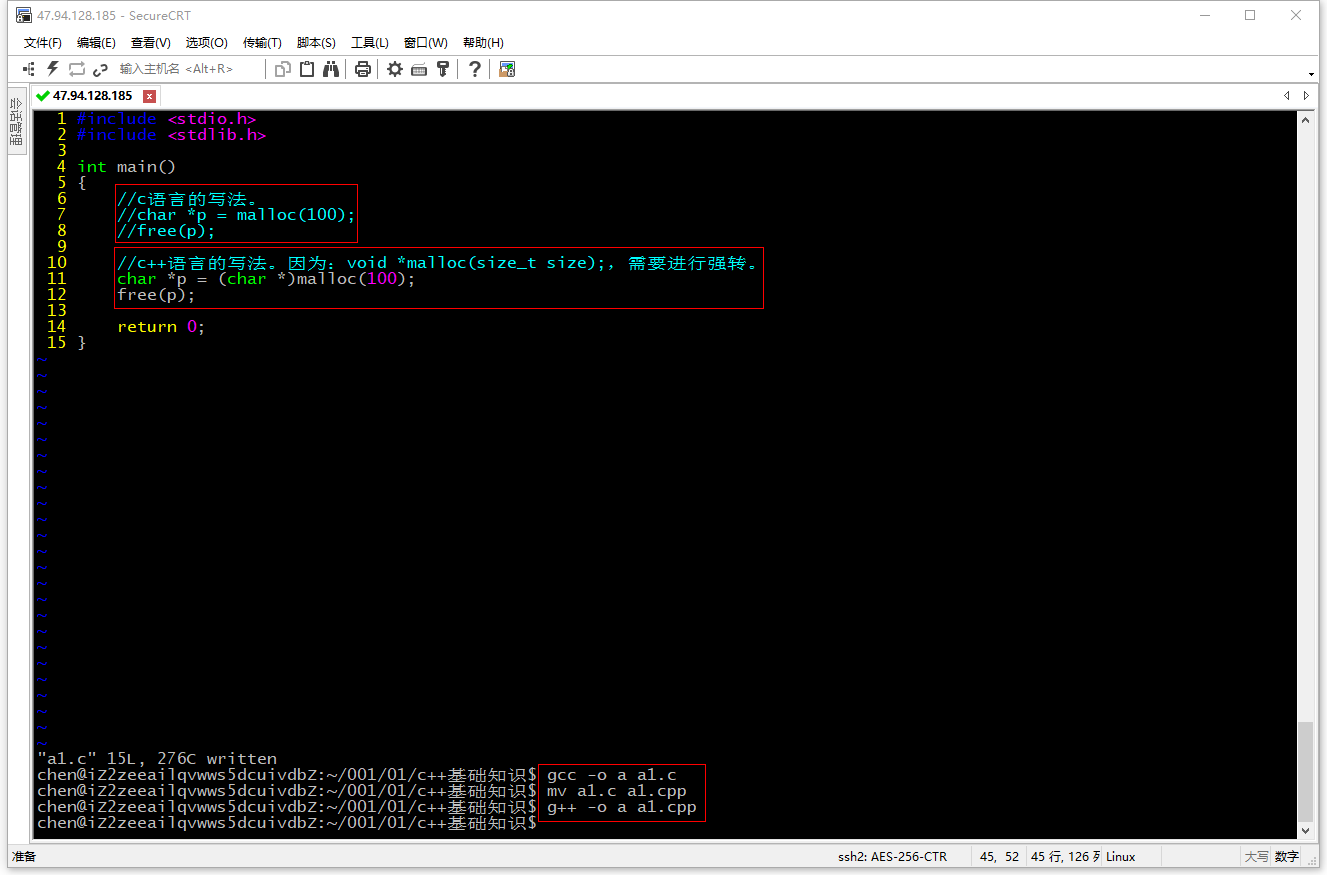
==========================================================================================================================================================涉及到的知识点有:一、c++基础知识01二、c++基础知识02 1、c语言中,如何在调用main函数之前就执行一段代码?三、类与结构的区别01四、类与结构的区别02五、类的继承概念 1、一个mfc程序的例子的核心代码: 2、破解MFC中按钮的例子。 3、MFC版的小小IDE: 4、MFC版的小小浏览器:==========================================================================================================================================================会用到两个界面工具:vs2017下的MFC和QT,它们都是基于图形的。所以有些知识我们还没有学习到。它们本身的构架就是用c++来完成的。 基础班的知识点实在是太少了,做项目的话储备还是不够的,所以下面的两天课程先把做项目中用到的基本的c++语法快速过一遍。=============================================================================一、c++基础知识01 c++语言可以兼容c语言的内存管理机制,但如果用malloc分配的内存就必须要free掉。 如果用new分配的就必须用delete掉,不能混合使用。--------------------------------------linux下示例代码如下: 1 #include <stdio.h> 2 #include <stdlib.h> 3 4 int main() 5 { 6 //c语言的写法。 7 //char *p = malloc(100); 8 //free(p); 9 10 //c++语言的写法。因为:void *malloc(size_t size);需要进行强转。 11 char *p = (char *)malloc(100); 12 free(p); 13 14 return 0; 15 } 如下图所示: -------------------------------------- 1 #include <stdio.h> 2 3 int main() 4 { 5 //在堆中分配1个char。 6 char *p = new char; 7 delete p; //释放一个char。 8 9 //在堆中分配100个char。 10 char *p1 = new char[100]; 11 delete p1; //释放第一个char。 12 delete []p1;//释放一个数组。 13 14 //在c++中。 15 const int a = 0; 16 int *p2 = (int *)&a; 17 *p2 = 100; 18 printf("%d\n", a); //0 通过指针改不了,是真的常量了。 19 20 return 0; 21 } --------------------------------------在c语言中,所有的函数都是全局的,所有的全局函数的名字是不能够相同的。但在c++中是可以的,那叫函数重载。 linux下示例代码如下: 1 #include <stdio.h> 2 3 //c语言中形参不能赋值,但c++中形参可以赋值。 4 void test01(int a = 10) //这叫形参的缺省值,调用该函数时如果没有写实参,那么形参就是默认值。 5 { 6 printf("%d\n", a); 7 } 8 9 //但是上面缺省值的写法会有一个问题如下:语法冲突:语法的二义性。 10 void test01(void) 11 { 12 printf("aaaa\n"); 13 } 14 15 //函数的重载。 16 void test(int a) 17 { 18 printf("%d\n", a); 19 } 20 21 void test(int a, int b) 22 { 23 printf("%d, %d\n", a, b); 24 } 25 26 int main() 27 { 28 test01(); //语法冲突:语法的二义性。 29 test(1); 30 test(4, 5); 31 32 return 0; 33 } =============================================================================二、c++基础知识02 在c++里面读写一个结构的成员的时候,往往更多时候是用成员函数去读写它。而不是直接通过初始化列表去初始化它。 c++不需要每次把struct写上的,即简化了c语言的某些地方,同时对结构做出了最大的改变是:在结构里面可以有函数。 c++中对象的通俗简单的解释为:结构一旦加载到了内存里面,它就成对象了,就是它变活了的意思。否则的话,它什么也不是。 构造函数是一个结构在内存中(堆栈均可)变成一个变量的时候,就会自动被调用的。--------------------------------------linux下示例代码如下: 1 include <stdio.h> 2 #include <string.h> 3 4 struct man 5 { 6 //成员变量。 7 char name[20]; 8 int age; 9 10 //成员函数。 11 //在c++里面读写一个结构的成员的时候,往往更多时候是用成员函数去读写它。而不是直接通过初始化列表去初始化它。 12 //c++不需要每次把struct写上的,即简化了c语言的某些地方,同时对结构做出了最大的改变是:在结构里面可以有函数。 13 void set_name(const char *p) 14 { 15 strcpy(name, p); 16 } 17 void set_age(int a) 18 { 19 age = a; 20 } 21 const char *get_name() 22 { 23 return name; 24 } 25 int get_age() 26 { 27 return age; 28 } 29 30 //函数没有返回值,名字和结构名字相同,叫构造函数。 31 //构造函数是一个结构在内存中(堆栈均可)变成一个变量的时候,就会自动被调用的。 32 man() 33 { 34 printf("hello cmj\n"); 35 } 36 //构造函数的重载。 37 man(const char *p) 38 { 39 strcpy(name, p); 40 } 41 //构造函数的重载+缺省值。 42 man(const char *p, int a = 10) 43 { 44 age = a; 45 strcpy(name, p); 46 } 47 48 //析构函数:没有参数,没有返回值。 49 ~man() 50 { 51 printf("~man\n"); 52 } 53 }; 54 55 int main() 56 { 57 /* 58 //c语言的写法。 59 struct man m = { 0 }; 60 strcpy(m.name, "张三"); 61 m.age = 20; 62 63 //c++的写法。 64 man = m = { 0 }; 65 strcpy(m.name, "张三"); 66 m.age = 20; 67 */ 68 69 //m放在栈里面。 70 //这里调用的是没有形参的构造函数。 71 man m;//执行完这句后,结构成了栈里面的一个变量了。 72 m.set_name("张三"); 73 m.set_age(30); 74 printf("%s, %d\n", m.get_name(), m.get_age()); 75 76 //m1放在堆里面。 77 man *m1 = new man;//执行完这句后,结构成了堆里面的一个变量了。 78 m1->set_name("李四"); 79 m1->set_age(40); 80 printf("%s, %d\n", m1->get_name(), m1->get_age()); 81 delete m1; 82 83 //m2放在栈里面。 84 //在定义的同时初始化值。 85 //明确的调用形参类型为const char *的构造函数。 86 //man m2("王二麻子"); 87 //printf("%s\n", m2.get_name()); 88 89 //m3放在栈里面。 90 //在定义的同时初始化值。 91 //构造函数+缺省值。 92 man m3("程五", 50); 93 printf("%s, %d\n", m3.get_name(), m3.get_age()); 94 95 //m4放在堆里面。 96 //在定义的同时初始化值。 97 man *m4 = new man("张六", 60); 98 printf("%s, %d\n", m4->get_name(), m4->get_age()); 99 delete m4; 100 101 return 0; 102 } 输出结果为: chen@iZ2zeeailqvwws5dcuivdbZ:~/001/01/c++基础知识$ g++ -o a a4.cpp chen@iZ2zeeailqvwws5dcuivdbZ:~/001/01/c++基础知识$ a hello cmj 张三, 30 hello cmj 李四, 40 ~man 程五, 50 张六, 60 ~man ~man ~man -----------------------------------------------------------------------------构造函数是一个结构在内存中(堆栈均可)变成一个变量的时候,就会自动被调用的。 如果结构在内存中销毁的时候,则自动调用析构函数。 注意:构造函数可以有多个(因为有参数),但析构函数只能有一个(因为没有参数),而且没有参数。 再一个例子如下:-----------------------------------------------------------------------------linux下示例代码如下: 1 #include <stdio.h> 2 3 struct A 4 { 5 int age; 6 7 A(int a) 8 { 9 age = a; 10 printf("A, %d\n", age); 11 } 12 ~A() 13 { 14 printf("~A, %d\n", age); 15 } 16 }; 17 18 int main() 19 { 20 A a(10); //自动变量,栈变量,所有的自动变量的生命周期就是变量所属的大括号。 21 22 A *p = new A(20); //堆变量 23 delete p; //销毁。 24 25 return 0; 26 } //自动变量销毁。 输出结果为: chen@iZ2zeeailqvwws5dcuivdbZ:~/001/01/c++基础知识$ g++ -o a a5.cpp chen@iZ2zeeailqvwws5dcuivdbZ:~/001/01/c++基础知识$ a A, 10 A, 20 ~A, 20 ~A, 10 =============================================================================c语言中,如何在调用main函数之前就执行一段代码?答:这一点在c语言好像不容易突破哦! 在c++下就是很容易解决的。此时,程序的入口成了某一个构造函数了,如下代码所示:虽然我们一般不这么写,但是在c++中我们确实可以写出这样的程序来。 实际上我们用MFC去写程序时,我们从来就没有操作过main函数。它的函数的入口往往就是:某一类的构造函数或者是某一个类指定的成员函数。在c++有些构架里面确实是程序入口不在main,此时的main有它的独特用处。--------------------------------------linux下示例代码如下: 1 #include <stdio.h> 2 3 struct A 4 { 5 A() 6 { 7 int a; 8 scanf("%d", &a); 9 int b; 10 scanf("%d", &b); 11 printf("%d\n", a + b); 12 } 13 }; 14 15 A a; 16 17 int main() 18 { 19 return 0; 20 } 输出结果为: chen@iZ2zeeailqvwws5dcuivdbZ:~/001/01/c++基础知识$ g++ -o a a6.cpp chen@iZ2zeeailqvwws5dcuivdbZ:~/001/01/c++基础知识$ a 45 89 134 =============================================================================其实c++的关键字要远远多于c语言,但c++的难点在于面向对象这块。 c++中的this指针使用说明:--------------------------------------linux下示例代码如下: 1 #include <stdio.h> 2 3 struct A 4 { 5 //无参构造函数。 6 A() 7 { 8 } 9 10 /* 11 int age; 12 void set_age(int a) 13 { 14 age = a; 15 } 16 */ 17 18 int age; 19 void set_age(int age) 20 { 21 //解决类变量(结构变量)和参数变量同名的问题。 22 //age = age; //不能这么写。 23 this->age = age; //this是c++的关键字,代表对象struct A{...};出现在内存里面时的地址。 24 } 25 //看下this是什么。 26 struct A *get_addr() 27 { 28 return this; 29 } 30 }; 31 32 int main() 33 { 34 //a出现在栈中时: 35 A a; //在c++中,此时a是一个对象。 36 printf("%p, %p\n", &a, a.get_addr()); //0x7ffe088cdb10, 0x7ffe088cdb10 37 38 //a出现在堆中时: 39 A *p = new A; 40 printf("%p, %p\n", p, p->get_addr()); //0x82b030, 0x82b030 41 delete p; 42 43 return 0; 44 } =============================================================================c++结构中的任何成员是什么值,我们是可以提前控制的,做到让任何使用该结构的人,你不管怎么用,都不会出错,代码更安全!这是c++语言的特别大的魅力所在之一。--------------------------------------对于c++而言,它总是可以在内存中维护一个你需要大小的合理的一块内存,而用c语言来实现的话,就比较复杂。。--------------------------------------在C++里面,结构所有的成员都是公有的,就是外部可以访问的。但是class里面所有的成员都是私有的,外部不能访问。(私有的意思是:只能在类的内部去用。)public: 公有成员private: 私有成员--------------------------------------三、类与结构的区别01 linux下示例代码如下: 1 #include <stdio.h> 2 #include <string.h> 3 4 //c++中一般不用结构struct, 5 //而是用类class。其实类class就是c语言结构struct的扩展。 6 //其实是java向c++学习的,java在发明的时候,就是用c++这种语言套过去的,java把c++中复杂的东西去掉:比如:指针、多重继承等等。 7 8 //struct man 9 class man 10 { 11 public: 12 char *name; 13 //int age; 14 15 //c++小技巧:用构造函数+无参数,来使name为空。 16 man() 17 { 18 name = NULL; 19 } 20 21 //c++中这样用结构: 22 void set_name(const char *name) 23 { 24 //如果name不是空,就销毁。 25 if (name) 26 { 27 delete []this->name; 28 } 29 30 //如果name为空,就继续执行下面的: 31 //动态的根据参数的大小来得到一块堆内存来使用。 32 this->name = new char[strlen(name) + 1]; //堆内存变量。 33 strcpy(this->name, name); 34 } 35 36 //如果还没有set_name呢,就去get_name,也会出现问题:需要加一个判断: 37 const char *get_name() 38 { 39 if (name) 40 { 41 return name; 42 } 43 else 44 { 45 return "没有东东"; 46 } 47 } 48 49 int get_age() 50 { 51 return age; 52 } 53 54 //在main中我们什么也不去调用的时候,当自动变量生命周期结束时,name为空,但析构函数也会执行,有问题:需要加一个判断。 55 ~man() 56 { 57 if (name) 58 { 59 delete []name; 60 } 61 } 62 63 private: 64 int age; 65 }; 66 67 int main() 68 { 69 /* 70 //c语言中会这样用结构: 71 struct man m; 72 m.name = malloc(20); 73 */ 74 75 //m是自动变量,栈变量,所有的自动变量的生命周期就是变量所属的大括号。 76 man m; 77 m.set_name("cmjcmjcmjcmjcmjcmj"); 78 m.set_name("a"); 79 printf("%s\n", m.get_name()); 80 81 //m1是堆变量。但m1同时又指向另一块堆的地址。 82 man *m1 = new man; 83 m1->set_name("hahahaha"); 84 m1->set_name("aaa"); 85 printf("%s\n", m1->get_name()); 86 delete m1; 87 88 //由以上得出结论:面向对象编程的好处:m和m1在里面干什么,对于外面的使用者来说是不用关心的。外面的使用者只需知道我调用哪个函数就可以了。 89 //如果在一个团队里面去工作,假如说:我给你提供一个类,你在使用这个类的时候出现问题了,找我,让我去修改下,而对于你而言不需要在意,你只管调用就好。也即你做好你自己的工作就行。 90 //这样分工就更明确了、各司其职。这就是面向对象的一个案例叫封装。即:把好多东西封装在某一个结构里面去,然后我们在这个结构的外面去用它。并不关心结构里面做了什么事情。 91 92 return 0; 93 } -----------------------------------------------------------------------------四、类与结构的区别02 linux下示例代码如下: 1 #include <stdio.h> 2 #include <string.h> 3 4 class man 5 { 6 //c++中通过以下这种方式来初始化成员的。不会像c语言那样通过大括号来赋值的。 7 //c++这样做的好处是:在类的外部不用去担心它的初始化了,因为在类的内部已经解决问题了。 8 private: 9 char *name; 10 int age; 11 12 public: 13 man() 14 { 15 name = NULL; 16 age = 0; 17 } 18 ~man() 19 { 20 if (name) 21 delete []name; 22 } 23 const char *get_name() 24 { 25 return name; 26 } 27 int get_age() 28 { 29 return age; 30 } 31 void set_name(const char *name) 32 { 33 //name使用private的好处。可以使我们的类完善,有保护,可控。对于c语言来说是做不到的。 34 if (strcmp(name, "难听的名字") == 0) 35 return; 36 37 if (this->name) 38 delete []this->name; 39 this->name = new char[strlen(name) + 1]; 40 strcpy(this->name, name); 41 } 42 void set_age(int age) 43 { 44 //age使用private的好处。可以使我们的类完善,有保护,可控。对于c语言来说是做不到的。 45 if (age >= 0 && age <=200) 46 this->age = age; 47 } 48 }; 49 50 int main() 51 { 52 man m; 53 //m.set_name("黑泽"); 54 //m.set_age(25); 55 56 //用户自己输入: 57 char name[100]; 58 scanf("%s", name); 59 int age = 0; 60 scanf("%d", &age); 61 62 m.set_name(name); 63 m.set_age(age); 64 65 printf("%s, %d\n", m.get_name(), m.get_age()); 66 67 return 0; 68 } =============================================================================五、类的继承概念 类为什么要继承呢?是有关系的类才去继承,没有任何关系的类去继承是没有意义的。通过继承,可以让我的子类自动拥有一些父类的一些功能,子类的功能一定要和父类的功能有关联才行(即要有很强的关联性)。 所以呢,所谓的面向对象的编程,在很多时候,都在设计封装这些类,怎么设计和封装才更加合理是很重要的。 面向对象就是说我已经把工具做好了,你只管会用且用的巧妙就行;面向过程就是所有的工具都是我们自己动手去做。=============================================================================1、一个mfc程序的例子的核心代码: ...... ...... ...... void CMFCApplication1Dlg::OnBnClickedButton2() { // TODO: 在此添加控件通知处理程序代码 UpdateData(TRUE);//把用户在控件里面输入的值和变量对应起来。 c = a + b; UpdateData(FALSE);//把变量c的值显示在控件里面。 } void CMFCApplication1Dlg::OnBnClickedButton3() { // TODO: 在此添加控件通知处理程序代码 UpdateData(TRUE);//把用户在控件里面输入的值和变量对应起来。 c = a - b; UpdateData(FALSE);//把变量c的值显示在控件里面。 } void CMFCApplication1Dlg::OnBnClickedButton5() { // TODO: 在此添加控件通知处理程序代码 UpdateData(TRUE);//把用户在控件里面输入的值和变量对应起来。 c = a / b; UpdateData(FALSE);//把变量c的值显示在控件里面。 } void CMFCApplication1Dlg::OnBnClickedButton4() { // TODO: 在此添加控件通知处理程序代码 UpdateData(TRUE);//把用户在控件里面输入的值和变量对应起来。 c = a * b; UpdateData(FALSE);//把变量c的值显示在控件里面。 } ...... ...... ...... =============================================================================2、破解MFC中按钮的例子。 windows的窗口都有句柄,窗口里的控件也一样有句柄。所以要先得到句柄才行。 打开vs2017下Spy++的方法:工具(T)-->Spy++(+)-->查找窗口-->查找程序工具-->获得窗口句柄。 应用:可以打开windows下的一些灰色按钮。--------------------------------------vs2017下的示例代码: 1 #include <Windows.h> 2 3 int main() 4 { 5 Sleep(3000); 6 //发送一个鼠标左键按下消息。 7 SendMessage((HWND)0x001C07C4, WM_LBUTTONDOWN, 0, 0);//给指定的句柄发送消息。 8 SendMessage((HWND)0x001C07C4, WM_LBUTTONUP, 0, 0); 9 return 0; 10 } =============================================================================面相对象的好处:就是说我们一个大的应用程序是一个大的积木作品,有许多的小积木组成,我们可以做自己的小积木来用,也可以用别人的小积木来组建积木作品。再比如:做cpu不关心硬盘怎么做,做鼠标不关心电源怎么做,各司其职,最后组合成一台电脑。 3、MFC版的小小IDE:--------------------------------------vs2017下核心代码如下: ...... ...... ...... // 如果向对话框添加最小化按钮,则需要下面的代码 // 来绘制该图标。 对于使用文档/视图模型的 MFC 应用程序, // 这将由框架自动完成。 void CideDlg::OnPaint()//当主窗口的大小发生改变的时候,会调用你OnPaint函数。 { if (IsIconic()) { CPaintDC dc(this); // 用于绘制的设备上下文 SendMessage(WM_ICONERASEBKGND, reinterpret_cast<WPARAM>(dc.GetSafeHdc()), 0); // 使图标在工作区矩形中居中 int cxIcon = GetSystemMetrics(SM_CXICON); int cyIcon = GetSystemMetrics(SM_CYICON); CRect rect; GetClientRect(&rect); int x = (rect.Width() - cxIcon + 1) / 2; int y = (rect.Height() - cyIcon + 1) / 2; // 绘制图标 dc.DrawIcon(x, y, m_hIcon); } else { CRect rect;//CRect是MFC提供的一个类,功能是实现一个矩形结构。 GetClientRect(&rect);//得到客户区窗口的大小。 edit1.SetWindowPos(NULL, 0, 0, rect.Width(), rect.Height(), 0);//实现客户区窗口大小和主窗口大小一样大。 CDialog::OnPaint(); } } ...... ...... ...... //菜单中的退出功能。 void CideDlg::On32774()//菜单中退出的对应的执行函数。 { // TODO: 在此添加命令处理程序代码 CDialog::OnCancel(); } //菜单中的关于功能。 void CideDlg::On32778() { // TODO: 在此添加命令处理程序代码 CAboutDlg dlgAbout; dlgAbout.DoModal();//这就是菜单中弹出关于对话框的代码。 } //菜单中的打开功能。 void CideDlg::On32772() { // TODO: 在此添加命令处理程序代码 //CFileDialog cf(FALSE);//这是MFC提供的一个类,功能是:弹出一个文件保存对话框。 CFileDialog cf(TRUE);//这是MFC提供的一个类,功能是:弹出一个文件打开对话框。 //判断一下:如果用户按的是确定按钮,才执行下面的显示文件路径和文件名的代码+显示文件内容。如果用户按的是取消按钮,程序什么也不做。 if (cf.DoModal() == IDOK)//弹出对话框。 { CString cs; //这是MFC提供的一个字符串类,因为c语言并没有字符串这个数据类型,操作起来不方便,需要用char *来操作。 //于是对于c++而言,它提供了类似一个像java的String类的CString类,有很多功能。 cs = cf.GetPathName();//得到用户所选文件的文件名。 //MessageBox(cs);//显示用户所选的文件的文件路径和文件名,即该句的意思是:弹出一个对话框,该对话框用于显示文件路径和文件名。 //注意:CString在宽码配置下是一个UCS2的编码格式的字符串。 //因为中文版的windows里面的文件是GBK编码的,所以需要把宽码格式的字符串转化为GBK格式的字符串。所以微软还提供了一个字符串类叫做:CStringA类。 //CStringA类可以放GBK编码格式的字符串。 CStringA file_name(cs);//调用CStringA的构造函数,将文件名的宽码字符串转化为ASCII。因为GBK的编码是基于ASCII的。 filename = file_name;//可以在其他函数中得到用户保存的文件名。因为filename是在类里面定义的,只要这个类存在,该变量就不会消失。 //显示文件内容。 //FILE *fopen(const char *path, const char *mode); FILE *p = fopen(file_name.GetBuffer(), "rb");//将CStringA类型转化为const char *类型。因为fopen是c语言函数,CStringA是c++的类。 CStringA content;//存放文件内容。 if (p) { while (!feof(p)) { char buf[1024] = { 0 }; fgets(buf, sizeof(buf), p);//读取一行的字符串。 content += buf; //字符串追加。因为content实际上是c++的一个类,不是字符串,之所以这样写为了我们操作简单。 //content += "\r\n"; } fclose(p); //注意:我们做的窗口里面显示使用的是宽码编码的。所以需要把读出来的ASCII文件放到content中去,然后通过这个CString类用宽码显示出来。 CString con; con = content;//把ASCII转化为宽码。 //设置edit1的内容。 edit1.SetWindowText(con); } } } //菜单中的保存功能。 void CideDlg::On32773() { // TODO: 在此添加命令处理程序代码 CFileDialog cf(FALSE);//这是MFC提供的一个类,功能是:弹出一个文件保存对话框。 //CFileDialog cf(TRUE);//这是MFC提供的一个类,功能是:弹出一个文件打开对话框。 //判断一下:如果用户按的是确定按钮,才执行下面的显示文件路径和文件名的代码+显示文件内容。如果用户按的是取消按钮,程序什么也不做。 if (cf.DoModal() == IDOK)//弹出对话框。 { CString cs; //这是MFC提供的一个字符串类,因为c语言并没有字符串这个数据类型,操作起来不方便,需要用char *来操作。 //于是对于c++而言,它提供了类似一个像java的String类的CString类,有很多功能。 cs = cf.GetPathName();//得到用户所选文件的文件名。 //MessageBox(cs);//显示用户所选的文件的文件路径和文件名,即该句的意思是:弹出一个对话框,该对话框用于显示文件路径和文件名。 CStringA file_name(cs);//调用CStringA的构造函数,将文件名的宽码字符串转化为ASCII。因为GBK的编码是基于ASCII的。 filename = file_name;//可以在其他函数中得到用户保存的文件名。因为filename是在类里面定义的,只要这个类存在,该变量就不会消失。 CString con; //得到用户在窗口输入的具体的数据。即:将用户在edit1中输入的内容放入变量con。 edit1.GetWindowText(con); //该内容是宽码,需要转化成ASCII字符串。 CStringA content(con); FILE *p = fopen(file_name.GetBuffer(), "w"); fputs(content.GetBuffer(), p); fclose(p); } } //菜单中的新建功能。 void CideDlg::On32771() { // TODO: 在此添加命令处理程序代码 CString cs; //设置edit1的内容。 edit1.SetWindowText(cs); } //菜单中的拷贝功能。 void CideDlg::On32775() { // TODO: 在此添加命令处理程序代码 edit1.Copy(); } //菜单中的粘贴功能。 void CideDlg::On32777() { // TODO: 在此添加命令处理程序代码 edit1.Paste(); } //菜单中的剪切功能。 void CideDlg::On32776() { // TODO: 在此添加命令处理程序代码 edit1.Cut(); } //菜单中的编译功能。 void CideDlg::On32779() { // TODO: 在此添加命令处理程序代码 //这里不能知道用户保存的文件名是什么。因为我们保存的代码中所有的变量都是局部自动变量,只要保存完成后,我们就不知道用户保存的是一个什么的文件名了。 //如何解决呢?答:我们完全可以把filename定义在类的变量里面去,也就是说我们可以把filename定义在ideDIg.h里面去。 //然后每次打开文件或者保存文件时,来一个赋值操作:filename = file_name;//可以在其他函数中得到用户保存的文件名。 //因为filename是在类里面定义的,只要这个类存在,该变量就不会消失。 //定义一个字符串: //写死编译生成的文件的文件名 //CStringA cmd = "gcc -o C:\\Users\\Bruce\\Desktop\\haha\\a.exe " + filename; //把编译生成的文件的文件名随源文件变化而变化。 CStringA destname = filename; destname.Replace(".c", ".exe"); //把.c替换成.exe。 CStringA cmd = "gcc -o " + destname + " " + filename; //先测试看一下字符串是个什么东西。 //MessageBoxA(NULL, cmd, "", MB_OK); system(cmd.GetBuffer()); } //菜单中的运行功能。 void CideDlg::On32780() { // TODO: 在此添加命令处理程序代码 //把编译生成的文件的文件名随源文件变化而变化。 CStringA destname = filename; destname.Replace(".c", ".exe"); //把.c替换成.exe。 system(destname.GetBuffer()); } =============================================================================4、MFC版的小小浏览器: 现代工业社会,想快速的、高效的做一个产品,不需要从头到尾都要自己做。 面向对象:利用已有的功能,做出自己的功能。--------------------------------------vs2017下核心代码如下: 需要调加一个控件,需要用到windows的一个内建功能。操作如下:在面板上右键-->插入 ActiveX控件(X)-->Microsoft Web Browser ...... ...... ...... void Cie1Dlg::OnBnClickedOk() { // TODO: 在此添加控件通知处理程序代码 //CDialog::OnOK(); UpdateData(TRUE);//把用户在控件里面输入的值和变量对应起来。 web1.Navigate(text1, NULL, NULL, NULL, NULL); } void Cie1Dlg::OnBnClickedButton1() { // TODO: 在此添加控件通知处理程序代码 web1.GoBack(); } void Cie1Dlg::OnBnClickedButton2() { // TODO: 在此添加控件通知处理程序代码 web1.GoSearch(); } =============================================================================我的GitHub地址: https://github.com/heizemingjun 我的博客园地址: http://www.cnblogs.com/chenmingjun 我的蚂蚁笔记博客地址: http://blog.leanote.com/chenmingjun Copyright ©2018 黑泽明军 【转载文章务必保留出处和署名,谢谢!】