首页 文章 精选 留言 我的

精选列表

搜索[源码阅读],共10000篇文章
优秀的个人博客,低调大师

Ant Design 源码仓库被删除

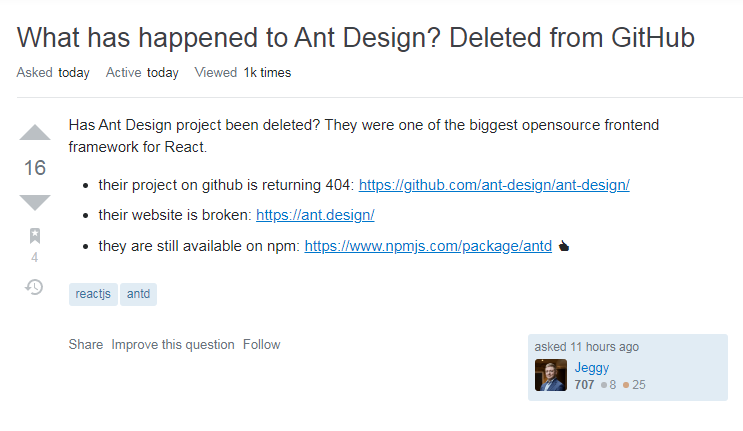
今天早些时候,stackoverflow 上有用户发现Ant Design 项目在 GitHub 上的仓库地址无法访问,疑似被官方删除。经过 Ant Design 官方的初步调查,认定此次事件是受到黑客攻击导致。 Ant Design 是一套企业级 UI 设计语言和 React 组件库,在社区中拥有庞大的用户群体。名为 Jeggy 的社区用户最早发现 Ant Design 的 GitHub 仓库地址返回 404,官网也暂时损坏,但使用 npm 时一切正常。 而 Ant Design 方面对于 GitHub 仓库被删表示未事先收到任何通知,团队与 GitHub 方面积极沟通以了解具体情况。 经调查,Ant Design 官方初步认定此次删库事件是由于项目官方的 GitHub 账号被黑客入侵导致。 目前Ant Design 官方正努力恢复项目的 GitHub 仓库。而 Ant Design 在Gitee 上的仓库仍可以正常访问。

优秀的个人博客,低调大师

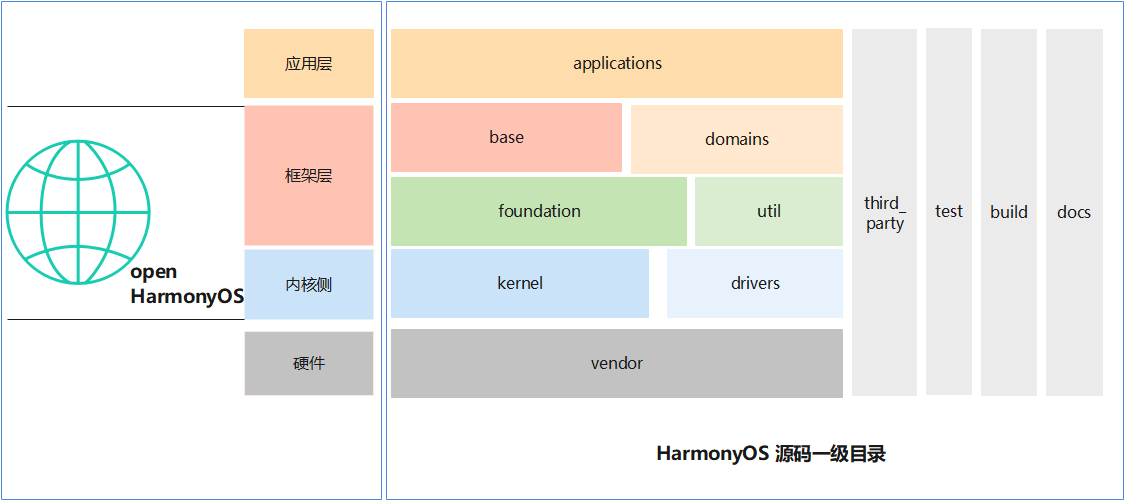
HarmonyOS应用开发常见示例源码

Http封装库:https://gitee.com/weimin20171202/HiHttp Json库:https://gitee.com/weimin20171202/hijson 常见组件使用的示例:https://gitee.com/weimin20171202/HarmonyComponent 简单天气app:https://gitee.com/weimin20171202/WeatherApp 一个简单的图片选择:https://gitee.com/weimin20171202/PictureSelect 简单画板:https://gitee.com/weimin20171202/DrawBoard 简单的页面跳转:https://gitee.com/weimin20171202/page-jump http请求和html文本处理:https://gitee.com/weimin20171202/jsoup 在线电子词典:https://gitee.com/weimin20171202/HiEdict (存在问题已经解决: java.io.IOException:cleartext Http traffic to www.iciba.com not permitted 在config.json中增加: "deviceConfig": { "default": { "network": { "usesCleartext":true } } }, https://developer.huawei.com/consumer/cn/forum/topic/0204422289062850612?fid=0101303901040230869)

优秀的个人博客,低调大师

Atomikos事务恢复流程源码解析

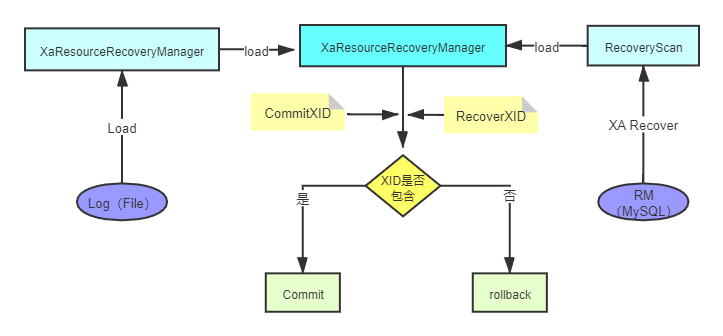
Atomikos-XA事务恢复 说事务恢复流程之前,我们来讨论下,会啥会出现事务恢复?XA二阶段提交协议不是强一致性的吗?要解答这个问题,我们就要来看看XA二阶段协议有什么问题? 问题一 :单点故障 由于协调者的重要性,一旦协调者TM发生故障。参与者RM会一直阻塞下去。尤其在第二阶段,协调者发生故障,那么所有的参与者还都处于锁定事务资源的状态中,而无法继续完成事务操作。(如果是协调者挂掉,可以重新选举一个协调者,但是无法解决因为协调者宕机导致的参与者处于阻塞状态的问题) 问题二 :数据不一致 数据不一致。在二阶段提交的阶段二中,当协调者向参与者发送commit请求之后,发生了局部网络异常或者在发送commit请求过程中协调者发生了故障,这回导致只有一部分参与者接受到了commit请求。而在这部分参与者接到commit请求之后就会执行commit操作。但是其他部分未接到commit请求的机器则无法执行事务提交。于是整个分布式系统便出现了数据不一致性的现象。 如何解决? 解决的方案简单,就是我们在事务的操作的每一步,我们都需要对事务状态的日志进行人为的记录,我们可以把日志记录存储在我们想存储的地方,可以是本地存储,也可以中心化的存储。atomikos的开源版本,我们之前也分析了,它是使用内存 + file的方式,存储在本地,这样的话,如果在一个集群系统里面,如果有节点宕机,日志又存储在本地,所以事务不能及时的恢复(需要重启服务)。 Atomikos 多场景下事务恢复。 Atomikos 提供了二种方式,来应对不同场景下的异常情况。 场景一: 服务节点不宕机,因为其他的原因,产生需要事务恢复的情况。 这个时候才要定时任务进行恢复。 具体的代码 com.atomikos.icatch.imp.TransactionServiceImp.init() 方法,会初始化一个定时任务,进行事务的恢复。 public synchronized void init ( Properties properties ) throws SysException { shutdownInProgress_ = false; control_ = new com.atomikos.icatch.admin.imp.LogControlImp ( (AdminLog) this.recoveryLog ); ConfigProperties configProperties = new ConfigProperties(properties); long recoveryDelay = configProperties.getRecoveryDelay(); recoveryTimer = new PooledAlarmTimer(recoveryDelay); recoveryTimer.addAlarmTimerListener(new AlarmTimerListener() { @Override public void alarm(AlarmTimer timer) { //进行事务恢复 performRecovery(); } }); TaskManager.SINGLETON.executeTask(recoveryTimer); initialized_ = true; } 最终会进入com.atomikos.datasource.xa.XATransactionalResource.recover() 方法。 public void recover() { XaResourceRecoveryManager xaResourceRecoveryManager = XaResourceRecoveryManager.getInstance(); if (xaResourceRecoveryManager != null) { //null for LogCloud recovery try { xaResourceRecoveryManager.recover(getXAResource()); } catch (Exception e) { refreshXAResource(); //cf case 156968 } } } 场景二: 当服务节点宕机重启动过程中进行事务的恢复。具体实现在com.atomikos.datasource.xa.XATransactionalResource.setRecoveryService()方法里面 @Override public void setRecoveryService ( RecoveryService recoveryService ) throws ResourceException { if ( recoveryService != null ) { if ( LOGGER.isTraceEnabled() ) LOGGER.logTrace ( "Installing recovery service on resource " + getName () ); this.branchIdentifier=recoveryService.getName(); //进行事务恢复 recover(); } } com.atomikos.datasource.xa.XATransactionalResource.recover() 流程详解。 主代码: public void recover(XAResource xaResource) throws XAException { // 根据XA recovery 协议获取 xid List<XID> xidsToRecover = retrievePreparedXidsFromXaResource(xaResource); Collection<XID> xidsToCommit; try { // xid 与日志记录的xid进行匹配 xidsToCommit = retrieveExpiredCommittingXidsFromLog(); for (XID xid : xidsToRecover) { if (xidsToCommit.contains(xid)) { //执行 XA commit xid 进行提交 replayCommit(xid, xaResource); } else { attemptPresumedAbort(xid, xaResource); } } } catch (LogException couldNotRetrieveCommittingXids) { LOGGER.logWarning("Transient error while recovering - will retry later...", couldNotRetrieveCommittingXids); } } 我们来看一下如何根据 XA recovery 协议获取RM端存储的xid。 进入方法 retrievePreparedXidsFromXaResource(xaResource), 最后进入 com.atomikos.datasource.xa.RecoveryScan.recoverXids()方法。 public static List<XID> recoverXids(XAResource xaResource, XidSelector selector) throws XAException { List<XID> ret = new ArrayList<XID>(); boolean done = false; int flags = XAResource.TMSTARTRSCAN; Xid[] xidsFromLastScan = null; List<XID> allRecoveredXidsSoFar = new ArrayList<XID>(); do { xidsFromLastScan = xaResource.recover(flags); flags = XAResource.TMNOFLAGS; done = (xidsFromLastScan == null || xidsFromLastScan.length == 0); if (!done) { // TEMPTATIVELY SET done TO TRUE // TO TOLERATE ORACLE 8.1.7 INFINITE // LOOP (ALWAYS RETURNS SAME RECOVER // SET). IF A NEW SET OF XIDS IS RETURNED // THEN done WILL BE RESET TO FALSE done = true; for ( int i = 0; i < xidsFromLastScan.length; i++ ) { XID xid = new XID ( xidsFromLastScan[i] ); // our own XID implements equals and hashCode properly if (!allRecoveredXidsSoFar.contains(xid)) { // a new xid is returned -> we can not be in a recovery loop -> go on allRecoveredXidsSoFar.add(xid); done = false; if (selector.selects(xid)) { ret.add(xid); } } } } } while (!done); return ret; } 我们重点关注xidsFromLastScan = xaResource.recover(flags); 这个方法,如果我们使用MySQL,那么久会进入 MysqlXAConnection.recover()方法。执行 XA recovery xid 语句来获取 xid。 protected static Xid[] recover(Connection c, int flag) throws XAException { /* * The XA RECOVER statement returns information for those XA transactions on the MySQL server that are in the PREPARED state. (See Section 13.4.7.2, ???XA * Transaction States???.) The output includes a row for each such XA transaction on the server, regardless of which client started it. * * XA RECOVER output rows look like this (for an example xid value consisting of the parts 'abc', 'def', and 7): * * mysql> XA RECOVER; * +----------+--------------+--------------+--------+ * | formatID | gtrid_length | bqual_length | data | * +----------+--------------+--------------+--------+ * | 7 | 3 | 3 | abcdef | * +----------+--------------+--------------+--------+ * * The output columns have the following meanings: * * formatID is the formatID part of the transaction xid * gtrid_length is the length in bytes of the gtrid part of the xid * bqual_length is the length in bytes of the bqual part of the xid * data is the concatenation of the gtrid and bqual parts of the xid */ boolean startRscan = ((flag & TMSTARTRSCAN) > 0); boolean endRscan = ((flag & TMENDRSCAN) > 0); if (!startRscan && !endRscan && flag != TMNOFLAGS) { throw new MysqlXAException(XAException.XAER_INVAL, Messages.getString("MysqlXAConnection.001"), null); } // // We return all recovered XIDs at once, so if not TMSTARTRSCAN, return no new XIDs // // We don't attempt to maintain state to check for TMNOFLAGS "outside" of a scan // if (!startRscan) { return new Xid[0]; } ResultSet rs = null; Statement stmt = null; List<MysqlXid> recoveredXidList = new ArrayList<MysqlXid>(); try { // TODO: Cache this for lifetime of XAConnection stmt = c.createStatement(); rs = stmt.executeQuery("XA RECOVER"); while (rs.next()) { final int formatId = rs.getInt(1); int gtridLength = rs.getInt(2); int bqualLength = rs.getInt(3); byte[] gtridAndBqual = rs.getBytes(4); final byte[] gtrid = new byte[gtridLength]; final byte[] bqual = new byte[bqualLength]; if (gtridAndBqual.length != (gtridLength + bqualLength)) { throw new MysqlXAException(XAException.XA_RBPROTO, Messages.getString("MysqlXAConnection.002"), null); } System.arraycopy(gtridAndBqual, 0, gtrid, 0, gtridLength); System.arraycopy(gtridAndBqual, gtridLength, bqual, 0, bqualLength); recoveredXidList.add(new MysqlXid(gtrid, bqual, formatId)); } } catch (SQLException sqlEx) { throw mapXAExceptionFromSQLException(sqlEx); } finally { if (rs != null) { try { rs.close(); } catch (SQLException sqlEx) { throw mapXAExceptionFromSQLException(sqlEx); } } if (stmt != null) { try { stmt.close(); } catch (SQLException sqlEx) { throw mapXAExceptionFromSQLException(sqlEx); } } } int numXids = recoveredXidList.size(); Xid[] asXids = new Xid[numXids]; Object[] asObjects = recoveredXidList.toArray(); for (int i = 0; i < numXids; i++) { asXids[i] = (Xid) asObjects[i]; } return asXids; } 这里要注意如果Mysql的版本 <5.7.7 ,则不会有任何数据,在以后的版本中Mysql进行了修复,因此如果我们想要使用MySQL充当RM,版本必须 >= 5.7.7 ,原因是: MySQL 5.6版本在客户端退出的时候,自动把已经prepare的事务回滚了,那么MySQL为什么要这样做?这主要取决于MySQL的内部实现,MySQL 5.7以前的版本,对于prepare的事务,MySQL是不会记录binlog的(官方说是减少fsync,起到了优化的作用)。只有当分布式事务提交的时候才会把前面的操作写入binlog信息,所以对于binlog来说,分布式事务与普通的事务没有区别,而prepare以前的操作信息都保存在连接的IO_CACHE中,如果这个时候客户端退出了,以前的binlog信息都会被丢失,再次重连后允许提交的话,会造成Binlog丢失,从而造成主从数据的不一致,所以官方在客户端退出的时候直接把已经prepare的事务都回滚了! 回到主线再从自己记录的事务日志里面获取XID Collection<XID> xidsToCommit = retrieveExpiredCommittingXidsFromLog(); 我们来看下获取事务日志里面的XID的retrieveExpiredCommittingXidsFromLog()方法。 然后进入com.atomikos.recovery.imp.RecoveryLogImp.getCommittingParticipants()方法。 public Collection<ParticipantLogEntry> getCommittingParticipants() throws LogReadException { Collection<ParticipantLogEntry> committingParticipants = new HashSet<ParticipantLogEntry>(); Collection<CoordinatorLogEntry> committingCoordinatorLogEntries = repository.findAllCommittingCoordinatorLogEntries(); for (CoordinatorLogEntry coordinatorLogEntry : committingCoordinatorLogEntries) { for (ParticipantLogEntry participantLogEntry : coordinatorLogEntry.participants) { committingParticipants.add(participantLogEntry); } } return committingParticipants; } 到这里我们来简单介绍一下,事务日志的存储结构。首先是 CoordinatorLogEntry,这是一次XA事务的所有信息实体类。 public class CoordinatorLogEntry implements Serializable { //全局事务id public final String id; //是否已经提交 public final boolean wasCommitted; /** * Only for subtransactions, null otherwise. */ public final String superiorCoordinatorId; //参与者集合 public final ParticipantLogEntry[] participants; } 再来看一下参与者实体类 ParticipantLogEntry : public class ParticipantLogEntry implements Serializable { private static final long serialVersionUID = 1728296701394899871L; /** * The ID of the global transaction as known by the transaction core. */ public final String coordinatorId; /** * Identifies the participant within the global transaction. */ public final String uri; /** * When does this participant expire (expressed in millis since Jan 1, 1970)? */ public final long expires; /** * Best-known state of the participant. */ public final TxState state; /** * For diagnostic purposes, null if not relevant. */ public final String resourceName; } 回到com.atomikos.recovery.xa.DefaultXaRecoveryLog.getExpiredCommittingXids() 方法,可以到获取了一次XA事务过程中,存储的事务日志中的xid。 public Set<XID> getExpiredCommittingXids() throws LogReadException { Set<XID> ret = new HashSet<XID>(); Collection<ParticipantLogEntry> entries = log.getCommittingParticipants(); for (ParticipantLogEntry entry : entries) { if (expired(entry) && !http(entry)) { XID xid = new XID(entry.coordinatorId, entry.uri); ret.add(xid); } } return ret; } 如果从RM中通过XA recovery取出的XID,包含在从事务日志中取出的XID,则进行commit,否则进行rollback. List<XID> xidsToRecover = retrievePreparedXidsFromXaResource(xaResource); Collection<XID> xidsToCommit; try { xidsToCommit = retrieveExpiredCommittingXidsFromLog(); for (XID xid : xidsToRecover) { if (xidsToCommit.contains(xid)) { replayCommit(xid, xaResource); } else { attemptPresumedAbort(xid, xaResource); } } } catch (LogException couldNotRetrieveCommittingXids) { LOGGER.logWarning("Transient error while recovering - will retry later...", couldNotRetrieveCommittingXids); } replayCommit 方法如下: private void replayCommit(XID xid, XAResource xaResource) { if (LOGGER.isDebugEnabled()) LOGGER.logDebug("Replaying commit of xid: " + xid); try { //进行事务提交 xaResource.commit(xid, false); //更新事务日志 log.terminated(xid); } catch (XAException e) { if (alreadyHeuristicallyTerminatedByResource(e)) { handleHeuristicTerminationByResource(xid, xaResource, e, true); } else if (xidTerminatedInResourceByConcurrentCommit(e)) { log.terminated(xid); } else { LOGGER.logWarning("Transient error while replaying commit - will retry later...", e); } } } attemptPresumedAbort(xid, xaResource); 方法如下: private void attemptPresumedAbort(XID xid, XAResource xaResource) { try { log.presumedAborting(xid); if (LOGGER.isDebugEnabled()) LOGGER.logDebug("Presumed abort of xid: " + xid); try { //进行回滚 xaResource.rollback(xid); //更新日志状态 log.terminated(xid); } catch (XAException e) { if (alreadyHeuristicallyTerminatedByResource(e)) { handleHeuristicTerminationByResource(xid, xaResource, e, false); } else if (xidTerminatedInResourceByConcurrentRollback(e)) { log.terminated(xid); } else { LOGGER.logWarning("Unexpected exception during recovery - ignoring to retry later...", e); } } } catch (IllegalStateException presumedAbortNotAllowedInCurrentLogState) { // ignore to retry later if necessary } catch (LogException logWriteException) { LOGGER.logWarning("log write failed for Xid: "+xid+", ignoring to retry later", logWriteException); } } 文章到此,已经写的很长很多了,我们分析了ShardingSphere对于XA方案,提供了一套SPI解决方案,对Atomikos进行了整合,也分析了Atomikos初始化流程,开始事务流程,获取连接流程,提交事务流程,回滚事务流程,事务恢复流程。 希望对大家理解XA的原理有所帮助。 作者介绍: 肖宇,Apache ShardingSphere Committer,开源hmily分布式事务框架作者, 开源soul网关作者,热爱开源,追求写优雅代码。目前就职入京东数科,参与ShardingSphere的开源建设,以及分布式数据库的研发工作。

优秀的个人博客,低调大师

Apache ShardingSphere整合Atomikos源码解析

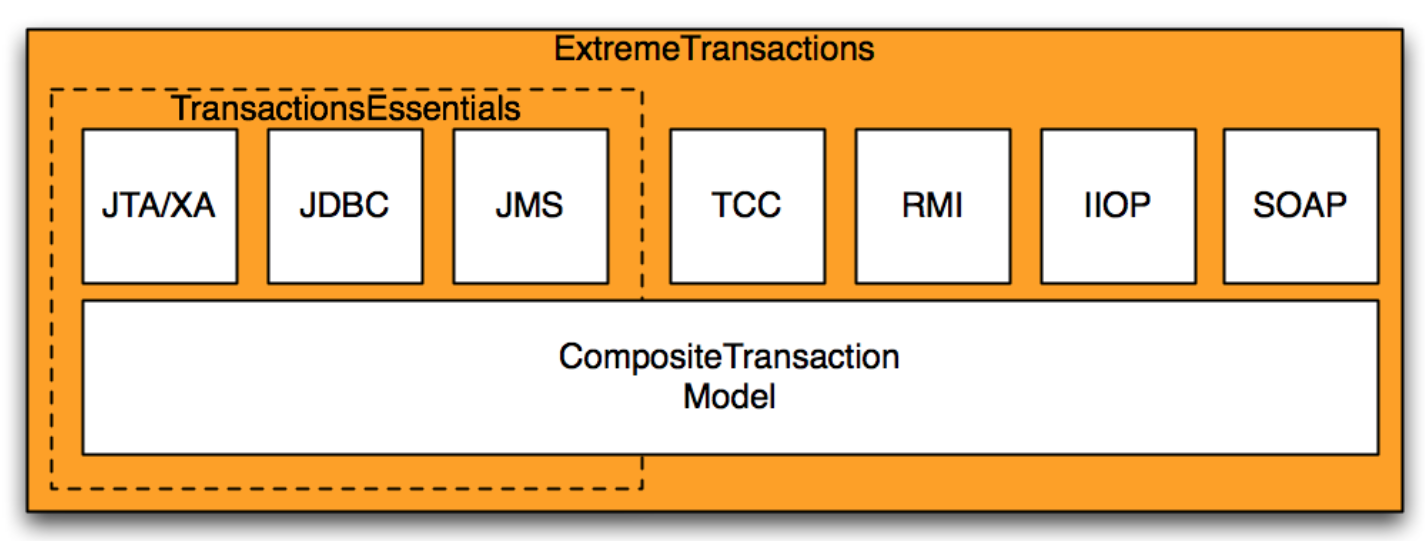
Shardingsphere整合Atomikos对XA分布式事务的支持 Apache ShardingSphere 是一套开源的分布式数据库中间件解决方案组成的生态圈,它由 JDBC、Proxy 和 Sidecar(规划中)这 3 款相互独立,却又能够混合部署配合使用的产品组成。 它们均提供标准化的数据分片、分布式事务和数据库治理功能,可适用于如 Java 同构、异构语言、云原生等各种多样化的应用场景。 ShardingSphere 已于2020年4月16日成为 Apache 软件基金会的顶级项目。 咋们话不多,接上篇,我们直接进入正题。 Atomikos简单介绍 Atomikos(https://www.atomikos.com/),其实是一家公司的名字,提供了基于JTA规范的XA分布式事务TM的实现。其旗下最著名的产品就是事务管理器。产品分两个版本: TransactionEssentials:开源的免费产品; ExtremeTransactions:上商业版,需要收费。 这两个产品的关系如下图所示: ExtremeTransactions在TransactionEssentials的基础上额外提供了以下功能(重要的): 支持TCC:这是一种柔性事务 支持通过RMI、IIOP、SOAP这些远程过程调用技术,进行事务传播。 事务日志云存储,云端对事务进行恢复,并且提供了完善的管理后台。 org.apache.shardingsphere.transaction.xa.XAShardingTransactionManager详解 我们简单的来回顾下org.apache.shardingsphere.transaction.spi.ShardingTransactionManager public interface ShardingTransactionManager extends AutoCloseable { /** * Initialize sharding transaction manager. * * @param databaseType database type * @param resourceDataSources resource data sources */ void init(DatabaseType databaseType, Collection<ResourceDataSource> resourceDataSources); /** * Get transaction type. * * @return transaction type */ TransactionType getTransactionType(); /** * Judge is in transaction or not. * * @return in transaction or not */ boolean isInTransaction(); /** * Get transactional connection. * * @param dataSourceName data source name * @return connection * @throws SQLException SQL exception */ Connection getConnection(String dataSourceName) throws SQLException; /** * Begin transaction. */ void begin(); /** * Commit transaction. */ void commit(); /** * Rollback transaction. */ void rollback(); } 我们重点县关注init方法,从它的命名,你就应该能够看出来,这是整个框架的初始化方法,让我们来看看它是如何进行初始化的。 private final Map<String, XATransactionDataSource> cachedDataSources = new HashMap<>(); private final XATransactionManager xaTransactionManager = XATransactionManagerLoader.getInstance().getTransactionManager(); @Override public void init(final DatabaseType databaseType, final Collection<ResourceDataSource> resourceDataSources) { for (ResourceDataSource each : resourceDataSources) { cachedDataSources.put(each.getOriginalName(), new XATransactionDataSource(databaseType, each.getUniqueResourceName(), each.getDataSource(), xaTransactionManager)); } xaTransactionManager.init(); } 首先SPI的方式加载XATransactionManager的具体实现类,这里返回的就是org.apache.shardingsphere.transaction.xa.atomikos.manager.AtomikosTransactionManager。 我们在关注下 new XATransactionDataSource() , 进入 org.apache.shardingsphere.transaction.xa.jta.datasource。XATransactionDataSource类的构造方法。 public XATransactionDataSource(final DatabaseType databaseType, final String resourceName, final DataSource dataSource, final XATransactionManager xaTransactionManager) { this.databaseType = databaseType; this.resourceName = resourceName; this.dataSource = dataSource; if (!CONTAINER_DATASOURCE_NAMES.contains(dataSource.getClass().getSimpleName())) { // 重点关注 1 ,返回了xaDatasource xaDataSource = XADataSourceFactory.build(databaseType, dataSource); this.xaTransactionManager = xaTransactionManager; // 重点关注2 注册资源 xaTransactionManager.registerRecoveryResource(resourceName, xaDataSource); } } 我们重点来关注 XADataSourceFactory.build(databaseType, dataSource),从名字我们就可以看出,这应该是返回JTA规范里面的XADataSource,在ShardingSphere里面很多的功能,可以从代码风格的命名上就能猜出来,这就是优雅代码(吹一波)。不多逼逼,我们进入该方法。 public final class XADataSourceFactory { public static XADataSource build(final DatabaseType databaseType, final DataSource dataSource) { return new DataSourceSwapper(XADataSourceDefinitionFactory.getXADataSourceDefinition(databaseType)).swap(dataSource); } } 首先又是一个SPI定义的 XADataSourceDefinitionFactory,它根据不同的数据库类型,来加载不同的方言。然后我们进入 swap方法。 public XADataSource swap(final DataSource dataSource) { XADataSource result = createXADataSource(); setProperties(result, getDatabaseAccessConfiguration(dataSource)); return result; } 很简明,第一步创建,XADataSource,第二步给它设置属性(包含数据的连接,用户名密码等),然后返回。 返回 XATransactionDataSource 类,关注 xaTransactionManager.registerRecoveryResource(resourceName, xaDataSource); 从名字可以看出,这是注册事务恢复资源。这个我们在事务恢复的时候详解。 返回 XAShardingTransactionManager.init() ,我们重点来关注: xaTransactionManager.init();,最后进入AtomikosTransactionManager.init()。流程图如下: 代码: public final class AtomikosTransactionManager implements XATransactionManager { private final UserTransactionManager transactionManager = new UserTransactionManager(); private final UserTransactionService userTransactionService = new UserTransactionServiceImp(); @Override public void init() { userTransactionService.init(); } } 进入UserTransactionServiceImp.init() private void initialize() { //添加恢复资源 不用关心 for (RecoverableResource resource : resources_) { Configuration.addResource ( resource ); } for (LogAdministrator logAdministrator : logAdministrators_) { Configuration.addLogAdministrator ( logAdministrator ); } //注册插件 不用关心 for (TransactionServicePlugin nxt : tsListeners_) { Configuration.registerTransactionServicePlugin ( nxt ); } //获取配置属性 重点关心 ConfigProperties configProps = Configuration.getConfigProperties(); configProps.applyUserSpecificProperties(properties_); //进行初始化 Configuration.init(); } 我们重点关注,获取配置属性。最后进入com.atomikos.icatch.provider.imp.AssemblerImp.initializeProperties()方法。 @Override public ConfigProperties initializeProperties() { //读取classpath下的默认配置transactions-defaults.properties Properties defaults = new Properties(); loadPropertiesFromClasspath(defaults, DEFAULT_PROPERTIES_FILE_NAME); //读取classpath下,transactions.properties配置,覆盖transactions-defaults.properties中相同key的值 Properties transactionsProperties = new Properties(defaults); loadPropertiesFromClasspath(transactionsProperties, TRANSACTIONS_PROPERTIES_FILE_NAME); //读取classpath下,jta.properties,覆盖transactions-defaults.properties、transactions.properties中相同key的值 Properties jtaProperties = new Properties(transactionsProperties); loadPropertiesFromClasspath(jtaProperties, JTA_PROPERTIES_FILE_NAME); //读取通过java -Dcom.atomikos.icatch.file方式指定的自定义配置文件路径,覆盖之前的同名配置 Properties customProperties = new Properties(jtaProperties); loadPropertiesFromCustomFilePath(customProperties); //最终构造一个ConfigProperties对象,来表示实际要使用的配置 Properties finalProperties = new Properties(customProperties); return new ConfigProperties(finalProperties); } 接下来重点关注, Configuration.init(), 进行初始化。 ublic static synchronized boolean init() { boolean startupInitiated = false; if (service_ == null) { startupInitiated = true; //SPI方式加载插件注册,无需过多关心 addAllTransactionServicePluginServicesFromClasspath(); ConfigProperties configProperties = getConfigProperties(); //调用插件的beforeInit方法进行初始化话,无需过多关心 notifyBeforeInit(configProperties); //进行事务日志恢复的初始化,很重要,接下来详解 assembleSystemComponents(configProperties); //进入系统注解的初始化,一般重要 initializeSystemComponents(configProperties); notifyAfterInit(); if (configProperties.getForceShutdownOnVmExit()) { addShutdownHook(new ForceShutdownHook()); } } return startupInitiated; } 我们先来关注 assembleSystemComponents(configProperties); 进入它,进入com.atomikos.icatch.provider.imp.AssemblerImp.assembleTransactionService()方法: @Override public TransactionServiceProvider assembleTransactionService( ConfigProperties configProperties) { RecoveryLog recoveryLog =null; //打印日志 logProperties(configProperties.getCompletedProperties()); //生成唯一名字 String tmUniqueName = configProperties.getTmUniqueName(); long maxTimeout = configProperties.getMaxTimeout(); int maxActives = configProperties.getMaxActives(); boolean threaded2pc = configProperties.getThreaded2pc(); //SPI方式加载OltpLog ,这是最重要的扩展地方,如果用户没有SPI的方式去扩展那么就为null OltpLog oltpLog = createOltpLogFromClasspath(); if (oltpLog == null) { LOGGER.logInfo("Using default (local) logging and recovery..."); //创建事务日志存储资源 Repository repository = createRepository(configProperties); oltpLog = createOltpLog(repository); //??? Assemble recoveryLog recoveryLog = createRecoveryLog(repository); } StateRecoveryManagerImp recoveryManager = new StateRecoveryManagerImp(); recoveryManager.setOltpLog(oltpLog); //生成唯一id生成器,以后生成XID会用的到 UniqueIdMgr idMgr = new UniqueIdMgr ( tmUniqueName ); int overflow = idMgr.getMaxIdLengthInBytes() - MAX_TID_LENGTH; if ( overflow > 0 ) { // see case 73086 String msg = "Value too long : " + tmUniqueName; LOGGER.logFatal ( msg ); throw new SysException(msg); } return new TransactionServiceImp(tmUniqueName, recoveryManager, idMgr, maxTimeout, maxActives, !threaded2pc, recoveryLog); } 我们重点来分析createOltpLogFromClasspath(), 采用SPI的加载方式来获取,默认这里会返回 null, 什么意思呢? 就是当没有扩展的时候,atomikos,会创建框架自定义的资源,来存储事务日志。 private OltpLog createOltpLogFromClasspath() { OltpLog ret = null; ServiceLoader<OltpLogFactory> loader = ServiceLoader.load(OltpLogFactory.class,Configuration.class.getClassLoader()); int i = 0; for (OltpLogFactory l : loader ) { ret = l.createOltpLog(); i++; } if (i > 1) { String msg = "More than one OltpLogFactory found in classpath - error in configuration!"; LOGGER.logFatal(msg); throw new SysException(msg); } return ret; } 我们跟着进入 Repository repository = createRepository(configProperties); private CachedRepository createCoordinatorLogEntryRepository( ConfigProperties configProperties) throws LogException { //创建内存资源存储 InMemoryRepository inMemoryCoordinatorLogEntryRepository = new InMemoryRepository(); //进行初始化 inMemoryCoordinatorLogEntryRepository.init(); //创建使用文件存储资源作为backup FileSystemRepository backupCoordinatorLogEntryRepository = new FileSystemRepository(); //进行初始化 backupCoordinatorLogEntryRepository.init(); //内存与file资源进行合并 CachedRepository repository = new CachedRepository(inMemoryCoordinatorLogEntryRepository, backupCoordinatorLogEntryRepository); repository.init(); return repository; } 这里就会创建出 CachedRepository,里面包含了 InMemoryRepository 与 FileSystemRepository 回到主线 com.atomikos.icatch.config.Configuration.init(), 最后来分析下notifyAfterInit(); private static void notifyAfterInit() { //进行插件的初始化 for (TransactionServicePlugin p : tsListenersList_) { p.afterInit(); } for (LogAdministrator a : logAdministrators_) { a.registerLogControl(service_.getLogControl()); } //设置事务恢复服务,进行事务的恢复 for (RecoverableResource r : resourceList_ ) { r.setRecoveryService(recoveryService_); } } 插件的初始化会进入com.atomikos.icatch.jta.JtaTransactionServicePlugin.afterInit() public void afterInit() { TransactionManagerImp.installTransactionManager(Configuration.getCompositeTransactionManager(), autoRegisterResources); //如果我们自定义扩展了 OltpLog ,这里就会返回null,如果是null,那么XaResourceRecoveryManager就是null RecoveryLog recoveryLog = Configuration.getRecoveryLog(); long maxTimeout = Configuration.getConfigProperties().getMaxTimeout(); if (recoveryLog != null) { XaResourceRecoveryManager.installXaResourceRecoveryManager(new DefaultXaRecoveryLog(recoveryLog, maxTimeout),Configuration.getConfigProperties().getTmUniqueName()); } } 重点注意 RecoveryLog recoveryLog = Configuration.getRecoveryLog(); ,如果用户采用SPI的方式,扩展了com.atomikos.recovery.OltpLog ,这里就会返回 null。 如果是null,则不会对 XaResourceRecoveryManager 进行初始化。 回到 notifyAfterInit(), 我们来分析 setRecoveryService。 public void setRecoveryService ( RecoveryService recoveryService ) throws ResourceException { if ( recoveryService != null ) { if ( LOGGER.isTraceEnabled() ) LOGGER.logTrace ( "Installing recovery service on resource " + getName () ); this.branchIdentifier=recoveryService.getName(); recover(); } } 我们进入 recover() 方法: public void recover() { XaResourceRecoveryManager xaResourceRecoveryManager = XaResourceRecoveryManager.getInstance(); //null for LogCloud recovery if (xaResourceRecoveryManager != null) { try { xaResourceRecoveryManager.recover(getXAResource()); } catch (Exception e) { refreshXAResource(); //cf case 156968 } } } 看到最关键的注释了吗,如果用户采用SPI的方式,扩展了com.atomikos.recovery.OltpLog,那么XaResourceRecoveryManager 为null,则就会进行云端恢复,反之则进行事务恢复。 事务恢复很复杂,我们会单独来讲。 到这里atomikos的基本的初始化已经完成。 atomikos事务begin流程 我们知道,本地的事务,都会有一个 trainsaction.begin, 对应XA分布式事务来说也不另外,我们再把思路切换回XAShardingTransactionManager.begin(), 会调用com.atomikos.icatch.jta.TransactionManagerImp.begin()。流程图如下: 代码: public void begin ( int timeout ) throws NotSupportedException, SystemException { CompositeTransaction ct = null; ResumePreviousTransactionSubTxAwareParticipant resumeParticipant = null; ct = compositeTransactionManager.getCompositeTransaction(); if ( ct != null && ct.getProperty ( JTA_PROPERTY_NAME ) == null ) { LOGGER.logWarning ( "JTA: temporarily suspending incompatible transaction: " + ct.getTid() + " (will be resumed after JTA transaction ends)" ); ct = compositeTransactionManager.suspend(); resumeParticipant = new ResumePreviousTransactionSubTxAwareParticipant ( ct ); } try { //创建事务补偿点 ct = compositeTransactionManager.createCompositeTransaction ( ( ( long ) timeout ) * 1000 ); if ( resumeParticipant != null ) ct.addSubTxAwareParticipant ( resumeParticipant ); if ( ct.isRoot () && getDefaultSerial () ) ct.setSerial (); ct.setProperty ( JTA_PROPERTY_NAME , "true" ); } catch ( SysException se ) { String msg = "Error in begin()"; LOGGER.logError( msg , se ); throw new ExtendedSystemException ( msg , se ); } recreateCompositeTransactionAsJtaTransaction(ct); } 这里我们主要关注 compositeTransactionManager.createCompositeTransaction(), public CompositeTransaction createCompositeTransaction ( long timeout ) throws SysException { CompositeTransaction ct = null , ret = null; ct = getCurrentTx (); if ( ct == null ) { ret = getTransactionService().createCompositeTransaction ( timeout ); if(LOGGER.isDebugEnabled()){ LOGGER.logDebug("createCompositeTransaction ( " + timeout + " ): " + "created new ROOT transaction with id " + ret.getTid ()); } } else { if(LOGGER.isDebugEnabled()) LOGGER.logDebug("createCompositeTransaction ( " + timeout + " )"); ret = ct.createSubTransaction (); } Thread thread = Thread.currentThread (); setThreadMappings ( ret, thread ); return ret; } 创建了事务补偿点,然后把他放到了用当前线程作为key的Map当中,这里思考,为啥它不用 threadLocal。 到这里atomikos的事务begin流程已经完成。 大家可能有些疑惑,begin好像什么都没有做,XA start 也没调用? 别慌,下一节继续来讲。 XATransactionDataSource getConnection() 流程 我们都知道想要执行SQL语句,必须要获取到数据库的connection。让我们再回到 XAShardingTransactionManager.getConnection() 最后会调用到org.apache.shardingsphere.transaction.xa.jta.datasourceXATransactionDataSource.getConnection()。流程图如下: 代码 : public Connection getConnection() throws SQLException, SystemException, RollbackException { //先检查是否已经有存在的connection,这一步很关心,也是XA的关键,因为XA事务,必须在同一个connection if (CONTAINER_DATASOURCE_NAMES.contains(dataSource.getClass().getSimpleName())) { return dataSource.getConnection(); } //获取数据库连接 Connection result = dataSource.getConnection(); //转成XAConnection,其实是同一个连接 XAConnection xaConnection = XAConnectionFactory.createXAConnection(databaseType, xaDataSource, result); //获取JTA事务定义接口 Transaction transaction = xaTransactionManager.getTransactionManager().getTransaction(); if (!enlistedTransactions.get().contains(transaction)) { //进行资源注册 transaction.enlistResource(new SingleXAResource(resourceName, xaConnection.getXAResource())); transaction.registerSynchronization(new Synchronization() { @Override public void beforeCompletion() { enlistedTransactions.get().remove(transaction); } @Override public void afterCompletion(final int status) { enlistedTransactions.get().clear(); } }); enlistedTransactions.get().add(transaction); } return result; } 首先第一步很关心,尤其是对shardingsphere来说,因为在一个事务里面,会有多个SQL语句,打到相同的数据库,所以对相同的数据库,必须获取同一个XAConnection,这样才能进行XA事务的提交与回滚。 我们接下来关心 transaction.enlistResource(new SingleXAResource(resourceName, xaConnection.getXAResource()));, 会进入com.atomikos.icatch.jta.TransactionImp.enlistResource(), 代码太长,截取一部分。 try { restx = (XAResourceTransaction) res .getResourceTransaction(this.compositeTransaction); // next, we MUST set the xa resource again, // because ONLY the instance we got as argument // is available for use now ! // older instances (set in restx from previous sibling) // have connections that may be in reuse already // ->old xares not valid except for 2pc operations restx.setXAResource(xares); restx.resume(); } catch (ResourceException re) { throw new ExtendedSystemException( "Unexpected error during enlist", re); } catch (RuntimeException e) { throw e; } addXAResourceTransaction(restx, xares); 我们直接看 restx.resume(); public synchronized void resume() throws ResourceException { int flag = 0; String logFlag = ""; if (this.state.equals(TxState.LOCALLY_DONE)) {// reused instance flag = XAResource.TMJOIN; logFlag = "XAResource.TMJOIN"; } else if (!this.knownInResource) {// new instance flag = XAResource.TMNOFLAGS; logFlag = "XAResource.TMNOFLAGS"; } else throw new IllegalStateException("Wrong state for resume: " + this.state); try { if (LOGGER.isDebugEnabled()) { LOGGER.logDebug("XAResource.start ( " + this.xidToHexString + " , " + logFlag + " ) on resource " + this.resourcename + " represented by XAResource instance " + this.xaresource); } this.xaresource.start(this.xid, flag); } catch (XAException xaerr) { String msg = interpretErrorCode(this.resourcename, "resume", this.xid, xaerr.errorCode); LOGGER.logWarning(msg, xaerr); throw new ResourceException(msg, xaerr); } setState(TxState.ACTIVE); this.knownInResource = true; } 哦多尅,看见了吗,各位,看见了 this.xaresource.start(this.xid, flag); 了吗????,我们进去,假设我们使用的Mysql数据库: public void start(Xid xid, int flags) throws XAException { StringBuilder commandBuf = new StringBuilder(300); commandBuf.append("XA START "); appendXid(commandBuf, xid); switch(flags) { case 0: break; case 2097152: commandBuf.append(" JOIN"); break; case 134217728: commandBuf.append(" RESUME"); break; default: throw new XAException(-5); } this.dispatchCommand(commandBuf.toString()); this.underlyingConnection.setInGlobalTx(true); } 组装XA start Xid SQL语句,进行执行。 到这里,我们总结下,在获取数据库连接的时候,我们执行了XA协议接口中的 XA start xid atomikos事务commit流程 好了,上面我们已经开启了事务,现在我们来分析下事务commit流程,我们再把视角切换回XAShardingTransactionManager.commit(),最后我们会进入com.atomikos.icatch.imp.CompositeTransactionImp.commit() 方法。流程图如下: 代码: public void commit () throws HeurRollbackException, HeurMixedException, HeurHazardException, SysException, SecurityException, RollbackException { //首先更新下事务日志的状态 doCommit (); setSiblingInfoForIncoming1pcRequestFromRemoteClient(); if ( isRoot () ) { //真正的commit操作 coordinator.terminate ( true ); } } 我们关注 coordinator.terminate ( true ); protected void terminate ( boolean commit ) throws HeurRollbackException, HeurMixedException, SysException, java.lang.SecurityException, HeurCommitException, HeurHazardException, RollbackException, IllegalStateException { synchronized ( fsm_ ) { if ( commit ) { //判断有几个参与者,如果只有一个,直接提交 if ( participants_.size () <= 1 ) { commit ( true ); } else { //否则,走XA 2阶段提交流程,先prepare, 再提交 int prepareResult = prepare (); // make sure to only do commit if NOT read only if ( prepareResult != Participant.READ_ONLY ) commit ( false ); } } else { rollback (); } } } 首先会判断参与者的个数,这里我们可以理解为MySQL的database数量,如果只有一个,退化成一阶段,直接提交。 如果有多个,则走标准的XA二阶段提交流程。 我们来看 prepare (); 流程,最后会走到com.atomikos.icatch.imp.PrepareMessage.send() ---> com.atomikos.datasource.xa.XAResourceTransaction.prepare() int ret = 0; terminateInResource(); if (TxState.ACTIVE == this.state) { // tolerate non-delisting apps/servers suspend(); } // duplicate prepares can happen for siblings in serial subtxs!!! // in that case, the second prepare just returns READONLY if (this.state == TxState.IN_DOUBT) return Participant.READ_ONLY; else if (!(this.state == TxState.LOCALLY_DONE)) throw new SysException("Wrong state for prepare: " + this.state); try { // refresh xaresource for MQSeries: seems to close XAResource after // suspend??? testOrRefreshXAResourceFor2PC(); if (LOGGER.isTraceEnabled()) { LOGGER.logTrace("About to call prepare on XAResource instance: " + this.xaresource); } ret = this.xaresource.prepare(this.xid); } catch (XAException xaerr) { String msg = interpretErrorCode(this.resourcename, "prepare", this.xid, xaerr.errorCode); if (XAException.XA_RBBASE <= xaerr.errorCode && xaerr.errorCode <= XAException.XA_RBEND) { LOGGER.logWarning(msg, xaerr); // see case 84253 throw new RollbackException(msg); } else { LOGGER.logError(msg, xaerr); throw new SysException(msg, xaerr); } } setState(TxState.IN_DOUBT); if (ret == XAResource.XA_RDONLY) { if (LOGGER.isDebugEnabled()) { LOGGER.logDebug("XAResource.prepare ( " + this.xidToHexString + " ) returning XAResource.XA_RDONLY " + "on resource " + this.resourcename + " represented by XAResource instance " + this.xaresource); } return Participant.READ_ONLY; } else { if (LOGGER.isDebugEnabled()) { LOGGER.logDebug("XAResource.prepare ( " + this.xidToHexString + " ) returning OK " + "on resource " + this.resourcename + " represented by XAResource instance " + this.xaresource); } return Participant.READ_ONLY + 1; } 终于,我们看到了这么一句 ret = this.xaresource.prepare(this.xid); 但是等等,我们之前不是说了,XA start xid 以后要先 XA end xid 吗? 答案就在 suspend(); 里面。 public synchronized void suspend() throws ResourceException { // BugzID: 20545 // State may be IN_DOUBT or TERMINATED when a connection is closed AFTER // commit! // In that case, don't call END again, and also don't generate any // error! // This is required for some hibernate connection release strategies. if (this.state.equals(TxState.ACTIVE)) { try { if (LOGGER.isDebugEnabled()) { LOGGER.logDebug("XAResource.end ( " + this.xidToHexString + " , XAResource.TMSUCCESS ) on resource " + this.resourcename + " represented by XAResource instance " + this.xaresource); } //执行了 xa end 语句 this.xaresource.end(this.xid, XAResource.TMSUCCESS); } catch (XAException xaerr) { String msg = interpretErrorCode(this.resourcename, "end", this.xid, xaerr.errorCode); if (LOGGER.isTraceEnabled()) LOGGER.logTrace(msg, xaerr); // don't throw: fix for case 102827 } setState(TxState.LOCALLY_DONE); } } 到了这里,我们已经执行了 XA start xid -> XA end xid --> XA prepare xid, 接下来就是最后一步 commit 我们再回到 terminate(false) 方法,来看 commit()流程。其实和 prepare流程一样,最后会走到 com.atomikos.datasource.xa.XAResourceTransaction.commit()。 commit执行完,数据提交 //繁杂代码过多,就显示核心的 this.xaresource.commit(this.xid, onePhase); 思考:这里的参与者提交是在一个循环里面,一个一个提交的,如果之前的提交了,后面的参与者提交的时候,挂了,就会造成数据的不一致性。 Atomikos rollback() 流程 上面我们已经分析了commit流程,其实rollback流程和commit流程一样,我们在把目光切换回 org.apache.shardingsphere.transaction.xa.XAShardingTransactionManager.rollback() ,最后会执行到com.atomikos.icatch.imp.CompositeTransactionImp.rollback()。 public void rollback () throws IllegalStateException, SysException { //清空资源,更新事务日志状态等 doRollback (); if ( isRoot () ) { try { coordinator.terminate ( false ); } catch ( Exception e ) { throw new SysException ( "Unexpected error in rollback: " + e.getMessage (), e ); } } } 重点关注 coordinator.terminate ( false ); ,这个和 commit流程是一样的,只不过在 commit流程里面,参数传的是true。 protected void terminate ( boolean commit ) throws HeurRollbackException, HeurMixedException, SysException, java.lang.SecurityException, HeurCommitException, HeurHazardException, RollbackException, IllegalStateException { synchronized ( fsm_ ) { if ( commit ) { if ( participants_.size () <= 1 ) { commit ( true ); } else { int prepareResult = prepare (); // make sure to only do commit if NOT read only if ( prepareResult != Participant.READ_ONLY ) commit ( false ); } } else { //如果是false,走的是rollback rollback (); } } } 我们重点关注 rollback() ,最后会走到com.atomikos.datasource.xa.XAResourceTransaction.rollback()。 public synchronized void rollback() throws HeurCommitException, HeurMixedException, HeurHazardException, SysException { terminateInResource(); if (rollbackShouldDoNothing()) { return; } if (this.state.equals(TxState.TERMINATED)) { return; } if (this.state.equals(TxState.HEUR_MIXED)) throw new HeurMixedException(); if (this.state.equals(TxState.HEUR_COMMITTED)) throw new HeurCommitException(); if (this.xaresource == null) { throw new HeurHazardException("XAResourceTransaction " + getXid() + ": no XAResource to rollback?"); } try { if (this.state.equals(TxState.ACTIVE)) { // first suspend xid suspend(); } // refresh xaresource for MQSeries: seems to close XAResource after // suspend??? testOrRefreshXAResourceFor2PC(); if (LOGGER.isDebugEnabled()) { LOGGER.logDebug("XAResource.rollback ( " + this.xidToHexString + " ) " + "on resource " + this.resourcename + " represented by XAResource instance " + this.xaresource); } this.xaresource.rollback(this.xid); 先在supend()方法里面执行了 XA end xid 语句, 接下来执行 this.xaresource.rollback(this.xid); 进行数据的回滚。 文章到此,已经写的很长很多了,我们分析了ShardingSphere对于XA方案,提供了一套SPI解决方案,对Atomikos进行了整合,也分析了Atomikos初始化流程,开始事务流程,获取连接流程,提交事务流程,回滚事务流程。希望对大家理解XA的原理有所帮助。 作者介绍: 肖宇,Apache ShardingSphere Committer,开源hmily分布式事务框架作者, 开源soul网关作者,热爱开源,追求写优雅代码。目前就职入京东数科,参与ShardingSphere的开源建设,以及分布式数据库的研发工作。

优秀的个人博客,低调大师

java线程池源码白话分析

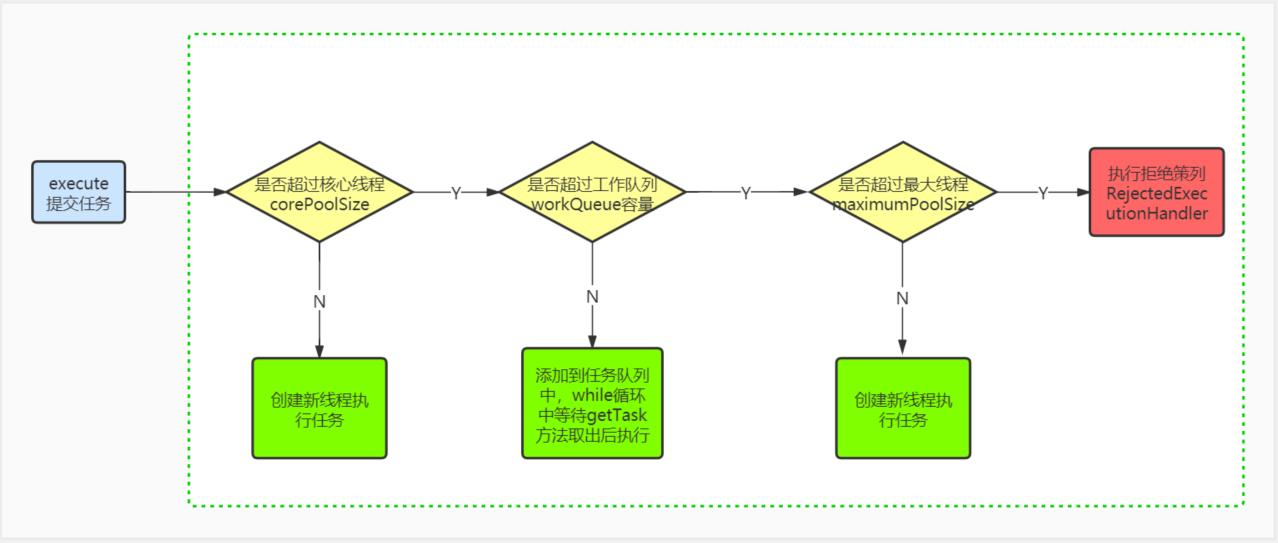
1.计算机的基础知识 位逻辑运算符: &: 位与运算符,只有两个操作数都是true,结果才是true。 |: 位或运算符,只有两个操作数都是false,结果才是false。 ~: 位非运算符:如果位为0,结果是1,如果位为1,结果是0. ^: 位异或运算:两个数转为二进制,然后从高位开始比较,如果相同则为0,不相同则为1。 位移运算: <<: 无符号左移 >>: 无符号右移 >>>:带符号右移(没有带符号左移这种操作) 二进制: 二进制都是以补码的形式表示的 正数的原码,反码,补码都一样; 要得到负数的补码,必须先求负数的反码,负数的反码;负数的反码按位1改成0,0改成1;负数的补码等于反码+1 2.ThreadPoolExecutor简单示例 public class ThreadPoolExecutorTest { ​ public static void main(String[] args) { BlockingQueue b = new ArrayBlockingQueue(100); ​ ThreadPoolExecutor threadPoolExecutor = new ThreadPoolExecutor(2, 10, 500000, TimeUnit.SECONDS, b, new RejectedExecutionHandler() { @Override public void rejectedExecution(Runnable r, ThreadPoolExecutor executor) { ​ } }); threadPoolExecutor.execute(() -> { try { Thread.sleep(10000); } catch (InterruptedException e) { e.printStackTrace(); } System.out.println(111111); }); ​ threadPoolExecutor.execute(() -> { try { Thread.sleep(10000); } catch (InterruptedException e) { e.printStackTrace(); } System.out.println(2222222); }); ​ } } 3.ThreadPoolExecutor属性分析 public class ThreadPoolExecutor extends AbstractExecutorService { ​ //用于保存线程运行状态和当前线程池线程运行的数量 //高3位用于代表线程的运行状态,低29位代表线程池的线程最大数量 private final AtomicInteger ctl = new AtomicInteger(ctlOf(RUNNING, 0)); //32-3=29 private static final int COUNT_BITS = Integer.SIZE - 3; //00011111111111111111111111111111,高3位为0,低29位为1,代表线程池的线程最大数量 //参与运算用于得到线程的运行状态和线程池线程的数量 private static final int CAPACITY = (1 << COUNT_BITS) - 1; //线程池运行的状态,后面单独分析 //线程池处于运行状态,11100000000000000000000000000000 private static final int RUNNING = -1 << COUNT_BITS; //线程池处于shutdown状态,00000000000000000000000000000000 private static final int SHUTDOWN = 0 << COUNT_BITS; //线程池处于结束状态,00100000000000000000000000000000 private static final int STOP = 1 << COUNT_BITS; //线程池运行任务为空的时候的状态,01000000000000000000000000000000 private static final int TIDYING = 2 << COUNT_BITS; //线程处于彻底终止的状态,01100000000000000000000000000000 private static final int TERMINATED = 3 << COUNT_BITS; //获取线程池运行状态,c代表ctl值 private static int runStateOf(int c) { return c & ~CAPACITY; } //获取线程池工作线程数量,c代表ctl值 private static int workerCountOf(int c) { return c & CAPACITY; } //获取ctl值,rs代表线程的运行状态,wc代表线程池工作线程数量,形成一个32位二进制数 //高三位代表线程池运行状态,低29位代表线程池工作线程数量 private static int ctlOf(int rs, int wc) { return rs | wc; } ​ //传入ctl值和线程某个运行状态,比较ctl值是否小于传入的线程的某个运行状态 private static boolean runStateLessThan(int c, int s) { return c < s; } ​ //传入ctl值和线程运行状态,比较ctl值是否大于传入的线程的某个运行状态 private static boolean runStateAtLeast(int c, int s) { return c >= s; } ​ //判断线程运行状态是否是运行状态,因为RUNNING=-1是最小的状态值 private static boolean isRunning(int c) { return c < SHUTDOWN; } ​ //通过CAS操作将工作线程数+1 private boolean compareAndIncrementWorkerCount(int expect) { return ctl.compareAndSet(expect, expect + 1); } ​ //通过CAS操作将工作线程数-1 private boolean compareAndDecrementWorkerCount(int expect) { return ctl.compareAndSet(expect, expect - 1); } ​ //do-while循环可以强制让工作线程数-1 private void decrementWorkerCount() { do {} while (! compareAndDecrementWorkerCount(ctl.get())); } ​ //线程池的工作队列,在构造方法中初始化 private final BlockingQueue<Runnable> workQueue; private final ReentrantLock mainLock = new ReentrantLock(); ​ //保存worker的池子 private final HashSet<Worker> workers = new HashSet<Worker>(); ​ private final Condition termination = mainLock.newCondition(); ​ //记录线程池生命周期中,线程池运行的线程的最大数量 private int largestPoolSize; ​ //线程池完成任务数量 private long completedTaskCount; ​ //创建线程工厂 private volatile ThreadFactory threadFactory; ​ //线程中断策列 private volatile RejectedExecutionHandler handler; ​ //在指定时间单位下,线程存活时间 private volatile long keepAliveTime; ​ //核心线程数 private volatile int corePoolSize; ​ //最大线程数 private volatile int maximumPoolSize; ​ //线程池满了后的中断策列 private static final RejectedExecutionHandler defaultHandler = new AbortPolicy(); ​ private static final RuntimePermission shutdownPerm = new RuntimePermission("modifyThread"); ​ private final AccessControlContext acc; //当从工作队列中取不到任务时的时候,是否需要回收核心线程 private volatile boolean allowCoreThreadTimeOut; } 4.ThreadPoolExecutor构造方法分析 public ThreadPoolExecutor(int corePoolSize, int maximumPoolSize, long keepAliveTime, TimeUnit unit, BlockingQueue<Runnable> workQueue, ThreadFactory threadFactory, RejectedExecutionHandler handler) { //会检查参数,不符合条件抛出异常 if (corePoolSize < 0 || maximumPoolSize <= 0 || maximumPoolSize < corePoolSize || keepAliveTime < 0) throw new IllegalArgumentException(); //工作队列,线程工厂,拒绝策列不能为空 if (workQueue == null || threadFactory == null || handler == null) throw new NullPointerException(); this.acc = System.getSecurityManager() == null ? null : AccessController.getContext(); this.corePoolSize = corePoolSize; this.maximumPoolSize = maximumPoolSize; this.workQueue = workQueue; this.keepAliveTime = unit.toNanos(keepAliveTime); this.threadFactory = threadFactory; this.handler = handler; } 5.线程池创建线程顺序分析 当我们执行execute方法提交一个线程的时候,首先会判断当前线程池线程数是否超过核心线程数corePoolSize,若是没有超过,则创建新线程,若是超过,则尝试将Runnable提交到工作队列workQueue中。如果工作队列workQueue没有超过容量,则Runnable提交到工作队列中,如果超过了workQueue的容量,则尝试创建线程。如果此时创建的线程小于最大线程数maximumPoolSize,则创建线程,如果超过了maximumPoolSize,则执行拒绝策列。 6.ThreadPoolExecutor.execute方法分析 public void execute(Runnable command) { //如果runnable为空,抛出异常 if (command == null) throw new NullPointerException(); //获取ctl值,该值高3位代表线程池运行状态,低29位代表线程池当前运行线程数量 int c = ctl.get(); //CASE1:获取线程池运行线程数量,如果小于核心线程数,则创建线程,addWorker传入参数为core //也就是说,线程池不是一上来就把核心线程创建了,必须在提交runnable任务到线程池的时候才一个一个创建 if (workerCountOf(c) < corePoolSize) { //addWorker是创建线程的核心方法,关键点在Worker类的构造方法和runWorker方法的while循环 if (addWorker(command, true)) return; c = ctl.get(); } //CASE2:条件1不成立说明核心线程数已满,将任务添加到阻塞队列中。 if (isRunning(c) && workQueue.offer(command)) { int recheck = ctl.get(); if (! isRunning(recheck) && remove(command)) reject(command); else if (workerCountOf(recheck) == 0) addWorker(null, false); } //CASE3:条件1和2都不成立,说明核心线程已创建完全并且任务队列已满 //调用addWorker创建非核心线程,如果返回false,说明线程数达到最大线程数,执行拒绝策列 else if (!addWorker(command, false)) reject(command); } 6.1.Worker类分析 每个线程的创建都离不开Worker类,该类完全包装了线程运行的所需要的属性,并提供了初始化线程和从阻塞队列中获取被阻塞的线程并执行的一系列方法。 观察该类代码发现,该类继承了AbstractQueuedSynchronizer并实现了Runnable接口,在创建线程的时候,实际Thread类的构造方法包装的就是Worker类自己(我们知道一般Runnable需要被传入到Thread里面的,如:Thread t = new Thread(runnable), t.start()启动线程)。而从execute方法传过来的Runnable实现只是被封装到了firstTask中,创建出来的Thread在执行的时候,调用的start方法也只是启动了该类的runWorker方法,而真正封装我们执行逻辑的firstTask这个Runnable类在后续调用中也只是执行自己的run方法而已,并不再被Thread封装。 worker为什么要继承AbstractQueuedSynchronizer呢? 因为在runWork的方法内,在调用firstTask处理业务逻辑前,会给代码加上独占锁,加这个独占锁的目的是什么呢?因为我们在调用shutDown方法的时候,并不会终止处于运行中的线程。shutDown方法会根据独占锁来判断当前worker是否正在工作。 private final class Worker extends AbstractQueuedSynchronizer implements Runnable { private static final long serialVersionUID = 6138294804551838833L; ​ //需要创建的线程,该线程封装的Runnable是自己 final Thread thread; ​ //execute传入的Runnable,该runnable并不被Thread包装,后续调用自己的run方法。 Runnable firstTask; ​ volatile long completedTasks; ​ Worker(Runnable firstTask) { //设置线程池处于运行状态 setState(-1); //封装execute传入进来的包含实际逻辑的Runnable this.firstTask = firstTask; //创建一个线程,这里注意,线程封装的Runnable是自己 //示例使用Executors.defaultThreadFactory() this.thread = getThreadFactory().newThread(this); } //被thread属性封装后调用start方法后,会自动启动该run方法,执行后续逻辑 //后续逻辑会调用firstTask.run()方法启动实际业务逻辑 public void run() { runWorker(this); } ​ protected boolean isHeldExclusively() { return getState() != 0; } ​ protected boolean tryAcquire(int unused) { if (compareAndSetState(0, 1)) { setExclusiveOwnerThread(Thread.currentThread()); return true; } return false; } ​ protected boolean tryRelease(int unused) { setExclusiveOwnerThread(null); setState(0); return true; } ​ public void lock() { acquire(1); } public boolean tryLock() { return tryAcquire(1); } public void unlock() { release(1); } public boolean isLocked() { return isHeldExclusively(); } ​ void interruptIfStarted() { Thread t; if (getState() >= 0 && (t = thread) != null && !t.isInterrupted()) { try { t.interrupt(); } catch (SecurityException ignore) { } } } } 6.2.addWorker方法分析 addWorker是创建线程的核心方法,一个worker代表一个线程,而workers这个全局变量可以代表线程池,只有向workers里面添加worker成功的时候,才能代表创建线程成功了。addWorker在执行过程中,会根据线程池状态和线程池数量判断是否能创建线程,创建线程成功会将记录线程池状态和数量的ctl值+1,并将worker加入到workers里面,更新线程池生命周期内线程池线程的最大数量,然后启动线程执行任务。 addWorker的core参数代表是否是在创建核心线程,core为true代表创建核心线程,false代表阻塞队列已满,创建非核心线程。 返回值: true代表创建线程并启动成功,false代表创建线程失败。 什么时候返回false呢? CASE1.线程池状态rs>SHUTDOWN; CASE2.线程池状态为SHUTDOWN的时候,阻塞队列没有任务了,为空; CASE3.线程池状态为SHUTDOWN的时候,execute提交的Runnable(被封装到firstTask里面)不为空; CASE4.如果是创建核心线程,此时已经超过核心线程数;如果是创建非核心线程,此时已经超过最大线程数; CASE5.ThreadFactory创建线程为空,这里一般是我们自定义线程工厂的时候出的问题; private boolean addWorker(Runnable firstTask, boolean core) { //retry代码除了检查是否能创建线程外,还负责将ctl值+1,如果不能创建线程,则返回false; retry: for (;;) { //获取当前ctl值 int c = ctl.get(); //获取当前线程池运行状态 int rs = runStateOf(c); //CASE1.线程池状态rs>SHUTDOWN;返回false; //CASE2.线程池状态为SHUTDOWN的时候,阻塞队列没有任务了,为空; //CASE3.线程池状态为SHUTDOWN的时候,execute提交的Runnable(被封装到firstTask里面)不为空; if (rs >= SHUTDOWN && ! (rs == SHUTDOWN && firstTask == null && ! workQueue.isEmpty())) return false; ​ //循环判断是否能将ctl+1设置成功 for (;;) { //获取当前运行中的线程数量 int wc = workerCountOf(c); //条件1:wc >= CAPACITY基本不可能,CAPACITY为理论上的最大线程数,一个5亿级的数字 //CASE4.根据core参数,如果是创建核心线程,此时已经超过核心线程数,则返回false //如果是创建非核心线程,此时已经超过最大线程数,则返回false if (wc >= CAPACITY || wc >= (core ? corePoolSize : maximumPoolSize)) return false; //条件成立,说明给ctl修改+1成功了,代表给线程数+1设置成功了,可以退出循环创建线程了 //如果在执行这段代码的时候,线程池状态正巧被改了,这里也会失败,因为ctl的高3位代表的是线程状态 if (compareAndIncrementWorkerCount(c)) break retry; //如果上面设置线程数+1失败,则实时获取线程状态并和当前的比较 c = ctl.get(); //状态被改变了跳到retry再次判断是否允许创建线程 if (runStateOf(c) != rs) continue retry; } } //代码走到这里代表已经允许创建线程了 //表示创建的worker是否已经启动,启动也代表线程创建成功了 boolean workerStarted = false; //添加worker到worker队列是否成功的状态 boolean workerAdded = false; //局部变量 Worker w = null; try { //构建work对象 w = new Worker(firstTask); //获取worker的构造方法创建的线程 final Thread t = w.thread; //这里加了这段判断是为了防止自己实现的TreadFactory有bug导致创建线程失败 if (t != null) { //向works这个hashset里面添加works的时候,需要全局加锁,以下代码线程并不安全 //该段代码我的理解就是为了维护largestPoolSize这个值,记录线程池生命周期中, //线程池运行的线程的最大数量 final ReentrantLock mainLock = this.mainLock; mainLock.lock(); try { //获取当前线程池状态 int rs = runStateOf(ctl.get()); //检查线程池状态必须是RUNNING或者处于SHUTDOWN的时候,并没有提交具体的任务 if (rs < SHUTDOWN || (rs == SHUTDOWN && firstTask == null)) { //防止人为定义线程工厂创建线程并启动了start方法的情况 if (t.isAlive()) throw new IllegalThreadStateException(); //向线程池添加worker workers.add(w); //获取线程池线程数量 int s = workers.size(); //如果线程池线程数量>记录的值,更新线程池生命周期内最大线程记录数 if (s > largestPoolSize) largestPoolSize = s; //表示向线程池中添加线程成功了 workerAdded = true; } } finally { mainLock.unlock(); } if (workerAdded) { //启动线程,该方法实际会启动worker类的run方法,然后执行runWorker方法 t.start(); //设置线程启动状态为成功 workerStarted = true; } } } finally { if (! workerStarted) //后面再分析 addWorkerFailed(w); } return workerStarted; } 6.3.runWorker方法分析 addWorker方法创建线程成功,Worker类的Thread会调用start方法启动自己的run方法,因为Worker类实现了Runnable接口,run方法里面调用了runWorker方法。实际我们execute方法传入的Runnable被封装到了Worker类的firstTask属性里面。然后在runWorker里面调用run方法启动具体的逻辑,注意这里并没用再用Thrad封装Runnable了。线程启动后,会一直运行While循环,循环第一次运行自己传入的Runnable,第二次及之后则通过getTask方法从任务队列种获取具体的Runnable任务了。一旦While循环内发生异常或者getTask返回空,则会调用processWorkerExit执行线程销毁逻辑。getTask方法获取不到具体任务的线程都可被认为是空闲线程。 final void runWorker(Worker w) { //wt=w.thread Thread wt = Thread.currentThread(); //execute实际传入的包含业务逻辑的Runnable,该Runnable不再被Thread包装,调用自己的run方法 Runnable task = w.firstTask; //引用设置为null,帮助gc w.firstTask = null; //先调用unlock方法设置当前独占线程为空,线程运行状态为0 w.unlock(); //线程退出状态,true代表线程因为异常退出了 boolean completedAbruptly = true; try { //线程被创建并启动后就一直执行while循环,直到发生异常或者退出 //条件1:task != null,线程初创task不为空 //条件2:条件1不成立说明线程非初创并且核心线程数已满,说明已经创建好线程,从队列中取task任务 while (task != null || (task = getTask()) != null) { //设置独占锁,因为shutDown方法调用的时候不会立刻终止运行中的线程, //会根据是否持有独占锁来判断当前worker是否处于运行状态 w.lock(); //线程池处于STOP/TIDYING/TERMINATION且当前线程没有设置中断状态 //给当前线程设一个中断状态 if ((runStateAtLeast(ctl.get(), STOP) || (Thread.interrupted() && runStateAtLeast(ctl.get(), STOP))) && !wt.isInterrupted()) wt.interrupt(); try { //钩子方法,留给子类实现,在执行实际业务代码之前 beforeExecute(wt, task); Throwable thrown = null; try { //调用实际业务方法的逻辑 task.run(); } catch (RuntimeException x) { thrown = x; throw x; } catch (Error x) { thrown = x; throw x; } catch (Throwable x) { thrown = x; throw new Error(x); } finally { //钩子方法,留给子类实现,在执行实际业务代码之后 afterExecute(task, thrown); } } finally { //将task设置为空 task = null; //每个worker完成任务数量+1 w.completedTasks++; //释放掉锁,正常情况下会回到while循环继续执行getTask,发生异常会执行下面的finally //getTask为空也会退出while循环 w.unlock(); } } //如果getTask()返回空的时候,执行退出逻辑 completedAbruptly = false; } finally { //线程退出逻辑 //completedAbruptly=true因为异常退出 //completedAbruptly=false正常退出 processWorkerExit(w, completedAbruptly); } } 6.4.getTask方法分析 当getTask返回空的时候,线程可以执行销毁逻辑了。 getTask什么时候返回空? 1.线程池处于SHUTDOWN状态,工作队列为空的时候; 2.线程池处于STOP状态以上的时候,将线程池线程数-1并返回空; 3.当工作队列为空的时候; 注意,线程池的allowCoreThreadTimeOut属性会影响getTask方法,导致getTask方法一直阻塞在workQueue.take()这里的,这样就不会销毁线程。 1.allowCoreThreadTimeOut=true,使用非阻塞方法从队列获取任务 2.allowCoreThreadTimeOut=false,线程池线程数还未达到核心线程数上限,使用阻塞方法获取任务,这样就可以使得核心线程不会被销毁,getTask方法一直阻塞等待获取队列种的任务。 3.allowCoreThreadTimeOut=false,线程池线程数达到核心线程数,使用非阻塞方法获取任务 private Runnable getTask() { boolean timedOut = false; ​ for (;;) { int c = ctl.get(); int rs = runStateOf(c); ​ //成立1:线程池处于SHUTDOWN状态且工作队列为空的时候 //成立2:线程池处于STOP状态以上的时候,将线程池线程数-1并返回空 if (rs >= SHUTDOWN && (rs >= STOP || workQueue.isEmpty())) { decrementWorkerCount(); return null; } ​ //获取线程池线程数 int wc = workerCountOf(c); ​ //1.allowCoreThreadTimeOut=true,使用非阻塞方法从队列获取任务 //2.allowCoreThreadTimeOut=false,线程池线程数还未达到核心线程数,使用阻塞方法获取任务, //3.allowCoreThreadTimeOut=false,线程池线程数达到核心线程数,使用非阻塞方法获取任务 boolean timed = allowCoreThreadTimeOut || wc > corePoolSize; ​ //条件1-1:wc > maximumPoolSize,可能最大线程数设置的比核心线程数小,此时没有空闲线程可以接手 //条件1-2:timed && timedOut的timedOut在poll(keepAliveTime, TimeUnit.NANOSECONDS) //方法获取超时的时候,循环第二次执行的时候才可能导致条件为true //条件2:线程池还有其他线程,工作队列为空返回true //以上1和2条件成立了,任务返回为空。 if ((wc > maximumPoolSize || (timed && timedOut)) && (wc > 1 || workQueue.isEmpty())) { //尝试将线程数-1,并不一定会成功,可能被其他线程改过,失败则继续循环尝试-1 if (compareAndDecrementWorkerCount(c)) return null; continue; } ​ ​ try { //当timed=true的时候,使用poll获取超时候导致r=null的时候,timedOut=true, //再次执行循环 Runnable r = timed ? workQueue.poll(keepAliveTime, TimeUnit.NANOSECONDS) : workQueue.take();//阻塞方式从队列获取,防止线程线程执行销毁逻辑 if (r != null) return r; timedOut = true; } catch (InterruptedException retry) { timedOut = false; } } } 6.5.processWorkerExit方法分析 该方法用于执行线程销毁的逻辑。 1.加锁,从workers队列中移除一个worker,将线程池完成任务总数量+1, 释放锁; 2.判断是否需要关闭线程池; 3.如果线程正常完成并退出,根据allowCoreThreadTimeOut判断是否需要回收核心线程, 若allowCoreThreadTimeOut=true,只需要保证线程池最少有一个线程即可,也就是说超过1的空闲线程一定会被销毁。 若allowCoreThreadTimeOut=false,在线程数未达到核心线程数上限的情况下,由于getTask方法的阻塞,不会执行线程销毁的逻辑;当线程数达到核心线程数上限的情况,且队列也达到上限数,这之后创建的任何线程在getTask方法获取不到具体任务的情况下都会销毁 private void processWorkerExit(Worker w, boolean completedAbruptly) { //因为异常退出,线程运行数-1 if (completedAbruptly) decrementWorkerCount(); ​ final ReentrantLock mainLock = this.mainLock; mainLock.lock(); try { //取出每个worker执行的任务数量,并汇总到全局的任务执行数量中 completedTaskCount += w.completedTasks; //将worker从池中移除 workers.remove(w); } finally { mainLock.unlock(); } ​ //尝试关闭线程池并处理空闲线程 tryTerminate(); ​ //获取线程ctl值 int c = ctl.get(); //如果线程池当前状态小于STOP状态,说明线程池处于RUNNING,SHUTDOWN状态 if (runStateLessThan(c, STOP)) { //如果线程池是正常退出返回false走下面的流程 if (!completedAbruptly) { //allowCoreThreadTimeOut表示是否允许核心线程销毁 //min表示线程池允许的最小线程数,最少为1 int min = allowCoreThreadTimeOut ? 0 : corePoolSize; //条件1:min==0说明允许核心线程销毁 //条件2:工作队列不为空 if (min == 0 && ! workQueue.isEmpty()) //设置线程池最小线程数 min = 1; //如果当前线程池线程数大于min的值,返回,这里不管min是核心线程数还是1 //也就是说,超过核心线程的线程数在getTask方法从队列取不到的时候一定会回收 //而核心线程是否回收会根据allowCoreThreadTimeOut属性来判断 if (workerCountOf(c) >= min) return; } //上面从workers池中删除了一个worker,这里添加进去一个空任务的worker //核心线程数=0的情况会执行到这里,会维持核心线程数最少为1 addWorker(null, false); } } 6.6.tryTerminate方法分析 尝试关闭线程池方法并处理空闲线程,interruptIdleWorkers方法处理空闲线程,设置中断状态。每个线程退出都会单独调用该方法。 final void tryTerminate() { //自旋 for (;;) { //获取线程ctl值 int c = ctl.get(); //条件1:线程池处于RUNNING状态说明线程池当前正常,直接返回 //条件2:runStateAtLeast(c, TIDYING)说明已经有线程使得线程池由TIDYING -> TERMINATED状态 //转换了,当前线程直接返回 //条件3:(runStateOf(c) == SHUTDOWN && ! workQueue.isEmpty()) //说明线程池虽然处于SHUTDOWN状态,但工作队列不为空,得等队列处理完再尝试关闭线程池的逻辑。 if (isRunning(c) || runStateAtLeast(c, TIDYING) || (runStateOf(c) == SHUTDOWN && ! workQueue.isEmpty())) return; //能走到这里两种情况 //1.线程池状态>=STOP了 //2.线程池状态于SHUTDOWN状态,但队列为空了 if (workerCountOf(c) != 0) { //回收空闲的线程,因为执行runworer方法的时候worker会加锁,所以没加锁的都是空闲的 interruptIdleWorkers(ONLY_ONE); return; } ​ //workerCountOf(c) == 0 时,会来到这里,说明线程都已经销毁了 final ReentrantLock mainLock = this.mainLock; mainLock.lock(); try { //设置线程池状态为TIDYING状态。 if (ctl.compareAndSet(c, ctlOf(TIDYING, 0))) { try { //钩子方法,等用户实现 terminated(); } finally { //钩子方法设置线程池状态为TERMINATED状态 ctl.set(ctlOf(TERMINATED, 0)); //唤醒调用 awaitTermination() 方法的线程。 termination.signalAll(); } return; } } finally { mainLock.unlock(); } } } 6.7.interruptIdleWorkers方法分析 处理一个空闲线程方法。所有处于执行中的线程都会加锁(w.lock())。上面我们提过,核心线程被take方法阻塞的时候,我们这里设置线程t.interrupt(), 会解除take的阻塞。 private void interruptIdleWorkers(boolean onlyOne) { final ReentrantLock mainLock = this.mainLock; mainLock.lock(); try { for (Worker w : workers) { Thread t = w.thread; //线程没有中断且尝试加锁成功,因为所有处于执行中的线程都会加锁(w.lock()) //未加锁的说明处于空闲中了。 if (!t.isInterrupted() && w.tryLock()) { try { //设置线程中断 t.interrupt(); } catch (SecurityException ignore) { } finally { w.unlock(); } } if (onlyOne) break; } } finally { mainLock.unlock(); } } 6.8.awaitTermination方法分析 该方法是判断线程池状态状态是否是TERMINATED,如果是则直接返回true,否则会await挂起当前线程指定的时间 public boolean awaitTermination(long timeout, TimeUnit unit) throws InterruptedException { long nanos = unit.toNanos(timeout); final ReentrantLock mainLock = this.mainLock; mainLock.lock(); try { for (;;) { if (runStateAtLeast(ctl.get(), TERMINATED)) return true; if (nanos <= 0) return false; nanos = termination.awaitNanos(nanos); } } finally { mainLock.unlock(); } } 6.9.shutDown和shutDownNow方法分析 shutDown方法会优雅的关闭线程池,设置线程池状态为SHUTDOWN,已经处于队列中的任务会继续等待执行完。 shutDownNow方法会立即关闭线程池,设置线程池状态为STOP。 public void shutdown() { final ReentrantLock mainLock = this.mainLock; //获取线程池全局锁 mainLock.lock(); try { checkShutdownAccess(); //设置线程池状态为SHUTDOWN advanceRunState(SHUTDOWN); //中断空闲线程 interruptIdleWorkers(); //空方法,子类可以扩展 onShutdown(); // hook for ScheduledThreadPoolExecutor } finally { //释放线程池全局锁 mainLock.unlock(); } tryTerminate(); } public List<Runnable> shutdownNow() { //返回值引用 List<Runnable> tasks; final ReentrantLock mainLock = this.mainLock; //获取线程池全局锁 mainLock.lock(); try { checkShutdownAccess(); //设置线程池状态为STOP advanceRunState(STOP); //中断线程池中所有线程 interruptWorkers(); //导出未处理的task tasks = drainQueue(); } finally { mainLock.unlock(); } ​ tryTerminate(); //返回当前任务队列中 未处理的任务。 return tasks; } 7.ThreadPoolExecutor拒绝策列 默认有以下4中拒绝策列,用户也可以实现RejectedExecutionHandler接口自定义。 CallerRunsPolicy将任务交给调用者执行 AbortPolicy抛出异常 DiscardPolicy什么都不做,直接丢弃 DiscardOldestPolicy丢弃老的,执行新的 public static class CallerRunsPolicy implements RejectedExecutionHandler { ​ public CallerRunsPolicy() { } ​ //交给主线程执行 public void rejectedExecution(Runnable r, ThreadPoolExecutor e) { if (!e.isShutdown()) { r.run(); } } } ​ public static class AbortPolicy implements RejectedExecutionHandler { ​ public AbortPolicy() { } ​ //中断拒绝 public void rejectedExecution(Runnable r, ThreadPoolExecutor e) { throw new RejectedExecutionException("Task " + r.toString() + " rejected from " + e.toString()); } } ​ public static class DiscardPolicy implements RejectedExecutionHandler { ​ public DiscardPolicy() { } ​ //直接抛弃什么都不做 public void rejectedExecution(Runnable r, ThreadPoolExecutor e) { } } ​ public static class DiscardOldestPolicy implements RejectedExecutionHandler { ​ public DiscardOldestPolicy() { } ​ //丢弃老的 ,执行新的 public void rejectedExecution(Runnable r, ThreadPoolExecutor e) { if (!e.isShutdown()) { e.getQueue().poll(); e.execute(r); } } } 8.扩展:改变线程池的初始化过程 如果我们想让线程按核心线程,最大线程,最后再进队列的方式初始化,应该怎么做? public void execute(Runnable command) { //如果runnable为空,抛出异常 if (command == null) throw new NullPointerException(); //获取ctl值,该值高3位代表线程池运行状态,低29位代表线程池当前运行线程数量 int c = ctl.get(); //CASE1:获取线程池运行线程数量,如果小于核心线程数,则创建线程,addWorker传入参数为core //也就是说,线程池不是一上来就把核心线程创建了,必须在提交runnable任务到线程池的时候才一个一个创建 if (workerCountOf(c) < corePoolSize) { //addWorker是创建线程的核心方法,关键点在Worker类的构造方法和runWorker方法的while循环 if (addWorker(command, true)) return; c = ctl.get(); } //CASE2:条件1不成立说明核心线程数已满,将任务添加到阻塞队列中。 if (isRunning(c) && workQueue.offer(command)) { int recheck = ctl.get(); if (! isRunning(recheck) && remove(command)) reject(command); else if (workerCountOf(recheck) == 0) addWorker(null, false); } //CASE3:条件1和2都不成立,说明核心线程已创建完全并且任务队列已满 //调用addWorker创建非核心线程,如果返回false,说明线程数达到最大线程数,执行拒绝策列 else if (!addWorker(command, false)) reject(command); } 我们在说execute方法初始化线程池过程中。CASE2:workQueue.offer(command)会将任务加入到队列。所以,我们这里只需要自定义BlockingQueue,改造offer方法,在里面判断,当线程池线程数还未达到最大线程数的时候返回false即可。 Dubbo的EagerThreadPool自定义了一个BlockingQueue,在offer()方法中,如果当前线程池数量小于最大线程池时,直接返回false,这里就达到了调节线程池执行顺序的目的。 9.推荐 分享一个朋友的公众号,有很多干货,包含netty,spring,线程,spring cloud等详细讲解,也有详细的学习规划图,面试题整理等,我感觉在讲课这块比我讲的清楚:

优秀的个人博客,低调大师

Cassandra源码解析系列启动模块

以3.11.4为基础 Cassandra 启动流程从bin下面的cassandra脚本开始进去看,会涉及到cassandra-env.sh进行进程启动的一些参数设置比如堆上内存分配,日志参数配置,基本环境设置等,我们直接看到启动的进程,也就是launch_service 这个函数,然后看到里面的exec 执行JAVA的进程,也就是class(launch_service参数传进来的classname为org.apache.cassandra.service.CassandraDaemon类);大概的流程是: cassandra -> lauch_service -> JAVA启动org.apache.cassandra.service.CassandraDaemon; 接下来就是看到org.apache.cassandra.service.CassandraDaemon这个类,直接在这个类里面通过main函数找到启动的入口: public static void main(String[] args) { instance.activate(); } 在active函数里面有3个主要要看的函数: // Do not put any references to DatabaseDescriptor above the forceStaticInitialization call. try { applyConfig(); MBeanWrapper.instance.registerMBean(new StandardMBean(new NativeAccess(), NativeAccessMBean.class), MBEAN_NAME, MBeanWrapper.OnException.LOG); if (FBUtilities.isWindows) { // We need to adjust the system timer on windows from the default 15ms down to the minimum of 1ms as this // impacts timer intervals, thread scheduling, driver interrupts, etc. WindowsTimer.startTimerPeriod(DatabaseDescriptor.getWindowsTimerInterval()); } setup(); String pidFile = System.getProperty("cassandra-pidfile"); if (pidFile != null) { new File(pidFile).deleteOnExit(); } start(); } catch (Throwable e) { boolean logStackTrace = e instanceof ConfigurationException ? ((ConfigurationException)e).logStackTrace : true; System.out.println("Exception (" + e.getClass().getName() + ") encountered during startup: " + e.getMessage()); if (logStackTrace) { if (runManaged) logger.error("Exception encountered during startup", e); // try to warn user on stdout too, if we haven't already detached e.printStackTrace(); exitOrFail(3, "Exception encountered during startup", e); } else { if (runManaged) logger.error("Exception encountered during startup: {}", e.getMessage()); // try to warn user on stdout too, if we haven't already detached System.err.println(e.getMessage()); exitOrFail(3, "Exception encountered during startup: " + e.getMessage()); } } applyConfig();主要是用来初始化cassandra.yaml配置文件里的基本的配置,setup主要是做一些单节点初始化的时候的一些初始化工作,比如load本地的sstable元信息到内存,清除无用的sstable文件,启动的时候没有commit的transaction 执行或回滚,commitlog 的启动以及回放,集群元信息的效验,启动compaction,启动7000端口内部交流server等等事情; start函数主要是启动9042的client监听端口,主要是netty的server,当然如果是thrift的话,也启动9160 端口服务;

资源下载

更多资源
Mario

Mario

马里奥是站在游戏界顶峰的超人气多面角色。马里奥靠吃蘑菇成长,特征是大鼻子、头戴帽子、身穿背带裤,还留着胡子。与他的双胞胎兄弟路易基一起,长年担任任天堂的招牌角色。

腾讯云软件源

腾讯云软件源

为解决软件依赖安装时官方源访问速度慢的问题,腾讯云为一些软件搭建了缓存服务。您可以通过使用腾讯云软件源站来提升依赖包的安装速度。为了方便用户自由搭建服务架构,目前腾讯云软件源站支持公网访问和内网访问。

Nacos

Nacos

Nacos /nɑ:kəʊs/ 是 Dynamic Naming and Configuration Service 的首字母简称,一个易于构建 AI Agent 应用的动态服务发现、配置管理和AI智能体管理平台。Nacos 致力于帮助您发现、配置和管理微服务及AI智能体应用。Nacos 提供了一组简单易用的特性集,帮助您快速实现动态服务发现、服务配置、服务元数据、流量管理。Nacos 帮助您更敏捷和容易地构建、交付和管理微服务平台。

Spring

Spring

Spring框架(Spring Framework)是由Rod Johnson于2002年提出的开源Java企业级应用框架,旨在通过使用JavaBean替代传统EJB实现方式降低企业级编程开发的复杂性。该框架基于简单性、可测试性和松耦合性设计理念,提供核心容器、应用上下文、数据访问集成等模块,支持整合Hibernate、Struts等第三方框架,其适用范围不仅限于服务器端开发,绝大多数Java应用均可从中受益。

用户登录
用户注册