首页 文章 精选 留言 我的

精选列表

搜索[源码阅读],共10005篇文章
优秀的个人博客,低调大师

SparkContext源码阅读

SparkContext是spark的入口,通过它来连接集群、创建RDD、广播变量等等。 class SparkContext(config: SparkConf) extends Logging with ExecutorAllocationClient { private val creationSite: CallSite = Utils.getCallSite() //如果生命了2个sparkContext,则会使用warn来取代exception.防止退出 private val allowMultipleContexts: Boolean = config.getBoolean("spark.driver.allowMultipleContexts", false) ..防止两个sparkcontext同时运行 SparkContext.markPartiallyConstructed(this, allowMultipleContexts) private[spark] var preferredNodeLocationData: Map[String, Set[SplitInfo]] = Map() val startTime = System.currentTimeMillis() //当提交任务执行spark-submit时,加载系统环境变量 def this() = this(new SparkConf()) def this(master: String, appName: String, conf: SparkConf) = this(SparkContext.updatedConf(conf, master, appName)) //preferredNodeLocationData 用于启动查找nodes,启动相应的container def this( master: String, appName: String, sparkHome: String = null, jars: Seq[String] = Nil, environment: Map[String, String] = Map(), preferredNodeLocationData: Map[String, Set[SplitInfo]] = Map()) = { this(SparkContext.updatedConf(new SparkConf(), master, appName, sparkHome, jars, environment)) if (preferredNodeLocationData.nonEmpty) { logWarning("Passing in preferred locations has no effect at all, see SPARK-8949") } this.preferredNodeLocationData = preferredNodeLocationData //构造函数 private[spark] def this(master: String, appName: String) = this(master, appName, null, Nil, Map(), Map()) private[spark] def this(master: String, appName: String, sparkHome: String) = this(master, appName, sparkHome, Nil, Map(), Map()) private[spark] def this(master: String, appName: String, sparkHome: String, jars: Seq[String]) = this(master, appName, sparkHome, jars, Map(), Map()) private[spark] def conf: SparkConf = _conf //clone Conf,那么在运行时就不能被修改 def getConf: SparkConf = conf.clone() def jars: Seq[String] = _jars def files: Seq[String] = _files def master: String = _conf.get("spark.master") def appName: String = _conf.get("spark.app.name") private[spark] def isEventLogEnabled: Boolean = _conf.getBoolean("spark.eventLog.enabled", false) private[spark] def eventLogDir: Option[URI] = _eventLogDir private[spark] def eventLogCodec: Option[String] = _eventLogCodec //创建schedular val (sched, ts) = SparkContext.createTaskScheduler(this, master) _schedulerBackend = sched _taskScheduler = ts _dagScheduler = new DAGScheduler(this) _heartbeatReceiver.ask[Boolean](TaskSchedulerIsSet) //启动taskschedular _taskScheduler.start() applicationId = _taskScheduler.applicationId() _applicationAttemptId = taskScheduler.applicationAttemptId() _conf.set("spark.app.id", _applicationId) _env.blockManager.initialize(_applicationId) //创建一个新的RDD,通过step来增加元素 def range( start: Long, end: Long, step: Long = 1, numSlices: Int = defaultParallelism): RDD[Long] = withScope { assertNotStopped() // when step is 0, range will run infinitely require(step != 0, "step cannot be 0") val numElements: BigInt = { val safeStart = BigInt(start) val safeEnd = BigInt(end) if ((safeEnd - safeStart) % step == 0 || safeEnd > safeStart ^ step > 0) { (safeEnd - safeStart) / step } else { (safeEnd - safeStart) / step + 1 } } parallelize(0 until numSlices, numSlices).mapPartitionsWithIndex((i, _) => { val partitionStart = (i * numElements) / numSlices * step + start val partitionEnd = (((i + 1) * numElements) / numSlices) * step + start def getSafeMargin(bi: BigInt): Long = if (bi.isValidLong) { bi.toLong } else if (bi > 0) { Long.MaxValue } else { Long.MinValue } val safePartitionStart = getSafeMargin(partitionStart) val safePartitionEnd = getSafeMargin(partitionEnd) new Iterator[Long] { private[this] var number: Long = safePartitionStart private[this] var overflow: Boolean = false override def hasNext = if (!overflow) { if (step > 0) { number < safePartitionEnd } else { number > safePartitionEnd } } else false override def next() = { val ret = number number += step if (number < ret ^ step < 0) { overflow = true } ret } } }) } //创建一个RDD def makeRDD[T: ClassTag]( seq: Seq[T], numSlices: Int = defaultParallelism): RDD[T] = withScope { parallelize(seq, numSlices) } //读取本地、HDFS的文件,返回一个String的字符串 def textFile( path: String, minPartitions: Int = defaultMinPartitions): RDD[String] = withScope { assertNotStopped() hadoopFile(path, classOf[TextInputFormat], classOf[LongWritable], classOf[Text], minPartitions).map(pair => pair._2.toString) } //加载一个二进制文件, @Experimental def binaryRecords( path: String, recordLength: Int, conf: Configuration = hadoopConfiguration): RDD[Array[Byte]] = withScope { assertNotStopped() conf.setInt(FixedLengthBinaryInputFormat.RECORD_LENGTH_PROPERTY, recordLength) val br = newAPIHadoopFile[LongWritable, BytesWritable, FixedLengthBinaryInputFormat](path, classOf[FixedLengthBinaryInputFormat], classOf[LongWritable], classOf[BytesWritable], conf = conf) val data = br.map { case (k, v) => val bytes = v.getBytes assert(bytes.length == recordLength, "Byte array does not have correct length") bytes } data } //获得一个为HADOOP sequenceFile给定键值对类型的RDD def sequenceFile[K, V](path: String, keyClass: Class[K], valueClass: Class[V], minPartitions: Int ): RDD[(K, V)] = withScope { assertNotStopped() val inputFormatClass = classOf[SequenceFileInputFormat[K, V]] hadoopFile(path, inputFormatClass, keyClass, valueClass, minPartitions) } //1300发送一个广播变量到集群的每个节点 def broadcast[T: ClassTag](value: T): Broadcast[T] = { assertNotStopped() if (classOf[RDD[_]].isAssignableFrom(classTag[T].runtimeClass)) { logWarning("Can not directly broadcast RDDs; instead, call collect() and " + "broadcast the result (see SPARK-5063)") } val bc = env.broadcastManager.newBroadcast[T](value, isLocal) val callSite = getCallSite logInfo("Created broadcast " + bc.id + " from " + callSite.shortForm) cleaner.foreach(_.registerBroadcastForCleanup(bc)) bc }

优秀的个人博客,低调大师

HBase源码阅读资源

HBase MemStoreFlusher 虽与最新版0.98.7的实现已经有差异,但分析的比较好 MemeStoreFlusher在HRegionServer类中初始化。 HRegionServer实现了Runnable接口,在run方法中针对MemeStoreFlusher进行了初始化 privatevoidinitializeThreads()throwsIOException{ //Cacheflushingthread. this.cacheFlusher=newMemStoreFlusher(conf,this); ... } 启动: this.cacheFlusher.start(uncaughtExceptionHandler); interrupt: if(this.cacheFlusher!=null)this.cacheFlusher.interruptIfNecessary();

优秀的个人博客,低调大师

datax源码阅读三:JobContainer

前面介绍的python文件和Engine都是用于做初始化准备,真正的执行都是在这里完成,start代码如下: /** * jobContainer主要负责的工作全部在start()里面,包括init、prepare、split、scheduler、 * post以及destroy和statistics */ @Override public void start() { LOG.info("DataX jobContainer starts job."); boolean hasException = false; boolean isDryRun = false; try { this.startTimeStamp = System.currentTimeMillis(); isDryRun = configuration.getBool(CoreConstant.DATAX_JOB_SETTING_DRYRUN, false); if(isDryRun) { LOG.info("jobContainer starts to do preCheck ..."); this.preCheck(); } else { userConf = configuration.clone(); LOG.debug("jobContainer starts to do preHandle ..."); this.preHandle(); LOG.debug("jobContainer starts to do init ..."); this.init(); LOG.info("jobContainer starts to do prepare ..."); this.prepare(); LOG.info("jobContainer starts to do split ..."); this.totalStage = this.split(); LOG.info("jobContainer starts to do schedule ..."); this.schedule(); LOG.debug("jobContainer starts to do post ..."); this.post(); LOG.debug("jobContainer starts to do postHandle ..."); this.postHandle(); LOG.info("DataX jobId [{}] completed successfully.", this.jobId); this.invokeHooks(); } } catch (Throwable e) { LOG.error("Exception when job run", e); hasException = true; if (e instanceof OutOfMemoryError) { this.destroy(); System.gc(); } if (super.getContainerCommunicator() == null) { // 由于 containerCollector 是在 scheduler() 中初始化的,所以当在 scheduler() 之前出现异常时,需要在此处对 containerCollector 进行初始化 AbstractContainerCommunicator tempContainerCollector; // standalone tempContainerCollector = new StandAloneJobContainerCommunicator(configuration); super.setContainerCommunicator(tempContainerCollector); } Communication communication = super.getContainerCommunicator().collect(); // 汇报前的状态,不需要手动进行设置 // communication.setState(State.FAILED); communication.setThrowable(e); communication.setTimestamp(this.endTimeStamp); Communication tempComm = new Communication(); tempComm.setTimestamp(this.startTransferTimeStamp); Communication reportCommunication = CommunicationTool.getReportCommunication(communication, tempComm, this.totalStage); super.getContainerCommunicator().report(reportCommunication); throw DataXException.asDataXException( FrameworkErrorCode.RUNTIME_ERROR, e); } finally { if(!isDryRun) { this.destroy(); this.endTimeStamp = System.currentTimeMillis(); if (!hasException) { //最后打印cpu的平均消耗,GC的统计 VMInfo vmInfo = VMInfo.getVmInfo(); if (vmInfo != null) { vmInfo.getDelta(false); LOG.info(vmInfo.totalString()); LogUtil.logVmInfo(vmInfo); } LOG.info(PerfTrace.getInstance().summarizeNoException()); this.logStatistics(); } } } } 主要执行流程为: 1、preHandle():job前置操作 2、init():初始化reader和writer 3、prepare():执行插件的prepare操作 4、split():切分任务 5、schedule():执行任务 6、post():执行插件的post操作 7、postHandle():job后置操作 8、invokeHooks():调用hook 9、输出统计结果 上述任务流是顺序执行的,第5步会将切分的task分配到多个taskGroup中并发执行,其中preHandle、postHandle、invokeHooks不影响整体执行,可以先忽略,下面主要介绍关键步骤1)init()关键代码主要是初始化reader和writer插件 /** * reader和writer的初始化 */ private void init() { this.jobReader = this.initJobReader(jobPluginCollector); this.jobWriter = this.initJobWriter(jobPluginCollector); } /** * reader job的初始化,返回Reader.Job * * @return */ private Reader.Job initJobReader( JobPluginCollector jobPluginCollector) { this.readerPluginName = this.configuration.getString( CoreConstant.DATAX_JOB_CONTENT_READER_NAME); classLoaderSwapper.setCurrentThreadClassLoader(LoadUtil.getJarLoader( PluginType.READER, this.readerPluginName)); Reader.Job jobReader = (Reader.Job) LoadUtil.loadJobPlugin( PluginType.READER, this.readerPluginName); // 设置reader的jobConfig jobReader.setPluginJobConf(this.configuration.getConfiguration( CoreConstant.DATAX_JOB_CONTENT_READER_PARAMETER)); // 设置reader的readerConfig jobReader.setPeerPluginJobConf(this.configuration.getConfiguration( CoreConstant.DATAX_JOB_CONTENT_WRITER_PARAMETER)); jobReader.setJobPluginCollector(jobPluginCollector); jobReader.init(); classLoaderSwapper.restoreCurrentThreadClassLoader(); return jobReader; } reader插件初始化的时候使用了自定义classLoader,这样可以做到插件级别的隔离,插件初始化完成之后调用了job的init函数,用于初始化插件的Job,writer插件初始化同理 2)prepare():prepare操作比较简单,分别执行reader和writer插件Job中的prepare函数即可,同样,每次执行前都会先加载对应的classLoader用于隔离 private void prepare() { this.prepareJobReader(); this.prepareJobWriter(); } 3)split():切分任务task /** * 执行reader和writer最细粒度的切分,需要注意的是,writer的切分结果要参照reader的切分结果, * 达到切分后数目相等,才能满足1:1的通道模型,所以这里可以将reader和writer的配置整合到一起, * 然后,为避免顺序给读写端带来长尾影响,将整合的结果shuffler掉 */ private int split() { this.adjustChannelNumber(); if (this.needChannelNumber <= 0) { this.needChannelNumber = 1; } List<Configuration> readerTaskConfigs = this .doReaderSplit(this.needChannelNumber); int taskNumber = readerTaskConfigs.size(); List<Configuration> writerTaskConfigs = this .doWriterSplit(taskNumber); List<Configuration> transformerList = this.configuration.getListConfiguration(CoreConstant.DATAX_JOB_CONTENT_TRANSFORMER); LOG.debug("transformer configuration: "+ JSON.toJSONString(transformerList)); /** * 输入是reader和writer的parameter list,输出是content下面元素的list */ List<Configuration> contentConfig = mergeReaderAndWriterTaskConfigs( readerTaskConfigs, writerTaskConfigs, transformerList); LOG.debug("contentConfig configuration: "+ JSON.toJSONString(contentConfig)); this.configuration.set(CoreConstant.DATAX_JOB_CONTENT, contentConfig); return contentConfig.size(); } 上面函数主要分为3步: 1、计算限速和并发,即实际的channel数和每个channel的限速,主要在adjustChannelNumber()中,这里不做过多说明 2、根据实际的channel数,切分reader端,具体的切分逻辑reader插件可以自行实现 3、根据reader端切分的数目切分writer端,达到reader:writer=1:1,这样每个task中都包含一个reader和一个writer 4)schedule():执行切分出来的task /** * schedule首先完成的工作是把上一步reader和writer split的结果整合到具体taskGroupContainer中, * 同时不同的执行模式调用不同的调度策略,将所有任务调度起来 */ private void schedule() { /** * 这里的全局speed和每个channel的速度设置为B/s */ int channelsPerTaskGroup = this.configuration.getInt( CoreConstant.DATAX_CORE_CONTAINER_TASKGROUP_CHANNEL, 5); int taskNumber = this.configuration.getList( CoreConstant.DATAX_JOB_CONTENT).size(); this.needChannelNumber = Math.min(this.needChannelNumber, taskNumber); PerfTrace.getInstance().setChannelNumber(needChannelNumber); /** * 通过获取配置信息得到每个taskGroup需要运行哪些tasks任务 */ List<Configuration> taskGroupConfigs = JobAssignUtil.assignFairly(this.configuration, this.needChannelNumber, channelsPerTaskGroup); LOG.info("Scheduler starts [{}] taskGroups.", taskGroupConfigs.size()); ExecuteMode executeMode = null; AbstractScheduler scheduler; try { executeMode = ExecuteMode.STANDALONE; scheduler = initStandaloneScheduler(this.configuration); //设置 executeMode for (Configuration taskGroupConfig : taskGroupConfigs) { taskGroupConfig.set(CoreConstant.DATAX_CORE_CONTAINER_JOB_MODE, executeMode.getValue()); } if (executeMode == ExecuteMode.LOCAL || executeMode == ExecuteMode.DISTRIBUTE) { if (this.jobId <= 0) { throw DataXException.asDataXException(FrameworkErrorCode.RUNTIME_ERROR, "在[ local | distribute ]模式下必须设置jobId,并且其值 > 0 ."); } } LOG.info("Running by {} Mode.", executeMode); this.startTransferTimeStamp = System.currentTimeMillis(); scheduler.schedule(taskGroupConfigs); this.endTransferTimeStamp = System.currentTimeMillis(); } catch (Exception e) { LOG.error("运行scheduler 模式[{}]出错.", executeMode); this.endTransferTimeStamp = System.currentTimeMillis(); throw DataXException.asDataXException( FrameworkErrorCode.RUNTIME_ERROR, e); } /** * 检查任务执行情况 */ this.checkLimit(); } schedule执行过程主要分为以下几步: 1、计算taskGroup个数 2、将切分的task分配到taskGroup中 3、启动线程池执行taskGroup,具体代码流程为scheduler.schedule(taskGroupConfigs) -> AbstractScheduler.schedule -> startAllTaskGroup -> ProcessInnerScheduler.startAllTaskGroup -> this.taskGroupContainerExecutorService.execute(taskGroupContainerRunner) -> TaskGroupContainerRunner.run() -> this.taskGroupContainer.start() 4、收集taskGroup汇报的信息 5)post():执行插件的post操作 private void post() { this.postJobWriter(); this.postJobReader(); }

优秀的个人博客,低调大师

Hive metastore源码阅读(二)

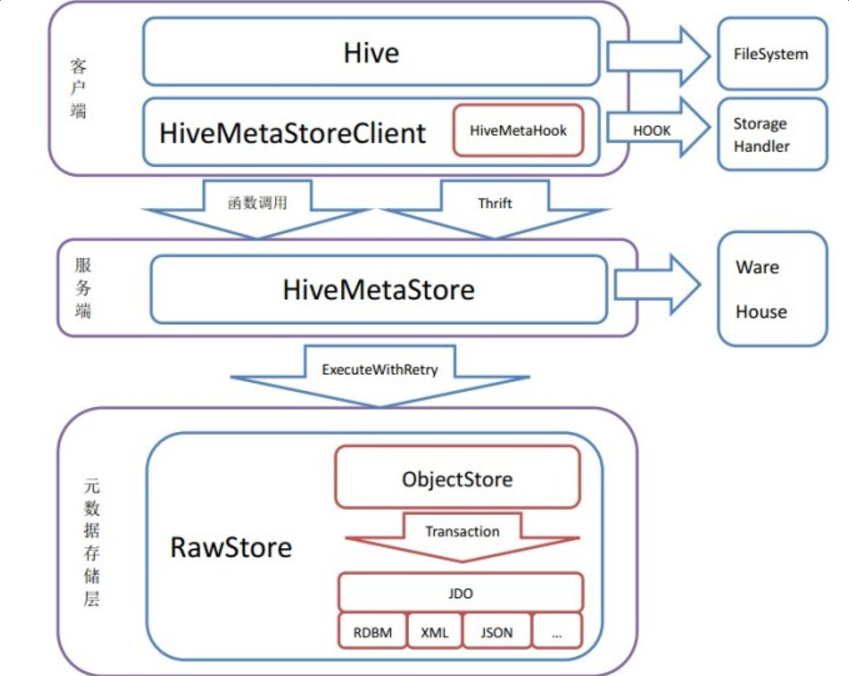
最近随着项目的深入,发现hive meta有些弊端,就是你会发现它的元数据操作与操作物理集群的代码耦合在一起,非常不利于扩展。比如:在create_table的时候同时进行路径校验及创建,如下代码: 1 if (!TableType.VIRTUAL_VIEW.toString().equals(tbl.getTableType())) { 2 if (tbl.getSd().getLocation() == null 3 || tbl.getSd().getLocation().isEmpty()) { 4 tblPath = wh.getTablePath( 5 ms.getDatabase(tbl.getDbName()), tbl.getTableName()); 6 } else { 7 if (!isExternal(tbl) && !MetaStoreUtils.isNonNativeTable(tbl)) { 8 LOG.warn("Location: " + tbl.getSd().getLocation() 9 + " specified for non-external table:" + tbl.getTableName()); 10 } 11 tblPath = wh.getDnsPath(new Path(tbl.getSd().getLocation())); 12 } 13 tbl.getSd().setLocation(tblPath.toString()); 14 } 15 16 if (tblPath != null) { 17 if (!wh.isDir(tblPath)) { 18 if (!wh.mkdirs(tblPath, true)) { 19 throw new MetaException(tblPath 20 + " is not a directory or unable to create one"); 21 } 22 madeDir = true; 23 } 所以这是meta无法统一所有元数据的原因么。。其实hive metastore的代码从大的来看,就好比元数据的增删改查,从上次梳理中我们看到,在创建HiveMetaStore的init方法中,同时创建了三种Listener---MetaStorePreEventListener,MetaStoreEventListener,MetaStoreEndFunctionListener用于对每一步事件的监听与记录。同时呢,它还new出了WareHouse,用以进行物理操作。 1 public void init() throws MetaException { 2 rawStoreClassName = hiveConf.getVar(HiveConf.ConfVars.METASTORE_RAW_STORE_IMPL); 3 initListeners = MetaStoreUtils.getMetaStoreListeners( 4 MetaStoreInitListener.class, hiveConf, 5 hiveConf.getVar(HiveConf.ConfVars.METASTORE_INIT_HOOKS)); 6 for (MetaStoreInitListener singleInitListener: initListeners) { 7 MetaStoreInitContext context = new MetaStoreInitContext(); 8 singleInitListener.onInit(context); 9 } 10 11 String alterHandlerName = hiveConf.get("hive.metastore.alter.impl", 12 HiveAlterHandler.class.getName()); 13 alterHandler = (AlterHandler) ReflectionUtils.newInstance(MetaStoreUtils.getClass( 14 alterHandlerName), hiveConf); 15 wh = new Warehouse(hiveConf); 16 。。。。 17 } 接下来,我们从元数据的生命周期开始,学习下Partiiton的生命周期。在HiveMetaStoreClient中,查找add_partition作为入口,这种操作在我们insert overwrite 以表中某个字段为分区时,比如dt=20170830,作用到的操作。或者是add_partitions,创建分区表后进行数据的导入,那么会创建多个分区路径,下面以add_partiitons为例: 1 public int add_partitions(List<Partition> new_parts) 2 throws InvalidObjectException, AlreadyExistsException, MetaException, 3 TException { 4 return client.add_partitions(new_parts); 5 } 6 7 @Override 8 public List<Partition> add_partitions( 9 List<Partition> parts, boolean ifNotExists, boolean needResults) 10 throws InvalidObjectException, AlreadyExistsException, MetaException, TException { 11 if (parts.isEmpty()) { 12 return needResults ? new ArrayList<Partition>() : null; 13 } 14 Partition part = parts.get(0); 15 AddPartitionsRequest req = new AddPartitionsRequest( 16 part.getDbName(), part.getTableName(), parts, ifNotExists); 17 req.setNeedResult(needResults); 18 AddPartitionsResult result = client.add_partitions_req(req); 19 return needResults ? filterHook.filterPartitions(result.getPartitions()) : null; 20 } 这里的client来自于ThriftHiveMetastore.Iface接口对象,其实现子类HiveMetaStore并调用init方法进行创建。随后将封装了AddPartitionsRequest类,其实这个类还是partition的属性,但是这样封装的好处是,今后再调用的时候不用再去获取partition的DbName,,TableName等信息,一次性封装以便后续直接使用该对象。随后,我们查看client调用add_partitions_req,下面代码高能预警,非常多,我们一点点分析。 1 private List<Partition> add_partitions_core( 2 RawStore ms, String dbName, String tblName, List<Partition> parts, boolean ifNotExists) 3 throws MetaException, InvalidObjectException, AlreadyExistsException, TException { 4 logInfo("add_partitions"); 5 boolean success = false; 6 // Ensures that the list doesn't have dups, and keeps track of directories we have created. 7 Map<PartValEqWrapper, Boolean> addedPartitions = new HashMap<PartValEqWrapper, Boolean>(); 8 List<Partition> result = new ArrayList<Partition>(); 9 List<Partition> existingParts = null; 10 Table tbl = null; 11 try { 12 ms.openTransaction(); 13 tbl = ms.getTable(dbName, tblName); 14 if (tbl == null) { 15 throw new InvalidObjectException("Unable to add partitions because " 16 + "database or table " + dbName + "." + tblName + " does not exist"); 17 } 18 19 if (!parts.isEmpty()) { 20 firePreEvent(new PreAddPartitionEvent(tbl, parts, this)); 21 } 22 23 for (Partition part : parts) { 24 if (!part.getTableName().equals(tblName) || !part.getDbName().equals(dbName)) { 25 throw new MetaException("Partition does not belong to target table " 26 + dbName + "." + tblName + ": " + part); 27 } 28 boolean shouldAdd = startAddPartition(ms, part, ifNotExists); 29 if (!shouldAdd) { 30 if (existingParts == null) { 31 existingParts = new ArrayList<Partition>(); 32 } 33 existingParts.add(part); 34 LOG.info("Not adding partition " + part + " as it already exists"); 35 continue; 36 } 37 boolean madeDir = createLocationForAddedPartition(tbl, part); 38 if (addedPartitions.put(new PartValEqWrapper(part), madeDir) != null) { 39 // Technically, for ifNotExists case, we could insert one and discard the other 40 // because the first one now "exists", but it seems better to report the problem 41 // upstream as such a command doesn't make sense. 42 throw new MetaException("Duplicate partitions in the list: " + part); 43 } 44 initializeAddedPartition(tbl, part, madeDir); 45 result.add(part); 46 } 47 if (!result.isEmpty()) { 48 success = ms.addPartitions(dbName, tblName, result); 49 } else { 50 success = true; 51 } 52 success = success && ms.commitTransaction(); 53 } finally { 54 if (!success) { 55 ms.rollbackTransaction(); 56 for (Entry<PartValEqWrapper, Boolean> e : addedPartitions.entrySet()) { 57 if (e.getValue()) { 58 wh.deleteDir(new Path(e.getKey().partition.getSd().getLocation()), true); 59 // we just created this directory - it's not a case of pre-creation, so we nuke 60 } 61 } 62 fireMetaStoreAddPartitionEvent(tbl, parts, null, false); 63 } else { 64 fireMetaStoreAddPartitionEvent(tbl, result, null, true); 65 if (existingParts != null) { 66 // The request has succeeded but we failed to add these partitions. 67 fireMetaStoreAddPartitionEvent(tbl, existingParts, null, false); 68 } 69 } 70 } 71 return result; 72 } View Code 首先呢 1、ms.openTransaction(),这个上次已经提到过,是为了保证操作的原子性。随后tbl = ms.getTable(dbName, tblName); 2、通过dbName以及tableName获取正个Table对象。 3、通过firePreEvent记录事件。 4、开始循环遍历partiiton,通过startAddPartition方法校验该partition是否在元数据中存在 5、调用createLocationForAddedPartition方法进行文件路径创建,随后调用initializeAddedPartition,主要是将table的param信息赋给partition,与hive的表结构有关,最终会将param扩展信息写入类似meta_partition_param的扩展信息表。 6、待物理操作完毕之后,进行ms.addPartitions(dbName, tblName, result)元数据信息的meta录入。 7、如果说partition的路径已经存在,则抛出异常,并且在最后删除已经创建的路径。这个有一次,请看上面,首先创建了一个Map, Map<PartValEqWrapper, Boolean> addedPartitions = new HashMap<PartValEqWrapper, Boolean>();将partition对象作为key,mkdir成功失败的布尔值作为value,最终通过判断value的值,来删除创建成功的partition. 删除,和查询就不说了,因为太过简单,那么alter_partition来了,client.alter_partition(dbName, tblName, newPart);从client端调用我也不说了~,传入dbName,tbleName以及新的partition,随之在hivemetaStore中调用了rename_partition方法: @Override public void rename_partition(final String db_name, final String tbl_name, final List<String> part_vals, final Partition new_part) throws InvalidOperationException, MetaException, TException { // Call rename_partition without an environment context. rename_partition(db_name, tbl_name, part_vals, new_part, null); } private void rename_partition(final String db_name, final String tbl_name, final List<String> part_vals, final Partition new_part, final EnvironmentContext envContext) throws InvalidOperationException, MetaException, TException { startTableFunction("alter_partition", db_name, tbl_name); if (LOG.isInfoEnabled()) { LOG.info("New partition values:" + new_part.getValues()); if (part_vals != null && part_vals.size() > 0) { LOG.info("Old Partition values:" + part_vals); } } Partition oldPart = null; Exception ex = null; try { firePreEvent(new PreAlterPartitionEvent(db_name, tbl_name, part_vals, new_part, this)); if (part_vals != null && !part_vals.isEmpty()) { MetaStoreUtils.validatePartitionNameCharacters(new_part.getValues(), partitionValidationPattern); } oldPart = alterHandler.alterPartition(getMS(), wh, db_name, tbl_name, part_vals, new_part); // Only fetch the table if we actually have a listener Table table = null; for (MetaStoreEventListener listener : listeners) { if (table == null) { table = getMS().getTable(db_name, tbl_name); } AlterPartitionEvent alterPartitionEvent = new AlterPartitionEvent(oldPart, new_part, table, true, this); alterPartitionEvent.setEnvironmentContext(envContext); listener.onAlterPartition(alterPartitionEvent); } } catch (InvalidObjectException e) { ex = e; throw new InvalidOperationException(e.getMessage()); } catch (AlreadyExistsException e) { ex = e; throw new InvalidOperationException(e.getMessage()); } catch (Exception e) { ex = e; if (e instanceof MetaException) { throw (MetaException) e; } else if (e instanceof InvalidOperationException) { throw (InvalidOperationException) e; } else if (e instanceof TException) { throw (TException) e; } else { throw newMetaException(e); } } finally { endFunction("alter_partition", oldPart != null, ex, tbl_name); } return; } 我们继续来看: 1、startTableFunction方法主要用来计数 2、new_part.getValues()其实获取的是partition的具体列值信息,比如dt=20170830,那么获取的就是这个20170830 3、随之通过validatePartitionNameCharacters校验partitionName是否合法。 4、随后通过alterHandler.alterPartition进行partition的更改,但是为什么要用oldPart命名?已经修改了呀?(疑问)我们跟进去会发现,其调用了updatePartColumnStats方法: private void updatePartColumnStats(RawStore msdb, String dbName, String tableName, List<String> partVals, Partition newPart) throws MetaException, InvalidObjectException { dbName = HiveStringUtils.normalizeIdentifier(dbName); tableName = HiveStringUtils.normalizeIdentifier(tableName); String newDbName = HiveStringUtils.normalizeIdentifier(newPart.getDbName()); String newTableName = HiveStringUtils.normalizeIdentifier(newPart.getTableName()); Table oldTable = msdb.getTable(dbName, tableName); if (oldTable == null) { return; } try { String oldPartName = Warehouse.makePartName(oldTable.getPartitionKeys(), partVals); String newPartName = Warehouse.makePartName(oldTable.getPartitionKeys(), newPart.getValues()); if (!dbName.equals(newDbName) || !tableName.equals(newTableName) || !oldPartName.equals(newPartName)) { msdb.deletePartitionColumnStatistics(dbName, tableName, oldPartName, partVals, null); } else { Partition oldPartition = msdb.getPartition(dbName, tableName, partVals); if (oldPartition == null) { return; } if (oldPartition.getSd() != null && newPart.getSd() != null) { List<FieldSchema> oldCols = oldPartition.getSd().getCols(); if (!MetaStoreUtils.areSameColumns(oldCols, newPart.getSd().getCols())) { updatePartColumnStatsForAlterColumns(msdb, oldPartition, oldPartName, partVals, oldCols, newPart); } } } } catch (NoSuchObjectException nsoe) { LOG.debug("Could not find db entry." + nsoe); //ignore } catch (InvalidInputException iie) { throw new InvalidObjectException("Invalid input to update partition column stats." + iie); } } 5、通过Warehouse.makePartName组装partition的原有和新的表达,比如:dt=20180830,新的为dataPart=20180830 6、这里会有层判断,如果新的表达与旧的表达不同则删除原有meta信息,否则将会调用updatePartColumnStatsForAlterColumns进行meta元数据的更新。 随后就木有了。。太晚了,碎觉啦,明天还要作死上班呢哈哈哈哈~


优秀的个人博客,低调大师

Spark RDD类源码阅读

每天进步一点点~开搞~ abstract class RDD[T: ClassTag]( //@transient 注解表示将字段标记为瞬态的 @transient private var _sc: SparkContext, // Seq是序列,元素有插入的先后顺序,可以有重复的元素。 @transient private var deps: Seq[Dependency[_]] ) extends Serializable with Logging { if (classOf[RDD[_]].isAssignableFrom(elementClassTag.runtimeClass)) { user programs that } //这里应该是声明sparkContext对象后才能使用RDD的调用 private def sc: SparkContext = { if (_sc == null) { throw new SparkException( "RDD transformations and actions can only be invoked by the driver, not inside of other " + "transformations; for example, rdd1.map(x => rdd2.values.count() * x) is invalid because " + "the values transformation and count action cannot be performed inside of the rdd1.map " + "transformation. For more information, see SPARK-5063.") } _sc } //构建一个RDD应该是一对一的关系,比如子RDD对应唯一的父RDD def this(@transient oneParent: RDD[_]) = this(oneParent.context , List(new OneToOneDependency(oneParent))) private[spark] def conf: SparkConf = _conf //sparkconf的设置 def getConf: SparkConf = conf.clone() //获取相应的配置信息 def jars: Seq[String] = _jars def files: Seq[String] = _files def master: String = _conf.get("spark.master") def appName: String = _conf.get("spark.app.name") private[spark] def isEventLogEnabled: Boolean = _conf.getBoolean("spark.eventLog.enabled", false) private[spark] def eventLogDir: Option[URI] = _eventLogDir private[spark] def eventLogCodec: Option[String] = _eventLogCodec //临时文件夹的名称为spark+随机时间戳 val externalBlockStoreFolderName = "spark-" + randomUUID.toString() //判断是否为local模式 def isLocal: Boolean = (master == "local" || master.startsWith("local[")) //用于触发事件的监听 private[spark] val listenerBus = new LiveListenerBus // 该方法可用于测试用 private[spark] def createSparkEnv( conf: SparkConf, isLocal: Boolean, listenerBus: LiveListenerBus): SparkEnv = { SparkEnv.createDriverEnv(conf, isLocal, listenerBus, SparkContext.numDriverCores(master)) } //加载env配置文件 private[spark] def env: SparkEnv = _env private[spark] val addedFiles = HashMap[String, Long]() private[spark] val addedJars = HashMap[String, Long]() //监听所有调用persist的RDD private[spark] val persistentRdds = new TimeStampedWeakValueHashMap[Int, RDD[_]] //重用配置hadoop Configuration def hadoopConfiguration: Configuration = _hadoopConfiguration //用于设置executorMemory的内存数量 private[spark] def executorMemory: Int = _executorMemory // 将环境参数传递给exeuctor private[spark] val executorEnvs = HashMap[String, String]() // 设置正在使用SparkContext的用户 val sparkUser = Utils.getCurrentUserName() //设置提交的appliaction的唯一标识。就是当提交给yarn或local模式时,申请资源的applaction名称 def applicationId: String = _applicationId def applicationAttemptId: Option[String] = _applicationAttemptId def metricsSystem: MetricsSystem = if (_env != null) _env.metricsSystem else null private[spark] def eventLogger: Option[EventLoggingListener] = _eventLogger private[spark] def executorAllocationManager: Option[ExecutorAllocationManager] = _executorAllocationManager private[spark] def cleaner: Option[ContextCleaner] = _cleaner private[spark] var checkpointDir: Option[String] = None // 用户可以使用本地变量来传递消息 protected[spark] val localProperties = new InheritableThreadLocal[Properties] { override protected def childValue(parent: Properties): Properties = { //clone一下,防止父变量改变从而影响子变量 semantics (SPARK-10563). if (conf.get("spark.localProperties.clone", "false").toBoolean) { SerializationUtils.clone(parent).asInstanceOf[Properties] } else { new Properties(parent) } } override protected def initialValue(): Properties = new Properties() } private def warnSparkMem(value: String): String = { logWarning("Using SPARK_MEM to set amount of memory to use per executor process is " + "deprecated, please use spark.executor.memory instead.") value } //设置log级别,包括ALL, DEBUG, ERROR, FATAL, INFO, OFF, TRACE, WARN def setLogLevel(logLevel: String) { val validLevels = Seq("ALL", "DEBUG", "ERROR", "FATAL", "INFO", "OFF", "TRACE", "WARN") if (!validLevels.contains(logLevel)) { throw new IllegalArgumentException( s"Supplied level $logLevel did not match one of: ${validLevels.mkString(",")}") } Utils.setLogLevel(org.apache.log4j.Level.toLevel(logLevel)) } //不同模式的配置参数 if (!_conf.contains("spark.master")) { throw new SparkException("A master URL must be set in your configuration") } if (!_conf.contains("spark.app.name")) { throw new SparkException("An application name must be set in your configuration") } // System property spark.yarn.app.id must be set if user code ran by AM on a YARN cluster // yarn-standalone is deprecated, but still supported if ((master == "yarn-cluster" || master == "yarn-standalone") && !_conf.contains("spark.yarn.app.id")) { throw new SparkException("Detected yarn-cluster mode, but isn't running on a cluster. " + "Deployment to YARN is not supported directly by SparkContext. Please use spark-submit.") } _conf.setIfMissing("spark.driver.host", Utils.localHostName()) _conf.setIfMissing("spark.driver.port", "0") _conf.set("spark.executor.id", SparkContext.DRIVER_IDENTIFIER) _jars = _conf.getOption("spark.jars").map(_.split(",")).map(_.filter(_.size != 0)).toSeq.flatten _files = _conf.getOption("spark.files").map(_.split(",")).map(_.filter(_.size != 0)) .toSeq.flatten _eventLogDir = if (isEventLogEnabled) { val unresolvedDir = conf.get("spark.eventLog.dir", EventLoggingListener.DEFAULT_LOG_DIR) .stripSuffix("/") Some(Utils.resolveURI(unresolvedDir)) } else { None } _eventLogCodec = { val compress = _conf.getBoolean("spark.eventLog.compress", false) if (compress && isEventLogEnabled) { Some(CompressionCodec.getCodecName(_conf)).map(CompressionCodec.getShortName) } else { None } } //jobProgressListener应该在创建sparkEnv之前,因为当创建sparkEnv时,一些信息将会被发送到jobProgressListener,否则就会丢失啦。 _jobProgressListener = new JobProgressListener(_conf) listenerBus.addListener(jobProgressListener) _env = createSparkEnv(_conf, isLocal, listenerBus) SparkEnv.set(_env) _metadataCleaner = new MetadataCleaner(MetadataCleanerType.SPARK_CONTEXT, this.cleanup, _conf) _statusTracker = new SparkStatusTracker(this) _progressBar = if (_conf.getBoolean("spark.ui.showConsoleProgress", true) && !log.isInfoEnabled) { Some(new ConsoleProgressBar(this)) } else { None } _ui = if (conf.getBoolean("spark.ui.enabled", true)) { Some(SparkUI.createLiveUI(this, _conf, listenerBus, _jobProgressListener, _env.securityManager, appName, startTime = startTime)) } else { None } if (jars != null) { jars.foreach(addJar) } if (files != null) { files.foreach(addFile) } //获取启动app设置的参数变量,如果没有则获取配置文件中的 _executorMemory = _conf.getOption("spark.executor.memory") .orElse(Option(System.getenv("SPARK_EXECUTOR_MEMORY"))) .orElse(Option(System.getenv("SPARK_MEM")) .map(warnSparkMem)) .map(Utils.memoryStringToMb) .getOrElse(1024) //500这里在创建HeartbeatReceiver 之前先创建createTaskScheduler,因为每个Executor在构造函数中检索HeartbeatReceiver _heartbeatReceiver = env.rpcEnv.setupEndpoint( HeartbeatReceiver.ENDPOINT_NAME, new HeartbeatReceiver(this))

优秀的个人博客,低调大师

Databend 源码阅读:配置管理

作者:尚卓燃(PsiACE)澳门科技大学在读硕士,Databend 研发工程师实习生 Apache OpenDAL(Incubating) Committer https://github.com/PsiACE 对于 Databend 这样复杂的数据库服务端程序,往往需要支持大量的可配置选项,以帮助运维人员根据实际使用需要管理和调优系统。 Databend 目前支持三种配置方式:命令行、环境变量和配置文件,优先级依次递减。 一般情况下,推荐使用配置文件来记录和管理各种配置。 对于 K8S 集群,为了灵活变更部分配置(比如,特性开关),使用环境变量可能是更优雅的形式。 命令行则用于调整本地环境下的少数冲突配置。 Databend Query 中的映射 对于 databend-query ,不管是什么形式的配置,其配置选项几乎可以看作是代码的扁平化树形映射,即基本符合代码中「配置域」+「配置项」的逻辑。 环境变量和配置文件中,利用 serfig 将代码嵌套展开,使用 _ 做为分隔符。 命令行中稍有不同:一方面,分隔符使用 -;另一方面,部分命令行选项的名称中没有绑定配置域。 为了更好理解这里的映射关系,我们可以深入到具体一项配置,下面将围绕 admin_api_address 这个配置项展开。 在环境变量上,需要使用 QUERY_ADMIN_API_ADDRESS ,QUERY 表征这个配置所处的域,而 ADMIN_API_ADDRESS 是具体的配置项。 在配置文件中,通常是使用 toml 来进行配置。 [query] 表征配置所处的域,admin_api_address 为具体的配置项。 [query] ... # Databend Query http address. # For admin RESET API. admin_api_address = "0.0.0.0:8081" ... 命令行中需要使用 --admin-api-address 进行配置,这一项没有绑定「配置域」。如果是配置 --storage-s3-access-key-id ,那么「storage」+ 「s3」构成配置域,「access-key-id」是具体的配置项。 在了解如何对 admin_api_address 进行配置后,让我们进入到配置相关的代码,进一步查看映射关系的代码形式(位于 src/query/config/src/config.rs)。 pub struct Config { ... // Query engine config. #[clap(flatten)] pub query: QueryConfig, ... } /// Query config group. #[derive(Clone, Debug, PartialEq, Eq, Serialize, Deserialize, Args)] #[serde(default, deny_unknown_fields)] pub struct QueryConfig { ... #[clap(long, default_value = "127.0.0.1:8080")] pub admin_api_address: String, ... } 因为代码中使用了嵌套的层级结构,最上层是 Config,而 admin_api_address 是 pub query: QueryConfig 中的一个配置项,经过 serfig 处理后,需要使用 QUERY 或者 [query] 表征其所处的域,配置项就还是 admin_api_address 。 而命令行中具体的配置项名称和默认值会受到 #[clap(long = "<long-name>", default_value = "<value>")] 控制),clap 会接管配置: admin_api_address 就变成了 --admin-api-address。 --storage-s3-access-key-id 而言,其实际的代码层级是 Config -> StorageConfig -> S3StorageConfig -> access_key_id,字段之上有标注 #[clap(long = "storage-s3-access-key-id", default_value_t)] ,所以需要使用 --storage-s3-access-key-id 进行配置。 Databend Meta 中的映射 databend-meta 的配置文件和命令行逻辑与 databend-query 是基本一致的。但是环境变量是通过 serfig 内置的 serde-env 自行定义的映射关系(但同样可以尝试按「配置域」+「配置项」进行理解)。 同样具体到单独的某项配置来看一下,这里以 log_dir 为例。 在环境变量上,需要使用 METASRV_LOG_DIR ,METASRV 表征这个配置所处的域,而 LOG_DIR 是具体的配置项。 而在配置文件中,这一配置项作用于全局,只需要: log_dir = "./.databend/logs1" 在命令行中当然也直接 --log-dir 进行配置。 让我们通过代码来解构其映射,代码位于 src/meta/service/src/configs/outer_v0.rs。 #[derive(Clone, Debug, Serialize, Deserialize, PartialEq, Eq, Parser)] #[clap(about, version = &**METASRV_COMMIT_VERSION, author)] #[serde(default)] pub struct Config { ... /// Log file dir #[clap(long = "log-dir", default_value = "./.databend/logs")] pub log_dir: String, ... } 配置文件和命令行参数相关的配置项是由 Config 结构体管理的,逻辑与 databend-query 一致,就不再赘述。 而环境变量的配置项是由 ConfigViaEnv 结构体进行处理的,如下: /// #[serde(flatten)] doesn't work correctly for env. /// We should work around it by flatten them manually. /// We are seeking for better solutions. #[derive(Clone, Debug, Serialize, Deserialize, PartialEq, Eq)] #[serde(default)] pub struct ConfigViaEnv { ... pub metasrv_log_dir: String, ... } 与 Config 之间的映射关系位于 impl From<Config> for ConfigViaEnv 和 impl Into<Config> for ConfigViaEnv 这两个部分。对于 metasrv_log_dir 而言,就是映射到前面的 log_dir 字段。

优秀的个人博客,低调大师

datax源码阅读二:Engine流程

一、根据前面python文件知道,java的main函数是com.alibaba.datax.core.Engine public static void main(String[] args) throws Exception { int exitCode = 0; try { Engine.entry(args); } catch (Throwable e) { exitCode = 1; String trace = ExceptionTracker.trace(e); String errDesc = "未知datax错误,参考堆栈内容分析。"; LOG.error("\n\n经DataX智能分析,该任务最可能的错误原因是:\n" + trace); if (e instanceof DataXException) { DataXException tempException = (DataXException) e; ErrorCode errorCode = tempException.getErrorCode(); errDesc = errorCode.getDescription(); if (errorCode instanceof FrameworkErrorCode) { FrameworkErrorCode tempErrorCode = (FrameworkErrorCode) errorCode; exitCode = tempErrorCode.toExitValue(); } } System.exit(exitCode); } System.exit(exitCode); } main函数主要catch了一下异常,并将异常信息打印出来,实际执行在entry函数中 public static void entry(final String[] args) throws Throwable { Options options = new Options(); options.addOption("job", true, "Job config."); options.addOption("jobid", true, "Job unique id."); options.addOption("mode", true, "Job runtime mode."); BasicParser parser = new BasicParser(); CommandLine cl = parser.parse(options, args); String jobPath = cl.getOptionValue("job"); // 如果用户没有明确指定jobid, 则 datax.py 会指定 jobid 默认值为-1 String jobIdString = cl.getOptionValue("jobid"); RUNTIME_MODE = cl.getOptionValue("mode"); Configuration configuration = ConfigParser.parse(jobPath); long jobId; if (!"-1".equalsIgnoreCase(jobIdString)) { jobId = Long.parseLong(jobIdString); } else { // only for dsc & ds & datax 3 update String dscJobUrlPatternString = "/instance/(\\d{1,})/config.xml"; String dsJobUrlPatternString = "/inner/job/(\\d{1,})/config"; String dsTaskGroupUrlPatternString = "/inner/job/(\\d{1,})/taskGroup/"; List<String> patternStringList = Arrays.asList(dscJobUrlPatternString, dsJobUrlPatternString, dsTaskGroupUrlPatternString); jobId = parseJobIdFromUrl(patternStringList, jobPath); } boolean isStandAloneMode = "standalone".equalsIgnoreCase(RUNTIME_MODE); if (!isStandAloneMode && jobId == -1) { // 如果不是 standalone 模式,那么 jobId 一定不能为-1 throw DataXException.asDataXException(FrameworkErrorCode.CONFIG_ERROR, "非 standalone 模式必须在 URL 中提供有效的 jobId."); } configuration.set(CoreConstant.DATAX_CORE_CONTAINER_JOB_ID, jobId); //打印vmInfo VMInfo vmInfo = VMInfo.getVmInfo(); if (vmInfo != null) { LOG.info(vmInfo.toString()); } LOG.info("\n" + Engine.filterJobConfiguration(configuration) + "\n"); LOG.debug(configuration.toJSON()); ConfigurationValidate.doValidate(configuration); Engine engine = new Engine(); engine.start(configuration); } entry函数主要功能: 1、解析了java命令行的三个参数,分别是job、jobid和mode,其中job是用户配置的json文件路径,jobid和mode是python文件带进来的,单机模式下可以忽略改参数 2、读取用户配置的json文件,转化为内部的configuration配置 3、打印相关信息,并校验json文件的合法性 4、启动engine执行 entry执行完毕之后,进入start函数,关键代码如下: public void start(Configuration allConf) { // 绑定column转换信息 ColumnCast.bind(allConf); /** * 初始化PluginLoader,可以获取各种插件配置 */ LoadUtil.bind(allConf); ************* container = new JobContainer(allConf); ************* container.start(); } start函数中主要包括: 1、列转换默认值,即动态在configuration中注入默认值 2、初始化插件的LoadUtil,后面classLoader相关操作都会依赖这个函数 3、初始化JobContainer并启动

资源下载

更多资源
Nacos

Nacos

Nacos /nɑ:kəʊs/ 是 Dynamic Naming and Configuration Service 的首字母简称,一个易于构建 AI Agent 应用的动态服务发现、配置管理和AI智能体管理平台。Nacos 致力于帮助您发现、配置和管理微服务及AI智能体应用。Nacos 提供了一组简单易用的特性集,帮助您快速实现动态服务发现、服务配置、服务元数据、流量管理。Nacos 帮助您更敏捷和容易地构建、交付和管理微服务平台。

Spring

Spring

Spring框架(Spring Framework)是由Rod Johnson于2002年提出的开源Java企业级应用框架,旨在通过使用JavaBean替代传统EJB实现方式降低企业级编程开发的复杂性。该框架基于简单性、可测试性和松耦合性设计理念,提供核心容器、应用上下文、数据访问集成等模块,支持整合Hibernate、Struts等第三方框架,其适用范围不仅限于服务器端开发,绝大多数Java应用均可从中受益。

Rocky Linux

Rocky Linux

Rocky Linux(中文名:洛基)是由Gregory Kurtzer于2020年12月发起的企业级Linux发行版,作为CentOS稳定版停止维护后与RHEL(Red Hat Enterprise Linux)完全兼容的开源替代方案,由社区拥有并管理,支持x86_64、aarch64等架构。其通过重新编译RHEL源代码提供长期稳定性,采用模块化包装和SELinux安全架构,默认包含GNOME桌面环境及XFS文件系统,支持十年生命周期更新。

WebStorm

WebStorm

WebStorm 是jetbrains公司旗下一款JavaScript 开发工具。目前已经被广大中国JS开发者誉为“Web前端开发神器”、“最强大的HTML5编辑器”、“最智能的JavaScript IDE”等。与IntelliJ IDEA同源,继承了IntelliJ IDEA强大的JS部分的功能。

用户登录
用户注册