首页 文章 精选 留言 我的

精选列表

搜索[源码阅读],共10005篇文章
优秀的个人博客,低调大师

源码阅读之ArrayList实现细节

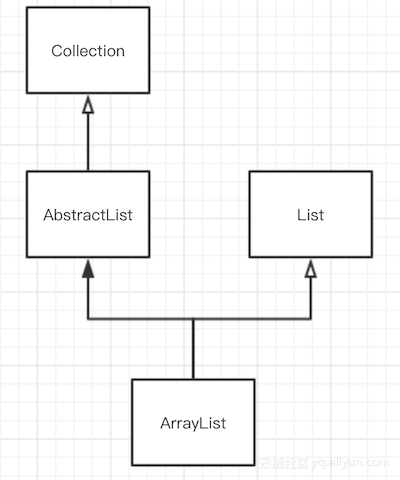
0x00 描述 ArrayList 可以说是 Java 程序猿最为常用的一种数据结构了。ArrayList 是通过数组实现的,容量可以自增的线性表。而数组的优点是计算机可以通过下标计算访问地址,所以访问元素的速度是很快的,时间复杂度为O(1);但数组并不擅长插入和删除操作,这些操作的时间复杂度是O(n)。因此 ArrayList 继承了数组这些特点。 继承关系 ArrayList 继承于 AbstractList 并实现了 List 、RandomAccess、Cloneable 和 Serializable 接口。 而 AbstractList 是继承于 Collection 接口。因此简单的关系图可以表达为 重要属性 elementData 这个是存放数据的 Object 数组 size 记录当前数组元素的个数 modCount 用于记录修改次数,例如增加、删除等操作时此变量会自增。当这个变量异常变化时,会抛出 ConcurrentModificationException 构造方法 public ArrayList() { this.elementData = DEFAULTCAPACITY_EMPTY_ELEMENTDATA; } 默认构造函数初始化 elementData 大小为10 空数组。 public ArrayList(int initialCapacity) { if (initialCapacity > 0) { this.elementData = new Object[initialCapacity]; } else if (initialCapacity == 0) { this.elementData = EMPTY_ELEMENTDATA; } else { throw new IllegalArgumentException("Illegal Capacity: "+ initialCapacity); } } 此方法通过一个 initialCapacity 变量对数组进行初始化。当传入的 initialCapacity 大于0时,elementData就是初始化为大小为 initialCapacity 的空数组;否则就是初始化为大小为0的空数组。 public ArrayList(Collection<? extends E> c) { elementData = c.toArray(); if ((size = elementData.length) != 0) { // c.toArray might (incorrectly) not return Object[](see 6260652) if (elementData.getClass() != Object[].class) elementData = Arrays.copyOf(elementData, size, Object[].class); } else { // replace with empty array. this.elementData = EMPTY_ELEMENTDATA; } } 这个方法是通过一个 Collection 对象进行初始化的。这里调用了 Arrays.copyOf 方法将数组元素进行拷贝,并返回一个新的数组。后文会详细解析这个方法。 0x01 常用方法 add(E e) 给 ArrayList 添加一个元素 public boolean add(E e) { ensureCapacityInternal(size + 1); // Increments modCount!! elementData[size++] = e; return true; } 添加元素之前,调用了 ensureCapacityInternal 方法,确保 elementData 数组有足够的空间。然后数组后面添加一个元素,并把元素个数 size 的值加1。 private void ensureCapacityInternal(int minCapacity) { if (elementData == DEFAULTCAPACITY_EMPTY_ELEMENTDATA) { minCapacity = Math.max(DEFAULT_CAPACITY, minCapacity); } ensureExplicitCapacity(minCapacity); } 在 ensureCapacityInternal 中先判断 elementData 是否为空数组,如果是,则取 DEFAULT_CAPACITY 与 minCapacity 的最大值作为数组的最小容量。 然后再执行 ensureExplicitCapacity 方法。 private void ensureExplicitCapacity(int minCapacity) { modCount++; // overflow-conscious code if (minCapacity - elementData.length > 0) grow(minCapacity); } 先把 modCount 加1,表示对该列表进行了一次操作。 minCapacity 表示目前需要的容量大小。如果它大于目前 elementData 的容量大小,那么就会执行 grow 方法增加数组容量。 private void grow(int minCapacity) { // overflow-conscious code int oldCapacity = elementData.length; int newCapacity = oldCapacity + (oldCapacity >> 1);//右移1位操作相当于除2 if (newCapacity - minCapacity < 0) newCapacity = minCapacity; if (newCapacity - MAX_ARRAY_SIZE > 0) newCapacity = hugeCapacity(minCapacity); // minCapacity is usually close to size, so this is a win: elementData = Arrays.copyOf(elementData, newCapacity); } 该方法的逻辑是 先获取到 newCapacity ,它是原来容量大小的1.5倍 如果需要的容量大小 minCapacity 大于原来容量的1.5,那么 newCapacity 就取 minCapacity 如果 newCapacity 还大于最大的容量,那么就执行 hugeCapacity 来计算得到容量大小 最后调用 Arrays.copyOf 方法把 elementData 拷贝到一个新的数组中,这个新数组大小为 newCapacity private static int hugeCapacity(int minCapacity) { if (minCapacity < 0) // overflow throw new OutOfMemoryError(); return (minCapacity > MAX_ARRAY_SIZE) ? Integer.MAX_VALUE : MAX_ARRAY_SIZE; } 因此在调用 add 方法时,如果当前数组 elementData 的容量不够时,就会调用扩容的 grow 方法,把数组扩大为原来的1.5倍的大小。 add(int index, E element) 在指定的 index 位置上添加一个元素 public void add(int index, E element) { if (index > size || index < 0) throw new IndexOutOfBoundsException(outOfBoundsMsg(index)); ensureCapacityInternal(size + 1); // Increments modCount!! System.arraycopy(elementData, index, elementData, index + 1, size - index); elementData[index] = element; size++; } 通过上面的 add 方法的走读,这个方法就很好理解了。 先对 index 参数的有效性进行判断; 然后执行 ensureCapacityInternal 确保数组的容量大小是足够的,此时 modCount 也会自增; 再执行 System.arraycopy 方法把数组元素从 index 的位置后移1位;(System.arraycopy 函数后文还会讲到) 最后在 index 位置上赋值,并把 size 加 1。 addAll(Collection<? extends E> c) public boolean addAll(Collection<? extends E> c) { Object[] a = c.toArray(); int numNew = a.length; ensureCapacityInternal(size + numNew); // Increments modCount System.arraycopy(a, 0, elementData, size, numNew); size += numNew; return numNew != 0; } addAll 方法把一个 Collection 对象添加到列表中来。 它会先把 Collection 对象通过 toArray 方法转化为数组,然后再调用 System.arraycopy 进行数据的移动。 addAll(int index, Collection<? extends E> c) public boolean addAll(int index, Collection<? extends E> c) { if (index > size || index < 0) throw new IndexOutOfBoundsException(outOfBoundsMsg(index)); Object[] a = c.toArray(); int numNew = a.length; ensureCapacityInternal(size + numNew); // Increments modCount int numMoved = size - index; if (numMoved > 0) System.arraycopy(elementData, index, elementData, index + numNew, numMoved); System.arraycopy(a, 0, elementData, index, numNew); size += numNew; return numNew != 0; } 在 index 位置上添加一个列表 它与上面 addAll 方法的区别就是先从 index 开始移动 numNew 个位置,即空出 numNew 个位置。 然后再空出的 numNew 位置上添加元素。 remove(int index) 删除指定 index 位置上的元素 public E remove(int index) { if (index >= size) throw new IndexOutOfBoundsException(outOfBoundsMsg(index)); modCount++; E oldValue = (E) elementData[index]; int numMoved = size - index - 1; if (numMoved > 0) System.arraycopy(elementData, index+1, elementData, index, numMoved); elementData[--size] = null; // clear to let GC do its work return oldValue; } 执行流程为 检查 index 有效性,无效则抛出 IndexOutOfBoundsException 异常 modCount 自增 通过 index 下标取出元素 计算 index 后面需要移动的元素个数 通过 System.arraycopy 将 index 后面的元素都往前移动1位 最后把末尾元素置位 null,并把 size 的值减 1。 remove(Object o) 通过一个元素对象进行删除 public boolean remove(Object o) { if (o == null) { for (int index = 0; index < size; index++) if (elementData[index] == null) { fastRemove(index); return true; } } else { for (int index = 0; index < size; index++) if (o.equals(elementData[index])) { fastRemove(index); return true; } } return false; } 当传一个元素对象进行删除操作时,需要遍历数组,找到该元素在列表中的位置 index; 然后通过 fastRemove 方法进行删除。 private void fastRemove(int index) { modCount++; int numMoved = size - index - 1; if (numMoved > 0) System.arraycopy(elementData, index+1, elementData, index, numMoved); elementData[--size] = null; // clear to let GC do its work } clear() 清空列表 public void clear() { modCount++; // clear to let GC do its work for (int i = 0; i < size; i++) elementData[i] = null; size = 0; } subList(int fromIndex, int toIndex) 获取子列表 public List<E> subList(int fromIndex, int toIndex) { subListRangeCheck(fromIndex, toIndex, size); return new SubList(this, 0, fromIndex, toIndex); } static void subListRangeCheck(int fromIndex, int toIndex, int size) { if (fromIndex < 0) throw new IndexOutOfBoundsException("fromIndex = " + fromIndex); if (toIndex > size) throw new IndexOutOfBoundsException("toIndex = " + toIndex); if (fromIndex > toIndex) throw new IllegalArgumentException("fromIndex(" + fromIndex +") > toIndex(" + toIndex + ")"); } 首先检查下标是否正确,然后构造一个 SubList 对象,这是一个内部类。 SubList 也是继承于 AbstractList。 private class SubList extends AbstractList<E> implements RandomAccess { private final AbstractList<E> parent; private final int parentOffset; private final int offset; int size; SubList(AbstractList<E> parent, int offset, int fromIndex, int toIndex) { this.parent = parent; this.parentOffset = fromIndex; this.offset = offset + fromIndex; this.size = toIndex - fromIndex; this.modCount = ArrayList.this.modCount; } public E set(int index, E e) { if (index < 0 || index >= this.size) throw new IndexOutOfBoundsException(outOfBoundsMsg(index)); if (ArrayList.this.modCount != this.modCount) throw new ConcurrentModificationException(); E oldValue = (E) ArrayList.this.elementData[offset + index]; ArrayList.this.elementData[offset + index] = e; return oldValue; } public E get(int index) { if (index < 0 || index >= this.size) throw new IndexOutOfBoundsException(outOfBoundsMsg(index)); if (ArrayList.this.modCount != this.modCount) throw new ConcurrentModificationException(); return (E) ArrayList.this.elementData[offset + index]; } ... public void add(int index, E e) { if (index < 0 || index > this.size) throw new IndexOutOfBoundsException(outOfBoundsMsg(index)); if (ArrayList.this.modCount != this.modCount) throw new ConcurrentModificationException(); parent.add(parentOffset + index, e); this.modCount = parent.modCount; this.size++; } public E remove(int index) { if (index < 0 || index >= this.size) throw new IndexOutOfBoundsException(outOfBoundsMsg(index)); if (ArrayList.this.modCount != this.modCount) throw new ConcurrentModificationException(); E result = parent.remove(parentOffset + index); this.modCount = parent.modCount; this.size--; return result; } ... public boolean addAll(Collection<? extends E> c) { return addAll(this.size, c); } public boolean addAll(int index, Collection<? extends E> c) { if (index < 0 || index > this.size) throw new IndexOutOfBoundsException(outOfBoundsMsg(index)); int cSize = c.size(); if (cSize==0) return false; if (ArrayList.this.modCount != this.modCount) throw new ConcurrentModificationException(); parent.addAll(parentOffset + index, c); this.modCount = parent.modCount; this.size += cSize; return true; } ... } SubList 构造方法需要一个父列表。在获取、添加、删除元素的方法中实际上都是调用父列表中的方法。 不过这些操作的方法中会判断 modCount 的值是否已经变化,如果异常改变了,那么就会抛出 ConcurrentModificationException 异常。 forEach(Consumer<? super E> action) 遍历列表元素 public void forEach(Consumer<? super E> action) { Objects.requireNonNull(action); final int expectedModCount = modCount; @SuppressWarnings("unchecked") final E[] elementData = (E[]) this.elementData; final int size = this.size; for (int i=0; modCount == expectedModCount && i < size; i++) { action.accept(elementData[i]); } // Android-note: // Iterator will not throw a CME if we add something while iterating over the *last* element // forEach will throw a CME in this case. if (modCount != expectedModCount) { throw new ConcurrentModificationException(); } } 同样地,此方法中如果 modCount 被异常修改了(例如在其他线程中执行了 add 方法)那么就会抛出 ConcurrentModificationException 异常。 iterator() 获取遍历器 public Iterator<E> iterator() { return new Itr(); } Itr 是一个内部类,实现了 Iterator 接口。 private class Itr implements Iterator<E> { // Android-changed: Add "limit" field to detect end of iteration. // The "limit" of this iterator. This is the size of the list at the time the // iterator was created. Adding & removing elements will invalidate the iteration // anyway (and cause next() to throw) so saving this value will guarantee that the // value of hasNext() remains stable and won't flap between true and false when elements // are added and removed from the list. protected int limit = ArrayList.this.size; int cursor; // index of next element to return int lastRet = -1; // index of last element returned; -1 if no such int expectedModCount = modCount; public boolean hasNext() { return cursor < limit; } @SuppressWarnings("unchecked") public E next() { if (modCount != expectedModCount) throw new ConcurrentModificationException(); int i = cursor; if (i >= limit) throw new NoSuchElementException(); Object[] elementData = ArrayList.this.elementData; if (i >= elementData.length) throw new ConcurrentModificationException(); cursor = i + 1; return (E) elementData[lastRet = i]; } public void remove() { if (lastRet < 0) throw new IllegalStateException(); if (modCount != expectedModCount) throw new ConcurrentModificationException(); try { ArrayList.this.remove(lastRet); cursor = lastRet; lastRet = -1; expectedModCount = modCount; limit--; } catch (IndexOutOfBoundsException ex) { throw new ConcurrentModificationException(); } } ... } 该类中 cursor 属性记录了当前迭代的位置,每调用一次 next 方法都会加 1,lastRet 则记录了上一次的元素位置。 remove 方法则是通过调用外部类的 remove 方法来实现的。 以上两个方法中也需要注意 ConcurrentModificationException 异常的发生。 contains(Object o) 检测是否包含元素 public boolean contains(Object o) { return indexOf(o) >= 0; } public int indexOf(Object o) { if (o == null) { for (int i = 0; i < size; i++) if (elementData[i]==null) return i; } else { for (int i = 0; i < size; i++) if (o.equals(elementData[i])) return i; } return -1; } 可以看出要检测一个元素是否在列表中,是通过遍历来实现的。 System.arraycopy public static native void arraycopy(Object src, int srcPos, Object dest, int destPos,int length); 这是数组拷贝函数,是 native 函数,它经过虚拟机优化的,效率比较高。在 ArrayList 中移动元素就是通过这个方法。 Arrays.copyOf public static <T> T[] copyOf(T[] original, int newLength) { return (T[]) copyOf(original, newLength, original.getClass()); } public static <T,U> T[] copyOf(U[] original, int newLength, Class<? extends T[]> newType) { @SuppressWarnings("unchecked") T[] copy = ((Object)newType == (Object)Object[].class) ? (T[]) new Object[newLength] : (T[]) Array.newInstance(newType.getComponentType(), newLength); System.arraycopy(original, 0, copy, 0, Math.min(original.length, newLength)); return copy; } 可以看出 copyOf 函数最终调用的是 System.arraycopy 方法。本文中 grow 方法就是调用 copyOf 来实现扩容的。 0x02 总结 ArrayList 是基于数组实现的线性表,它支持自动扩容,每次增加原来容量的1.5倍。 通过下标获取元素操作效率高,而删除和插入操作则需要移动元素,效率不高。 remove 函数通过对象删除元素时需要遍历列表,而通过下标 index 删除元素比通过对象删除元素的效率要高。 containts 与 clear方法需要遍历。 subList 获取到子列表,对子列表的修改同样也会修改父列表。 ArrayList 没有同步锁,在多线程操作时需要注意 ConcurrentModificationException 异常。 如果在同一线程中对 ArrayList 操作时引起 modCount 异常改变时,也要注意 ConcurrentModificationException ,这时候要检查代码逻辑问题。

优秀的个人博客,低调大师

String(JDK1.8) 源码阅读记录

版权声明:本文为博主原创文章,未经博主允许不得转载。 https://blog.csdn.net/weixin_40254498/article/details/82464207 String 在 Java 中字符串属于对象。 Java 提供了 String 类来创建和操作字符串。 定义 使用了final ,说明该类不能被继承。同时还实现了: java.io.Serializable Comparable CharSequence public final class String implements java.io.Serializable, Comparable<String>, CharSequence { } 属性 /** The value is used for character storage. * String就是用char[]实现的。保存的 */ private final char value[]; /** Cache the hash code for the string * hash 值 */ private int hash; // Default to 0 /** use serialVersionUID from JDK 1.0.2 for interoperability * Java的序列化机制是通过在运行时判断类的serialVersionUID来验证版本一致性的。 */ private static final long serialVersionUID = -6849794470754667710L; /** * Class String is special cased within the Serialization Stream Protocol. * 类字符串在序列化流协议中是特殊的。 * A String instance is written into an ObjectOutputStream according to * 将字符串实例写入ObjectOutputStream中,根据 a标签 * <a href="{@docRoot}/../platform/serialization/spec/output.html"> * Object Serialization Specification, Section 6.2, "Stream Elements"</a> */ private static final ObjectStreamField[] serialPersistentFields = new ObjectStreamField[0]; 构造方法 String 的构造方法大概有十几种,其中最常用的如下: /** * 根据字符串创建字符串对象 * Initializes a newly created {@code String} object so that it represents * the same sequence of characters as the argument; in other words, the * newly created string is a copy of the argument string. Unless an * explicit copy of {@code original} is needed, use of this constructor is * unnecessary since Strings are immutable. * * @param original * A {@code String} */ public String(String original) { this.value = original.value; this.hash = original.hash; } /** * 根据byte数组创建字符串对象 * byte[] to String 是根据系统的编码来的,但是也可以自己指定编码 * Constructs a new {@code String} by decoding the specified array of bytes * using the platform's default charset. The length of the new {@code * String} is a function of the charset, and hence may not be equal to the * length of the byte array. * * <p> The behavior of this constructor when the given bytes are not valid * in the default charset is unspecified. The {@link * java.nio.charset.CharsetDecoder} class should be used when more control * over the decoding process is required. * * @param bytes The bytes to be decoded into characters * @since JDK1.1 */ public String(byte bytes[]) { this(bytes, 0, bytes.length); } /** * 在Java中,String实例中保存有一个char[]字符数组,char[]字符数组是以unicode码来存储的, * String 和 char 为内存形式,byte是网络传输或存储的序列化形式。 * 所以在很多传输和存储的过程中需要将byte[]数组和String进行相互转化。 * 所以,String提供了一系列重载的构造方法来将一个字符数组转化成String, * 提到byte[]和String之间的相互转换就不得不关注编码问题。 * 例如: * public String(byte bytes[], int offset, int length, Charset charset) {} * String(byte bytes[], String charsetName) * String(byte bytes[], int offset, int length, String charsetName) * and so on * String(byte[] bytes, Charset charset)是指通过charset来解码指定的byte数组, * 将其解码成unicode的char[]数组,够造成新的String。 * * 下面这个构造方法可以指定字节数组的编码 * Constructs a new {@code String} by decoding the specified array of * bytes using the specified {@linkplain java.nio.charset.Charset charset}. * The length of the new {@code String} is a function of the charset, and * hence may not be equal to the length of the byte array. * * <p> This method always replaces malformed-input and unmappable-character * sequences with this charset's default replacement string. The {@link * java.nio.charset.CharsetDecoder} class should be used when more control * over the decoding process is required. * * @param bytes * The bytes to be decoded into characters * * @param charset * The {@linkplain java.nio.charset.Charset charset} to be used to * decode the {@code bytes} * * @since 1.6 */ public String(byte bytes[], Charset charset) { this(bytes, 0, bytes.length, charset); } /** * 根据char数组 * Allocates a new {@code String} so that it represents the sequence of * characters currently contained in the character array argument. The * contents of the character array are copied; subsequent modification of * the character array does not affect the newly created string. * * @param value * The initial value of the string */ public String(char value[]) { this.value = Arrays.copyOf(value, value.length); /** * 根据 StringBuffer 创建 String对象 * Allocates a new string that contains the sequence of characters * currently contained in the string buffer argument. The contents of the * string buffer are copied; subsequent modification of the string buffer * does not affect the newly created string. * * @param buffer * A {@code StringBuffer} */ public String(StringBuffer buffer) { synchronized(buffer) { this.value = Arrays.copyOf(buffer.getValue(), buffer.length()); } } /** * 根据 StringBuilder 创建 String对象 * Allocates a new string that contains the sequence of characters * currently contained in the string builder argument. The contents of the * string builder are copied; subsequent modification of the string builder * does not affect the newly created string. * * <p> This constructor is provided to ease migration to {@code * StringBuilder}. Obtaining a string from a string builder via the {@code * toString} method is likely to run faster and is generally preferred. * * @param builder * A {@code StringBuilder} * * @since 1.5 */ public String(StringBuilder builder) { this.value = Arrays.copyOf(builder.getValue(), builder.length()); } /* * 这是一个受保护构造方法,因为不能继承,所以内部使用 * 第二个属性基本没有用,只能是true * 从代码中可以看出来是直接引用,而不是新建一个,为了提高性能,节省内存等。 * 保护的原因也是为了保证字符串不可修改。 * Package private constructor which shares value array for speed. * this constructor is always expected to be called with share==true. * a separate constructor is needed because we already have a public * String(char[]) constructor that makes a copy of the given char[]. */ String(char[] value, boolean share) { // assert share : "unshared not supported"; this.value = value; } 常用的方法 getByte /** * 将字符串转成可用的 byte数组 * 在通信的比较多,例如 网络中传输、8583报文、socket通信 * 要想不乱码,就得搞清楚通信双方所使用的字节编码!!! * Encodes this {@code String} into a sequence of bytes using the named * charset, storing the result into a new byte array. * * <p> The behavior of this method when this string cannot be encoded in * the given charset is unspecified. The {@link * java.nio.charset.CharsetEncoder} class should be used when more control * over the encoding process is required. * * @param charsetName * The name of a supported {@linkplain java.nio.charset.Charset * charset} * * @return The resultant byte array * * @throws UnsupportedEncodingException * If the named charset is not supported * * @since JDK1.1 */ public byte[] getBytes(String charsetName) throws UnsupportedEncodingException { if (charsetName == null) throw new NullPointerException(); return StringCoding.encode(charsetName, value, 0, value.length); } /** * 同上 * Encodes this {@code String} into a sequence of bytes using the given * {@linkplain java.nio.charset.Charset charset}, storing the result into a * new byte array. * * <p> This method always replaces malformed-input and unmappable-character * sequences with this charset's default replacement byte array. The * {@link java.nio.charset.CharsetEncoder} class should be used when more * control over the encoding process is required. * * @param charset * The {@linkplain java.nio.charset.Charset} to be used to encode * the {@code String} * * @return The resultant byte array * * @since 1.6 */ public byte[] getBytes(Charset charset) { if (charset == null) throw new NullPointerException(); return StringCoding.encode(charset, value, 0, value.length); } /** * 将使用系统默认编码。 * 要注意的,部署的时候容易出错的地方就是这里, * windows 环境和linux环境字节编码不一样.所以建议指定编码方法 * Encodes this {@code String} into a sequence of bytes using the * platform's default charset, storing the result into a new byte array. * * <p> The behavior of this method when this string cannot be encoded in * the default charset is unspecified. The {@link * java.nio.charset.CharsetEncoder} class should be used when more control * over the encoding process is required. * * @return The resultant byte array * * @since JDK1.1 */ public byte[] getBytes() { return StringCoding.encode(value, 0, value.length); } hashCode /** * hash算法 * hashCode可以保证相同的字符串的hash值肯定相同, * 但是,hash值相同并不一定是value值就相同。 * 所以要保证两个字符串相等还得用上 equals * s[0]*31^(n-1) + s[1]*31^(n-2) + ... + s[n-1] */ public int hashCode() { int h = hash; if (h == 0 && value.length > 0) { char val[] = value; for (int i = 0; i < value.length; i++) { h = 31 * h + val[i]; } hash = h; } return h; } equals /** * * 在hashmap中 * 一定要重写 equals 和 hachcode * 才能保证是同一个字符串 * 正因为String 重写了我们才能愉快的使用字符串作为key */ public boolean equals(Object anObject) { /** 首先判断是不是自己!*/ if (this == anObject) { return true; } /** 在判断是不是String类型 */ if (anObject instanceof String) { String anotherString = (String)anObject; int n = value.length; /** 判断长度 */ if (n == anotherString.value.length) { char v1[] = value; char v2[] = anotherString.value; int i = 0; /** 判断字节 */ while (n-- != 0) { if (v1[i] != v2[i]) return false; i++; } return true; } } return false; } substring 这个方法在JDK1.6(含1.6)以前和JDK1.7之后(含1.7)有了不一样的变化 JDK1.6 substring /** * 仍然创建新的字符串但是 旧字符串还在 只是新的引用了旧的一部分 * 但旧字符串很大的时候,因为新的引用一小部分而无法回收会导致内存泄漏 * 一般使用加上一个空的字符串来生成新的解决这个问题 * str = str.substring(x, y) + "" */ String(int offset, int count, char value[]) { this.value = value; this.offset = offset; this.count = count; } public String substring(int beginIndex, int endIndex) { /** 校验数组溢出 */ return new String(offset + beginIndex, endIndex - beginIndex, value); } 内存泄露:在计算机科学中,内存泄漏指由于疏忽或错误造成程序未能释放已经不再使用的内存。 内存泄漏并非指内存在物理上的消失,而是应用程序分配某段内存后,由于设计错误,导致在释放该段内存之前就失去了对该段内存的控制,从而造成了内存的浪费。 JDK1.8 substring jdk1.7之后直接新建了一个字符串 。虽然增加了内存,但是解决了内存泄漏问题。 public String substring(int beginIndex, int endIndex) { if (beginIndex < 0) { throw new StringIndexOutOfBoundsException(beginIndex); } if (endIndex > value.length) { throw new StringIndexOutOfBoundsException(endIndex); } int subLen = endIndex - beginIndex; if (subLen < 0) { throw new StringIndexOutOfBoundsException(subLen); } return ((beginIndex == 0) && (endIndex == value.length)) ? this : new String(value, beginIndex, subLen); public String(char value[], int offset, int count) { if (offset < 0) { throw new StringIndexOutOfBoundsException(offset); } if (count <= 0) { if (count < 0) { throw new StringIndexOutOfBoundsException(count); } if (offset <= value.length) { this.value = "".value; return; } } // Note: offset or count might be near -1>>>1. if (offset > value.length - count) { throw new StringIndexOutOfBoundsException(offset + count); } this.value = Arrays.copyOfRange(value, offset, offset+count); } valueOf /** 调用对象自己的toString方法 */ public static String valueOf(Object obj) { return (obj == null) ? "null" : obj.toString(); } public static String valueOf(char data[]) { return new String(data); } public static String valueOf(char data[], int offset, int count) { return new String(data, offset, count); } String + 号重载 String str = "abc"; String str1= str + "def"; /** 反编译之后 */ String str = "abc"; String str1= (new StringBuilder(String.valueOf(str))).append("def").toString(); spilt 按照字符regex将字符串分成limit份。 public String[] split(String regex, int limit) { /* fastpath if the regex is a (1)one-char String and this character is not one of the RegEx's meta characters ".$|()[{^?*+\\", or (2)two-char String and the first char is the backslash and the second is not the ascii digit or ascii letter. */ char ch = 0; if (((regex.value.length == 1 && ".$|()[{^?*+\\".indexOf(ch = regex.charAt(0)) == -1) || (regex.length() == 2 && regex.charAt(0) == '\\' && (((ch = regex.charAt(1))-'0')|('9'-ch)) < 0 && ((ch-'a')|('z'-ch)) < 0 && ((ch-'A')|('Z'-ch)) < 0)) && (ch < Character.MIN_HIGH_SURROGATE || ch > Character.MAX_LOW_SURROGATE)) { int off = 0; int next = 0; boolean limited = limit > 0; ArrayList<String> list = new ArrayList<>(); while ((next = indexOf(ch, off)) != -1) { if (!limited || list.size() < limit - 1) { list.add(substring(off, next)); off = next + 1; } else { // last one //assert (list.size() == limit - 1); list.add(substring(off, value.length)); off = value.length; break; } } // If no match was found, return this if (off == 0) return new String[]{this}; // Add remaining segment if (!limited || list.size() < limit) list.add(substring(off, value.length)); // Construct result int resultSize = list.size(); if (limit == 0) { while (resultSize > 0 && list.get(resultSize - 1).length() == 0) { resultSize--; } } String[] result = new String[resultSize]; return list.subList(0, resultSize).toArray(result); } return Pattern.compile(regex).split(this, limit); } 按照字符regex将字符串分割 /** 直接调用 split(String regex, int limit) limit 为 零 */ public String[] split(String regex) { return split(regex, 0); } equalsIgnoreCase public boolean equalsIgnoreCase(String anotherString) { return (this == anotherString) ? true : (anotherString != null) && (anotherString.value.length == value.length) && regionMatches(true, 0, anotherString, 0, value.length); } 三目运算符加 && 代替 多个if replaceFirst、replaceAll、replace String replaceFirst(String regex, String replacement) String replaceAll(String regex, String replacement) String replace(CharSequence target, CharSequence replacement) replace的参数是char和CharSequence,即可以支持字符的替换,也支持字符串的替换 replaceAll和replaceFirst的参数是regex,即基于规则表达式的替换,replace只要有符合就替换 replaceFirst(),只替换第一次出现的字符串; 其他方法 String 类中还有很多方法。例如: public int length(){} 返回字符串长度 public boolean isEmpty() { } 返回字符串是否为空 public char charAt(int index) {} 返回字符串中第(index+1)个字符 public char[] toCharArray() {} 转化成字符数组 public String trim(){} 去掉两端空格 public String toUpperCase(){} 转化为大写 public String toLowerCase(){} 转化为小写 public String concat(String str) {} 拼接字符串 public boolean matches(String regex){} 判断字符串是否匹配给定的regex正则表达式 public boolean contains(CharSequence s) 判断字符串是否包含字符序列s


优秀的个人博客,低调大师

Spark源码阅读笔记一——part of core

内部accumulator通过心跳报告给drivertask运行时可以累加accumulator,但是不能读取value,value只能在driver获取spark内部用一个weakhashmap保存accumulator,便于gc的清理 CacheManagerspark的类用于负责传递RDD的分区内容给BlockManager,并保证一个节点不会载入一个rdd的两份拷贝,这个通过一个hashset实现,已载入的rdd会将id保存到set中获取和计算rdd时,先判断是否已经计算,如果没有再从blockmanager获取block然后计算结果。除非是本地模式,不然rdd的计算结果都会缓存如果rdd不需要在内存中缓存,则直接将计算结果通过iterator直接传给blockmanager在rdd需要缓存时,我们必须小心不能在内存中一次性展开全部的partition,否则如果jvm没有足够的空间给这个单个的partition可能会引发OOM异常。取而代之的是,我们展开这些value,小心的、可能的放弃并丢掉这个partition到磁盘如果合适。如果空间足够就全部缓存到内存中,否则如果使用磁盘就放到磁盘,不然直接就返回value DependencyNarrowDependency:一个子partition依赖于多个父partitionShuffleDependency:shuffle stage的输出依赖,在shuffle中,rdd是短暂的因为我们在executor端不需要它 ExecutorAllocationClient与cluster manager请求或杀掉executor的客户端根据我们的调度需要更新集群,依赖于三个信息1 executor的数量,我们需要的全部的executor数,cluster manager不能杀掉任何运行中的executor来达到这个数量,这是我们想要分配的executor数量2 所有要运行的stage中有本地偏好的task数量,包括运行等待和完成的task3 task到运行host的map ExecutorAllocationManager(EAM)一个代理,根据工作负载动态的分配和移除executorEAM维护一个移动的目标executor数量,定期的同步到cluster manager。target的数量从配置的一个初始值开始,并根据等待和运行task数变化在当前的target数量多于需要控制的当前的负载时,会减少target数量。target总是会一次性减到可以运行所以当前运行和等待task的数量当需要响应积压的等待需要调度的task时,会增加target的数量。如果一个队列在N秒内没有排空,则新的executor被加入。如果这个队列仍然在另外的M秒内存在,则更多的executor会被加入。增加的数量在每轮以上一轮的指数级增加,直到达到上限。上限是基于一个配置的属性和当前运行和等待任务的数量。指数增长有双重理由。1 executor应该在开始缓慢的增加,以防万一额外需要的executor数量很小。否则我们增加了多于我们需要的executor数量则我们需要在后面移除他们。2 executor的数量需要快速增加,以防万一executor的数量最大值非常高,否则在繁重的工作负载下性能提升需要很长时间。executor移除的策略很简单,如果一个executor已经空闲了K秒,意味着它没有被调度用于执行任何task,因而移除它。这里没有重试的逻辑,因为我们假定cluster manager最终会异步的执行所有它收到的请求。相关的spark属性如下 成员变量initializing,是否需要一直等待初始化的executor集合被分配,当这个变量为true的时候,我们不会取消未执行的executor请求。这个在下面两种情况会被设置成false1 一个stage被提交2 一个executor的空闲时间超时用于增加减少executor的调度任务是一个定时任务,每100毫秒执行一次调度方法上,首先基于添加时间和我们当前的需要调整我们请求的executor,然后如果一个已存在的executor已经过期了,则杀掉。 updateAndSyncNumExecutorsTarget:更新target数量并同步结果到cluster manager。检查我们已存在的分配和之前的请求超过我们现在的需要。如果满足,truncate target数量并让cluster manager知道以便于它可以取消不需要的等待的请求。如果不满足,并且添加的时间超时,看看我们是否能请求新的executor,并刷新添加时间。 当一个executor(程它为executor X)因为到达了下限而没有被删除,则它不会再被标记位空闲。当有新的executor加入,我们不再在最低下限,则我们必须再次标记executor X为空闲,以使我们不会忘记它是一个被移除的候选。当scheduler的队列是空的时候,就会将addtime设为未设置所有cache的block会被报告给driver,但不包括广播的block当executor执行任务了(busy),就会清除它的idle timeprivate val stageIdToExecutorPlacementHints = new mutable.HashMap[Int, (Int, Map[String, Int])]stageid到tuple的map,tuple是节点和将会在这个节点上运行的task的数量taskstart和blockmanageradded这些事件是在不同的线程执行的,因而顺序不一定,taskstart事件中将对应的executor置为busytaskend,如果executor不再运行任何调度的任务,则标记为idle如果task失败,则会将scheduler置为积压任务的状态,将这个task从这个stage对应的task列表中移除

优秀的个人博客,低调大师

Spark Netty与Jetty (源码阅读十一)

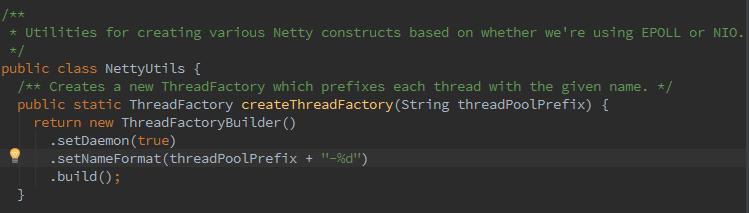
spark呢,对Netty API又做了一层封装,那么Netty是什么呢~是个鬼。它基于NIO的服务端客户端框架,具体不再说了,下面开始。 创建了一个线程工厂,生成的线程都给定一个前缀名。 像一般的netty框架一样,创建Netty的EventLoopGroup: 在常用的netty框架中呢,会创建客户端辅助类,设置SocketChannel: Bootstrap b = new Bootstrap(); b.group(group).channel(NioSocketChannel.class) spark中呢 根据参数IOMode,返回正确的客户端SocketChannel: 返回正确的服务端socketChannel: 返回远端的Channel地址: 创建一个ByteBuf对本地线程缓存禁用的分配器。ByteBuf是由事件循环线程分配,所以线程本地缓存对于TransportClient是禁用的,ByteBuf释放是由Executor线程,不是事件循环线程完成。本地线程缓存经常会延迟ByteBuf的回收,导致巨大的内存消耗。 Spark这个禽兽,对Jetty也进行了封装,什么是Jetty呢,它是以java作为开发语言的servlet容器,它的API以一组jar包的形式发布,提供网络和web服务.在我理解,Netty是用socket~Jetty呢 就是Http~那么下来,我们看一下JettyUtils: createServlet,生成HttpServlet匿名内部类,此Responder类型发生隐式转换,转换为用户传入的函数参数。 要为Jetty创建servlet,就涉及ServletContextHandler的API的使用,生成ServletContextHandler: 创建给定路径为前缀的请求的响应处理,将SparkUI中的全部handler加入ContextHandlerCollection.,如果使用配置spark.ui.filters指定了filter,则给所有handler添加filter.然后调用startServiceOnPort,最终回调函数connect:

优秀的个人博客,低调大师

Netty 源码阅读入门实战(一)-介绍

1 简介 以 Netty 为底层的框架 Netty 是什么 Netty 技术和方法的特点 设计 针对多种传输类型的统一接口 - 阻塞和非阻塞 简单但更强大的线程模型 真正的无连接的数据报套接字支持 链接逻辑支持复用 易用性 大量的 Javadoc 和 代码实例 除了在 JDK 1.6 + 额外的限制。(一些特征是只支持在Java 1.7 +。可选的功能可能有额外的限制。) 性能 比核心 Java API 更好的吞吐量,较低的延时 资源消耗更少,这个得益于共享池和重用 减少内存拷贝 健壮性 消除由于慢,快,或重载连接产生的 OutOfMemoryError 消除经常发现在 NIO 在高速网络中的应用中的不公平的读/写比 安全 完整的 SSL / TLS 和 StartTLS 的支持 运行在受限的环境例如 Applet 或 OSGI 社区 发布的更早和更频繁 社区驱动

资源下载

更多资源
腾讯云软件源

腾讯云软件源

为解决软件依赖安装时官方源访问速度慢的问题,腾讯云为一些软件搭建了缓存服务。您可以通过使用腾讯云软件源站来提升依赖包的安装速度。为了方便用户自由搭建服务架构,目前腾讯云软件源站支持公网访问和内网访问。

Nacos

Nacos

Nacos /nɑ:kəʊs/ 是 Dynamic Naming and Configuration Service 的首字母简称,一个易于构建 AI Agent 应用的动态服务发现、配置管理和AI智能体管理平台。Nacos 致力于帮助您发现、配置和管理微服务及AI智能体应用。Nacos 提供了一组简单易用的特性集,帮助您快速实现动态服务发现、服务配置、服务元数据、流量管理。Nacos 帮助您更敏捷和容易地构建、交付和管理微服务平台。

Sublime Text

Sublime Text

Sublime Text具有漂亮的用户界面和强大的功能,例如代码缩略图,Python的插件,代码段等。还可自定义键绑定,菜单和工具栏。Sublime Text 的主要功能包括:拼写检查,书签,完整的 Python API , Goto 功能,即时项目切换,多选择,多窗口等等。Sublime Text 是一个跨平台的编辑器,同时支持Windows、Linux、Mac OS X等操作系统。

WebStorm

WebStorm

WebStorm 是jetbrains公司旗下一款JavaScript 开发工具。目前已经被广大中国JS开发者誉为“Web前端开发神器”、“最强大的HTML5编辑器”、“最智能的JavaScript IDE”等。与IntelliJ IDEA同源,继承了IntelliJ IDEA强大的JS部分的功能。

用户登录
用户注册