首页 文章 精选 留言 我的

精选列表

搜索[Springboot],共4373篇文章
优秀的个人博客,低调大师

精通SpringBoot——第十三篇:整合Mybatis多数据源

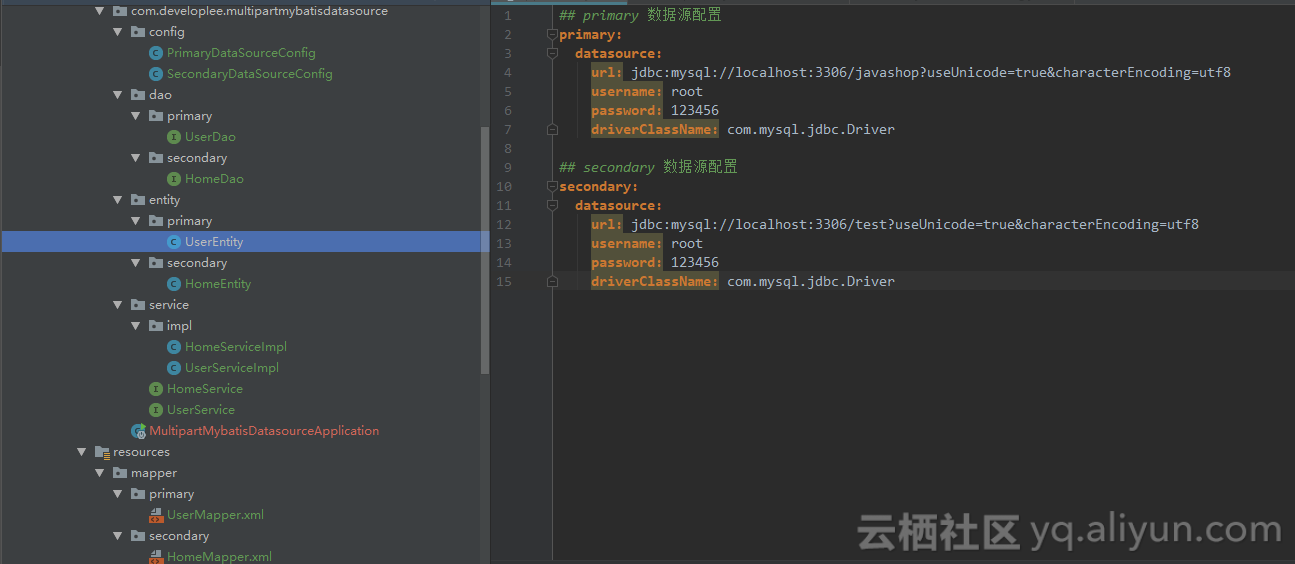
久违了,最近度过了一段倦怠期,这段时间干什么都没有动力,拖延症复发。好在我回来了.... ——From me .进入今天的主题——在Spring Boot 项目中整合mybatis多数据源,其实很简单,其实并不难。整体项目结构以及数据源配置application.yml: 看代码吧. 第一个数据源配置(作为主数据源) /** * @author Lensen * @desc * @since 2018/9/19 10:22 */ @Configuration @MapperScan(basePackages = PrimaryDataSourceConfig.PACKAGE, sqlSessionFactoryRef = "primarySqlSessionFactory") public class PrimaryDataSourceConfig { static final String PACKAGE = "com.developlee.multipartmybatisdatasource.dao.primary"; static final String MAPPER_LOCATION = "classpath:mapper/primary/*.xml"; @Value("${primary.datasource.url}") private String url; @Value("${primary.datasource.username}") private String user; @Value("${primary.datasource.password}") private String password; @Value("${primary.datasource.driverClassName}") private String driverClass; @Bean(name = "primaryDataSource") @Primary public DataSource primaryDataSource() { DruidDataSource dataSource = new DruidDataSource(); dataSource.setDriverClassName(driverClass); dataSource.setUrl(url); dataSource.setUsername(user); dataSource.setPassword(password); return dataSource; } @Bean(name = "primaryTransactionManager") @Primary public DataSourceTransactionManager primaryTransactionManager() { return new DataSourceTransactionManager(primaryDataSource()); } @Bean(name = "primarySqlSessionFactory") @Primary public SqlSessionFactory primarySqlSessionFactory(@Qualifier("primaryDataSource") DataSource primaryDataSource) throws Exception { final SqlSessionFactoryBean sessionFactory = new SqlSessionFactoryBean(); sessionFactory.setDataSource(primaryDataSource); sessionFactory.setMapperLocations(new PathMatchingResourcePatternResolver() .getResources(PrimaryDataSourceConfig.MAPPER_LOCATION)); return sessionFactory.getObject(); } } 第二个数据源配置 /** * @author Lensen * @desc * @since 2018/9/19 10:22 */ @Configuration @MapperScan(basePackages = SecondaryDataSourceConfig.PACKAGE, sqlSessionFactoryRef = "secondarySqlSessionFactory") public class SecondaryDataSourceConfig { static final String PACKAGE = "com.developlee.multipartmybatisdatasource.dao.secondary"; static final String MAPPER_LOCATION = "classpath:mapper/secondary/*.xml"; @Value("${secondary.datasource.url}") private String url; @Value("${secondary.datasource.username}") private String user; @Value("${secondary.datasource.password}") private String password; @Value("${secondary.datasource.driverClassName}") private String driverClass; @Bean(name = "secondaryDataSource") public DataSource secondaryDataSource() { DruidDataSource dataSource = new DruidDataSource(); dataSource.setDriverClassName(driverClass); dataSource.setUrl(url); dataSource.setUsername(user); dataSource.setPassword(password); return dataSource; } @Bean(name = "secondaryTransactionManager") public DataSourceTransactionManager secondaryTransactionManager() { return new DataSourceTransactionManager(secondaryDataSource()); } @Bean(name = "secondarySqlSessionFactory") public SqlSessionFactory secondarySqlSessionFactory(@Qualifier("secondaryDataSource") DataSource secondaryDataSource) throws Exception { final SqlSessionFactoryBean sessionFactory = new SqlSessionFactoryBean(); sessionFactory.setDataSource(secondaryDataSource); sessionFactory.setMapperLocations(new PathMatchingResourcePatternResolver() .getResources(SecondaryDataSourceConfig.MAPPER_LOCATION)); return sessionFactory.getObject(); } } 其他业务逻辑代码就不贴了,代码可在我的github上找到。文章末尾有地址。 application.yml ## primary 数据源配置 primary: datasource: url: jdbc:mysql://localhost:3306/javashop?useUnicode=true&characterEncoding=utf8 username: root password: 123456 driverClassName: com.mysql.jdbc.Driver ## secondary 数据源配置 secondary: datasource: url: jdbc:mysql://localhost:3306/test?useUnicode=true&characterEncoding=utf8 username: root password: 123456 driverClassName: com.mysql.jdbc.Driver pom.xml <dependency> <groupId>org.springframework.boot</groupId> <artifactId>spring-boot-starter-web</artifactId> </dependency> <dependency> <groupId>org.mybatis.spring.boot</groupId> <artifactId>mybatis-spring-boot-starter</artifactId> <version>1.3.2</version> </dependency> <dependency> <groupId>mysql</groupId> <artifactId>mysql-connector-java</artifactId> <scope>runtime</scope> </dependency> <dependency> <groupId>org.projectlombok</groupId> <artifactId>lombok</artifactId> <optional>true</optional> </dependency> <!-- https://mvnrepository.com/artifact/com.alibaba/druid-spring-boot-starter --> <dependency> <groupId>com.alibaba</groupId> <artifactId>druid-spring-boot-starter</artifactId> <version>1.1.10</version> </dependency> 测试: @RunWith(SpringRunner.class) @SpringBootTest public class MultipartMybatisDatasourceApplicationTests { @Autowired UserServiceImpl userService; @Autowired HomeServiceImpl homeService; @Test public void contextLoads() { UserEntity userEntity = new UserEntity(); userEntity.setId(1L); userEntity.setName("Lensen"); userEntity.setMobile("13738718660"); HomeEntity homeEntity = new HomeEntity(); homeEntity.setId(1L); homeEntity.setUserId(1L); homeEntity.setCity("杭州"); homeEntity.setTown("西湖区"); userService.saveUser(userEntity); homeService.saveHome(homeEntity); userService.getUserById(1L); homeService.getHomeByUserId(1L); } } 代码可以在我的github.com中找到。 That's All。 关注我的公众号,也不一定会更新文章。hahah~~

优秀的个人博客,低调大师

SpringBoot实战(四)之使用JDBC和Spring访问数据库

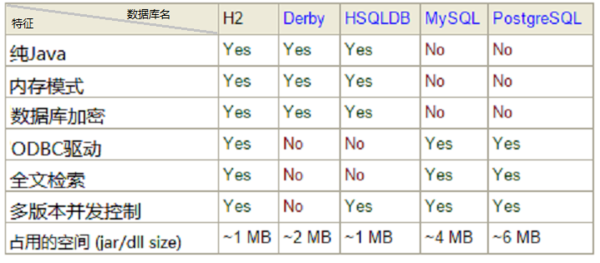
这里演示的是h2databse示例,所以简单的介绍普及下h2database相关知识 H2数据库是一个开源的关系型数据库。 H2是一个嵌入式数据库引擎,采用java语言编写,不受平台的限制,同时H2提供了一个十分方便的web控制台用于操作和管理数据库内容。它还提供兼容模式,可以兼容一些主流的数据库,因此采用H2作为开发期的数据库非常方便。 H2数据库特点: 短小精干。 Java编写,可使用GCJ和IKVM.NET编译。 同时支持网络版和嵌入式版本,另外还提供了内存版。 有比较好的兼容性,支持相当标准的sql标准,支持集群。 提供JDBC、ODBC访问接口,提供了非常友好的基于web的数据库管理界面。 这里说下JdbcTemplate,之所以会出现JdbcTemplate,我个人加上我自己的一些想法,传统的JDBC的高耦合性和许多重复性增删改查,使得JDBC的升级版诞生,这一点与MyBatis Plus有共同的特点。而JDBCTemplate正是看到这一点后,对于JDBC进行升级。 关于JDBCTemplate示例,大家可以参考这位朋友写的示例:https://www.cnblogs.com/janes/p/6971839.html 下面引用下他的关于JdbcTemplate的介绍: JdbcTemplate是最基本的Spring JDBC模板,这个模板支持简单的JDBC数据库访问功能以及基于索引参数的查询。 Spring数据访问模板:在数据库操作过程中,有很大一部分重复工作,比如事务控制、管理资源以及处理异常等,Spring的模板类处理这些固定部分。同时,应用程序相关的数据访问在回调的实现中处理,包括语句、绑定参数以及整理结果等。这样一来,我们只需关心自己的数据访问逻辑即可。 Spring的JDBC框架承担了资源管理和异常处理的工作,从而简化了JDBC代码,我们只需要编写从数据库读写数据的必需代码就万事大吉了。 一、导入依赖 <?xml version="1.0" encoding="UTF-8"?> <project xmlns="http://maven.apache.org/POM/4.0.0" xmlns:xsi="http://www.w3.org/2001/XMLSchema-instance" xsi:schemaLocation="http://maven.apache.org/POM/4.0.0 http://maven.apache.org/xsd/maven-4.0.0.xsd"> <modelVersion>4.0.0</modelVersion> <groupId>org.springframework</groupId> <artifactId>gs-relational-data-access</artifactId> <version>0.1.0</version> <parent> <groupId>org.springframework.boot</groupId> <artifactId>spring-boot-starter-parent</artifactId> <version>1.5.8.RELEASE</version> </parent> <properties> <java.version>1.8</java.version> </properties> <dependencies> <dependency> <groupId>org.springframework.boot</groupId> <artifactId>spring-boot-starter-jdbc</artifactId> </dependency> <dependency> <groupId>com.h2database</groupId> <artifactId>h2</artifactId> </dependency> </dependencies> <build> <plugins> <plugin> <groupId>org.springframework.boot</groupId> <artifactId>spring-boot-maven-plugin</artifactId> </plugin> </plugins> </build> </project> 二、编写实体 Customer.java package hello; public class Customer { private long id; private String firstName, lastName; public Customer(long id, String firstName, String lastName) { this.id = id; this.firstName = firstName; this.lastName = lastName; } @Override public String toString() { return String.format( "Customer[id=%d, firstName='%s', lastName='%s']", id, firstName, lastName); } public long getId() { return id; } public void setId(long id) { this.id = id; } public String getFirstName() { return firstName; } public void setFirstName(String firstName) { this.firstName = firstName; } public String getLastName() { return lastName; } public void setLastName(String lastName) { this.lastName = lastName; } } 三、编写启动类 package hello; import org.slf4j.Logger; import org.slf4j.LoggerFactory; import org.springframework.beans.factory.annotation.Autowired; import org.springframework.boot.CommandLineRunner; import org.springframework.boot.SpringApplication; import org.springframework.boot.autoconfigure.SpringBootApplication; import org.springframework.jdbc.core.JdbcTemplate; import java.util.Arrays; import java.util.List; import java.util.stream.Collectors; @SpringBootApplication public class Application implements CommandLineRunner { private static final Logger log = LoggerFactory.getLogger(Application.class); public static void main(String args[]) { SpringApplication.run(Application.class, args); } @Autowired JdbcTemplate jdbcTemplate; @Override public void run(String... strings) throws Exception { log.info("Creating tables"); jdbcTemplate.execute("DROP TABLE customers IF EXISTS"); jdbcTemplate.execute("CREATE TABLE customers(" + "id SERIAL, first_name VARCHAR(255), last_name VARCHAR(255))"); // Split up the array of whole names into an array of first/last names List<Object[]> splitUpNames = Arrays.asList("John Woo", "Jeff Dean", "Josh Bloch", "Josh Long").stream() .map(name -> name.split(" ")) .collect(Collectors.toList()); // Use a Java 8 stream to print out each tuple of the list splitUpNames.forEach(name -> log.info(String.format("Inserting customer record for %s %s", name[0], name[1]))); // Uses JdbcTemplate's batchUpdate operation to bulk load data jdbcTemplate.batchUpdate("INSERT INTO customers(first_name, last_name) VALUES (?,?)", splitUpNames); log.info("Querying for customer records where first_name = 'Josh':"); jdbcTemplate.query( "SELECT id, first_name, last_name FROM customers WHERE first_name = ?", new Object[] { "Josh" }, (rs, rowNum) -> new Customer(rs.getLong("id"), rs.getString("first_name"), rs.getString("last_name")) ).forEach(customer -> log.info(customer.toString())); } } 最终结果是: 该main()方法使用Spring Boot的SpringApplication.run()方法来启动应用程序。您是否注意到没有一行XML?也没有web.xml文件。此Web应用程序是100%纯Java,您无需处理配置任何管道或基础结构。 Spring Boot支持H2,一种内存中的关系数据库引擎,并自动创建连接。因为我们使用的是spring-jdbc,Spring Boot会自动创建一个JdbcTemplate。该@Autowired JdbcTemplate字段自动加载它并使其可用。 这个Application类实现了Spring BootCommandLineRunner,这意味着它将run()在加载应用程序上下文后执行该方法。 首先,使用JdbcTemplate’s `execute方法安装一些DDL。 其次,您获取字符串列表并使用Java 8流,将它们拆分为Java数组中的firstname / lastname对。 然后使用JdbcTemplate’s `batchUpdate方法在新创建的表中安装一些记录。方法调用的第一个参数是查询字符串,最后一个参数(Objects的数组)包含要替换为“?”字符的查询的变量。 补充说明: Java 8 lambdas很好地映射到单个方法接口,如Spring的RowMapper。如果您使用的是Java 7或更早版本,则可以轻松插入匿名接口实现,并具有与lambda expresion正文所包含的相同的方法体,并且它可以毫不费力地使用Spring。


优秀的个人博客,低调大师

SpringBoot实战(十)之使用Spring Boot Actuator构建RESTful Web服务

一、导入依赖 <?xml version="1.0" encoding="UTF-8"?> <project xmlns="http://maven.apache.org/POM/4.0.0" xmlns:xsi="http://www.w3.org/2001/XMLSchema-instance" xsi:schemaLocation="http://maven.apache.org/POM/4.0.0 http://maven.apache.org/xsd/maven-4.0.0.xsd"> <modelVersion>4.0.0</modelVersion> <groupId>org.springframework</groupId> <artifactId>gs-actuator-service</artifactId> <version>0.1.0</version> <parent> <groupId>org.springframework.boot</groupId> <artifactId>spring-boot-starter-parent</artifactId> <version>1.5.8.RELEASE</version> </parent> <dependencies> <dependency> <groupId>org.springframework.boot</groupId> <artifactId>spring-boot-starter-web</artifactId> </dependency> <dependency> <groupId>org.springframework.boot</groupId> <artifactId>spring-boot-starter-actuator</artifactId> </dependency> <dependency> <groupId>org.springframework.boot</groupId> <artifactId>spring-boot-starter-test</artifactId> <scope>test</scope> </dependency> </dependencies> <properties> <java.version>1.8</java.version> </properties> <build> <plugins> <plugin> <groupId>org.springframework.boot</groupId> <artifactId>spring-boot-maven-plugin</artifactId> </plugin> </plugins> </build> </project> 二、构建实体 package hello; public class Greeting { private final long id; private final String content; public Greeting(long id, String content) { this.id = id; this.content = content; } public long getId() { return id; } public String getContent() { return content; } } 三、编写Controller package hello; import java.util.concurrent.atomic.AtomicLong; import org.springframework.stereotype.Controller; import org.springframework.web.bind.annotation.GetMapping; import org.springframework.web.bind.annotation.RequestParam; import org.springframework.web.bind.annotation.ResponseBody; @Controller public class HelloWorldController { private static final String template = "Hello, %s!"; private final AtomicLong counter = new AtomicLong(); @GetMapping("/hello-world") @ResponseBody public Greeting sayHello(@RequestParam(name="name", required=false, defaultValue="Stranger") String name) { return new Greeting(counter.incrementAndGet(), String.format(template, name)); } } 四、编写配置文件 server.port: 9000 management.server.port: 9001 management.server.address: 127.0.0.1 五、编写启动类 package hello; import org.springframework.boot.SpringApplication; import org.springframework.boot.autoconfigure.SpringBootApplication; /** * 使用Spring Boot Actuator构建RESTful Web服务 * */ @SpringBootApplication public class HelloWorldApplication { public static void main(String[] args) { SpringApplication.run(HelloWorldApplication.class, args); } } 六、编写测试类 /* * Copyright 2012-2014 the original author or authors. * * Licensed under the Apache License, Version 2.0 (the "License"); * you may not use this file except in compliance with the License. * You may obtain a copy of the License at * * http://www.apache.org/licenses/LICENSE-2.0 * * Unless required by applicable law or agreed to in writing, software * distributed under the License is distributed on an "AS IS" BASIS, * WITHOUT WARRANTIES OR CONDITIONS OF ANY KIND, either express or implied. * See the License for the specific language governing permissions and * limitations under the License. */ package hello; import java.util.Map; import org.junit.Test; import org.junit.runner.RunWith; import org.springframework.beans.factory.annotation.Autowired; import org.springframework.beans.factory.annotation.Value; import org.springframework.boot.test.context.SpringBootTest; import org.springframework.boot.test.web.client.TestRestTemplate; import org.springframework.http.HttpStatus; import org.springframework.http.ResponseEntity; import org.springframework.test.context.TestPropertySource; import org.springframework.test.context.junit4.SpringRunner; import static org.assertj.core.api.BDDAssertions.then; /** * Basic integration tests for service demo application. * * @author Dave Syer */ @RunWith(SpringRunner.class) @SpringBootTest(webEnvironment = SpringBootTest.WebEnvironment.RANDOM_PORT) @TestPropertySource(properties = {"management.port=0"}) public class HelloWorldApplicationTests { @org.springframework.boot.context.embedded.LocalServerPort private int port; @Value("${local.management.port}") private int mgt; @Autowired private TestRestTemplate testRestTemplate; @Test public void shouldReturn200WhenSendingRequestToController() throws Exception { @SuppressWarnings("rawtypes") ResponseEntity<Map> entity = this.testRestTemplate.getForEntity( "http://localhost:" + this.port + "/hello-world", Map.class); then(entity.getStatusCode()).isEqualTo(HttpStatus.OK); } @Test public void shouldReturn200WhenSendingRequestToManagementEndpoint() throws Exception { @SuppressWarnings("rawtypes") ResponseEntity<Map> entity = this.testRestTemplate.getForEntity( "http://localhost:" + this.mgt + "/actuator/info", Map.class); then(entity.getStatusCode()).isEqualTo(HttpStatus.OK); } }

优秀的个人博客,低调大师

springCloud Finchley 实战入门(基于springBoot 2.0.3)【五 Hystrix 服务容错保护】

服务容错保护 在微服务的架构中,存在着那么多单元服务,若一个单元出现故障,就很容易因依赖关系二引发故障的蔓延,最终导致整个系统的瘫痪。这样的架构相比较传统的架构更加不稳定。为了解决这个问题,产生了断路器等一系列的服务保护机制。 spring Cloud Hystrix实现了断路器、线程隔离等一系列服务保护功能。它也是基于Netflix的开源框架Hystrix实现的。,该框架的目标在于通过控制那些访问远程系统、服务和第三方库的节点,从而对延时和故障提供更加强大的容错能力。 快速入门 我们以之前的内容作为基础,针对"service-user-ribbon"进行配置。 在"service-user-ribbon"的pom.xml配置文件添加Hystrix依赖 <!--添加Hystrix依赖 断路器容错保护--> <dependency> <groupId>org.springframework.cloud</groupId> <artifactId>spring-cloud-starter-netflix-hystrix</artifactId> </dependency> 完整的pom.xml <?xml version="1.0" encoding="UTF-8"?> <project xmlns="http://maven.apache.org/POM/4.0.0" xmlns:xsi="http://www.w3.org/2001/XMLSchema-instance" xsi:schemaLocation="http://maven.apache.org/POM/4.0.0 http://maven.apache.org/xsd/maven-4.0.0.xsd"> <modelVersion>4.0.0</modelVersion> <groupId>com.example</groupId> <artifactId>eureka-bussniss-service-user-client-ribbon</artifactId> <version>0.0.1-SNAPSHOT</version> <packaging>jar</packaging> <name>eureka-bussniss-service-user-client-ribbon</name> <description>Demo project for Spring Boot</description> <parent> <groupId>org.springframework.boot</groupId> <artifactId>spring-boot-starter-parent</artifactId> <version>2.0.3.RELEASE</version> <relativePath/> <!-- lookup parent from repository --> </parent> <properties> <project.build.sourceEncoding>UTF-8</project.build.sourceEncoding> <project.reporting.outputEncoding>UTF-8</project.reporting.outputEncoding> <java.version>1.8</java.version> <spring-cloud.version>Finchley.RELEASE</spring-cloud.version> </properties> <dependencies> <dependency> <groupId>org.springframework.cloud</groupId> <artifactId>spring-cloud-starter-netflix-eureka-server</artifactId> </dependency> <dependency> <groupId>org.springframework.cloud</groupId> <artifactId>spring-cloud-starter-netflix-ribbon</artifactId> </dependency> <!--添加Hystrix依赖 断路器容错保护--> <dependency> <groupId>org.springframework.cloud</groupId> <artifactId>spring-cloud-starter-netflix-hystrix</artifactId> </dependency> <dependency> <groupId>org.projectlombok</groupId> <artifactId>lombok</artifactId> </dependency> <dependency> <groupId>org.springframework.boot</groupId> <artifactId>spring-boot-starter-test</artifactId> <scope>test</scope> </dependency> </dependencies> <dependencyManagement> <dependencies> <dependency> <groupId>org.springframework.cloud</groupId> <artifactId>spring-cloud-dependencies</artifactId> <version>${spring-cloud.version}</version> <type>pom</type> <scope>import</scope> </dependency> </dependencies> </dependencyManagement> <build> <plugins> <plugin> <groupId>org.springframework.boot</groupId> <artifactId>spring-boot-maven-plugin</artifactId> </plugin> </plugins> </build> </project> 然后在主类EurekaBussnissServiceUserClientRibbonApplication中使用@EnableHystrix 注解以开启 Hystrix 特性 @SpringBootApplication @EnableEurekaClient @EnableHystrix public class EurekaBussnissServiceUserClientRibbonApplication { public static void main(String[] args) { SpringApplication.run(EurekaBussnissServiceUserClientRibbonApplication.class, args); } @Bean @LoadBalanced //开启客户端负载均衡 RestTemplate restTemplate() { return new RestTemplate(); } } 接下来修改服务消费方式,在UserManagementRibbonClient类的接口方法:ListUsersByRibbon增加@HystrixCommand并且指定fallbackMethod名,再实现该方法。具体的代码如下: /** * 使用 @HystrixCommand 注解的 fallbackMethod 指定失败方法,并实现该方法 * * @return */ @GetMapping("/listUsersByRibbon") @HystrixCommand(fallbackMethod = "listUsersByRibbonFallback") public String ListUsersByRibbon() { /** * hystrix 断路器的默认的超时时间为2000毫秒 * 这里测试的在3000毫秒的随机出现的超时概率出发断路器 对应的代码逻辑见service-user项目的listUsers接口 */ long start = System.currentTimeMillis(); String result = this.restTemplate.getForObject("http://service-user/listUsers", String.class); long end = System.currentTimeMillis(); log.info("Spend Time :"+(end-start)); return result; } public String listUsersByRibbonFallback() { return "listUsersByRibbon异常,端口:" + port; } 配置完成重启项目,在8802和8803服务正常的情况下服务调用正常。 当我们把其中一个service-user服务停掉。例如:把8802停掉,只剩下8803服务,我们重新访问http://localhost:8901/listUsersByRibbon地址,当我们一开始访问到8802服务时,因为此时服务已经挂了,所以我们会看到下面的响应: 1532500404150.png 过了几秒后,继续访问我们会发现请求总是负载到了8803的端口了,不会再去请求8802 1532500486184.png 接下来我们重新把8802的服务启动后,继续访问http://localhost:8901/listUsersByRibbon这时我们会发现请求接口又被一轮询的方式负载到8802和8803了 1532500622445.png 1532500630124.png 这样我们就实现了基础的分布式微服务的容错保护了。github 项目源码 接下来我们会再研究一下,Hystrix框架针对单个应用实例和集群提供的监控功能。

资源下载

更多资源
Mario

Mario

马里奥是站在游戏界顶峰的超人气多面角色。马里奥靠吃蘑菇成长,特征是大鼻子、头戴帽子、身穿背带裤,还留着胡子。与他的双胞胎兄弟路易基一起,长年担任任天堂的招牌角色。

腾讯云软件源

腾讯云软件源

为解决软件依赖安装时官方源访问速度慢的问题,腾讯云为一些软件搭建了缓存服务。您可以通过使用腾讯云软件源站来提升依赖包的安装速度。为了方便用户自由搭建服务架构,目前腾讯云软件源站支持公网访问和内网访问。

Spring

Spring

Spring框架(Spring Framework)是由Rod Johnson于2002年提出的开源Java企业级应用框架,旨在通过使用JavaBean替代传统EJB实现方式降低企业级编程开发的复杂性。该框架基于简单性、可测试性和松耦合性设计理念,提供核心容器、应用上下文、数据访问集成等模块,支持整合Hibernate、Struts等第三方框架,其适用范围不仅限于服务器端开发,绝大多数Java应用均可从中受益。

WebStorm

WebStorm

WebStorm 是jetbrains公司旗下一款JavaScript 开发工具。目前已经被广大中国JS开发者誉为“Web前端开发神器”、“最强大的HTML5编辑器”、“最智能的JavaScript IDE”等。与IntelliJ IDEA同源,继承了IntelliJ IDEA强大的JS部分的功能。

用户登录
用户注册