首页 文章 精选 留言 我的

精选列表

搜索[AGI开发],共10000篇文章
优秀的个人博客,低调大师

iOS开发-UIView扩展CGRect

关于UIView的位置都会遇到,一般需要改变UIView的位置,需要先获取原有的frame位置,然后在frame上面修改,有的时候如果只是改变了一下垂直方向的位置,宽度和高度的一种,这种写法很麻烦。下面两种写法第二种明显更简单,如果需要实现第二种方法就需要扩展UIView。 1 2 3 4 5 6 7 8 //1 CGRect frame=self.testView.frame; frame.size.width=120; self.testView.frame=frame; [self printFrame]; //2 self.testView.width=120; [self printFrame]; 扩展定义: 1 2 3 4 5 6 7 8 9 10 11 12 13 14 15 16 17 18 19 20 21 22 23 24 25 @ interface UIView (ReSize) @property (nonatomic, assign) CGSize size; @property (nonatomic,assign) CGFloat x; @property (nonatomic,assign) CGFloat y; @property (nonatomic, assign) CGFloat top; @property (nonatomic, assign) CGFloat bottom; @property (nonatomic, assign) CGFloat left; @property (nonatomic, assign) CGFloat right; @property (nonatomic, assign) CGFloat centerX; @property (nonatomic, assign) CGFloat centerY; @property (nonatomic, assign) CGFloat width; @property (nonatomic, assign) CGFloat height; @end 扩展实现: 1 2 3 4 5 6 7 8 9 10 11 12 13 14 15 16 17 18 19 20 21 22 23 24 25 26 27 28 29 30 31 32 33 34 35 36 37 38 39 40 41 42 43 44 45 46 47 48 49 50 51 52 53 54 55 56 57 58 59 60 61 62 63 64 65 66 67 68 69 70 71 72 73 74 75 76 77 78 79 80 81 82 83 84 85 86 87 88 89 90 91 92 93 94 95 96 97 98 99 100 101 102 103 104 105 106 107 108 109 110 111 112 113 114 115 116 117 118 119 120 121 122 123 124 125 126 127 128 129 @implementation UIView (ReSize) - (CGSize)size; { return [self frame].size; } - ( void )setSize:(CGSize)size; { CGPoint origin = [self frame].origin; [self setFrame:CGRectMake(origin.x, origin.y, size.width, size.height)]; } -(CGFloat)x{ CGRect frame=[self frame]; return frame.origin.x; } -( void )setX:(CGFloat)x{ CGRect frame=[self frame]; frame.origin.x=x; [self setFrame:frame]; } -(CGFloat)y{ CGRect frame=[self frame]; return frame.origin.y; } -( void )setY:(CGFloat)y{ CGRect frame=[self frame]; frame.origin.y=y; return [self setFrame:frame]; } - (CGFloat)left; { return CGRectGetMinX([self frame]); } - ( void )setLeft:(CGFloat)x; { CGRect frame = [self frame]; frame.origin.x = x; [self setFrame:frame]; } - (CGFloat)top; { return CGRectGetMinY([self frame]); } - ( void )setTop:(CGFloat)y; { CGRect frame = [self frame]; frame.origin.y = y; [self setFrame:frame]; } - (CGFloat)right; { return CGRectGetMaxX([self frame]); } - ( void )setRight:(CGFloat)right; { CGRect frame = [self frame]; frame.origin.x = right - frame.size.width; [self setFrame:frame]; } - (CGFloat)bottom; { return CGRectGetMaxY([self frame]); } - ( void )setBottom:(CGFloat)bottom; { CGRect frame = [self frame]; frame.origin.y = bottom - frame.size.height; [self setFrame:frame]; } - (CGFloat)centerX; { return [self center].x; } - ( void )setCenterX:(CGFloat)centerX; { [self setCenter:CGPointMake(centerX, self.center.y)]; } - (CGFloat)centerY; { return [self center].y; } - ( void )setCenterY:(CGFloat)centerY; { [self setCenter:CGPointMake(self.center.x, centerY)]; } - (CGFloat)width; { return CGRectGetWidth([self frame]); } - ( void )setWidth:(CGFloat)width; { CGRect frame = [self frame]; frame.size.width = width; [self setFrame:CGRectStandardize(frame)]; } - (CGFloat)height; { return CGRectGetHeight([self frame]); } - ( void )setHeight:(CGFloat)height; { CGRect frame=[self frame]; frame.size.height = height; [self setFrame:CGRectStandardize(frame)]; } @end 项目源代码地址:https://github.com/SmallElephant/iOS-FEViewReSize 本文转自Fly_Elephant博客园博客,原文链接:http://www.cnblogs.com/xiaofeixiang/p/5119677.html,如需转载请自行联系原作者

优秀的个人博客,低调大师

iOS开发-UIRefreshControl下拉刷新

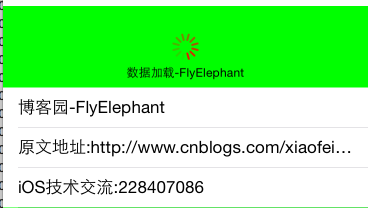
下拉刷新一直都是第三库的天下,有的第三库甚至支持上下左右刷新,UIRefreshControl是iOS6之后支持的一个刷新控件,不过由于功能单一,样式不能自定义,因此不能满足大众的需求,用法比较简单在UITableview和UICollectionview上面直接添加子视图即可使用。 代码调用: 1 2 3 4 5 6 7 self .refreshControl = [[UIRefreshControl alloc] init]; [_refreshControl addTarget: self action: @selector (refreshView:) forControlEvents:UIControlEventValueChanged]; [ self .refreshControl setAttributedTitle:[[ NSAttributedString alloc] initWithString:@ "数据加载-FlyElephant" ]]; [ self .refreshControl setTintColor:[UIColor redColor]]; [ self .tableView addSubview: self .refreshControl]; 刷新回调: 1 2 3 4 5 6 -( void )refreshView:(UIRefreshControl *)control{ dispatch_after(dispatch_time(DISPATCH_TIME_NOW, (int64_t)(3.0 * NSEC_PER_SEC )), dispatch_get_main_queue(), ^{ [ self .refreshControl endRefreshing]; NSLog (@ "原文地址:http://www.cnblogs.com/xiaofeixiang" ); }); } 当然如果有合适的图片我们可以覆盖加载的图片: 1 2 3 4 self .loadingImageView = [[UIImageView alloc] initWithImage:[UIImage imageNamed: @ "RefreshIcon" ]]; self .loadingImageView.center = CGPointMake(CGRectGetMidX( self .view.bounds), 30); [ self .refreshControl insertSubview: self .loadingImageView atIndex:0]; [ self .refreshControl bringSubviewToFront: self .loadingImageView]; 实现效果不是很好: 本文转自Fly_Elephant博客园博客,原文链接:http://www.cnblogs.com/xiaofeixiang/p/4668815.html,如需转载请自行联系原作者

优秀的个人博客,低调大师

iOS开发之检查更新

iOS设备检查更新版本: 1 2 3 4 5 6 7 8 9 10 11 12 13 14 15 16 17 18 19 20 21 22 23 24 25 26 27 28 29 30 31 32 33 34 35 36 37 38 39 40 41 42 43 44 45 46 47 48 49 50 51 52 53 54 55 56 57 58 59 60 61 62 63 64 65 66 67 68 69 70 71 72 73 74 75 76 77 78 79 80 81 82 83 84 85 86 87 #pragma mark - 检查更新 - ( void )checkUpdateWithAPPID:( NSString *)APPID { //获取当前应用版本号 NSDictionary *appInfo = [[ NSBundle mainBundle] infoDictionary]; NSString *currentVersion = [appInfo objectForKey:@ "CFBundleVersion" ]; NSString *updateUrlString = [ NSString stringWithFormat:@ "http://itunes.apple.com/lookup?id=%@" ,APPID]; NSURL *updateUrl = [ NSURL URLWithString:updateUrlString]; versionRequest = [ASIFormDataRequest requestWithURL:updateUrl]; [versionRequest setRequestMethod:@ "GET" ]; [versionRequest setTimeOutSeconds:60]; [versionRequest addRequestHeader:@ "Content-Type" value:@ "application/json" ]; //loading view CustomAlertView *checkingAlertView = [[CustomAlertView alloc] initWithFrame:NAVIGATION_FRAME style:CustomAlertViewStyleDefault noticeText:@ "正在检查更新..." ]; checkingAlertView.userInteractionEnabled = YES ; [ self .navigationController.view addSubview:checkingAlertView]; [checkingAlertView release]; [versionRequest setCompletionBlock:^{ [checkingAlertView removeFromSuperview]; NSError *error = nil ; NSDictionary *dict = [ NSJSONSerialization JSONObjectWithData:[versionRequest responseData] options: NSJSONReadingMutableContainers error:&error]; if (!error) { if (dict != nil ) { // DLog(@"dict %@",dict); int resultCount = [[dict objectForKey:@ "resultCount" ] integerValue]; if (resultCount == 1) { NSArray *resultArray = [dict objectForKey:@ "results" ]; // DLog(@"version %@",[resultArray objectAtIndex:0]); NSDictionary *resultDict = [resultArray objectAtIndex:0]; // DLog(@"version is %@",[resultDict objectForKey:@"version"]); NSString *newVersion = [resultDict objectForKey:@ "version" ]; if ([newVersion doubleValue] > [currentVersion doubleValue]) { NSString *msg = [ NSString stringWithFormat:@ "最新版本为%@,是否更新?" ,newVersion]; newVersionURlString = [[resultDict objectForKey:@ "trackViewUrl" ] copy ]; DLog(@ "newVersionUrl is %@" ,newVersionURlString); // if ([newVersionURlString hasPrefix:@"https"]) { // [newVersionURlString replaceCharactersInRange:NSMakeRange(0, 5) withString:@"itms-apps"]; // } UIAlertView *alertView = [[UIAlertView alloc] initWithTitle:@ "提示" message:msg delegate: self cancelButtonTitle:@ "暂不" otherButtonTitles:@ "立即更新" , nil ]; alertView.tag = 1000; [alertView show]; [alertView release]; } else { UIAlertView *alertView = [[UIAlertView alloc] initWithTitle:@ "提示" message:@ "您使用的是最新版本!" delegate: self cancelButtonTitle: nil otherButtonTitles:@ "确定" , nil ]; alertView.tag = 1001; [alertView show]; [alertView release]; } } } } else { DLog( "error is %@" ,[error debugDescription]); } }]; [versionRequest setFailedBlock:^{ [checkingAlertView removeFromSuperview]; CustomAlertView *alertView = [[CustomAlertView alloc] initWithFrame:NAVIGATION_FRAME style:CustomAlertViewStyleWarning noticeText:@ "操作失败,请稍候再试!" ]; [ self .navigationController.view addSubview:alertView]; [alertView release]; [alertView selfRemoveFromSuperviewAfterSeconds:1.0]; }]; [versionRequest startSynchronous]; } - ( void )alertView:(UIAlertView *)alertView clickedButtonAtIndex:( NSInteger )buttonIndex { DLog(@ "newVersionUrl is %@" ,newVersionURlString); if (buttonIndex) { if (alertView.tag == 1000) { if (newVersionURlString) { [[UIApplication sharedApplication] openURL:[ NSURL URLWithString:newVersionURlString]]; } } } } 来源:http://blog.csdn.net/heartofthesea/article/details/14127587 本文转自夏雪冬日博客园博客,原文链接:http://www.cnblogs.com/heyonggang/p/3539691.html,如需转载请自行联系原作者

优秀的个人博客,低调大师

iOS OC开发代码规范

1.变量、类名、函数名 使用驼峰命名法 2.尽量使用完整的单词命名,尽量不采用 缩写单词 3.类名使用大写字母打头,前缀统一加上HH 例如:HHHomePageController 4.类的成员变量使用 下划线打头, 例如_age 5.禁止在项目中的任何地方,包括文件名、目录名、逻辑目录名、项目名等地方使用空格或中文字符 6.为了不影响阅读,一个方法中代码不要超过100行。一个类中代码不要超过600行, 有超过的再回头重构的时候想办法分解 7.每个.h文件最开始处用简短文字说明一下该类的功能 8.类中第___个功能模块以 #pragma mark - 分隔,上空两行,下空一行 9.常用对象 命名采用后缀,如下 UIView: View 例如:UICandidateView : viewCandidate; UILabel: Lab 例如: UICopyLabel: labCopy; UIButton: Btn 例如: UISelectedButton: btnSelected; UIImage: img imgAvatar; UIImageView: imgViewAbc UITextField: textFiledName; UITextView: textViewEdit; NSArray: arrName; NSMutableArray: mArrName; NSDictionary: dictPosition; NSMutableDictionary :MDictPosition; NSString :strName; NSMutableString :mStrName; NSAttributedString :attributedStrName; NSMutableAttributedString :mAttributedStrName; 10. 文档注释格式如下 /** 方法或变量名说明 @param 参数1说明 @param 参数2说明 ... @return 若方法有返回值,则对返回值进行说明 */ 12. 注意 常量和宏的声明 CGFloat cellHeight = 12.0f; static CGFloat const cellHeight = 12.0f; static NSString *const JumpNotificationName = @“JumpNotificationName”; 13.关于.h空行规定 13.1.文件说明与头文件包涵(#import)之间空1行 13.2.头文件包涵(#import)之间如果需要分类区别,各类别之间空1行 13.3.头文件包涵(#import)与@class之间空2行 13.4.@interface与@class之间空1行 13.5.头文件{}里面,空1行开始声明成员对象,如果需要分类别,各类别之间空1行 13.6.{}外空一行开始书写属性,如果需要分类,各类别之间空1行 13.7.空1行书写方法,如果各方法之间需要分类别,各类别之间空1行 13.8.方法完成之后,空1行@end 13.9.如果需要声明protocal,空2行接着写。通常protocal写在@end后,但是声明在@interface前,也可以另写1个文件 14.关于.m中空行的规定 14.1.文件说明与头文件包涵(#import)之间空1行 14.2.头文件包涵(#import)之间如果需要分类区别,各类别之间空1行 14.3.@implementation和@synthesize之间空1行,@synthesize不要使用逗号(,)如果需要分类区别,各类别之间空1行 14.4.@synthesize与 法之间空2 14.5.各方法之间空2行 15.方法里面的空行 15.1.方法名后空1行开始写 15.2.变量声明后需要空1行,如果需要分类区别区分,各类别之间空1行 15.3.条件,循环,选择语句,整个语句结束,需要空1行 15.4.各功能块之间空1行 15.5.最后1个反括号之前不空 15.6.注释与代码之间不空 15.7.#pragma mark与方法之间空1行 16关于空格 16.1.h中协议<>前 有1个空格 16.2.h中成员声明时,类型与变量之间有少1个空格。星号(*)靠近变量,不靠近类型 16.3.@property后有1各空格,()里面,逗号后面有1个空格,括号外面,先留1个空格,再声明属性 16.4.方法+,-后,与()之间有1个空格 16.5.返回类型与*之间有1个空格, 方法参数中返回类型与*之间有1个空格 16.6.多参数的方法,每个参数后都有1个空格 17.关于bool值 17.1.不要 if(obj==nil){}, if(!obj){} 17.2.比较时把常量放前 可以避免错误 17.3.不要 if(aBool==YES){},直接 if(aBool){} 或if(!!aBool){} 18.变量属性名和其它 18.1.尽量在使用的时候才声明变量,尽量少声明全局变量 18.2.变量名不要只使1个字 ,尽量能表明变量的意思 18.3.@synthesize和@dynamic,应该放在类实现的最上面,每一个声明都单独一行 18.4.协议protocol需要加#pragma marks-来区分 18.5.obj = nil; delegate也应该在dealloc里面写 delegate = nil; 19其它 19.1@interface与@implementation与import之间空1行 19.2属性的声明和实现,尽量避免书写@synthesize,如果用到@synthesize,要紧接着@implementation书写,不要换行 19.3成员变量尽量写在@implementation内部,有必要对外暴露时,才写在@interface下 19.4临时变量的声明,尽量赋初始值, eg: NSInteger a = 0; 19.5声明多个临时变量,必须另起一行,禁止书写 int a = 3, b = 5; 19.6临时变量的声明语法写完后,必须各行开始书写逻辑代码,逻辑代码中可以穿插 临时变量的声明,同样必须隔行书写 19.7遇到新的代码块,必须隔行书写。包括函数的实现,if, switch分支,while,do while,for循环等 19.8所有的代码块必须用{}, 即只有1行的if代码也必须用{}, if (success) { return YES; } 19.9所有的二次元运算符,必须以空格隔开,如 x += 12, 不能写成 x += 12; 19.10.所有的逗号后必须追加一个空格, 例如CGRectMake(12, 12, 43, 40); 19.11.尽量用NSInteger 取代int, 用NSUInteger 取代unsigned int

优秀的个人博客,低调大师

MyEclipse基本开发环境配置!

1、安装JDK(略过) 注意事项: 1.1)注意环境变量的配置 1.2)不要保持默认路径 1.3)不要有中文 1.4)不要有特殊字符 ... 2、tomcat选择(当然也可以用weblogic等产品) 2.1)官方下载tomcat版本 2.2)JDK和tomcat版本尽力不要差别太大,避免不兼容问题 ... 3、MyEclipse下载安装(当然也可以用Eclipse,免费) 3.1)注意破解(破解比较简单略过) 3.2)单独定义工作空间 3.3)程序基本了解 eg:(最好集中化管理,不要按照的乱七八糟,尽量不要安装到C盘) 简单测试: 创建项目,并访问测试

资源下载

更多资源
Mario

Mario

马里奥是站在游戏界顶峰的超人气多面角色。马里奥靠吃蘑菇成长,特征是大鼻子、头戴帽子、身穿背带裤,还留着胡子。与他的双胞胎兄弟路易基一起,长年担任任天堂的招牌角色。

腾讯云软件源

腾讯云软件源

为解决软件依赖安装时官方源访问速度慢的问题,腾讯云为一些软件搭建了缓存服务。您可以通过使用腾讯云软件源站来提升依赖包的安装速度。为了方便用户自由搭建服务架构,目前腾讯云软件源站支持公网访问和内网访问。

Rocky Linux

Rocky Linux

Rocky Linux(中文名:洛基)是由Gregory Kurtzer于2020年12月发起的企业级Linux发行版,作为CentOS稳定版停止维护后与RHEL(Red Hat Enterprise Linux)完全兼容的开源替代方案,由社区拥有并管理,支持x86_64、aarch64等架构。其通过重新编译RHEL源代码提供长期稳定性,采用模块化包装和SELinux安全架构,默认包含GNOME桌面环境及XFS文件系统,支持十年生命周期更新。

Sublime Text

Sublime Text

Sublime Text具有漂亮的用户界面和强大的功能,例如代码缩略图,Python的插件,代码段等。还可自定义键绑定,菜单和工具栏。Sublime Text 的主要功能包括:拼写检查,书签,完整的 Python API , Goto 功能,即时项目切换,多选择,多窗口等等。Sublime Text 是一个跨平台的编辑器,同时支持Windows、Linux、Mac OS X等操作系统。

用户登录
用户注册