首页 文章 精选 留言 我的

精选列表

搜索[融合分析],共10000篇文章
优秀的个人博客,低调大师

WebRTC整体架构分析

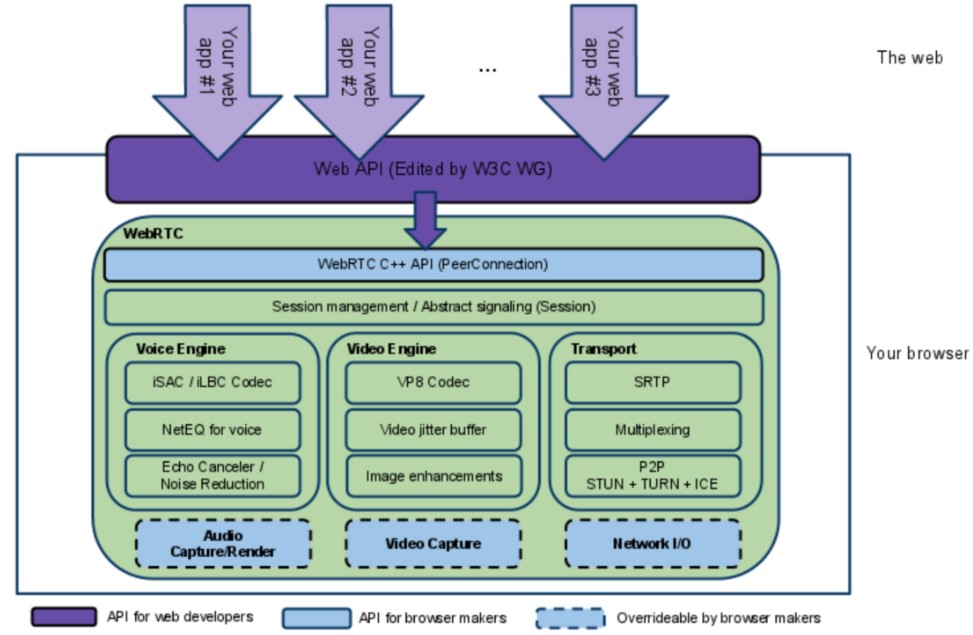
1 设计WebRTC的目的 WebRTC(Web Real-Time Communication)项目的最终目的主要是让Web开发者能够基于浏览器(ChromeFireFox...)轻易快捷开发出丰富的实时多媒体应用,而无需下载安装任何插件,Web开发者也无需关注多媒体的数字信号处理过程,只需编写简单的Javascript程序即可实现。W3C等组织正在制定Javascript标准API,目前是WebRTC 1.0版本(2019年10月24日),Draft状态,网址:http://w3c.github.io/webrtc-pc/。 另外WebRTC还希望能够建立一个多互联网浏览器间健壮的实时通信的平台,形成开发者与浏览器厂商良好的生态环境。同时,Google也希望和致力于让WebRTC的技术成为HTML5标准之一,可见Google布局之深远。 2 WebRTC架构图 图2.1 WebRTC架构图 架构图颜色标识说明: (1)紫色部分是Web开发者API层; (2)蓝色实线部分是面向浏览器厂商的API层(其中本人研究的部分主要在Voice Engine中的一部分); (3)蓝色虚线部分浏览器厂商可以自定义实现。 3 WebRTC架构组件介绍 1.Your Web App Web开发者开发的程序,Web开发者可以基于集成WebRTC的浏览器提供的web API开发基于视频、音频的实时通信应用。 2.Web API 面向第三方开发者的WebRTC标准API(Javascript),使开发者能够容易地开发出类似于网络视频聊天的web应用。 3.WebRTC Native C++ API 本地C++ API层,使浏览器厂商容易实现WebRTC标准的Web API,抽象地对数字信号过程进行处理。 4.Transport / Session 传输/会话层 会话层组件采用了libjingle库的部分组件实现,无须使用xmpp/jingle协议 (1)RTP Stack协议栈 Real Time Protocol (2)STUN/ICE 可以通过STUN和ICE组件来建立不同类型网络间的呼叫连接。 (3)Session Management 一个抽象的会话层,提供会话建立和管理功能。该层协议留给应用开发者自定义实现。 5.VoiceEngine(我的研究核心) 音频引擎是包含一系列音频多媒体处理的框架,包括从视频采集卡到网络传输端等整个解决方案。 (1)iSAC Internet Speech Audio Codec 针对VoIP和音频流的宽带和超宽带音频编解码器,是WebRTC音频引擎的默认的编解码器 采样频率:16khz,24khz,32khz;(默认为16khz) 自适应速率为10kbit/s ~ 52kbit/; 自适应包大小:30~60ms; 算法延时:frame + 3ms (2)iLBC Internet Low Bitrate Codec VoIP音频流的窄带语音编解码器 采样频率:8khz; 20ms帧比特率为15.2kbps 30ms帧比特率为13.33kbps 标准由IETF RFC3951和RFC3952定义 (3)NetEQ for Voice 针对音频软件实现的语音信号处理元件 NetEQ算法:自适应抖动控制算法以及语音包丢失隐藏算法。使其能够快速且高解析度地适应不断变化的网络环境,确保音质优美且缓冲延迟最小。 是GIPS公司独步天下的技术,能够有效的处理由于网络抖动和语音包丢失时候对语音质量产生的影响。 PS:NetEQ 也是WebRTC中一个极具价值的技术,对于提高VoIP质量有明显效果,加以AECNRAGC等模块集成使用,效果更好。 (4)Acoustic Echo Canceler (AEC) 回声消除器是一个基于软件的信号处理元件,能实时的去除mic采集到的回声。 (5)Noise Reduction (NR) 噪声抑制也是一个基于软件的信号处理元件,用于消除与相关VoIP的某些类型的背景噪声(嘶嘶声,风扇噪音等等… …) 6.VideoEngine——WebRTC视频处理引擎 VideoEngine是包含一系列视频处理的整体框架,从摄像头采集视频到视频信息网络传输再到视频显示整个完整过程的解决方案。 (1)VP8 视频图像编解码器,是WebRTC视频引擎的默认的编解码器 VP8适合实时通信应用场景,因为它主要是针对低延时而设计的编解码器。 PS:VPx编解码器是Google收购ON2公司后开源的,VPx现在是WebM项目的一部分,而WebM项目是Google致力于推动的HTML5标准之一 (2)Video Jitter Buffer 视频抖动缓冲器,可以降低由于视频抖动和视频信息包丢失带来的不良影响。 (3)Image enhancements 图像质量增强模块 对网络摄像头采集到的图像进行处理,包括明暗度检测、颜色增强、降噪处理等功能,用来提升视频质量。 4 WebRTC核心模块API 1.网络传输模块:libjingle WebRTC重用了libjingle的一些组件,主要是network和transport组件,关于libjingle的文档资料可以查看这里。 2.音频、视频图像处理的主要数据结构 常量VideoEngineVoiceEngine _注意:以下所有的方法、类、结构体、枚举常量等都在webrtc命名空间里。 表4.1 数据结构列表 类、结构体、枚举常量 头文件 Structures common_types.h Enumerators common_types.h Classes common_types.h class VoiceEngine voe_base.h class VideoEngine vie_base.h 3.音频引擎(VoiceEngine)模块APIs 表4.2 音频引擎(VoiceEngine)模块APIs 本文转载自https://blog.csdn.net/temotemo/article/details/7530504,部分内容做修改。

优秀的个人博客,低调大师

http 服务源码分析

多读go的源码,可以加深对go语言的理解和认知,今天分享一下http相关的源码部分 在不使用第三方库的情况下,我们可以很容易的的用go实现一个http服务, package main import ( "fmt" "net/http" ) func IndexHandler(w http.ResponseWriter, r *http.Request) { fmt.Fprintln(w, "hello world ! ") } func main() { http.HandleFunc("/", IndexHandler) if err := http.ListenAndServe(":9100", nil); err != nil { panic(err) } } 直接在浏览器里访问9100端口就可以返回 hello world ! go已经把所有的细节封装好了,我们只需要自己去写Handler实现就够了。源码简单来说做了以下几件事: 把我们自定义的Handler方法添加到默认路由DefaultServeMux的Map里比如:http.HandleFunc("/", IndexHandler) (btw: go语言的map是非线程安全的,可以在http源码里看到官方的处理方式); 启动一个tcp服务监听9100端口,等待http调用; 当监听到有http调用时,启动一个协程来处理这个请求,这个是go的http服务快的一个重要原因,把请求内容转换成http.Request, 把当前连接封装http.RespnseWriter; 默认路由DefaultServeMux根据request的path找到相应的Handler,把 request和 responseWriter传给Handler 进行业务逻辑处理,response响应信息write给客户端; ServeMux & Handler http 包的默认路由 DefaultServeMux 是 ServeMux 结构休的实例http.HandleFunc("/", IndexHandler) 的调用,会把path信息和自定义的方法信息保存到 DefaultServeMux 的 m map[string]muxEntry变量里我们看一下ServeMux 的定义: type ServeMux struct { mu sync.RWMutex m map[string]muxEntry es []muxEntry // slice of entries sorted from longest to shortest. hosts bool // whether any patterns contain hostnames } type muxEntry struct { h Handler pattern string } ServeMux 中保存了path和Handler 的对应关系,也是路由关系。 Handler muxEntry 中的 h Handler 对就的就是我们自定义的Handler方法比如,我们自己例子中的方法 func IndexHandler(w http.ResponseWriter, r *http.Request) 细心的同学可能会问 Handler是一个接口,但是我们只是定义了一个方法,这是怎么转换的呢?接口Halder设置了签名规则,也就是我们自定义的处理方法 type Handler interface { ServeHTTP(ResponseWriter, *Request) } go语言中所有的自定义类型都可以实现自己的方法,http包是用一个自定义的func来去实现了Handler接口, type HandlerFunc func(ResponseWriter, *Request) // ServeHTTP calls f(w, r). func (f HandlerFunc) ServeHTTP(w ResponseWriter, r *Request) { f(w, r) } 然后在ServerMux的方法HandleFunc处理的时候会把 handler func(ResponseWriter, *Request) 转换成 HandlerFunc, 如下所示: // HandleFunc registers the handler function for the given pattern. func (mux *ServeMux) HandleFunc(pattern string, handler func(ResponseWriter, *Request)) { if handler == nil { panic("http: nil handler") } mux.Handle(pattern, HandlerFunc(handler)) } ServerMux 结构中还有一个读写锁 mu sync.RWMutex mu就是用来处理多线程下map的安全访问的。 查找&调用 Handler 得到自定义的handler方法,就是去map中根据path匹配得到Handler func (mux *ServeMux) handler(host, path string) (h Handler, pattern string) { mux.mu.RLock() defer mux.mu.RUnlock() // Host-specific pattern takes precedence over generic ones if mux.hosts { h, pattern = mux.match(host + path) } if h == nil { h, pattern = mux.match(path) } if h == nil { h, pattern = NotFoundHandler(), "" } return } func (mux *ServeMux) match(path string) (h Handler, pattern string) { // Check for exact match first. v, ok := mux.m[path] if ok { return v.h, v.pattern } // Check for longest valid match. mux.es contains all patterns // that end in / sorted from longest to shortest. for _, e := range mux.es { if strings.HasPrefix(path, e.pattern) { return e.h, e.pattern } } return nil, "" } ServeMux 实现了 Handler 接口,也是默认的路由调用的具体规则实现的地方,他的 ServeHTTP 方法处理方式就是得到自定义的handler方法,并调用我们自定义的方法: func (mux *ServeMux) ServeHTTP(w ResponseWriter, r *Request) { if r.RequestURI == "*" { if r.ProtoAtLeast(1, 1) { w.Header().Set("Connection", "close") } w.WriteHeader(StatusBadRequest) return } h, _ := mux.Handler(r) h.ServeHTTP(w, r) } 接口Halder设置了签名规则,也就是我们自定义的处理方法比如下面的代码,函数IndexHandler就是我们自定义的方法,返回给客户端请求一个 hello world ! 字符串。中间请求是如何调用到我们自定义的方法的具体逻辑都是http包提供的,但是一点也不神秘, http.HandleFunc("/", IndexHandler) // IndexHandler 我们自己定义的Handler方法 func IndexHandler(w http.ResponseWriter, r *http.Request) { fmt.Fprintln(w, "hello world ! ") } type Handler interface { ServeHTTP(ResponseWriter, *Request) } // type HandlerFunc func(ResponseWriter, *Request) // ServeHTTP calls f(w, r). func (f HandlerFunc) ServeHTTP(w ResponseWriter, r *Request) { f(w, r) } http ListenAndServe 说完 ServeMux 是如何结合 Handler 接口,来实现路由和调用后,就要说一下,http服务是如何得到客户端传入的信息,封装requet和rresponse的。在启动程序的时候http.ListenAndServe, 有两个参数,第一个是指写端口号,第二个是处理逻辑,如果我们没有给定处理逻辑,会使用默认的处理DefaultServeMux func (sh serverHandler) ServeHTTP(rw ResponseWriter, req *Request) { handler := sh.srv.Handler if handler == nil { handler = DefaultServeMux } if req.RequestURI == "*" && req.Method == "OPTIONS" { handler = globalOptionsHandler{} } handler.ServeHTTP(rw, req) } ListenAndServe 方法打开tcp端口进行监听,然后把Listener 传给srv.Serve方法 func (srv *Server) ListenAndServe() error { // 省略部分代码 ... ln, err := net.Listen("tcp", addr) if err != nil { return err } return srv.Serve(tcpKeepAliveListener{ln.(*net.TCPListener)}) } 具体要说一下 Service 方法,这个方法中,对监听tcp请求,然后把请求的客户端连接进行封装, func (srv *Server) Serve(l net.Listener) error { // 省略部分代码 ... ctx := context.WithValue(baseCtx, ServerContextKey, srv) for { rw, e := l.Accept() // 省略部分代码 ... tempDelay = 0 c := srv.newConn(rw) c.setState(c.rwc, StateNew) // before Serve can return go c.serve(ctx) } } 把客户端的请求封装成一个Conn,然后启动一个协程go c.serve(ctx)来处理这个连接请求,这就是http包快的一个重要原因,每一个连接就是一个协程。客户端可以先和服务器进行连接,然后利用这个conn来多次发送http请求,这样,就可以减少每次的进行连接而提高一些速度。像一些rpc里就是利用这点去实现的双向的stream流,比如我之前的帖子go微服务框架go-micro深度学习(五) stream 调用过程详解,他就是建立一个tcp连接,然后基于这个conn,发送多个request,返回多次respose数据。 // Serve a new connection. func (c *conn) serve(ctx context.Context) { c.remoteAddr = c.rwc.RemoteAddr().String() ctx = context.WithValue(ctx, LocalAddrContextKey, c.rwc.LocalAddr()) // 省略部分代码 ... // 循环读取请求 ... for { // 读取请求数据,封装response w, err := c.readRequest(ctx) if c.r.remain != c.server.initialReadLimitSize() { // If we read any bytes off the wire, we're active. c.setState(c.rwc, StateActive) } // 省略部分代码 ... // 路由调用自定义的方法,把封装好的responseWrite和 request传到方法内 serverHandler{c.server}.ServeHTTP(w, w.req) w.cancelCtx() if c.hijacked() { return } w.finishRequest() // 省略部分代码 ... } }

优秀的个人博客,低调大师

LevelDB源码分析-Compact

Compaction compact由背景线程完成,代码中触发背景线程的函数为: void DBImpl::MaybeScheduleCompaction() { mutex_.AssertHeld(); if (background_compaction_scheduled_) { // Already scheduled } else if (shutting_down_.Acquire_Load()) { // DB is being deleted; no more background compactions } else if (!bg_error_.ok()) { // Already got an error; no more changes } else if (imm_ == nullptr && manual_compaction_ == nullptr && !versions_->NeedsCompaction()) { // No work to be done } else { background_compaction_scheduled_ = true; env_->Schedule(&DBImpl::BGWork, this); } } 背景线程调用的函数为: void DBImpl::BGWork(void *db) { reinterpret_cast<DBImpl *>(db)->BackgroundCall(); } 这个函数是调用BackgroundCall函数实现的: void DBImpl::BackgroundCall() { MutexLock l(&mutex_); assert(background_compaction_scheduled_); if (shutting_down_.Acquire_Load()) { // No more background work when shutting down. } else if (!bg_error_.ok()) { // No more background work after a background error. } else { BackgroundCompaction(); } background_compaction_scheduled_ = false; // Previous compaction may have produced too many files in a level, // so reschedule another compaction if needed. MaybeScheduleCompaction(); background_work_finished_signal_.SignalAll(); } 这个函数主要调用BackgroundCompaction实现相应逻辑: void DBImpl::BackgroundCompaction() 如果immutable table存在则先调用CompactMemTable函数: mutex_.AssertHeld(); if (imm_ != nullptr) { CompactMemTable(); return; } 然后调用PickCompaction函数,PickCompaction函数选取合适的level中需要compact的文件,然后封装一个Compact对象: else { c = versions_->PickCompaction(); } 通过IsTrivialMove判断选出的sstable是否只有一个且在较低的level,并且该sstable与下下一level不会有太多的overlap,如果是的话,简单的将这个sstable移动到下一level。 Status status; if (c == nullptr) { // Nothing to do } else if (!is_manual && c->IsTrivialMove()) { // Move file to next level assert(c->num_input_files(0) == 1); FileMetaData *f = c->input(0, 0); c->edit()->DeleteFile(c->level(), f->number); c->edit()->AddFile(c->level() + 1, f->number, f->file_size, f->smallest, f->largest); status = versions_->LogAndApply(c->edit(), &mutex_); if (!status.ok()) { RecordBackgroundError(status); } VersionSet::LevelSummaryStorage tmp; Log(options_.info_log, "Moved #%lld to level-%d %lld bytes %s: %s\n", static_cast<unsigned long long>(f->number), c->level() + 1, static_cast<unsigned long long>(f->file_size), status.ToString().c_str(), versions_->LevelSummary(&tmp)); } 如果当前level中需要compact的sstable和level+2中的overlap没有超过阈值时,调用DoCompactionWork进行compact,然后调用CleanupCompaction清除compactstate对象,调用DeleteObsoleteFiles删除旧文件,回收内存和磁盘空间: else { CompactionState *compact = new CompactionState(c); status = DoCompactionWork(compact); if (!status.ok()) { RecordBackgroundError(status); } CleanupCompaction(compact); c->ReleaseInputs(); DeleteObsoleteFiles(); } delete c; 其中调用的PickCompaction函数为: Compaction *VersionSet::PickCompaction() 如果有level达到compact的阈值,优先将这个level进行compact。将最大的key大于上一次compact的最大的key的sstable加入inputs_[0]的数组中作为compact的sstable,如果compact_pointer_[level]中没有记录,则从头开始取sstable,如果不存在最大的key大于上一次compact的最大的key的sstable,则将key最小的sstable作为需要compact的sstable: Compaction *c; int level; // We prefer compactions triggered by too much data in a level over // the compactions triggered by seeks. const bool size_compaction = (current_->compaction_score_ >= 1); const bool seek_compaction = (current_->file_to_compact_ != nullptr); if (size_compaction) { level = current_->compaction_level_; assert(level >= 0); assert(level + 1 < config::kNumLevels); c = new Compaction(options_, level); // Pick the first file that comes after compact_pointer_[level] for (size_t i = 0; i < current_->files_[level].size(); i++) { FileMetaData *f = current_->files_[level][i]; if (compact_pointer_[level].empty() || icmp_.Compare(f->largest.Encode(), compact_pointer_[level]) > 0) { c->inputs_[0].push_back(f); break; } } if (c->inputs_[0].empty()) { // Wrap-around to the beginning of the key space c->inputs_[0].push_back(current_->files_[level][0]); } } 如果没有level达到需要compact的阈值,但是有文件因为seek的命中率不够而达到了compact的阈值,则将这个文件compact: else if (seek_compaction) { level = current_->file_to_compact_level_; c = new Compaction(options_, level); c->inputs_[0].push_back(current_->file_to_compact_); } 如果compact的是level0,则还需要调用GetOverlappingInputs函数求出有overlap的文件,然后再调用SetupOtherInputs函数完成compact对象的构建: c->input_version_ = current_; c->input_version_->Ref(); // Files in level 0 may overlap each other, so pick up all overlapping ones if (level == 0) { InternalKey smallest, largest; GetRange(c->inputs_[0], &smallest, &largest); // Note that the next call will discard the file we placed in // c->inputs_[0] earlier and replace it with an overlapping set // which will include the picked file. current_->GetOverlappingInputs(0, &smallest, &largest, &c->inputs_[0]); assert(!c->inputs_[0].empty()); } SetupOtherInputs(c); return c; CompactMemTable函数 void DBImpl::CompactMemTable() 调用WriteLevel0Table将immutable mmtable写入sstable: mutex_.AssertHeld(); assert(imm_ != nullptr); // Save the contents of the memtable as a new Table VersionEdit edit; Version *base = versions_->current(); base->Ref(); Status s = WriteLevel0Table(imm_, &edit, base); base->Unref(); if (s.ok() && shutting_down_.Acquire_Load()) { s = Status::IOError("Deleting DB during memtable compaction"); } 更新当前lognumber,旧日志不再需要,生效新的version: // Replace immutable memtable with the generated Table if (s.ok()) { edit.SetPrevLogNumber(0); edit.SetLogNumber(logfile_number_); // Earlier logs no longer needed s = versions_->LogAndApply(&edit, &mutex_); } 删除旧文件: if (s.ok()) { // Commit to the new state imm_->Unref(); imm_ = nullptr; has_imm_.Release_Store(nullptr); DeleteObsoleteFiles(); } else { RecordBackgroundError(s); } WriteLevel0Table函数为: Status DBImpl::WriteLevel0Table(MemTable *mem, VersionEdit *edit, Version *base) 调用BuildTable接口将immutable memtable写入sstable: mutex_.AssertHeld(); const uint64_t start_micros = env_->NowMicros(); FileMetaData meta; meta.number = versions_->NewFileNumber(); pending_outputs_.insert(meta.number); Iterator *iter = mem->NewIterator(); Log(options_.info_log, "Level-0 table #%llu: started", (unsigned long long)meta.number); Status s; { mutex_.Unlock(); s = BuildTable(dbname_, env_, options_, table_cache_, iter, &meta); mutex_.Lock(); } Log(options_.info_log, "Level-0 table #%llu: %lld bytes %s", (unsigned long long)meta.number, (unsigned long long)meta.file_size, s.ToString().c_str()); delete iter; pending_outputs_.erase(meta.number); 调用PickLevelForMemTableOutput函数选择合适的level将新的sstable加入: // Note that if file_size is zero, the file has been deleted and // should not be added to the manifest. int level = 0; if (s.ok() && meta.file_size > 0) { const Slice min_user_key = meta.smallest.user_key(); const Slice max_user_key = meta.largest.user_key(); if (base != nullptr) { level = base->PickLevelForMemTableOutput(min_user_key, max_user_key); } edit->AddFile(level, meta.number, meta.file_size, meta.smallest, meta.largest); } CompactionStats stats; stats.micros = env_->NowMicros() - start_micros; stats.bytes_written = meta.file_size; stats_[level].Add(stats); return s; PickLevelForMemTableOutput函数: int Version::PickLevelForMemTableOutput( const Slice &smallest_user_key, const Slice &largest_user_key) { int level = 0; if (!OverlapInLevel(0, &smallest_user_key, &largest_user_key)) { // Push to next level if there is no overlap in next level, // and the #bytes overlapping in the level after that are limited. InternalKey start(smallest_user_key, kMaxSequenceNumber, kValueTypeForSeek); InternalKey limit(largest_user_key, 0, static_cast<ValueType>(0)); std::vector<FileMetaData *> overlaps; while (level < config::kMaxMemCompactLevel) { if (OverlapInLevel(level + 1, &smallest_user_key, &largest_user_key)) { break; } if (level + 2 < config::kNumLevels) { // Check that file does not overlap too many grandparent bytes. GetOverlappingInputs(level + 2, &start, &limit, &overlaps); const int64_t sum = TotalFileSize(overlaps); if (sum > MaxGrandParentOverlapBytes(vset_->options_)) { break; } } level++; } } return level; } 选择level的策略为:如果level0和sstable的key有重合,则插入level0,否则循环搜索之后的level,如果下一level和sstable的key有重合,则直接返回,如果没有重合,考虑下下个level和sstable的重合的key的量,如果超过了设定的阈值,则返回(为了保证之后选取该sstable与下一level进行compact的时候,涉及下一level的文件不会太多,减小开销)。 DoCompactionWork函数 Status DBImpl::DoCompactionWork(CompactionState *compact) 将smallest_snapshot赋值为最老的snapshots的sequencenumber,如果不存在snapshots则赋值为当前数据库的sequencenumber: const uint64_t start_micros = env_->NowMicros(); int64_t imm_micros = 0; // Micros spent doing imm_ compactions Log(options_.info_log, "Compacting %d@%d + %d@%d files", compact->compaction->num_input_files(0), compact->compaction->level(), compact->compaction->num_input_files(1), compact->compaction->level() + 1); assert(versions_->NumLevelFiles(compact->compaction->level()) > 0); assert(compact->builder == nullptr); assert(compact->outfile == nullptr); if (snapshots_.empty()) { compact->smallest_snapshot = versions_->LastSequence(); } else { compact->smallest_snapshot = snapshots_.oldest()->sequence_number(); } 调用MakeInputIterator获取需要compact的文件上的迭代器,可以通过这个迭代器直接遍历所有需要compact的文件。 // Release mutex while we're actually doing the compaction work mutex_.Unlock(); Iterator *input = versions_->MakeInputIterator(compact->compaction); input->SeekToFirst(); Status status; ParsedInternalKey ikey; std::string current_user_key; bool has_current_user_key = false; SequenceNumber last_sequence_for_key = kMaxSequenceNumber; 开始通过迭代器遍历需要compact的文件。首先,如果有immutable memtable存在,首先调用CompactMemTable函数进行compact。 for (; input->Valid() && !shutting_down_.Acquire_Load();) { // Prioritize immutable compaction work if (has_imm_.NoBarrier_Load() != nullptr) { const uint64_t imm_start = env_->NowMicros(); mutex_.Lock(); if (imm_ != nullptr) { CompactMemTable(); // Wake up MakeRoomForWrite() if necessary. background_work_finished_signal_.SignalAll(); } mutex_.Unlock(); imm_micros += (env_->NowMicros() - imm_start); } 获取迭代器当前指向的entry的key值,调用ShouldStopBefore函数判断是否需要停止当前sstable的构建,如果需要,则调用FinishCompactionOutputFile函数将包含当前sstable的文件输出。ShouldStopBefore函数主要是判断当前的sstable中的key是否与下下一level中的key的overlap过大,如果过大则停止当前sstable的构建: Slice key = input->key(); if (compact->compaction->ShouldStopBefore(key) && compact->builder != nullptr) { status = FinishCompactionOutputFile(compact, input); if (!status.ok()) { break; } } 将key解码,key和之前的key重复且之前的key的sequencenumber比smallest_snapshot要小则丢弃这个key,因为既然之前重复的key的sequencenumber都比smallest_snapshot要小,当前key也肯定小,key标记为删除且之后的level中不存在这个key(也就是说这个key的删除不会影响到之后)也丢弃这个key。 // Handle key/value, add to state, etc. bool drop = false; if (!ParseInternalKey(key, &ikey)) { // Do not hide error keys current_user_key.clear(); has_current_user_key = false; last_sequence_for_key = kMaxSequenceNumber; } else { if (!has_current_user_key || user_comparator()->Compare(ikey.user_key, Slice(current_user_key)) != 0) { // First occurrence of this user key current_user_key.assign(ikey.user_key.data(), ikey.user_key.size()); has_current_user_key = true; last_sequence_for_key = kMaxSequenceNumber; } if (last_sequence_for_key <= compact->smallest_snapshot) { // Hidden by an newer entry for same user key drop = true; // (A) } else if (ikey.type == kTypeDeletion && ikey.sequence <= compact->smallest_snapshot && compact->compaction->IsBaseLevelForKey(ikey.user_key)) { // For this user key: // (1) there is no data in higher levels // (2) data in lower levels will have larger sequence numbers // (3) data in layers that are being compacted here and have // smaller sequence numbers will be dropped in the next // few iterations of this loop (by rule (A) above). // Therefore this deletion marker is obsolete and can be dropped. drop = true; } last_sequence_for_key = ikey.sequence; } 如果不丢弃key的话,当前的写入sstable的文件不存在则调用OpenCompactionOutputFile函数创建一个文件,然后将KV写入,如果写入后sstable大小达到阈值则调用FinishCompactionOutputFile函数写出这个文件。 if (!drop) { // Open output file if necessary if (compact->builder == nullptr) { status = OpenCompactionOutputFile(compact); if (!status.ok()) { break; } } if (compact->builder->NumEntries() == 0) { compact->current_output()->smallest.DecodeFrom(key); } compact->current_output()->largest.DecodeFrom(key); compact->builder->Add(key, input->value()); // Close output file if it is big enough if (compact->builder->FileSize() >= compact->compaction->MaxOutputFileSize()) { status = FinishCompactionOutputFile(compact, input); if (!status.ok()) { break; } } } 循环以上过程: input->Next(); } 结束遍历之后,将没有写出的文件写出: if (status.ok() && shutting_down_.Acquire_Load()) { status = Status::IOError("Deleting DB during compaction"); } if (status.ok() && compact->builder != nullptr) { status = FinishCompactionOutputFile(compact, input); } if (status.ok()) { status = input->status(); } delete input; input = nullptr; 记录统计信息: CompactionStats stats; stats.micros = env_->NowMicros() - start_micros - imm_micros; for (int which = 0; which < 2; which++) { for (int i = 0; i < compact->compaction->num_input_files(which); i++) { stats.bytes_read += compact->compaction->input(which, i)->file_size; } } for (size_t i = 0; i < compact->outputs.size(); i++) { stats.bytes_written += compact->outputs[i].file_size; } mutex_.Lock(); stats_[compact->compaction->level() + 1].Add(stats); 将此次compaction生效: if (status.ok()) { status = InstallCompactionResults(compact); } if (!status.ok()) { RecordBackgroundError(status); } VersionSet::LevelSummaryStorage tmp; Log(options_.info_log, "compacted to: %s", versions_->LevelSummary(&tmp)); return status; 230 Love u


优秀的个人博客,低调大师

LevelDB源码分析-编码

编码(util/coding.h util/coding.cc) LevelDB将整型编码为二进制字符串的形式,同时又能够和ASCII字符区分。 首先是定长编码: void EncodeFixed32(char *buf, uint32_t value) { if (port::kLittleEndian) { memcpy(buf, &value, sizeof(value)); } else { buf[0] = value & 0xff; buf[1] = (value >> 8) & 0xff; buf[2] = (value >> 16) & 0xff; buf[3] = (value >> 24) & 0xff; } } void EncodeFixed64(char *buf, uint64_t value) { if (port::kLittleEndian) { memcpy(buf, &value, sizeof(value)); } else { buf[0] = value & 0xff; buf[1] = (value >> 8) & 0xff; buf[2] = (value >> 16) & 0xff; buf[3] = (value >> 24) & 0xff; buf[4] = (value >> 32) & 0xff; buf[5] = (value >> 40) & 0xff; buf[6] = (value >> 48) & 0xff; buf[7] = (value >> 56) & 0xff; } } 这里根据机器区分大端和小端,LevelDB编码后的字符串为小端存储。在编码时,只是简单的将8位二进制码存储在一个char字符的位置上。因为定长,所以可以和ASCII字符区分。 接下来是定长编码的一些接口函数: void PutFixed32(std::string *dst, uint32_t value) // 将一个32位整型值定长编码后存入dst void PutFixed64(std::string *dst, uint64_t value) // 将一个64位整型值定长编码后存入dst 然后是变长编码: char *EncodeVarint32(char *dst, uint32_t v) { // Operate on characters as unsigneds unsigned char *ptr = reinterpret_cast<unsigned char *>(dst); static const int B = 128; if (v < (1 << 7)) { *(ptr++) = v; } else if (v < (1 << 14)) { *(ptr++) = v | B; *(ptr++) = v >> 7; } else if (v < (1 << 21)) { *(ptr++) = v | B; *(ptr++) = (v >> 7) | B; *(ptr++) = v >> 14; } else if (v < (1 << 28)) { *(ptr++) = v | B; *(ptr++) = (v >> 7) | B; *(ptr++) = (v >> 14) | B; *(ptr++) = v >> 21; } else { *(ptr++) = v | B; *(ptr++) = (v >> 7) | B; *(ptr++) = (v >> 14) | B; *(ptr++) = (v >> 21) | B; *(ptr++) = v >> 28; } return reinterpret_cast<char *>(ptr); } char *EncodeVarint64(char *dst, uint64_t v) { static const int B = 128; unsigned char *ptr = reinterpret_cast<unsigned char *>(dst); while (v >= B) { *(ptr++) = (v & (B - 1)) | B; v >>= 7; } *(ptr++) = static_cast<unsigned char>(v); return reinterpret_cast<char *>(ptr); } LevelDB的变长编码设计的十分巧妙,它以7个二进制bit为一个单位,存入一个char中,同时为了和ASCII码进行区分,将char的最高位设为1(ASCII码为0-127),同样采用小端存储的形式。但是变长编码的最后一个char的最高位是0,以此作为变长编码后的字符串的结束标志。 例如,11001011101111001会被编码为11111001 10101110 00000110。 接下来是一些变长编码的接口函数: void PutVarint32(std::string *dst, uint32_t v) // 将一个32位整型值变长编码后存入dst void PutVarint64(std::string *dst, uint64_t v) // 将一个64位整型值变长编码后存入dst int VarintLength(uint64_t v) // 获取变长编码后的字符串长度(以字节计数) const char *GetVarint32PtrFallback(const char *p, const char *limit, uint32_t *value) // 将以p到limit之间的变长编码字符串解码为32位整型值 bool GetVarint32(Slice *input, uint32_t *value) // 将以p到limit之间的变长编码字符串解码为32位整型值并封装入Slice中 const char *GetVarint64Ptr(const char *p, const char *limit, uint64_t *value) // 将以p到limit之间的变长编码字符串解码为64位整型值 bool GetVarint64(Slice *input, uint64_t *value) // 将以p到limit之间的变长编码字符串解码为64位整型值并封装入Slice中 227 Love u

优秀的个人博客,低调大师

Erlang PoolBoy 源码分析

问题存疑: 1.如何释放使用过的进程,被再次利用 答:通过try after 的方式,try checkout锁定一个进程,after 用完之后释放被锁定的进程 2.如果出现初始进程不够了,如果处理 答:如果不够用,判定max_overflow参数,确定是否需要重新创建进程,或者将此使用者放入等待列表中,一旦有新释放的,就马上给他使用,受超时器的影响 3.创建新的进程,是如何释放的 答:如果此进程是弹性创建的,则直接释放此进程,如果是work中的进程,则释放使用权 4.如果达到最大的创建进程数,又是如何处理的 答:根据block参数确定,是否忽略或者加入等待列表中 5.如果创建的进程 答:poolboy_sup 通过sample_one_by_one参数形式,动态调用supervisor:start_child创建进程池中的进程 6.为什么需要将初始创建的进程和poolboy进程link起来,有何用意 答:这样就可以将所有的逻辑全部集中在poolboy进程,只是将poolboy_sup当作一个中间件来使用创建进程池中的进程 queue 队列 支持先进先出或者后进先出模式 基本思路 1.通过一个外部sup启动一个poolboy进程,poolboy进程再启动一个poolboy_sup进程 2.poolboy_sup 就是这个进程池,然后启动若干个进程,但是poolboy进程操纵poolboy_sup进程创建很多个进程,然后将这些进程全部保存在poolboy进程 poolboy进程并且与poolboy_sup进程创建的进程进行link 当外部进程需要进程时直接从poolboy进程入口,然后使用,并且poolboy进程还监控所有使用的外部进程 当外部进程down掉后,poolboy进行善后操作,每一个外部进程独享poolboy进程中的一个进程 通过try after 方法,先独享进程,用完后,再释放进程 link的还有一个操作,就是处理poolboy进程池中进程挂掉的情况,先关闭此进程,并进行善后操作,然后,重新启用一个新的进程,带起挂掉的进程 主要的接口就是checkout和checkin的两个接口创建 数据结构采用queue,有两种方式可选,fifo(先进先出),fofi(后进先出)的方式,遍历整个进程池 还采用了一种动态创建进程的机制,就是说,如果发现现有创建的进程不够用了,那就需要创建一个临时的进程,满足使用,当使用完之后,再释放此进程 如果在释放的时候,发现还有等待的进程,则继续使用释放的进程,进行执行 启动 1.创建两个数据结构,wait:queue:new 保存等待的进程吃中分配的进程,monitors=ets:new()创建一个监控使用进程池中进程的数据 2.创建poolboy_sup 监督进程,采用sample_one_by_one 启动,后面采用supervisor:start_child(Sup,Args)启动进程 3.设置启动参数: worker_module:启动进程池的进程模块名 size:进程池中常见size个进程 max_overflow:最多可以弹性创建进程的数量 starategy:lifo|fifo 后进先出|先进先出模式 (一版来说,进程池中的进程没有区别的) Block:true 允许进程获取等待 false 不允许进程获取等待,在checkout接口中设置 4.启动进程池进程 supervisor:start_child(Sup,Args)启动子进程,填充进程池 使用 调用poolboy:transaction(PoolName,Query) 工作机制: 1.首先调用checkout获取进程池中的一个进程,调用的是call同步的方法执行,并设置超时时间 2.使用完毕之后,调用checkin释放进程使用 3.如果出现进程池没有进程,就可以通过max_overflow参数配置,确认是否可以生成新的进程以供使用 4.如果没有,则可以通过Block参数,确认是否可以将当前请求放入waiting中,只要有进程释放,就将此进程返回 5.进程使用完毕,则释放此进程的使用权,清理监控数据列表,然后判定是否弹性创建,决定是否释放,如果有等待进程,则将此进程使用权转移使用 异常处理 1.使用进程挂掉:调用down的handle_info,清理监控列表和工作列表,以及等待列表 2.进程池中进程挂掉:删除监控,重新生成一个进程 执行函数 checkout 获取一个可用进程 checkin 释放一个使用进程 transaction 一个完整的获取和释放进程过程 可能的不足之处 短暂 I/O 任务(比如数据库访问)的大型 worker 池会因为太多迁入和迁出活动而拖垮单个 poolboy 管理器。 参考: Erlang 池管理 maestro Erlang:https://www.oschina.net/p/maestro-erlang

优秀的个人博客,低调大师

Spark 通信原理分析

Spark通信原理(发件箱和收件箱) 更多资源 github: https://github.com/opensourceteams/spark-scala-maven csdn(汇总视频在线看): https://blog.csdn.net/thinktothings/article/details/84726769 Youtube视频分享 youtube:https://youtu.be/3vUVwbEGf1E​ BiliBili视频分享 bilibili : https://www.bilibili.com/video/av37442199/ Spark通信说明图 发件箱Outbox 发送消息在LinkList中存储 private val messages = new java.util.LinkedList[OutboxMessage] /** * Send a message. If there is no active connection, cache it and launch a new connection. If * [[Outbox]] is stopped, the sender will be notified with a [[SparkException]]. */ def send(message: OutboxMessage): Unit = { val dropped = synchronized { if (stopped) { true } else { messages.add(message) false } } if (dropped) { message.onFailure(new SparkException("Message is dropped because Outbox is stopped")) } else { drainOutbox() } } 消息发送 取出列表中的第一个元素 message = messages.poll() 调用消息发送 message.sendWith(_client) /** * Drain the message queue. If there is other draining thread, just exit. If the connection has * not been established, launch a task in the `nettyEnv.clientConnectionExecutor` to setup the * connection. */ private def drainOutbox(): Unit = { var message: OutboxMessage = null synchronized { if (stopped) { return } if (connectFuture != null) { // We are connecting to the remote address, so just exit return } if (client == null) { // There is no connect task but client is null, so we need to launch the connect task. launchConnectTask() return } if (draining) { // There is some thread draining, so just exit return } message = messages.poll() if (message == null) { return } draining = true } while (true) { try { val _client = synchronized { client } if (_client != null) { message.sendWith(_client) } else { assert(stopped == true) } } catch { case NonFatal(e) => handleNetworkFailure(e) return } synchronized { if (stopped) { return } message = messages.poll() if (message == null) { draining = false return } } } } 收件箱Inbox 对RpcMessage类型消息进行端点的 receiveAndReply 方法调用 对OneWayMessage类型消息进行端点的 receive方法调用 /** * Process stored messages. */ def process(dispatcher: Dispatcher): Unit = { var message: InboxMessage = null inbox.synchronized { if (!enableConcurrent && numActiveThreads != 0) { return } message = messages.poll() if (message != null) { numActiveThreads += 1 } else { return } } while (true) { safelyCall(endpoint) { message match { case RpcMessage(_sender, content, context) => try { endpoint.receiveAndReply(context).applyOrElse[Any, Unit](content, { msg => throw new SparkException(s"Unsupported message $message from ${_sender}") }) } catch { case NonFatal(e) => context.sendFailure(e) // Throw the exception -- this exception will be caught by the safelyCall function. // The endpoint's onError function will be called. throw e } case OneWayMessage(_sender, content) => endpoint.receive.applyOrElse[Any, Unit](content, { msg => throw new SparkException(s"Unsupported message $message from ${_sender}") }) case OnStart => endpoint.onStart() if (!endpoint.isInstanceOf[ThreadSafeRpcEndpoint]) { inbox.synchronized { if (!stopped) { enableConcurrent = true } } } case OnStop => val activeThreads = inbox.synchronized { inbox.numActiveThreads } assert(activeThreads == 1, s"There should be only a single active thread but found $activeThreads threads.") dispatcher.removeRpcEndpointRef(endpoint) endpoint.onStop() assert(isEmpty, "OnStop should be the last message") case RemoteProcessConnected(remoteAddress) => endpoint.onConnected(remoteAddress) case RemoteProcessDisconnected(remoteAddress) => endpoint.onDisconnected(remoteAddress) case RemoteProcessConnectionError(cause, remoteAddress) => endpoint.onNetworkError(cause, remoteAddress) } } inbox.synchronized { // "enableConcurrent" will be set to false after `onStop` is called, so we should check it // every time. if (!enableConcurrent && numActiveThreads != 1) { // If we are not the only one worker, exit numActiveThreads -= 1 return } message = messages.poll() if (message == null) { numActiveThreads -= 1 return } } } }

资源下载

更多资源
Mario

Mario

马里奥是站在游戏界顶峰的超人气多面角色。马里奥靠吃蘑菇成长,特征是大鼻子、头戴帽子、身穿背带裤,还留着胡子。与他的双胞胎兄弟路易基一起,长年担任任天堂的招牌角色。

腾讯云软件源

腾讯云软件源

为解决软件依赖安装时官方源访问速度慢的问题,腾讯云为一些软件搭建了缓存服务。您可以通过使用腾讯云软件源站来提升依赖包的安装速度。为了方便用户自由搭建服务架构,目前腾讯云软件源站支持公网访问和内网访问。

Sublime Text

Sublime Text

Sublime Text具有漂亮的用户界面和强大的功能,例如代码缩略图,Python的插件,代码段等。还可自定义键绑定,菜单和工具栏。Sublime Text 的主要功能包括:拼写检查,书签,完整的 Python API , Goto 功能,即时项目切换,多选择,多窗口等等。Sublime Text 是一个跨平台的编辑器,同时支持Windows、Linux、Mac OS X等操作系统。

WebStorm

WebStorm

WebStorm 是jetbrains公司旗下一款JavaScript 开发工具。目前已经被广大中国JS开发者誉为“Web前端开发神器”、“最强大的HTML5编辑器”、“最智能的JavaScript IDE”等。与IntelliJ IDEA同源,继承了IntelliJ IDEA强大的JS部分的功能。

用户登录
用户注册