首页 文章 精选 留言 我的

精选列表

搜索[融合分析],共10000篇文章
优秀的个人博客,低调大师

Etcd源码分析: 存储

存储数据结构 Etcd存储在集群搭建和使用篇有简介,总结起来有如下特点: 采用kv型数据存储,一般情况下比关系型数据库快。 支持动态存储(内存)以及静态存储(磁盘)。 分布式存储,可集成为多节点集群。 存储方式,采用类似目录结构。 1、只有叶子节点才能真正存储数据,相当于文件。 2、叶子节点的父节点一定是目录,目录不能存储数据。 叶子节点数据结构位于 /store/store.go type store struct { Root *node WatcherHub *watcherHub CurrentIndex uint64 Stats *Stats CurrentVersion int ttlKeyHeap *ttlKeyHeap // need to recovery manually worldLock sync.RWMutex // stop the world lock clock clockwork.Clock readonlySet types.Set } 其父节点数据结构位于/store/node.go type node struct { Path string CreatedIndex uint64 ModifiedIndex uint64 Parent *node `json:"-"` // should not encode this field! avoid circular dependency. ExpireTime time.Time Value string // for key-value pair Children map[string]*node // for directory // A reference to the store this node is attached to. store *store } 其中Path即为key WAL 内存中的数据格式 +-------------------------------+ | F | Pad | | +-----------+ Length | | | +-------------------------------+ | type | +-------------------------------+ | CRC | +-------------------------------+ | Data | +-------------------------------+ 字段名称 含义 占用大小 文本1 文本2 文本3 F 是否存在补齐数据 0:表示没有补齐字段 1:表示存在补齐字段 1bit Pad 表示补齐长度。在F为1时有效 7bit Length 表示数据有效负载长度,不包括F、Pad自身长度、补齐字段。 56bit Type 类型 int64,8字节,有符号 CRC 校验 uint32,4字节,无符号 Data 私有数据 WAL文件数据格式 当我们持久化到文件系统中,数据格式并不是上面介绍,而是grpc格式。 WAL文件以小端序方式存储 启动一个全新etcd,默认会在目录:/var/lib/etcd/default.etcd/member/wal/中生成一个.wal文件。 WAL的定义和创建 定义在wal.go中, WAL日志文件遵循一定的命名规则,由walName()实现,格式为"序号--raft日志索引.wal"。 // 根据seq和index产生wal文件名 func walName(seq, index uint64) string { return fmt.Sprintf("%016x-%016x.wal", seq, index) } WAL对外暴露的创建接口就是Create()函数 // Create creates a WAL ready for appending records. The given metadata is // recorded at the head of each WAL file, and can be retrieved(检索) with ReadAll. func Create(dirpath string, metadata []byte) (*WAL, error) { if Exist(dirpath) { return nil, os.ErrExist } // 先在.tmp临时文件上做修改,修改完之后可以直接执行rename,这样起到了原子修改文件的效果 tmpdirpath := filepath.Clean(dirpath) + ".tmp" if fileutil.Exist(tmpdirpath) { if err := os.RemoveAll(tmpdirpath); err != nil { return nil, err } } if err := fileutil.CreateDirAll(tmpdirpath); err != nil { return nil, err } // dir/filename ,filename从walName获取 seq-index.wal p := filepath.Join(tmpdirpath, walName(0, 0)) // 对文件上互斥锁 f, err := fileutil.LockFile(p, os.O_WRONLY|os.O_CREATE, fileutil.PrivateFileMode) if err != nil { return nil, err } // 定位到文件末尾 if _, err = f.Seek(0, io.SeekEnd); err != nil { return nil, err } // 预分配文件,大小为SegmentSizeBytes(64MB) if err = fileutil.Preallocate(f.File, SegmentSizeBytes, true); err != nil { return nil, err } // 新建WAL结构 w := &WAL{ dir: dirpath, metadata: metadata,// metadata 可为nil } // 在这个wal文件上创建一个encoder w.encoder, err = newFileEncoder(f.File, 0) if err != nil { return nil, err } // 把这个上了互斥锁的文件加入到locks数组中 w.locks = append(w.locks, f) if err = w.saveCrc(0); err != nil { return nil, err } // 将metadataType类型的record记录在wal的header处 if err = w.encoder.encode(&walpb.Record{Type: metadataType, Data: metadata}); err != nil { return nil, err } // 保存空的snapshot if err = w.SaveSnapshot(walpb.Snapshot{}); err != nil { return nil, err } // 重命名,之前以.tmp结尾的文件,初始化完成之后重命名,类似原子操作 if w, err = w.renameWal(tmpdirpath); err != nil { return nil, err } // directory was renamed; sync parent dir to persist rename pdir, perr := fileutil.OpenDir(filepath.Dir(w.dir)) if perr != nil { return nil, perr } // 将上述的所有文件操作进行同步 if perr = fileutil.Fsync(pdir); perr != nil { return nil, perr } // 关闭目录 if perr = pdir.Close(); err != nil { return nil, perr } return w, nil } 其中, SaveSnapshot()是做walpb.Snapshot持久化的, 里面的内容略过, 不过里面有一行代码if err := w.encoder.encode(rec)表示一条Record需要先把序列化后才能持久化,这个是通过encode()函数完成的(encoder.go) 一个Record被序列化之后(这里为JOSN格式),会以一个Frame的格式持久化。Frame首先是一个长度字段(encodeFrameSize()完成,在encoder.go文件),64bit,其中MSB表示这个Frame是否有padding字节,接下来才是真正的序列化后的数据 WAL存储 当raft模块收到一个proposal时就会调用Save方法完成(定义在wal.go)持久化 func (w *WAL) Save(st raftpb.HardState, ents []raftpb.Entry) error { w.mu.Lock() // 上锁 defer w.mu.Unlock() // short cut(捷径), do not call sync // IsEmptyHardState returns true if the given HardState is empty. if raft.IsEmptyHardState(st) && len(ents) == 0 { return nil } // 是否需要同步刷新磁盘 mustSync := raft.MustSync(st, w.state, len(ents)) // TODO(xiangli): no more reference operator // 保存所有日志项 for i := range ents { if err := w.saveEntry(&ents[i]); err != nil { return err } } // 持久化HardState, HardState表示服务器当前状态,定义在raft.pb.go,主要包含Term、Vote、Commit if err := w.saveState(&st); err != nil { return err } // 获取最后一个LockedFile的大小(已经使用的) curOff, err := w.tail().Seek(0, io.SeekCurrent) if err != nil { return err } // 如果小于64MB if curOff < SegmentSizeBytes { if mustSync { // 如果需要sync,就执行sync return w.sync() } return nil } // 否则执行切割(也就是说明,WAL文件是可以超过64MB的) return w.cut() } snapshot snapshot比wal大小要小5倍左右,只有CRC和Data两个字段 etcd中对raft snapshot的定义如下(在文件raft.pb.go): type Snapshot struct { Data []byte `protobuf:"bytes,1,opt,name=data" json:"data,omitempty"` Metadata SnapshotMetadata `protobuf:"bytes,2,opt,name=metadata" json:"metadata"` XXX_unrecognized []byte `json:"-"` } Metadata则是snaoshot的元信息 // snapshot的元数据 type SnapshotMetadata struct { // 最后一次的配置状态 ConfState ConfState `protobuf:"bytes,1,opt,name=conf_state,json=confState" json:"conf_state"` // 被快照取代的最后的条目在日志中的索引值(appliedIndex) Index uint64 `protobuf:"varint,2,opt,name=index" json:"index"` // 该条目的任期号 Term uint64 `protobuf:"varint,3,opt,name=term" json:"term"` XXX_unrecognized []byte `json:"-"` } snapshot持久化使用func (s *Snapshotter) SaveSnap(snapshot raftpb.Snapshot) 过程比较简单, 略去, 里面可以看到snapshot文件的命名规则 // 将raft snapshot序列化后持久化到磁盘 func (s *Snapshotter) save(snapshot *raftpb.Snapshot) error { // 产生snapshot的时间 start := time.Now() // snapshot的文件名Term-Index.snap fname := fmt.Sprintf("%016x-%016x%s", snapshot.Metadata.Term, snapshot.Metadata.Index, snapSuffix) 动态存储 +--------------------+ +--------------------+ | etcdserver/raft.go | | raft/storge.go | | +<-------->+ | | startNode() | | NewMemoryStorge() | +---------^----------+ +--------------------+ | | | +---------v----------+ +--------------------+ | rafe/node.go | | rafe/node.go | | +<-------->+ | | StartNode() | | newRaft() | +---------^----------+ +--------------------+ | | | +---------v----------+ | raft/node.go | | | | run() | +--------------------+ 首先调用NewMemoryStorage进行初始化,然后在newRaft()中生成raftLog对象并且调用InitialState()进行状态初始化,最后在node中run方法接收数据。


优秀的个人博客,低调大师

BroadcastReceiver的源码分析

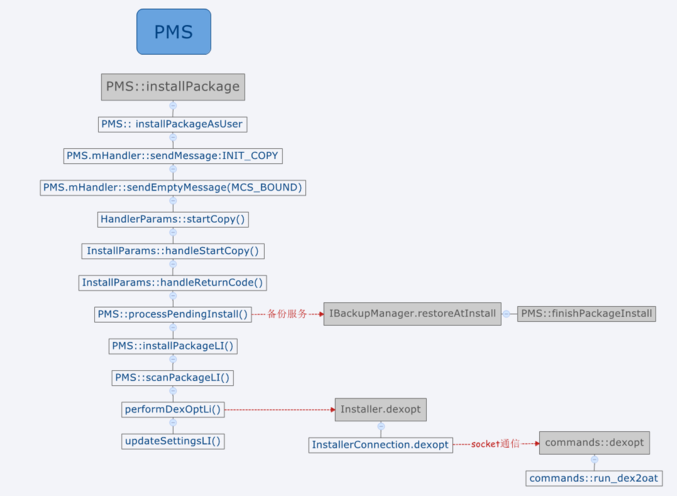
android提供了广播机制,通过BroadcastReceiver可以在不同的进程间传递消息。类似于观察者模式,A应用通过注册广播表示A对消息subject感兴趣,当B应用发出subject类型的消息的时候,A应用就能收到对应的消息。 android提供静态和动态两种方式进行消息注册,静态注册指的是在AndroidManifest.xml中进行注册,动态注册指的是在Activity通过registerReceiver的方式进行广播注册。 静态广播注册流程 静态广播注册指的是在AndroidManifest.xml注册Receiver,当Apk安装时会将静态注册的Receiver信息注册到PMS中,APK的安装流程(https://www.jianshu.com/p/953475cea991)如下: APK安装流程 其中installPackageLI完成了Apk的解析,生成了Package对象,scanPackageLi包括四大组件注册之类的操作。 PMS.scanPackageDirtyLI注册静态广播 解析到APK里的静态广播会注册到PMS的mReceivers对象中,mReceivers类型为ActivityIntentResolver。 动态广播注册流程 Activity通过registerReceiver方式进行广播注册,注册流程如下: registerReceiver流程 ContextImpl.registerReceiverInternal ContextImpl.registerReceiverInternal 该函数根据BroadcastReceiver对象生成IIntentReceiver对象,该对象和ApplicationThread的功能一样,试想一下,APP进程向AMS进程注册广播,当AMS收到广播向APP进程分发时需要用到Binder调用,IIntentReceiver就是进行跨进程调用的。 AMS.registerReceiver AMS将IIntentReceiver保存到mReisterdReceivers中,最终保存到mReceiverResolver.addFilter(bf);中。 sendBroadcast发送广播 sendBroascast流程 发送广播最终走到了AMS.broadcastIntentLocked,其中核心的代码如下所示: AMS.broadcastIntentLocked broadcastIntentLocked中receivers表示静态注册的广播,通过collectReceiverComponents从PMS那里获取;registerdReceivers表示动态注册的广播,从mReceiverResolver那里获取。在获取到要接受所有广播后,就调用如下函数进行广播分发。 广播分发 scheduleBroadcastsLocked开始进行广播发送 BroadcastQueue.scheduleBroadcastsLocked Handler消息最终调用了BroadcastQueue.processNextBroadcast,然后调用了performReceiveLocked, processNextBroadcast processNextBroadcast调用了performReceiverLocked performReceiverLocked performReceiverLocked继续调用IItentReceiver.performReceiver,该调用的Binder方式, IItentReceiver.performReceiver 最终调用了Args.run Args.run Args.run通过类加载器加载Receiver对象,并最终调用onReceive函数,至此,广播发送完成。

优秀的个人博客,低调大师

Android换肤方案分析

0x0 背景 无论是出于用户个性化的考虑,或者是不同场景下的氛围渲染,客户端应用存在着换肤的需求。本文举出三种常见的换肤方案,并加以对比,以作后续参考。无论何种方案,换肤的核心都包含皮肤的管理,皮肤的加载,以及皮肤的生效。不同的方案在解决这些问题上有不同的思路。 0x1 手动重新设置UI资源 这种方式最简单,在业务代码里面手动写设置新皮肤的逻辑,当新皮肤下发时,回调该逻辑重新设置UI资源,就达到了换肤的逻辑。这种方案思路简单,但是业务入侵的,需要手动写代码,有维护成本。而且由于需要手动写重新设置UI的逻辑,因此一般不会对所有的控件都更换UI资源,因此换肤的范围存在局限性。 public void onSkinChanged(JSONObject newSkin) { int newTextColor = newSkin.optIn

优秀的个人博客,低调大师

Kotlin集合框架分析

一、Kotlin中集合框架和Java集合框架特别相似 掌握以下例子就Ok了 package cn.kotliner.kotlin.collections /** * Created by wangdong * 集合框架 * kotlin中集合的映射,最终都映射到Java中的list * kotlin中所有的list和map都是不可变的接口,如下不可以.add或者.remove * 但是kotlin的mutableList和mutablemap是可变的 * public interface MutableList<E> : List<E>, MutableCollection<E> { * Modification Operations *override fun add(element: E): Boolean *override fun remove(element: E): Boolean * Bulk Modification Operations *override fun addAll(elements: Collection<E>): Boolean * * kotlin的mutablemap * public interface MutableMap<K, V> : Map<K, V> { *public fun put(key: K, value: V): V? *public fun remove(key: K): V? *@SinceKotlin("1.1") *@PlatformDependent *public fun remove(key: K, value: V): Boolean { * See default implementation in JDK sources *return true *} *public fun putAll(from: Map<out K, V>): Unit */ fun main(args: Array<String>) { //List集合 val list = listOf("Hello", "World") //list.add() //map集合 val map = mapOf("key" to "value", "2" to "whatever") //map.put() } object Test{ val list = listOf(1, 2,4) }

优秀的个人博客,低调大师

istio网络转发分析

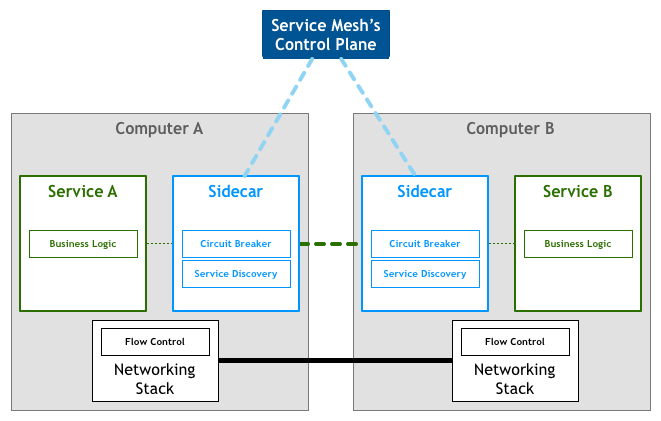
背景介绍 service mesh 和 istio概述 Service Mesh是专用的基础设施层,轻量级高性能网络代理。提供安全的、快速的、可靠地服务间通讯,与实际应用部署一起,但对应用透明。 为了帮助理解, 下图展示了服务网格的典型边车部署方式: 图中应用作为服务的发起方,只需要用最简单的方式将请求发送给本地的服务网格代理,然后网格代理会进行后续的操作,如服务发现,负载均衡,最后将请求转发给目标服务。当有大量服务相互调用时,它们之间的服务调用关系就会形成网格,如下图所示: Istio——一个用来连接、管理和保护微服务的开放service mesh平台。Istio提供一种简单的方式来建立已部署服务网络,具备负载均衡、服务间认证、监控等功能,而不需要改动任何服务代码。想要为服务增加对Istio的支持,您只需要在环境中部署一个特殊的边车(si

优秀的个人博客,低调大师

hbase snapshot源码分析

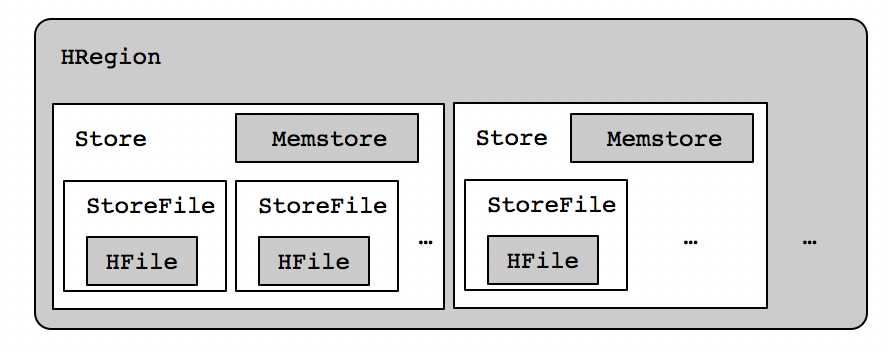
snapshot操作在硬盘上形式: /hbase/.snapshots /.tmp &lt;---- working directory /[snapshot name] &lt;----- completed snapshot 当snapshot完成时的形式展示: /hbase/.snapshots/[snapshot name] .snapshotinfo &lt;--- Description of the snapshot .tableinfo &lt;--- Copy of the tableinfo /.logs /[server_name] /... [log files] ... /[region name] &lt;---- All the region's information .regioninfo &lt;---- Copy of the HRegionInfo /[column family name] /[hfile name] &lt;--- name of the hfile in the real region ... ... snapshot基本步骤: 1.执行前会枷锁操作,不允许删除添加操作; 2.在hdfs在创建指定目录,写入相关的信息进去; 3.刷新memstore中的数据到hfile, 4.为hfile文件创建引用指针. 以下是大体的代码流程。 hbaseAdmin执行发起的snapshot: public void snapshot(final String snapshotName, final TableName tableName, SnapshotDescription.Type type) throws IOException, SnapshotCreationException, IllegalArgumentException { SnapshotDescription.Builder builder = SnapshotDescription.newBuilder(); builder.setTable(tableName.getNameAsString()); builder.setName(snapshotName); builder.setType(type); snapshot(builder.build()); } 执行快照并等待服务器完成该快照(阻止)。HBase实例一次只能有一个快照,或者结果可能是未定义(你可以告诉多个HBase集群同时快照,但只有一个在单个群集同时)。 public void snapshot(SnapshotDescription snapshot) throws IOException, SnapshotCreationException, IllegalArgumentException { // actually take the snapshot SnapshotResponse response = takeSnapshotAsync(snapshot); MasterRpcService:异步触发并完成一次snapshot: `master.snapshotManager.takeSnapshot(snapshot);` SnapshotManager类:完成一次snapshot需要根据表的状态:disabled或者enabled if (assignmentMgr.getTableStateManager().isTableState(snapshotTable, ZooKeeperProtos.Table.State.ENABLED)) { LOG.debug("Table enabled, starting distributed snapshot."); snapshotEnabledTable(snapshot); LOG.debug("Started snapshot: " + ClientSnapshotDescriptionUtils.toString(snapshot)); } // For disabled table, snapshot is created by the master else if (assignmentMgr.getTableStateManager().isTableState(snapshotTable, ZooKeeperProtos.Table.State.DISABLED)) { LOG.debug("Table is disabled, running snapshot entirely on master."); snapshotDisabledTable(snapshot); LOG.debug("Started snapshot: " + ClientSnapshotDescriptionUtils.toString(snapshot)); } private synchronized void snapshotEnabledTable(SnapshotDescription snapshot) throws HBaseSnapshotException { // setup the snapshot prepareToTakeSnapshot(snapshot); // Take the snapshot of the enabled table EnabledTableSnapshotHandler handler = new EnabledTableSnapshotHandler(snapshot, master, this); snapshotTable(snapshot, handler); } enabled状态下执行表的snapshot: // setup the snapshot 准备工作 prepareToTakeSnapshot(snapshot); // Take the snapshot of the enabled table EnabledTableSnapshotHandler handler = new EnabledTableSnapshotHandler(snapshot, master, this); 开始执行snapshot snapshotTable(snapshot, handler); } snapshot开始之前的设置准备:检查是否有一个在运行的snapshot工作以及还原snapshot工作的请求存在。# // make sure we aren't already running a snapshot if (isTakingSnapshot(snapshot)) { SnapshotSentinel handler = this.snapshotHandlers.get(snapshotTable); throw new SnapshotCreationException("Rejected taking " + ClientSnapshotDescriptionUtils.toString(snapshot) + " because we are already running another snapshot " + (handler != null ? ("on the same table " + ClientSnapshotDescriptionUtils.toString(handler.getSnapshot())) : "with the same name"), snapshot); } // make sure we aren't running a restore on the same table if (isRestoringTable(snapshotTable)) { SnapshotSentinel handler = restoreHandlers.get(snapshotTable); throw new SnapshotCreationException("Rejected taking " + ClientSnapshotDescriptionUtils.toString(snapshot) + " because we are already have a restore in progress on the same snapshot " + ClientSnapshotDescriptionUtils.toString(handler.getSnapshot()), snapshot); } try { // delete the working directory, since we aren't running the snapshot. Likely leftovers // from a failed attempt. fs.delete(workingDir, true); // recreate the working directory for the snapshot if (!fs.mkdirs(workingDir)) { throw new SnapshotCreationException("Couldn't create working directory (" + workingDir + ") for snapshot", snapshot); } 设置准备工作完成就开始进行snapshot用指定的handler进行snapshot工作: handler.prepare(); this.executorService.submit(handler); this.snapshotHandlers.put(TableName.valueOf(snapshot.getTable()), handler); ... TakeSnapshotHandler真正开始处理snapshot操作: 1.将snapshot描述信息写入.snapshotinfo目录 FsPermission perms = FSUtils.getFilePermissions(fs, fs.getConf(), HConstants.DATA_FILE_UMASK_KEY); Path snapshotInfo = new Path(workingDir, SnapshotDescriptionUtils.SNAPSHOTINFO_FILE); try { FSDataOutputStream out = FSUtils.create(fs, snapshotInfo, perms, true); try { snapshot.writeTo(out); } finally { out.close(); } } 2.复制表的信息: snapshotManifest.addTableDescriptor(this.htd); 3.获取hregionserver上的regions以及位置信息 ##: List<Pair<HRegionInfo, ServerName>> regionsAndLocations; if (TableName.META_TABLE_NAME.equals(snapshotTable)) { regionsAndLocations = new MetaTableLocator().getMetaRegionsAndLocations(server.getZooKeeper()); } else { regionsAndLocations = MetaTableAccessor.getTableRegionsAndLocations(server.getZooKeeper(), server.getConnection(), snapshotTable, false); } 4.开始执行snapshot操作,上面获取到的region信息及位置信息 // run the snapshot snapshotRegions(regionsAndLocations); 启动snapshot程序::: 在regionserver上开始snapshot // start the snapshot on the RS所有的snapshot操作的具体细节 Procedure proc = coordinator.startProcedure(this.monitor, this.snapshot.getName(), this.snapshot.toByteArray(), Lists.newArrayList(regionServers)); if (proc == null) { String msg = "Failed to submit distributed procedure for snapshot '" + snapshot.getName() + "'"; LOG.error(msg); throw new HBaseSnapshotException(msg); } 等待snapshot完成: proc.waitForCompleted(); 将下线的region作为disabled处理 // Take the offline regions as disabled for (Pair<HRegionInfo, ServerName> region : regions) { HRegionInfo regionInfo = region.getFirst(); if (regionInfo.isOffline() && (regionInfo.isSplit() || regionInfo.isSplitParent())) { LOG.info("Take disabled snapshot of offline region=" + regionInfo); snapshotDisabledRegion(regionInfo); } } 5.相关region信息以及servername,用来验证snapshot的有效性 // extract each pair to separate lists Set<String> serverNames = new HashSet<String>(); for (Pair<HRegionInfo, ServerName> p : regionsAndLocations) { if (p != null && p.getFirst() != null && p.getSecond() != null) { HRegionInfo hri = p.getFirst(); if (hri.isOffline() && (hri.isSplit() || hri.isSplitParent())) continue; serverNames.add(p.getSecond().toString()); } } 6.刷新内存状态,写snapshot-mnifest信息到目录 // flush the in-memory state, and write the single manifest status.setStatus("Consolidate snapshot: " + snapshot.getName()); snapshotManifest.consolidate(); 7.开始验证snapshot的有效性 // verify the snapshot is valid status.setStatus("Verifying snapshot: " + snapshot.getName()); verifier.verifySnapshot(this.workingDir, serverNames); 8.完成snapshot,转移目录等 // complete the snapshot, atomically moving from tmp to .snapshot dir. completeSnapshot(this.snapshotDir, this.workingDir, this.fs); msg = "Snapshot " + snapshot.getName() + " of table " + snapshotTable + " completed"; status.markComplete(msg); LOG.info(msg); metricsSnapshot.addSnapshot(status.getCompletionTimestamp() - status.getStartTime());

资源下载

更多资源
Mario

Mario

马里奥是站在游戏界顶峰的超人气多面角色。马里奥靠吃蘑菇成长,特征是大鼻子、头戴帽子、身穿背带裤,还留着胡子。与他的双胞胎兄弟路易基一起,长年担任任天堂的招牌角色。

腾讯云软件源

腾讯云软件源

为解决软件依赖安装时官方源访问速度慢的问题,腾讯云为一些软件搭建了缓存服务。您可以通过使用腾讯云软件源站来提升依赖包的安装速度。为了方便用户自由搭建服务架构,目前腾讯云软件源站支持公网访问和内网访问。

Spring

Spring

Spring框架(Spring Framework)是由Rod Johnson于2002年提出的开源Java企业级应用框架,旨在通过使用JavaBean替代传统EJB实现方式降低企业级编程开发的复杂性。该框架基于简单性、可测试性和松耦合性设计理念,提供核心容器、应用上下文、数据访问集成等模块,支持整合Hibernate、Struts等第三方框架,其适用范围不仅限于服务器端开发,绝大多数Java应用均可从中受益。

WebStorm

WebStorm

WebStorm 是jetbrains公司旗下一款JavaScript 开发工具。目前已经被广大中国JS开发者誉为“Web前端开发神器”、“最强大的HTML5编辑器”、“最智能的JavaScript IDE”等。与IntelliJ IDEA同源,继承了IntelliJ IDEA强大的JS部分的功能。

用户登录
用户注册