ELK(elasticsearch+logstash+kibana)开源日志分析平台搭建
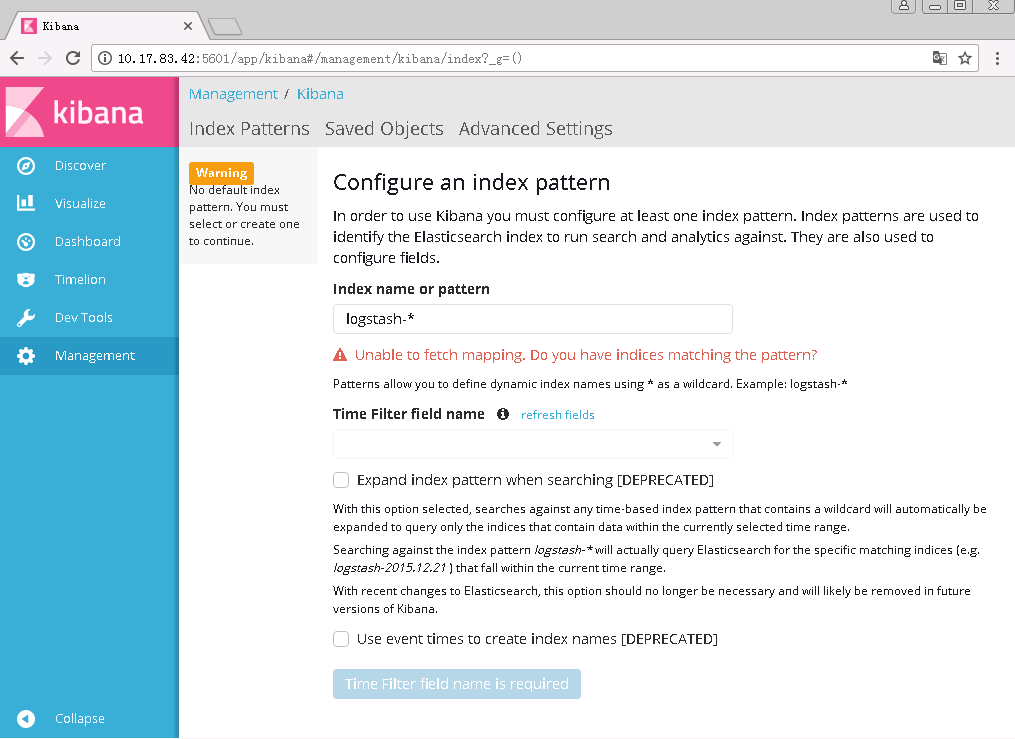
环境介绍 System: CentOS7.2 x86_64 hostname:elk-server.huangming.org IP Address: 10.0.6.42、10.17.83.42 本篇的ELK环境为单机部署方式,即将ELK所有的软件包都安装在一台服务器上,配置如下: CPU: 4c Mem: 8G Disk: 50 一、Elasticsearch安装 1、安装jdk 1.8及以上的版本(安装过程略) 1 2 3 4 [root@elk-serverelk] #java-version javaversion "1.8.0_65" Java(TM)SERuntimeEnvironment(build1.8.0_65-b17) JavaHotSpot(TM)64-BitServerVM(build25.65-b01,mixedmode) 2、下载Elasticsearch最新版本(目前5.5版本) 1 2 3 4 使用curl命令下载 tar 包 #curl-L-Ohttps://artifacts.elastic.co/downloads/elasticsearch/elasticsearch-5.5.2.tar.gz 也可以使用wget命令下载 #wgethttps://artifacts.elastic.co/downloads/elasticsearch/elasticsearch-5.5.2.tar.gz 3、解压至指定目录(安装目录)/usr/local/下,并将其重命名为elasticsearch (完整的目录应该为/usr/local/elasticsearch) 1 2 3 #tar-zxfelasticsearch-5.5.2.tar.gz-C/usr/local/ #cd/usr/local/ #mvelasticsearch-5.5.2elasticsearch 2、创建一个用于运行elasticsearch的普通用户,随后修改elasticsearch家目录的所属权限为该用户;创建elasticsearch数据存储目录/data/elasticsearch 1 2 3 4 5 #groupaddelasticsearch #useradd-gelasticsearchelasticsearch-m #chown-Relasticsearch./usr/local/elasticsearch #mkdir/data/elasticsearch #chown-Relasticsearch./data/elasticsearch 2、修改elasticsearch.yml配置文件 1 2 3 4 5 6 #vimconfig/elasticsearch.yml cluster.name:my-application #ELK集群名称 path.data: /data/elasticsearch #elasticsearch数据存储目录 path.logs: /usr/local/elasticsearch/logs #elasticsearch日志存储路径 network.host:10.17.83.42 #elasticsearch监听地址,默认为localhost http.port:9200 #elasticsearch监听端口,默认问9200 6、修改相关的内核参数 #打开/etc/security/limits.conf文件,添加以下参数 1 2 3 4 *softnproc2048 *hardnproc16384 *softnofile65536 *hardnofile65536 #修改vm.max_map_count=262144 1 #echo"/etc/sysctl.conf">>/etc/sysctl.conf 7、运行elasticsearch (注意:要切换到普通用户运行) # su - elasticsearch $ ./bin/elasticsearch 运行elasticsearch 1 2 3 4 5 6 7 8 9 10 11 12 13 14 15 16 17 18 19 20 21 22 23 24 25 26 27 28 29 30 [elasticsearch@elk-server~]$ cd /usr/local/elasticsearch/ [elasticsearch@elk-serverelasticsearch]$. /bin/elasticsearch [2017-08-28T14:51:31,069][INFO][o.e.n.Node][]initializing... [2017-08-28T14:51:31,186][INFO][o.e.e.NodeEnvironment][6eN59Pf]using[1]datapaths,mounts[[/(rootfs)]],netusable_space[89.4gb],nettotal_space[91.4gb],spins?[unknown],types[rootfs] [2017-08-28T14:51:31,187][INFO][o.e.e.NodeEnvironment][6eN59Pf]heapsize[1.9gb],compressedordinaryobjectpointers[ true ] [2017-08-28T14:51:31,188][INFO][o.e.n.Node]nodename[6eN59Pf]derivedfromnodeID[6eN59PfuS7iVRfoEppsngg]; set [node.name]tooverride [2017-08-28T14:51:31,189][INFO][o.e.n.Node]version[5.5.2],pid[2759],build[b2f0c09 /2017-08-14T12 :33:14.154Z],OS[Linux /3 .10.0-327.el7.x86_64 /amd64 ],JVM[OracleCorporation /Java HotSpot(TM)64-BitServerVM /1 .8.0_65 /25 .65-b01] [2017-08-28T14:51:31,189][INFO][o.e.n.Node]JVMarguments[-Xms2g,-Xmx2g,-XX:+UseConcMarkSweepGC,-XX:CMSInitiatingOccupancyFraction=75,-XX:+UseCMSInitiatingOccupancyOnly,-XX:+AlwaysPreTouch,-Xss1m,-Djava.awt.headless= true ,-Dfile.encoding=UTF-8,-Djna.nosys= true ,-Djdk.io.permissionsUseCanonicalPath= true ,-Dio.netty.noUnsafe= true ,-Dio.netty.noKeySetOptimization= true ,-Dio.netty.recycler.maxCapacityPerThread=0,-Dlog4j.shutdownHookEnabled= false ,-Dlog4j2.disable.jmx= true ,-Dlog4j.skipJansi= true ,-XX:+HeapDumpOnOutOfMemoryError,-Des.path.home= /usr/local/elasticsearch ] [2017-08-28T14:51:32,174][INFO][o.e.p.PluginsService][6eN59Pf]loadedmodule[aggs-matrix-stats] [2017-08-28T14:51:32,174][INFO][o.e.p.PluginsService][6eN59Pf]loadedmodule[ingest-common] [2017-08-28T14:51:32,175][INFO][o.e.p.PluginsService][6eN59Pf]loadedmodule[lang-expression] [2017-08-28T14:51:32,175][INFO][o.e.p.PluginsService][6eN59Pf]loadedmodule[lang-groovy] [2017-08-28T14:51:32,175][INFO][o.e.p.PluginsService][6eN59Pf]loadedmodule[lang-mustache] [2017-08-28T14:51:32,175][INFO][o.e.p.PluginsService][6eN59Pf]loadedmodule[lang-painless] [2017-08-28T14:51:32,175][INFO][o.e.p.PluginsService][6eN59Pf]loadedmodule[parent- join ] [2017-08-28T14:51:32,175][INFO][o.e.p.PluginsService][6eN59Pf]loadedmodule[percolator] [2017-08-28T14:51:32,175][INFO][o.e.p.PluginsService][6eN59Pf]loadedmodule[reindex] [2017-08-28T14:51:32,176][INFO][o.e.p.PluginsService][6eN59Pf]loadedmodule[transport-netty3] [2017-08-28T14:51:32,176][INFO][o.e.p.PluginsService][6eN59Pf]loadedmodule[transport-netty4] [2017-08-28T14:51:32,176][INFO][o.e.p.PluginsService][6eN59Pf]nopluginsloaded [2017-08-28T14:51:33,991][INFO][o.e.d.DiscoveryModule][6eN59Pf]usingdiscovery type [zen] [2017-08-28T14:51:34,576][INFO][o.e.n.Node]initialized [2017-08-28T14:51:34,577][INFO][o.e.n.Node][6eN59Pf]starting... [2017-08-28T14:51:34,814][INFO][o.e.t.TransportService][6eN59Pf]publish_address{10.17.83.42:9300},bound_addresses{10.17.83.42:9300} [2017-08-28T14:51:34,826][INFO][o.e.b.BootstrapChecks][6eN59Pf]boundorpublishingtoanon-loopbackornon-link- local address,enforcingbootstrapchecks [2017-08-28T14:51:37,883][INFO][o.e.c.s.ClusterService][6eN59Pf]new_master{6eN59Pf}{6eN59PfuS7iVRfoEppsngg}{hs82h4vkTwKCEvKybCodbw}{10.17.83.42}{10.17.83.42:9300},reason:zen-disco-elected-as-master([0]nodesjoined) [2017-08-28T14:51:37,900][INFO][o.e.h.n.Netty4HttpServerTransport][6eN59Pf]publish_address{10.17.83.42:9200},bound_addresses{10.17.83.42:9200} [2017-08-28T14:51:37,900][INFO][o.e.n.Node][6eN59Pf]started [2017-08-28T14:51:37,925][INFO][o.e.g.GatewayService][6eN59Pf]recovered[0]indicesintocluster_state [2017-08-28T14:51:43,485][INFO][o.e.c.m.MetaDataCreateIndexService][6eN59Pf][.kibana]creatingindex,cause[api],templates[],shards[1]/[1],mappings[_default_,index-pattern,server,visualization,search,timelion-sheet,config,dashboard,url] 一般情况我们要求elasticsearch在后台运行,使用命令如下: 1 $. /bin/elasticsearch -d 8、检查elasticsearch状态,如下则表示正常运行 1 2 3 4 5 6 7 8 9 10 11 12 13 14 [root@elk-serverelasticsearch] #curlhttp://10.17.83.42:9200 { "name" : "6eN59Pf" , "cluster_name" : "my-application" , "cluster_uuid" : "cKopwE1iTciIQAiFI6d8Gw" , "version" :{ "number" : "5.5.2" , "build_hash" : "b2f0c09" , "build_date" : "2017-08-14T12:33:14.154Z" , "build_snapshot" : false , "lucene_version" : "6.6.0" }, "tagline" : "YouKnow,forSearch" } 二、Logstash安装 1、下载logstash软件包 1 #wgethttps://artifacts.elastic.co/downloads/logstash/logstash-5.5.2.tar.gz 2、解压至指定安装目录 1 2 3 4 #tar-zxflogstash-5.5.2.tar.gz-C/usr/local/ #cd/usr/local/ #mvlogstash-5.5.2logstash 3、运行logstash # cd logstash/ # ./bin/logstash -e 'input { stdin { } } output { stdout {} }' 输入”hello world! ”,验证是否正常输出 1 2 3 4 5 6 7 8 9 10 11 12 [root@elk-serverlogstash] #./bin/logstash-e'input{stdin{}}output{stdout{}}' ERRORStatusLoggerNolog4j2configuration file found.Usingdefaultconfiguration:loggingonlyerrorstotheconsole. SendingLogstash'slogsto /usr/local/logstash/logs which isnowconfiguredvialog4j2.properties [2017-08-28T15:11:33,267][INFO][logstash.setting.writabledirectory]Creatingdirectory{:setting=> "path.queue" ,:path=> "/usr/local/logstash/data/queue" } [2017-08-28T15:11:33,273][INFO][logstash.setting.writabledirectory]Creatingdirectory{:setting=> "path.dead_letter_queue" ,:path=> "/usr/local/logstash/data/dead_letter_queue" } [2017-08-28T15:11:33,300][INFO][logstash.agent]NopersistentUUID file found.GeneratingnewUUID{:uuid=> "2fb479ab-0ca5-4979-89b1-4246df9a7472" ,:path=> "/usr/local/logstash/data/uuid" } [2017-08-28T15:11:33,438][INFO][logstash.pipeline]Startingpipeline{ "id" => "main" , "pipeline.workers" =>8, "pipeline.batch.size" =>125, "pipeline.batch.delay" =>5, "pipeline.max_inflight" =>1000} [2017-08-28T15:11:33,455][INFO][logstash.pipeline]Pipelinemainstarted Thestdinpluginisnowwaiting for input: [2017-08-28T15:11:33,497][INFO][logstash.agent]SuccessfullystartedLogstashAPIendpoint{:port=>9600} helloworld! 2017-08-28T07:11:42.724Zelk-server.huangming.orghelloworld! 三、Kibana安装 1、下载kibana 1 #wgethttps://artifacts.elastic.co/downloads/kibana/kibana-5.5.2-linux-x86_64.tar.gz 2、解压至安装目录 1 2 3 #tar-zxfkibana-5.5.2-linux-x86_64.tar.gz-C/usr/local/ #cd/usr/local/ #mvkibana-5.5.2-linux-x86_64kibana 3、修改配置 1 2 3 4 5 6 7 #cdkibana/ #vimconfig/kibana.yml server.port:5601 #监听端口 server.host: "10.17.83.42" #指定后端服务器 elasticsearch.url: "http://10.17.83.42:9200" #指定elasticsearch实例地址 4、运行kibana # ./bin/kibana & 1 2 3 4 5 6 7 8 9 10 [root@elk-serverkibana] #./bin/kibana& [1]3219 [root@elk-serverkibana] #log[07:26:02.496][info][status][plugin:kibana@5.5.2]Statuschangedfromuninitializedtogreen-Ready log[07:26:02.604][info][status][plugin:elasticsearch@5.5.2]Statuschangedfromuninitializedtoyellow-Waiting for Elasticsearch log[07:26:02.637][info][status][plugin:console@5.5.2]Statuschangedfromuninitializedtogreen-Ready log[07:26:02.682][info][status][plugin:metrics@5.5.2]Statuschangedfromuninitializedtogreen-Ready log[07:26:02.930][info][status][plugin:elasticsearch@5.5.2]Statuschangedfromyellowtogreen-Kibanaindexready log[07:26:02.932][info][status][plugin:timelion@5.5.2]Statuschangedfromuninitializedtogreen-Ready log[07:26:02.937][info][listening]Serverrunningathttp: //10 .17.83.42:5601 log[07:26:02.939][info][status][uisettings]Statuschangedfromuninitializedtogreen-Ready 5、验证kibana 在客户端浏览器打开http://10.17.83.42:5601 在该页面提示我们需要创建一个index 首先创建一个kinana默认的index(名称为.kibana),如果输入的index名不存在,则无法创建 查看运行状态及已安装的插件 至此ELK已经搭建完成了,下面来创建一个收集message系统日志的实例 本文转自 HMLinux 51CTO博客,原文链接:http://blog.51cto.com/7424593/1960254