首页 文章 精选 留言 我的

精选列表

搜索[语法],共10006篇文章
优秀的个人博客,低调大师

Python语法

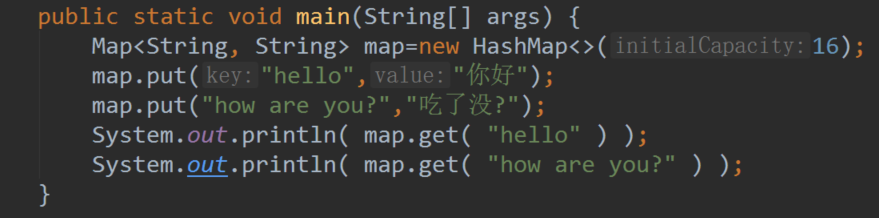
1. 结构 1. 没有花括号{} 2. 表达式以冒号:开头 3. 换行符分割语句 4. 以代码块的对齐方式来区分代码块 2. 变量 没有类型关键字,没有声明关键字,直接变量名= year = 2017 month = 9 day = 1 date = "2017年9月1日"' 4. 定义类 class开头 class 类名: def 方法名(self): print("Hello wrold!") 5. 继承 # 继承 class Father: name = "" def __init__(self, name): self.name = name def sayName(self): print(self.name) class Son(Father): def __init__(self, name): super().__init__(name) self.name = name + "的父亲" son = Son("张三") son.sayName() 结果 张三的父亲 6.访问控制 __foo__: 定义的是特列方法,类似 __init__() 之类的。 _foo: 以单下划线开头的表示的是 protected 类型的变量,即保护类型只能允许其本身与子类进行访问, 不能用于 from module import * __foo: 双下划线的表示的是私有类型(private)的变量, 只能是允许这个类本身进行访问了。 7.List 集合使用中括号定义,访问通过下标进行访问,和其他语言都是一样的 name=["王大","赵二","张三","李四"] #删除下标为2的元素:张三 del name[2] 8. 字典(Dictionary) 相当于java中的map,是有key-value组成的 dict = {'Alice': '2341', 'Beth': '9102', 'Cecil': '3258'} 9. 实例化对象 没有new关键字,直接以类名()创建 10.流程控制 基本上与其他语言一样,只不过没有()和{},详情看1 if case : print("111") else : print("222") 数据类型转换 int(x [,base]) 将x转换为一个整数 long(x [,base] ) 将x转换为一个长整数 float(x) 将x转换到一个浮点数 complex(real [,imag]) 创建一个复数 str(x) 将对象 x 转换为字符串 repr(x) 将对象 x 转换为表达式字符串 eval(str) 用来计算在字符串中的有效Python表达式,并返回一个对象 tuple(s) 将序列 s 转换为一个元组 list(s) 将序列 s 转换为一个列表 set(s) 转换为可变集合 dict(d) 创建一个字典。d 必须是一个序列 (key,value)元组。 frozenset(s) 转换为不可变集合 chr(x) 将一个整数转换为一个字符 unichr(x) 将一个整数转换为Unicode字符 ord(x) 将一个字符转换为它的整数值 hex(x) 将一个整数转换为一个十六进制字符串 oct(x) 将一个整数转换为一个八进制字符串

优秀的个人博客,低调大师

JavaScript 语法

JavaScript 是一个脚本语言。它是一个轻量级,但功能强大的编程语言。 JavaScript 字面量(值)在编程语言中,一般固定值称为字面量,如 3.14,1001 。数字(Number)字面量 可以是整数或者是小数,或者是科学计数(e)如:123e5。 字符串(String)字面量 可以使用单引号或双引号:"John Doe"'John Doe' ; 表达式字面量 用于计算:5 + 65 * 10 数组(Array)字面量 定义一个数组:[40, 100, 1, 5, 25, 10] 对象(Object)字面量 定义一个对象:{firstName:"John", lastName:"Doe", age:50, eyeColor:"blue"} 函数(Function)字面量 定义一个函数:function myFunction(a, b) { return a * b;} JavaScript 变量在编程语言中,变量用于存储数据值。JavaScript 使用关键字 var 来定义变量, 使用等号来为变量赋值:var x, lengthx = 5length = 6 ;变量可以通过变量名访问。在指令式语言中,变量通常是可变的。字面量是一个恒定的值。注意:变量是一个名称。字面量是一个值。 JavaScript 语句在 HTML 中,JavaScript 语句向浏览器发出的命令。语句是用分号分隔:x = 5 + 6; 数据类型的概念:编程语言中,数据类型是一个非常重要的内容。为了可以操作变量,了解数据类型的概念非常重要。如果没有使用数据类型,以下实例将无法执行:16 + "Volvo"; JavaScript 函数JavaScript 语句可以写在函数内,函数可以重复引用:引用一个函数 = 调用函数(执行函数内的语句)。 function myFunction(a, b) { return a * b; // 返回 a 乘以 b 的结果 } JavaScript 字母大小写:JavaScript 对大小写是敏感的。当编写 JavaScript 语句时,请留意是否关闭大小写切换键。函数 getElementById 与 getElementbyID 是不同的同样,变量 myVariable 与 MyVariable 也是不同的。

优秀的个人博客,低调大师

Kotlin 基础语法

Kotlin 文件以 .kt 为后缀。 包声明 包的声明应处于源文件顶部: package my.demo import java.util.* // …… kotlin源文件不需要相匹配的目录和包,源文件可以放在任何文件目录。如果没有指定包,默认为default包。 默认导入 有多个包会默认导入到每个 Kotlin 文件中: kotlin.* kotlin.annotation.* kotlin.collections.* kotlin.comparisons.* kotlin.io.* kotlin.ranges.* kotlin.sequences.* kotlin.text.* 函数定义 函数定义使用关键字 fun,参数格式为: 参数 : 类型,下面给出几个例子 //带有两个 Int 参数、返回 Int 的函数 fun sum(a: Int, b: Int): Int { // Int 参数,返回值 Int return a + b } 表达式作为函数体,返回类型自动推断: fun sum(a: Int, b: Int) = a + b public fun sum(a: Int, b: Int): Int = a + b // public 方法则必须明确写出返回类型 无返回值的函数(类似Java中的void): fun printSum(a: Int, b: Int): Unit { println("sum of $a and $b is ${a + b}") } // 如果是返回 Unit类型,则可以省略(对于public方法也是这样): public fun printSum(a: Int, b: Int) { print(a + b) } 可变长参数函数 函数的变长参数可以用vararg关键字进行标识: fun vars(vararg v:Int){ for(vt in v){ print(vt) } } // 测试 fun main(args: Array<String>) { vars(1,2,3,4,5) // 输出12345 } lambda(匿名函数) lambda表达式使用实例: // 测试 fun main(args: Array<String>) { val sumLambda: (Int, Int) -> Int = {x,y -> x+y} println(sumLambda(1,2)) // 输出 3 } 定义常量与变量 不可变变量定义:val 关键字,只能赋值一次的变量(类似Java中final修饰的变量) val <标识符> : <类型> = <初始化值> 可变变量定义:var 关键字 var <标识符> : <类型> = <初始化值> 常量与变量都可以没有初始化值,但是在引用前必须初始化 编译器支持自动类型判断,即声明时可以不指定类型,由编译器判断。 val a: Int = 1 // 立即赋值 val b = 1 // 系统自动推断变量类型为Int val c: Int // 如果不在声明时初始化,则必须提供变量类型 c = 1 // 明确赋值 var x = 5 // 系统自动推断变量类型为Int x += 1 // 变量可修改 注释 Kotlin 支持单行和多行注释,实例如下: // 这是一个单行注释 /* 这是一个多行的 块注释。 */ 与 Java 不同, Kotlin 中的块注释允许嵌套。 字符串模板 $ 表示一个变量名或者变量值 $varName 表示变量值 ${varName.fun()} 表示变量的方法返回值: var a = 1 // 模板中的简单名称: val s1 = "a is $a" a = 2 // 模板中的任意表达式: val s2 = "${s1.replace("is", "was")}, but now is $a" NULL检查机制 Kotlin的空安全设计对于声明可为空的参数,在使用时要进行空判断处理,有两种处理方式,字段后加!!像Java一样抛出空异常,另一种字段后加?可不做处理返回值为 null或配合?:做空判断处理 //类型后面加?表示可为空 var age: String? = "23" //抛出空指针异常 val ages = age!!.toInt() //不做处理返回 null val ages1 = age?.toInt() //age为空返回-1 val ages2 = age?.toInt() ?: -1 当一个引用可能为 null 值时, 必须在声明处的类型后添加?来标识该引用可为空 当 str 中的字符串内容不是一个整数时, 返回 null: fun parseInt(str: String): Int? { // ... } 以下实例演示如何使用一个返回值可为 null 的函数: fun printProduct(arg1: String, arg2: String) { val x = parseInt(arg1) val y = parseInt(arg2) // 直接使用 `x * y` 会导致错误, 因为它们可能为 null. if (x != null && y != null) { // 在进行过 null 值检查之后, x 和 y 的类型会被自动转换为非 null 变量 print(x * y) } } 或者 // …… if (x == null) { println("Wrong number format in arg1: '$arg1'") return } if (y == null) { println("Wrong number format in arg2: '$arg2'") return } ​ // 在空检测后,x 与 y 会自动转换为非空值 println(x * y) 类型检测及自动类型转换 我们可以使用 is 运算符检测一个表达式是否是某类型的一个实例(类似于Java中的instanceof关键字)。如果一个不可变的局部变量或属性已经判断出为某类型,那么检测后的分支中可以直接当作该类型使用,无需显式转换: fun getStringLength(obj: Any): Int? { if (obj is String) { // 做过类型判断以后,obj会被系统自动转换为String类型 return obj.length } // 在离开类型检测分支后,`obj` 仍然是 `Any` 类型 return null } 在这里还有一种方法,与Java中instanceof不同,使用!is fun getStringLength(obj: Any): Int? { fun getStringLength(obj: Any): Int? { if (obj !is String) return null // `obj` 在这一分支自动转换为 `String` return obj.length } 甚至还可以 fun getStringLength(obj: Any): Int? { // 在 `&&` 运算符的右侧, `obj` 的类型会被自动转换为 `String` if (obj is String && obj.length > 0) return obj.length return null } 区间 区间表达式由具有操作符形式..的 rangeTo 函数辅以 in 和 !in 形成。 区间是为任何可比较类型定义的,但对于整型原生类型,它有一个优化的实现。以下是使用区间的一些示例: for (i in 1..4) print(i) // 输出“1234” for (i in 4..1) print(i) // 什么都不输出 if (i in 1..10) { // 等同于 1 <= i && i <= 10 println(i) } // 使用 step 指定步长 for (i in 1..4 step 2) print(i) // 输出“13” for (i in 4 downTo 1 step 2) print(i) // 输出“42” // 使用 until 函数排除结束元素 for (i in 1 until 10) { // i in [1, 10) 排除了 10 println(i) } 实例测试 fun main(args: Array<String>) { print("循环输出:") for (i in 1..4) print(i) // 输出“1234” println("\n----------------") print("设置步长:") for (i in 1..4 step 2) print(i) // 输出“13” println("\n----------------") print("使用 downTo:") for (i in 4 downTo 1 step 2) print(i) // 输出“42” println("\n----------------") print("使用 until:") // 使用 until 函数排除结束元素 for (i in 1 until 4) { // i in [1, 4) 排除了 4 print(i) } println("\n----------------") } 输出结果: 循环输出:1234 ---------------- 设置步长:13 ---------------- 使用 downTo:42 ---------------- 使用 until:123 ---------------- 参考: http://www.runoob.com/kotlin/kotlin-basic-syntax.html https://www.kotlincn.net/docs/reference/basic-syntax.html

优秀的个人博客,低调大师

python 基础语法

1.查看python版本 python -V 以上命令执行结果如下: 2.标识符 第一个字符必须是字母表中字母或下划线_。 标识符的其他的部分由字母、数字和下划线组成。 标识符对大小写敏感。 3.python保留字 保留字即关键字,我们不能把它们用作任何标识符名称。Python 的标准库提供了一个 keyword 模块,可以输出当前版本的所有关键字: >>> import keyword >>> keyword.kwlist['False', 'None', 'True', 'and', 'as', 'assert', 'break', 'class', 'continue', 'def', 'del', 'elif', 'else', 'except', 'finally', 'for', 'from', 'global', 'if', 'import', 'in', 'is', 'lambda', 'nonlocal', 'not', 'or', 'pass', 'raise', 'return', 'try', 'while', 'with', 'yield'] 4.注释 Python中单行注释以#开头,实例如下: # 第一个注释 print ("Hello, Python!") 多行注释可以用多个#号,还有'''和""": # 第一个注释 # 第二个注释 ''' 第三注释 第四注释 ''' """ 第五注释 第六注释 """ print ("Hello, Python!") 5.行与缩进 python最具特色的就是使用缩进来表示代码块,不需要使用大括号{}。 缩进的空格数是可变的,但是同一个代码块的语句必须包含相同的缩进空格数。 if True: print('True') else: print('False') 以下代码最后一行语句缩进数的空格数不一致,会导致运行错误: if True: print('C') print('C#') else: print('python') print('java') # 缩进不一致,会导致运行错误错误:IndentationError: unindent does not match any outer indentation level 补充:if else 后的参数可不写"()",单必须写":" 6.多行语句 Python 通常是一行写完一条语句,但如果语句很长,我们可以使用反斜杠(\)来实现多行语句 total = "item_one \ item_two \ item_three" 在 [], {}, 或 () 中的多行语句,不需要使用反斜杠(\) total = ['one', 'two', 'three'] 7.等待用户输入 temp = input('\n请输入内容:') print(temp) \n在结果输出前会输出个新的空行 8.同一行显示多条语句 Python可以在同一行中使用多条语句,语句之间使用分号(;)分割 import sys; x = 'runoob'; sys.stdout.write(x + '\n') # 输出结果:runoob 9.Print 输出 print 默认输出是换行的,如果要实现不换行需要在变量末尾加上end="": string1 = "one" string2 = "two" # 换行输出 print(string1) print(string2) # 不换行输出 print(string1,end=" ") print(string2) 10.import 与 from...import 在 python 用import或者from...import来导入相应的模块。 将整个模块(turtle)导入,格式为:importturtle 从某个模块中导入某个函数,格式为:from turtle import done 从某个模块中导入多个函数,格式为:from turtle import done,deepcopy 将某个模块中的全部函数导入,格式为:from turtle import * import turtle from turtle import done from turtle import done,deepcopy from turtle import * 11.命令行参数 很多程序可以执行一些操作来查看一些基本信息,Python可以使用-h参数查看各参数帮助信息


优秀的个人博客,低调大师

JavaScript 基本语法

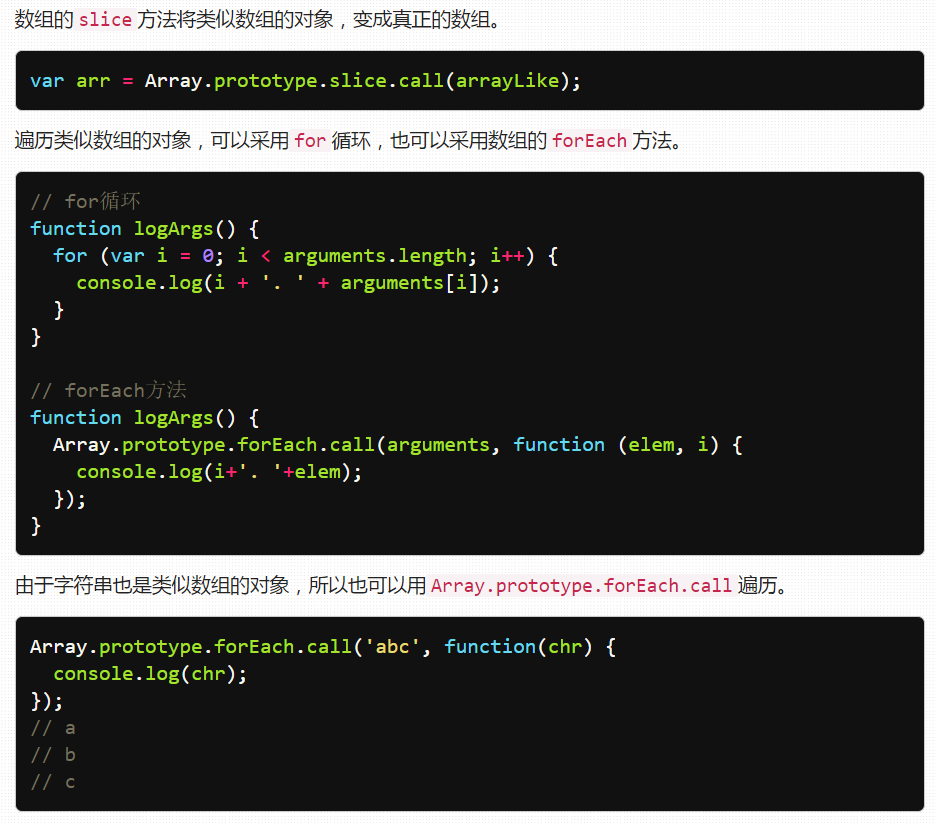
标识符 第一个字符,可以是任意Unicode字母(包括英文字母和其他语言的字母),以及美元符号($)和下划线(_)。 第二个字符及后面的字符,除了Unicode字母、美元符号和下划线,还可以用数字0-9。 JavaScript有一些保留字,不能用作标识符:arguments、break、case、catch、class、const、continue、debugger、default、delete、do、else、enum、eval、export、extends、false、finally、for、function、if、implements、import、in、instanceof、interface、let、new、null、package、private、protected、public、return、static、super、switch、this、throw、true、try、typeof、var、void、while、with、yield。 来源: http://javascript.ruanyifeng.com/grammar/basic.html 还有三个词虽然不是保留字,但是因为具有特别含义,也不应该用作标识符: Infinity 、 NaN 、 undefined 。 类数组对象的遍历可以使用和数组对象的遍历一样的方法, js用户自定义错误 下面的例子充分反映了try...catch...finally这三者之间的执行顺序。 function f() { try { console.log(0); throw 'bug'; } catch(e) { console.log(1); return true; // 这句原本会延迟到finally代码块结束再执行 console.log(2); // 不会运行 } finally { console.log(3); return false; // 这句会覆盖掉前面那句return console.log(4); // 不会运行 } console.log(5); // 不会运行 } var result = f(); // 0 // 1 // 3 result // false 上面代码中,catch代码块结束执行之前,会先执行finally代码块。从catch转入finally的标志,不仅有return语句,还有throw语句。 function f() { try { throw '出错了!'; } catch(e) { console.log('捕捉到内部错误'); throw e; // 这句原本会等到finally结束再执行 } finally { return false; // 直接返回 } } try { f(); } catch(e) { // 此处不会执行 console.log('caught outer "bogus"'); } // 捕捉到内部错误 上面代码中,进入catch代码块之后,一遇到throw语句,就会去执行finally代码块,其中有return false语句,因此就直接返回了,不再会回去执行catch代码块剩下的部分了。 来源: http://javascript.ruanyifeng.com/grammar/error.html 来自为知笔记(Wiz)

优秀的个人博客,低调大师

hadoop streaming 语法

1、hadoop streaming 命令格式 $HADOOP_HOME/bin/hadoop jar hadoop-streaming.jar \ -D mapred.job.name="streaming_wordcount" \ -D mapred.map.tasks=3 \ -D mapred.reduce.tasks=3 \ -D mapred.job.priority=3 \ -input /input/ \ -output /output/ \ -mapper python mapper.py \ -reducer python reducer.py \ -file ./mapper.py \ -file ./reducer.py 参数说明 mapred.job.name:作业名称 mapred.map.tasks:map任务数量 mapred.reduce.tasks:reduce任务数量 mapred.job.priority:作业优先级 -input:在HDFS上的作业输入路径,支持通配符,支持多个文件 -output:在HDFS上的作业结果输出路径 -mapper:mapper可执行程序或Java类 -reducer:reducer可执行程序或Java类 -file:分发本地文件 注:在hadoop2.x版本中,hadoop-streaming.jar 程序存放在$HADOOP_HOME/share/hadoop/tools/lib目录下;在hadoop1.x版本中,hadoop-streaming.jar程序存放在$HADOOP_HOME/contrib/streaming目录下 2、hadoop streaming 常用参数 hadoop streaming 参数 参数 说明 -input <path> 输入数据路径 -output <path> 输出数据路径 -mapper <cmd/JavaClassName> mapper可执行程序或Java类 -reducer <cmd/JavaClassName> reducer可执行程序或Java类 -file <file> Optional 分发本地文件 -cacheFile <file> Optional 分发HDFS文件 -cacheArchive <file> Optional 分发HDFS压缩文件 -numReduceTasks <num> Optional reduce任务个数 -jobconf -D NAME=VALUE Optional 作业配置参数 -combiner <JavaClassName> Optional Combiner Java类 -partitioner <JavaClassName> Optional Partitioner Java类 -inputformat <JavaClassName> Optional InputFormat Java类 -outputformat <JavaClassName> Optional OutputFormat Java类 -inputreader <spec> Optional InputReader配置 -cmdenv <n>=<v> Optional 传给mapper和reducer的环境变量 -mapdebug <path> Optional mapper失败时运行的debug程序 -reducedebug <path> Optional reducer失败时运行的debug程序 -verbose Optional 详细输出模式 -jobconf -D NAME=VALUE Optional作业参数说明 作业参数 作业参数说明 mapred.job.name 作业名 mapred.job.priority 作业优先级 mapred.job.map.capacity 最多同时运行map任务数 mapred.job.reduce.capacity 最多同时运行reduce任务数 hadoop.job.ugi 作业执行权限 mapred.map.tasks map任务个数 mapred.reduce.tasks reduce任务个数 mapred.job.groups 作业可运行的计算节点分组 mapred.task.timeout 任务没有响应(输入输出)的最大时间 mapred.compress.map.output map的输出是否压缩 mapred.map.output.compression.codec map的输出压缩方式 mapred.output.compress reduce的输出是否压缩 mapred.output.compression.codec reduce的输出压缩方式 stream.map.output.field.separator map输出分隔符 3、参考资料 https://hadoop.apache.org/docs/r2.6.0/hadoop-mapreduce-client/hadoop-mapreduce-client-core/HadoopStreaming.html 本文转自 巴利奇 51CTO博客,原文链接:http://blog.51cto.com/balich/2065419

优秀的个人博客,低调大师

MarkDown基本语法

Dillinger Dillinger is a cloud-enabled, mobile-ready, offline-storage, AngularJS powered HTML5 Markdown editor. Type some Markdown on the left See HTML in the right Magic New Features! Import a HTML file and watch it magically convert to Markdown Drag and drop images (requires your Dropbox account be linked) You can also: Import and save files from GitHub, Dropbox, Google Drive and One Drive Drag and drop markdown and HTML files into Dillinger Export documents as Markdown, HTML and PDF Markdown is a lightweight markup language based on the formatting conventions that people naturally use in email. As [John Gruber] writes on the Markdown site The overriding design goal for Markdown'sformatting syntax is to make it as readableas possible. The idea is that aMarkdown-formatted document should bepublishable as-is, as plain text, withoutlooking like it's been marked up with tagsor formatting instructions. This text you see here is actually written in Markdown! To get a feel for Markdown's syntax, type some text into the left window and watch the results in the right. Tech Dillinger uses a number of open source projects to work properly: [AngularJS] - HTML enhanced for web apps! [Ace Editor] - awesome web-based text editor [markdown-it] - Markdown parser done right. Fast and easy to extend. [Twitter Bootstrap] - great UI boilerplate for modern web apps [node.js] - evented I/O for the backend [Express] - fast node.js network app framework [@tjholowaychuk] [Gulp] - the streaming build system Breakdance - HTML to Markdown converter [jQuery] - duh And of course Dillinger itself is open source with a public repository on GitHub. Installation Dillinger requires Node.js v4+ to run. Install the dependencies and devDependencies and start the server. $ cd dillinger $ npm install -d $ node app For production environments... $ npm install --production $ NODE_ENV=production node app Plugins Dillinger is currently extended with the following plugins. Instructions on how to use them in your own application are linked below. Plugin README Dropbox [plugins/dropbox/README.md] [PlDb] Github [plugins/github/README.md] [PlGh] Google Drive [plugins/googledrive/README.md] [PlGd] OneDrive [plugins/onedrive/README.md] [PlOd] Medium [plugins/medium/README.md] [PlMe] Google Analytics [plugins/googleanalytics/README.md] [PlGa] Development Want to contribute? Great! Dillinger uses Gulp + Webpack for fast developing.Make a change in your file and instantanously see your updates! Open your favorite Terminal and run these commands. First Tab: $ node app Second Tab: $ gulp watch (optional) Third: $ karma test Building for source For production release: $ gulp build --prod Generating pre-built zip archives for distribution: $ gulp build dist --prod Docker Dillinger is very easy to install and deploy in a Docker container. By default, the Docker will expose port 8080, so change this within the Dockerfile if necessary. When ready, simply use the Dockerfile to build the image. cd dillinger docker build -t joemccann/dillinger:${package.json.version} This will create the dillinger image and pull in the necessary dependencies. Be sure to swap out ${package.json.version} with the actual version of Dillinger. Once done, run the Docker image and map the port to whatever you wish on your host. In this example, we simply map port 8000 of the host to port 8080 of the Docker (or whatever port was exposed in the Dockerfile): docker run -d -p 8000:8080 --restart="always" <youruser>/dillinger:${package.json.version} Verify the deployment by navigating to your server address in your preferred browser. 127.0.0.1:8000 Kubernetes + Google Cloud See KUBERNETES.md Todos Write MORE Tests Add Night Mode License MIT Free Software, Hell Yeah!

优秀的个人博客,低调大师

python:好用的 with 语法

手动清理资源占用是个很痛苦的事情,比如刚学编程时候,老鸟就建议:写完open xxx 之后一定要写一个配对儿的 close,然后再往他俩中间写逻辑。 python 现在有个好玩的东西,利用上下文可以自动释放掉一个对象: class test(): def __init__(self,msg): print(msg) def __enter__(self): print('Enter Object test') def __exit__(self, exc_type, exc_val, exc_tb): print('Exit Object test') object=test('Hello') print('***head of code block***') with object as t: print('Did something here...') print('***end of code block***') 运行结果如下: Hello ***head of code block*** Enter Object test Did something here... Exit Object test ***end of code block*** Process finished with exit code 0 于是,对于系统自带的文件操作就有了下面这样的用法: content='' with open('test.txt','a',encoding='UTF-8') as f: f.write('Hello World\n') with open('test.txt','r',encoding='UTF-8') as f: content=f.read() print(content) *注意两个f不是同一个对象 是不是很爽?几下就搞定了O(∩_∩)O

资源下载

更多资源
Mario

Mario

马里奥是站在游戏界顶峰的超人气多面角色。马里奥靠吃蘑菇成长,特征是大鼻子、头戴帽子、身穿背带裤,还留着胡子。与他的双胞胎兄弟路易基一起,长年担任任天堂的招牌角色。

腾讯云软件源

腾讯云软件源

为解决软件依赖安装时官方源访问速度慢的问题,腾讯云为一些软件搭建了缓存服务。您可以通过使用腾讯云软件源站来提升依赖包的安装速度。为了方便用户自由搭建服务架构,目前腾讯云软件源站支持公网访问和内网访问。

Spring

Spring

Spring框架(Spring Framework)是由Rod Johnson于2002年提出的开源Java企业级应用框架,旨在通过使用JavaBean替代传统EJB实现方式降低企业级编程开发的复杂性。该框架基于简单性、可测试性和松耦合性设计理念,提供核心容器、应用上下文、数据访问集成等模块,支持整合Hibernate、Struts等第三方框架,其适用范围不仅限于服务器端开发,绝大多数Java应用均可从中受益。

Rocky Linux

Rocky Linux

Rocky Linux(中文名:洛基)是由Gregory Kurtzer于2020年12月发起的企业级Linux发行版,作为CentOS稳定版停止维护后与RHEL(Red Hat Enterprise Linux)完全兼容的开源替代方案,由社区拥有并管理,支持x86_64、aarch64等架构。其通过重新编译RHEL源代码提供长期稳定性,采用模块化包装和SELinux安全架构,默认包含GNOME桌面环境及XFS文件系统,支持十年生命周期更新。

用户登录
用户注册