首页 文章 精选 留言 我的

精选列表

搜索[网站开发],共10000篇文章
优秀的个人博客,低调大师

Android开发实践:布局的平分

从一个简单的任务入手,“如何在水平方向上一左一右均匀地放置两个Button”,有很多种方式可以实现这个功能,在此做一个简单的总结,顺便深入理解下有关gravity, layout_weight 等相关概念的原理和应用。 一、效果图 二、思考 RelativeLayout 和 LinearLayout 中分别如何左右放置button (1) 在RelativeLayout中放置 由于 RelativeLayout 内部的子控件都可以指定相对位置,因此很容易实现左右放置两个Button的任务,如下所示: 1 2 3 4 5 6 7 8 9 10 11 12 13 14 15 16 17 18 < RelativeLayout android:layout_width = "match_parent" android:layout_height = "wrap_content" android:orientation = "horizontal" > < Button android:layout_width = "wrap_content" android:layout_height = "wrap_content" android:text = "LeftButton" android:layout_alignParentLeft = "true" /> < Button android:layout_width = "wrap_content" android:layout_height = "wrap_content" android:text = "RightButton" android:layout_alignParentRight = "true" /> </ RelativeLayout > 效果如图所示: (2) 在LinearLayout中放置 由于LinearLayout是顺序排放所有的控件,如果希望两个button分开地位于一左一右,则必须在两个Button之间再加一个layout_weight为1.0的隐形view才能实现。示例如下: 1 2 3 4 5 6 7 8 9 10 11 12 13 14 15 16 17 18 19 20 21 22 < LinearLayout android:layout_width = "match_parent" android:layout_height = "wrap_content" android:layout_margin = "10dp" android:orientation = "horizontal" > < Button android:layout_width = "wrap_content" android:layout_height = "wrap_content" android:text = "LeftButton" /> < View android:layout_width = "0dp" android:layout_weight = "1.0" android:layout_height = "0dp" /> < Button android:layout_width = "wrap_content" android:layout_height = "wrap_content" android:text = "RightButton" /> </ LinearLayout > 效果如图所示: 三、 在水平方向“均分”整个Layout 其实,对于LinearLayout而言,最简单地平分方式就是将子控件的layout_width属性值设置为0,同时layout_weight属性设置为1.0这样,所有的子控件就会自动均分整个LinearLayout ,例如: 1 2 3 4 5 6 7 8 9 10 11 12 13 14 15 16 17 18 19 < LinearLayout android:layout_width = "match_parent" android:layout_height = "wrap_content" android:layout_margin = "10dp" android:orientation = "horizontal" > < Button android:layout_width = "0dp" android:layout_height = "wrap_content" android:layout_weight = "1.0" android:text = "LeftButton" /> < Button android:layout_width = "0dp" android:layout_height = "wrap_content" android:layout_weight = "1.0" android:text = "Right" /> </ LinearLayout > 效果如图: 由图中效果可以看到,两个Button很好地一左一右平分了整个LinearLayout,但是由于Button的layout_width设置的是0dp,通过layout_weight来决定长度,因此Button都被横向拉长了,如果希望Button的layout_width设置为wrap_content,那该如何实现均分呢?其实,可以通过在Button外再包围一层LinearLayout来实现,示例如下: 1 2 3 4 5 6 7 8 9 10 11 12 13 14 15 16 17 18 19 20 21 22 23 24 25 26 27 28 29 30 31 32 < LinearLayout android:layout_width = "match_parent" android:layout_height = "wrap_content" android:layout_margin = "10dp" android:orientation = "horizontal" > < LinearLayout android:layout_width = "0dp" android:layout_height = "wrap_content" android:layout_weight = "1.0" android:orientation = "horizontal" > < Button android:layout_width = "wrap_content" android:layout_height = "wrap_content" android:text = "LeftButton" android:layout_gravity = "center" /> </ LinearLayout > < LinearLayout android:layout_width = "0dp" android:layout_height = "wrap_content" android:layout_weight = "1.0" android:orientation = "horizontal" android:gravity = "center_horizontal" > < Button android:layout_width = "wrap_content" android:layout_height = "wrap_content" android:text = "RightButton" /> </ LinearLayout > </ LinearLayout > 这样地话,由两个Button外围的LinearLayout平分了整个水平的layout,两个button的大小采用wrap_content,也不会被拉伸,并且通过外围的LinearLayout的android:gravity属性实现了居中。 这里注意Button外围的LinearLayout的android:gravity属性,很关键,该属性决定其子控件在该控件中的位置。所以Button外围的LinearLayout设置了android:gravity="center",因此Button才能在该LinearLayout的正中央。 思考,如果给Button加一个android:gravity="right"的属性,会是什么效果呢? 答案: 会使得 Button 内部的文字向右靠齐,而不是在中央。 本文转自 Jhuster 51CTO博客,原文链接:http://blog.51cto.com/ticktick/1321114,如需转载请自行联系原作者

优秀的个人博客,低调大师

iOS开发-舒尔特表

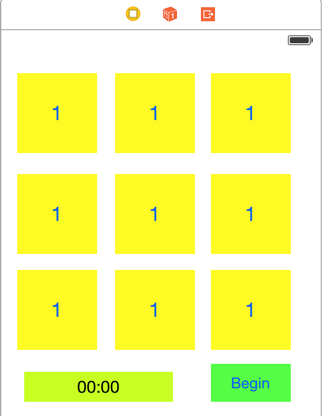
周末闲来无事,看一个概念,挺有意思的,舒尔特表,网上也有很多人写过类似的Demo,本人闲来无事也写了一下,舒尔特表听起来很高大上的样子,不过本人的理解就是一个正方形的矩阵中放的各种小格子,可以是字母,数字或者说是文字,舒尔特表可以通过动态的练习锻炼视神经末梢。心理学上用此表来研究和发展心理感知的速度,其中包括视觉定向搜索运动的速度。培养注意力集中、分配、控制能力;拓展视幅;加快视频;提高视觉的稳定性、辨别力、定向搜索能力。练习的时间越长,看表所需的时间会越短。随着练习的深入,眼球的末梢视觉能力提高,不仅初学者可以有效地拓展视幅,加快阅读节奏,锻炼眼睛快速认读;而且对于进入提高阶段之后,同时拓展纵横视幅,达到一目十行、一目一页非常有效。每表按字符顺序,迅速找全所有的字符,平均1个字符用1秒钟成绩为优良,即9格用9秒、16格用16秒、25格用25秒。(百度百科) 页面布局 根据上面的概念,大概页面布局就是3*3的九宫格,一般是选择数字练习,也没有特别的多弄弄,Main.storyBoard的布局如下: 需要将所有的按钮弄成一个集合,还有就是所有按钮共用一个事件: 集合演示: 按钮共用事件演示: Demo实现 上面中的界面主要都是数字1,因此需要的一个方法生成一个随机的数组,方法如下,生成一个随机不重复的数组大概的规则就是首先顶一个数组,之后的话,需要将数组打乱,使用随机数随机生成索引即可: 1 2 3 4 5 6 7 8 9 10 11 12 13 14 - ( NSArray *)getDataArray{ //需要展示的数组 NSMutableArray *arr=[ NSMutableArray array]; for ( NSInteger i=1; i<10; i++) { [arr addObject:@(i)]; } NSInteger count=[arr count]; //生成随机数组 for ( NSInteger i=0; i<count; i++) { NSInteger index=arc4random()%(count-i)+i; [arr exchangeObjectAtIndex:index withObjectAtIndex:i]; } return arr; } 将数组中的值赋值给页面的按钮: 1 2 3 4 5 6 7 8 9 10 11 12 13 14 - ( void )initButtonTitle{ //实例化结果集的可变数组 self .resultArr=[ NSMutableArray array]; NSArray *arr=[ self getDataArray]; for (UIButton *button in self .visionButtons) { NSString *result=[arr[button.tag-1]stringValue]; [button setTitle:result forState:UIControlStateNormal]; //重新开始的时候要重新设置按钮的背景和状态 [button setBackgroundColor:[UIColor yellowColor]]; [button setEnabled: YES ]; } [_timerLabel setText:@ "00:00" ]; self .timer=[ NSTimer scheduledTimerWithTimeInterval:0.1 invocation: nil repeats: YES ]; } 在viewDidLoad启动的时候调用对应的程序: 1 [ self initButtonTitle]; 这个时候看到页面的布局应该是这样的: 做到这一步基本上这个程序完成差不多了,然后就是计时,完成之后统计,闲来看下具体的效果,然后看代码可能会更好一点: 功能基本上就是设置按钮的背景颜色,是否可以点击,计时,清零,弹框,显示之前点击的结果,一步一步的分析: 定义成员变量计时和存储结果: 1 2 3 4 5 @interface ViewController () @property NSMutableArray *resultArr; @property NSTimer *timer; @property NSDate *beginDate; @end 设置定时器: 1 self .timer=[ NSTimer scheduledTimerWithTimeInterval:0.1 invocation: nil repeats: YES ]; 设置按钮的背景颜色和显隐: 1 2 [button setBackgroundColor:[UIColor yellowColor]]; [button setEnabled: YES ]; 统计时间: 1 2 3 NSInteger allTime=[_timer.fireDate timeIntervalSinceDate:_beginDate]; NSString *timeFormat=[ NSString stringWithFormat:@ "%02ld:%02ld" ,allTime/1000,allTime%1000]; [_timerLabel setText:timeFormat]; 判断结果,如果所有的结果是升序的那么是成功的,否则就是失败的: 1 2 3 4 5 6 7 8 9 //判断一个数组是不是升序 - ( BOOL )getArrayAsc:( NSArray *)originalArr{ for ( NSInteger i=0; i<[originalArr count]-1; i++) { if (originalArr[i]>originalArr[i+1]) { return NO ; } } return YES ; } 所有按钮的点击事件如下: 1 2 3 4 5 6 7 8 9 10 11 12 13 14 15 16 17 18 19 20 21 22 23 24 25 26 27 28 29 30 31 32 33 34 35 36 - ( IBAction )getResult:( id )sender { UIButton *button=(UIButton *)sender; //设置背景颜色 [button setBackgroundColor:[UIColor greenColor]]; //按钮点击一次就不再点击 [button setEnabled: NO ]; NSInteger value=[[[button titleLabel] text] integerValue]; [ self .resultArr addObject:[ NSNumber numberWithInteger:value]]; //点击第一个按钮之后设置开始时间 if ([ self .resultArr count]==1) { //游戏开始时间 _beginDate=[ NSDate date]; //游戏开始 [_timer fire]; } NSInteger allTime=[_timer.fireDate timeIntervalSinceDate:_beginDate]; NSString *timeFormat=[ NSString stringWithFormat:@ "%02ld:%02ld" ,allTime/1000,allTime%1000]; [_timerLabel setText:timeFormat]; //所有的点击完成之后的调用 if ([ self .resultArr count]==9) { //销毁定时器 [_timer invalidate]; //弹框 NSString *tip; if ([ self getArrayAsc: self .resultArr]) { tip=@ "恭喜你,通过比赛" ; } else { tip=@ "不好意思,比赛失败" ; } //将点击的结果使用逗号进行拼接 NSString *resultStr=[ NSString stringWithFormat:@ "%@" ,[ self .resultArr componentsJoinedByString:@ "," ]]; UIAlertView *alterView=[[UIAlertView alloc] initWithTitle:tip message:resultStr delegate: nil cancelButtonTitle:@ "确定" otherButtonTitles: nil ]; [alterView show]; } } ViewController.m中的代码: 1 2 3 4 5 6 7 8 9 10 11 12 13 14 15 16 17 18 19 20 21 22 23 24 25 26 27 28 29 30 31 32 33 34 35 36 37 38 39 40 41 42 43 44 45 46 47 48 49 50 51 52 53 54 55 56 57 58 59 60 61 62 63 64 65 66 67 68 69 70 71 72 73 74 75 76 77 78 79 80 81 82 83 84 85 86 87 88 89 90 91 92 93 94 95 96 97 98 99 100 101 102 103 104 105 106 107 108 109 110 111 // // ViewController.m // TableVision // // Created by keso on 15/1/18. // Copyright (c) 2015年 keso. All rights reserved. // #import "ViewController.h" @interface ViewController () @property NSMutableArray *resultArr; @property NSTimer *timer; @property NSDate *beginDate; @end @implementation ViewController - ( void )viewDidLoad { [ super viewDidLoad]; // Do any additional setup after loading the view, typically from a nib. [ self initButtonTitle]; // self.timer=[NSTimer scheduledTimerWithTimeInterval:1.0 target:self selector:nil userInfo:nil repeats:YES]; } - ( void )triggerTime:( NSTimer *)sender{ } - ( void )initButtonTitle{ //实例化结果集的可变数组 self .resultArr=[ NSMutableArray array]; NSArray *arr=[ self getDataArray]; for (UIButton *button in self .visionButtons) { NSString *result=[arr[button.tag-1]stringValue]; [button setTitle:result forState:UIControlStateNormal]; //重新开始的时候要重新设置按钮的背景和状态 [button setBackgroundColor:[UIColor yellowColor]]; [button setEnabled: YES ]; } [_timerLabel setText:@ "00:00" ]; self .timer=[ NSTimer scheduledTimerWithTimeInterval:0.1 invocation: nil repeats: YES ]; } - ( IBAction )oneMore:( id )sender { [ self initButtonTitle]; } - ( NSArray *)getDataArray{ //需要展示的数组 NSMutableArray *arr=[ NSMutableArray array]; for ( NSInteger i=1; i<10; i++) { [arr addObject:@(i)]; } NSInteger count=[arr count]; //生成随机数组 for ( NSInteger i=0; i<count; i++) { NSInteger index=arc4random()%(count-i)+i; [arr exchangeObjectAtIndex:index withObjectAtIndex:i]; } return arr; } - ( IBAction )getResult:( id )sender { UIButton *button=(UIButton *)sender; //设置背景颜色 [button setBackgroundColor:[UIColor greenColor]]; //按钮点击一次就不再点击 [button setEnabled: NO ]; NSInteger value=[[[button titleLabel] text] integerValue]; [ self .resultArr addObject:[ NSNumber numberWithInteger:value]]; //点击第一个按钮之后设置开始时间 if ([ self .resultArr count]==1) { //游戏开始时间 _beginDate=[ NSDate date]; //游戏开始 [_timer fire]; } NSInteger allTime=[_timer.fireDate timeIntervalSinceDate:_beginDate]; NSString *timeFormat=[ NSString stringWithFormat:@ "%02ld:%02ld" ,allTime/1000,allTime%1000]; [_timerLabel setText:timeFormat]; //所有的点击完成之后的调用 if ([ self .resultArr count]==9) { //销毁定时器 [_timer invalidate]; //弹框 NSString *tip; if ([ self getArrayAsc: self .resultArr]) { tip=@ "恭喜你,通过比赛" ; } else { tip=@ "不好意思,比赛失败" ; } //将点击的结果使用逗号进行拼接 NSString *resultStr=[ NSString stringWithFormat:@ "%@" ,[ self .resultArr componentsJoinedByString:@ "," ]]; UIAlertView *alterView=[[UIAlertView alloc] initWithTitle:tip message:resultStr delegate: nil cancelButtonTitle:@ "确定" otherButtonTitles: nil ]; [alterView show]; } } - ( void )didReceiveMemoryWarning { [ super didReceiveMemoryWarning]; // Dispose of any resources that can be recreated. } //判断一个数组是不是升序 - ( BOOL )getArrayAsc:( NSArray *)originalArr{ for ( NSInteger i=0; i<[originalArr count]-1; i++) { if (originalArr[i]>originalArr[i+1]) { return NO ; } } return YES ; } @end 本文转自Fly_Elephant博客园博客,原文链接:http://www.cnblogs.com/xiaofeixiang/p/4232605.html,如需转载请自行联系原作者

优秀的个人博客,低调大师

Android开发之:Toast和Notification

之前我们的文章中曾经介绍Dialog,实际上已经实现了提醒功能,在Android中,还可以通过Toast(提醒)和Notification(通知)来实现提醒功能。和Dialog相比,这种提醒更加友好,并且不会打断用户的当前操作。本节详细讲解Toast和Notification控件的级本概述,后续我们会介绍具体使用方法。 Toast简介 Toast是Android中用来显示信息的一种机制,和Dialog不一样的是,Toast 是没有焦点的,而且Toast显示的时间有限,过一定的时间就会自动消失。例如,在下面的代码中,编写了Activity的子类别ToastDemo。 package com.a3gs.toast; import android.app.Activity; import android.os.Bundle; import android.view.View; import android.widget.Button; import android.widget.EditText; import android.widget.Toast; public class ToastDemo extends Activity { private EditText myET; private Button myBtn; /** Called when the activity is first created. */ @Override public void onCreate(Bundle savedInstanceState) { super.onCreate(savedInstanceState); setContentView(R.layout.main); myET = (EditText) findViewById(R.id.myET); myBtn = (Button) findViewById(R.id.myBtn); myBtn.setOnClickListener(new Button.OnClickListener(){ @Override public void onClick(View v) { // TODO Auto-generated method stub Toast.makeText(ToastDemo.this, "您所填的信息是:" + myET.getText ().toString(), Toast.LENGTH_LONG).show(); myET.setText(""); } }); } } 然后编写main.xml文件,其代码如下。 <?xml version="1.0" encoding="utf-8"?> <LinearLayout xmlns:android="http://schemas.android.com/apk/res/android" android:orientation="vertical" android:layout_width="fill_parent" android:layout_height="fill_parent" > <TextView android:layout_width="fill_parent" android:layout_height="wrap_content" android:text="@string/myText" /> <EditText android:id="@+id/myET" android:layout_width="180px" android:layout_height="wrap_content" /> <Button android:id="@+id/myBtn" android:layout_width="100px" android:layout_height="wrap_content" android:text="@string/BtnText" /> </LinearLayout> 这样,就简单使用了Toast实现了提示功能。执行后的初始效果如图6-61所示;输入信息并单击“发送”按钮后,会以提示的方式显示输入的数据,如图6-62所示。 Notification简介 Notification看名字就知道,是一个和提醒有关的东西,它通常和NotificationManager一块使用。具体来说,其主要功能如下。 1.NotificationManager和Notification用来设置通知 通知的设置等操作相对比较简单,基本的使用方式就是新建一个Notification对象,设置好通知的各项参数,然后使用系统后台运行的NotificationManager服务将通知发出来。基本步骤如下。 1)得到NotificationManager,代码如下。 String ns = Context.NOTIFICATION_SERVICE; NotificationManager mNotificationManager = (NotificationManager) getSystemService(ns); 2)创建一个新的Notification对象,代码如下。 Notification notification = new Notification(); notification.icon = R.drawable.notification_icon; 也可以使用稍微复杂一些的方式创建Notification,代码如下。 int icon = R.drawable.notification_icon; //通知图标 CharSequence tickerText = "Hello"; //状态栏(Status Bar)显示的通知文本提示 long when = System.currentTimeMillis(); //通知产生的时间,会在通知信息里显示 Notification notification = new Notification(icon, tickerText, when); 3)填充Notification的各个属性,代码如下。 Context context = getApplicationContext(); CharSequence contentTitle = "My notification"; CharSequence contentText = "Hello World!"; Intent notificationIntent = new Intent(this, MyClass.class); PendingIntent contentIntent = PendingIntent.getActivity(this, 0, notificationIntent, 0); notification.setLatestEventInfo(context, contentTitle, contentText, contentIntent); Notification提供了如下几种手机提示方式。 状态栏(Status Bar)显示的通知文本提示,例如: notification.tickerText = "hello"; 发出提示音,例如: notification.defaults |= Notification.DEFAULT_SOUND; notification.sound = Uri.parse("file:///sdcard/notification/ringer.mp3"); notification.sound = Uri.withAppendedPath(Audio.Media.INTERNAL_CONTENT_URI, "6"); 手机振动,例如: notification.defaults |= Notification.DEFAULT_VIBRATE; long[] vibrate = {0,100,200,300}; notification.vibrate = vibrate; LED灯闪烁,例如: notification.defaults |= Notification.DEFAULT_LIGHTS; notification.ledARGB = 0xff00ff00; notification.ledOnMS = 300; notification.ledOffMS = 1000; notification.flags |= Notification.FLAG_SHOW_LIGHTS; 4)发送通知,代码如下。 private static final int ID_NOTIFICATION = 1; mNotificationManager.notify(ID_NOTIFICATION, notification); 2.更新通知 如果需要更新一个通知,只需要在设置好Notification之后,再调用setLatestEventInfo,然后重新发送一次通知即可。 为了更新一个已经触发过的Notification,传入相同的ID。用户既可以传入相同的Notification对象,也可以是一个全新的对象。只要ID相同,新的Notification对象会替换状态条图标和扩展的状态窗口的细节。 另外,还可以使用ID来取消Notification,通过调用NotificationManager的cancel方法,代码如下。 notificationManager.cancel(notificationRef); 当取消一个Notification时,会移除它的状态条图标以及清除在扩展的状态窗口中的信息。 本文转自 wws5201985 51CTO博客,原文链接:http://blog.51cto.com/wws5201985/760497,如需转载请自行联系原作者

优秀的个人博客,低调大师

IOS开发-通知与消息机制

在多数移动应用中不论什么时候都仅仅能有一个应用程序处于活跃状态。假设其它应用此刻发生了一些用户感兴趣的那么通过通知机制就能够告诉用户此时发生的事情。 iOS中通知机制又叫消息机制,其包含两类:一类是本地通知;还有一类是推送通知,也叫远程通知。 两种通知在iOS中的表现一致,能够通过横幅或者弹出提醒两种形式告诉用户,而且点击通知能够会打开应用程序,可是实现原理却全然不同。今天就和大家一块去看一下怎样在iOS中实现这两种机制,而且在文章后面会补充通知中心的内容避免刚開始学习的人对两种概念的混淆。 通知 本地通知是由本地应用触发的。它是基于时间行为的一种通知形式,比如闹钟定时、待办事项提醒。又或者一个应用在一段时候后不使用一般会提示用户使用此应用等都是本地通知。 创建一个本地通知通常分为以下几个步骤: 创建UILocalNotification。 设置处理通知的时间fireDate。 配置通知的内容:通知主体、通知声音、图标数字等。 配置通知传递的自己定义数据參数userInfo(这一步可选)。 调用通知,能够使用scheduleLocalNotification:按计划调度一个通知,也能够使用presentLocalNotificationNow马上调用通知。 以下就以一个程序更新后用户长期没有使用的提醒为例对本地通知做一个简单的了解。 在这个过程中并没有牵扯太多的界面操作。全部的逻辑都在AppDelegate中:进入应用后假设没有注冊通知,须要首先注冊通知请求用户同意通知;一旦调用完注冊方法,不管用户是否选择同意通知此刻都会调用应用程序的 - (void)application:(UIApplication *)application didRegisterUserNotificationSettings:(UIUserNotificationSettings *)notificationSettings 代理方法,在这种方法中依据用户的选择:假设是同意通知则会依照前面的步骤创建通知并在一定时间后运行 本文转自mfrbuaa博客园博客,原文链接:http://www.cnblogs.com/mfrbuaa/p/5054457.html,如需转载请自行联系原作者

优秀的个人博客,低调大师

Android开发21——隐式意图

所谓隐式意图就是在意图激活Activity、Service或BroadcastReceiver这三类组件时,并不显示指出需要显示指出主键的名字,而是通过指定action,data,category,Android系统会根据这三个特征找到最合适的组件并激活。先看自定义的例子 <applicationandroid:icon="@drawable/icon"android:label="@string/app_name"> <activityandroid:name=".MainActivity" android:label="@string/app_name"> <intent-filter> <actionandroid:name="android.intent.action.MAIN"/> <categoryandroid:name="android.intent.category.LAUNCHER"/> </intent-filter> </activity> <activityandroid:name=".OtherActivity1"android:label="@string/app_name"> <intent-filter> <actionandroid:name="cn.xy.action"/> <categoryandroid:name="android.intent.category.DEFAULT"></category> </intent-filter> </activity> <activityandroid:name=".OtherActivity2"android:label="@string/app_name"> <intent-filter> <actionandroid:name="cn.xy.action2"/> <actionandroid:name="cn.xy2.action2"/> <categoryandroid:name="cn.xy.category2"></category> <categoryandroid:name="cn.xy2.category2"></category> <categoryandroid:name="android.intent.category.DEFAULT"></category> </intent-filter> </activity> <activityandroid:name=".OtherActivity3"android:label="@string/app_name"> <intent-filter> <actionandroid:name="cn.xy.action3"/> <categoryandroid:name="cn.xy.category3"></category> <dataandroid:scheme="xy"android:host="www.xy.cn"android:path="/xy"></data> <categoryandroid:name="android.intent.category.DEFAULT"></category> </intent-filter> </activity> <activityandroid:name=".OtherActivity4"android:label="@string/app_name"> <intent-filter> <actionandroid:name="cn.xy.action4"/> <categoryandroid:name="cn.xy.category4"></category> <dataandroid:scheme="xy"android:host="www.xy.cn"></data> <dataandroid:mimeType="image/*"/> <categoryandroid:name="android.intent.category.DEFAULT"></category> </intent-filter> </activity> </application> /** *隐式意图激活Activity * *@author徐越 * */ publicclassMainActivityextendsActivity { @Override publicvoidonCreate(BundlesavedInstanceState) { super.onCreate(savedInstanceState); setContentView(R.layout.main); } publicvoidgoActivity1(Viewv) { Intentintent=newIntent(); intent.setAction("cn.xy.action"); //方法内部默认为intent注册了android.intent.category.DEFAULT类别,所以在AndroidManifest.xml中要写上该类别 this.startActivity(intent); } publicvoidgoActivity2(Viewv) { //在只配置action和category时只要intent的action和category出现在intent-filter中就可以匹配 Intentintent=newIntent(); intent.setAction("cn.xy.action2"); intent.addCategory("cn.xy.category2"); this.startActivity(intent); } publicvoidgoActivity3(Viewv) { Intentintent=newIntent(); intent.setAction("cn.xy.action3"); intent.addCategory("cn.xy.category3"); //数据以uri形式传递 intent.setData(Uri.parse("xy://www.xy.cn/xy")); this.startActivity(intent); } publicvoidgoActivity4(Viewv) { Intentintent=newIntent(); intent.setAction("cn.xy.action4"); intent.addCategory("cn.xy.category4"); //不能分别写setData和setType,因为setType会将setData设置的值清除掉 intent.setDataAndType(Uri.parse("xy://www.xy.cn/xxx"),"image/gif"); this.startActivity(intent); } } 看一个系统intent的例子,我们在应用中比如要实现拨打电话 //v为当前被点击的按钮对象 publicvoidonClick(Viewv) { //获取电话号码 Stringphone=txtPhone.getText().toString(); //调用系统自带拨号器设置拨号意图对象 Intentintent=newIntent(); intent.setAction("android.intent.action.CALL"); intent.setData(Uri.parse("tel:"+phone)); //激活意图,方法内部会自动为Intent添加类别android.intent.category.DEFAULT startActivity(intent); } 本文转自IT徐胖子的专栏博客51CTO博客,原文链接http://blog.51cto.com/woshixy/1096171如需转载请自行联系原作者 woshixuye111

优秀的个人博客,低调大师

iOS开发-Xcode入门ObjC程序

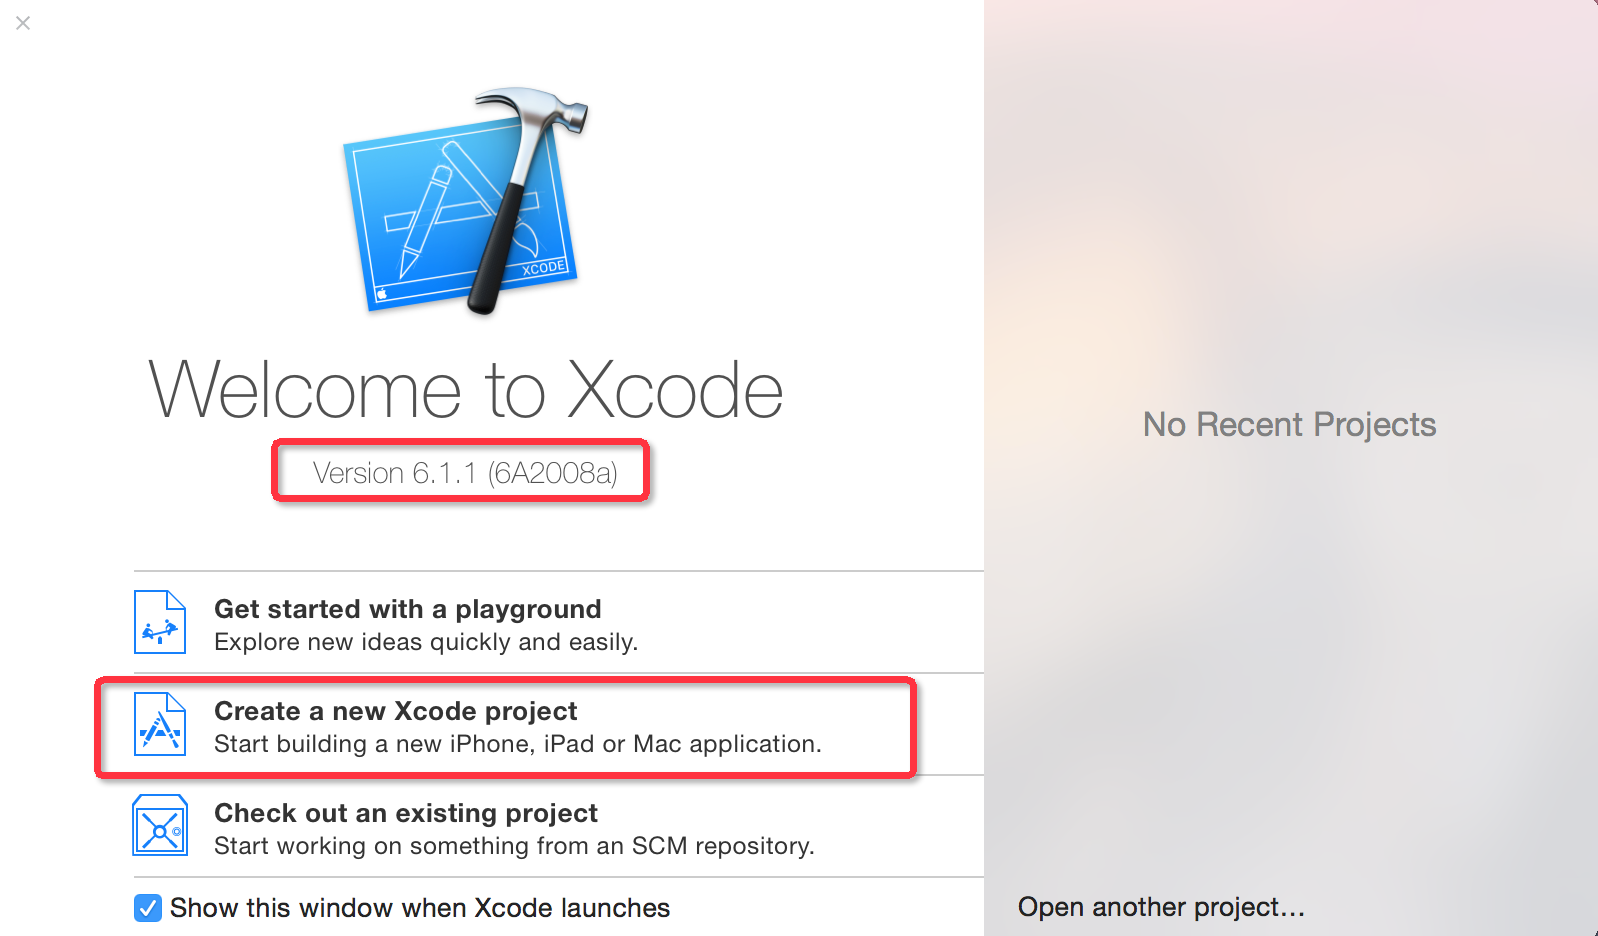
元旦三天假跟妹子冷战一天半,剩下的半天觉得无聊,可以写点东西,折腾了下xCode 6.1,虽然iPhone6比较丑,但是不影响IOS在高端机上面的地位,ObjC是扩充C的面向对象编程语言。主要使用于Mac OS X和GNUStep这两个使用OpenStep标准的系统,在NeXTSTEP和OpenStep中它更是基本语言。ObjC可以在GCC以及Clang运作的系统上编写和编译,因GCC与Clang含Objective-C的编译器。1980年代初布莱德·确斯(Brad Cox)在其公司Stepstone发明Objective-C。算起来也有30多年的历史了,真正火起来还是因为IOS,成为编写苹果家族移动领域的神器。开始正题吧: OC项目 1.启动页面 2.简单的项目命令行项目,类似于vs中的控制台 3.命名项目名称 4.项目保存路径 5.项目结构,运行项目及其结果 调整字体 默认的字体很小,个人看的很不习惯,启动xCode之后,最上面xCode下有Preference,之后可以看到以下页面: 这个时候可以看到很多选项,最简单暴力一点就是全部command+a全选,全部调整一下,调整字体页面: 本文转自Fly_Elephant博客园博客,原文链接:http://www.cnblogs.com/xiaofeixiang/p/4198895.html,如需转载请自行联系原作者

资源下载

更多资源
Mario

Mario

马里奥是站在游戏界顶峰的超人气多面角色。马里奥靠吃蘑菇成长,特征是大鼻子、头戴帽子、身穿背带裤,还留着胡子。与他的双胞胎兄弟路易基一起,长年担任任天堂的招牌角色。

腾讯云软件源

腾讯云软件源

为解决软件依赖安装时官方源访问速度慢的问题,腾讯云为一些软件搭建了缓存服务。您可以通过使用腾讯云软件源站来提升依赖包的安装速度。为了方便用户自由搭建服务架构,目前腾讯云软件源站支持公网访问和内网访问。

Spring

Spring

Spring框架(Spring Framework)是由Rod Johnson于2002年提出的开源Java企业级应用框架,旨在通过使用JavaBean替代传统EJB实现方式降低企业级编程开发的复杂性。该框架基于简单性、可测试性和松耦合性设计理念,提供核心容器、应用上下文、数据访问集成等模块,支持整合Hibernate、Struts等第三方框架,其适用范围不仅限于服务器端开发,绝大多数Java应用均可从中受益。

Rocky Linux

Rocky Linux

Rocky Linux(中文名:洛基)是由Gregory Kurtzer于2020年12月发起的企业级Linux发行版,作为CentOS稳定版停止维护后与RHEL(Red Hat Enterprise Linux)完全兼容的开源替代方案,由社区拥有并管理,支持x86_64、aarch64等架构。其通过重新编译RHEL源代码提供长期稳定性,采用模块化包装和SELinux安全架构,默认包含GNOME桌面环境及XFS文件系统,支持十年生命周期更新。

用户登录
用户注册