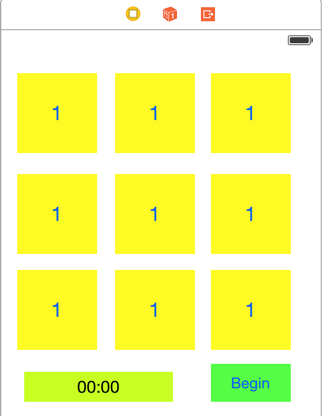
首页 文章 精选 留言 我的

精选列表

搜索[网站开发],共10000篇文章
优秀的个人博客,低调大师

mac os 配置Android开发环境

1.安装Eclipse 下载地址:http://www.eclipse.org/downloads/ 用uname-a看一下当前的系统内核是多少位的,选择相应的版本下载,解压完即完成了安装 2.安装SDK 下载地址:http://developer.android.com/sdk/index.html 下载之后解压,移动到一个比较合适的位置,一般放在用户目录下 3.安装ADT 下载地址:http://developer.android.com/sdk/installing/installing-adt.html 该页面中有一个表格,里面有具体的下载地址,下载之后不用解压 4.配置环境 现在要将SDK,ADT都集成到Eclipse中 在Eclipse->help->InstallNewSoftware中点击Add按钮,再点archive,然后选择下载好的ADT压缩包后确定。 在下方的列表中会出现Developmenttools等项目,勾选所有选项后,点next,等待安装完成即可。 在Eclipse->偏好设定->android中,在右侧的SDKLocation栏中浏览之前解压前移动后的SDK目录,点击OK即可. 选择菜单中的Eclipse->Window->AndroidSDKManager, 在左上角的Tools->Options中勾选上Forcehttps://...,然后close,再次打开AndroidSDKManager,这样就能顺利的下载更新列表了,选择new和update之后,点击install按钮,一路安装即可 本文转自 ustb80 51CTO博客,原文链接:http://blog.51cto.com/ustb80/1030996,如需转载请自行联系原作者

优秀的个人博客,低调大师

Android开发实践:玩转EditText控件

Android的EditText控件是一个非常常用的控件,用得最多的地方就是做登录、注册页面了,它能为用户提供一个直观便捷的输入框。本文简单总结下EditText控件中比较常用的一些设置,并为每一种设置提供两种方式的实现,一种是在布局文件中实现,另一种是在程序中通过代码动态的设置。 1. 如何添加一个方框 在Android的Hololight主题下,EditText控件默认是只有一条底部的蓝色横线的,怎么给你的EditText添加一个方框呢? 【布局】: 设置 android:background 属性,给它一个长方形的白***片,或者自定义一个长方形的drawable文件即可。 例如: 1 android:background= "@drawable/shape_bg" 【代码】: 1 2 EditTextmEditText=(EditText)findViewById(R.id.MyEditText); mEditText.setBackgroundResource(R.drawable.shape_bg); 2. 如何设置字体大小、颜色、加粗 【布局】: 布局中的属性依次为 android:textSize,android:textColor,android:textStyle属性 例如: 1 2 3 android:padding="15sp" android:textSize="15sp" android:textStyle="bold" 【代码】: 1 2 3 4 EditTextmEditText=(EditText)findViewById(R.id.MyEditText); mEditText.setTextSize( 15 ); mEditText.setTextColor(Color.BLACK); mEditText.setTypeface(Typeface.DEFAULT_BOLD); 3. 如何设置以密码的形式显示 【布局】: 设置 android:password 属性为 true 例如: 1 android:password="true" 【代码】: 1 2 EditTextmEditText=(EditText)findViewById(R.id.MyEditText); mEditText.setInputType(InputType.TYPE_TEXT_VARIATION_PASSWORD); 4. 如何禁止用户输入回车换行 【布局】: 设置 android:singleLine 属性为 true 例如: 1 android:singleLine="true" 【代码】: 1 2 EditTextmEditText=(EditText)findViewById(R.id.MyEditText); mEditText.setSingleLine(); 5. 如何设置没有输入时的提示信息 【布局】: 设置 android:hint 属性的值 例如: 1 android:hint="inputyourname" 【代码】: 1 2 EditTextmEditText=(EditText)findViewById(R.id.MyEditText); mEditText.setHint( "Inputyourname" ); 6. 如何在输入框的行首空几个字符 【布局】: 设置 android:paddingLeft 属性即可 例如: 1 android:paddingLeft="15sp" 【代码】: 1 2 EditTextmEditText=(EditText)findViewById(R.id.MyEditText); mEditText.setPadding( 15 , 0 , 0 , 0 ); 7. 如何限制输入的长度 【布局】: 设置 android:maxLength 属性的值即可 例如: 1 android:maxLength="10" 【代码】: 1 2 3 4 EditTextmEditText=(EditText)findViewById(R.id.MyEditText); InputFilter[]filters= new InputFilter[ 1 ]; filters[ 0 ]= new InputFilter.LengthFilter( 10 ); mEditText.setFilters(filters); 8. 如何限制输入类型为:数字,电话号码,日期,时间 【布局】: 设置 android:inputType 属性可以指定 textPassword, phone, number, date,time 等类型 例如: 1 android:inputType="text" 【代码】: 1 2 EditTextmEditText=(EditText)findViewById(R.id.MyEditText); mEditText.setInputType(InputType.TYPE_CLASS_TEXT); //InputType有很多种类型可以选择 9. 如何限制只能输入指定的字符 【布局】: 设置 android:digits 属性即可 例如: 1 android:digits="abcdef" 【代码】: 有两种方法可以实现: 方法一: 1 2 3 EditTextmEditText=(EditText)findViewById(R.id.MyEditText); Stringdigits= "abcdef" ; mEditText.setKeyListener(DigitsKeyListener.getInstance(digits)); 方法二: 1 2 3 4 5 6 7 8 9 10 11 12 13 14 15 16 17 18 19 EditTextmEditText=(EditText)findViewById(R.id.MyEditText); InputFilter[]filters= new InputFilter[ 1 ]; filters[ 0 ]= new MyInputFilter( "abcdef" ); mEditText.setFilters(filters); public class MyInputFilter extends LoginFilter.UsernameFilterGeneric{ private StringmAllowedDigits; public PopInputFilter(Stringdigits){ mAllowedDigits=digits; } @Override public boolean isAllowed( char c){ if (mAllowedDigits.indexOf(c)!=- 1 ){ return true ; } return false ; } } 10. 让密码的输入字体大小与明文的字体一致 当你设置了android:password = "true" 属性后,你会发现,它的字体大小会跟没有设置password属性的EditText的大小不一致,因此,如果期望他们表现一致的话,可以通过代码如下设置: 1 2 3 EditTextmEditText=(EditText)findViewById(R.id.MyEditText); mEditText.setTypeface(Typeface.DEFAULT); mEditText.setTransformationMethod( new PasswordTransformationMethod()); 本文转自 Jhuster 51CTO博客,原文链接:http://blog.51cto.com/ticktick/1333414,如需转载请自行联系原作者

优秀的个人博客,低调大师

Android开发实践:布局的平分

从一个简单的任务入手,“如何在水平方向上一左一右均匀地放置两个Button”,有很多种方式可以实现这个功能,在此做一个简单的总结,顺便深入理解下有关gravity, layout_weight 等相关概念的原理和应用。 一、效果图 二、思考 RelativeLayout 和 LinearLayout 中分别如何左右放置button (1) 在RelativeLayout中放置 由于 RelativeLayout 内部的子控件都可以指定相对位置,因此很容易实现左右放置两个Button的任务,如下所示: 1 2 3 4 5 6 7 8 9 10 11 12 13 14 15 16 17 18 < RelativeLayout android:layout_width = "match_parent" android:layout_height = "wrap_content" android:orientation = "horizontal" > < Button android:layout_width = "wrap_content" android:layout_height = "wrap_content" android:text = "LeftButton" android:layout_alignParentLeft = "true" /> < Button android:layout_width = "wrap_content" android:layout_height = "wrap_content" android:text = "RightButton" android:layout_alignParentRight = "true" /> </ RelativeLayout > 效果如图所示: (2) 在LinearLayout中放置 由于LinearLayout是顺序排放所有的控件,如果希望两个button分开地位于一左一右,则必须在两个Button之间再加一个layout_weight为1.0的隐形view才能实现。示例如下: 1 2 3 4 5 6 7 8 9 10 11 12 13 14 15 16 17 18 19 20 21 22 < LinearLayout android:layout_width = "match_parent" android:layout_height = "wrap_content" android:layout_margin = "10dp" android:orientation = "horizontal" > < Button android:layout_width = "wrap_content" android:layout_height = "wrap_content" android:text = "LeftButton" /> < View android:layout_width = "0dp" android:layout_weight = "1.0" android:layout_height = "0dp" /> < Button android:layout_width = "wrap_content" android:layout_height = "wrap_content" android:text = "RightButton" /> </ LinearLayout > 效果如图所示: 三、 在水平方向“均分”整个Layout 其实,对于LinearLayout而言,最简单地平分方式就是将子控件的layout_width属性值设置为0,同时layout_weight属性设置为1.0这样,所有的子控件就会自动均分整个LinearLayout ,例如: 1 2 3 4 5 6 7 8 9 10 11 12 13 14 15 16 17 18 19 < LinearLayout android:layout_width = "match_parent" android:layout_height = "wrap_content" android:layout_margin = "10dp" android:orientation = "horizontal" > < Button android:layout_width = "0dp" android:layout_height = "wrap_content" android:layout_weight = "1.0" android:text = "LeftButton" /> < Button android:layout_width = "0dp" android:layout_height = "wrap_content" android:layout_weight = "1.0" android:text = "Right" /> </ LinearLayout > 效果如图: 由图中效果可以看到,两个Button很好地一左一右平分了整个LinearLayout,但是由于Button的layout_width设置的是0dp,通过layout_weight来决定长度,因此Button都被横向拉长了,如果希望Button的layout_width设置为wrap_content,那该如何实现均分呢?其实,可以通过在Button外再包围一层LinearLayout来实现,示例如下: 1 2 3 4 5 6 7 8 9 10 11 12 13 14 15 16 17 18 19 20 21 22 23 24 25 26 27 28 29 30 31 32 < LinearLayout android:layout_width = "match_parent" android:layout_height = "wrap_content" android:layout_margin = "10dp" android:orientation = "horizontal" > < LinearLayout android:layout_width = "0dp" android:layout_height = "wrap_content" android:layout_weight = "1.0" android:orientation = "horizontal" > < Button android:layout_width = "wrap_content" android:layout_height = "wrap_content" android:text = "LeftButton" android:layout_gravity = "center" /> </ LinearLayout > < LinearLayout android:layout_width = "0dp" android:layout_height = "wrap_content" android:layout_weight = "1.0" android:orientation = "horizontal" android:gravity = "center_horizontal" > < Button android:layout_width = "wrap_content" android:layout_height = "wrap_content" android:text = "RightButton" /> </ LinearLayout > </ LinearLayout > 这样地话,由两个Button外围的LinearLayout平分了整个水平的layout,两个button的大小采用wrap_content,也不会被拉伸,并且通过外围的LinearLayout的android:gravity属性实现了居中。 这里注意Button外围的LinearLayout的android:gravity属性,很关键,该属性决定其子控件在该控件中的位置。所以Button外围的LinearLayout设置了android:gravity="center",因此Button才能在该LinearLayout的正中央。 思考,如果给Button加一个android:gravity="right"的属性,会是什么效果呢? 答案: 会使得 Button 内部的文字向右靠齐,而不是在中央。 本文转自 Jhuster 51CTO博客,原文链接:http://blog.51cto.com/ticktick/1321114,如需转载请自行联系原作者

优秀的个人博客,低调大师

iOS开发-舒尔特表

周末闲来无事,看一个概念,挺有意思的,舒尔特表,网上也有很多人写过类似的Demo,本人闲来无事也写了一下,舒尔特表听起来很高大上的样子,不过本人的理解就是一个正方形的矩阵中放的各种小格子,可以是字母,数字或者说是文字,舒尔特表可以通过动态的练习锻炼视神经末梢。心理学上用此表来研究和发展心理感知的速度,其中包括视觉定向搜索运动的速度。培养注意力集中、分配、控制能力;拓展视幅;加快视频;提高视觉的稳定性、辨别力、定向搜索能力。练习的时间越长,看表所需的时间会越短。随着练习的深入,眼球的末梢视觉能力提高,不仅初学者可以有效地拓展视幅,加快阅读节奏,锻炼眼睛快速认读;而且对于进入提高阶段之后,同时拓展纵横视幅,达到一目十行、一目一页非常有效。每表按字符顺序,迅速找全所有的字符,平均1个字符用1秒钟成绩为优良,即9格用9秒、16格用16秒、25格用25秒。(百度百科) 页面布局 根据上面的概念,大概页面布局就是3*3的九宫格,一般是选择数字练习,也没有特别的多弄弄,Main.storyBoard的布局如下: 需要将所有的按钮弄成一个集合,还有就是所有按钮共用一个事件: 集合演示: 按钮共用事件演示: Demo实现 上面中的界面主要都是数字1,因此需要的一个方法生成一个随机的数组,方法如下,生成一个随机不重复的数组大概的规则就是首先顶一个数组,之后的话,需要将数组打乱,使用随机数随机生成索引即可: 1 2 3 4 5 6 7 8 9 10 11 12 13 14 - ( NSArray *)getDataArray{ //需要展示的数组 NSMutableArray *arr=[ NSMutableArray array]; for ( NSInteger i=1; i<10; i++) { [arr addObject:@(i)]; } NSInteger count=[arr count]; //生成随机数组 for ( NSInteger i=0; i<count; i++) { NSInteger index=arc4random()%(count-i)+i; [arr exchangeObjectAtIndex:index withObjectAtIndex:i]; } return arr; } 将数组中的值赋值给页面的按钮: 1 2 3 4 5 6 7 8 9 10 11 12 13 14 - ( void )initButtonTitle{ //实例化结果集的可变数组 self .resultArr=[ NSMutableArray array]; NSArray *arr=[ self getDataArray]; for (UIButton *button in self .visionButtons) { NSString *result=[arr[button.tag-1]stringValue]; [button setTitle:result forState:UIControlStateNormal]; //重新开始的时候要重新设置按钮的背景和状态 [button setBackgroundColor:[UIColor yellowColor]]; [button setEnabled: YES ]; } [_timerLabel setText:@ "00:00" ]; self .timer=[ NSTimer scheduledTimerWithTimeInterval:0.1 invocation: nil repeats: YES ]; } 在viewDidLoad启动的时候调用对应的程序: 1 [ self initButtonTitle]; 这个时候看到页面的布局应该是这样的: 做到这一步基本上这个程序完成差不多了,然后就是计时,完成之后统计,闲来看下具体的效果,然后看代码可能会更好一点: 功能基本上就是设置按钮的背景颜色,是否可以点击,计时,清零,弹框,显示之前点击的结果,一步一步的分析: 定义成员变量计时和存储结果: 1 2 3 4 5 @interface ViewController () @property NSMutableArray *resultArr; @property NSTimer *timer; @property NSDate *beginDate; @end 设置定时器: 1 self .timer=[ NSTimer scheduledTimerWithTimeInterval:0.1 invocation: nil repeats: YES ]; 设置按钮的背景颜色和显隐: 1 2 [button setBackgroundColor:[UIColor yellowColor]]; [button setEnabled: YES ]; 统计时间: 1 2 3 NSInteger allTime=[_timer.fireDate timeIntervalSinceDate:_beginDate]; NSString *timeFormat=[ NSString stringWithFormat:@ "%02ld:%02ld" ,allTime/1000,allTime%1000]; [_timerLabel setText:timeFormat]; 判断结果,如果所有的结果是升序的那么是成功的,否则就是失败的: 1 2 3 4 5 6 7 8 9 //判断一个数组是不是升序 - ( BOOL )getArrayAsc:( NSArray *)originalArr{ for ( NSInteger i=0; i<[originalArr count]-1; i++) { if (originalArr[i]>originalArr[i+1]) { return NO ; } } return YES ; } 所有按钮的点击事件如下: 1 2 3 4 5 6 7 8 9 10 11 12 13 14 15 16 17 18 19 20 21 22 23 24 25 26 27 28 29 30 31 32 33 34 35 36 - ( IBAction )getResult:( id )sender { UIButton *button=(UIButton *)sender; //设置背景颜色 [button setBackgroundColor:[UIColor greenColor]]; //按钮点击一次就不再点击 [button setEnabled: NO ]; NSInteger value=[[[button titleLabel] text] integerValue]; [ self .resultArr addObject:[ NSNumber numberWithInteger:value]]; //点击第一个按钮之后设置开始时间 if ([ self .resultArr count]==1) { //游戏开始时间 _beginDate=[ NSDate date]; //游戏开始 [_timer fire]; } NSInteger allTime=[_timer.fireDate timeIntervalSinceDate:_beginDate]; NSString *timeFormat=[ NSString stringWithFormat:@ "%02ld:%02ld" ,allTime/1000,allTime%1000]; [_timerLabel setText:timeFormat]; //所有的点击完成之后的调用 if ([ self .resultArr count]==9) { //销毁定时器 [_timer invalidate]; //弹框 NSString *tip; if ([ self getArrayAsc: self .resultArr]) { tip=@ "恭喜你,通过比赛" ; } else { tip=@ "不好意思,比赛失败" ; } //将点击的结果使用逗号进行拼接 NSString *resultStr=[ NSString stringWithFormat:@ "%@" ,[ self .resultArr componentsJoinedByString:@ "," ]]; UIAlertView *alterView=[[UIAlertView alloc] initWithTitle:tip message:resultStr delegate: nil cancelButtonTitle:@ "确定" otherButtonTitles: nil ]; [alterView show]; } } ViewController.m中的代码: 1 2 3 4 5 6 7 8 9 10 11 12 13 14 15 16 17 18 19 20 21 22 23 24 25 26 27 28 29 30 31 32 33 34 35 36 37 38 39 40 41 42 43 44 45 46 47 48 49 50 51 52 53 54 55 56 57 58 59 60 61 62 63 64 65 66 67 68 69 70 71 72 73 74 75 76 77 78 79 80 81 82 83 84 85 86 87 88 89 90 91 92 93 94 95 96 97 98 99 100 101 102 103 104 105 106 107 108 109 110 111 // // ViewController.m // TableVision // // Created by keso on 15/1/18. // Copyright (c) 2015年 keso. All rights reserved. // #import "ViewController.h" @interface ViewController () @property NSMutableArray *resultArr; @property NSTimer *timer; @property NSDate *beginDate; @end @implementation ViewController - ( void )viewDidLoad { [ super viewDidLoad]; // Do any additional setup after loading the view, typically from a nib. [ self initButtonTitle]; // self.timer=[NSTimer scheduledTimerWithTimeInterval:1.0 target:self selector:nil userInfo:nil repeats:YES]; } - ( void )triggerTime:( NSTimer *)sender{ } - ( void )initButtonTitle{ //实例化结果集的可变数组 self .resultArr=[ NSMutableArray array]; NSArray *arr=[ self getDataArray]; for (UIButton *button in self .visionButtons) { NSString *result=[arr[button.tag-1]stringValue]; [button setTitle:result forState:UIControlStateNormal]; //重新开始的时候要重新设置按钮的背景和状态 [button setBackgroundColor:[UIColor yellowColor]]; [button setEnabled: YES ]; } [_timerLabel setText:@ "00:00" ]; self .timer=[ NSTimer scheduledTimerWithTimeInterval:0.1 invocation: nil repeats: YES ]; } - ( IBAction )oneMore:( id )sender { [ self initButtonTitle]; } - ( NSArray *)getDataArray{ //需要展示的数组 NSMutableArray *arr=[ NSMutableArray array]; for ( NSInteger i=1; i<10; i++) { [arr addObject:@(i)]; } NSInteger count=[arr count]; //生成随机数组 for ( NSInteger i=0; i<count; i++) { NSInteger index=arc4random()%(count-i)+i; [arr exchangeObjectAtIndex:index withObjectAtIndex:i]; } return arr; } - ( IBAction )getResult:( id )sender { UIButton *button=(UIButton *)sender; //设置背景颜色 [button setBackgroundColor:[UIColor greenColor]]; //按钮点击一次就不再点击 [button setEnabled: NO ]; NSInteger value=[[[button titleLabel] text] integerValue]; [ self .resultArr addObject:[ NSNumber numberWithInteger:value]]; //点击第一个按钮之后设置开始时间 if ([ self .resultArr count]==1) { //游戏开始时间 _beginDate=[ NSDate date]; //游戏开始 [_timer fire]; } NSInteger allTime=[_timer.fireDate timeIntervalSinceDate:_beginDate]; NSString *timeFormat=[ NSString stringWithFormat:@ "%02ld:%02ld" ,allTime/1000,allTime%1000]; [_timerLabel setText:timeFormat]; //所有的点击完成之后的调用 if ([ self .resultArr count]==9) { //销毁定时器 [_timer invalidate]; //弹框 NSString *tip; if ([ self getArrayAsc: self .resultArr]) { tip=@ "恭喜你,通过比赛" ; } else { tip=@ "不好意思,比赛失败" ; } //将点击的结果使用逗号进行拼接 NSString *resultStr=[ NSString stringWithFormat:@ "%@" ,[ self .resultArr componentsJoinedByString:@ "," ]]; UIAlertView *alterView=[[UIAlertView alloc] initWithTitle:tip message:resultStr delegate: nil cancelButtonTitle:@ "确定" otherButtonTitles: nil ]; [alterView show]; } } - ( void )didReceiveMemoryWarning { [ super didReceiveMemoryWarning]; // Dispose of any resources that can be recreated. } //判断一个数组是不是升序 - ( BOOL )getArrayAsc:( NSArray *)originalArr{ for ( NSInteger i=0; i<[originalArr count]-1; i++) { if (originalArr[i]>originalArr[i+1]) { return NO ; } } return YES ; } @end 本文转自Fly_Elephant博客园博客,原文链接:http://www.cnblogs.com/xiaofeixiang/p/4232605.html,如需转载请自行联系原作者

资源下载

更多资源
腾讯云软件源

腾讯云软件源

为解决软件依赖安装时官方源访问速度慢的问题,腾讯云为一些软件搭建了缓存服务。您可以通过使用腾讯云软件源站来提升依赖包的安装速度。为了方便用户自由搭建服务架构,目前腾讯云软件源站支持公网访问和内网访问。

Nacos

Nacos

Nacos /nɑ:kəʊs/ 是 Dynamic Naming and Configuration Service 的首字母简称,一个易于构建 AI Agent 应用的动态服务发现、配置管理和AI智能体管理平台。Nacos 致力于帮助您发现、配置和管理微服务及AI智能体应用。Nacos 提供了一组简单易用的特性集,帮助您快速实现动态服务发现、服务配置、服务元数据、流量管理。Nacos 帮助您更敏捷和容易地构建、交付和管理微服务平台。

Rocky Linux

Rocky Linux

Rocky Linux(中文名:洛基)是由Gregory Kurtzer于2020年12月发起的企业级Linux发行版,作为CentOS稳定版停止维护后与RHEL(Red Hat Enterprise Linux)完全兼容的开源替代方案,由社区拥有并管理,支持x86_64、aarch64等架构。其通过重新编译RHEL源代码提供长期稳定性,采用模块化包装和SELinux安全架构,默认包含GNOME桌面环境及XFS文件系统,支持十年生命周期更新。

Sublime Text

Sublime Text

Sublime Text具有漂亮的用户界面和强大的功能,例如代码缩略图,Python的插件,代码段等。还可自定义键绑定,菜单和工具栏。Sublime Text 的主要功能包括:拼写检查,书签,完整的 Python API , Goto 功能,即时项目切换,多选择,多窗口等等。Sublime Text 是一个跨平台的编辑器,同时支持Windows、Linux、Mac OS X等操作系统。

用户登录
用户注册