首页 文章 精选 留言 我的

精选列表

搜索[运维产品],共10007篇文章
优秀的个人博客,低调大师

Apache运维架构之Apache+PHP

当前互联网主流web服务器说明 1、IIS 微软的web服务器 2、apache 中小web服务器主流,web服务器中的老大哥 3、nginx 新兴的web服务器主流 4、tomcat 中小企业动态服务器,互联网java容器主流 5、resin 大型企业动态服务器,互联网java容器主流 apache的特点及应用场合 特点:功能强大,配置简单,速度快,应用广泛,性能稳定可靠,并可做代理服务器和负载均衡 应用场合: 1、使用apache来运行静态html网页,图片,处理静态小文件能力不及nginx 2、使用apache结合php引擎来运行php程序,lamp由此成为经典组合 3、使用apache结合tomcat及resin运行jsp java等程序,成为中小企业的首选 4、使用apache做代理及负载均衡 本次环境所用到的软件版本如下(操作系统centos6.7) 1、基础环境准备 [root@ansibletools]#tarxfapr-1.4.5.tar.gz [root@ansibletools]#cdapr-1.4.5 [root@ansibleapr-1.4.5]#./configure--prefix=/usr/local/apr [root@ansibleapr-1.4.5]#make&&makeinstall [root@ansibletools]#tarxfapr-util-1.3.12.tar.gz [root@ansibletools]#cdapr-util-1.3.12 [root@ansibleapr-util-1.3.12]#./configure--prefix=/usr/local/apr-util--with-apr=/usr/local/apr/bin/apr-1-config [root@ansibleapr-util-1.3.12]#make&&makeinstall [root@ansiblepcre-8.10]#unzippcre-8.10.zip [root@ansibletools]#cdpcre-8.10 [root@ansiblepcre-8.10]#./configure--prefix=/usr/local/pcre [root@ansiblepcre-8.10]#make&&makeinstall [root@ansibletools]#tarxflibxml2-2.7.6.tar.gz [root@ansibletools]#cdlibxml2-2.7.6 [root@ansiblelibxml2-2.7.6]#vimconfigure将下面那行注释掉 #$RM"$cfgfile" [root@ansiblelibxml2-2.7.6]#./configure--prefix=/usr/local/libxml2--without-zlib [root@ansiblelibxml2-2.7.6]#make&&makeinstall [root@ansibletools]#tarxflibmcrypt-2.5.8.tar.gz [root@ansibletools]#cdlibmcrypt-2.5.8 [root@ansiblelibmcrypt-2.5.8]#./configure--prefix=/usr/local/libmcrypt [root@ansiblelibmcrypt-2.5.8]#make&&makeinstall [root@ansibletools]#tarxfzlib-1.2.5.tar.gz [root@ansibletools]#cdzlib-1.2.5 [root@ansiblezlib-1.2.5]#./configure [root@ansiblezlib-1.2.5]#make&&makeinstall [root@ansibletools]#tarxflibpng-1.4.1.tar.gz [root@ansibletools]#cdlibpng-1.4.1 [root@ansiblelibpng-1.4.1]#./configure--prefix=/usr/local/libpng [root@ansiblelibpng-1.4.1]#make&&makeinstall [root@ansibletools]#mkdir/usr/local/jpeg6 [root@ansibletools]#mkdir/usr/local/jpeg6/bin [root@ansibletools]#mkdir/usr/local/jpeg6/lib [root@ansibletools]#mkdir/usr/local/jpeg6/include [root@ansibletools]#mkdir-p/usr/local/jpeg6/man/man1 [root@ansibletools]#tarxfjpegsrc.v6b.tar.gz [root@ansibletools]#cdjpeg-6b/ [root@ansiblejpeg-6b]#./configure--prefix=/usr/local/jpeg6/--enable-shared--enable-static [root@ansiblejpeg-6b]#make&&make报错 ./libtool--mode=compilegcc-O2-I.-c./jcapimin.c make:./libtool:Commandnotfound make:***[jcapimin.lo]Error127 解决方法 [root@ansibletools]#tarxflibtool-2.2.6a.tar.gz [root@ansibletools]#cdlibtool-2.2.6 [root@ansiblelibtool-2.2.6]#./configure [root@ansiblelibtool-2.2.6]#make&&makeinstall [root@ansiblelibtool-2.2.6]#cd../jpeg-6b/ [root@ansiblejpeg-6b]#cp/usr/share/libtool/config/config.sub. [root@ansiblejpeg-6b]#cp/usr/share/libtool/config/config.guess. [root@ansiblejpeg-6b]#./configure--prefix=/usr/local/jpeg6/--enable-shared--enable-static [root@ansiblejpeg-6b]#make&&make [root@ansibletools]#tarxffreetype-2.3.12.tar.gz [root@ansibletools]#cdfreetype-2.3.12 [root@ansiblefreetype-2.3.12]#./configure--prefix=/usr/local/freetype [root@ansiblefreetype-2.3.12]#make&&makeinstall [root@ansibletools]#tarxfautoconf-2.61.tar.gz [root@ansibletools]#cdautoconf-2.61 [root@ansibleautoconf-2.61]#./configure [root@ansibleautoconf-2.61]#make&&makeinstall [root@ansibletools]#tarxflibgd-2.1.1.tar. libgd-2.1.1.tar.gzlibgd-2.1.1.tar.xz [root@ansibletools]#tarxflibgd-2.1.1.tar.gz [root@ansibletools]#cdlibgd-2.1.1 [root@ansiblelibgd-2.1.1]#./configure\ >--prefix=/usr/local/gd2/\ >--enable-m4_pattern_allow\ >--with-zlib=/usr/local/zlib/\ >--with-jpeg=/usr/local/jpeg6/\ >--with-png=/usr/local/libpng/\ >--with-freetype=/usr/local/freetype/ [root@ansiblelibgd-2.1.1]#make&&makeinstall 2、安装编译apache [root@ansibletools]#useradd-s/sbin/nologin-Mwww [root@ansibletools]#tarxfhttpd-2.4.18.tar.bz2 [root@ansibletools]#cdhttpd-2.4.18 [root@ansiblehttpd-2.4.18]#./configure--prefix=/usr/local/apache2--enable-mods-shared=all--enable-so--enable-proxy-ajp--enable-rewrite--with-apr=/usr/local/apr--with-apr-util=/usr/local/apr-util/--with-pcre=/usr/local/pcre/ [root@ansiblehttpd-2.4.18]#make&&makeinstall 3、安装编译mysql [root@ansiblemysql-5.6.17]#useradd-s/sbin/nologin-Mmysql [root@ansiblemysql-5.6.17]#yuminstallcmake-y [root@ansibletools]#tarxfmysql-5.6.17.tar.gz [root@ansibletools]#cdmysql-5.6.17 [root@ansiblemysql-5.6.17]#cmake\ -DCMAKE_INSTALL_PREFIX=/usr/local/mysql\ -DMYSQL_DATADIR=/usr/local/mysql/data\ -DSYSCONFDIR=/etc\ -DWITH_MYISAM_STORAGE_ENGINE=1\ -DWITH_INNOBASE_STORAGE_ENGINE=1\ -DWITH_MEMORY_STORAGE_ENGINE=1\ -DWITH_READLINE=1\ -DMYSQL_UNIX_ADDR=/var/lib/mysql/mysql.sock\ -DMYSQL_TCP_PORT=3306\ -DENABLED_LOCAL_INFILE=1\ -DWITH_PARTITION_STORAGE_ENGINE=1\ -DEXTRA_CHARSETS=all\ -DDEFAULT_CHARSET=utf8\ -DDEFAULT_COLLATION=utf8_general_ci [root@ansiblemysql-5.6.17]#make&&makeinstall [root@ansiblemysql-5.6.17]#chown-Rmysql.mysql/usr/local/mysql/ [root@ansiblescripts]#pwd /tools/mysql-5.6.17/scripts [root@ansiblescripts]#chmod+xmysql_install_db [root@ansiblescripts]#./mysql_install_db--basedir=/usr/local/mysql--datadir=/usr/local/mysql/data--user=mysql InstallingMySQLsystemtables...2016-08-1913:13:180[Warning]TIMESTAMPwithimplicitDEFAULTvalueisdeprecated.Pleaseuse--explicit_defaults_for_timestampserveroption(seedocumentationformoredetails). 2016-08-1913:13:1864062[Note]InnoDB:Usingatomicstorefcountbufferpoolpages 2016-08-1913:13:1864062[Note]InnoDB:TheInnoDBmemoryheapisdisabled 2016-08-1913:13:1864062[Note]InnoDB:Mutexesandrw_locksuseGCCatomicbuiltins 2016-08-1913:13:1864062[Note]InnoDB:Compressedtablesusezlib1.2.3 2016-08-1913:13:1864062[Note]InnoDB:NotusingCPUcrc32instructions 2016-08-1913:13:1864062[Note]InnoDB:Initializingbufferpool,size=128.0M 2016-08-1913:13:1864062[Note]InnoDB:Completedinitializationofbufferpool 2016-08-1913:13:1864062[Note]InnoDB:Thefirstspecifieddatafile./ibdata1didnotexist:anewdatabasetobecreated! 2016-08-1913:13:1864062[Note]InnoDB:Settingfile./ibdata1sizeto12MB 2016-08-1913:13:1864062[Note]InnoDB:Databasephysicallywritesthefilefull:wait... 2016-08-1913:13:1964062[Note]InnoDB:Settinglogfile./ib_logfile101sizeto48MB 2016-08-1913:13:2164062[Note]InnoDB:Settinglogfile./ib_logfile1sizeto48MB 2016-08-1913:13:2364062[Note]InnoDB:Renaminglogfile./ib_logfile101to./ib_logfile0 2016-08-1913:13:2364062[Warning]InnoDB:Newlogfilescreated,LSN=45781 2016-08-1913:13:2364062[Note]InnoDB:Doublewritebuffernotfound:creatingnew 2016-08-1913:13:2364062[Note]InnoDB:Doublewritebuffercreated 2016-08-1913:13:2364062[Note]InnoDB:128rollbacksegment(s)areactive. 2016-08-1913:13:2364062[Warning]InnoDB:Creatingforeignkeyconstraintsystemtables. 2016-08-1913:13:2364062[Note]InnoDB:Foreignkeyconstraintsystemtablescreated 2016-08-1913:13:2364062[Note]InnoDB:Creatingtablespaceanddatafilesystemtables. 2016-08-1913:13:2364062[Note]InnoDB:Tablespaceanddatafilesystemtablescreated. 2016-08-1913:13:2364062[Note]InnoDB:Waitingforpurgetostart 2016-08-1913:13:2364062[Note]InnoDB:5.6.17started;logsequencenumber0 2016-08-1913:13:2464062[Note]Binlogend 2016-08-1913:13:2464062[Note]InnoDB:FTSoptimizethreadexiting. 2016-08-1913:13:2464062[Note]InnoDB:Startingshutdown... 2016-08-1913:13:2464062[Note]InnoDB:Shutdowncompleted;logsequencenumber1625977 OK Fillinghelptables...2016-08-1913:13:240[Warning]TIMESTAMPwithimplicitDEFAULTvalueisdeprecated.Pleaseuse--explicit_defaults_for_timestampserveroption(seedocumentationformoredetails). 2016-08-1913:13:2464085[Note]InnoDB:Usingatomicstorefcountbufferpoolpages 2016-08-1913:13:2464085[Note]InnoDB:TheInnoDBmemoryheapisdisabled 2016-08-1913:13:2464085[Note]InnoDB:Mutexesandrw_locksuseGCCatomicbuiltins 2016-08-1913:13:2464085[Note]InnoDB:Compressedtablesusezlib1.2.3 2016-08-1913:13:2464085[Note]InnoDB:NotusingCPUcrc32instructions 2016-08-1913:13:2464085[Note]InnoDB:Initializingbufferpool,size=128.0M 2016-08-1913:13:2464085[Note]InnoDB:Completedinitializationofbufferpool 2016-08-1913:13:2464085[Note]InnoDB:HighestsupportedfileformatisBarracuda. 2016-08-1913:13:2464085[Note]InnoDB:128rollbacksegment(s)areactive. 2016-08-1913:13:2564085[Note]InnoDB:Waitingforpurgetostart 2016-08-1913:13:2564085[Note]InnoDB:5.6.17started;logsequencenumber1625977 2016-08-1913:13:2564085[Note]Binlogend 2016-08-1913:13:2564085[Note]InnoDB:FTSoptimizethreadexiting. 2016-08-1913:13:2564085[Note]InnoDB:Startingshutdown... 2016-08-1913:13:2664085[Note]InnoDB:Shutdowncompleted;logsequencenumber1625987 OK Tostartmysqldatboottimeyouhavetocopy support-files/mysql.servertotherightplaceforyoursystem PLEASEREMEMBERTOSETAPASSWORDFORTHEMySQLrootUSER! Todoso,starttheserver,thenissuethefollowingcommands: /usr/local/mysql/bin/mysqladmin-urootpassword'new-password' /usr/local/mysql/bin/mysqladmin-uroot-hansiblepassword'new-password' Alternativelyyoucanrun: /usr/local/mysql/bin/mysql_secure_installation whichwillalsogiveyoutheoptionofremovingthetest databasesandanonymoususercreatedbydefault.Thisis stronglyrecommendedforproductionservers. Seethemanualformoreinstructions. YoucanstarttheMySQLdaemonwith: cd.;/usr/local/mysql/bin/mysqld_safe& YoucantesttheMySQLdaemonwithmysql-test-run.pl cdmysql-test;perlmysql-test-run.pl Pleasereportanyproblemsathttp://bugs.mysql.com/ ThelatestinformationaboutMySQLisavailableonthewebat http://www.mysql.com SupportMySQLbybuyingsupport/licensesathttp://shop.mysql.com Newdefaultconfigfilewascreatedas/usr/local/mysql/my.cnfand willbeusedbydefaultbytheserverwhenyoustartit. Youmayeditthisfiletochangeserversettings 注:在启动MySQL服务时,会按照一定次序搜索my.cnf,先在/etc目录下找,找不到则会搜索"$basedir/my.cnf", 在本例中就是/usr/local/mysql/my.cnf,这是新版MySQL的配置文件的默认位置! [root@ansiblehttpd-2.4.18]#cp/usr/local/mysql/support-files/mysql.server/etc/init.d/mysqld [root@ansiblehttpd-2.4.18]#chmod+x/etc/init.d/mysqld [root@ansiblehttpd-2.4.18]#/etc/init.d/mysqldstart StartingMySQL.......SUCCESS! 4、编译安装php [root@ansiblephp-5.6.18]#yuminstalllibXpm-devel-y [root@ansibletools]#tarxfphp-5.6.18.tar.gz [root@ansibletools]#cdphp-5.6.18 [root@ansiblephp-5.6.18]#./configure\ --prefix=/usr/local/php\ --with-config-file-path=/usr/local/php/etc\ --with-apxs2=/usr/local/apache2/bin/apxs\ --with-mysql=/usr/local/mysql/\ --with-libxml-dir=/usr/local/libxml2/\ --with-png-dir=/usr/local/libpng/\ --with-jpeg-dir=/usr/local/jpeg6/\ --with-freetype-dir=/usr/local/freetype/\ --with-gd=/usr/local/gd2/\ --with-zlib-dir=/usr/local/zlib/\ --with-mcrypt=/usr/local/libmcrypt/\ --with-mysqli=/usr/local/mysql/bin/mysql_config\ --with-xpm-dir=/usr/lib64/\ --enable-soap\ --enable-mbstring=all\ --enable-sockets [root@ansiblephp-5.6.18]#make&&makeinstall 5、apache配置 [root@ansiblephp-5.6.18]#vim/usr/local/apache2/conf/httpd.conf ServerNamelocalhost DirectoryIndexindex.phpindex.html AddType application/x-httpd-php.php.phtml AddTypeapplication/x-httpd-php-source.phps Includeconf/extra/httpd-vhosts.conf LoadModulephp5_modulemodules/libphp5.so Userwww Groupwww [root@ansiblephp-5.6.18]#vim/usr/local/apache2/conf/extra/httpd-vhosts.conf #VirtualHosts <VirtualHost*:80> ServerAdmin1335120568@qq.com DocumentRoot"/usr/local/apache2/htdocs/www" ServerNamewww.martin1.com ServerAliasmartin1.com ErrorLog"logs/www-error_log" CustomLog"logs/www-access_log"common </VirtualHost> <VirtualHost*:80> ServerAdmin1335120568@qq.com DocumentRoot"/usr/local/apache2/htdocs/blog" ServerNameblog.martin1.com ErrorLog"logs/blog-error_log" CustomLog"logs/blog-access_log"common </VirtualHost> [root@ansiblephp-5.6.18]#mkdir-p/usr/local/apache2/htdocs/{www,blog} [root@ansiblephp-5.6.18]#vim/usr/local/apache2/htdocs/www/index.php <?php phpinfo(); ?> [root@ansible php-5.6.18]# /usr/local/apache2/bin/apachectl restart [root@ansible php-5.6.18]# lsof -i :80 COMMAND PID USER FD TYPE DEVICE SIZE/OFF NODE NAME httpd 8307 root 4u IPv6 295815 0t0 TCP *:http (LISTEN) httpd 8309 www 4u IPv6 295815 0t0 TCP *:http (LISTEN) httpd 8310 www 4u IPv6 295815 0t0 TCP *:http (LISTEN) httpd 8312 www 4u IPv6 295815 0t0 TCP *:http (LISTEN) 6、访问测试(如果出现php页面,则说明整合成功) 再简单截图之前编译安装的过程 最后说下如果要在lamp环境下安装编译zabbix 按照如下操作即可 ./configure--prefix=/usr/local/zabbix-server --enable-server --with-mysql--with-net-snmp --with-libcurl --with-libxml2cp -a/home/oldboy/tools/zabbix-3.0.3/frontends/php/* /usr/local/apache2/htdocs/www/

优秀的个人博客,低调大师

运维监控平台之zabbix详解2

1、Zabbix架构 zabbix是一个基于WEB界面的提供分布式系统监视以及网络监视功能的企业级的开源解决方案。zabbix能监视各种网络参数,保证服务器系统的安全运营;并提供灵活的通知机制以让系统管理员快速定位/解决存在的各种问题。 Zabbix的运行架构如下图所示: 2、组件 zabbix由以下几个组件部分构成: 1)、Zabbix Server:负责接收agent发送的报告信息的核心组件,所有配置,统计数据及操作数据均由其组织进行; 2)、Database Storage:专用于存储所有配置信息,以及由zabbix收集的数据; 3)、Web interface:zabbix的GUI接口,通常与Server运行在同一台主机上; 4)、Proxy:可选组件,常用于分布监控环境中,代理Server收集部分被监控端的监控数据并统一发往Server端; 5、Agent:部署在被监控主机上,负责收集本地数据并发往Server端或Proxy端; 3、进程 默认情况下zabbix包含5个程序:zabbix_agentd、zabbix_get、zabbix_proxy、zabbix_sender、zabbix_server,另外一个zabbix_java_gateway是可选,这个需要另外安装。下面来分别介绍下他们各自的作用。 zabbix_agentd 客户端守护进程,此进程收集客户端数据,例如cpu负载、内存、硬盘使用情况等。 zabbix_get zabbix工具,单独使用的命令,通常在server或者proxy端执行获取远程客户端信息的命令。通常用户排错。例如在server端获取不到客户端的内存数据,我们可以使用zabbix_get获取客户端的内容的方式来做故障排查。 zabbix_sender zabbix工具,用于发送数据给server或者proxy,通常用于耗时比较长的检查。很多检查非常耗时间,导致zabbix超时。于是我们在脚本执行完毕之后,使用sender主动提交数据。 zabbix_server zabbix服务端守护进程。zabbix_agentd、zabbix_get、zabbix_sender、zabbix_proxy、zabbix_java_gateway的数据最终都是提交到server 备注:当然不是数据都是主动提交给zabbix_server,也有的是server主动去取数据。 zabbix_proxy zabbix代理守护进程。功能类似server,唯一不同的是它只是一个中转站,它需要把收集到的数据提交/被提交到server里。 zabbix_java_gateway zabbix2.0之后引入的一个功能。顾名思义:Java网关,类似agentd,但是只用于Java方面。需要特别注意的是,它只能主动去获取数据,而不能被动获取数据。它的数据最终会给到server或者proxy。 4、zabbix监控环境中相关术语 主机(host):要监控的网络设备,可由IP或DNS名称指定; 主机组(host group):主机的逻辑容器,可以包含主机和模板,但同一个组织内的主机和模板不能互相链接;主机组通常在给用户或用户组指派监控权限时使用; 监控项(item):一个特定监控指标的相关的数据;这些数据来自于被监控对象;item是zabbix进行数据收集的核心,相对某个监控对象,每个item都由"key"标识; 触发器(trigger):一个表达式,用于评估某监控对象的特定item内接收到的数据是否在合理范围内,也就是阈值;接收的数据量大于阈值时,触发器状态将从"OK"转变为"Problem",当数据再次恢复到合理范围,又转变为"OK"; 事件(event):触发一个值得关注的事情,比如触发器状态转变,新的agent或重新上线的agent的自动注册等; 动作(action):指对于特定事件事先定义的处理方法,如发送通知,何时执行操作; 报警媒介类型(media):发送通知的手段或者通道,如Email、Jabber或者SMS等; 模板(template):用于快速定义被监控主机的预设条目集合,通常包含了item、trigger、graph、screen、application以及low-level discovery rule;模板可以直接链接至某个主机; 前端(frontend):Zabbix的web接口 5、zabbix安装 上篇文章我们介绍过了在LNMP环境下 zabbix-server的安装,因此这里就不再说明了,这里简单说明下环境规划及zabbix-agent的安装,操作系统都是centos6.7 两台服务器都安装zabbix-agent [root@ansible~]#wget [root@ansible~]#rpm-ivhzabbix-release-3.0-1.el6.noarch.rpm Preparing...###########################################[100%] 1:zabbix-release###########################################[100%] [root@ansible~]#yum-yinstallzabbix-agent [root@ansible ~]# vim /etc/zabbix/zabbix_agentd.conf 修改配置文件 Server=172.16.80.117 #这个地址填写zabbix-server所在的ip,默认是127.0.0.1 [root@ansible ~]# /etc/init.d/zabbix-agent start Starting Zabbix agent: [ OK ] 6、监控第一台主机(172.16.80.128) zabbix配置流程基本如下 Host groups(主机组)→Hosts(主机)→Applications(监控项组)→Items(监控项)→Triggers(触发器)→Event(事件)→Actions(处理动作)→User groups(用户组)→Users(用户)→Medias(告警方式)→Audit(日志审计) 配置步骤是 configuration---->hosts---->create host 接下来选择templates选项卡,输入关键字linux,我们选择第一个模块 之后我们就可以看到我们刚才添加的那台主机172.16.80.128,红色方框里面是什么意思我们在上面已经说明相关概念了,这里就不再说明,过一会儿就可以出图了 7、用户参数User parameters 有时候当我们监控的项目在zabbix预定义的key中没有定义时,这时候我们可以通过编写zabbix的用户参数的方法来监控我们要求的项目item。形象一点说zabbix代理端配置文件中的User parameters就相当于通过脚本获取要监控的值,然后把相关的脚本或者命令写入到配置文件中的User parameter中然后zabbix server读取配置文件中的返回值通过处理前端的方式返回给用户。 7.1 用户参数的语法 UserParameter=<key>,<command> 其中UserParameter为关键字,key为用户自定义key名字可以随便起,<command>为我们要运行的命令或者脚本。 一个简单的例子: UserParameter=ping,echo 1 代理程序程序将会永远的返回1当我们在服务器端添加item的key为 ping时候。 稍微复杂的例子 UserParameter=mysql.ping,/usr/bin/mysqladmin -uroot -p123456 ping | grep -c alive 当我们执行mysqladmin -uroot ping命令的时候如果mysq存活要返回mysqld is alive ,我们通过grep–c来计算mysqld is alive的个数,如果mysql存活着个数为1,如果不存活很明显mysqld is alive的个数为0,通过这种方法我们可以来判断mysql的存活状态。 对于zabbix代理程序程如果mysql存活状态序将当返回1,如果mysql不存活状态将返回0,当我们在服务器端添加item的key为mysql.ping时候。 7.2 让key接受参数 通过让key也接受参数的方法使item添加时更具备了灵活性,例如系统预定义key :vm.memory.size[<mode>],其中的mode模式就是用户要接受的参数,当我们填写为free时则返回的为内存的剩余大小,如果我们填入的为userd时这返回的是内存已经使用的大小。 相关语法 在/etc/zabbix/zabbix_agentd.conf中配置参数,写法如下。 UserParameter=key,command 除了上面这种写法,还支持参数传递的写法,具体如下。 UserParameter=key[*],command $1 $2 $3 …. 描述 Key:Key的值在主机系统中必须是唯一的,其中*代表命令中接受的参数 命令:客户端系统中可执行的命令 例1: UserParameter=ping[*],echo $1 ping[0] - will always return '0' ping[aaa] - will always return 'aaa' 注意: 1.用户自定义参数一定要包含一个key和一个命令,也可以是一个脚本 2.key在整个系统是唯一的 3.用户自定义参数返回值,最大返回512兆 4.自定义完后,重启服务测试Key 7.3通过用户参数测试网站的连通性 可以看到该命令执行的结果是返回状态码200 说明网站正常 [root@ansible~]#vim/etc/zabbix/zabbix_agentd.conf修改客户端配置文件 UnsafeUserParameters=1 UserParameter=http_check,/usr/bin/curl-o/dev/null-s-w%{http_code}$1 [root@ansible~]#/etc/init.d/zabbix-agentrestart ShuttingdownZabbixagent:[OK] StartingZabbixagent:[OK] 在zabbix-server测试 [root@centos02~]#zabbix_get-s172.16.80.128-p10050-k"http_check[172.16.80.128]" 为监控端添加相应的item,triggers,graphs http_check['172.16.80.128'] 最后我们来看下截图情况,中间我们会模拟下httpd停掉的情况 8、通过zabbix监控nginx的状态 nginx配置 ###status server{ listen80; server_namestatus.martin.org; location/{ stub_statuson; access_logoff; } } 访问测试 Activeconnections:对后端发起的活动连接数; server accepts 7:nginx总共处理了29179个连接; handled:成功创建了29179次握手; requests:总共处理了34952请求。 Reading:nginx读取客户端的header数; Writing: nginx返回给客户端的header数; Waiting: nginx请求处理完成,正在等待下一请求指令的连接。 编写检测nginx的脚本 [root@centos02tools]#vimnginx.sh #!/bin/bash BKUP_DATE=`/bin/date+%Y%m%d` LOG="/var/log/nginx.log" HOST=status.martin.org PORT="80" #Functionstoreturnnginxstats functionactive{ /usr/bin/curl"http://$HOST:$PORT"2>/dev/null|grep'Active'|awk'{print$NF}' } functionreading{ /usr/bin/curl"http://$HOST:$PORT"2>/dev/null|grep'Reading'|awk'{print$2}' } functionwriting{ /usr/bin/curl"http://$HOST:$PORT"2>/dev/null|grep'Writing'|awk'{print$4}' } functionwaiting{ /usr/bin/curl"http://$HOST:$PORT"2>/dev/null|grep'Waiting'|awk'{print$6}' } functionaccepts{ /usr/bin/curl"http://$HOST:$PORT"2>/dev/null|awkNR==3|awk'{print$1}' } functionhandled{ /usr/bin/curl"http://$HOST:$PORT"2>/dev/null|awkNR==3|awk'{print$2}' } functionrequests{ /usr/bin/curl"http://$HOST:$PORT"2>/dev/null|awkNR==3|awk'{print$3}' } #Runtherequestedfunction $1 [root@centos02alertscripts]#cp/tools/nginx.sh/application/zabbix-server/share/zabbix/alertscripts/ [root@centos02alertscripts]#chownzabbix.zabbixnginx.sh [root@centos02alertscripts]#chmod+x/application/zabbix-server/share/zabbix/alertscripts/nginx.sh [root@centos02alertscripts]#vim/etc/zabbix/zabbix_agentd.conf UserParameter=nginx.accepts,/application/zabbix-server/share/zabbix/alertscripts/nginx.shaccepts UserParameter=nginx.handled,/application/zabbix-server/share/zabbix/alertscripts/nginx.shhandled UserParameter=nginx.requests,/application/zabbix-server/share/zabbix/alertscripts/nginx.shrequests UserParameter=nginx.connections.active,/application/zabbix-server/share/zabbix/alertscripts/nginx.shactive UserParameter=nginx.connections.reading,/application/zabbix-server/share/zabbix/alertscripts/nginx.shreading UserParameter=nginx.connections.writing,/application/zabbix-server/share/zabbix/alertscripts/nginx.shwriting UserParameter=nginx.connections.waiting,/application/zabbix-server/share/zabbix/alertscripts/nginx.shwaiting [root@centos02alertscripts]#/etc/init.d/zabbix-agentrestart ShuttingdownZabbixagent:[OK] StartingZabbixagent:[OK]


优秀的个人博客,低调大师

运维监控平台之zabbix详解1

本来是想一篇文章介绍完的,写着写着发现篇幅太长,所以决定还是分两篇来介绍,本次软件所用的版本信息如下(基于LNMP环境),操作系统centos6.7 nginx-1.6.3.tar.gz php-5.6.24.tar.gz mysql-5.5.49-linux2.6-x86_64.tar.gz zabbix-3.0.4.tar.gz (zabbix-3以上版本之支持php5.4以上环境) LNMP环境搭建不再这里说明了,如果不懂的看本人之前写的nginx+php,这里简单介绍下php编译 [root@centos02tools]#wgethttp://cn2.php.net/distributions/php-5.6.24.tar.gz [root@centos02tools]#tarxfphp-5.6.24.tar.gz [root@centos02tools]#cdphp-5.6.24 [root@centos02php-5.6.24]#./configure\ >--prefix=/application/php5.6.24\ >--with-mysql=/application/mysql\ >--with-pdo-mysql=mysqlnd--with-mysqli=mysqlnd >--with-iconv-dir=/usr/local/libiconv\ >--with-freetype-dir\ >--with-jpeg-dir\ >--with-png-dir\ >--with-zlib\ >--with-libxml-dir=/usr\ >--enable-xml\ >--disable-rpath\ >--enable-safe-mode\ >--enable-bcmath\ >--enable-shmop\ >--enable-sysvsem\ >--enable-inline-optimization\ >--with-curl\ >--with-curlwrappers\ >--enable-mbregex\ >--enable-fpm\ >--enable-mbstring\ >--with-mcrypt\ >--with-gd\ >--enable-gd-native-ttf\ >--with-openssl\ >--with-mhash\ >--enable-pcntl\ >--enable-sockets\ >--with-xmlrpc\ >--enable-zip\ >--enable-soap\ >--enable-short-tags\ >--enable-zend-multibyte\ >--enable-static\ >--with-xsl\ >--with-fpm-user=nginx\ >--with-fpm-group=nginx\ >--enable-ftp >--with-gettext Generatingfiles configure:creating./config.status creatingmain/internal_functions.c creatingmain/internal_functions_cli.c +--------------------------------------------------------------------+ |License:| |ThissoftwareissubjecttothePHPLicense,availableinthis| |distributioninthefileLICENSE.Bycontinuingthisinstallation| |process,youareboundbythetermsofthislicenseagreement.| |Ifyoudonotagreewiththetermsofthislicense,youmustabort| |theinstallationprocessatthispoint.| +--------------------------------------------------------------------+ ThankyouforusingPHP. config.status:creatingphp5.spec config.status:creatingmain/build-defs.h config.status:creatingscripts/phpize config.status:creatingscripts/man1/phpize.1 config.status:creatingscripts/php-config config.status:creatingscripts/man1/php-config.1 config.status:creatingsapi/cli/php.1 config.status:creatingsapi/fpm/php-fpm.conf config.status:creatingsapi/fpm/init.d.php-fpm config.status:creatingsapi/fpm/php-fpm.service config.status:creatingsapi/fpm/php-fpm.8 config.status:creatingsapi/fpm/status.html config.status:creatingsapi/cgi/php-cgi.1 config.status:creatingext/phar/phar.1 config.status:creatingext/phar/phar.phar.1 config.status:creatingmain/php_config.h config.status:executingdefaultcommands configure:WARNING:unrecognizedoptions:--enable-safe-mode,--with-curlwrappers,--enable-zend-multibyte 编译过程截图如下 [root@centos02application]#ln-s/application/mysql/lib/libmysqlclient.so.18/usr/lib64/ [root@centos02application]#touchext/phar/phar.phar [root@centos02application]#make&&makeinstall Buildcomplete. Don'tforgettorun'maketest'. Installingsharedextensions:/application/php5.6.24/lib/php/extensions/no-debug-non-zts-20131226/ InstallingPHPCLIbinary:/application/php5.6.24/bin/ InstallingPHPCLImanpage:/application/php5.6.24/php/man/man1/ InstallingPHPFPMbinary:/application/php5.6.24/sbin/ InstallingPHPFPMconfig:/application/php5.6.24/etc/ InstallingPHPFPMmanpage:/application/php5.6.24/php/man/man8/ InstallingPHPFPMstatuspage:/application/php5.6.24/php/php/fpm/ InstallingPHPCGIbinary:/application/php5.6.24/bin/ InstallingPHPCGImanpage:/application/php5.6.24/php/man/man1/ Installingbuildenvironment:/application/php5.6.24/lib/php/build/ Installingheaderfiles:/application/php5.6.24/include/php/ Installinghelperprograms:/application/php5.6.24/bin/ program:phpize program:php-config Installingmanpages:/application/php5.6.24/php/man/man1/ page:phpize.1 page:php-config.1 InstallingPEARenvironment:/application/php5.6.24/lib/php/ [PEAR]Archive_Tar-installed:1.4.0 [PEAR]Console_Getopt-installed:1.4.1 [PEAR]Structures_Graph-installed:1.1.1 [PEAR]XML_Util-installed:1.3.0 [PEAR]PEAR-installed:1.10.1 WrotePEARsystemconfigfileat:/application/php5.6.24/etc/pear.conf Youmaywanttoadd:/application/php5.6.24/lib/phptoyourphp.iniinclude_path /tools/php-5.6.24/build/shtoolinstall-cext/phar/phar.phar/application/php5.6.24/bin ln-s-fphar.phar/application/php5.6.24/bin/phar InstallingPDOheaders:/application/php5.6.24/include/php/ext/pdo/ [root@centos02php-5.6.24]#ln-s/application/php5.6.24//application/php [root@centos02php-5.6.24]#cpphp.ini-production/application/php/lib/php.ini [root@centos02php-5.6.24]#cd/application/php/etc/ [root@centos02etc]#cpphp-fpm.conf.defaultphp-fpm.conf [root@centos02etc]#catphp-fpm.conf [global] [www] user=nginx group=nginx listen=127.0.0.1:9000 pm=dynamic pm.max_children=5 pm.start_servers=2 pm.min_spare_servers=1 pm.max_spare_servers=3 [root@centos02etc]#/application/php/sbin/php-fpm nginx配置如下 [root@centos02etc]#cat/application/nginx/conf/nginx.conf worker_processes2; events{ worker_connections1024; } http{ log_formatmain'$remote_addr-$remote_user[$time_local]"$request"' '$status$body_bytes_sent"$http_referer"' '"$http_user_agent""$http_x_forwarded_for"'; includemime.types; default_typeapplication/octet-stream; sendfileon; keepalive_timeout65; server{ listen80; server_namewww.martin.commartin.com; location/{ roothtml/www; indexindex.phpindex.htmlindex.htm; } location~.*\.(php|php5)?${ roothtml/www; fastcgi_pass127.0.0.1:9000; fastcgi_indexindex.php; includefastcgi.conf; } access_loglogs/access_www.logmain; } server{ listen80; server_namebbs.martin.com; location/{ roothtml/bbs; indexindex.phpindex.htmlindex.htm; } location~.*\.(php|php5)?${ fastcgi_pass127.0.0.1:9000; fastcgi_indexindex.php; includefastcgi.conf; } access_loglogs/access_bbs.logmain; } ###status server{ listen80; server_namestatus.martin.org; location/{ stub_statuson; access_logoff; } } } 浏览器访问测试 (www.martin.com---172.16.80.117) 至此整个LNMP环境准备完成,zabbix(在LNMP环境下)选择源码编译安装 curl 7.19.7 系统默认版本,升级该软件版本,否则后面邮件功能会有问题 [root@centos02application]#rpm-Uvhhttp://www.city-fan.org/ftp/contrib/yum-repo/rhel6/x86_64/city-fan.org-release-1-13.rhel6.noarch.rpm Retrievinghttp://www.city-fan.org/ftp/contrib/yum-repo/rhel6/x86_64/city-fan.org-release-1-13.rhel6.noarch.rpm warning:/var/tmp/rpm-tmp.jSwm5A:HeaderV3DSA/SHA1Signature,keyIDb56a8bac:NOKEY Preparing...###########################################[100%] 1:city-fan.org-release###########################################[100%] [root@centos02application]#yuminstalllibcurl-y [root@centos02application]#curl-V再次查看版本 curl7.50.1(x86_64-redhat-linux-gnu)libcurl/7.50.1OpenSSL/1.0.1ezlib/1.2.3c-ares/1.11.0libidn/1.18libssh2/1.7.0nghttp2/1.6.0 Protocols:dictfileftpftpsgopherhttphttpsimapimapsldapldapspop3pop3srtspscpsftpsmbsmbssmtpsmtpstelnettftp Features:AsynchDNSIDNIPv6LargefileGSS-APIKerberosSPNEGONTLMNTLM_WBSSLlibzHTTP2UnixSocketsMetalink 安装zabbix依赖包 [root@centos02zabbix-3.0.4]#yum-yinstallmysql-devellibxml2-develnet-snmp-devellibcurl-devel [root@centos02tools]#wgethttp://ncu.dl.sourceforge.net/project/zabbix/ZABBIX%20Latest%20Stable/3.0.4/zabbix-3.0.4.tar.gz [root@centos02tools]#tarxfzabbix-3.0.4.tar.gz [root@centos02tools]#cdzabbix-3.0.4 [root@centos02zabbix-3.0.4]#./configure--prefix=/application/zabbix-server--enable-server--with-mysql--with-net-snmp--with-libcurl--with-libxml2--enable-agent--enable-proxy Enableserver:yes Serverdetails: Withdatabase:MySQL WEBMonitoring:cURL NativeJabber:no SNMP:yes IPMI:no SSH:no TLS:no ODBC:no Linkerflags:-L/usr/lib64/mysql-L/usr/lib64-rdynamic Libraries:-lmysqlclient-lxml2-lnetsnmp-lcurl-lm-ldl-lrt-lresolv Enableproxy:yes Proxydetails: Withdatabase:MySQL WEBMonitoring:cURL SNMP:yes IPMI:no SSH:no TLS:no ODBC:no Linkerflags:-L/usr/lib64/mysql-L/usr/lib64-rdynamic Libraries:-lmysqlclient-lxml2-lnetsnmp-lcurl-lm-ldl-lrt-lresolv Enableagent:yes Agentdetails: TLS:no Linkerflags:-rdynamic Libraries:-lcurl-lm-ldl-lrt-lresolv EnableJavagateway:no LDAPsupport:no IPv6support:no *********************************************************** *Nowrun'makeinstall'* ** *ThankyouforusingZabbix!* *<http://www.zabbix.com>* *********************************************************** [root@centos02 zabbix-3.0.4]# make install 由于zabbix启动脚本路径默认指向的是/usr/local/sbin路径,因此,需要提前建立软链接 [root@centos02zabbix-3.0.4]#ln-s/application/zabbix-server/sbin/*/usr/local/sbin/ [root@centos02zabbix-3.0.4]#ln-s/application/zabbix-server/bin/*/usr/local/bin/ 生成zabbix的web文件 [root@centos02zabbix-3.0.4]#mkdir/application/nginx/html/zabbix [root@centos02zabbix-3.0.4]#cp-a/tools/zabbix-3.0.4/frontends/php/*/application/nginx/html/zabbix/ 手动创建zabbix数据库及授权 [root@centos02zabbix-3.0.4]#mysql-uroot-p123456 WelcometotheMySQLmonitor.Commandsendwith;or\g. YourMySQLconnectionidis4 Serverversion:5.5.49-logMySQLCommunityServer(GPL) Copyright(c)2000,2013,Oracleand/oritsaffiliates.Allrightsreserved. OracleisaregisteredtrademarkofOracleCorporationand/orits affiliates.Othernamesmaybetrademarksoftheirrespective owners. Type'help;'or'\h'forhelp.Type'\c'toclearthecurrentinputstatement. mysql>createdatabasezabbixdefaultcharsetutf8; QueryOK,1rowaffected(0.16sec) mysql>grantallonzabbix.*tozabbix@'localhost'identifiedby'zabbix'; QueryOK,0rowsaffected(0.16sec) mysql>flushprivileges; QueryOK,0rowsaffected(0.19sec) 导入zabbix数据库文件 [root@centos02mysql]#pwd /tools/zabbix-3.0.4/database/mysql [root@centos02mysql]#mysql-uzabbix-pzabbixzabbix<schema.sql [root@centos02mysql]#mysql-uzabbix-pzabbixzabbix<p_w_picpaths.sql [root@centos02mysql]#mysql-uzabbix-pzabbixzabbix<data.sql 配置zabbixserver端 修改zabbix配置文件,配置zabbix_server cd/usr/local/zabbix/etc vi/usr/local/zabbix/etc/zabbix_server.conf DBName=zabbix#数据库名称 DBUser=zabbix#数据库用户名 DBPassword=zabbix#数据库密码 ListenIP=localhost#数据库ip地址 DBSocket=/tmp/mysql.sock#这里填写mysql实际的socket位置查看/etc/my.cnf即可 AlertScriptsPath=/application/zabbix-server/share/zabbix/alertscripts#zabbix运行脚本存放目录 修改php.ini文件/application/php/lib/php.ini post_max_size=16M max_execution_time=300 memory_limit=128M max_input_time=300 date.timezone=Asia/Shanghai always_populate_raw_post_data=-1 extension=php_gettext.dll 修改nginx配置文件如下 [root@centos02mysql]#cat/application/nginx/conf/nginx.conf worker_processes2; events{ worker_connections1024; } http{ log_formatmain'$remote_addr-$remote_user[$time_local]"$request"' '$status$body_bytes_sent"$http_referer"' '"$http_user_agent""$http_x_forwarded_for"'; includemime.types; default_typeapplication/octet-stream; sendfileon; keepalive_timeout65; server{ listen80; server_namewww.martin.commartin.com; location/{ roothtml/zabbix; indexindex.phpindex.htmlindex.htm; } location~.*\.(php|php5)?${ roothtml/zabbix; fastcgi_pass127.0.0.1:9000; fastcgi_indexindex.php; includefastcgi.conf; } access_loglogs/access_zabbix.logmain; } server{ listen80; server_namebbs.martin.com; location/{ roothtml/bbs; indexindex.phpindex.htmlindex.htm; } location~.*\.(php|php5)?${ fastcgi_pass127.0.0.1:9000; fastcgi_indexindex.php; includefastcgi.conf; } access_loglogs/access_bbs.logmain; } ###status server{ listen80; server_namestatus.martin.org; location/{ stub_statuson; access_logoff; } } } [root@centos02mysql]#/application/nginx/sbin/nginx-sreload [root@centos02mysql]#useradd-s/sbin/nologin-Mzabbix [root@centos02mysql]#/etc/init.d/zabbix_serverstart Startingzabbix_server:[OK] [root@centos02mysql]#/application/php/sbin/php-fpm [root@centos02init.d]#/application/zabbix-server/sbin/zabbix_server-c/application/zabbix-server/etc/zabbix_server.conf 浏览器访问http://www.martin.com/ 用户名/密码 默认是 Admin/zabbix 再来看下中文界面 安装agent [root@centos02tools]#wgethttp://repo.zabbix.com/zabbix/3.0/rhel/6/x86_64/zabbix-release-3.0-1.el6.noarch.rpm [root@centos02tools]#rpm-ivhzabbix-release-3.0-1.el6.noarch.rpm Preparing...###########################################[100%] 1:zabbix-release###########################################[100%] [root@centos02tools]#yum-yinstallzabbix-agent [root@centos02tools]#/etc/init.d/zabbix-agentstart启动agent StartingZabbixagent:[OK] 按照图示步骤启用主机监控即可 这次我们简单介绍到这里,下篇我们正式开始介绍zabbix监控

优秀的个人博客,低调大师

9个SQL运维常遇到的问题

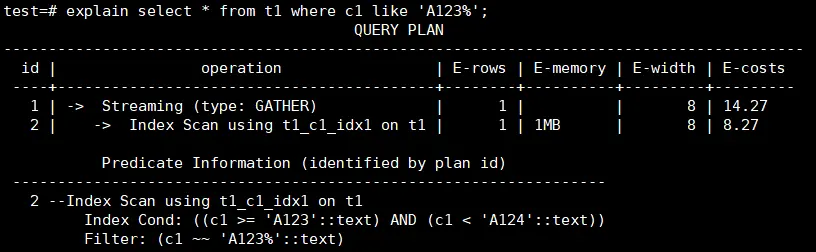
摘要:本文重点介绍单个SQL语句持续执行慢的场景。 本文分享自华为云社区《GaussDB(DWS) SQL性能问题案例集》,作者:黎明的风。 本文重点介绍单个SQL语句持续执行慢的场景。我们可以对执行慢的SQL进行单独分析,SELECT、INSERT、UPDATE等语句都可以使用explain verbose + SQL语句输出查询计划来进行分析,这样只输出查询计划,语句不会被实际的执行。 如果查询计划只出现__REMOTE_FQS_QUERY__或__REMOTE_LIGHT_QUERY__,看不到具体的计划,可以先执行set enable_fast_query_shipping to off; 然后再重新打印执行计划。 经常遇到的问题有以下几个: 【案例1】语句中包含不下推的函数 检查查询计划中是否包含_REMOTE_TABLE_QUERY_关键字, 如果有则表示语句没有下推,数据需要从DN上收取到CN上,然后语句在CN上执行。语句不下推原因,要从CN的日志中查找,搜索的关键字为:SQL can’t be shipped,以下为函数造成的不下推例子: LOG: SQL can't be shipped, reason: Function Fun1() can not be shipped 此外如果出现以下几种不下推的关键字:__REMOTE_GROUP_QUERY__、__REMOTE_LIMIT_QUERY__、 __REMOTE_SORT_QUERY__。这种需要检查enable_stream_operator参数是否处于关闭状态,一般来说打开STREAM开关后,语句就可以下推执行了。 如果出现以下两种关键字,表示语句可以下推执行: __REMOTE_FQS_QUERY__:表明语句走了Fast Query Shipping(FQS),SQL语句会下发到DN上执行,并且各DN之间没有数据交互,常见的场景有过滤条件为等值查询(where id = 1),或者关联的列是表的分布列的查询(where t1.id = t2.id)。 __REMOTE_LIGHT_QUERY__:表明语句走了Light Proxy(CN轻量化),将语句下发给了单个DN去处理,常见的场景过滤条件是分布列的等值查询(where id = 1),或者向一个DN插入数据的INSERT语句。 【案例2】表上有索引但没有走索引扫描,进行了全表扫描 从查询计划中可以看到Seq Scan或CStore Scan这样的关键字,如下所示: 对于行存表:-> Seq Scan on t1 对于列存表:-> CStore Scan on col_t1 出现这种问题通常有以下几种情况: 没有对所查询的表收集统计信息 如果表的实际行数很大,而估算行数很小,查询时可能会走全表顺序扫描,造成执行速度慢。此时通过analyze表更新统计信息,让优化器选择最佳的查询计划,一般就可以解决执行慢的问题。 【案例3】模糊匹配没有走索引 后模糊匹配查询可以通过建立一个BTREE索引来实现,需要根据数据类型设置索引的operator,对于text,varchar和char分别设置和text_pattern_ops,varchar_pattern_ops和bpchar_pattern_ops。 例如c1列的类型为text,创建索引时增加text_pattern_ops。 CREATE INDEX ON t1 (c1 text_pattern_ops); 创建索引后,可以看到语句执行时会使用到前面创建的索引,执行速度会变快。 【案例4】创建索引时所指定列的顺序问题 多列复合索引的组织结构与单列字段索引结构类似,按索引内表达式指定的顺序编排。当创建多列复合索引时,选择什么样的列的顺序,对查询性能会带来一定的影响。 例如按照c_date,c1和c2列的顺序建立检索,如果符合c_date条件的数据很多,通过这个索引扫描的数据就很会很多,造成执行时间长。 新建多列复合索引,将查询条件里的等值条件的列放到索引列的前面,先使用等值进行过滤,需要扫描的数据变少,查询变快。 【案例5】分区表没有分区剪枝进行了全表扫描 问题背景:XSYX局点使用MERGE INTO语句将每天的数据入库到表里,目标表为分区表,业务上线运行一段时间后发现MERGE INTO速度逐渐变慢。 原因分析:MERGE INTO语句的源表和目标表都是分区表,当前仅对源表增加了时间的过滤条件,可以进行分区剪枝。目标表由于没有指定时间过滤条件,进行的是全表扫描,随着每日的入库业务运行,目标表的数据量越来越大,造成执行速度越来越慢。 解决方案:由于源表的数据在MERGE INTO时会导入到目标表的对应分区里,可以对目标表增加时间的过滤条件进行分区剪枝。 业务修改前的查询计划: 对目标表增加了时间过滤条件后的计划显示可以走分区剪枝: 【案例6】表数据在DN节点上有存储倾斜 从查询计划中的A-time可以看到最长和最短的执行时间相差很大,说明在不同DN上扫描数据的时间不同。 在查询计划的DN信息中,通过rows可以看出在datanode1上扫描的数据量明显多于datanode2,说明有存储倾斜,这种情况建议对表进行合理的设计,选择合适的分布列,将数据均匀分布到所有的DN上。 【案例7】自定义函数引起执行慢 问题现象:查询语句比较简单,两个表做关联后输出了其中一列的值,在输出前增加了一个自定义函数对数据进行了处理。 原因分析:自定义函数里逻辑相对复杂,包含了对表的查询及数据计算逻辑,造成执行变慢。 解决方案;业务上对自定义函数进行性能优化。 【案例8】查询视图执行时间长 问题现象:某YD局点从C80版本迁移数据到8.1.1版本后,查询PG_STAT_USER_TABLES视图的时间由几分钟变成半个小时都不出结果。 原因分析:8.1.1版本中的PG_STAT_USER_TABLES视图在获取插入、更新、删除的行数的字段数值时,每一条记录都涉及到CN和DN的交互,在数据量和集群规模大的情况下耗时较多。 解决方案:建议根据应用的实际需要,将视图定义中不需要的函数注释掉以提升查询效率。 【案例9】关闭indexscan和bitmapscan后可以使用并行提升性能 问题现象: 查询计划中显示走了Index Scan,通过索引查询出的数据量比较大,速度慢。 原因分析:由于使用索引扫描时无法使用并行查询,当索引访问的数据量大时执行速度较慢。 解决方案:将enable_indexscan和enable_bitmapscan参数关闭,设置query_dop后走并行查询。 点击关注,第一时间了解华为云新鲜技术~

优秀的个人博客,低调大师

Kubernetes 4000节点运维经验分享

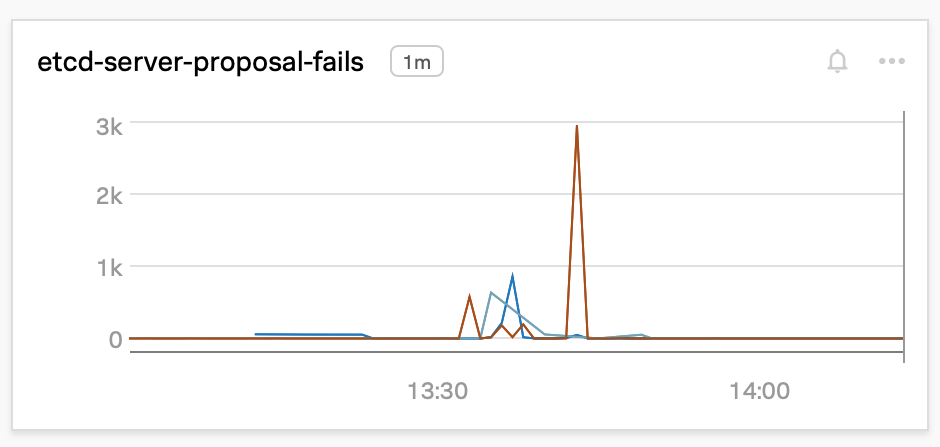
在 PayPal,我们最近开始试水 Kubernetes。我们大部分的工作负载都运行在 Apache Mesos 上,而作为迁移的一部分,我们需要从性能方面了解下运行 Kubernetes 集群以及 PayPal 特有的控制平面。其中最主要的是了解平台的可扩展性,以及通过调整集群找出可以改进的地方。 与 Apache Mesos 不同的是,前者无需任何修改即可扩展到 10,000 个节点,而扩展 Kubernetes 则非常具有挑战性。Kubernetes 的可扩展性不仅仅体现在节点和 Pod 的数量上,还有其他多个方面,如创建的资源数量、每个 Pod 的容器数量、服务总数和 Pod 部署的吞吐量。本文描述了我们在扩展过程中遇到的一些挑战,以及我们如何解决这些问题。 集群拓扑 我们的生产环境中有各种不同规模的集群,包含数千个节点。我们的设置包括三个主节点和一个外部的三节点 etcd 集群,所有这些都运行在谷歌云平台(GCP)上。控制平面前面有一个负载平衡器,所有数据节点都与控制平面属于相同的区域。 工作负载 为了进行性能测试,我们使用了一个开源的工作负载生成器 k-bench,并针对我们的场景做了修改。我们使用的资源对象是简单的 Pod 和部署。我们按不同的批次大小和部署间隔时间,分批次连续对它们进行部署。 扩展 开始时,Pod 和节点数量都比较少。通过压力测试,我们发现可以改进的地方,并继续扩大集群的规模,因为我们观察到性能有所改善。每个工作节点有四个 CPU 内核,最多可容纳 40 个 Pod。我们扩展到大约 4100 个节点。用于基准测试的应用程序是一个无状态的服务,运行在 100 个服务质量(QoS)有保证的毫核(millicores )上。 我们从 1000 个节点、2000 个 Pod 开始,接着是 16000 个 Pod,然后是 32000 个 Pod。之后,我们跃升到 4100 个节点、15 万个 Pod,接着是 20 万个 Pod。我们不得不增加每个节点的核数,以容纳更多的 Pod。 API 服务器 事实证明,API 服务器是一个瓶颈,有几个到 API 服务器的连接返回 504 网关超时,此外还有本地客户端限流(指数退避)。这些问题在扩展过程中 呈指数级 增长: I0504 17:54:55.731559 1 request.go:655] Throttling request took 1.005397106s, request: POST:https://<>:443/api/v1/namespaces/kbench-deployment-namespace-14/Pods.. I0504 17:55:05.741655 1 request.go:655] Throttling request took 7.38390786s, request: POST:https://<>:443/api/v1/namespaces/kbench-deployment-namespace-13/Pods.. I0504 17:55:15.749891 1 request.go:655] Throttling request took 13.522138087s, request: POST:https://<>:443/api/v1/namespaces/kbench-deployment-namespace-13/Pods.. I0504 17:55:25.759662 1 request.go:655] Throttling request took 19.202229311s, request: POST:https://<>:443/api/v1/namespaces/kbench-deployment-namespace-20/Pods.. I0504 17:55:35.760088 1 request.go:655] Throttling request took 25.409325008s, request: POST:https://<>:443/api/v1/namespaces/kbench-deployment-namespace-13/Pods.. I0504 17:55:45.769922 1 request.go:655] Throttling request took 31.613720059s, request: POST:https://<>:443/api/v1/namespaces/kbench-deployment-namespace-6/Pods.. API 服务器上限制速率的队列的大小是通过 max-mutating-requests-inflight 和 max-requests-inflight 更新的。1.20 版本中引入的 优先级和公平性 特性测试版,就是在 API 服务器上这两个标记的控制下将队列的总大小在不同的队列类别之间进行划分。例如,群首选举请求的优先级比 Pod 请求高。在每个优先级中,都有可配置队列的公平性。未来还可以通过 PriorityLevelConfiguration&FlowSchema API 对象做进一步调优。 控制器管理器 控制器管理器负责为副本集、命名空间等本地资源以及数量众多的部署(由副本集管理)提供控制器。控制器管理器与 API 服务器同步其状态的速度是有限的。有多个调节器用于调整这一行为: kube-api-qps -- 控制器管理器在一秒钟内可以向 API 服务器进行查询的次数。 kube-api-burst -- 控制器管理器突发流量峰值,是 kube-api-qps 之上另一个并发调用数。 concurrent-deployment-syncs -- 部署、复制集等对象同步调用的并发性。 调度器 当作为一个独立的组件单独测试时,调度器可以支持每秒 1000 个 Pod 的高吞吐率。然而,在将调度器部署到一个在线集群中时,我们注意到,实际的吞吐量有所降低。etcd 实例速度慢导致调度器的绑定延迟增加,使得待处理队列的大小增加到数千个 Pod 的程度。我们的想法是在测试运行期间将这个数值保持在 100 以下,因为数量比较大的话会影响 Pod 的启动延迟。此外,我们最后还调整了群首选举参数,以应对短暂的网络分区或网络拥堵引发的虚假重启。 etcd etcd 是 Kubernetes 集群中最关键的一部分。这一点从 etcd 在整个集群中引发的、以不同方式表现出来的大量问题可以看出来。经过非常仔细的研究,我们才找到根本原因,并扩展 etcd 以匹配我们预期的规模。 在扩展过程中,许多 Raft proposal 开始失败: 通过调查分析,我们发现,GCP 将 PD-SSD 磁盘的吞吐量限制在每秒 100MB 左右(如下图所示),我们的磁盘大小为 100G。GCP 没有提供增加吞吐量限制的方法——它只 随着磁盘的大小增加。尽管 etcd 节点只需要不到 10G 的空间,我们首先尝试了 1TB PD-SSD。然而,当所有 4k 个节点同时加入 Kubernetes 控制平面时,磁盘再大也会成为一个 瓶颈。我们决定使用本地 SSD,它的吞吐量非常高,代价是在出现故障时丢失数据的几率略高,因为它 不是持久化的。 在迁移到本地 SSD 后,我们并没有看到最快的 SSD 带来了预期的性能。我们用 FIO 直接在磁盘上做了一些基准测试,数值在意料之中。但是,对于所有成员的写入并发,etcd 基准测试讲述了一个不同的故事: Plain TextLOCAL SSDSummary: Total: 8.1841 secs. Slowest: 0.5171 secs. Fastest: 0.0332 secs. Average: 0.0815 secs. Stddev: 0.0259 secs. Requests/sec: 12218.8374 PD SSD Summary: Total: 4.6773 secs. Slowest: 0.3412 secs. Fastest: 0.0249 secs. Average: 0.0464 secs. Stddev: 0.0187 secs. Requests/sec: 21379.7235 本地 SSD 的表现更差!经过深入调查,这是由 ext4 文件系统的写屏障缓存提交导致的。由于 etcd 使用写前日志,并在每次提交到 Raft 日志时调用 fsync,所以可以禁用写屏障。此外,我们在文件系统级和应用程序级有 DB 备份作业,用于 DR。在这样修改之后,使用本地 SSD 的数值提高到了与 PD-SSD 相当的程度: Plain TextLOCAL SSDSummary: Total: 4.1823 secs. Slowest: 0.2182 secs. Fastest: 0.0266 secs. Average: 0.0416 secs. Stddev: 0.0153 secs. Requests/sec: 23910.3658 这一改进的效果在 etcd 的 WAL 同步持续时间和后端提交延迟上体现了出来,如下图所示,在 15:55 左右这个时间点上,WAL 同步持续时间和后端提交延迟降低了 90% 以上: etcd 中默认的 MVCC 数据库大小为 2GB。在 DB 空间不足的告警被触发时,这个大小最大会增加到 8GB。由于该数据库的 利用率约为 60%,所以我们能够扩展到 20 万个无状态 Pod。 经过上述这些优化,在预期的规模下,集群更加稳定了,然而,在 API 延迟方面,我们的 SLI 还差很多。 etcd 服务器还会偶尔重启,仅一次重启就会破坏基准测试结果,尤其是 P99 值。仔细观察发现,v1.20 版的 etcd YAML 中有一个存活探针 Bug。为了解决这个问题,我们采用了一个变通办法,即增加失败阈值的计数。 在用尽所有方法对 etcd 进行了垂直扩展之后,主要是在资源方面(CPU、内存、磁盘),我们发现,etcd 的性能受到范围查询的影响。当范围查询很多时,etcd 的表现并不好,对 Raft 日志的写入也受到影响,增加了集群的延迟。以下是一次测试运行中影响性能的每个 Kubernetes 资源的范围查询的数量: Plain Textetcd$ sudo grep -ir "events" 0.log.20210525-035918 | wc -l130830etcd$ sudo grep -ir "Pods" 0.log.20210525-035918 | wc -l107737etcd$ sudo grep -ir "configmap" 0.log.20210525-035918 | wc -l86274etcd$ sudo grep -ir "deployments" 0.log.20210525-035918 | wc -l6755etcd$ sudo grep -ir "leases" 0.log.20210525-035918 | wc -l4853etcd$ sudo grep -ir "nodes" 0.log.20210525-035918 | wc -l 由于这些查询很耗时,etcd 的后端延迟受到了很大的影响。在事件资源上对 etcd 服务器进行分片管理后,我们看到,在 Pod 高度竞争的情况下,集群的稳定性有所提高。将来,还可以进一步在 Pod 资源上对 etcd 集群进行分片。配置 API 服务器联系相关的 etcd 以与分片的资源进行交互很容易。 结果 在对 Kubernetes 的各种组件做完优化和调整后,我们观察到,延迟有大幅改善。下图展示了随着时间的推移,为满足 SLO 而实现的性能提升。其中,工作负载是 150k 个 Pod,每个部署 250 个副本,10 个并发工作进程。只要 Pod 启动的 P99 延迟在 5 秒之内,按照 Kubernetes SLO,我们就算是很好了。 下图显示了当集群有 20 万个 Pod 时,API 调用延迟完全符合 SLO。 _ 我们还实现了 20 万个 Pod P99 启动延迟为 5 秒左右,而 Pod 部署速率远远高于 K8s 针对 5k 节点测试时所声称的 3000 个 Pod/ 分钟。_ 总结 Kubernetes 是一个复杂的系统,必须深入了解控制平面,才能知道如何扩展每个组件。通过这次操练,我们学到了很多东西,并将继续优化我们的集群。

资源下载

更多资源
腾讯云软件源

腾讯云软件源

为解决软件依赖安装时官方源访问速度慢的问题,腾讯云为一些软件搭建了缓存服务。您可以通过使用腾讯云软件源站来提升依赖包的安装速度。为了方便用户自由搭建服务架构,目前腾讯云软件源站支持公网访问和内网访问。

Rocky Linux

Rocky Linux

Rocky Linux(中文名:洛基)是由Gregory Kurtzer于2020年12月发起的企业级Linux发行版,作为CentOS稳定版停止维护后与RHEL(Red Hat Enterprise Linux)完全兼容的开源替代方案,由社区拥有并管理,支持x86_64、aarch64等架构。其通过重新编译RHEL源代码提供长期稳定性,采用模块化包装和SELinux安全架构,默认包含GNOME桌面环境及XFS文件系统,支持十年生命周期更新。

Sublime Text

Sublime Text

Sublime Text具有漂亮的用户界面和强大的功能,例如代码缩略图,Python的插件,代码段等。还可自定义键绑定,菜单和工具栏。Sublime Text 的主要功能包括:拼写检查,书签,完整的 Python API , Goto 功能,即时项目切换,多选择,多窗口等等。Sublime Text 是一个跨平台的编辑器,同时支持Windows、Linux、Mac OS X等操作系统。

WebStorm

WebStorm

WebStorm 是jetbrains公司旗下一款JavaScript 开发工具。目前已经被广大中国JS开发者誉为“Web前端开发神器”、“最强大的HTML5编辑器”、“最智能的JavaScript IDE”等。与IntelliJ IDEA同源,继承了IntelliJ IDEA强大的JS部分的功能。

用户登录
用户注册