首页 文章 精选 留言 我的

精选列表

搜索[springcloud],共1352篇文章
优秀的个人博客,低调大师

Dante Cloud 2.7.3.4 发布, SpringCloud升级2021.0.4支持多租户

Dante Cloud 是一款企业级微服务架构和服务能力开发平台。首个全面拥抱 Spring Authorization Server 的版本,基于Spring Boot 2.7.3、Spring Cloud 2021.0.4、Spring Cloud Alibaba 2021.0.1.0、 Spring Authorization Server 0.3.1、Nacos 2.1.1 等最新版本开发的多租户系统,遵循SpringBoot编程思想,高度模块化和可配置化。具备服务发现、配置、熔断、限流、降级、监控、多级缓存、分布式事务、工作流等功能 平台定位 构建成熟的、完善的、全面的,基于 OAuth2.1 的、前后端分离的微服务架构解决方案。 面向企业级应用和互联网应用设计开发,既兼顾传统项目的微服务化,又满足互联网应用开发建设、快速迭代的使用需求。 平台架构使用微服务领域及周边相关的各类新兴技术或主流技术进行建设,是帮助快速跨越架构技术选型、研究探索阶段的利器。 代码简洁规范、结构合理清晰,是新技术开发应用的典型的、综合性案例,助力开发人员对新兴技术的学习和掌握。 [1]、特别说明 Dante Cloud (但丁,原 Eurynome Cloud) 正式加入 Dromara 开源社区。Dante Cloud 将继续秉承“简洁、高效、包容、务实”的理念,不断地深耕细作、去粗取精,用心打造一款适应未来信息化建设需求的精致产品。同时,与 Dromara 开源社区以及社区中所有的优秀人才一起互相扶持、并肩前行,创造更多、更好、更精的产品以回馈社会,促进软件开源的发展。 谢谢大家对 Eurynome Cloud 支持与厚爱,希望大家继续给与 Dante Cloud以及Dromara 开源社区关注与支持 [2]、为什么更名为DanteCloud 原项目名称 Eurynome Cloud,很多朋友都反映名字太长、读起来拗口、不容易记等问题。因此在加入 Dromara 开源社区之际,将名字进行了变更。 Dante,即但丁·阿利基耶里(公元1265年-公元1321年),13世纪末意大利诗人,现代意大利语的奠基者,欧洲文艺复兴时代的开拓人物之一,以长诗《神曲》(原名《喜剧》)而闻名,后来一位作家叫薄伽丘将其命名为神圣的喜剧。 他被认为是中古时期意大利文艺复兴中最伟大的诗人,也是西方最杰出的诗人之一,最伟大的作家之一。恩格斯评价说:“封建的中世纪的终结和现代资本主义纪元的开端,是以一位大人物为标志的,这位人物就是意大利人但丁,他是中世纪的最后一位诗人,同时又是新时代的最初一位诗人” 更名为 Dante Cloud,寓意本项目会像恩格斯对但丁的评价一样,在行业变革的时期,可以成为一款承上启下,助力企业信息化建设变革的产品。 [3]、本次更新内容 重要更新 [升级] Spring Cloud 版本升级至 2021.0.4 [升级] Skywalking Agent 版本升级至 8.12.0 [新增] 基于 JPA 的多租户系统支持,支持 Database 和 Schema 两种模式,可通过配置进行开启和关闭。 [重构] 基于 JetCache 的自定义 Hibernate 二级缓存,支持多租户模式下数据的分布式多级缓存。 [重构] 重构前端详情页面参数的传递方式,解决 vue-router 自 4.1.4 版本不再建议使用 push param 传递参数而导致的新增、编辑功能不可用问题。 其它更新 [优化] 优化部分代码日志输出内容及日志输出级别 [优化] 优化基于 JetCache 的 Hibernate 二级缓存代码 [升级] 升级 antisamy XSS 防护配置文件 [修复] 临时修复 BPMN.js 在线工作流编辑器,在第一次加载页面时抛错无法显示 Canvas 和 Property Panel 问题。 [修复] 第三方社交登录 logo 在生产环境下无法正常显示问题。 [优化] 优化服务配置,将第三方社交登录相关配置移至 Nacos 方便修改。 依赖更新 antisamy 版本升级至 1.7.1 hutool 版本升级至 5.8.6 tencentcloud-sdk-java-sms 版本升级至 3.1.590 fastjson2 版本升级至 2.0.13 alipay-sdk-java 版本升级至 4.33.39.ALL [4]、Dante Cloud 2.7.X 主要变化 基于 Spring Authorization Server 深度定制: 基于 Spring Data JPA,重新构建 Spring Authorization Server 基础数据存储代码,替代原有 JDBC 数据访问方式,破除 Spring Authorization Server 原有数据存储局限,扩展为更符合实际应用的方式和设计。 基于 Spring Authorization Server,在 OAuth 2.1 规范基础之上,增加自定义“密码”认证模式,以兼容现有基于 OAuth 2 规范的、前后端分离的应用。 基于 Spring Authorization Server,在 OAuth 2.1 规范基础之上,增加自定义Social Credentials 认证模式,支持手机短信验证码、微信小程序、第三方应用登录。 遵照 Spring Security 5 以及 Spring Authorization Server 的代码规范,进行 OAuth2 认证服务器核心代码的开发,遵照其使用 Jackson 反序列化的方式, 增加大量自定义 Jackson Module。 支持 Spring Authorization Server 的标准的Token加密校验方式外,还了增加支持自定义证书的 Token 加密方式,可通过配置动态修改 支持 OAuth2 OIDC 认证模式,补充前端 OIDC 认证相关配置操作,以及对应的 /userinfo 接口调用支持 和 客户端注册支持 支持 OAuth2 Authorization Code PKCE 认证模式 扩展 Spring Authorization Server 默认的 Client Credentials 模式,实现 Refresh Token 的创建。 扩展 Spring Authorization Server 默认的 Client Credentials 模式,实现真正的使用 Scope 权限对接口进行验证。 增加客户端 Scope 的权限配置功能,并与已有的用户权限体系解耦 自定义 Spring Authorization Server 授权码模式登录认证页面和授权确认页面,授权码模式登录采用数据加密传输。支持多种验证码类型,暂不支持行为验证码。 基于Spring Authorization Server和JPA构建支持Database和Schema模式的多租户架构。 代码结构的大规模调整和优化: 对原有代码进行了深度的“庖丁解牛”,严格遵照“单一职责”原则,根据各个组件的职责以及用途,将整个工程拆解细化为多个各自独立组件模块,在最大程度上降低代码间的耦合,也更容易聚焦和定位问题。 将通用化组件提取为独立工程,独立编译、按需选用,极大的降低系统主工程代码量。相关组件也已上传至 Maven 中央仓库,降低系统主工程工程代码编译耗时,改进和提升 CICD 效率, 原有主工程代码结构也进行了深化调整,代码分包更加合理,代码逻辑也更加清晰。 [5]、界面预览 [6]、额外说明 本项目以后将主要维护 `Spring Authorization Server` 版本,原有基于 `Spring Security OAuth2` 的版本已经移至 spring-security-oauth2 分支,可以从该分支或发行版页面获取历史版本继续使用。后期会根据 ISSUE 以及使用用户反馈情况,再行决定是否继续维护 `Spring Security OAuth2` 版本。 基于 Vue3、Vite3、Quasar2、Pinia 等新版前端已发布,原有基于 Vue2、Vuetify2、Typescript 开发的前端代码已移至 vue2+vuetify2+typescript 分支 自 2.7.2.3 版本起,Dante Cloud 所有核心代码全部开源。新开放内容包括: 接口权限鉴权:全面整合 `@PreAuthorize` 注解权限与 `URL` 权限,通过后端动态配置,无须在代码中配置 `Spring Security` 权限注解以及权限方法,即可实现接口鉴权以及权限的动态修改。采用分布式鉴权方案,规避 Gateway 统一鉴权的压力以及重复鉴权问题 动态权限数据分发:采用分布式服务独立鉴权方案,`Spring Security` `@PreAuthorize` 的权限注解、权限方法以及 `URL` 权限,通过后端动态配置后,实时动态分发至对应服务。 User 数据策略访问:`OAuth2` `UserDetails` 核心数据支持直连数据库获取和 `Feign` 远程调用两种模式。`OAuth2` 直连数据库模式性能更优,`Feign` 访问远程调用可扩展性更强。可通过配置动态修改采用策略方式。 手机短信验证码注册认证:采用自定义 `OAuth2` 授权模式,使用统一 `Token` 接口,实现手机验证码登录认证,与平台为统一体系,统一返回`OAuth2` Token,支持服务接口鉴权 第三方系统社交注册认证:集成 `JustAuth`,采用自定义 `OAuth2` 授权模式,使用统一 `Token` 接口,实现基于 `JustAuth` 实现第三方系统社交登录认证,与平台为统一体系,统一返回 `OAuth2` Token,支持服务接口鉴权。所有 `JustAuth` 支持的第三方系统均支持。 微信小程序注册认证:采用自定义 `OAuth2` 授权模式,使用统一 `Token` 接口,实现支持微信小程序登录认证,与平台为统一体系,统一返回 `OAuth2` Token,支持服务接口鉴权。 其它方式注册认证:采用策略模式对外部系登录认证和用户注册进行接入支持,采用 `OAuth2` 默认认证接口。目前未集成的外部系统,可参考标准,适当增减参数,即可支持接入。 多通道 SMS 集成:集成阿里,百度,中国移动,华为,京东,极光,网易,七牛,腾讯,又拍,云片等平台短信发送通道。可通过配置动态选择具体使用通道。支持多模版定义以及模版参数顺序控制 微信小程序订阅消息:支持微信小程序订阅消息发送。提供订阅消息模版工厂,可根据自身业务需求,编写少量代码既可以拓展支持新订阅消息模版。 Dromara开源社区 一、社区愿景 让每一位开源爱好者,体会到开源的快乐。 二、社区官网 https://dromara.org 是 Dromara 开源社区官方网站。 三、成员项目

优秀的个人博客,低调大师

HYC 0.02 版本发布,基于 springcloud + antd 的低代码研发工具

更新内容: [新增] 产品管理,添加涉及接口、涉及模型、涉及仓库、涉及数据库、涉及字典功能。 [新增] 新增产品初始化脚本功能,运行完成系统涉及基础脚本运行。 [新增] 产品升级,添加在线升级脚本管理功能,包含升级文件,文件编译、一键发布等功能 [新增] 产品编译功能,监控每次升级任务编译记录。 [新增] 产品运行功能,查看系统运行时系统各组件记录。 [新增] 产品历史功能,每次升级备份脚本记录。 [新增] 页面设计-新增默认编译功能。 [新增] 接口设计-新增默认编译功能。 https://gitee.com/beijixiongwanjia/haiyuan-cloud-web https://gitee.com/beijixiongwanjia/haiyuan-cloud-server 如果觉得还不错,STAR 一下吧

优秀的个人博客,低调大师

【SpringCloud技术专题】「Hystrix」(3)Command运作的原理和源码分析

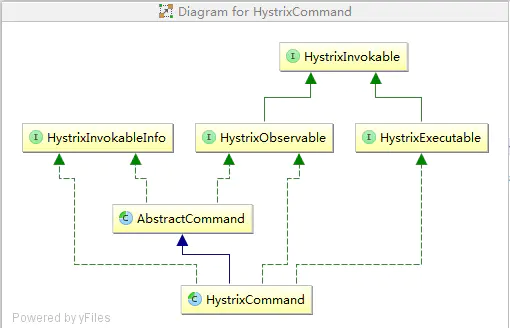
# [每日一句] > **也许你度过了很糟糕的一天,但这并不代表你会因此度过糟糕的一生。** ### 构建一个Hystrix的Command模式 这里我们需要关注三点: - (模板构造器)**HystrixCommand构造函数当中的super** - (真正的执行者)**HystrixCommand定义的run,run其实就是真正执行命令的地方** - (触发启动)**new HelloWorldHystrixCommand("test").execute()中execute是发起执行的过程** ### 实现Demo ```java public class HelloWorldHystrixCommand extends HystrixCommand { private final String name; public HelloWorldHystrixCommand(String name) { super(HystrixCommandGroupKey.Factory.asKey("ExampleGroup")); this.name = name; } @Override protected String run() throws Exception { //Thread.sleep(100); return "hello"+name; } } public static void main(String[] args){ String result = new HelloWorldHystrixCommand("test").execute(); System.out.println(result); } ``` ### HystrixCommand初始化过程 > **HystrixCommand的类关系图下,这里我们只需要暂时关注HystrixCommand继承自AbstractCommand即可,其他的我也没仔细看**。 #### HystrixCommand类依赖图 ![](https://oscimg.oschina.net/oscnet/up-b51f34ca2c47b7b123b9ebd3507900d40c4.png) ##### HelloWorldHystrixCommand的构造步骤如下: 1. **具体类HelloWorldHystrixCommand继承自HystrixCommand, 通过super()调用了HystrixCommand的构造函数** 2. **HystrixCommand通过super()命令调用AbstractCommand实现初始化** #### AbstractCommand类当中比较核心的几个对象如下: - metrics:统计指标 - circuitBreaker:熔断器变量 - threadPool:隔离的线程池 - concurrencyStrategy :并发策略 ```java protected HystrixCommand(HystrixCommandGroupKey group) { super(group, null, null, null, null, null, null, null, null, null, null, null); } protected AbstractCommand(HystrixCommandGroupKey group, HystrixCommandKey key, HystrixThreadPoolKey threadPoolKey, HystrixCircuitBreaker circuitBreaker, HystrixThreadPool threadPool,HystrixCommandProperties.Setter commandPropertiesDefaults, HystrixThreadPoolProperties.Setter threadPoolPropertiesDefaults, HystrixCommandMetrics metrics, TryableSemaphore fallbackSemaphore, TryableSemaphore executionSemaphore, HystrixPropertiesStrategy propertiesStrategy, HystrixCommandExecutionHook executionHook) { this.commandGroup = initGroupKey(group); this.commandKey = initCommandKey(key, getClass()); this.properties = initCommandProperties(this.commandKey, propertiesStrategy, commandPropertiesDefaults); this.threadPoolKey = initThreadPoolKey(threadPoolKey, this.commandGroup, this.properties.executionIsolationThreadPoolKeyOverride().get()); this.metrics = initMetrics(metrics, this.commandGroup, this.threadPoolKey, this.commandKey, this.properties); this.circuitBreaker = initCircuitBreaker(this.properties.circuitBreakerEnabled().get(), circuitBreaker, this.commandGroup, this.commandKey, this.properties, this.metrics); // 线程池相关配置,通过线程池进行隔离 this.threadPool = initThreadPool(threadPool, this.threadPoolKey, threadPoolPropertiesDefaults); //Strategies from plugins this.eventNotifier = HystrixPlugins.getInstance().getEventNotifier(); this.concurrencyStrategy = HystrixPlugins.getInstance().getConcurrencyStrategy(); HystrixMetricsPublisherFactory.createOrRetrievePublisherForCommand(this.commandKey, this.commandGroup, this.metrics, this.circuitBreaker, this.properties); this.executionHook = initExecutionHook(executionHook); this.requestCache = HystrixRequestCache.getInstance(this.commandKey, this.concurrencyStrategy); this.currentRequestLog = initRequestLog(this.properties.requestLogEnabled().get(), this.concurrencyStrategy); /* fallback semaphore override if applicable */ this.fallbackSemaphoreOverride = fallbackSemaphore; /* execution semaphore override if applicable */ this.executionSemaphoreOverride = executionSemaphore; } ``` ### Hystrix的执行 > **从Hystrix的整个执行的生命周期来看**,**可以分为两个阶段,阶段一主要是Observable的创建,阶段二主要是Observable的执行**。 - **两个过程的实际实现中运用了大量的RxJava的技能包,所以阅读起来有一点绕,我只能按照我粗浅的理解来尽量把整个过程讲解清楚。** - **切入详细的过程当中,大家需要带有两个疑问去看代码,只有找到能解答这两个疑问的代码才算看懂了主流程,两个疑问分别是:(1)如何分配执行线程;(2)如何判定超时。** #### Hystrix的Observable创建过程 Hystrix的创建过程比较复杂,大致核心流程如下: 1. **类HystrixCommand中execute方法开始执行,内部的queue()是实际执行整个过程,get()是获取执行的结果。** 2. **类HystrixCommand中queue方法,delegate = toObservable().toBlocking().toFuture(),toObservable负责创建Observable对象,toFuture负责执行任务(Future)。** 3. **类AbstractCommand中toObservable方法,hystrixObservable = `Observable.defer(applyHystrixSemantics)`负责关联applyHystrixSemantics。** 4. **类AbstractCommand中applyHystrixSemantics方法,executeCommandAndObserve(cmd)负责执行具体的AbstractCommand采用相关的Observable进行关联绑定。** 5. **类AbstractCommand中executeCommandAndObserve方法中,`executeCommandWithSpecifiedIsolation(cmd).lift(new HystrixObservableTimeoutOperator (_cmd))`负责关联执行_cmd并关联超时检测任务。** 6. **类AbstractCommand中executeCommandWithSpecifiedIsolation是执行的具体的命令,【HystrixObservableTimeoutOperator是超时检测任务】。** 7. **类AbstractCommand中executeCommandWithSpecifiedIsolation方法中,getUserExecutionObservable负责执行具体任务,同时通过`subscribeOn(threadPool.getScheduler(new Func0 ()))`关联threadPool隔离执行任务,关键的隔离任务的位置。** 8. **类HystrixCommand中getUserExecutionObservable方法中,`Observable.just(run())`负责执行任务,这个run方法就是HelloWorldHystrixCommand的run方法,也就是这里终于回调回了真正的run函数。** #### execute执行方法 ```java public R execute() { try { return queue().get(); } catch (Exception e) { throw Exceptions.sneakyThrow(decomposeException(e)); } } ``` #### 获取Observable获取相关的Future ```java public Future queue() { //todo ((Observable )that).single().subscribe(new Subscriber () //todo BlockingOperatorToFuture.toFuture里面真正执行任务 //todo toObservable内部是通过RxJava构建 final Future delegate = toObservable().toBlocking().toFuture(); final Future f = new Future () { @Override public boolean cancel(boolean mayInterruptIfRunning) { if (delegate.isCancelled()) { return false; } if (HystrixCommand.this.getProperties().executionIsolationThreadInterruptOnFutureCancel().get()) { interruptOnFutureCancel.compareAndSet(false, mayInterruptIfRunning); } final boolean res = delegate.cancel(interruptOnFutureCancel.get()); if (!isExecutionComplete() && interruptOnFutureCancel.get()) { final Thread t = executionThread.get(); if (t != null && !t.equals(Thread.currentThread())) { t.interrupt(); } } return res; } @Override public boolean isCancelled() { return delegate.isCancelled(); } @Override public boolean isDone() { return delegate.isDone(); } @Override public R get() throws InterruptedException, ExecutionException { return delegate.get(); } @Override public R get(long timeout, TimeUnit unit) throws InterruptedException, ExecutionException, TimeoutException { return delegate.get(timeout, unit); } }; if (f.isDone()) { try { f.get(); return f; } catch (Exception e) { Throwable t = decomposeException(e); if (t instanceof HystrixBadRequestException) { return f; } else if (t instanceof HystrixRuntimeException) { HystrixRuntimeException hre = (HystrixRuntimeException) t; switch (hre.getFailureType()) { case COMMAND_EXCEPTION: case TIMEOUT: return f; default: throw hre; } } else { throw Exceptions.sneakyThrow(t); } } } return f; } public Observable toObservable() { final AbstractCommand _cmd = this; final Action0 terminateCommandCleanup = new Action0() { @Override public void call() { if (_cmd.commandState.compareAndSet(CommandState.OBSERVABLE_CHAIN_CREATED, CommandState.TERMINAL)) { handleCommandEnd(false); //user code never ran } else if (_cmd.commandState.compareAndSet(CommandState.USER_CODE_EXECUTED, CommandState.TERMINAL)) { handleCommandEnd(true); //user code did run } } }; final Action0 unsubscribeCommandCleanup = new Action0() { @Override public void call() { circuitBreaker.markNonSuccess(); if (_cmd.commandState.compareAndSet(CommandState.OBSERVABLE_CHAIN_CREATED, CommandState.UNSUBSCRIBED)) { if (!_cmd.executionResult.containsTerminalEvent()) { _cmd.eventNotifier.markEvent(HystrixEventType.CANCELLED, _cmd.commandKey); try { executionHook.onUnsubscribe(_cmd); } catch (Throwable hookEx) { logger.warn("Error calling HystrixCommandExecutionHook.onUnsubscribe", hookEx); } _cmd.executionResultAtTimeOfCancellation = _cmd.executionResult .addEvent((int) (System.currentTimeMillis() - _cmd.commandStartTimestamp), HystrixEventType.CANCELLED); } handleCommandEnd(false); //user code never ran } else if (_cmd.commandState.compareAndSet(CommandState.USER_CODE_EXECUTED, CommandState.UNSUBSCRIBED)) { if (!_cmd.executionResult.containsTerminalEvent()) { _cmd.eventNotifier.markEvent(HystrixEventType.CANCELLED, _cmd.commandKey); try { executionHook.onUnsubscribe(_cmd); } catch (Throwable hookEx) { logger.warn("Error calling HystrixCommandExecutionHook.onUnsubscribe", hookEx); } _cmd.executionResultAtTimeOfCancellation = _cmd.executionResult .addEvent((int) (System.currentTimeMillis() - _cmd.commandStartTimestamp), HystrixEventType.CANCELLED); } handleCommandEnd(true); //user code did run } } }; final Func0 > applyHystrixSemantics = new Func0 >() { @Override public Observable call() { if (commandState.get().equals(CommandState.UNSUBSCRIBED)) { return Observable.never(); } return applyHystrixSemantics(_cmd); } }; final Func1 wrapWithAllOnNextHooks = new Func1 () { @Override public R call(R r) { R afterFirstApplication = r; try { afterFirstApplication = executionHook.onComplete(_cmd, r); } catch (Throwable hookEx) { logger.warn("Error calling HystrixCommandExecutionHook.onComplete", hookEx); } try { return executionHook.onEmit(_cmd, afterFirstApplication); } catch (Throwable hookEx) { logger.warn("Error calling HystrixCommandExecutionHook.onEmit", hookEx); return afterFirstApplication; } } }; final Action0 fireOnCompletedHook = new Action0() { @Override public void call() { try { executionHook.onSuccess(_cmd); } catch (Throwable hookEx) { logger.warn("Error calling HystrixCommandExecutionHook.onSuccess", hookEx); } } }; //defer在subscribe的时候会真正执行 return Observable.defer(new Func0 >() { @Override public Observable call() { /* this is a stateful object so can only be used once */ if (!commandState.compareAndSet(CommandState.NOT_STARTED, CommandState.OBSERVABLE_CHAIN_CREATED)) { IllegalStateException ex = new IllegalStateException(""); //TODO make a new error type for this throw new HystrixRuntimeException(FailureType.BAD_REQUEST_EXCEPTION, _cmd.getClass(), getLogMessagePrefix() + " ", ex, null); } commandStartTimestamp = System.currentTimeMillis(); if (properties.requestLogEnabled().get()) { if (currentRequestLog != null) { currentRequestLog.addExecutedCommand(_cmd); } } final boolean requestCacheEnabled = isRequestCachingEnabled(); final String cacheKey = getCacheKey(); /* try from cache first */ if (requestCacheEnabled) { HystrixCommandResponseFromCache fromCache = (HystrixCommandResponseFromCache ) requestCache.get(cacheKey); if (fromCache != null) { isResponseFromCache = true; return handleRequestCacheHitAndEmitValues(fromCache, _cmd); } } // todo 这里应该在会去执行applyHystrixSemantics方法 Observable hystrixObservable = Observable.defer(applyHystrixSemantics) .map(wrapWithAllOnNextHooks); Observable afterCache; // put in cache if (requestCacheEnabled && cacheKey != null) { // wrap it for caching HystrixCachedObservable toCache = HystrixCachedObservable.from(hystrixObservable, _cmd); HystrixCommandResponseFromCache fromCache = (HystrixCommandResponseFromCache ) requestCache.putIfAbsent(cacheKey, toCache); if (fromCache != null) { // another thread beat us so we'll use the cached value instead toCache.unsubscribe(); isResponseFromCache = true; return handleRequestCacheHitAndEmitValues(fromCache, _cmd); } else { // we just created an ObservableCommand so we cast and return it afterCache = toCache.toObservable(); } } else { afterCache = hystrixObservable; } //todo 关联逻辑 return afterCache .doOnTerminate(terminateCommandCleanup) .doOnUnsubscribe(unsubscribeCommandCleanup) .doOnCompleted(fireOnCompletedHook); } }); } // TODO: 2018/7/9 真正执行代码的地方在这里 private Observable applyHystrixSemantics(final AbstractCommand _cmd) { executionHook.onStart(_cmd); if (circuitBreaker.attemptExecution()) { final TryableSemaphore executionSemaphore = getExecutionSemaphore(); final AtomicBoolean semaphoreHasBeenReleased = new AtomicBoolean(false); final Action0 singleSemaphoreRelease = new Action0() { @Override public void call() { if (semaphoreHasBeenReleased.compareAndSet(false, true)) { executionSemaphore.release(); } } }; final Action1 markExceptionThrown = new Action1 () { @Override public void call(Throwable t) { eventNotifier.markEvent(HystrixEventType.EXCEPTION_THROWN, commandKey); } }; if (executionSemaphore.tryAcquire()) { try { executionResult = executionResult.setInvocationStartTime(System.currentTimeMillis()); // TODO: 2018/7/9 executeCommandAndObserve执行任务的地方 return executeCommandAndObserve(_cmd) .doOnError(markExceptionThrown) .doOnTerminate(singleSemaphoreRelease) .doOnUnsubscribe(singleSemaphoreRelease); } catch (RuntimeException e) { return Observable.error(e); } } else { return handleSemaphoreRejectionViaFallback(); } } else { return handleShortCircuitViaFallback(); } } private Observable executeCommandAndObserve(final AbstractCommand _cmd) { final HystrixRequestContext currentRequestContext = HystrixRequestContext.getContextForCurrentThread(); final Action1 markEmits = new Action1 () { @Override public void call(R r) { if (shouldOutputOnNextEvents()) { executionResult = executionResult.addEvent(HystrixEventType.EMIT); eventNotifier.markEvent(HystrixEventType.EMIT, commandKey); } if (commandIsScalar()) { long latency = System.currentTimeMillis() - executionResult.getStartTimestamp(); eventNotifier.markEvent(HystrixEventType.SUCCESS, commandKey); executionResult = executionResult.addEvent((int) latency, HystrixEventType.SUCCESS); eventNotifier.markCommandExecution(getCommandKey(), properties.executionIsolationStrategy().get(), (int) latency, executionResult.getOrderedList()); circuitBreaker.markSuccess(); } } }; final Action0 markOnCompleted = new Action0() { @Override public void call() { if (!commandIsScalar()) { long latency = System.currentTimeMillis() - executionResult.getStartTimestamp(); eventNotifier.markEvent(HystrixEventType.SUCCESS, commandKey); executionResult = executionResult.addEvent((int) latency, HystrixEventType.SUCCESS); eventNotifier.markCommandExecution(getCommandKey(), properties.executionIsolationStrategy().get(), (int) latency, executionResult.getOrderedList()); circuitBreaker.markSuccess(); } } }; final Func1 > handleFallback = new Func1 >() { @Override public Observable call(Throwable t) { circuitBreaker.markNonSuccess(); Exception e = getExceptionFromThrowable(t); executionResult = executionResult.setExecutionException(e); if (e instanceof RejectedExecutionException) { return handleThreadPoolRejectionViaFallback(e); } else if (t instanceof HystrixTimeoutException) { return handleTimeoutViaFallback(); } else if (t instanceof HystrixBadRequestException) { return handleBadRequestByEmittingError(e); } else { /* * Treat HystrixBadRequestException from ExecutionHook like a plain HystrixBadRequestException. */ if (e instanceof HystrixBadRequestException) { eventNotifier.markEvent(HystrixEventType.BAD_REQUEST, commandKey); return Observable.error(e); } return handleFailureViaFallback(e); } } }; final Action1 > setRequestContext = new Action1 >() { @Override public void call(Notification rNotification) { setRequestContextIfNeeded(currentRequestContext); } }; //todo 这里是否执行超时动作,executeCommandWithSpecifiedIsolation这个函数非常重要 Observable execution; if (properties.executionTimeoutEnabled().get()) { execution = executeCommandWithSpecifiedIsolation(_cmd) .lift(new HystrixObservableTimeoutOperator (_cmd)); //todo HystrixObservableTimeoutOperator负责执行超时动作 } else { execution = executeCommandWithSpecifiedIsolation(_cmd); } return execution.doOnNext(markEmits) .doOnCompleted(markOnCompleted) .onErrorResumeNext(handleFallback) .doOnEach(setRequestContext); } private Observable executeCommandWithSpecifiedIsolation(final AbstractCommand _cmd) { if (properties.executionIsolationStrategy().get() == ExecutionIsolationStrategy.THREAD) { return Observable.defer(new Func0 >() { @Override public Observable call() { executionResult = executionResult.setExecutionOccurred(); if (!commandState.compareAndSet(CommandState.OBSERVABLE_CHAIN_CREATED, CommandState.USER_CODE_EXECUTED)) { return Observable.error(new IllegalStateException( "execution attempted while in state : " + commandState.get().name())); } metrics.markCommandStart(commandKey, threadPoolKey, ExecutionIsolationStrategy.THREAD); if (isCommandTimedOut.get() == TimedOutStatus.TIMED_OUT) { // the command timed out in the wrapping thread so we will return immediately // and not increment any of the counters below or other such logic return Observable.error(new RuntimeException("timed out before executing run()")); } if (threadState.compareAndSet(ThreadState.NOT_USING_THREAD, ThreadState.STARTED)) { //we have not been unsubscribed, so should proceed HystrixCounters.incrementGlobalConcurrentThreads(); threadPool.markThreadExecution(); // store the command that is being run endCurrentThreadExecutingCommand = Hystrix.startCurrentThreadExecutingCommand(getCommandKey()); executionResult = executionResult.setExecutedInThread(); try { //todo 估计是前置依赖吧 executionHook.onThreadStart(_cmd); executionHook.onRunStart(_cmd); executionHook.onExecutionStart(_cmd); //todo 真正执行的地方 return getUserExecutionObservable(_cmd); } catch (Throwable ex) { return Observable.error(ex); } } else { //command has already been unsubscribed, so return immediately return Observable.empty(); } } }).doOnTerminate(new Action0() { @Override public void call() { if (threadState.compareAndSet(ThreadState.STARTED, ThreadState.TERMINAL)) { handleThreadEnd(_cmd); } if (threadState.compareAndSet(ThreadState.NOT_USING_THREAD, ThreadState.TERMINAL)) { } } }).doOnUnsubscribe(new Action0() { @Override public void call() { if (threadState.compareAndSet(ThreadState.STARTED, ThreadState.UNSUBSCRIBED)) { handleThreadEnd(_cmd); } if (threadState.compareAndSet(ThreadState.NOT_USING_THREAD, ThreadState.UNSUBSCRIBED)) { //if it was never started and was cancelled, then no need to clean up } //if it was terminal, then other cleanup handled it } }).subscribeOn(threadPool.getScheduler(new Func0 () { //todo subscribeOn 据说获取线程的地方???? @Override public Boolean call() { return properties.executionIsolationThreadInterruptOnTimeout().get() && _cmd.isCommandTimedOut.get() == TimedOutStatus.TIMED_OUT; } })); } else { return Observable.defer(new Func0 >() { @Override public Observable call() { executionResult = executionResult.setExecutionOccurred(); if (!commandState.compareAndSet(CommandState.OBSERVABLE_CHAIN_CREATED, CommandState.USER_CODE_EXECUTED)) { return Observable.error(new IllegalStateException( "execution attempted while in state : " + commandState.get().name())); } metrics.markCommandStart(commandKey, threadPoolKey, ExecutionIsolationStrategy.SEMAPHORE); // semaphore isolated // store the command that is being run endCurrentThreadExecutingCommand = Hystrix.startCurrentThreadExecutingCommand(getCommandKey()); try { executionHook.onRunStart(_cmd); executionHook.onExecutionStart(_cmd); return getUserExecutionObservable(_cmd); } catch (Throwable ex) { return Observable.error(ex); } } }); } } private Observable getUserExecutionObservable(final AbstractCommand _cmd) { Observable userObservable; try { userObservable = getExecutionObservable(); } catch (Throwable ex) { // the run() method is a user provided implementation so can throw instead of using Observable.onError // so we catch it here and turn it into Observable.error userObservable = Observable.error(ex); } return userObservable .lift(new ExecutionHookApplication(_cmd)) .lift(new DeprecatedOnRunHookApplication(_cmd)); } // 真正执行run的位置 final protected Observable getExecutionObservable() { return Observable.defer(new Func0 >() { @Override public Observable call() { try { return Observable.just(run()); } catch (Throwable ex) { return Observable.error(ex); } } }).doOnSubscribe(new Action0() { @Override public void call() { // Save thread on which we get subscribed so that we can interrupt it later if needed executionThread.set(Thread.currentThread()); } }); } ``` ### Hystrix的执行过程 > toFuture过程中真正触发构建的Observable的的代码在((Observable )that).single().subscribe()当中,关注几个方法: onCompleted负责设置完成标记。 onNext负责设置结果。 ```java public static Future toFuture(Observable that) { final CountDownLatch finished = new CountDownLatch(1); final AtomicReference value = new AtomicReference (); final AtomicReference error = new AtomicReference (); @SuppressWarnings("unchecked") final Subscription s = ((Observable )that).single().subscribe(new Subscriber (){ @Override public void onCompleted() { finished.countDown(); } @Override public void onError(Throwable e) { error.compareAndSet(null, e); finished.countDown(); } @Override public void onNext(T v) { // "single" guarantees there is only one "onNext" value.set(v); } }); return new Future () { private volatile boolean cancelled; @Override public boolean cancel(boolean mayInterruptIfRunning) { if (finished.getCount() > 0) { cancelled = true; s.unsubscribe(); // release the latch (a race condition may have already released it by now) finished.countDown(); return true; } else { // can't cancel return false; } } @Override public boolean isCancelled() { return cancelled; } @Override public boolean isDone() { return finished.getCount() == 0; } @Override public T get() throws InterruptedException, ExecutionException { finished.await(); return getValue(); } @Override public T get(long timeout, TimeUnit unit) throws InterruptedException, ExecutionException, TimeoutException { if (finished.await(timeout, unit)) { return getValue(); } else { throw new TimeoutException("Timed out after " + unit.toMillis(timeout) + "ms waiting for underlying Observable."); } } private T getValue() throws ExecutionException { final Throwable throwable = error.get(); if (throwable != null) { throw new ExecutionException("Observable onError", throwable); } else if (cancelled) { // Contract of Future.get() requires us to throw this: throw new CancellationException("Subscription unsubscribed"); } else { return value.get(); } } }; } ```
优秀的个人博客,低调大师

【SpringCloud技术专题】「Hystrix」(3)超时机制的原理和实现

[每日一句] 也许你度过了很糟糕的一天,但这并不代表你会因此度过糟糕的一生。 [温馨提示] 承接上一篇文章🏹「Hystrix」(2)参数配置的详细介绍 在这里推荐给大家martinfowler的熔断器介绍和权威指南,有兴趣的小伙伴们可以研究一下哈。 主要介绍相关:官网说明 关于 【Hystrix如何运行的介绍】的介绍 [背景介绍] 分布式系统的规模和复杂度不断增加,随着而来的是对分布式系统可用性的要求越来越高。在各种高可用设计模式中,【熔断、隔离、降级、限流】是经常被使用的。而相关的技术,Hystrix本身早已算不上什么新技术,但它却是最经典的技术体系!。 Hystrix以实现熔断降级的设计,从而提高了系统的可用性。 Hystrix是一个在调用端上,实现断路器模式,以及隔舱模式,通过避免级联故障,提高系统容错能力,从而实现高可用设计的一个Java服务组件库。 Hystrix实现了资源隔离机制 前提介绍 Hystrix的超时检测本质上通过启动单独线程去检测的,线程的执行的时间刚好就是任务超时的时间,本质上就是这么个简单的逻辑。 Hystrix超时后会抛出一个HystrixTimeoutException的异常。 超时检测逻辑 Hystrix的超时包括注册过程和执行过程两个,注册过程如下: 执行lift(new HystrixObservableTimeoutOperator<R>(_cmd))关联超时检测任务。 在HystrixObservableTimeoutOperator类中,new TimerListener()负责创建检测任务,HystrixTimer.getInstance().addTimerListener(listener)负责关联定时任务。 在HystrixObservableTimeoutOperator类中,addTimerListener通过java的定时任务服务scheduleAtFixedRate在延迟超时时间后执行。 Hystrix的超时执行过程如下: 在超时后执行listener.tick()方法后执行类TimerListener的tick方法 在TimerListener类的tick方法中执行timeoutRunnable.run()后执行HystrixContextRunnable的run方法 在HystrixContextRunnable类run方法中执行child.onError(new HystrixTimeoutException())实现超时。 executeCommandWithSpecifiedIsolation(_cmd).lift(new HystrixObservableTimeoutOperator<R>(_cmd)); private static class HystrixObservableTimeoutOperator<R> implements Operator<R, R> { final AbstractCommand<R> originalCommand; public HystrixObservableTimeoutOperator(final AbstractCommand<R> originalCommand) { this.originalCommand = originalCommand; } @Override public Subscriber<? super R> call(final Subscriber<? super R> child) { final CompositeSubscription s = new CompositeSubscription(); // if the child unsubscribes we unsubscribe our parent as well child.add(s); //capture the HystrixRequestContext upfront so that we can use it in the timeout thread later final HystrixRequestContext hystrixRequestContext = HystrixRequestContext.getContextForCurrentThread(); TimerListener listener = new TimerListener() { @Override public void tick() { if(originalCommand.isCommandTimedOut .compareAndSet(TimedOutStatus.NOT_EXECUTED, TimedOutStatus.TIMED_OUT)) { // report timeout failure originalCommand.eventNotifier.markEvent(HystrixEventType.TIMEOUT, originalCommand.commandKey); // shut down the original request s.unsubscribe(); final HystrixContextRunnable timeoutRunnable = new HystrixContextRunnable( originalCommand.concurrencyStrategy, hystrixRequestContext, new Runnable() { @Override public void run() { child.onError(new HystrixTimeoutException()); } }); timeoutRunnable.run(); } } @Override public int getIntervalTimeInMilliseconds() { return originalCommand.properties.executionTimeoutInMilliseconds().get(); } }; final Reference<TimerListener> tl = HystrixTimer.getInstance().addTimerListener(listener); // set externally so execute/queue can see this originalCommand.timeoutTimer.set(tl); /** * If this subscriber receives values it means the parent succeeded/completed */ Subscriber<R> parent = new Subscriber<R>() { @Override public void onCompleted() { if (isNotTimedOut()) { // stop timer and pass notification through tl.clear(); child.onCompleted(); } } @Override public void onError(Throwable e) { if (isNotTimedOut()) { // stop timer and pass notification through tl.clear(); child.onError(e); } } @Override public void onNext(R v) { if (isNotTimedOut()) { child.onNext(v); } } private boolean isNotTimedOut() { // if already marked COMPLETED (by onNext) or succeeds in setting to COMPLETED return originalCommand.isCommandTimedOut.get() == TimedOutStatus.COMPLETED || originalCommand.isCommandTimedOut.compareAndSet(TimedOutStatus.NOT_EXECUTED, TimedOutStatus.COMPLETED); } }; // if s is unsubscribed we want to unsubscribe the parent s.add(parent); return parent; } } public Reference<TimerListener> addTimerListener(final TimerListener listener) { startThreadIfNeeded(); // add the listener Runnable r = new Runnable() { @Override public void run() { try { listener.tick(); } catch (Exception e) { logger.error("Failed while ticking TimerListener", e); } } }; //这里直接简单粗暴的scheduleAtFixedRate以超时时间作为周期去判断是否执行完成 ScheduledFuture<?> f = executor.get().getThreadPool().scheduleAtFixedRate(r, listener.getIntervalTimeInMilliseconds(), listener.getIntervalTimeInMilliseconds(), TimeUnit.MILLISECONDS); return new TimerReference(listener, f); } public class HystrixContextRunnable implements Runnable { private final Callable<Void> actual; private final HystrixRequestContext parentThreadState; public HystrixContextRunnable(Runnable actual) { this(HystrixPlugins.getInstance().getConcurrencyStrategy(), actual); } public HystrixContextRunnable(HystrixConcurrencyStrategy concurrencyStrategy, final Runnable actual) { this(concurrencyStrategy, HystrixRequestContext.getContextForCurrentThread(), actual); } public HystrixContextRunnable(final HystrixConcurrencyStrategy concurrencyStrategy, final HystrixRequestContext hystrixRequestContext, final Runnable actual) { this.actual = concurrencyStrategy.wrapCallable(new Callable<Void>() { @Override public Void call() throws Exception { actual.run(); return null; } }); this.parentThreadState = hystrixRequestContext; } @Override public void run() { HystrixRequestContext existingState = HystrixRequestContext.getContextForCurrentThread(); try { // set the state of this thread to that of its parent HystrixRequestContext.setContextOnCurrentThread(parentThreadState); // execute actual Callable with the state of the parent try { actual.call(); } catch (Exception e) { throw new RuntimeException(e); } } finally { // restore this thread back to its original state HystrixRequestContext.setContextOnCurrentThread(existingState); } } }

优秀的个人博客,低调大师

Spring Cloud 2.x系列之springcloud整合lettuce使用redis

Redis是一种nosql数据库,以键值对<key,value>的形式存储数据,其速度相比于MySQL之类的数据库,相当于内存读写与硬盘读写的差别,所以常常用作缓存,用于少写多读的场景下,直接从缓存拿数据比从数据库(数据库要I/O操作)拿要快得多。Redis目前几乎无处不在,大公司小公司都在用。 Spring cloud 2.x版本后默认Redis客户端连接池类型使用的是lettuce,而Sping cloud 1.5.x使用的jedis。Lettuce和Jedis的都是连接Redis Server的客户端程序。Jedis在实现上是直连redis server,多线程环境下非线程安全,除非使用连接池,为每个Jedis实例增加物理连接;Lettuce基于Netty的连接实例(StatefulRedisConnection),可以在多个线程间并发访问,且线程安全,满足多线程环境下的并发访问,同时它是可伸缩的设计,一个连接实例不够的情况也可以按需增加连接实例。 1、新建项目sc-redis,对应的pom.xml文件如下 <project xmlns="http://maven.apache.org/POM/4.0.0" xmlns:xsi="http://www.w3.org/2001/XMLSchema-instance" xsi:schemaLocation="http://maven.apache.org/POM/4.0.0http://maven.apache.org/xsd/maven-4.0.0.xsd"> <modelVersion>4.0.0</modelVersion> <groupId>spring-cloud</groupId> <artifactId>sc-redis</artifactId> <version>0.0.1-SNAPSHOT</version> <packaging>jar</packaging> <name>sc-redis</name> <url>http://maven.apache.org</url> <parent> <groupId>org.springframework.boot</groupId> <artifactId>spring-boot-starter-parent</artifactId> <version>2.0.4.RELEASE</version> </parent> <dependencyManagement> <dependencies> <dependency> <groupId>org.springframework.cloud</groupId> <artifactId>spring-cloud-dependencies</artifactId> <version>Finchley.RELEASE</version> <type>pom</type> <scope>import</scope> </dependency> </dependencies> </dependencyManagement> <properties> <project.build.sourceEncoding>UTF-8</project.build.sourceEncoding> <maven.compiler.source>1.8</maven.compiler.source> <maven.compiler.target>1.8</maven.compiler.target> </properties> <dependencies> <dependency> <groupId>org.springframework.boot</groupId> <artifactId>spring-boot-starter-data-redis</artifactId> </dependency> <dependency> <groupId>org.apache.commons</groupId> <artifactId>commons-pool2</artifactId> </dependency> <dependency> <groupId>org.springframework.boot</groupId> <artifactId>spring-boot-starter-web</artifactId> </dependency> </dependencies> </project> 2、新建spring boot启动类 package sc.redis; import org.springframework.boot.SpringApplication; import org.springframework.boot.autoconfigure.SpringBootApplication; @SpringBootApplication public class RedisApplication { public static void main(String[] args) { SpringApplication.run(RedisApplication.class,args); } } 3、新建配置文件application.yml server: port: 9004 spring: application: name: sc-redis redis: host: 127.0.0.1 password: port: 6379 timeout: 10000 # 连接超时时间(毫秒) database: 0 # Redis默认情况下有16个分片,这里配置具体使用的分片,默认是0 lettuce: pool: max-active: 8 # 连接池最大连接数(使用负值表示没有限制)默认 8 max-wait: -1 # 连接池最大阻塞等待时间(使用负值表示没有限制)默认 -1 max-idle: 8 # 连接池中的最大空闲连接默认 8 min-idle: 0 # 连接池中的最小空闲连接默认 0 备注:reids对用的所有配置项可以在以下类查看 org.springframework.boot.autoconfigure.data.redis.RedisProperties 4、自定义Reids的Template 默认情况下的模板只能支持RedisTemplate<String, String>,也就是只能存入字符串,这在开发中是不友好的,所以自定义模板是很有必要的,当自定义了模板又想使用String存储这时候就可以使用StringRedisTemplate的方式,它们之间并不冲突。 package sc.redis.config; import java.io.Serializable; import org.springframework.boot.autoconfigure.AutoConfigureAfter; import org.springframework.boot.autoconfigure.data.redis.RedisAutoConfiguration; import org.springframework.context.annotation.Bean; import org.springframework.context.annotation.Configuration; import org.springframework.data.redis.connection.lettuce.LettuceConnectionFactory; import org.springframework.data.redis.core.RedisTemplate; import org.springframework.data.redis.serializer.GenericJackson2JsonRedisSerializer; import org.springframework.data.redis.serializer.StringRedisSerializer; @Configuration @AutoConfigureAfter(RedisAutoConfiguration.class) public class RedisCacheAutoConfiguration { @Bean public RedisTemplate<String, Serializable> redisCacheTemplate(LettuceConnectionFactoryredisConnectionFactory) { RedisTemplate<String, Serializable> template = newRedisTemplate<>(); //键的序列化方式 template.setKeySerializer(newStringRedisSerializer()); //值的序列化方式 template.setValueSerializer(newGenericJackson2JsonRedisSerializer()); template.setConnectionFactory(redisConnectionFactory); returntemplate; } } 5、新建一个模拟的Controller类 packagesc.redis.config; import java.io.Serializable; import java.util.HashMap; import java.util.Map; import org.springframework.beans.factory.annotation.Autowired; import org.springframework.data.redis.core.RedisTemplate; import org.springframework.web.bind.annotation.GetMapping; import org.springframework.web.bind.annotation.PathVariable; import org.springframework.web.bind.annotation.ResponseBody; import org.springframework.web.bind.annotation.RestController; import sc.redis.model.User; @RestController publicclassUserCacheController { //@Autowired //private StringRedisTemplate stringRedisTemplate; @Autowired privateRedisTemplate<String, Serializable> redisCacheTemplate; @GetMapping(value = "/cache/user/cacheUser") @ResponseBody public Map<String, Object> cacheUser() { Map<String,Object> result = new HashMap<String, Object>(); result.put("code", "000000"); result.put("msg", "success"); User u = new User(); u.setId(1L); u.setAge(23); u.setUserName("huangjinjin"); u.setPosition("cto"); result.put("body", u); redisCacheTemplate.opsForValue().set(String.valueOf(u.getId()), u); returnresult; } /** * 获取缓存信息 * @param id * @return */ @GetMapping(value = "/cache/user/getCacheUser/{id}") @ResponseBody public Map<String, Object> getCacheUser(@PathVariable Long id) { Map<String,Object> result = new HashMap<String, Object>(); result.put("code", "000000"); result.put("msg", "success"); User u = (User) redisCacheTemplate.opsForValue().get(String.valueOf(1)); System.out.println(u.getUserName()); result.put("body", u); returnresult; } } 6、启动sc-redis项目,并验证是否启动成功 7、使用postman访问接口 (1)存储值到redis http://127.0.0.1:9004/cache/user/cacheUser (2)从redis获取存贮的值 http://127.0.0.1:9004/cache/user/getCacheUser/1 使用redis客户端redis-cli查看是否把相关数据存贮到redis 下列的就是Redis其它类型所对应的操作方式: opsForValue:对应 String(字符串) opsForZSet:对应 ZSet(有序集合) opsForHash:对应 Hash(哈希) opsForList:对应 List(列表) opsForSet:对应 Set(集合) opsForGeo:对应 GEO(地理位置) 源码: https://gitee.com/hjj520/spring-cloud-2.x 原文发布时间:2018-9-24 本文作者:java乐园 本文来自云栖社区合作伙伴“java乐园”,了解相关信息可以关注“java乐园”

优秀的个人博客,低调大师

springCloud Finchley 实战入门(基于springBoot 2.0.3)【五 Hystrix 服务容错保护】

服务容错保护 在微服务的架构中,存在着那么多单元服务,若一个单元出现故障,就很容易因依赖关系二引发故障的蔓延,最终导致整个系统的瘫痪。这样的架构相比较传统的架构更加不稳定。为了解决这个问题,产生了断路器等一系列的服务保护机制。 spring Cloud Hystrix实现了断路器、线程隔离等一系列服务保护功能。它也是基于Netflix的开源框架Hystrix实现的。,该框架的目标在于通过控制那些访问远程系统、服务和第三方库的节点,从而对延时和故障提供更加强大的容错能力。 快速入门 我们以之前的内容作为基础,针对"service-user-ribbon"进行配置。 在"service-user-ribbon"的pom.xml配置文件添加Hystrix依赖 <!--添加Hystrix依赖 断路器容错保护--> <dependency> <groupId>org.springframework.cloud</groupId> <artifactId>spring-cloud-starter-netflix-hystrix</artifactId> </dependency> 完整的pom.xml <?xml version="1.0" encoding="UTF-8"?> <project xmlns="http://maven.apache.org/POM/4.0.0" xmlns:xsi="http://www.w3.org/2001/XMLSchema-instance" xsi:schemaLocation="http://maven.apache.org/POM/4.0.0 http://maven.apache.org/xsd/maven-4.0.0.xsd"> <modelVersion>4.0.0</modelVersion> <groupId>com.example</groupId> <artifactId>eureka-bussniss-service-user-client-ribbon</artifactId> <version>0.0.1-SNAPSHOT</version> <packaging>jar</packaging> <name>eureka-bussniss-service-user-client-ribbon</name> <description>Demo project for Spring Boot</description> <parent> <groupId>org.springframework.boot</groupId> <artifactId>spring-boot-starter-parent</artifactId> <version>2.0.3.RELEASE</version> <relativePath/> <!-- lookup parent from repository --> </parent> <properties> <project.build.sourceEncoding>UTF-8</project.build.sourceEncoding> <project.reporting.outputEncoding>UTF-8</project.reporting.outputEncoding> <java.version>1.8</java.version> <spring-cloud.version>Finchley.RELEASE</spring-cloud.version> </properties> <dependencies> <dependency> <groupId>org.springframework.cloud</groupId> <artifactId>spring-cloud-starter-netflix-eureka-server</artifactId> </dependency> <dependency> <groupId>org.springframework.cloud</groupId> <artifactId>spring-cloud-starter-netflix-ribbon</artifactId> </dependency> <!--添加Hystrix依赖 断路器容错保护--> <dependency> <groupId>org.springframework.cloud</groupId> <artifactId>spring-cloud-starter-netflix-hystrix</artifactId> </dependency> <dependency> <groupId>org.projectlombok</groupId> <artifactId>lombok</artifactId> </dependency> <dependency> <groupId>org.springframework.boot</groupId> <artifactId>spring-boot-starter-test</artifactId> <scope>test</scope> </dependency> </dependencies> <dependencyManagement> <dependencies> <dependency> <groupId>org.springframework.cloud</groupId> <artifactId>spring-cloud-dependencies</artifactId> <version>${spring-cloud.version}</version> <type>pom</type> <scope>import</scope> </dependency> </dependencies> </dependencyManagement> <build> <plugins> <plugin> <groupId>org.springframework.boot</groupId> <artifactId>spring-boot-maven-plugin</artifactId> </plugin> </plugins> </build> </project> 然后在主类EurekaBussnissServiceUserClientRibbonApplication中使用@EnableHystrix 注解以开启 Hystrix 特性 @SpringBootApplication @EnableEurekaClient @EnableHystrix public class EurekaBussnissServiceUserClientRibbonApplication { public static void main(String[] args) { SpringApplication.run(EurekaBussnissServiceUserClientRibbonApplication.class, args); } @Bean @LoadBalanced //开启客户端负载均衡 RestTemplate restTemplate() { return new RestTemplate(); } } 接下来修改服务消费方式,在UserManagementRibbonClient类的接口方法:ListUsersByRibbon增加@HystrixCommand并且指定fallbackMethod名,再实现该方法。具体的代码如下: /** * 使用 @HystrixCommand 注解的 fallbackMethod 指定失败方法,并实现该方法 * * @return */ @GetMapping("/listUsersByRibbon") @HystrixCommand(fallbackMethod = "listUsersByRibbonFallback") public String ListUsersByRibbon() { /** * hystrix 断路器的默认的超时时间为2000毫秒 * 这里测试的在3000毫秒的随机出现的超时概率出发断路器 对应的代码逻辑见service-user项目的listUsers接口 */ long start = System.currentTimeMillis(); String result = this.restTemplate.getForObject("http://service-user/listUsers", String.class); long end = System.currentTimeMillis(); log.info("Spend Time :"+(end-start)); return result; } public String listUsersByRibbonFallback() { return "listUsersByRibbon异常,端口:" + port; } 配置完成重启项目,在8802和8803服务正常的情况下服务调用正常。 当我们把其中一个service-user服务停掉。例如:把8802停掉,只剩下8803服务,我们重新访问http://localhost:8901/listUsersByRibbon地址,当我们一开始访问到8802服务时,因为此时服务已经挂了,所以我们会看到下面的响应: 1532500404150.png 过了几秒后,继续访问我们会发现请求总是负载到了8803的端口了,不会再去请求8802 1532500486184.png 接下来我们重新把8802的服务启动后,继续访问http://localhost:8901/listUsersByRibbon这时我们会发现请求接口又被一轮询的方式负载到8802和8803了 1532500622445.png 1532500630124.png 这样我们就实现了基础的分布式微服务的容错保护了。github 项目源码 接下来我们会再研究一下,Hystrix框架针对单个应用实例和集群提供的监控功能。

优秀的个人博客,低调大师

每天学点SpringCloud(七):路由器和过滤器-Zuul

版权声明:本文为博主原创文章,未经博主允许不得转载。博客源地址为zhixiang.org.cn https://blog.csdn.net/myFirstCN/article/details/81055026 为什么要使用Zuul 先来看一下下方这个图 假如现在我们具有四个微服务,分别是用户、订单、支付、催收微服务,它们的调用方式分别是使用http、restful、thrift、kafka。这个时候如果我们在客户端直接调用的话感觉是不是太费劲了,客户端需要维护这几种调用方式的客户端,如果后期新增微服务或者减少或者更换调用方式等,都需要修改客户端。那么我们来看一下加入Zuul以后是什么样子的呢 Zuul呢就负责了所有的调用,解耦了客户端和微服务。也符合我们设计的单一职责原则。 使用Zuul 首先呢,我们在原先的父项目下新增一个cloud-demo-zuul模块,引入依赖 <dependency> <groupId>org.springframework.cloud</groupId> <artifactId>spring-cloud-starter-netflix-eureka-server</artifactId> </dependency> <dependency> <groupId>org.springframework.cloud</groupId> <artifactId>spring-cloud-starter-netflix-zuul</artifactId> </dependency> <groupId>org.springframework.cloud</groupId> <artifactId>spring-cloud-starter-netflix-eureka-server</artifactId> </dependency> <dependency> <groupId>org.springframework.cloud</groupId> <artifactId>spring-cloud-starter-netflix-zuul</artifactId> </dependency> 创建包cn.org.zhixiang,在此包下新建启动类CloudDemoZuulApplication @SpringBootApplication @EnableZuulProxy public class CloudDemoZuulApplication { public static void main(String[] args) { SpringApplication.run(CloudDemoZuulApplication.class, args); } } @EnableZuulProxy public class CloudDemoZuulApplication { public static void main(String[] args) { SpringApplication.run(CloudDemoZuulApplication.class, args); } } @EnableZuulProxy就是开启Zuul的注解 接下来看一下application.yml spring: application: name: zuul-demo server: port: 8093 eureka: client: register-with-eureka: true service-url: defaultZone: http://root:root@localhost:8761/eureka application: name: zuul-demo server: port: 8093 eureka: client: register-with-eureka: true service-url: defaultZone: http://root:root@localhost:8761/eureka 这个配置其实是跟我们以往的服务消费者的配置是一样的,为什么要这样配置呢,因为在这个之前我们需要先复习一下以往的知识点,没有看过以往博客的小伙伴可以先参考这个:https://zhixiang.org.cn 首先启动我们的Eureka服务,然后启动一个提供者cloud-demo-provider。我们知道这个时候我们直接访问http://localhost:8078/user/getUser/2是可以获得数据的对吧,那么我的Zuul是怎么使用的呢。我们启动一下我们的Zuul。 这个时候我们访问http://localhost:8093/provider-demo/user/getUser/2获得的数据是一样的,也就是说我们的Zuul做了一个路由转发。我们可以看到这个url中有一个provider-demo,这个呢是提供者的spring.application.name的值,那么如果我们不想使用这个呢,比如说现在我知道这是user微服务,我就想如果访问user微服务我就使用http://localhost:8093/user/user/getUser/2怎么办呢。 配置 我们需要在yml中加上一个配置。 zuul: routes: provider-demo: /user/** routes: provider-demo: /user/** 这个配置呢就是把服务id为provider-demo的微服务项目地址映射为/user/**.注意最后是两个*,为什么是两个呢,如果是一个*只能匹配/user/a,/user/b这种路径,而匹配不了/user/a/b这种。而我们配两个*的话不仅可以匹配/user/a/b,还能匹配/user/a/b/c/d等。 这个时候我们访问http://localhost:8093/user/user/getUser/2的时候就可以得到数据了。 其实还有别的写法。我们来看一下 1. zuul: routes: demo: path: /user/** serviceId: provider-demo routes: demo: path: /user/** serviceId: provider-demo 2. zuul: routes: demo: path: /user/** url: http://localhost:8078/ routes: demo: path: /user/** url: http://localhost:8078/ 上方这两种方式都是可以的,那个demo呢其实是自定义的,只要不是重复就行。然后path呢就是网页上我们访问的url。这两种方式就是分别将这哥path映射到serviceId或者一个url。 负载均衡 刚才我们探讨的一直都是单个服务的情况,那么当我们有多个微服务的时候应该怎么操作呢 zuul: routes: demo: path: /user/** serviceId: provider-demo provider-demo: ribbon: listOfServers: http://localhost:8078,http://localhost:8079 routes: demo: path: /user/** serviceId: provider-demo provider-demo: ribbon: listOfServers: http://localhost:8078,http://localhost:8079 使用这种方式以后,我们再启动一下我们原先的cloud-demo-provider-2项目,然后启动Zuul访问时会发现已经实现了负载均衡 文件上传 我们使用zuul做路由的时候可能会碰到上传文件的需求,上传小文件到是没事,但是如果大文件的话是无法上传呢,这儿呢就有一个办法来绕过SpringMVC的DispatchServlet。 例如我们上传文件的接口为http://localhost:8093/user/user/uploadFile 那么我们在上传的时候就可以访问http://localhost:8093/zuul/user/user/uploadFile来实现上传大文件 GitHub:https://github.com/2388386839/spring-cloud-demo 码云:https://gitee.com/zhixiang_blog/spring-cloud-demo 如果对您有所帮助,请记得帮忙点一个star哦 本文出自https://zhixiang.org.cn,转载请保留。

优秀的个人博客,低调大师

阿里云Kubernetes SpringCloud 实践进行时(3): API网关服务Zuul

简介 为了更好地支撑日益增长的庞大业务量,我们常常需要把服务进行整合、拆分,使我们的服务不仅能通过集群部署抵挡流量的冲击,又能根据业务在其上进行灵活的扩展。随着分布式的普及、服务的快速增长与云计算技术的进步,微服务架构也因其特有的优势而备受关注。微服务架构的本质,是把整体的业务拆分成很多有特定明确功能的服务,通过很多分散的小服务之间的配合,去解决更大,更复杂的问题。对被拆分后的服务进行分类和管理,彼此之间使用统一的接口来进行交互。 本系列讲述了在阿里云Kubernetes容器服务基础之上,如何快速搭建基于Spring Cloud的微服务架构中的基础设施: 第一篇:分布式服务注册与发现系统 第二篇:分布式配置管理系统 第三篇:API网关服务Zuul 系统 第四篇:分布式追踪系统 第五篇:分布式弹性服务与容错处理框架Hystrix及其监控仪表板 第六

资源下载

更多资源
优质分享App

优质分享App

近一个月的开发和优化,本站点的第一个app全新上线。该app采用极致压缩,本体才4.36MB。系统里面做了大量数据访问、缓存优化。方便用户在手机上查看文章。后续会推出HarmonyOS的适配版本。

Mario

Mario

马里奥是站在游戏界顶峰的超人气多面角色。马里奥靠吃蘑菇成长,特征是大鼻子、头戴帽子、身穿背带裤,还留着胡子。与他的双胞胎兄弟路易基一起,长年担任任天堂的招牌角色。

Nacos

Nacos

Nacos /nɑ:kəʊs/ 是 Dynamic Naming and Configuration Service 的首字母简称,一个易于构建 AI Agent 应用的动态服务发现、配置管理和AI智能体管理平台。Nacos 致力于帮助您发现、配置和管理微服务及AI智能体应用。Nacos 提供了一组简单易用的特性集,帮助您快速实现动态服务发现、服务配置、服务元数据、流量管理。Nacos 帮助您更敏捷和容易地构建、交付和管理微服务平台。

Spring

Spring

Spring框架(Spring Framework)是由Rod Johnson于2002年提出的开源Java企业级应用框架,旨在通过使用JavaBean替代传统EJB实现方式降低企业级编程开发的复杂性。该框架基于简单性、可测试性和松耦合性设计理念,提供核心容器、应用上下文、数据访问集成等模块,支持整合Hibernate、Struts等第三方框架,其适用范围不仅限于服务器端开发,绝大多数Java应用均可从中受益。

用户登录
用户注册