首页 文章 精选 留言 我的

精选列表

搜索[快速入门],共10000篇文章
优秀的个人博客,低调大师

Jboot 2.2.1 发布,分布式开发更加简单快速

Jboot 是一个基于 JFinal、JFinal-Undertow、Dubbo 等开发的微服务框架,帮助开发者降低微服务开发门槛。同时完美支持在 idea、eclipse 下多 maven 模块,对java代码、html、css、js 等资源文件进行热加载,爽爽的开发。 Jboot v2.2.1 更新内容如下: 优化:findCountByColumns 返回的类型由 Long 改为 long,客户端调用的时候不需要再判断是否为null。 优化:JbootDbManager 重命名为 ArpManager 新增:JbootDb 工具类,用于增强 JFinal 的Db 工具类,增加 JbootDb.findByColumns 及其 JbootDb.deleteByColumns 系列方法 maven 依赖: <dependency> <groupId>io.jboot</groupId> <artifactId>jboot</artifactId> <version>2.2.1</version> </dependency> Hello World: @RequestMapping("/") public class HelloworldController extends JbootController { public void index(){ renderText("hello world"); } public static void main(String[] args){ JbootApplication.run(args); } }

优秀的个人博客,低调大师

Jboot 2.2.0 发布,分布式开发更加简单快速

Jboot 是一个基于 JFinal、JFinal-Undertow、Dubbo 等开发的微服务框架,帮助开发者降低微服务开发门槛。同时完美支持在 idea、eclipse 下多 maven 模块,对java代码、html、css、js 等资源文件进行热加载,爽爽的开发。 明天 10.1 了,今天发布 2.2.0 给大家一个国企的礼物。这个版本主要是新增了根据Columns进行增删改查的方法,同时增强了代码生成器的生成能力,Jboot 历时近3年,已经发布了 100+ 个版本,成熟而稳定。 Jboot 3.0 也在开始计划了,预计年底能出来第一个版本。 Jboot v2.2.0 更新内容如下: 新增:JbootModel 新增 deleteByColumns 的方法 新增:JbootModel 新增 batchDeleteByIds 的方法 新增:JbootModel 新增 findCountByColumns 的方法 新增:Columns 查询新增 not in 的功能 新增:代码生成器新增 findFirstByColumns 系列方法 新增:代码生成器新增 findListByColumns 系列方法 新增:代码生成器新增 findCountByColumns 系列方法 新增:代码生成器新增 paginateByColumns 系列方法 新增:代码生成器新增 deleteByColumns 系列方法 优化:优化Service层的代码生成器 优化:AnnotationUtil 的性能问题 优化:更新 jboot/cglib/fastjson/druid/HikariCP 等依赖 优化:完善 docker 部署的相关问题 优化:优化 DialectKit 的方法逻辑,使之更加容易阅读 修复:修复 fatjar 打包时,获取classpath 和 banner等不正确的问题 修复: JbootScheduleManager 无法移除已经添加的任务的问题 maven 依赖: <dependency> <groupId>io.jboot</groupId> <artifactId>jboot</artifactId> <version>2.2.0</version> </dependency> Hello World: @RequestMapping("/") public class HelloworldController extends JbootController { public void index(){ renderText("hello world"); } public static void main(String[] args){ JbootApplication.run(args); } }

优秀的个人博客,低调大师

运维编排系列场景-----快速生成模版shell命令

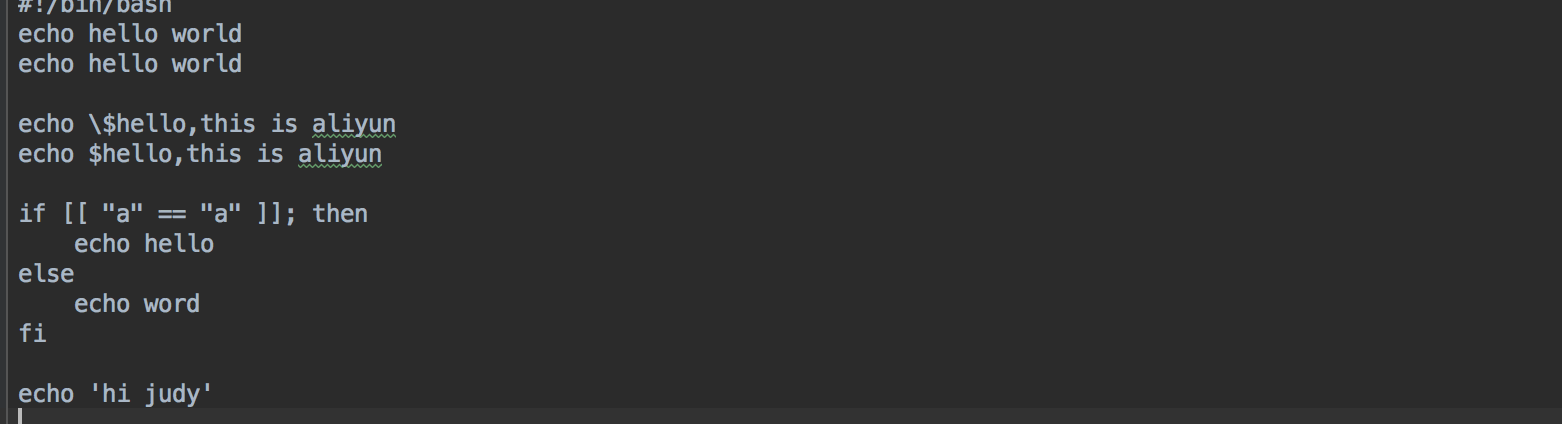
应用场景 当通过模版的方式在一台机器上运行shell文件时,需要在模版中把当前的所有shell命令都需要手动操作写进模版中,并添加需要写入的shell文件,尤其是遇到一些需要转译的特殊字符时,还需要手改,操作较为浪费时间。 解决方案 把当前需要修改的shell命令写入一个本地shell文件,通过python脚本的方式来实现把此文件内的所有命令转化为某一种特定的形式,及解决转化后的脚本特殊字符写进模版中转译的问题,转化的脚本可以直接输入到模版中运行,并保留格式。 一、转化shell脚本下面为用python实现的转化脚本,并将脚本命名为:oos_convert import re import sys commands = sys.argv # 要翻译的shell 脚本 file_path = '' or commands[1] def translate(): with open(file_path, 'r+', encoding='utf-8') as f: lines = f.readlines() for index, line in enumerate(lines): if index == 0: continue # print() new_line = repr(line).replace('\\t', ' ').replace('\\n', '').strip("'") if new_line.startswith('"'): print(new_line + ',') else: rep_line = new_line.replace('"', '\\"') print('"' + rep_line + '",') translate() Python脚本的运行方式:运行命令:pythonoos_convert.pyxxx.sh (例如:pythonoos_convert.py~/command.sh)或者在pycharm等编辑工具中直接运行,在编辑工具中需要将file_path根据实际需求来补充。 如下所示为一个shell文件内的命令 将以上python代码写入到一个自定义命名的py的文件中,在命令行中用python运行此文件,其运行结果如下所示,并将运行出来的结果复制到JSON格式的模版中。 二、打开控制台,找到运维编排三、创建模版 按如下所示编辑模版,并将python脚本转化的内容,复制到下面的模版中。注意:此脚本转化的内容仅支持JSON格式。 { "FormatVersion": "OOS-2019-06-01", "Description": "Creates a cloud assistant command and triggers it on one ECS instance.", "Parameters": { "instanceId": { "Description": "The ID of ECS instance that will invoke command.", "Type": "String", "AllowedPattern": "i-[A-Za-z0-9]*", "MinLength": 1, "MaxLength": 30 }, "regionId": { "Type": "String" }, "OOSAssumeRole": { "Description": "The RAM role to be assumed by OOS.", "Type": "String", "Default": "OOSServiceRole" } }, "RamRole": "{{ OOSAssumeRole }}", "Tasks": [ { "Name": "createCommand", "Action": "ACS::ExecuteAPI", "Description": "Creates a cloud assistant command.", "Properties": { "Service": "ECS", "API": "CreateCommand", "Parameters": { "CommandContent": { "Fn::Base64Encode": { "Fn::Join": [ "\n", [ "echo hello world", "echo hello world", "", "echo \\$hello,this is aliyun", "echo $hello,this is aliyun", "", "if [[ \"a\" == \"a\" ]]; then", " echo hello", "else", " echo word", "fi", "", "echo 'hi judy'" ] ] } }, "RegionId": "{{ regionId }}", "Name": "{{ ACS::ExecutionId }}", "Type": "RunShellScript", "WorkingDir": "/root", "Timeout": 30 } }, "Outputs": { "CommandId": { "Type": "String", "ValueSelector": "CommandId" } } }, { "Name": "invokeCommand", "Action": "ACS::ExecuteAPI", "Description": "Triggers a cloud assistant command on one ECS instances.", "Properties": { "Service": "ECS", "API": "InvokeCommand", "Parameters": { "CommandId": "{{ createCommand.CommandId }}", "InstanceIds": [ "{{ instanceId }}" ], "RegionId": "{{regionId}}" } }, "Outputs": { "InvokeId": { "Type": "String", "ValueSelector": "InvokeId" } } }, { "Name": "untilInvocationReady", "Action": "ACS::WaitFor", "Description": "Waits for the command to be completed.", "Delay": 20, "Retries": 30, "DelayType": "Constant", "Properties": { "Service": "ECS", "API": "DescribeInvocations", "Parameters": { "RegionId": "{{regionId}}", "InvokeId": "{{ invokeCommand.InvokeId }}" }, "DesiredValues": [ "Finished" ], "StopRetryValues": [ "Failed" ], "PropertySelector": "Invocations.Invocation[].InvokeStatus" }, "OnError": "deleteCommand" }, { "Name": "describeInvocationResults", "Action": "ACS::ExecuteAPI", "Description": "Views the command output of a cloud assistant command in the specified ECS instance.", "Properties": { "Service": "ECS", "API": "DescribeInvocationResults", "Parameters": { "RegionId": "{{regionId}}", "InvokeId": "{{ invokeCommand.InvokeId }}" } }, "Outputs": { "InvocationResult": { "Type": "String", "ValueSelector": "Invocation.InvocationResults.InvocationResult[].Output" } } }, { "Name": "checkInvocationResult", "Action": "ACS::CheckFor", "Description": "Views the command output of a cloud assistant command in the specified ECS instance.", "Properties": { "Service": "ECS", "API": "DescribeInvocationResults", "Parameters": { "RegionId": "{{regionId}}", "InvokeId": "{{ invokeCommand.InvokeId }}" }, "PropertySelector": "Invocation.InvocationResults.InvocationResult[].ExitCode", "DesiredValues": [ 0 ] } }, { "Name": "deleteCommand", "Action": "ACS::ExecuteAPI", "Description": "Deletes a cloud assistant command.", "Properties": { "Service": "ECS", "API": "DeleteCommand", "Parameters": { "RegionId": "{{ regionId}}", "CommandId": "{{ createCommand.CommandId }}" } } } ], "Outputs": { "InvocationOutput": { "Type": "String", "Value": { "Fn::Base64Decode": "{{ describeInvocationResults.InvocationResult }}" } } } } 四、校验模版,并格式化模版脚本转化完的模版格式如下所示,转化的脚本,如果格式没有对齐,点击鼠标右键,选择Format Doucument,来使模版格式化。注意:需要手动删除脚本最后一句的逗号。 五、创建执行找到创建好的模版,点击创建执行 六、点击创建执行模版开始正式执行,在输入的实例上执行想要运行的shell命令。 总结 由以上举例可见,此脚本的作用为手动操作节省了时间,并把在模版中解决了特殊字符转译的问题。此脚本还有很多不完善的地方,欢迎提出意见。 欢迎使用OOS OOS客户支持钉钉群:23330931OOS管理控制台的链接OOS帮助文档的链接

优秀的个人博客,低调大师

IoT+Tablestore快速构建智能售货机应用

一、 背景介绍 近年来,物联网(IoT)技术发生了巨大的变化。NB-IoT、LoRa等技术的产生解决了网络覆盖、设备功耗成本问题;尤其是最近5G技术的商用,意味着支持海量设备连接进行高质量数据通讯即将有坚实的基础设施支持。在过去的二十年,人的各种活动如社交、购物等产生了海量的数据。据分析,每个人身边至少有1000个左右的物体,如果将比人的数量多的多的各种物体、设备都接入网络,可以预见到,在不远的未来社会将会产生比现在多无数倍的各种数据,数据量将呈现爆炸式增长。那么问题来了,如何接入这些物体设备、如何将这些采集到的海量数据进行存储分析? 以零售行业为例,基于IoT技术的自助饮料机、福袋机、口红机、自助彩票机、自助售药机等遍地开花,广泛分布在商场、工厂、学校、写字楼、火车站、机场等区域。据最新的调查数据,日

优秀的个人博客,低调大师

借助URLOS快速安装jenkins-持续集成工具

环境需求 最低硬件配置:1核CPU,1G内存(1+1)提示:如果你的应用较多,而主机节点的硬件配置较低,建议在部署节点时开通虚拟虚拟内存; 生产环境建议使用2G或以上内存; 推荐安装系统:Ubuntu-16.04、Ubuntu-18.04、CentOS7.X、Debian9X的64位的纯净的操作系统; URLOS安装 curl -LO www.urlos.com/iu && sh iu Jenkins安装流程 1.在应用市场中搜索“jenkins”并安装,如下图: 2.填写服务名称、选择运行节点、服务端口、选择智能部署 然后点击“提交”按钮,等待部署完成; 3. jenkins初始化向导 访问http://IP:8080(其中的IP是你的服务器的IP) 这里需要填写初始密码,创建服务完成后,可在当前服务的文件管理中找到密码文件,路径为jenkins_home/secrets/initialAdminPassword 找到密码,将密码填入后继续步骤: 选择安装社区流行的插件还是自定义安装插件 我们选择自定义安装插件: 可以看到已经默认选择了一些插件,我们可以选择自己需要的来安装。 选择“install”进行下一步: 创建管理员账户: 登录后: jenkins的详细使用方法请查考官方文档: https://jenkins.io/zh/doc/

优秀的个人博客,低调大师

日志服务数据加工:快速开始(SLB日志加工实战)

背景 这里我们拿一个Logstore中的网关数据(阿里云SLB日志)举例,对其数据进行加工并分发到不同的Logstore中。 数据 源logstore(slb-log)的数据内容是一个阿里云SLB的网络日志,格式样例如下: __source__: log_service __tag__:__receive_time__: 1559799897 __topic__: body_bytes_sent: 740 client_ip: 1.2.3.4 host: m.abcd.com http_host: m.abcd.com http_referer: - http_x_forwarded_for: - http_x_real_ip: - read_request_time: 0 request_length: 0 r

优秀的个人博客,低调大师

docker-compose快速搭建 Prometheus+Grafana监控系统

一、说明Prometheus负责收集数据,Grafana负责展示数据。其中采用Prometheus 中的 Exporter含:1)Node Exporter,负责收集 host 硬件和操作系统数据。它将以容器方式运行在所有 host 上。2)cAdvisor,负责收集容器数据。它将以容器方式运行在所有 host 上。3)Alertmanager,负责告警。它将以容器方式运行在所有 host 上。完整Exporter列表请参考:https://prometheus.io/docs/instrumenting/exporters/ 二、安装docker,docker-compose2.1 安装docker先安装一个64位的Linux主机,其内核必须高于3.10,内存不低于1GB。在该主机上安装Docker。 # 安装依赖包 yum install -y yum-utils device-mapper-persistent-data lvm2 # 添加Docker软件包源 yum-config-manager --add-repo https://download.docker.com/linux/centos/docker-ce.repo # 安装Docker CE yum install docker-ce -y # 启动 systemctl start docker # 开机启动 systemctl enable docker # 查看Docker信息 docker info 2.2 安装docker-compose curl -L https://github.com/docker/compose/releases/download/1.23.2/docker-compose-`uname -s`-`uname -m` -o /usr/local/bin/docker-compose chmod +x /usr/local/bin/docker-compose 三、添加配置文件 mkdir -p /usr/local/src/config cd /usr/local/src/config 2.1 添加prometheus.yml配置文件,vim prometheus.yml # my global config global: scrape_interval: 15s # Set the scrape interval to every 15 seconds. Default is every 1 minute. evaluation_interval: 15s # Evaluate rules every 15 seconds. The default is every 1 minute. # scrape_timeout is set to the global default (10s). # Alertmanager configuration alerting: alertmanagers: - static_configs: - targets: ['192.168.159.129:9093'] # - alertmanager:9093 # Load rules once and periodically evaluate them according to the global 'evaluation_interval'. rule_files: - "node_down.yml" # - "first_rules.yml" # - "second_rules.yml" # A scrape configuration containing exactly one endpoint to scrape: # Here it's Prometheus itself. scrape_configs: # The job name is added as a label `job=<job_name>` to any timeseries scraped from this config. - job_name: 'prometheus' static_configs: - targets: ['192.168.159.129:9090'] - job_name: 'cadvisor' static_configs: - targets: ['192.168.159.129:8080'] - job_name: 'node' scrape_interval: 8s static_configs: - targets: ['192.168.159.129:9100'] 2.2 添加邮件告警配置文件添加配置文件alertmanager.yml,配置收发邮件邮箱vim alertmanager.yml global: smtp_smarthost: 'smtp.163.com:25' #163服务器 smtp_from: 'tsiyuetian@163.com' #发邮件的邮箱 smtp_auth_username: 'tsiyuetian@163.com' #发邮件的邮箱用户名,也就是你的邮箱 smtp_auth_password: 'TPP***' #发邮件的邮箱密码 smtp_require_tls: false #不进行tls验证 route: group_by: ['alertname'] group_wait: 10s group_interval: 10s repeat_interval: 10m receiver: live-monitoring receivers: - name: 'live-monitoring' email_configs: - to: '1933306137@qq.com' #收邮件的邮箱 2.3 添加报警规则添加一个node_down.yml为 prometheus targets 监控vim node_down.yml groups: - name: node_down rules: - alert: InstanceDown expr: up == 0 for: 1m labels: user: test annotations: summary: "Instance {{ $labels.instance }} down" description: "{{ $labels.instance }} of job {{ $labels.job }} has been down for more than 1 minutes." 四、编写docker-composevim docker-compose-monitor.yml version: '2' networks: monitor: driver: bridge services: prometheus: image: prom/prometheus container_name: prometheus hostname: prometheus restart: always volumes: - /usr/local/src/config/prometheus.yml:/etc/prometheus/prometheus.yml - /usr/local/src/config/node_down.yml:/etc/prometheus/node_down.yml ports: - "9090:9090" networks: - monitor alertmanager: image: prom/alertmanager container_name: alertmanager hostname: alertmanager restart: always volumes: - /usr/local/src/config/alertmanager.yml:/etc/alertmanager/alertmanager.yml ports: - "9093:9093" networks: - monitor grafana: image: grafana/grafana container_name: grafana hostname: grafana restart: always ports: - "3000:3000" networks: - monitor node-exporter: image: quay.io/prometheus/node-exporter container_name: node-exporter hostname: node-exporter restart: always ports: - "9100:9100" networks: - monitor cadvisor: image: google/cadvisor:latest container_name: cadvisor hostname: cadvisor restart: always volumes: - /:/rootfs:ro - /var/run:/var/run:rw - /sys:/sys:ro - /var/lib/docker/:/var/lib/docker:ro ports: - "8080:8080" networks: - monitor 五、启动docker-compose #启动容器: docker-compose -f /usr/local/src/config/docker-compose-monitor.yml up -d #删除容器: docker-compose -f /usr/local/src/config/docker-compose-monitor.yml down #重启容器: docker restart id 容器启动如下: prometheus targets界面如下: 备注:如果State为Down,应该是防火墙问题,参考下面防火墙配置。 prometheus graph界面如下: 备注:如果没有数据,同步下时间。 六、防火墙配置6.1 关闭selinux setenforce 0 vim /etc/sysconfig/selinux 6.2 配置iptables #删除自带防火墙 systemctl stop firewalld.service systemctl disable firewalld.service #安装iptables yum install -y iptables-services #配置 vim /etc/sysconfig/iptables *filter :INPUT ACCEPT [0:0] :FORWARD ACCEPT [0:0] :OUTPUT ACCEPT [24:11326] -A INPUT -m state --state RELATED,ESTABLISHED -j ACCEPT -A INPUT -p icmp -j ACCEPT -A INPUT -i lo -j ACCEPT -A INPUT -p tcp -m state --state NEW -m tcp --dport 22 -j ACCEPT -A INPUT -p tcp -m state --state NEW -m tcp --dport 9090 -j ACCEPT -A INPUT -p tcp -m state --state NEW -m tcp --dport 8080 -j ACCEPT -A INPUT -p tcp -m state --state NEW -m tcp --dport 3000 -j ACCEPT -A INPUT -p tcp -m state --state NEW -m tcp --dport 9093 -j ACCEPT -A INPUT -p tcp -m state --state NEW -m tcp --dport 9100 -j ACCEPT -A INPUT -j REJECT --reject-with icmp-host-prohibited -A FORWARD -j REJECT --reject-with icmp-host-prohibited COMMIT #启动 systemctl restart iptables.service systemctl enable iptables.service 七、配置Grafana7.1 添加Prometheus数据源 2 配置dashboards 说明:可以用自带模板,也可以去https://grafana.com/dashboards,下载对应的模板。 7.3 查看数据我从网页下载了docker相关的模板:Docker and system monitoring,893输入893,就会加载出下面的信息 导入后去首页查看数据 八、附录:单独命令启动各容器 #启动prometheus docker run -d -p 9090:9090 --name=prometheus \ -v /usr/local/src/config/prometheus.yml:/etc/prometheus/prometheus.yml \ -v /usr/local/src/config/node_down.yml:/etc/prometheus/node_down.yml \ prom/prometheus # 启动grafana docker run -d -p 3000:3000 --name=grafana grafana/grafana #启动alertmanager容器 docker run -d -p 9093:9093 -v /usr/local/src/config/config.yml:/etc/alertmanager/config.yml --name alertmanager prom/alertmanager #启动node exporter docker run -d \ -p 9100:9100 \ -v "/:/host:ro,rslave" \ --name=node_exporter \ quay.io/prometheus/node-exporter \ --path.rootfs /host #启动cadvisor docker run \ --volume=/:/rootfs:ro \ --volume=/var/run:/var/run:rw \ --volume=/sys:/sys:ro \ --volume=/var/lib/docker/:/var/lib/docker:ro \ --publish=8080:8080 \ --detach=true \ --name=cadvisor \ google/cadvisor:latest

优秀的个人博客,低调大师

实战:基于Spring Boot快速开发RESTful风格API接口

写在前面的话 这篇文章计划是在过年期间完成的,示例代码都写好了,结果亲戚来我家做客,文章没来得及写。已经很久没有更新文章了,小伙伴们,有没有想我啊。言归正传,下面开始,今天的话题。 目标 写一套符合规范,并且具有RESTful风格的API接口。 假定 你已会使用Spring Boot 2.x。 你已会使用Gradle构建Spring Boot工程。 你已会基于Spring Boot编写API接口。 你已会使用接口调试工具。 如果你还不会使用Spring Boot写接口,建议先看一下这篇文章 : 用Spring Boot开发API接口 步骤 1、基于Gradle构建Spring Boot示例项目。 2、引入JavaLib。 3、编写接口代码。 4、测试接口。 引入JavaLib 测试版(SNAPSHOT),都会发布到 JitPack 上,所以,从这里拉取的,都会是最新的,但是需要配置仓库地址。 正式版(RELEASE),才会推送到 Maven中央。 UserModel 我们用UserModel来存放我们的数据,以便存取。我个人比较喜欢用bean的,如果你喜欢用Map,那也是可以的。不过需要注意的是,需要加@JsonInclude(JsonInclude.Include.NON_NULL) ,他的作用是,如果某个字段为空时,在返回的JSON中,则不显示,如果没有,将为 null。 完整代码如下: package com.fengwenyi.demojavalibresult.model; import com.fasterxml.jackson.annotation.JsonInclude; import lombok.Data; import lombok.experimental.Accessors; import java.io.Serializable; /** * User Model * @author Wenyi Feng * @since 2019-02-05 */ @Data @Accessors(chain = true) @JsonInclude(JsonInclude.Include.NON_NULL) public class UserModel implements Serializable { private static final long serialVersionUID = -835481508750383832L; /** UID */ private String uid; /** Name */ private String name; /** Age */ private Integer age; } 编写接口返回码 这里我们使用 JavaLib 中result模块为我们提供的方法。只需要调用 BaseCodeMsg.app(Integer, String)即可。这里我们只写几个用作示例,完整代码如下: package com.fengwenyi.demojavalibresult.util; import com.fengwenyi.javalib.result.BaseCodeMsg; /** * 自定义返回码以及描述信息 * @author Wenyi Feng * @since 2019-02-05 */ public class CodeMsg { /* user error ------------------------------------------------------------------------------------------------------------*/ /** 用户不存在 */ public static final BaseCodeMsg ERROR_USER_NOT_EXIST = BaseCodeMsg.app(10001, "User Not Exist"); /** UID不能为空 */ public static final BaseCodeMsg ERROR_USER_UID_NOT_NULL = BaseCodeMsg.app(10002, "User UID Must Not null"); } BaseCodeMsg 我们看一下源码: package com.fengwenyi.javalib.result; /** * (基类)返回码及描述信息 * @author Wenyi Feng * @since 2019-01-22 */ public class BaseCodeMsg { /** 返回码 */ private Integer code; /** 返回码描述 */ private String msg; /** * 无参数构造方法 */ private BaseCodeMsg() {} /** * 构造方法 * @param code * @param msg */ private BaseCodeMsg(Integer code, String msg) { this.code = code; this.msg = msg; } public static BaseCodeMsg app(Integer code, String msg) { return new BaseCodeMsg(code, msg); } /** * 返回码填充 * @param args 填充内容 * @return CodeMsgEnum */ public BaseCodeMsg fillArgs(Object ... args) { this.msg = String.format(this.msg, args); return this; } /** * 获取返回码 * @return 返回码 */ public Integer getCode() { return code; } /** * 获取描述信息 * @return 描述信息 */ public String getMsg() { return msg; } /** 成功 */ public static final BaseCodeMsg SUCCESS = BaseCodeMsg.app(0, "Success"); /** 失败 */ public static final BaseCodeMsg ERROR_INIT = BaseCodeMsg.app(-1, "Error"); } 成功的标识是:当 code=0 时。 另外,我们还为你提供了预留字符串替换的方法。比如你想告诉用户某个字段不合法,那么你可以这样: 第一步:在CodeMsg中添加 public static final BaseCodeMsg ERROR_PARAM_ILLEGAL = BaseCodeMsg.app(20001, "Request Param Illegal : %s"); 第二步:返回 /** * 测试参数错误 * @return {@link Result} */ @GetMapping("/test-param-error") public Result testParamError() { return Result.error(CodeMsg.ERROR_PARAM_ILLEGAL.fillArgs("account")); } 测试结果: 编写接口代码 接下来,开始编写我们的接口代码。 首先指明,我们的接口接收和返回的文档格式。 consumes = MediaType.APPLICATION_JSON_UTF8_VALUE produces = MediaType.APPLICATION_JSON_UTF8_VALUE 再使用 JavaLib 中 Result。完整代码如下: package com.fengwenyi.demojavalibresult.controller; import com.fengwenyi.demojavalibresult.model.UserModel; import com.fengwenyi.demojavalibresult.util.CodeMsg; import com.fengwenyi.javalib.result.Result; import org.springframework.http.MediaType; import org.springframework.util.StringUtils; import org.springframework.web.bind.annotation.*; import javax.annotation.PostConstruct; import java.util.ArrayList; import java.util.List; import java.util.UUID; /** * User Controller : 用户操作 * @author Wenyi Feng * @since 2019-02-05 */ @RestController @RequestMapping(value = "/user", consumes = MediaType.APPLICATION_JSON_UTF8_VALUE, produces = MediaType.APPLICATION_JSON_UTF8_VALUE) public class UserController { /** 临时存放用户信息 */ private List<UserModel> userModelList = new ArrayList<>(); /** * 初始化用户 */ @PostConstruct public void init() { for (int i = 0; i < 10; i++) userModelList.add(new UserModel().setUid(UUID.randomUUID().toString()).setName("u" + i).setAge(10 + i)); } /** * 查询用户列表 * @return {@link Result} */ @GetMapping("/list") public Result list() { return Result.success(userModelList); } /** * 添加用户 * @param userModel 这里传JSON字符串 * @return {@link Result} */ @PostMapping("/add") public Result add(@RequestBody UserModel userModel) { if (userModel != null) { userModelList.add(userModel.setUid(UUID.randomUUID().toString())); return Result.success(); } return Result.error(); } /** * 根据UID获取用户 * @param uid UID * @return {@link Result} */ @GetMapping("/get/{uid}") public Result getByUid(@PathVariable("uid") String uid) { if (StringUtils.isEmpty(uid)) return Result.error(CodeMsg.ERROR_USER_UID_NOT_NULL); for (UserModel userModel : userModelList) if (userModel.getUid().equals(uid)) return Result.success(userModel); return Result.error(CodeMsg.ERROR_USER_NOT_EXIST); } } 测试 1、启动 2、list 访问:http://localhost:8080/user/list { "code": 0, "msg": "Success", "data": [ { "uid": "d8e2dfac-b6e8-46c7-9d43-5bb6bf99ce30", "name": "u0", "age": 10 }, { "uid": "87001637-9f21-4bc7-b589-bea1b2c795c4", "name": "u1", "age": 11 }, { "uid": "5e1398ca-8322-4a68-b0d2-1eb4c1cac9de", "name": "u2", "age": 12 }, { "uid": "e6ee5452-4148-4f6d-b820-9cc24e5c91b5", "name": "u3", "age": 13 }, { "uid": "3f428e26-57e1-4661-8275-ce3777b5da54", "name": "u4", "age": 14 }, { "uid": "b9d994b4-f090-40de-b0f3-e89c613061f2", "name": "u5", "age": 15 }, { "uid": "748d1349-5978-4746-b0c1-949eb5613a28", "name": "u6", "age": 16 }, { "uid": "abaadb7c-23fb-4297-a531-0c490927f6d5", "name": "u7", "age": 17 }, { "uid": "5e5917a1-8674-4367-94c6-6a3fd10a08d6", "name": "u8", "age": 18 }, { "uid": "03ed6a83-0cc0-4714-9d0d-f653ebb3a2eb", "name": "u9", "age": 19 } ] } 2、添加数据 看一下,数据是什么样子 与我们预想的结果一样。 获取数据 有数据样式: 无数据样式: 关于 冯文议。 2017年毕业于阿坝师范学院计算机应用专业。 现就职于深圳警圣技术股份有限公司,主要负责服务器接口开发工作。 技术方向:Java。 开源软件:JavaLib。 后记 到这里就结束了,如果在遇到什么问题,或者有不明白的地方,可以通过评论、留言或者私信等方式,告诉我。

资源下载

更多资源
Mario

Mario

马里奥是站在游戏界顶峰的超人气多面角色。马里奥靠吃蘑菇成长,特征是大鼻子、头戴帽子、身穿背带裤,还留着胡子。与他的双胞胎兄弟路易基一起,长年担任任天堂的招牌角色。

腾讯云软件源

腾讯云软件源

为解决软件依赖安装时官方源访问速度慢的问题,腾讯云为一些软件搭建了缓存服务。您可以通过使用腾讯云软件源站来提升依赖包的安装速度。为了方便用户自由搭建服务架构,目前腾讯云软件源站支持公网访问和内网访问。

Nacos

Nacos

Nacos /nɑ:kəʊs/ 是 Dynamic Naming and Configuration Service 的首字母简称,一个易于构建 AI Agent 应用的动态服务发现、配置管理和AI智能体管理平台。Nacos 致力于帮助您发现、配置和管理微服务及AI智能体应用。Nacos 提供了一组简单易用的特性集,帮助您快速实现动态服务发现、服务配置、服务元数据、流量管理。Nacos 帮助您更敏捷和容易地构建、交付和管理微服务平台。

Sublime Text

Sublime Text

Sublime Text具有漂亮的用户界面和强大的功能,例如代码缩略图,Python的插件,代码段等。还可自定义键绑定,菜单和工具栏。Sublime Text 的主要功能包括:拼写检查,书签,完整的 Python API , Goto 功能,即时项目切换,多选择,多窗口等等。Sublime Text 是一个跨平台的编辑器,同时支持Windows、Linux、Mac OS X等操作系统。

用户登录
用户注册