首页 文章 精选 留言 我的

精选列表

搜索[nodejs爬虫],共4926篇文章
优秀的个人博客,低调大师

1、web爬虫,requests请求

【转载自:https://www.jianshu.com/u/3fe4aab60ac4】requests请求,就是用python的requests模块模拟浏览器请求,返回html源码 模拟浏览器请求有两种,一种是不需要用户登录或者验证的请求,一种是需要用户登录或者验证的请求 一、不需要用户登录或者验证的请求 这种比较简单,直接利用requests模块发一个请求即可拿到html源码 #!/usr/bin/envpython #-*-coding:utf8-*- importrequests#导入模拟浏览器请求模块 http=requests.get(url="http://www.iqiyi.com/")#发送http请求 http.encoding="utf-8"#http请求编码 neir=http.text#获取http字符串代码 print(neir) 得到html源码 <!DOCTYPEhtml> <html> <head> <title>抽屉新热榜-聚合每日热门、搞笑、有趣资讯</title> <metacharset="utf-8"/> <metaname="keywords"content="抽屉新热榜,资讯,段子,图片,公众场合不宜,科技,新闻,节操,搞笑"/> <metaname="description"content=" 抽屉新热榜,汇聚每日搞笑段子、热门图片、有趣新闻。它将微博、门户、社区、bbs、社交网站等海量内容聚合在一起,通过用户推荐生成最热榜单。看抽屉新热榜,每日热门、有趣资讯尽收眼底。 "/> <metaname="robots"content="index,follow"/> <metaname="GOOGLEBOT"content="index,follow"/> <metaname="Author"content="搞笑"/> <metahttp-equiv="X-UA-Compatible"content="IE=EmulateIE8"> <linktype="image/x-icon"href="/images/chouti.ico"rel="icon"/> <linktype="image/x-icon"href="/images/chouti.ico"rel="ShortcutIcon"/> <linktype="image/x-icon"href="/images/chouti.ico"rel="bookmark"/> <linktype="application/opensearchdescription+xml" href="opensearch.xml"title="抽屉新热榜"rel="search"/> 二、需要用户登录或者验证的请求 获取这种页面时,我们首先要了解整个登录过程,一般登录过程是,当用户第一次访问时,会自动在浏览器生成cookie文件,当用户输入登录信息后会携带着生成的cookie文件,如果登录信息正确会给这个cookie 授权,授权后以后访问需要登录的页面时携带授权后cookie即可 1、首先访问一下首页,然后查看是否有自动生成cookie #!/usr/bin/envpython #-*-coding:utf8-*- importrequests#导入模拟浏览器请求模块 ###1、在没登录之前访问一下首页,获取cookie i1=requests.get( url="http://dig.chouti.com/", headers={'Referer':'http://dig.chouti.com/'} ) i1.encoding="utf-8"#http请求编码 i1_cookie=i1.cookies.get_dict() print(i1_cookie)#返回获取到的cookie #返回:{'JSESSIONID':'aaaTztKP-KaGLbX-T6R0v','gpsd':'c227f059746c839a28ab136060fe6ebe','route':'f8b4f4a95eeeb2efcff5fd5e417b8319'} 可以看到生成了cookie,说明如果登陆信息正确,后台会给这里的cookie授权,以后访问需要登录的页面携带授权后的cookie即可 2、让程序自动去登录授权cookie 首先我们用浏览器访问登录页面,随便乱输入一下登录密码和账号,获取登录页面url,和登录所需要的字段 携带cookie登录授权 #!/usr/bin/envpython #-*-coding:utf8-*- importrequests#导入模拟浏览器请求模块 ###1、在没登录之前访问一下首页,获取cookie i1=requests.get( url="http://dig.chouti.com/", headers={'Referer':'http://dig.chouti.com/'} ) i1.encoding="utf-8"#http请求编码 i1_cookie=i1.cookies.get_dict() print(i1_cookie)#返回获取到的cookie #返回:{'JSESSIONID':'aaaTztKP-KaGLbX-T6R0v','gpsd':'c227f059746c839a28ab136060fe6ebe','route':'f8b4f4a95eeeb2efcff5fd5e417b8319'} ###2、用户登陆,携带上一次的cookie,后台对cookie中的随机字符进行授权 i2=requests.post( url="http://dig.chouti.com/login",#登录url data={#登录字段 'phone':"8615284816568", 'password':"279819", 'oneMonth':"" }, headers={'Referer':'http://dig.chouti.com/'}, cookies=i1_cookie#携带cookie ) i2.encoding="utf-8" dluxxi=i2.text print(dluxxi)#查看登录后服务器的响应 #返回:{"result":{"code":"9999","message":"","data":{"complateReg":"0","destJid":"cdu_50072007463"}}}登录成功 3、登录成功后,说明后台已经给cookie授权,这样我们访问需要登录的页面时,携带这个cookie即可,比如获取个人中心 #!/usr/bin/envpython #-*-coding:utf8-*- importrequests#导入模拟浏览器请求模块 ###1、在没登录之前访问一下首页,获取cookie i1=requests.get( url="http://dig.chouti.com/", headers={'Referer':'http://dig.chouti.com/'} ) i1.encoding="utf-8"#http请求编码 i1_cookie=i1.cookies.get_dict() print(i1_cookie)#返回获取到的cookie #返回:{'JSESSIONID':'aaaTztKP-KaGLbX-T6R0v','gpsd':'c227f059746c839a28ab136060fe6ebe','route':'f8b4f4a95eeeb2efcff5fd5e417b8319'} ###2、用户登陆,携带上一次的cookie,后台对cookie中的随机字符进行授权 i2=requests.post( url="http://dig.chouti.com/login",#登录url data={#登录字段 'phone':"8615284816568", 'password':"279819", 'oneMonth':"" }, headers={'Referer':'http://dig.chouti.com/'}, cookies=i1_cookie#携带cookie ) i2.encoding="utf-8" dluxxi=i2.text print(dluxxi)#查看登录后服务器的响应 #返回:{"result":{"code":"9999","message":"","data":{"complateReg":"0","destJid":"cdu_50072007463"}}}登录成功 ###3、访问需要登录才能查看的页面,携带着授权后的cookie访问 shouquan_cookie=i1_cookie i3=requests.get( url="http://dig.chouti.com/user/link/saved/1", headers={'Referer':'http://dig.chouti.com/'}, cookies=shouquan_cookie#携带着授权后的cookie访问 ) i3.encoding="utf-8" print(i3.text)#查看需要登录才能查看的页面 获取需要登录页面的html源码成功 全部代码 get()方法,发送get请求encoding属性,设置请求编码cookies.get_dict()获取cookiespost()发送post请求text获取服务器响应信息 #!/usr/bin/envpython #-*-coding:utf8-*- importrequests#导入模拟浏览器请求模块 ###1、在没登录之前访问一下首页,获取cookie i1=requests.get( url="http://dig.chouti.com/", headers={'Referer':'http://dig.chouti.com/'} ) i1.encoding="utf-8"#http请求编码 i1_cookie=i1.cookies.get_dict() print(i1_cookie)#返回获取到的cookie #返回:{'JSESSIONID':'aaaTztKP-KaGLbX-T6R0v','gpsd':'c227f059746c839a28ab136060fe6ebe','route':'f8b4f4a95eeeb2efcff5fd5e417b8319'} ###2、用户登陆,携带上一次的cookie,后台对cookie中的随机字符进行授权 i2=requests.post( url="http://dig.chouti.com/login",#登录url data={#登录字段 'phone':"8615284816568", 'password':"279819", 'oneMonth':"" }, headers={'Referer':'http://dig.chouti.com/'}, cookies=i1_cookie#携带cookie ) i2.encoding="utf-8" dluxxi=i2.text print(dluxxi)#查看登录后服务器的响应 #返回:{"result":{"code":"9999","message":"","data":{"complateReg":"0","destJid":"cdu_50072007463"}}}登录成功 ###3、访问需要登录才能查看的页面,携带着授权后的cookie访问 shouquan_cookie=i1_cookie i3=requests.get( url="http://dig.chouti.com/user/link/saved/1", headers={'Referer':'http://dig.chouti.com/'}, cookies=shouquan_cookie#携带着授权后的cookie访问 ) i3.encoding="utf-8" print(i3.text)#查看需要登录才能查看的页面 注意:如果登录需要验证码,那就需要做图像处理,根据验证码图片,识别出验证码,将验证码写入登录字段

优秀的个人博客,低调大师

网络爬虫之抓取邮箱

import java.util.regex.Matcher; import java.util.regex.Pattern; /* 抓取邮箱号码 */ public class Demo7 { public static void main(String[] args) { String str = "有事没事联系:1122423@qq.com 有事没事联系:1122423@qq.com 有事没事联系:1122423@qq.com " + "有事没事联系:1122423@qq.com 有事没事联系:1122423@qq.com 有事没事联系:1122423@qq.com" + "有事没事联系:1122423@qq.com 有事没事联系:1122423@qq.com.cn 有事没事联:1122423@qq.com.cn" + "有事没事联系:1122423@163.com 有事没事联系:1122423@qq.net"; String reg = "[a-zA-Z1-9]\\w{1,11}@[a-zA-Z0-9]{2,}(\\.[a-z]{2,3}){1,2}"; /* 第一步: 先要把字符串的正则编译成Pattern对象 */ Pattern p = Pattern.compile(reg); /* 第二步: 把正则对象匹配字符串对象得到一个匹配器 */ Matcher m = p.matcher(str); while(m.find()){ System.out.println(m.group()); } } }

优秀的个人博客,低调大师

阿里云物联网平台AMQP服务端订阅NodeJS Demo

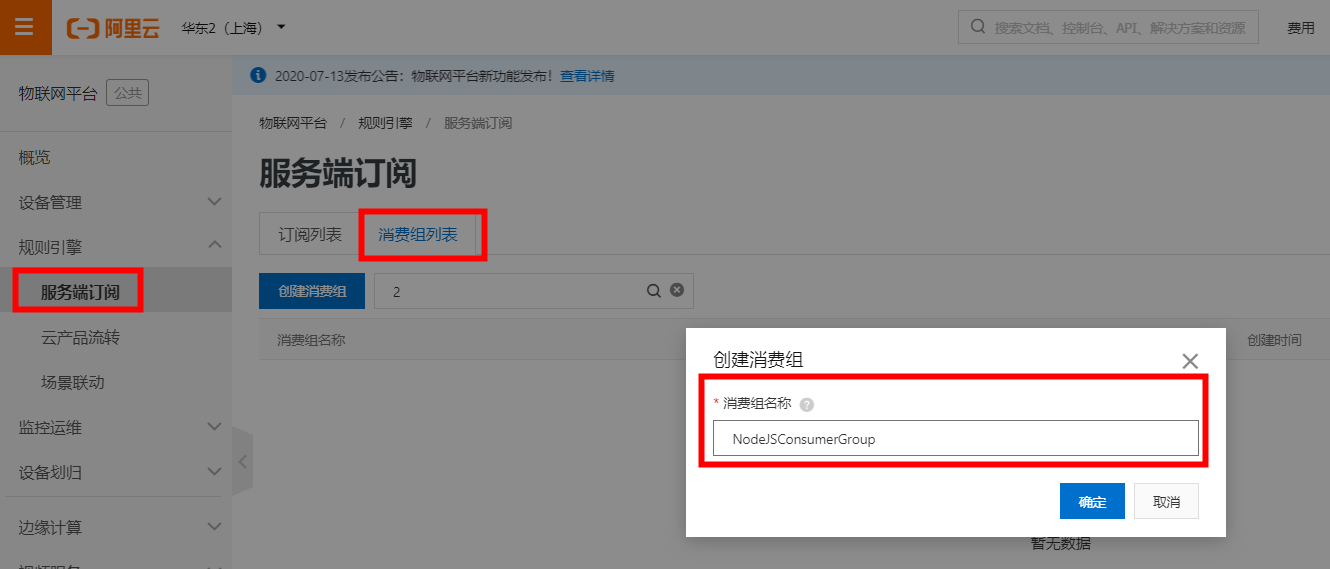
Step By Step 配置服务端订阅 1、创建消费组 2、创建订阅 参数获取 3、ConsumerGroupId获取位置 4、AccessKeyId、AccessKeySecret及Uid获取 参考地址:阿里云常见参数获取位置 5、iotInstanceId 独享实例需要指定,公共实例配置为空即可。 6、ClientId可以任意指定,例如设置为:tarodemo。 7、Host: ${uid}.iot-amqp.${regionId}.aliyuncs.com 例如:184*.iot-amqp.cn-shanghai.aliyuncs.com SDK 安装 npm install rhea Code Sample const container = require('rhea'); const crypto = require('crypto'); //建立连接。 var connection = container.connect({ //接入域名,请参见AMQP客户端接入说明文档。 'host': '18482************.iot-amqp.cn-shanghai.aliyuncs.com', 'port': 5671, 'transport':'tls', 'reconnect':true, 'idle_time_out':60000, //userName组装方法,请参见AMQP客户端接入说明文档。其中的iotInstanceId,购买的实例请填写实例ID,公共实例请填空字符串""。 //'username':'${YourClientId}|authMode=aksign,signMethod=hmacsha1,timestamp=1573489088171,authId=${YourAccessKeyId},iotInstanceId=${YourIotInstanceId},consumerGroupId=${YourConsumerGroupId}|', 'username':'tarodemo|authMode=aksign,signMethod=hmacsha1,timestamp=1573489088171,authId=LTAIOZZgYXPsMbDA,iotInstanceId=,consumerGroupId=R45CIUGUE3LJie1uaFjI000100|', //计算签名,password组装方法,请参见AMQP客户端接入说明文档。 //'password': hmacSha1('${YourAccessKeySecret}', 'authId=${YourAccessKeyId}&timestamp=1573489088171'), 'password': hmacSha1('v7C***********', 'authId=**********&timestamp=1573489088171'), }); //创建Receiver-Link。 var receiver = connection.open_receiver(); //接收云端推送消息的回调函数。 container.on('message', function (context) { var msg = context.message; var messageId = msg.message_id; var topic = msg.application_properties.topic; var content = Buffer.from(msg.body.content).toString(); // 输出内容 console.log(content); //发送ack,注意不要在回调函数有耗时逻辑。 context.delivery.accept(); }); //计算password签名。 function hmacSha1(key, context) { return Buffer.from(crypto.createHmac('sha1', key).update(context).digest()) .toString('base64'); } 测试效果 参考链接 Node.js SDK接入示例阿里云常见参数获取位置

优秀的个人博客,低调大师

nodejs 搭建 RESTful API 服务器的常用包及其简介

常用包 框架: yarn add express 数据库链接: yarn add sequelize yarn add mysql2 处理 favicon: yarn add serve-favicon 纪录日志: yarn add morgan 生成文档: yarn add --dev apidoc 解析请求参数: yarn add body-parser 设置 HTTP 头(提高安全性): yarn add helmet 文件变动监控(自动重启): yarn add --dev nodemon (启动服务器脚本中替换 node 即可) 允许 cors 请求: yarn add cors 压缩数据: yarn add compression 响应时间: yarn add response-time 数据伪造: yarn add faker – 数据验证: yarn add express-validator 进程管理: yarn add --dev pm2 带重启(nodemon用于开发环境),日志,负载均衡 serve-favicon 优点:把请求 favicon 的记录从日志中去除。缓存 icon 提高性能。使用兼容性最好的 Content-Type。 使用方式: var favicon = require('serve-favicon') app.use(favicon(path.join(__dirname, 'public', 'favicon.ico'))) morgan 使用方式: var morgan = require('morgan') app.use(morgan('combined')) //参数可选 dev tiny 或自定义输出日志格式,详见文档 // 导出日志文件 var express = require('express') var fs = require('fs') var morgan = require('morgan') var path = require('path') var app = express() // create a write stream (in append mode) var accessLogStream = fs.createWriteStream(path.join(__dirname, 'access.log'), {flags: 'a'}) // setup the logger app.use(morgan('combined', {stream: accessLogStream})) body-parser 使用方式: var bodyParser = require('body-parser') // parse application/x-www-form-urlencoded app.use(bodyParser.urlencoded({ extended: false })) //设置 false 使用 querystring 解析,处理 ajax 提交的复杂数据更在行。(true 使用 qs 解析) // parse application/json app.use(bodyParser.json()) apidoc 使用方式: 生成文档命令: apidoc -i routes/ -o doc/( routes 是程序入口,doc 是文档出口) 注释示例: /** * @api {get} /user/:id Read data of a User * @apiVersion 0.3.0 * @apiName GetUser * @apiGroup User * @apiPermission admin * * @apiDescription Compare Verison 0.3.0 with 0.2.0 and you will see the green markers with new items in version 0.3.0 and red markers with removed items since 0.2.0. * * @apiParam {String} id The Users-ID. * * @apiSuccess {String} id The Users-ID. * @apiSuccess {Date} registered Registration Date. * @apiSuccess {Date} name Fullname of the User. * @apiSuccess {String[]} nicknames List of Users nicknames (Array of Strings). * @apiSuccess {Object} profile Profile data (example for an Object) * @apiSuccess {Number} profile.age Users age. * @apiSuccess {String} profile.image Avatar-Image. * @apiSuccess {Object[]} options List of Users options (Array of Objects). * @apiSuccess {String} options.name Option Name. * @apiSuccess {String} options.value Option Value. * * @apiError NoAccessRight Only authenticated Admins can access the data. * @apiError UserNotFound The <code>id</code> of the User was not found. * * @apiErrorExample Response (example): * HTTP/1.1 401 Not Authenticated * { * "error": "NoAccessRight" * } */ helmet var express = require('express') var helmet = require('helmet') var app = express() app.use(helmet()) cors 使用方式: // 允许所有跨域请求 var express = require('express') var cors = require('cors') var app = express() app.use(cors()) // 允许某路由的跨域请求 app.get('/products/:id', cors(), function (req, res, next) { res.json({msg: 'This is CORS-enabled for a Single Route'}) }) // 允许某些域的请求 var whitelist = ['http://example1.com', 'http://example2.com'] var corsOptions = { origin: function (origin, callback) { if (whitelist.indexOf(origin) !== -1) { callback(null, true) } else { callback(new Error('Not allowed by CORS')) } } } app.get('/products/:id', cors(corsOptions), function (req, res, next) { res.json({msg: 'This is CORS-enabled for a whitelisted domain.'}) }) // 允许 GET/POST 以外的请求 app.options('/products/:id', cors()) // enable pre-flight request for DELETE request app.del('/products/:id', cors(), function (req, res, next) { res.json({msg: 'This is CORS-enabled for all origins!'}) }) // 对所有路由允许 app.options('*', cors()) // include before other routes compression 使用方式: var compression = require('compression') var express = require('express') var app = express() app.use(compression({filter: shouldCompress})) function shouldCompress (req, res) { if (req.headers['x-no-compression']) { // don't compress responses with this request header return false } // fallback to standard filter function return compression.filter(req, res) } response-time 使用方式: 该中间件将响应时间写在响应头 X-Response-Time 中 var express = require('express') var responseTime = require('response-time') var app = express() // 统计响应进入该中间件到写完响应头的毫秒数 app.use(responseTime()) express-validator 验证规则 // 初始化 app.use(expressValidator()) // this line must be immediately after any of the bodyParser middlewares! // 检查参数是否符合标准 req.check('testparam', 'Error Message').notEmpty().isInt() // 将参数转化为 req.sanitize('postparam').toBoolean() // 返回验证结果 req.getValidationResult().then(function(result) { // do something with the validation result }) pm2 pm2 start app.js --name="api" # Start application and name it "api" pm2 stop all # Stop all apps pm2 logs # Display logs of all apps pm2 web 后访问 http://localhost:9615/ # 查看系统状态

优秀的个人博客,低调大师

Python爬虫入门教程 36-100 酷安网全站应用爬虫 scrapy

爬前叨叨 2018年就要结束了,还有4天,就要开始写2019年的教程了,没啥感动的,一年就这么过去了,今天要爬取一个网站叫做酷安,是一个应用商店,大家可以尝试从手机APP爬取,不过爬取APP的博客,我打算在50篇博客之后在写,所以现在就放一放啦~~~ 酷安网站打开首页之后是一个广告页面,点击头部的应用即可 页面分析 分页地址找到,这样就可以构建全部页面信息 我们想要保存的数据找到,用来后续的数据分析 上述信息都是我们需要的信息,接下来,只需要爬取即可,本篇文章使用的还是scrapy,所有的代码都会在文章中出现,阅读全文之后,你就拥有完整的代码啦 import scrapy from apps.items import AppsItem # 导入item类 import re # 导入正则表达式类 class AppsSpider(scr

优秀的个人博客,低调大师

学习了《python网络爬虫实战》第一个爬虫,爬取新浪新闻

请安装anaconda,其中附带的spyder方便运行完查看变量 1.进入cmd控制台, 输入 pip install BeautifulSoup4 pip install requests 2.编写代码,代码已经很清晰了,直接运行不会报错并有成功的结果 def getNewsDetail(newsUrl): import requests from bs4 import BeautifulSoup from datetime import datetime newsWeb = requests.get(newsUrl) newsWeb.encoding = 'utf-8' soup = BeautifulSoup(newsWeb.text,'lxml') result = {} result['title'] = soup.select('.main-title')[0].text result['newsSource'] = soup.select('.source')[0].text timeSource = soup.select('.date')[0].text result['datetime'] = datetime.strptime(timeSource,'%Y年%m月%d日 %H:%M') result['article'] = soup.select('.article')[0].text result['editor'] = soup.select('.show_author')[0].text.strip('责任编辑:') result['comment'] = soup.select('.num')[0].text return result def parseListLinks(url): import requests import json newsDetails = [] request = requests.get(url) jsonLoad = json.loads(request.text.lstrip(' newsloadercallback(').rstrip(');')) newsUrls = [] for item in jsonLoad['result']['data']: newsUrls.append(item['url']) for url in newsUrls: newsDetails.append(getNewsDetail(url)) return newsDetails if __name__ == '__main__': #获取单个新闻页面的信息 newsUrl = 'http://news.sina.com.cn/s/wh/2018-01-08/doc-ifyqkarr7830426.shtml' newsDetail = getNewsDetail(newsUrl) #获取整个列表各个新闻页面的信息 rollUrl='http://api.roll.news.sina.com.cn/zt_list?channel=news&cat_1=gnxw\ &cat_2==gdxw1||=gatxw||=zs-pl||=mtjj&level==1||=2&show_ext=1&show_all=1&\ show_num=22&tag=1&format=json&page=23&callback=newsloadercallback&_=1515911333929' newsDetails = parseListLinks(rollUrl)

资源下载

更多资源
优质分享App

优质分享App

近一个月的开发和优化,本站点的第一个app全新上线。该app采用极致压缩,本体才4.36MB。系统里面做了大量数据访问、缓存优化。方便用户在手机上查看文章。后续会推出HarmonyOS的适配版本。

Nacos

Nacos

Nacos /nɑ:kəʊs/ 是 Dynamic Naming and Configuration Service 的首字母简称,一个易于构建 AI Agent 应用的动态服务发现、配置管理和AI智能体管理平台。Nacos 致力于帮助您发现、配置和管理微服务及AI智能体应用。Nacos 提供了一组简单易用的特性集,帮助您快速实现动态服务发现、服务配置、服务元数据、流量管理。Nacos 帮助您更敏捷和容易地构建、交付和管理微服务平台。

Rocky Linux

Rocky Linux

Rocky Linux(中文名:洛基)是由Gregory Kurtzer于2020年12月发起的企业级Linux发行版,作为CentOS稳定版停止维护后与RHEL(Red Hat Enterprise Linux)完全兼容的开源替代方案,由社区拥有并管理,支持x86_64、aarch64等架构。其通过重新编译RHEL源代码提供长期稳定性,采用模块化包装和SELinux安全架构,默认包含GNOME桌面环境及XFS文件系统,支持十年生命周期更新。

Sublime Text

Sublime Text

Sublime Text具有漂亮的用户界面和强大的功能,例如代码缩略图,Python的插件,代码段等。还可自定义键绑定,菜单和工具栏。Sublime Text 的主要功能包括:拼写检查,书签,完整的 Python API , Goto 功能,即时项目切换,多选择,多窗口等等。Sublime Text 是一个跨平台的编辑器,同时支持Windows、Linux、Mac OS X等操作系统。

用户登录
用户注册
修改密码
忘记密码