首页 文章 精选 留言 我的

精选列表

搜索[性能改进],共10012篇文章
优秀的个人博客,低调大师

用分布式账本改进国际转账业务

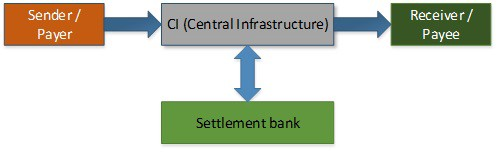
本文提出了一种基于区块链账本复制技术的支付解决方案,可以部署在同一银行的不同部门,或具有合作关系的不同银行之间,通过账本复制解决方案可以有效地减少使用SWIFT网络传递支付消息的成本,也可以减少在对端银行保留结算账户的被动成本。 本文提出的方案不需要替代或修改银行现有的账本,只需要部署一个封装应用来跟踪账本中的特定条目并将变化复制到所有的成员,从而确保每个银行在同一时刻可以看到同样的账本并且保证其准确性。为此我们建议使用区块链来开发此解决方案。 相关区块链教程/开发包推荐:以太坊 | 比特币 | EOS | Tendermint Core | Hyperledger Fabric | Omni/USDT | Ripple 1、目前的挑战 现有的账本体系,是在15世纪由Luca Pacioli开发的,不同的业务建立分立账本,因此仅保证自己版本的真实性,并没有彼此都认同的真实性。由于每个银行只能看到自己部分的交易,因此这就像盲人摸象。 为了解决这些缺点并在不同机构间处理支付,就需要一个中心化的受信任的第三方机构,例如SWIFT负责在商业银行间传递支付消息,中央银行负责处理支付结算,这两者都是受信任的第三方机构。 2、支付的背景知识 下图展示了目前的支付处理流程,这种方案被称为4盒模型,适应于所有的支付体系。CI(中心化设施)包括支付体系和体系提供商: 在一个支付机制中包含三个部分: 支付消息发送 支付调节 通过中央银行结算账户和账本条目进行结算 在商业银行间的支付消息传送通常是由第三方基础设施提供商(CI)来完成的,例如在国际间转账时,这个基础设施就是指SWIFT网络。 CI或者支付体系提供商通常作为所有商业银行的超级代理来运作,它负责计算并调节不同银行间的支付往来,然后将调节后的资金发送到结算银行(大多数情况下是中央银行)。不同银行自己的账本条目必须于CI账本条目一致,这让CI的账本成为所有账本中的超级账本。CI提供了支付调节的最终性。 结算银行(通常是不同国家的中央银行)接收到结算数据并利用结算账户在不同的商业银行间进行资金调拨以匹配发生的变化。结算银行提供了支付的最终性。为了降低自身的风险,结算银行需要所有的成员商业银行在结算账户中保持一定的资金量来满足日常结算要求。 没有一个银行对于资金的持有情况有完整了解,即使是结算银行也做不到。结算银行能够信任的唯一账户就是每家商业银行的结算账户。下图展示了在一个国家内转账过程中每个账本的情况,在跨境转账时也适用同样的原则: 3、基于区块链的账本复制方案 本方案将区块链账本映射为银行现有账本的虚拟账本,这样银行只需要很小的变动,可以利用现有的基础设施,向其他银行的支付通过SWIFT处理,向同一银行的支付转换为区块链交易并提交给分布式账本: 在上图中,每个银行都保留有账本的全部修改历史。因此,没有一个银行可以重复消费或进行欺诈。进入银行自身内部账本的交易都是通过虚拟账本,该虚拟账本作为一个黑盒子,由所有相关机构维护。这可以让每个银行都看到确切的有效账户余额以便确认或拒绝支付,而无需通过SWIFT或其他中心化的机制。 4、为什么使用区块链 在上面的方案中,我们使用区块链的原因在于: 没有单一的中心化数据库,数据可以在所有银行间复制 架构避免了对已输入数据的修改,你没有办法修改区块链上的数据 区块链中包含了商业实体创建的交易,这些区块实际上代替了SWIFT网络的确认 数据的每个副本都通过区块链协议同步,具有内在的安全性 可以随着规模扩大添加更多的机构 原文链接:用账本复制技术降低SWIFT转账成本 — 汇智网

优秀的个人博客,低调大师

ios17--自定义控件2改进

控制器: // // XMGViewController.h #import <UIKit/UIKit.h> @interface XMGViewController : UIViewController@end // // XMGViewController.m #import "XMGViewController.h" #import "XMGShop.h" #import "XMGShopView.h" @interface XMGViewController () @property (weak, nonatomic) IBOutlet UIView *shopCarView; @property (weak, nonatomic) IBOutlet UIButton *addButton; @property (weak, nonatomic) IBOutlet UIButton *removeButton; @property (nonatomic, strong) NSArray *dataArr; @end @implementation XMGViewController /** * 懒加载 */ - (NSArray *)dataArr{ if (_dataArr == nil) { // 加载数据 // 1.获取全路径 NSString *dataPath = [[NSBundle mainBundle] pathForResource:@"shopData.plist" ofType:nil]; self.dataArr = [NSArray arrayWithContentsOfFile:dataPath]; // 字典转模型 // 创建临时数组 NSMutableArray *tempArray = [NSMutableArray array]; for (NSDictionary *dict in _dataArr) { // 创建shop对象 XMGShop *shop = [XMGShop shopWithDict:dict]; // 把模型装入数组 [tempArray addObject:shop]; } self.dataArr = tempArray; } return _dataArr; } // 初始化数据 - (void)viewDidLoad { [super viewDidLoad]; } /** * 添加到购物车 * * @param button 按钮 */ - (IBAction)add:(UIButton *)button { /***********************1.定义一些常量*****************************/ // 1.总列数 NSInteger allCols = 3; // 2.商品的宽度 和 高度 CGFloat width = 80; CGFloat height = 100; // 3.求出水平间距 和 垂直间距 CGFloat hMargin = (self.shopCarView.frame.size.width - allCols * width) / (allCols -1); CGFloat vMargin = (self.shopCarView.frame.size.height - 2 * height) / 1; // 4. 设置索引 NSInteger index = self.shopCarView.subviews.count; // 5.求出x值 CGFloat x = (hMargin + width) * (index % allCols); CGFloat y = (vMargin + height) * (index / allCols); /***********************2.创建一个商品*****************************/ /* 原来的分开创建: // 1.创建商品的view UIView *shopView = [[UIView alloc] init]; // 2.设置frame shopView.frame = CGRectMake(x, y, width, height); // 3.设置背景颜色 shopView.backgroundColor = [UIColor greenColor]; // 4.添加到购物车 [self.shopCarView addSubview:shopView]; // 5.创建商品的UIImageView对象 UIImageView *iconView = [[UIImageView alloc] init]; iconView.frame = CGRectMake(0, 0, width, width); iconView.backgroundColor = [UIColor blueColor]; [shopView addSubview:iconView]; // 6.创建商品标题对象 UILabel *titleLabel = [[UILabel alloc] init]; titleLabel.frame = CGRectMake(0, width, width, height - width); titleLabel.backgroundColor = [UIColor yellowColor]; titleLabel.textAlignment = NSTextAlignmentCenter; // 居中 [shopView addSubview:titleLabel]; */ XMGShopView *shopView = [[XMGShopView alloc] init]; shopView.frame = CGRectMake(x, y, width, height); [self.shopCarView addSubview:shopView]; // shopView.titleLabel = nil; /***********************3.设置数据*****************************/ // 设置数据 XMGShop *shop = self.dataArr[index]; /* shopView.iconView.image = [UIImage imageNamed:shop.icon]; shopView.titleLabel.text = shop.name; */ [shopView setIcon:shop.icon]; [shopView setName:shop.name]; /***********************4.设置按钮的状态*****************************/ button.enabled = (index != 5); // 5.设置删除按钮的状态 self.removeButton.enabled = YES; } /** * 从购物车中删除 * * @param button 按钮 */ - (IBAction)remove:(UIButton *)button { // 1. 删除最后一个商品 UIView *lastShopView = [self.shopCarView.subviews lastObject]; [lastShopView removeFromSuperview]; // 3. 设置添加按钮的状态 self.addButton.enabled = YES; // 4. 设置删除按钮的状态 self.removeButton.enabled = (self.shopCarView.subviews.count != 0); } @end 自定义控件: // // XMGShopView.h #import <UIKit/UIKit.h> @interface XMGShopView : UIView // readonly 只会调用get方法 /** 图片控件 */ //@property (nonatomic, weak, readonly) UIImageView *iconView;// [self addSubview:iconView];已经有强指针引用了,这里用weak /** 标题控件 */ //@property (nonatomic, weak, readonly) UILabel *titleLabel; // 提供接口方法 - (void)setIcon: (NSString *)icon; - (void)setName: (NSString *)name; @end // // XMGShopView.m #import "XMGShopView.h" @interface XMGShopView () //扩展属性 @property (nonatomic, strong) UIImageView *iconView;//[self addSubview:iconView];有强指针指向了,用weak @property (nonatomic, strong) UILabel *titleLabel; @end @implementation XMGShopView /** * 初始化子控件(不要设置frame) * */ - (instancetype)init{ if (self = [super init]) { // 1.创建商品的UIImageView对象 UIImageView *iconView = [[UIImageView alloc] init]; iconView.backgroundColor = [UIColor blueColor]; [self addSubview:iconView]; _iconView = iconView; // 2.创建商品标题对象 UILabel *titleLabel = [[UILabel alloc] init]; titleLabel.backgroundColor = [UIColor yellowColor]; titleLabel.textAlignment = NSTextAlignmentCenter; // 居中 [self addSubview:titleLabel]; _titleLabel = titleLabel; } return self; } /** * 布局子控件(可以拿到frame) */ - (void)layoutSubviews{ // 0.一定要调用super [super layoutSubviews]; // 1.获取当前控件的尺寸 CGFloat width = self.frame.size.width; CGFloat height = self.frame.size.height; // 2.设置子控件的frame self.iconView.frame = CGRectMake(0, 0, width, width); self.titleLabel.frame = CGRectMake(0, width, width, height - width); } - (void)setIcon:(NSString *)icon{ // 设置数据 self.iconView.image = [UIImage imageNamed:icon]; } - (void)setName:(NSString *)name{ // 设置数据 self.titleLabel.text = name; } @end bean: // // XMGShop.h #import <Foundation/Foundation.h> @interface XMGShop : NSObject /** 图片的名称 */ @property (nonatomic, copy) NSString *icon; /** 商品的名称 */ @property (nonatomic, copy) NSString *name; // 提供构造方法 /* - (instancetype)initWithIcon: (NSString *)icon name: (NSString *)name; + (instancetype)shopWithIcon: (NSString *)icon name: (NSString *)name; */ - (instancetype)initWithDict:(NSDictionary *)dict; + (instancetype)shopWithDict:(NSDictionary *)dict; @end // // XMGShop.m #import "XMGShop.h" @implementation XMGShop /* - (instancetype)initWithIcon:(NSString *)icon name:(NSString *)name{ if (self = [super init]) { self.icon = icon; self.name = name; } return self; } + (instancetype)shopWithIcon:(NSString *)icon name:(NSString *)name{ return [[self alloc] initWithIcon:icon name:name]; } */ - (instancetype)initWithDict:(NSDictionary *)dict{ if (self = [super init]) { self.icon = dict[@"icon"]; self.name = dict[@"name"]; } return self; } + (instancetype)shopWithDict:(NSDictionary *)dict{ return [[self alloc] initWithDict:dict]; } @end 本文转自农夫山泉别墅博客园博客,原文链接:http://www.cnblogs.com/yaowen/p/7466778.html,如需转载请自行联系原作者


优秀的个人博客,低调大师

ios18---自定义控件3改进

控制器: // XMGViewController.h #import <UIKit/UIKit.h> @interface XMGViewController : UIViewController @end // XMGViewController.m #import "XMGViewController.h" #import "XMGShop.h" #import "XMGShopView.h" @interface XMGViewController () // 购物车 @property (weak, nonatomic) IBOutlet UIView *shopCarView; // 添加按钮 @property (weak, nonatomic) IBOutlet UIButton *addButton; // 删除按钮 @property (weak, nonatomic) IBOutlet UIButton *removeButton; /** 数据数组 */ @property (nonatomic, strong) NSArray *dataArr; @end @implementation XMGViewController /** * 懒加载,get方法 */ - (NSArray *)dataArr{ if (_dataArr == nil) { // 加载数据 // 1.获取全路径 NSString *dataPath = [[NSBundle mainBundle] pathForResource:@"shopData.plist" ofType:nil]; self.dataArr = [NSArray arrayWithContentsOfFile:dataPath]; // 字典转模型 // 创建临时数组 NSMutableArray *tempArray = [NSMutableArray array]; for (NSDictionary *dict in _dataArr) { // 创建shop对象 XMGShop *shop = [XMGShop shopWithDict:dict]; // 把模型装入数组 [tempArray addObject:shop]; } self.dataArr = tempArray; } return _dataArr; } // 初始化数据 - (void)viewDidLoad { [super viewDidLoad]; } /** * 添加到购物车 * * @param button 按钮 */ - (IBAction)add:(UIButton *)button { /***********************1.定义一些常量*****************************/ // 1.总列数 NSInteger allCols = 3; // 2.商品的宽度 和 高度 CGFloat width = 80; CGFloat height = 100; // 3.求出水平间距 和 垂直间距 CGFloat hMargin = (self.shopCarView.frame.size.width - allCols * width) / (allCols -1); CGFloat vMargin = (self.shopCarView.frame.size.height - 2 * height) / 1; // 4. 设置索引 NSInteger index = self.shopCarView.subviews.count; // 5.求出x值 CGFloat x = (hMargin + width) * (index % allCols); CGFloat y = (vMargin + height) * (index / allCols); /***********************2.创建一个商品*****************************/ /* XMGShopView *shopView = [[XMGShopView alloc] init]; shopView.frame = CGRectMake(x, y, width, height); // 设置数据 XMGShop *shop = self.dataArr[index]; shopView.shop = shop; [self.shopCarView addSubview:shopView]; */ XMGShopView *shopView = [XMGShopView shopViewWithShop:self.dataArr[index]]; shopView.frame = CGRectMake(x, y, width, height); [self.shopCarView addSubview:shopView]; /***********************3.设置数据*****************************/ // 设置数据 // XMGShop *shop = self.dataArr[index]; // [shopView setIcon:shop.icon]; // [shopView setName:shop.name]; /***********************4.设置按钮的状态*****************************/ button.enabled = (index != 5); // 5.设置删除按钮的状态 self.removeButton.enabled = YES; } /** * 从购物车中删除 * * @param button 按钮 */ - (IBAction)remove:(UIButton *)button { // 1. 删除最后一个商品 UIView *lastShopView = [self.shopCarView.subviews lastObject]; [lastShopView removeFromSuperview]; // 3. 设置添加按钮的状态 self.addButton.enabled = YES; // 4. 设置删除按钮的状态 self.removeButton.enabled = (self.shopCarView.subviews.count != 0); } @end 自定义控件: // XMGShopView.h #import <UIKit/UIKit.h> @class XMGShop; @interface XMGShopView : UIView /** 商品模型 */ @property (nonatomic, strong) XMGShop *shop; // 构造方法 - (instancetype)initWithShop: (XMGShop *)shop; + (instancetype)shopViewWithShop: (XMGShop *)shop; @end // XMGShopView.m #import "XMGShopView.h" #import "XMGShop.h" @interface XMGShopView () /** 图片控件 */ @property (nonatomic, weak) UIImageView *iconView; /** 标题控件 */ @property (nonatomic, weak) UILabel *titleLabel; @end @implementation XMGShopView /** * 初始化子控件(不要设置frame) * */ - (instancetype)init{ if (self = [super init]) { [self setUp]; } return self; } //构造方法,对象方法 - (instancetype)initWithShop:(XMGShop *)shop{ if (self = [super init]) { // 注意:先创建后赋值,不然空指针, [self setUp]; self.shop = shop;//调用set方法 } return self; } //构造方法,类方法 + (instancetype)shopViewWithShop:(XMGShop *)shop{ return [[self alloc] initWithShop:shop]; } /** * 初始化 */ - (void)setUp{ // 1.创建商品的UIImageView对象 UIImageView *iconView = [[UIImageView alloc] init]; iconView.backgroundColor = [UIColor blueColor]; [self addSubview:iconView]; _iconView = iconView; // 2.创建商品标题对象 UILabel *titleLabel = [[UILabel alloc] init]; titleLabel.backgroundColor = [UIColor yellowColor]; titleLabel.textAlignment = NSTextAlignmentCenter; // 居中 [self addSubview:titleLabel]; _titleLabel = titleLabel; } /** * 布局子控件(可以拿到frame) */ - (void)layoutSubviews{ // 0.一定要调用super [super layoutSubviews]; // 1.获取当前控件的尺寸 CGFloat width = self.frame.size.width; CGFloat height = self.frame.size.height; // 2.设置子控件的frame self.iconView.frame = CGRectMake(0, 0, width, width); self.titleLabel.frame = CGRectMake(0, width, width, height - width); } /** * 重写set方法:只要外边传数据就会调用 * 作用:设置数据 */ - (void)setShop:(XMGShop *)shop{ _shop = shop; // 设置数据 self.iconView.image = [UIImage imageNamed:shop.icon]; self.titleLabel.text = shop.name; } @end bean: // XMGShop.h #import <Foundation/Foundation.h> @interface XMGShop : NSObject /** 图片的名称 */ @property (nonatomic, copy) NSString *icon; /** 商品的名称 */ @property (nonatomic, copy) NSString *name; // 提供构造方法 /* - (instancetype)initWithIcon: (NSString *)icon name: (NSString *)name; + (instancetype)shopWithIcon: (NSString *)icon name: (NSString *)name; */ - (instancetype)initWithDict:(NSDictionary *)dict; + (instancetype)shopWithDict:(NSDictionary *)dict; @end // XMGShop.m #import "XMGShop.h" @implementation XMGShop /* - (instancetype)initWithIcon:(NSString *)icon name:(NSString *)name{ if (self = [super init]) { self.icon = icon; self.name = name; } return self; } + (instancetype)shopWithIcon:(NSString *)icon name:(NSString *)name{ return [[self alloc] initWithIcon:icon name:name]; } */ - (instancetype)initWithDict:(NSDictionary *)dict{ if (self = [super init]) { self.icon = dict[@"icon"]; self.name = dict[@"name"]; } return self; } + (instancetype)shopWithDict:(NSDictionary *)dict{ return [[self alloc] initWithDict:dict]; } @end 本文转自农夫山泉别墅博客园博客,原文链接:http://www.cnblogs.com/yaowen/p/7466861.html,如需转载请自行联系原作者

优秀的个人博客,低调大师

Microsoft 对 Node.js 改进以支持 ARM

Node.js 支持多种不同的平台,但是 ARM 上的 Windows 不在其中。为了解决这个问题,微软创建了自己的一个 Node.js 版本,其目的是为了支持 ARM 架构下运行的 Windows 10 操作系统。 为了完成这个要求,微软将 Node.js 默认的 V8 引擎改为在 Windows 10 上的 Chakra 引擎。因此,微软的 Node.js 版本跟标准的 Node.js 版本会有所区别,微软也声称希望将这些变化合并到 Node.js 的主分支上。 支持 ARM 上的 Windows 10 是微软物联网战略的重要一个环节,其修改的 Node.js 版本将可以运行在任意版本的 Windows 10 上,团队已经提供了一个 示例 来运行 Windows Universal “Hello, World” 应用以及在树莓派 2 上如何修改 项目 。文章转载自 开源中国社区 [http://www.oschina.net]

资源下载

更多资源
腾讯云软件源

腾讯云软件源

为解决软件依赖安装时官方源访问速度慢的问题,腾讯云为一些软件搭建了缓存服务。您可以通过使用腾讯云软件源站来提升依赖包的安装速度。为了方便用户自由搭建服务架构,目前腾讯云软件源站支持公网访问和内网访问。

Nacos

Nacos

Nacos /nɑ:kəʊs/ 是 Dynamic Naming and Configuration Service 的首字母简称,一个易于构建 AI Agent 应用的动态服务发现、配置管理和AI智能体管理平台。Nacos 致力于帮助您发现、配置和管理微服务及AI智能体应用。Nacos 提供了一组简单易用的特性集,帮助您快速实现动态服务发现、服务配置、服务元数据、流量管理。Nacos 帮助您更敏捷和容易地构建、交付和管理微服务平台。

Spring

Spring

Spring框架(Spring Framework)是由Rod Johnson于2002年提出的开源Java企业级应用框架,旨在通过使用JavaBean替代传统EJB实现方式降低企业级编程开发的复杂性。该框架基于简单性、可测试性和松耦合性设计理念,提供核心容器、应用上下文、数据访问集成等模块,支持整合Hibernate、Struts等第三方框架,其适用范围不仅限于服务器端开发,绝大多数Java应用均可从中受益。

WebStorm

WebStorm

WebStorm 是jetbrains公司旗下一款JavaScript 开发工具。目前已经被广大中国JS开发者誉为“Web前端开发神器”、“最强大的HTML5编辑器”、“最智能的JavaScript IDE”等。与IntelliJ IDEA同源,继承了IntelliJ IDEA强大的JS部分的功能。

用户登录
用户注册