首页 文章 精选 留言 我的

精选列表

搜索[文档管理],共10015篇文章
优秀的个人博客,低调大师

zookeeper基本安装文档

zookeeper 检查是否安装JDK rpm -qa|grep -E '^open[jre|jdk]|j[re|dk]' 卸载已安装JDK rpm -qa|grep Java|xargs rpm -e --nodeps yum安装jdk yum search java|grep jdk yum install java-1.8.0-openjdk 检查安装是否成功 java -version java version "1.8.0_101" Java(TM) SE Runtime Environment (build 1.8.0_101-b13) Java HotSpot(TM) 64-Bit Server VM (build 25.101-b13, mixed mode) 下载并安装 cd /root wget https://mirrors.tuna.tsinghua.edu.cn/apache/zookeeper/zookeeper-3.4.11/zookeeper-3.4.11.tar.gz tar -xvf zookeeper-3.4.11.tar.gz mv ./zookeeper-3.4.11 /usr/local/zookeeper mkdir /usr/local/zookeeper/var mkdir /usr/local/zookeeper/var/log echo 1 > /usr/local/zookeeper/var/log/myid cp /usr/local/zookeeper/conf/zoo_sample.cfg /usr/local/zookeeper/conf/zoo.cfg 修改配置 vim /usr/local/zookeeper/conf/zoo.cfg tickTime=2000 initLimit=5 syncLimit=2 dataDir=/usr/local/zookeeper/var/log dataLogDir=/usr/local/zookeeper/var/log clientPort=2181 # 多台server在下面配置即可,如果单台服务器构建多个server,则每个server用过的端口不能重复使用 # 格式: server.[n]=[server_ip]:[server与leader交互端口]:[server选举leader端口] # server.1=172.31.9.59:2182:2183 # server.2=172.31.9.60:2182:2183 # server.3=172.31.9.61:2182:2183 maxClientCnxns=60 minSessionTimeout=60 maxSessionTimeout=120 # purgeInterval含义: 0-禁用自动清除 1-使用自动清除 autopurge.purgeInterval=1 ESC :wq 安装zookeeper-c cd /usr/local/zookeeper/src/c ./configure make make install 防火墙开启 systemctl enable firewalld systemctl start firewalld firewall-cmd --zone=public --permanent --add-port=2181/tcp firewall-cmd --zone=public --permanent --add-port=2182/tcp firewall-cmd --zone=public --permanent --add-port=2183/tcp firewall-cmd --reload 单元文件 # 进入单元文件目录 cd /etc/systemd/system # 创建redis单元文件,格式为: [单元文件名].[单元文件类型] vim zookeeper.service [Unit] Description=开机启动zookeeper. After=default.target network.target [Service] User=root Group=root Type=forking PIDFile=/usr/local/zookeeper/var/log/zookeeper_server.pid ExecStart=/usr/local/zookeeper/bin/zkServer.sh start ExecReload=/usr/local/zookeeper/bin/zkServer.sh restart ExecStop=/usr/local/zookeeper/bin/zkServer.sh stop PrivateTmp=false Restart=always [Install] WantedBy=multi-user.target ESC :wq 安装php扩展:zookeeper参考链接 cd /root wget https://pecl.php.net/get/zookeeper-0.4.0.tgz tar -zxvf zookeeper-0.4.0.tgz cd zookeeper-0.4.0/ phpize ./configure make make install 安装php扩展libzookeeper参考链接 cd /root wget https://github.com/Timandes/libzookeeper/archive/v0.7.2.tar.gz tar -xvf v0.7.2.tar.gz cd libzookeeper-0.7.2 phpize ./configure make make install # 用来调起zookeeper-admin,仓库地址: https://github.com/Timandes/zookeeper-admin.git 修改php.ini vim /usr/local/php/lib/php.ini extension=libzookeeper.so extension=zookeeper.so ESC :wq PHP使用进程公共锁 # 出了$zc的作用域之后,锁将不存在 $zc = new \Zookeeper('127.0.0.1:2181'); //或者 //$zc = new \Zookeeper(); //$zc->connect('127.0.0.1:2181'); $zookeeper_key = '/xxx'; if ($zc->exists($zookeeper_key)) { //如果锁存在,则程序正在运行,不运行新的程序 return false; }else{ //如果锁文件不存在,则创建进程锁文件,运行程序 $acl = [ [ 'perms' => \Zookeeper::PERM_ALL,//共享锁(用来跨进程执行某个程序) 'scheme' => 'world', 'id' => 'anyone', ] ]; //尝试创建锁 $zookeeper_key_res = $zc->create($zookeeper_key, null, $acl, \Zookeeper::EPHEMERAL);//临时锁(可共享的) if ($zookeeper_key_res == $zookeeper_key) { //创建锁成功运行程序 //做些什么,比如等待10秒 sleep(10); $zc->delete($zookeeper_key);//其实不执行也会删除,因为这是一个临时锁,且return之后不再能取到$zc return true; } else { //创建锁失败不运行程序 return false; } }


优秀的个人博客,低调大师

haproxy 安装部署文档

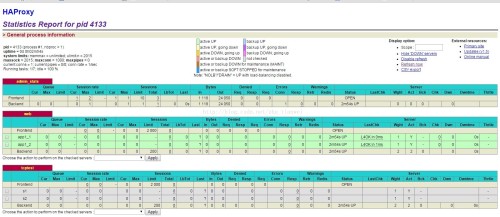
HAProxy提供高可用性、负载均衡以及基于TCP和HTTP应用的代理,支持虚拟主机,它是免费、快速并且可靠的一种解决方案。HAProxy特别适用于那些负载特大的web站点,这些站点通常又需要会话保持或七层处理。HAProxy运行在当前的硬件上,完全可以支持数以万计的并发连接。并且它的运行模式使得它可以很简单安全的整合进您当前的架构中,同时可以保护你的web服务器不被暴露到网络上. haproxy 配置中分成五部分内容,分别如下:1、global:参数是进程级的,通常是和操作系统相关。这些参数一般只设置一次,如果配置无误,就不需要再次进行修改2、defaults:配置默认参数,这些参数可以被用到frontend,backend,Listen组件3、frontend:接收请求的前端虚拟节点,Frontend可以更加规则直接指定具体使用后端的backend4、backend:后端服务集群的配置,是真实服务器,一个Backend对应一个或者多个实体服务器 5、Listen Fronted和backend的组合体 一、安装HAProxy 1.下载最新haproxy安装包,官网:http://www.haproxy.org,如果不能访问,可以使用在线代理访问下载。下载:haproxy-1.5.8.tar.gz 2.上传到linux上,并解压: # mkdir -p /app/zpy/3rd # cd /app/zpy/3rd # tar -zxvf haproxy-1.5.8.tar.gz 创建目录 # mkdir /app/zpy/haproxy 3.安装 # cdhaproxy-1.5.8 # make TARGET=linux26ARCH=x86_64PREFIX=/app/zpy/haproxy#将haproxy安装到/app/zpy/haproxy,TARGET是指定内核版本 make install PREFIX=/app/zpy/haproxy 进入/app/zpy/haproxy目录创建/app/zpy/haproxy/conf目录,复制配置examples cp /app/zpy/3rd/haproxy-1.5.8/examples/haproxy.cfg /app/zpy/haproxy/conf/ 4.修改配置 配置说明如下:(参考:http://freehat.blog.51cto.com/1239536/1347882) ###########全局配置######### global log127.0.0.1local0#[日志输出配置,所有日志都记录在本机,通过local0输出] log127.0.0.1local1notice#定义haproxy日志级别[errorwarringinfodebug] daemon#以后台形式运行harpoxy nbproc1#设置进程数量 pidfile/home/haproxy/haproxy/conf/haproxy.pid#haproxy进程PID文件 ulimit-n819200#ulimit的数量限制 maxconn4096#默认最大连接数,需考虑ulimit-n限制 #chroot/usr/share/haproxy#chroot运行路径 uid99#运行haproxy用户UID gid99#运行haproxy用户组gid #debug#haproxy调试级别,建议只在开启单进程的时候调试 #quiet ########默认配置############ defaults logglobal modehttp#默认的模式mode{tcp|http|health},tcp是4层,http是7层,health只会返回OK optionhttplog#日志类别,采用httplog optiondontlognull#不记录健康检查日志信息 retries2#两次连接失败就认为是服务器不可用,也可以通过后面设置 optionforwardfor#如果后端服务器需要获得客户端真实ip需要配置的参数,可以从HttpHeader中获得客户端ip optionhttpclose#每次请求完毕后主动关闭http通道,haproxy不支持keep-alive,只能模拟这种模式的实现 #optionredispatch#当serverId对应的服务器挂掉后,强制定向到其他健康的服务器,以后将不支持 optionabortonclose#当服务器负载很高的时候,自动结束掉当前队列处理比较久的链接 maxconn4096#默认的最大连接数 timeoutconnect5000ms#连接超时 timeoutclient30000ms#客户端超时 timeoutserver30000ms#服务器超时 #timeoutcheck2000#心跳检测超时 #timeouthttp-keep-alive10s#默认持久连接超时时间 #timeouthttp-request10s#默认http请求超时时间 #timeoutqueue1m#默认队列超时时间 balanceroundrobin#设置默认负载均衡方式,轮询方式 #balancesource#设置默认负载均衡方式,类似于nginx的ip_hash #balnaceleastconn#设置默认负载均衡方式,最小连接数 ########统计页面配置######## listenadmin_stats bind0.0.0.0:1080#设置Frontend和Backend的组合体,监控组的名称,按需要自定义名称 modehttp#http的7层模式 optionhttplog#采用http日志格式 #log127.0.0.1local0err#错误日志记录 maxconn10#默认的最大连接数 statsrefresh30s#统计页面自动刷新时间 statsuri/stats#统计页面url statsrealmXingCloud\Haproxy#统计页面密码框上提示文本 statsauthadmin:admin#设置监控页面的用户和密码:admin,可以设置多个用户名 statsauthFrank:Frank#设置监控页面的用户和密码:Frank statshide-version#隐藏统计页面上HAProxy的版本信息 statsadminifTRUE#设置手工启动/禁用,后端服务器(haproxy-1.4.9以后版本) ########设置haproxy错误页面##### errorfile403/home/haproxy/haproxy/errorfiles/403.http errorfile500/home/haproxy/haproxy/errorfiles/500.http errorfile502/home/haproxy/haproxy/errorfiles/502.http errorfile503/home/haproxy/haproxy/errorfiles/503.http errorfile504/home/haproxy/haproxy/errorfiles/504.http ########frontend前端配置############## bind*:80 #这里建议使用bind*:80的方式,要不然做集群高可用的时候有问题,vip切换到其他机器就不能访问了。 aclwebhdr(host)-iwww.abc.com #acl后面是规则名称,-i是要访问的域名, aclimghdr(host)-iimg.abc.com 如果访问www.abc.com这个域名就分发到下面的webserver的作用域。 #如果访问img.abc.com.cn就分发到imgserver这个作用域。 use_backendwebserverifweb use_backendimgserverifimg ########backend后端配置############## backendwebserver#webserver作用域 modehttp balanceroundrobin #banlanceroundrobin轮询,balancesource保存session值,支持static-rr,leastconn,first,uri等参数 optionhttpchk/index.htmlHTTP/1.0#健康检查 #检测文件,如果分发到后台index.html访问不到就不再分发给它 serverweb110.16.0.9:8085cookie1weight5checkinter2000rise2fall3 serverweb210.16.0.10:8085cookie2weight3checkinter2000rise2fall3 #cookie1表示serverid为1,checkinter1500是检测心跳频率 #rise2是2次正确认为服务器可用,fall3是3次失败认为服务器不可用,weight代表权重 backendimgserver modehttp optionhttpchk/index.php balanceroundrobin serverimg01192.168.137.101:80checkinter2000fall3 serverimg02192.168.137.102:80checkinter2000fall3 ########tcp配置################# listentest1 bind0.0.0.0:90 modetcp optiontcplog#日志类别,采用tcplog maxconn4086 #log127.0.0.1local0debug servers110.18.138.201:80weight1 servers210.18.102.190:80weight1 5.加上日志支持 # vim /etc/syslog.conf 在最下边增加 local3.* /home/haproxy/haproxy/logs/haproxy.log local0.* /home/haproxy/haproxy/logs/haproxy.log # vim /etc/sysconfig/syslog 修改: SYSLOGD_OPTIONS="-r -m 0" 重启日志服务service syslog restart 6.启动服务 启动服务: # /home/haproxy/haproxy/sbin/haproxy -f /home/haproxy/haproxy/conf/haproxy.cfg 重启服务: # /home/haproxy/haproxy/sbin/haproxy -f /home/haproxy/haproxy/conf/haproxy.cfg -st `cat /home/haproxy/haproxy/conf/haproxy.pid` 停止服务: # killall haproxy 7.监控 访问:http://192.168.101.125:1080/stats 配置参考: ###########全局配置######### global log 127.0.0.1 local0 daemon nbproc 4 maxconn 4096 uid 99 gid 99 pidfile /app/zpy/haproxy/conf/haproxy.pid ulimit-n 819200 chroot /var/empty quiet ########默认配置############ defaults log global mode http option httplog option dontlognull retries 3 option forwardfor option httpclose option redispatch option abortonclose timeout connect 5000ms timeout client 30000ms timeout server 30000ms timeout check 2000 balance roundrobin ########统计页面配置######## listen stats bind 0.0.0.0:1080 mode http option httplog maxconn 10 stats refresh 30s stats uri /stats stats realm ZPY Haproxy stats auth admin:admin stats hide-version stats admin if TRUE ########frontend前端配置############## frontend act bind *:8980 acl hadoop_policy hdr_dom(host) -i zipeiyi.hadoop.com # acl impcom-vir_policy hdr_dom(host) -i impcom-vir.zipeiyi.ceshi # acl imp-vir_policy hdr_dom(host) -i imp-vir.zipeiyi.ceshi use_backend hadoop if hadoop_policy # use_backend impcom-vir if impcom-vir_policy # use_backend imp-vir if imp-vir_policy ########backend后端配置############## backend hadoop mode http balance roundrobin server hadoop3 10.0.70.230:8080 check inter 2000 fall 3 server hadoop4 10.0.70.231:8080 check inter 2000 fall 3 #backend impcom-act # mode http # balance roundrobin # server impcom-act01 10.0.150.3:8180 check inter 2000 fall 3 # server impcom-act02 10.0.150.3:8190 check inter 2000 fall 3 在10.0.70.230、10.0.70.231上部署tomcat应用。 在DNS服务器(10.0.10.10)上添加解析 10.0.10.10zipeiyi.hadoop.com 浏览器访问http://zipeiyi.hadoop.com:8980进行验证。 本文转自 周新宇1991 51CTO博客,原文链接:http://blog.51cto.com/zhouxinyu1991/1871886,如需转载请自行联系原作者

优秀的个人博客,低调大师

官方文档 Upgrading Elasticsearch

Upgrading Elasticsearch Before upgrading Elasticsearch: Consult thebreaking changesdocs. Use theElasticsearch Migration Pluginto detect potential issues before upgrading. Test upgrades in a dev environment before upgrading your production cluster. Alwaysback up your databefore upgrading. Youcannot roll backto an earlier version unless you have a backup of your data. If you are using custom plugins, check that a compatible version is available. Elasticsearch can usually be upgraded using a rolling upgrade process, resulting in no interruption of service. This section details how to perform both rolling upgrades and upgrades with full cluster restarts. To determine whether a rolling upgrade is supported for your release, please consult this table: Upgrade From Upgrade To Supported Upgrade Type 1.x 5.x Reindex to upgrade 2.x 2.y Rolling upgrade(wherey > x) 2.x 5.x Full cluster restart 5.0.0 pre GA 5.x Full cluster restart 5.x 5.y Rolling upgrade(wherey > x) Indices created in Elasticsearch 1.x or before Elasticsearch is able to read indices created in theprevious major version only. For instance, Elasticsearch 5.x can use indices created in Elasticsearch 2.x, but not those created in Elasticsearch 1.x or before. This condition also applies to indices backed up withsnapshot and restore. If an index was originally created in 1.x, it cannot be restored into a 5.x cluster even if the snapshot was made by a 2.x cluster. Elasticsearch 5.x nodes will fail to start in the presence of too old indices. SeeReindex to upgradefor more information about how to upgrade old indices. !!!回滚升级就是一次升级一个节点!!!! A rolling upgrade allows the Elasticsearch cluster to be upgraded one node at a time, with no downtime for end users. Running multiple versions of Elasticsearch in the same cluster for any length of time beyond that required for an upgrade is not supported, as shards will not be replicated from the more recent version to the older version. Reindex to upgrade Elasticsearch is able to use indices created in the previous major version only. For instance, Elasticsearch 5.x can use indices created in Elasticsearch 2.x, but not those created in Elasticsearch 1.x or before. Elasticsearch 5.x nodes will fail to start in the presence of too old indices. If you are running an Elasticsearch 2.x cluster which contains indices that were created before 2.x, you will either need to delete those old indices or to reindex them before upgrading to 5.x. SeeReindex in place. If you are running an Elasticsearch 1.x cluster, you have two options: First upgrade to Elasticsearch 2.4.x, reindex the old indices, then upgrade to 5.x. SeeReindex in place. Create a new 5.x cluster and use reindex-from-remote to import indices directly from the 1.x cluster. SeeUpgrading with reindex-from-remote. Reindex in place The easiest way to reindex old (1.x) indices in place is to use theElasticsearch Migration Plugin. You will need to upgrade to Elasticsearch 2.3.x or 2.4.x first. Upgrading with reindex-from-remote If you are running a 1.x cluster and would like to migrate directly to 5.x without first migrating to 2.x, you can do so usingreindex-from-remote. 转自:https://www.elastic.co/guide/en/elasticsearch/reference/current/setup-upgrade.html#setup-upgrade 本文转自张昺华-sky博客园博客,原文链接:http://www.cnblogs.com/bonelee/p/7443844.html,如需转载请自行联系原作者

优秀的个人博客,低调大师

Frida JAVA API 文档

Java Java.available: a boolean specifying whether the current process has the a Java VM loaded, i.e. Dalvik or ART. Do not invoke any other Java properties or methods unless this is the case. Java.enumerateLoadedClasses(callbacks) enumerate classes loaded right now, where callbacks is an object specifying: onMatch: function (className): called for each loaded class with className that may be passed to use() to get a JavaScript wrapper. onComplete: function (): called when all classes have been enumerated. Java.enumerateLoadedClassesSync(): synchronous version of enumerateLoadedClasses() that returns the class names in an array. Java.perform(fn): ensure that the current thread is attached to the VM and call fn. (This isn’t necessary in callbacks from Java.) Java.perform(function () { var Activity = Java.use("android.app.Activity"); Activity.onResume.implementation = function () { send("onResume() got called! Let's call the original implementation"); this.onResume(); }; }); Java.use(className) dynamically get a JavaScript wrapper for className that you can instantiate objects from by calling $new() on it to invoke a constructor. Call $dispose() on an instance to clean it up explicitly (or wait for the JavaScript object to get garbage-collected, or script to get unloaded). Static and non-static methods are available, and you can even replace a method implementation and throw an exception from it: Java.perform(function () { var Activity = Java.use("android.app.Activity"); var Exception = Java.use("java.lang.Exception"); Activity.onResume.implementation = function () { throw Exception.$new("Oh noes!"); }; }); Java.scheduleOnMainThread(fn): run fn on the main thread of the VM. Java.choose(className, callbacks): enumerate live instances of the className class by scanning the Java heap, where callbacks is an object specifying: onMatch: function (instance): called once for each live instance found with a ready-to-use instance just as if you would have called Java.cast() with a raw handle to this particular instance. This function may return the string stop to cancel the enumeration early. onComplete: function (): called when all instances have been enumerated Java.cast(handle, klass): create a JavaScript wrapper given the existing instance at handle of given class klass (as returned from Java.use()). Such a wrapper also has a class property for getting a wrapper for its class, and a $className property for getting a string representation of its class-name. var Activity = Java.use("android.app.Activity"); var activity = Java.cast(ptr("0x1234"), Activity); WeakRef WeakRef.bind(value, fn): monitor value and call the fn callback as soon as value has been garbage-collected, or the script is about to get unloaded. Returns an id that you can pass to WeakRef.unbind() for explicit cleanup. This API is useful if you’re building a language-binding, where you need to free native resources when a JS value is no longer needed. WeakRef.unbind(id): stop monitoring the value passed to WeakRef.bind(value, fn), and call the fn callback immediately.

资源下载

更多资源
腾讯云软件源

腾讯云软件源

为解决软件依赖安装时官方源访问速度慢的问题,腾讯云为一些软件搭建了缓存服务。您可以通过使用腾讯云软件源站来提升依赖包的安装速度。为了方便用户自由搭建服务架构,目前腾讯云软件源站支持公网访问和内网访问。

Nacos

Nacos

Nacos /nɑ:kəʊs/ 是 Dynamic Naming and Configuration Service 的首字母简称,一个易于构建 AI Agent 应用的动态服务发现、配置管理和AI智能体管理平台。Nacos 致力于帮助您发现、配置和管理微服务及AI智能体应用。Nacos 提供了一组简单易用的特性集,帮助您快速实现动态服务发现、服务配置、服务元数据、流量管理。Nacos 帮助您更敏捷和容易地构建、交付和管理微服务平台。

Sublime Text

Sublime Text

Sublime Text具有漂亮的用户界面和强大的功能,例如代码缩略图,Python的插件,代码段等。还可自定义键绑定,菜单和工具栏。Sublime Text 的主要功能包括:拼写检查,书签,完整的 Python API , Goto 功能,即时项目切换,多选择,多窗口等等。Sublime Text 是一个跨平台的编辑器,同时支持Windows、Linux、Mac OS X等操作系统。

WebStorm

WebStorm

WebStorm 是jetbrains公司旗下一款JavaScript 开发工具。目前已经被广大中国JS开发者誉为“Web前端开发神器”、“最强大的HTML5编辑器”、“最智能的JavaScript IDE”等。与IntelliJ IDEA同源,继承了IntelliJ IDEA强大的JS部分的功能。

用户登录
用户注册