首页 文章 精选 留言 我的

精选列表

搜索[AI编程],共10000篇文章
优秀的个人博客,低调大师

老年人编程系列-go的编译顺序

根据官方文档https://golang.org/doc/install/source编译go源码需要$ cd src$ ./all.bash 拨拉开src/all.bash文件可以看到如下步骤 加载make.bash的内容 执行run.bash 执行dist banner命令 make.bash编译/cmd/dist, run.bash使用dist编译exec go tool dist test -rebuild "$@"非常神奇的是,对于1.5之前的版本,dist是用C写的,编译的顺序 gcc编译dist, dist编译go但是在1.5之后的版本,dist也是用GO写的,所以编译的顺序是 gcc编译dist dist编译工具链 dist重编自己 dist编译go go编译其他包和命令

优秀的个人博客,低调大师

并发编程专题三-线程的并发工具类

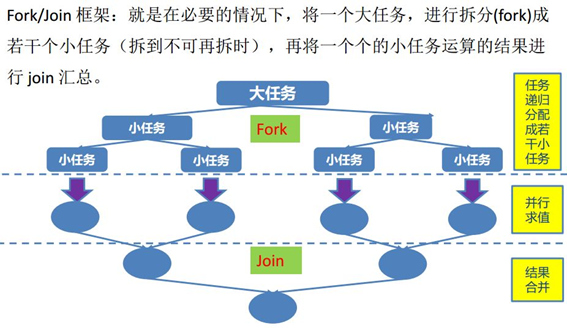
一、Fork-Join框架 1、分而治之 规模为N的问题,N<阈值,直接解决,N>阈值,将N分解为K个小规模子问题,子问题互相对立,与原问题形式相同,将子问题的解合并得到原问题的解 动态规范 2、工作密取 workStealing 就是在任务分割的时候,前面的任务执行可能会比后面的执行速度快,当前面的执行完,后面的还没执行的时候,执行完前面的任务的线程不会停止,而是从后面的任务的尾部取出子任务继续工作。Fork-Join就是实现了这样的机制。 Fork/Join使用的标准范式 代码如下: import java.util.concurrent.ForkJoinPool; import java.util.concurrent.RecursiveTask; /** * @Auther: BlackKingW * @Date: 2019/4/14 12:09 * @Description: */ public class SumArray { private static class SumTask extends RecursiveTask<Integer>{ private final static int THRESHOLD = MakeArray.ARRAY_LENGTH/10; private int[] src; //表示我们要实际统计的数组 private int fromIndex;//开始统计的下标 private int toIndex;//统计到哪里结束的下标 public SumTask(int[] src, int fromIndex, int toIndex) { this.src = src; this.fromIndex = fromIndex; this.toIndex = toIndex; } @Override protected Integer compute() { if(toIndex-fromIndex < THRESHOLD) { int count = 0; for(int i=fromIndex;i<=toIndex;i++) { //SleepTools.ms(1); count = count + src[i]; } return count; }else { //fromIndex....mid....toIndex //1...................70....100 int mid = (fromIndex+toIndex)/2; SumTask left = new SumTask(src,fromIndex,mid); SumTask right = new SumTask(src,mid+1,toIndex); invokeAll(left,right); return left.join()+right.join(); } } } public static void main(String[] args) { ForkJoinPool pool = new ForkJoinPool(); int[] src = MakeArray.makeArray(); SumTask innerFind = new SumTask(src,0,src.length-1); long start = System.currentTimeMillis(); pool.invoke(innerFind);//同步调用 System.out.println("Task is Running....."); System.out.println("The count is "+innerFind.join() +" spend time:"+(System.currentTimeMillis()-start)+"ms"); } } public class MakeArray { //数组长度 public static final int ARRAY_LENGTH = 100000000; public static int[] makeArray() { //new一个随机数发生器 Random r = new Random(); int[] result = new int[ARRAY_LENGTH]; for(int i=0;i<ARRAY_LENGTH;i++){ //用随机数填充数组 result[i] = r.nextInt(ARRAY_LENGTH*3); } return result; } } 二、常用的并发工具类 1、CountDownLatch 作用:是一组线程等待其他的线程完成工作以后在执行,加强版join await用来等待,countDown负责计数器的减一 代码示例: import java.util.concurrent.CountDownLatch; /** * @Auther: BlackKingW * @Date: 2019/4/14 12:09 * @Description: */ public class UseCountDownLatch { static CountDownLatch latch = new CountDownLatch(6); //初始化线程(只有一步,有4个) private static class InitThread implements Runnable{ @Override public void run() { System.out.println("Thread_"+Thread.currentThread().getId() +" ready init work......"); latch.countDown();//初始化线程完成工作了,countDown方法只扣减一次; for(int i =0;i<2;i++) { System.out.println("Thread_"+Thread.currentThread().getId() +" ........continue do its work"); } } } //业务线程 private static class BusiThread implements Runnable{ @Override public void run() { try { latch.await(); } catch (InterruptedException e) { e.printStackTrace(); } for(int i =0;i<3;i++) { System.out.println("BusiThread_"+Thread.currentThread().getId() +" do business-----"); } } } public static void main(String[] args) throws InterruptedException { //单独的初始化线程,初始化分为2步,需要扣减两次 new Thread(new Runnable() { @Override public void run() { SleepTools.ms(1); //休眠1s System.out.println("Thread_"+Thread.currentThread().getId() +" ready init work step 1st......"); latch.countDown();//每完成一步初始化工作,扣减一次 System.out.println("begin step 2nd......."); SleepTools.ms(1); System.out.println("Thread_"+Thread.currentThread().getId() +" ready init work step 2nd......"); latch.countDown();//每完成一步初始化工作,扣减一次 } }).start(); new Thread(new BusiThread()).start(); for(int i=0;i<=3;i++){ Thread thread = new Thread(new InitThread()); thread.start(); } latch.await(); System.out.println("Main do ites work........"); } } 2、CyclicBarrier 让一组线程达到某个屏障,被阻塞,一直到组内最后一个线程达到屏障时,屏障开放,所有被阻塞的线程会继续运行CyclicBarrier(int parties) CyclicBarrier(int parties, Runnable barrierAction),屏障开放,barrierAction定义的任务会执行 代码示例: import java.util.Map; import java.util.Random; import java.util.concurrent.ConcurrentHashMap; import java.util.concurrent.CyclicBarrier; /** * @Auther: BlackKingW * @Date: 2019/4/14 12:09 * @Description: */ public class UseCyclicBarrier { private static CyclicBarrier barrier = new CyclicBarrier(5,new CollectThread()); private static ConcurrentHashMap<String,Long> resultMap = new ConcurrentHashMap<>();//存放子线程工作结果的容器 public static void main(String[] args) { for(int i=0;i<=4;i++){ Thread thread = new Thread(new SubThread()); thread.start(); } } //负责屏障开放以后的工作 private static class CollectThread implements Runnable{ @Override public void run() { StringBuilder result = new StringBuilder(); for(Map.Entry<String,Long> workResult:resultMap.entrySet()){ result.append("["+workResult.getValue()+"]"); } System.out.println(" the result = "+ result); System.out.println("do other business........"); } } //工作线程 private static class SubThread implements Runnable{ @Override public void run() { long id = Thread.currentThread().getId();//线程本身的处理结果 resultMap.put(Thread.currentThread().getId()+"",id); Random r = new Random();//随机决定工作线程的是否睡眠 try { if(r.nextBoolean()) { Thread.sleep(2000+id); System.out.println("Thread_"+id+" ....do something "); } System.out.println(id+"....is await"); barrier.await(); Thread.sleep(1000+id); System.out.println("Thread_"+id+" ....do its business "); } catch (Exception e) { e.printStackTrace(); } } } } CountDownLatch和CyclicBarrier辨析 1、countdownlatch放行由第三者控制,CyclicBarrier放行由一组线程本身控制 2、countdownlatch放行条件》=线程数,CyclicBarrier放行条件=线程数 3、Semaphore 控制同时访问某个特定资源的线程数量,用在流量控制 import java.sql.Connection; import java.util.LinkedList; import java.util.concurrent.Semaphore; /** * @Auther: BlackKingW * @Date: 2019/4/14 12:09 * @Description: */ public class DBPoolSemaphore { private final static int POOL_SIZE = 10; private final Semaphore useful,useless;//useful表示可用的数据库连接,useless表示已用的数据库连接 public DBPoolSemaphore() { this. useful = new Semaphore(POOL_SIZE); this.useless = new Semaphore(0); } //存放数据库连接的容器 private static LinkedList<Connection> pool = new LinkedList<Connection>(); //初始化池 static { for (int i = 0; i < POOL_SIZE; i++) { pool.addLast(SqlConnectImpl.fetchConnection()); } } /*归还连接*/ public void returnConnect(Connection connection) throws InterruptedException { if(connection!=null) { System.out.println("当前有"+useful.getQueueLength()+"个线程等待数据库连接!!" +"可用连接数:"+useful.availablePermits()); useless.acquire(); synchronized (pool) { pool.addLast(connection); } useful.release(); } } /*从池子拿连接*/ public Connection takeConnect() throws InterruptedException { useful.acquire(); Connection conn; synchronized (pool) { conn = pool.removeFirst(); } useless.release(); return conn; } } 4、Exchange 两个线程间的数据交换,用的比较少 代码示例: import java.util.ArrayList; import java.util.HashSet; import java.util.List; import java.util.Set; import java.util.concurrent.Exchanger; /** * @Auther: BlackKingW * @Date: 2019/4/14 12:09 * @Description: */ public class UseExchange { private static final Exchanger<Set<String>> exchange = new Exchanger<Set<String>>(); public static void main(String[] args) { //第一个线程 new Thread(new Runnable() { @Override public void run() { Set<String> setA = new HashSet<String>();//存放数据的容器 try { /*添加数据 * set.add(.....) * */ setA = exchange.exchange(setA);//交换set /*处理交换后的数据*/ } catch (InterruptedException e) { } } }).start(); //第二个线程 new Thread(new Runnable() { @Override public void run() { Set<String> setB = new HashSet<String>();//存放数据的容器 try { /*添加数据 * set.add(.....) * set.add(.....) * */ setB = exchange.exchange(setB);//交换set /*处理交换后的数据*/ } catch (InterruptedException e) { } } }).start(); } } 5、Callable、Future和FutureTask 类之间的关系 isDone,结束,正常还是异常结束,或者自己取消,返回true; isCancelled 任务完成前被取消,返回true; cancel(boolean): 任务还没开始,返回false 任务已经启动,cancel(true),中断正在运行的任务,中断成功,返回true,cancel(false),不会去中断已经运行的任务 任务已经结束,返回false 代码示例: import java.util.Random; import java.util.concurrent.Callable; import java.util.concurrent.ExecutionException; import java.util.concurrent.FutureTask; /** * @Auther: BlackKingW * @Date: 2019/4/14 12:09 * @Description: */ public class UseFuture { /*实现Callable接口,允许有返回值*/ private static class UseCallable implements Callable<Integer>{ private int sum; @Override public Integer call() throws Exception { System.out.println("Callable子线程开始计算"); Thread.sleep(2000); for(int i=0;i<5000;i++) { sum = sum+i; } System.out.println("Callable子线程计算完成,结果="+sum); return sum; } } public static void main(String[] args) throws InterruptedException, ExecutionException { UseCallable useCallable = new UseCallable(); FutureTask<Integer> futureTask = new FutureTask<Integer>(useCallable); new Thread(futureTask).start(); Random r = new Random(); SleepTools.second(1); if(r.nextBoolean()) {//随机决定是获得结果还是终止任务 System.out.println("Get UseCallable result = "+futureTask.get()); }else { System.out.println("中断计算"); futureTask.cancel(true); } } } 场景举例:包含图片和文字的文档的处理:图片(云上),可以用future去取图片,主线程继续解析文字。

优秀的个人博客,低调大师

MapReduce稍微高级编程之PageRank算法的实现

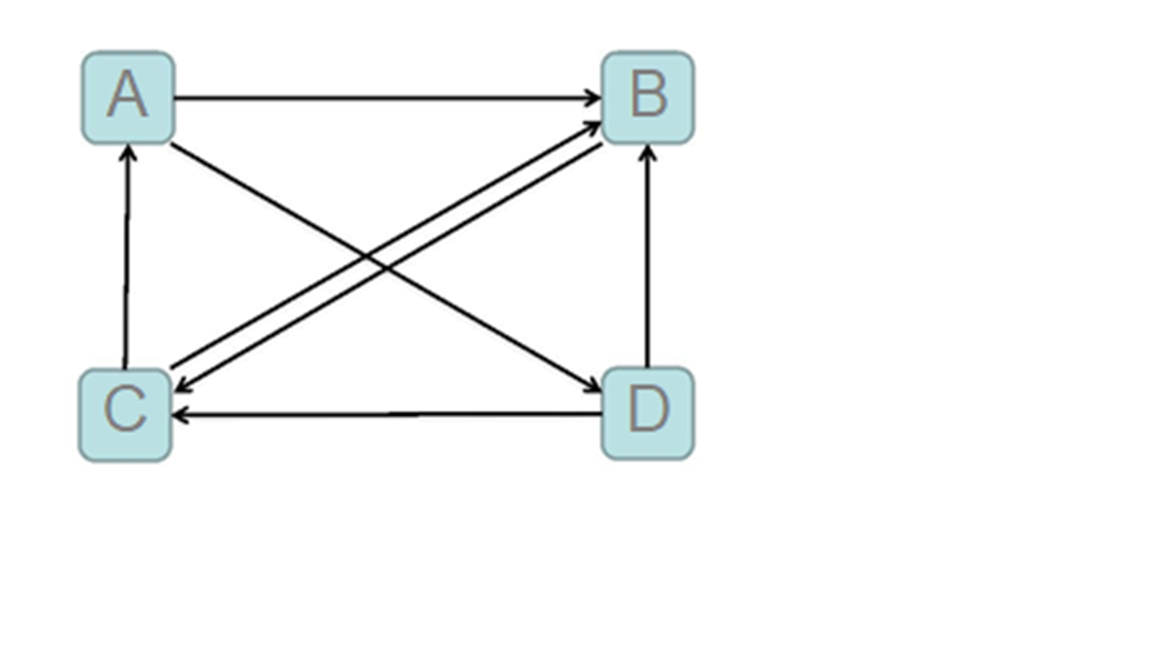
一、概念: PageRank是Google专有的算法,用于衡量特定网页相对于搜索引擎索引中的其他网页而言的重要程度。是Google创始人拉里·佩奇和谢尔盖·布林于1997年创造的。PageRank实现了将链接价值概念作为排名因素。这幅图表示的是一个简单的网络,下面介绍几个名词: 入链:指向该页面的链接为入链,入链相当于投票,到一个页面的超链接相当于对该页投一票。 入链数量:如果一个页面节点接收到的其他网页指向的入链数量越多,那么这个页面越重要 入链质量:指向页面A的入链质量不同,质量高的页面会通过链接向其他页面传递更多的权重。所以越是质量高的页面指向页面A,则页面A越重要。质量是指不同网页发出的链接所含的权重是不同的,比如百度百科里面的链接和你自己写的网页里面的链接肯定是不能比的。这么做主要是为了防止别人恶意刷“流量”。 出链:从本页面发出的链接为出链。 二、计算过程:下面我们介绍一下PageRank的算法流程: 初始值: 每个页面设置相同的PR值,Google的PageRank算法给每个页面的PR初始值为1,该页面的所有出链均分该页面的值。以上图为例,A页面的初始值为1,然后它每一条出链会均分它的值,即'AB' = 0.5,'AD' = 0.5,以此类推,最后每条链接都有自己的初始值。 迭代递归计算:每个页面都会先减去它通过出链输出去的值变成0,然后又会加上它的入链送进来的值得到新的价值。Google不断的重复计算每个页面的PageRank。那么经过不断的重复计算,这些页面的PR值会趋向于稳定,也就是收敛的状态。 在具体企业应用中怎么样确定收敛标准? 每个页面的PR值和上一次计算的PR相等 设定一个差值指标(0.0001)。当所有页面和上一次计算的PR差值平均小于该标准时,则收敛。 设定一个百分比(99%),当99%的页面和上一次计算的PR相等 三、算法修正:上面的算法有点小问题,试想一下如果有一个页面它只有入度没有出度,即“孤立网页”。那么经过若干次计算后,该网络的权值会慢慢流向这个只进不出的页面,使得这个页面的价值异常增大。因此我们需要对 PageRank公式进行修正。即在简单公式的基础上增加了阻尼系数(damping factor)q, q一般取值q=0.85。完整的计算公式: 四、代码书写:切入正题,开始写代码。mapreduce是M->R单向过程,那么当需要这么做“M->R->M->R....”的时候,则需要设置累加器传参数。 enum Count { my } 这是个累加器定义,后面会获取它。 Map: 假设我们拿到的网页数据是这么表示的: /**按照制表符分割 * A 1 B D * B 1 C * C 1 A B * D 1 B C */ 第0列为页面名称,第1列表示该页面的价值(初始值为1),其后的每一列表示的是该页面所有的出链指向的页面名称,当然数量是不固定的。下面是Map阶段的代码: class PageRankMapper extends Mapper<LongWritable, Text, Text, Text> { @Override protected void map(LongWritable key, Text value, Context context) throws IOException, InterruptedException { String[] split = value.toString().split("\t");//首先拿到值,返回列表 String page = split[0];//page名称 Double pagerank = Double.parseDouble(split[1]);//初始值是1,但是在随后的计算中会出现小数所以在这里转成Double //获取出链列表 String[] outlist = Arrays.copyOfRange(split, 2, split.length);//用Array里面的方法复制剩下的页面,构成专门的页面数组,方便后面的迭代。 //1、平分之后的pr值 Double avgPr = pagerank / outlist.length; //map阶段是要将数据的值发给reduce计算的,下面构造key和value for (String s : outlist) { Text outKey = new Text(s);//key Text outValue = new Text(avgPr.toString() + "\t*");//value值,以 "\t*"结尾是为了区分不同类型的数据 //第一种数据:key是页面名称,value是被分到的值(将与来自不同map的value一起计算求和) context.write(outKey, outValue); } //指定分隔符拼接数组,将原有的行数据发过去,保持“A 1 B C”这样的每个网页的出链列表还存在,然后将计算的结果替换1 //加上上一次网页的pr值 String outListStr = split[1] + "\t" + StringUtils.join(outlist, "\t"); Text text = new Text(outListStr + "\t#"); context.write(new Text(page), text); } } Reduce:拿到map发过来的数据应该是这样的<'A',['0.5 ','0.25 ','1 B D #']>,然后开始处理数据: class PageRankReducer extends Reducer<Text, Text, Text, Text> { @Override protected void reduce(Text key, Iterable<Text> values, Context context) throws IOException, InterruptedException { //当前网页的pagerank值 Double sum = 0.0; String lastPrAndOutList = ""; for (Text value : values) { String[] split = value.toString().split("\t");//每个value值都是用制表符分割的,且最后一个字符是标记,表示哪种类型的数据 String flag = split[split.length - 1];//取标记 //出链列表和上一次网页的pr值 if ("#".equals(flag)) {//出链列表 lastPrAndOutList = value.toString(); } else if ("*".equals(flag)) {//pagerank值加和 sum = sum + Double.parseDouble(split[0]); } } String[] split = lastPrAndOutList.split("\t"); //上一次pr值 Double lastPr = Double.parseDouble(split[0]); String[] outList = Arrays.copyOfRange(split, 1, split.length - 1);//构成输出 //加上阻尼系数,计算当前pr值 Double currPr = 0.15 / 4 + 0.85 * sum; //取绝对值 long abs = (long) (Math.abs(currPr - lastPr) * 1000); //获取累加器对象 Counter counter = context.getCounter(Count.my); //累加 /** * 累加所有网页pr值的差值 */ counter.increment(abs); //写入到hdfs /** * A 0.5 B D * B 1.5 C * C 1.5 A B * D 0.5 B C */ context.write(key, new Text(currPr.toString() + "\t" + StringUtils.join(outList, "\t"))); }} 设置job: public class RunJob { public static void main(String[] args) throws Exception { int i = 0;//用来拼接字符串的 //收敛阈值 double flag = 0.1; while (true) { i++; Configuration config = new Configuration(); FileSystem fs = FileSystem.get(config); Job job = Job.getInstance(config); job.setJarByClass(com.shujia.mr.pagerank.RunJob.class); job.setJobName("pagerank"); job.setMapperClass(PageRankMapper.class); job.setReducerClass(PageRankReducer.class); job.setMapOutputKeyClass(Text.class); job.setMapOutputValueClass(Text.class); job.setInputFormatClass(TextInputFormat.class); Path inputPath = new Path("E:\\data\\pagerank.txt"); //后一次读取前一次的输出结果 if (i > 1) { inputPath = new Path("E:\\data\\out" + (i - 1)); } FileInputFormat.addInputPath(job, inputPath); Path outPath = new Path("E:\\data\\out" + i); if (fs.exists(outPath)) { fs.delete(outPath, true); } FileOutputFormat.setOutputPath(job, outPath); boolean f = job.waitForCompletion(true); //计算当前所有网页的pagerank的和上一次pagerank的差值的平均值 //当差值的平均值小于设定的阈值之后收敛 /** * 累加器 * 在map端或者reduce端累加,在主函数里面读取的一个变量 * */ //获取累加器的值 Counter counter = job.getCounters().findCounter(Count.my); long value = counter.getValue(); //差值的平均值 double l = value / 4000.0; System.out.println(l); //当差值的平均值小于设定的阈值后收敛 if (l < flag) { break; } } } } 结语: 本篇只是简单地实现了pagerank算法,还有很多复杂情况处理,比如说并没有考虑入链质量问题,所以仅供练习。


优秀的个人博客,低调大师

Java 并发编程利用 Condition 来实现阻塞队列

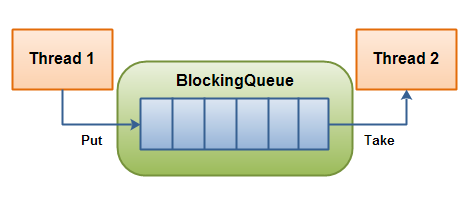
什么是阻塞队列 BlockingQueue 队列是一种数据结构,它的特点是先进先出(First In First Out),它有两个基本操作:在队列尾部加入一个元素,从队列头部移除一个元素。队列在多线程应用中,常用于生产-消费场景。 BlockingQueue 是 Java util.concurrent 包下重要的数据结构,BlockingQueue 提供了线程安全的队列访问方式:当阻塞队列进行插入数据时,如果队列已满,线程将会阻塞等待直到队列非满;从阻塞队列取数据时,如果队列已空,线程将会阻塞等待直到队列非空。并发包下很多高级同步类的实现都是基于 BlockingQueue 实现的。 BlockingQueue 具有 4 组不同的方法用于插入、移除以及对队列中的元素进行检查。如果请求的操作不能得到立即执行的话,每个方法的表现也不同。这些方法如下: BlockingQueue 是个接口,你需要使用它的实现之一来使用 BlockingQueue,Java.util.concurrent 包下具有以下 BlockingQueue 接口的实现类: ArrayBlockingQueue:ArrayBlockingQueue 是一个有界的阻塞队列,其内部实现是将对象放到一个数组里。有界也就意味着,它不能够存储无限多数量的元素。它有一个同一时间能够存储元素数量的上限。你可以在对其初始化的时候设定这个上限,但之后就无法对这个上限进行修改了。 DelayQueue:DelayQueue 对元素进行持有直到一个特定的延迟到期。注入其中的元素必须实现 java.util.concurrent.Delayed 接口。 LinkedBlockingQueue:LinkedBlockingQueue 内部以一个链式结构对其元素进行存储。如果需要的话,这一链式结构可以选择一个上限。如果没有定义上限,将使用 Integer.MAX_VALUE 作为上限。 PriorityBlockingQueue:PriorityBlockingQueue 是一个无界的并发队列。它使用了和类 java.util.PriorityQueue 一样的排序规则。你无法向这个队列中插入 null 值。所有插入到 PriorityBlockingQueue 的元素必须实现 java.lang.Comparable 接口。因此该队列中元素的排序就取决于你自己的 Comparable 实现。 SynchronousQueue:SynchronousQueue 是一个特殊的队列,它的内部同时只能够容纳单个元素。如果该队列已有一元素的话,试图向队列中插入一个新元素的线程将会阻塞,直到另一个线程将该元素从队列中抽走。同样,如果该队列为空,试图向队列中抽取一个元素的线程将会阻塞,直到另一个线程向队列中插入了一条新的元素。据此,把这个类称作一个队列显然是夸大其词了。它更多像是一个汇合点。 下面用 BlockQueue 技术来实现一下: /**定义一个盘子类,可以放鸡蛋和取鸡蛋*/ publicclassBigPlate{ /**装鸡蛋的盘子,大小为5*/ privateBlockingQueueeggs=newArrayBlockingQueue(5); /**放鸡蛋*/ publicvoidputEgg(Objectegg){ try{ eggs.put(egg);//向盘子末尾放一个鸡蛋,如果盘子满了,当前线程阻塞 }catch(InterruptedExceptione){ e.printStackTrace(); } //下面输出有时不准确,因为与put操作不是一个原子操作 System.out.println("放入鸡蛋"); } /**取鸡蛋*/ publicObjectgetEgg(){ Objectegg=null; try{ egg=eggs.take();//从盘子开始取一个鸡蛋,如果盘子空了,当前线程阻塞 }catch(InterruptedExceptione){ e.printStackTrace(); } //下面输出有时不准确,因为与take操作不是一个原子操作 System.out.println("拿到鸡蛋"); returnegg; } /**放鸡蛋线程*/ staticclassAddThreadextendsThread{ privateBigPlateplate; privateObjectegg=newObject(); publicAddThread(BigPlateplate){ this.plate=plate; } publicvoidrun(){ plate.putEgg(egg); } } /**取鸡蛋线程*/ staticclassGetThreadextendsThread{ privateBigPlateplate; publicGetThread(BigPlateplate){ this.plate=plate; } publicvoidrun(){ plate.getEgg(); } } publicstaticvoidmain(String[]args){ BigPlateplate=newBigPlate(); //先启动10个放鸡蛋线程 for(inti=0;i<10;i++){ newThread(newAddThread(plate)).start(); } //再启动10个取鸡蛋线程 for(inti=0;i<10;i++){ newThread(newGetThread(plate)).start(); } } } 利用 Condition 来实现阻塞队列 Java 1.5 之后新增了显式锁的接口 java.util.concurrent.locks.Lock 接口,同样提供了显式的条件接口 Condition,并对条件队列进行了增强。 Condition 对象可以提供和 Object 的 wait 和 notify 一样的行为,但是后者必须使用 synchronized 这个内置的monitor锁,而 Condition 使用的是 RenentranceLock 。这两种方式在阻塞等待时都会将相应的锁释放掉,但是 Condition 的等待可以中断,这是二者唯一的区别。 下面就用 Condition 技术来实现一下: classBuffer{ finalLocklock=newReentrantLock();//定义一个锁 finalConditionnotFull=lock.newCondition();//定义阻塞队列满了的Condition finalConditionnotEmpty=lock.newCondition();//定义阻塞队列空了的Condition finalObject[]items=newObject[10];//为了下面模拟,设置阻塞队列的大小为10,不要设太大 intputptr,takeptr,count;//数组下标,用来标定位置的 //往队列中存数据 publicvoidput(Objectx)throwsInterruptedException{ lock.lock();//上锁 try{ while(count==items.length){ System.out.println(Thread.currentThread().getName()+"被阻塞了,暂时无法存数据!"); notFull.await();//如果队列满了,那么阻塞存数据这个线程,等待被唤醒 } //如果没满,按顺序往数组中存 items[putptr]=x; if(++putptr==items.length)//这是到达数组末端的判断,如果到了,再回到始端 putptr=0; ++count;//消息数量 System.out.println(Thread.currentThread().getName()+"存好了值:"+x); notEmpty.signal();//好了,现在队列中有数据了,唤醒队列空的那个线程,可以取数据啦 }finally{ lock.unlock();//放锁 } } //从队列中取数据 publicObjecttake()throwsInterruptedException{ lock.lock();//上锁 try{ while(count==0){ System.out.println(Thread.currentThread().getName()+"被阻塞了,暂时无法取数据!"); notEmpty.await();//如果队列是空,那么阻塞取数据这个线程,等待被唤醒 } //如果没空,按顺序从数组中取 Objectx=items[takeptr]; if(++takeptr==items.length)//判断是否到达末端,如果到了,再回到始端 takeptr=0; --count;//消息数量 System.out.println(Thread.currentThread().getName()+"取出了值:"+x); notFull.signal();//好了,现在队列中有位置了,唤醒队列满的那个线程,可以存数据啦 returnx; }finally{ lock.unlock();//放锁 } } } 本文转载自 linkedkeeper.com

优秀的个人博客,低调大师

编程实战篇——Spring Boot 自动配置实现

基于Spring Boot自动配置的思想封装起来,使其他Spring Boot项目引入后能够进行快速配置。 AutoConfiguration Spring Boot的一个重要特性就是提供了各种各样的AutoConfiguration。例如DataSourceAutoConfiguration。这样我们只需要在配置文件中进行如下配置: spring: datasource: url: jdbc:mysql://xxxxxxxxxxx/realname username: xxxxx password: xxxxx driverClassName: com.mysql.jdbc.Driver复制代码 Spring Boot就会在容器中按照我们的配置的信息注入一个DataSource。那么Spring boot是怎么知道 DataSourceAutoConfiguration是自动配置类?其实很简单: Spring Boot在启动时候会读取文件Classpath:\META-INF\spring.factories的所有文件,spring.factories其实是一个properties的文件,即是 key = value的形式。 获取spring.factories中 key=org.springframework.boot.autoconfigure.EnableAutoConfiguration配置项的值(类的全路径)作为Spring启动配置类 Spring Boot 这种用“约定优于配置”思想可以大大的简化配置代码的编写。那么,我们就可以按照上面的套路来编写一个Spring Boot的自动配置类吧 实战 现在有一个配置Bean——PrintAfterInitBean,需要Spring容器启动以后,打印一次消息,并且该消息的内容是在配置文件中定义 第一步,编写配置Bean——PrintAfterInitBean 代码如下,因为只是一个简单例子,这里的配置Bean其实可以是其他任何复杂配置Bean,例如DataSource。往往一个公共包需要多个这样配置Bean才能完成其配置。 public class PrintAfterInitBean implements InitializingBean { private String message; public void afterPropertiesSet() throws Exception { System.out.println(message); } //setter getter }复制代码 第二步,创建一个AutoConfiguration。 如果搜索Spring Boot下面的类,你会发现其实有很多名字形如xxxAutoConfiguration的类,这些类都是Spirng Boot为我们做的一些快捷配置类。 创建一个TestAutoConfig,作为一个自动配置类。 @Configuration public class TestAutoConfig { @Bean @ConfigurationProperties(prefix = "init") @ConditionalOnMissingBean(PrintAfterInitBean.class) @ConditionalOnProperty(prefix = "init",value = "message") public PrintAfterInitBean printAfterInitBean() { return new PrintAfterInitBean(); } }复制代码 @ConfigurationProperties 是Spring Boot提供的方便属性注入的注解,功能其实和@Value类似 @ConditionalOnMissingBean 表示当BeanFactory中没有PrintAfterInitBean类型的Bean才会创建,否则就会忽略这个Bean。这个就是上图中所谓的【满足自动配置条件】,同理的,ConditionalOnProperty表示当存在配置前缀为init,配置值为message的配置的时候,才会生效。@ConditionalOnXXX 系列的注解都是为了在自动配置中,不侵入用户的配置。 第三步,创建spring.factories 在resources下面创建META-INF/spring.factories, 然后在文件中把第二步的类配置进去: org.springframework.boot.autoconfigure.EnableAutoConfiguration=com.xxx.TestAutoConfig复制代码 这样就完成一个Spring Boot自动配置,如果存在init.message的配置,那么Spring Boot启动的时候就会打印init.message配置对应值。 小结 Spring Boot的自动配置为我们在编写一个重复的配置代码(或者xml文件)中提供一套简便的部署方式,这样当用其他spring boot的项目依赖我们jar时候,配置起来就十分方便拉。从代码可以看出,Spring Boot 其实并没有什么实质性的创新,只是把一些“约定”的配置信息转换原来通过代码或xml实现的配置。 常用注解 @ConditionalOnXXX 前面已经介绍过,@ConditionalOnXXX 系列主要是自动配置是否生效,例如ConditionalOnClass,就是在某个Class存在的情况下才生效。这一系列的注解通过名字就知道用法,因此不再做过多的介绍。@ConditionalOnXXX 可以用于类名和方法名上。 用于类名上,要和 @Configuration一起使用,决定该配置类是否生效 用于方法名上(注:前提是该方法也是一个配置类,即有@Configuration注解),结合@Bean一起使用,判断该@Bean是否生成 用DataSourceAutoConfiguration 代码来说明。 @Configuration // 注:当存在DataSource.class 和 EmbeddedDatabaseType.class 存在的情况下,该配置路径才生效 @ConditionalOnClass({ DataSource.class, EmbeddedDatabaseType.class }) @EnableConfigurationProperties(DataSourceProperties.class) @Import({ Registrar.class, DataSourcePoolMetadataProvidersConfiguration.class }) public class DataSourceAutoConfiguration { private static final Log logger = LogFactory .getLog(DataSourceAutoConfiguration.class); @Bean // 注:只有当BeanFactory中不存在DataSourceInitializer类的Bean的情况下才会有效 @ConditionalOnMissingBean public DataSourceInitializer dataSourceInitializer(DataSourceProperties properties, ApplicationContext applicationContext) { return new DataSourceInitializer(properties, applicationContext); } ... }复制代码 自动配置的核心思想就是不侵占用户的代码,类似于“你有就用你的,你没有我就帮你做默认设置”。因此,我们在自己开发一个自动配置类的时候也需要注意这一点,不然就有点霸王条款的感觉。 @EnableConfigurationProperties 一般我们的自动配置类都会依赖外部的配置信息,而这些外部的配置信息可以封装成一个类,类似上面DataSourceAutoConfiguration中的@EnableConfigurationProperties(DataSourceProperties.class),DataSourceProperties类就是用来保存DataSource相关的配置信息。“约定优于配置”的思想就在这里体现,如果配置信息是以spring.datasource为前缀,那么配置信息都会注入到DataSourceProperties类中,供DataSourceAutoConfiguration使用。 @ConfigurationProperties(prefix = "spring.datasource") public class DataSourceProperties implements BeanClassLoaderAware, EnvironmentAware, InitializingBean { ... private Class<? extends DataSource> type; private String driverClassName; private String url; private String username; private String password; ... }复制代码 @AutoConfigureAfter 在一些特殊的情况下,一些自动配置类需要在某一些其他配置类后进行,例如依赖另外一个自动配置的Bean,这个时候就@AutoConfigureAfter来进行约束。 @Import @Import也是比较常见的一个配置注解,主要用于引入其他配置类,但是另外一个比较有用的配置就是引入一个ImportBeanDefinitionRegistrar接口,而这个就是用于使用在ApplicationContext初始化阶段的时候,注册(register)一些BeanDefinition。当然常见的Bean是可以通过@Bean注解注入,但是一些Spring ApplicationContext启动过程中用的到一些Bean则不行,例如BeanPostProcessor,BeanFactoryPostProcessor。 总结 Spring Boot 核心思想就是“约定优于配置”思想,在创建一个微服务的时候有很多得天独厚的优势,往往只用短短几行配置,就可以部署一个应用。这样在编码更多的是一些业务层面。而如果我们自己编写的一个公共包也能够通过短短几行配置即可以完成,不仅仅是代码层面的减少,更是接入方来说是一种“一站式服务”体验。当然前提是接入方也是使用的Spring Boot。 欢迎工作一到五年的Java工程师朋友们加入Java架构开发群:878249276,群内提供免费的Java架构学习资料(里面有高可用、高并发、高性能及分布式、Jvm性能调优、Spring源码,MyBatis,Netty,Redis,Kafka,Mysql,Zookeeper,Tomcat,Docker,Dubbo,Nginx等多个知识点的架构资料)合理利用自己每一分每一秒的时间来学习提升自己,不要再用"没有时间“来掩饰自己思想上的懒惰!趁年轻,使劲拼,给未来的自己一个交代!

资源下载

更多资源
Mario

Mario

马里奥是站在游戏界顶峰的超人气多面角色。马里奥靠吃蘑菇成长,特征是大鼻子、头戴帽子、身穿背带裤,还留着胡子。与他的双胞胎兄弟路易基一起,长年担任任天堂的招牌角色。

腾讯云软件源

腾讯云软件源

为解决软件依赖安装时官方源访问速度慢的问题,腾讯云为一些软件搭建了缓存服务。您可以通过使用腾讯云软件源站来提升依赖包的安装速度。为了方便用户自由搭建服务架构,目前腾讯云软件源站支持公网访问和内网访问。

Sublime Text

Sublime Text

Sublime Text具有漂亮的用户界面和强大的功能,例如代码缩略图,Python的插件,代码段等。还可自定义键绑定,菜单和工具栏。Sublime Text 的主要功能包括:拼写检查,书签,完整的 Python API , Goto 功能,即时项目切换,多选择,多窗口等等。Sublime Text 是一个跨平台的编辑器,同时支持Windows、Linux、Mac OS X等操作系统。

WebStorm

WebStorm

WebStorm 是jetbrains公司旗下一款JavaScript 开发工具。目前已经被广大中国JS开发者誉为“Web前端开发神器”、“最强大的HTML5编辑器”、“最智能的JavaScript IDE”等。与IntelliJ IDEA同源,继承了IntelliJ IDEA强大的JS部分的功能。

用户登录
用户注册