首页 文章 精选 留言 我的

精选列表

搜索[基础搭建],共10000篇文章
优秀的个人博客,低调大师

android中进度条—基础篇

本文转自 llb988 51CTO博客,原文链接:http://blog.51cto.com/llb988/486075,如需转载请自行联系原作者 android progrssbar 进度条即计算机在处理文件时,实时的,以图片形式显示处理文件的速度,完成度,剩余未完成文件的大小,和可能需要处理时间,一般以水平或者是图形条状显示 类代码 package com.smart; import android.app.Activity; import android.content.DialogInterface; import android.os.Bundle; import android.view.View; import android.view.View.OnClickListener; import android.view.Window; import android.widget.Button; import android.widget.ProgressBar; public class Main extends Activity implements OnClickListener { // 各位在导入包的时候,记住要导入import android.view.View.OnClickListener; private ProgressBar progressbarHorizontal; @Override public void onCreate(Bundle savedInstanceState) { super.onCreate(savedInstanceState); requestWindowFeature(Window.FEATURE_INDETERMINATE_PROGRESS); setContentView(R.layout.main); setProgressBarIndeterminateVisibility(true); progressbarHorizontal = (ProgressBar) findViewById(R.id.progressBarHorizontal); Button button1 = (Button) findViewById(R.id.button1); Button button2 = (Button) findViewById(R.id.button2); // 绑定器 button1.setOnClickListener(this); button2.setOnClickListener(this); } @Override public void onClick(View view) { switch (view.getId()) { // 处理“增加进度"按钮事件 case R.id.button1: progressbarHorizontal.setProgress((int) (progressbarHorizontal .getProgress() * 1.18)); progressbarHorizontal .setSecondaryProgress((int) (progressbarHorizontal .getSecondaryProgress() * 1.18)); break; // 处理“减少进度"按钮事件 case R.id.button2: progressbarHorizontal.setProgress((int) (progressbarHorizontal .getProgress() * 0.88)); progressbarHorizontal .setSecondaryProgress((int) (progressbarHorizontal .getSecondaryProgress() * 0.88)); break; } } } main.xml 代码 <?xml version="1.0" encoding="utf-8"?> <LinearLayout xmlns:android="http://schemas.android.com/apk/res/android" android:orientation="vertical" android:layout_width="fill_parent" android:layout_height="fill_parent" > <TextView android:layout_width="wrap_content" android:layout_height="wrap_content" android:text="SMART圆形进度条1" /> <ProgressBar android:layout_width="wrap_content" android:layout_height="wrap_content" style="?android:attr/progressBarStyleSmallTitle"/> <TextView android:layout_width="wrap_content" android:layout_height="wrap_content" android:text="SMART圆形进度条2" /> <ProgressBar android:layout_width="wrap_content" android:layout_height="wrap_content" /> <TextView android:layout_width="wrap_content" android:layout_height="wrap_content" android:text="SMART圆形进度条3" /> <ProgressBar android:layout_width="wrap_content" android:layout_height="wrap_content" style="?android:attr/progressBarStyleLarge" /> <TextView android:layout_width="wrap_content" android:layout_height="wrap_content" android:text="SMART水平进度条4" /> <ProgressBar android:layout_width="fill_parent" android:layout_height="wrap_content" style="?android:attr/progressBarStyleHorizontal" android:max="100" android:progress="30" /> <ProgressBar android:id="@+id/progressBarHorizontal" android:layout_width="fill_parent" android:layout_height="wrap_content" style="?android:attr/progressBarStyleHorizontal" android:max="100" android:progress="30" android:secondaryProgress="60" android:layout_marginTop="20dp" /> <LinearLayout xmlns:android="http://schemas.android.com/apk/res/android" android:orientation="horizontal" android:layout_width="fill_parent" android:layout_height="fill_parent" > <Button android:id="@+id/button1" android:layout_width="wrap_content" android:layout_height="wrap_content" android:layout_marginTop="20dp" android:text="进度增加" /> <Button android:id="@+id/button2" android:layout_width="wrap_content" android:layout_height="wrap_content" android:layout_marginTop="20dp" android:text="进度减小" /> </LinearLayout> </LinearLayout>

优秀的个人博客,低调大师

openstack学习笔记九 cinder基础配置

cinder 就是 云硬盘 配置cinder步骤 1 安装软件包,然后到keystone注册 创建必要的用户名 密码 服务 endpoint 2 设置配置文件 1 2 3 4 5 6 7 8 9 10 11 12 13 14 15 16 17 18 19 20 21 22 23 24 25 26 27 28 yum install openstack-cinder-y keystoneuser-create--namecinder--passhequan keystoneuser-role-add--usercinder--roleadmin--tennatservices keystoneservice-create--namecinder-- type volume--descriptioncinderxxx 例子关于cul keystoneservice-list |d1271040fa9144318a836a0b476d1e66|cinder|volume|CinderService| keystoneendpoint-list| grep d1271040fa9144318a836a0b476d1e66 |8e18c46fc51c4a6287ea740a37537a59|RegionOne|http: //115 .29.107.17:8776 /v1/ %(tenant_id)s|http: //115 .29.107.17:8776 /v1/ %(tenant_id)s|http: //115 .29.107.17:8776 /v1/ %(tenant_id)s|d1271040fa9144318a836a0b476d1e66| keystoneendpoint-create--service- id d1271040fa9144318a836a0b476d1e66--publicul 'http://115.29.107.17:8776/v1/%(tenant_id)s' --internalurl 'http://115.29.107.17:8776/v1/%(tenant_id)s' --adminurl 'http://115.29.107.17:8776/v1/%(tenant_id)s' [root@hequan~(keystone_admin)] #cd/etc/cinder/ [root@hequancinder(keystone_admin)] #ls api- paste .inipolicy.jsonrootwrap.d cinder.confrootwrap.confvolumes [root@hequancinder(keystone_admin)] #cpcinder.confcinder.conf.bak##备份 [root@hequan~(keystone_admin)] #cp/usr/share/cinder/cinder-dist.conf/etc/cinder/cinder.conf##复制配置文件 [root@hequancinder(keystone_admin)] #chownroot.cindercinder.conf##记得修改权限 [root@hequancinder(keystone_admin)] #openstack-db--init-servicecinder--passwordhequan--rootpw123456##创建数据库 1 2 3 4 5 6 7 8 9 10 11 12 13 14 15 16 17 18 19 20 21 22 23 24 25 26 27 28 29 30 31 32 33 34 35 36 37 38 39 40 41 42 43 44 45 46 47 48 49 50 [root@hequancinder(keystone_admin)] #vimcinder.conf [DEFAULT] logdir= /var/log/cinder state_path= /var/lib/cinder lock_path= /var/lib/cinder/tmp volumes_dir= /etc/cinder/volumes iscsi_helper=lioadm rootwrap_config= /etc/cinder/rootwrap .conf auth_strategy=keystone [database] connection=mysql: //cinder :hequan@115.29.107.17 /cinder [keystone_authtoken] admin_tenant_name=services admin_user=cinder admin_password=hequan auth_host=115.29.107.17 auth_port=35357 auth_protocol=http [root@hequancinder(keystone_admin)] #grep^rabbit/etc/keystone/keystone.conf rabbit_host=localhost rabbit_port=5672 rabbit_hosts=localhost:5672 rabbit_use_ssl=False rabbit_userid=guest rabbit_password=guest rabbit_virtual_host=/ rabbit_ha_queues=False ##把这些写到上面的配置文件里,通信用 [root@hequancinder(keystone_admin)] #systemctllist-unit-files|grepcinder openstack-cinder-api.serviceenabled ##用户接口 openstack-cinder-backup.serviceenabled ##备份 openstack-cinder-scheduler.serviceenabled ##调度 openstack-cinder-volume.serviceenabled ##后端存储卷 [root@hequancinder(keystone_admin)] #systemctlis-activeopenstack-cinder-api.service active [root@hequancinder(keystone_admin)] #systemctlstartopenstack-cinder-api.serviceopenstack-cinder-backup.serviceopenstack-cinder-scheduler.serviceopenstack-cinder-volume.service [root@hequancinder(keystone_admin)] #systemctlenableopenstack-cinder-api.serviceopenstack-cinder-backup.serviceopenstack-cinder-scheduler.serviceopenstack-cinder-volume.service 再创建一个cinderv2和上面一样 |8fe36f49892447679bc5433b21591906|cinderv2|volumev2|CinderServicev2| |75a8f5bbf35a42a0bfcd2e6a0d4cea9c|RegionOne|http: //115 .29.107.17:8776 /v2/ %(tenant_id)s|http: //115 .29.107.17:8776 /v2/ %(tenant_id)s|http: //115 .29.107.17:8776 /v2/ %(tenant_id)s|8fe36f49892447679bc5433b21591906| 2 修改配置 1 2 3 4 5 [root@hequancinder(keystone_admin)] #cinderlist +----+--------+------------------+------+------+-------------+----------+-------------+-------------+ |ID|Status|MigrationStatus|Name|Size|VolumeType|Bootable|Multiattach|Attachedto| +----+--------+------------------+------+------+-------------+----------+-------------+-------------+ +----+--------+------------------+------+------+-------------+----------+-------------+-------------+ 1 2 3 4 5 6 创建VG [root@hequancinder(keystone_admin)] #pvcreate/dev/xvdb [root@hequancinder(keystone_admin)] #vgcreatecinder-volumes/dev/xvdb [root@hequancinder(keystone_admin)] #vgs VG #PV#LV#SNAttrVSizeVFree cinder-volumes100wz--n-20.60g20.60g 1 2 3 4 5 6 7 8 9 10 11 12 13 14 15 16 17 18 19 20 21 22 23 24 25 26 27 28 29 30 31 32 33 34 35 36 [root@hequancinder(keystone_admin)] #cindercreate--display-namevoll1 +---------------------------------------+--------------------------------------+ |Property|Value| +---------------------------------------+--------------------------------------+ |attachments|[]| |availability_zone|nova| |bootable| false | |consistencygroup_id|None| |created_at|2016-07-27T15:14:07.000000| |description|None| |encrypted|False| | id |7f778803-41cd-492f-b3b7-baa349b9c3dc| |metadata|{}| |migration_status|None| |multiattach|False| |name|voll| |os-vol-host-attr:host|None| |os-vol-mig-status-attr:migstat|None| |os-vol-mig-status-attr:name_id|None| |os-vol-tenant-attr:tenant_id|ddac36f63e4547e0a8619574dbc41534| |os-volume-replication:driver_data|None| |os-volume-replication:extended_status|None| |replication_status|disabled| |size|1| |snapshot_id|None| |source_volid|None| |status|creating| |user_id|9382216e2ea540a2af70216577dbed00| |volume_type|None| +---------------------------------------+--------------------------------------+ [root@hequancinder(keystone_admin)] #cinderlist +--------------------------------------+-----------+------------------+------+------+-------------+----------+-------------+-------------+ |ID|Status|MigrationStatus|Name|Size|VolumeType|Bootable|Multiattach|Attachedto| +--------------------------------------+-----------+------------------+------+------+-------------+----------+-------------+-------------+ |7f778803-41cd-492f-b3b7-baa349b9c3dc|available|-|voll|1|-| false |False|| +--------------------------------------+-----------+------------------+------+------+-------------+----------+-------------+-------------+ 1 2 3 4 5 6 7 8 9 10 11 12 13 14 15 16 17 18 19 ##添加到上面的配置cinder.conf中作为单独字段 [lvm] iscsi_helper=lioadm volume_group=cinder-volumes ##那个组决定默认存储 iscsi_ip_address=115.29.107.17 volume_driver=cinder.volume.drivers.lvm.LVMVolumeDriver ##云硬盘默认存储LVM volumes_dir= /var/lib/cinder/volumes iscsi_protocol=iscsi volume_backend_name=lvm [root@hequancinder(keystone_admin)] #lvs LVVGAttrLSizePoolOriginData%Meta%MoveLogCpy%SyncConvert volume-7f778803-41cd-492f-b3b7-baa349b9c3dccinder-volumes-wi-a-----1.00g [root@hequancinder(keystone_admin)] #lvscan ACTIVE '/dev/cinder-volumes/volume-7f778803-41cd-492f-b3b7-baa349b9c3dc' [1.00GiB]inherit 1 2 3 4 5 6 更换名字 volume_group=vg0 [root@hequancinder(keystone_admin)] #vgrenamecinder-volumesvg0##更改名字 [root@hequan~] #vgs VG #PV#LV#SNAttrVSizeVFree vg0120wz--n-20.60g9.60g 1 2 3 4 5 6 7 8 9 10 11 待测试ceph做后端存储具体ceph配置可看我前一篇glance volume_driver=cinder.volume.drivers.rbd.RBDDriver rbd_pool=cinder #ceph卷名字 rbd_ceph_conf= /etc/ceph/ceph .conf rbd_flatten_volume_from_snapshot= false rbd_max_clone_depth=5 rbd_stone_chunk_size=4 rados_connect_timeout=-1 glance_api_version=2 setfacl-mu:cinder:r-- /etc/ceph/ceph .client.admin.keyring ##cinder可读 本文转自 295631788 51CTO博客,原文链接:http://blog.51cto.com/hequan/1830981,如需转载请自行联系原作者

优秀的个人博客,低调大师

openstack学习笔记二 网络设置基础

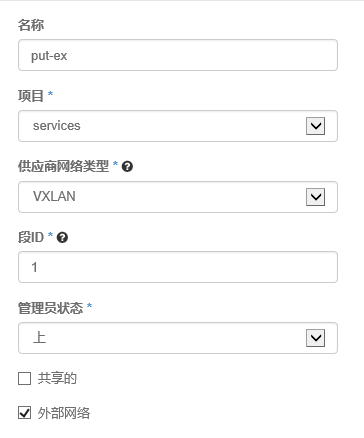
租用这个服务的机构,我们称之"租户/tenant/项目/project" 租户 用户 vxlan划分租户 1 2 3 4 5 6 7 8 9 10 11 12 13 14 15 16 17 [root@h1~] #ipaddr 1:lo:<LOOPBACK,UP,LOWER_UP>mtu65536qdiscnoqueuestateUNKNOWN link /loopback 00:00:00:00:00:00brd00:00:00:00:00:00 inet127.0.0.1 /8 scopehostlo valid_lftforeverpreferred_lftforever 2:eth0:<BROADCAST,MULTICAST,UP,LOWER_UP>mtu1500qdiscmqstateUPqlen1000 link /ether 00:50:56:a0:b6:6bbrdff:ff:ff:ff:ff:ff inet192.168.1.201 /24 brd192.168.1.255scopeglobaleth0 valid_lftforeverpreferred_lftforever 3:ovs-system:<BROADCAST,MULTICAST>mtu1500qdiscnoopstateDOWN link /ether 36:26:25:65:14:9cbrdff:ff:ff:ff:ff:ff 4:br-ex:<BROADCAST,MULTICAST,UP,LOWER_UP>mtu1500qdiscnoqueuestateUNKNOWN link /ether de:4c:6d:9c:15:4dbrdff:ff:ff:ff:ff:ff 5:br-int:<BROADCAST,MULTICAST>mtu1500qdiscnoopstateDOWN link /ether ce:0b:9b:b5:c1:4dbrdff:ff:ff:ff:ff:ff 6:br-tun:<BROADCAST,MULTICAST>mtu1500qdiscnoopstateDOWN link /ether ae:75:26:fb:f8:42brdff:ff:ff:ff:ff:ff 你想把哪个网络作为数据包的出口,那么你就应该把那个网卡桥接到 br-ex openvswitch 简称 ovs 配置网卡 重点 1 2 3 4 5 6 7 8 9 10 11 12 13 14 15 16 17 [root@h1network-scripts] #catifcfg-eth0 DEVICE=eth0 DEVICETYPE=ovs TYPE=OVSPort OVS_BRIDGE=br-ex ONBOOT= yes BOOTPROTO=none [root@h1network-scripts] #catifcfg-br-ex DEVICE=br-ex DEVICETYPE=ovs TYPE=OVSBridge ONBOOT= yes BOOTPROTO=none IPADDR=192.168.1.201 NETMASK=255.255.255.0 GATEWAY=192.168.1.1 DNS1=202.106.0.20 1 2 3 4 5 6 7 8 9 10 查看网卡 2:eth0:<BROADCAST,MULTICAST,UP,LOWER_UP>mtu1500qdiscmqmasterovs-systemstateUPqlen1000 link /ether 00:50:56:a0:b6:6bbrdff:ff:ff:ff:ff:ff 3:ovs-system:<BROADCAST,MULTICAST>mtu1500qdiscnoopstateDOWN link /ether d2:18:7d:5e:5e:b9brdff:ff:ff:ff:ff:ff 5:br-ex:<BROADCAST,MULTICAST,UP,LOWER_UP>mtu1500qdiscnoqueuestateUNKNOWN link /ether 00:50:56:a0:b6:6bbrdff:ff:ff:ff:ff:ff inet192.168.1.201 /24 brd192.168.1.255scopeglobalbr-ex valid_lftforeverpreferred_lftforever 管理员登陆http://192.168.1.201/dashboard 选择系统--网络--创建网络 创建,点击网络名称put-ex 下一步 创建一个项目,创建一个新的用户,新用户关联项目。 用新的用户登录,创建网络 先创建网络,然后创建路由,连到网络上,最后添加端口 本文转自 295631788 51CTO博客,原文链接:http://blog.51cto.com/hequan/1795705,如需转载请自行联系原作者

优秀的个人博客,低调大师

Mocha BSM基础架构管理——IT资产管理

业务需求与挑战 一般企业领导在做出购买设备的决策的时候总是很头痛,心里总是有这些问题: • 到底现在库存里有多少设备? • 有多少设备在维修? • 有没有设备借给别的部门? • 有多少设备已经报废了? • 企业装了哪些软件? • 有多少设备超过了折旧年限? • 某一个厂家的设备好不好用,返修率高吗? • 这些年来的IT资产投入有多大? 企业永远在面临着——追踪一个动态的IT资产,IT资产天天都在变,如果用手工统计是跟不上的。设备的管理不规范,到底谁领用了设备,设备在哪里成为一个企业的一大困惑。这些难题让企业的IT领导工作难上加难。 关键功能与亮点 以Portal为中心的灵活展现 轻易地通过浏览器访问,不用在终端装任何的客户端软件。Portal也能界面整合任何第三方IT资产相关的系统。 设备与软件管理 自动发现IT资产,追踪永远动态的企业IT资产。发现的设备包括: • 通过Agentless方式,发现Unix或者Linux服务器 • 通过SNMP方式,发现网络设备 • 通过WMi方式,发现Windows设备 IT资产生命周期管理 包括库存、领用、维修、借调、折旧、报废在内的全生命周期管理 支持非标准的IT资产 用户可以自定义不同的IT资产类别,所以系统可以支持不同种类的IT资产,甚至非IT资产。 IT资产变更管理 IT资产都有很多的配件,包括CPU,内存。这些配件都很容易丢失,Mocha ITAM追踪这些配件的变更,一旦发生变更,就可以发短信给相关的负责人。 软件管理 追踪企业安装的不同软件,可以设定不同的软件分类。 支持流程化管理 所有相关IT资产的领用,维修等都能通过流程来支持。 其他关键功能 • 供应商、厂家管理; •追踪对供应商和厂家的满意度; • 服务合同管理; • 追踪不同服务合同与设备的关联关系,以及服务合同的服务期限,在合同到期之前提醒相关的负责人; • 提供了丰富的报表功能以及补丁管理。 我们给客户带来什么 摩卡IT资产管理除了解决企业客户所面临的困惑,并且带来以下价值: • 让企业客户知道他们拥有什么IT资产; • 让企业客户知道IT资产在哪里; • 让企业客户知道IT资产是怎么被用。 在整个过程中,Mocha ITAM帮企业到了以下: • 提高整个IT资产投资回报率。IT资产得到很好的跟踪,不会再被闲置,用起来的整体效率提高了; • IT部门领导在做IT资产方面的决策就更容易了,更加科学,都是以具体数字为依据; • 通过IT资产管理的规范化和流程化管理,降低了IT资产的成本; • 提高IT部门对IT资产方面服务的响应,IT资产现在很容易就能追踪得到; • 降低不必要的成本以及风险。 更多相关信息,请点击 [url]http://www.mochabsm.com[/url] 本文转自赖永锋51CTO博客,原文链接:http://blog.51cto.com/mochasoft/86446 ,如需转载请自行联系原作者

优秀的个人博客,低调大师

学习OpenStack之 (0):基础知识

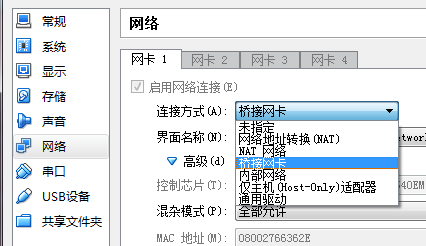
vi 方向键出现字母问题解决方法 执行命令 sudo apt-get remove vim-common 执行命令 sudo apt-get install vim 鼠标被virtualbox捕获无法释放 按右Control键可以释放鼠标 使服务在机器重启后自启动 sudo update-rc.d ssh defaults IP段表示方法 原来“/”后面的数字其实代表了掩码。正常情况下,掩码中的“1”是不可间断的,这样只要知道掩码中“1”的个数,就可以唯一地确定一个掩码。比如“/24”就表示掩码中有24个“1”,即“11111111 11111111 11111111 00000000”,用十进点分法表示就是“255.255.255.0”。 192.168.2.12与192.168.2.20 换成2进制 192.168.2.12二进制11000000.10101000.00000010.00001100 192.168.2.20二进制11000000.10101000.00000010.00010100 相与,有27位地址相同,所以可以写成192.168.2.12/27 主机位就是2的5次方,192168.2.12/27 有32个主机位 tar命令 tar -c: 建立压缩档案 -x:解压 -t:查看内容 -r:向压缩归档文件末尾追加文件 -u:更新原压缩包中的文件 这五个是独立的命令,压缩解压都要用到其中一个,可以和别的命令连用但只能用其中一个。下面的参数是根据需要在压缩或解压档案时可选的。 -z:有gzip属性的 -j:有bz2属性的 -Z:有compress属性的 -v:显示所有过程 -O:将文件解开到标准输出 下面的参数-f是必须的 -f: 使用档案名字,切记,这个参数是最后一个参数,后面只能接档案名。 # tar -cf all.tar *.jpg 这条命令是将所有.jpg的文件打成一个名为all.tar的包。-c是表示产生新的包,-f指定包的文件名。 # tar -rf all.tar *.gif 这条命令是将所有.gif的文件增加到all.tar的包里面去。-r是表示增加文件的意思。 # tar -uf all.tar logo.gif 这条命令是更新原来tar包all.tar中logo.gif文件,-u是表示更新文件的意思。 # tar -tf all.tar 这条命令是列出all.tar包中所有文件,-t是列出文件的意思 # tar -xf all.tar 这条命令是解出all.tar包中所有文件,-x是解开的意思 压缩 tar –cvf jpg.tar *.jpg //将目录里所有jpg文件打包成tar.jpg tar –czf jpg.tar.gz *.jpg //将目录里所有jpg文件打包成jpg.tar后,并且将其用gzip压缩,生成一个gzip压缩过的包,命名为jpg.tar.gz tar –cjf jpg.tar.bz2 *.jpg //将目录里所有jpg文件打包成jpg.tar后,并且将其用bzip2压缩,生成一个bzip2压缩过的包,命名为jpg.tar.bz2 tar –cZf jpg.tar.Z *.jpg //将目录里所有jpg文件打包成jpg.tar后,并且将其用compress压缩,生成一个umcompress压缩过的包,命名为jpg.tar.Z rar a jpg.rar *.jpg //rar格式的压缩,需要先下载rar for linux zip jpg.zip *.jpg //zip格式的压缩,需要先下载zip for linux 解压 tar –xvf file.tar //解压 tar包 tar -xzvf file.tar.gz //解压tar.gz tar -xjvf file.tar.bz2 //解压 tar.bz2 tar –xZvf file.tar.Z //解压tar.Z unrar e file.rar //解压rar unzip file.zip //解压zip 总结 1、*.tar 用 tar –xvf 解压 2、*.gz 用 gzip -d或者gunzip 解压 3、*.tar.gz和*.tgz 用 tar –xzf 解压 4、*.bz2 用 bzip2 -d或者用bunzip2 解压 5、*.tar.bz2用tar –xjf 解压 6、*.Z 用 uncompress 解压 7、*.tar.Z 用tar –xZf 解压 8、*.rar 用 unrar e解压 9、*.zip 用 unzip 解压 指定ubuntu的源,参考http://chenrongya.blog.163.com/blog/static/8747419620143185103297/ 配置静态ip地址 $sudo vi /etc/network/interfaces 原有内容只有如下两行: auto lo iface lo inet loopback 向末尾追加以下内容: auto eth0 iface eth0 inet static address 192.168.0.33 gateway 192.168.0.1 netmask 255.255.255.0 network 192.168.0.0 broadcast 192.168.0.255 然后保存退出; 修改机器名: 修改/etc/hostname 和 /etc/hosts,再重启机器 W: GPG error: http://ppa.launchpad.net lucid Release: The following signatures couldn't be verified because the public key is not available: NO_PUBKEY A1715D88E1DF1F24 Google 之,在这篇文档里有提到解决方案: http://muzso.hu/2007/05/25/how-to-fix-no_pubkey-errors-in-apt-get-update-operations 具体的解决方法步骤是(注意下面的KEY 是根据每次报错而不同的,可能需要用实际报错的KEY替换命令中的KEY值): $ sudo gpg --keyserver keyserver.ubuntu.com --recv A1715D88E1DF1F24 $sudo gpg --export --armor A1715D88E1DF1F24 | sudo apt-key add - 注:上面第二个命令中的第二个sudo,因为sudo不能跨越Pipe,所以第二个命令也需要使用sudo 在ubuntu上安装ssh server 现象: ssh client无法连到ubuntu sammydeair:~ Sammy$ ssh -l s1 10.211.55.4 ssh: connect to host 10.211.55.4 port 22: Connection refused 查看: ubuntu上ssh local,同样错误,发现是openssh-server没安装 解决: $ sudo apt-getupdate //视网络情况会花比较长的时间 $ sudo apt-getupgrade $ sudo apt-get install openssh-server $sudo /etc/init.d/ssh start 在Mac上使用过要license的Parallels Desktop和免费的VirtualBox,比较结果如下: 1. VirtualBox对鼠标的捕获和控制更加友好,Parallels需要按键来释放鼠标,但是VirtualBox里面完全自动。 2. VirtualBox里面虚拟机的运行速度似乎更快,至少关机比Parallels快。 3.VirutalBox里面可以很方便地复制虚拟机,但是在Parallels Desktop里面不知道什么原因“克隆”菜单为灰色不可用。 4. VirtualBox里面多网卡配置更方便。 5. google查到的VirtualBox的文章比Parallels Desktop多得多 至少在我看来,免费的VirtualBox要比收费的Parallels要好些。接下里继续体会VirtualBox。 在Ubuntu里面配置静态IP使得可以连接外网 1. 关闭虚机,在VirtualBox里面,设置虚机的一个网卡为桥接模式 2. 查看主机的DNS server 3. 开虚机,运行ifconfig和route命令,查看该网卡自动获得的IP,netmask,gateway s1@compute1:~$ route -n Kernel IP routing table Destination Gateway Genmask Flags Metric Ref Use Iface 0.0.0.0 192.168.1.1 0.0.0.0 UG 0 0 0 eth0 10.0.1.0 0.0.0.0 255.255.255.0 U 0 0 0 eth1 192.168.1.0 0.0.0.0 255.255.255.0 U 0 0 0 eth0 4. 运行命令vi /etc/network/interfaces,设置静态IP,gateway,broadcast,netmask auto eth0 iface eth0 inet static address 192.168.1.15 netmask 255.255.255.0 gateway 192.168.1.1 5.配置DNS, 运行vi /etc/resolvconf/resolv.conf.d/tail, 从而在/etc/resolvconf/resolv.conf.d/目录下创建tail文件,写入 nameserver 192.168.1.1 然后重启,DNS生效 6.测试。ping www.sohu.com s1@compute1:~$ ping www.sohu.com PING fsh.a.sohu.com (114.80.130.88) 56(84) bytes of data. 64 bytes from www.sohu.com (114.80.130.88): icmp_seq=1 ttl=56 time=4.65 ms 64 bytes from www.sohu.com (114.80.130.88): icmp_seq=2 ttl=56 time=6.91 ms 64 bytes from www.sohu.com (114.80.130.88): icmp_seq=3 ttl=56 time=5.39 ms VirtualBox 虚拟机的几种网络连接方式 (1)NAT(网络地址转换模式):能从虚拟机访问外网,主机不能访问虚拟机。 网络地址转换( NAT )是最简单的方法从一个虚拟机访问外部网。通常,它并不要求在主机网络和客户机上做任何配置。基于这个原因,它是默认的网络模式 。 原理:客户机(即虚拟机)送出的网络帧被 VirtualBox 的 NAT 引擎收到,抽取 TCP/IP 数据,再通过主机的操作系统(即安装 VirtualBox 的操作系统)重新发送出去。送到在主机上的一个应用程序,或者到位于主机同一网络的另一台计算机上,它看起来好象是安装在主机上的程序 VirtualBox,通过一个属于主机的 IP 地址,把数据发送出去。VirtualBox 倾听到数据包裹的回复,通过客户机的私人网络重新包装和发送往客户机上。 效果:使用NAT模式,就是让虚拟系统借助NAT(网络地址转换)功能,通过宿主机器所在的网络来访问公网。但纯NAT模式下,宿主机不能访问虚拟机。 使用场景:如果你想利用安装一个新的虚拟系统,在虚拟系统中不用进行任何手工配置就能直接访问互联网,建议你采用NAT模式. (2)Bridged方式:虚拟机和主机拥有同样的网络功能,能互相访问。 用这种方式,虚拟系统的IP可设置成和本机系统在同一网段,虚拟系统相当于网络内的一台独立的机器,和本机一起插在一个Hub上,网络内其他机器可访问虚拟系统,虚拟系统也可访问网络内其他机器,当然和本机系统的双向访问也不成问题。 (3)内部网络:虚拟机之间可以互相访问,虚拟机不能访问外网,主机和虚机之间不能访问。 内网模式,顾名思义就是内部网络模式: 虚拟机与外网完全断开,只实现虚拟机于虚拟机之间的内部网络模式。 (1)虚拟机与主机的关系:不能相互访问,彼此不属于同一个网络,无法相互访问。 (2)虚拟机与网络中其他主机的关系:不能相互访问,理由同上。 (3)虚拟机与虚拟机的关系:可以相互访问,前提是在设置网络时,两台虚拟机设置同一网络名称。 (4)host-only方式 (主机模式):虚拟机不能访问外网,主机可以访问虚拟机。 Virtualbox在宿主机中模拟出一张专供虚拟机使用的网卡,所有虚拟机都是连接到该网卡上的,虚拟机可以通过该网卡IP访问宿主机,同时Virtualbox提供一个DHCP服务,虚拟机可以获得一个内部网IP,宿主机可以通过该IP访问虚拟机。如果单纯使用Host-only模式,则虚拟机不能连接外部公共网络。 (5)通用驱动 作用和效果:运行用于选择网卡驱动。该驱动是virtualbox内部自带的,或者是通过extensionpack添加进来的。此模式实际上很少用到 一般来说,Bridged方式最方便好用。但如果本机系统是win2000而网线没插(或根本没有网卡),网络非常可能不可用(大部分用PCI网卡的机器都如此),此时就只能用NAT方式或host-only,之前所说的那两块虚拟网卡就是适应这两种网络准备的。 使用NAT和host-only混合模式,使得虚拟机既能访问外网,主机也能访问虚机 在虚机关机状态下配置网络,网卡1使用NAT模式,网卡2使用host-only模式。 1. 检查宿主机上host-only adapter的网络设置 当添加多个网卡时,比如 eth0 是 NAT 模式用于虚机访问外网,eth1 是 host-only 模式用于宿主机访问虚机,eth2 是internal 模式用于虚机之间互访,需要注意 default gateway。设置不对的话,虚机是不能访问外网的。当专有 eth0 时候,default gw 是它自己,当增加 eth1 和 eth2 后,default gw 就跑到了 eth2上,而 eth2 是不能用于外网访问的。因此,此时需要手工修改 default gw,修改为: route del default gw 192.168.1.1 route add default gw 10.0.2.2 eth0 root@ceph1:~# route -n Kernel IP routing table Destination Gateway Genmask Flags Metric Ref Use Iface 0.0.0.0 10.0.2.2 0.0.0.0 UG 0 0 0 eth0 10.0.2.0 0.0.0.0 255.255.255.0 U 0 0 0 eth0 192.168.1.0 0.0.0.0 255.255.255.0 U 0 0 0 eth2 192.168.56.0 0.0.0.0 255.255.255.0 U 0 0 0 eth1 root@ceph1:~# ping www.sohu.com PING fhk.a.sohu.com (175.100.207.201) 56(84) bytes of data. 64 bytes from 175.100.207.201: icmp_seq=1 ttl=41 time=133 ms 64 bytes from 175.100.207.201: icmp_seq=2 ttl=41 time=69.9 ms 64 bytes from 175.100.207.201: icmp_seq=3 ttl=41 time=69.4 ms 64 bytes from 175.100.207.201: icmp_seq=4 ttl=41 time=68.5 ms 64 bytes from 175.100.207.201: icmp_seq=5 ttl=41 time=71.9 ms 注意 eth0 的 default gw 是 10.0.2.2 而不是 10.0.2.1. 2. 开启虚拟机配置网络 sudo vi /etc/network/interfaces sudo /etc/init.d/networking restart 可运行ifconfig查看ip 3. 可以从主机ping和ssh虚拟机了 本文转自SammyLiu博客园博客,原文链接:http://www.cnblogs.com/sammyliu/p/4139246.html,如需转载请自行联系原作者

优秀的个人博客,低调大师

Android 项目开发基础再回顾(一)

1,主activity_splash: <RelativeLayout xmlns:android="http://schemas.android.com/apk/res/android" xmlns:tools="http://schemas.android.com/tools" android:layout_width="match_parent" android:layout_height="match_parent" android:background="@drawable/launcher_bg"//设置初始背景图片 tools:context=".SplashActivity" > <TextView android:id="@+id/tv_version_name" android:layout_width="wrap_content" android:layout_height="wrap_content" android:layout_centerInParent="true"#把这个textview 放到中间 android:shadowDx="1//这个指的是相对于原字体在x方向上的偏移量 android:shadowDy="1" android:shadowColor="#f00"//黑色 android:shadowRadius="1"//表示阴影的模糊程度 android:textSize="16sp" android:text="版本名称" /> <ProgressBar //加载滚动条 android:layout_below="@id/tv_version_name" android:layout_centerHorizontal="true" android:layout_width="wrap_content" android:layout_height="wrap_content" /> </RelativeLayout> 2,副activity_home <?xml version="1.0" encoding="utf-8"?> <LinearLayout xmlns:android="http://schemas.android.com/apk/res/android" android:layout_width="match_parent" android:layout_height="match_parent" android:orientation="vertical" > <TextView android:text="HomeActivity" android:textSize="20sp" android:textColor="#000" android:layout_width="wrap_content" android:layout_height="wrap_content" /> </LinearLayout> 3,让第二个活动可以启动 <activity android:name="com.example.moblesafe73.HomeActivity"/> 4,接下来创造两个工具类, 一个是将流转化为字符串 mport java.io.ByteArrayOutputStream; import java.io.IOException; import java.io.InputStream; public class StreamUtil { public static String StreamToString(InputStream is) { //1.在读取的过程中,将读取的内容存取到缓存中,然后一次性用字符转化成字符串 ByteArrayOutputStream bos=new ByteArrayOutputStream(); //2.读取操作,读到没有为止(循环) byte[] buffer=new byte[1024]; //3.记录读取内容的临时变量 int temp=-1; try { while((temp=is.read(buffer))!=-1){ bos.write(buffer,0,temp); } //返回读取的数据 return bos.toString(); } catch (IOException e) { // TODO 自动生成的 catch 块 e.printStackTrace(); }finally{ try { is.close(); bos.close(); } catch (IOException e) { // TODO 自动生成的 catch 块 e.printStackTrace(); } } return null; } } 另一个是可以弹出toast import android.content.Context; import android.widget.Toast; public class ToastUtils { public static void show(Context ctx,String msg){ Toast.makeText(ctx, msg, 0).show(); } } 5,主营业务的介绍: protected void onCreate(Bundle savedInstanceState) { super.onCreate(savedInstanceState); //去除当前activity头title requestWindowFeature(Window.FEATURE_NO_TITLE); setContentView(R.layout.activity_splash); //初始化ui initUI(); //初始化方法 initData(); } 6,关于如何初始化ui private void initUI() { // TODO 自动生成的方法存根 tv_version_name = (TextView) findViewById(R.id.tv_version_name); } 找到相应控件 private void initData() { // TODO 自动生成的方法存根 //应用版本名称 tv_version_name.setText(getVersionName()); //获取本地服务版本号 myLockVersionCode = getVersionCode(); //获取服务器版本号(客户端发请求,服务器给相应(json,xml一般用的是json)) checkVersion(); } //返回版本号 private int getVersionCode() { // TODO 自动生成的方法存根 //1,包管理者对象packagemanager PackageManager pm=getPackageManager(); //2,从包的管理者对象中,获取指定包名的基本信息(版本名称,版本号,0代表基本信息) try { PackageInfo packageinfo=pm.getPackageInfo(getPackageName(), 0); return packageinfo.versionCode; } catch (NameNotFoundException e) { // TODO 自动生成的 catch 块 e.printStackTrace(); } return 0; } 这个方法可以 再来看checkVersion();方法 如果上网的话需要用到线程方面的知识 private void checkVersion() { new Thread(){ public void run(){ //Message message=new Message(); Message msg=Message.obtain(); long startTime=System.currentTimeMillis();//程序开始的时间 try { //封装url地址 URL url=new URL("http://192.168.1.104:8080/update74.json"); //开启一个地址 HttpURLConnection connection=(HttpURLConnection)url.openConnection(); //3,设置常见的请求参数(请求头) //请求超时 connection.setConnectTimeout(2000); //读取超时 connection.setReadTimeout(2000); //默认是get请求 //connection.setRequestMethod("POST"); //获取请求响应码 if(connection.getResponseCode()==200){ //5.以流的形式,将数据保存起来 InputStream is=connection.getInputStream(); //6.将流换成字符串(工具类封装) String json=StreamUtil.StreamToString(is); Log.i(tag, json);//打印日志 //7.json解析 JSONObject jsonObject=new JSONObject(json); String versionName=jsonObject.getString("versionName"); mversionDes = jsonObject.getString("versionDes"); String versionCode=jsonObject.getString("versionCode"); mdownloadUrl = jsonObject.getString("downloadUrl"); Log.i(tag, versionName); Log.i(tag, mversionDes); Log.i(tag, versionCode); Log.i(tag, mdownloadUrl); //8,比对版本号(服务器版本号,提示用户更新) if(myLockVersionCode <Integer.parseInt(versionCode)){ //提示用户更新,弹出对话框 msg.what=UPDATE_VERSION; }else{ //进入应用程序主界面 msg.what=ENTER_HOME; } } }catch (MalformedURLException e) { // TODO 自动生成的 catch 块 e.printStackTrace(); msg.what=URL_ERROR; }catch (IOException e) { // TODO 自动生成的 catch 块 e.printStackTrace(); msg.what=IO_ERROR; } catch (JSONException e) { // TODO 自动生成的 catch 块 e.printStackTrace(); msg.what=JSON_ERROR; }finally{ //请求网络的时长超过四秒则不做处理 //请求小于四秒,强制让其睡眠四秒 long endTime=System.currentTimeMillis(); if(endTime-startTime<4000) { try { Thread.sleep(4000-(endTime-startTime)); } catch (InterruptedException e) { // TODO 自动生成的 catch 块 e.printStackTrace(); } } mhandler.sendMessage(msg); } }; }.start(); 对上述信息进行相关的处理: private Handler mhandler=new Handler(){ public void handleMessage(android.os.Message msg){ switch(msg.what){ case UPDATE_VERSION: //弹出对话框,提示用户更新 showUpdateDialog();//弹出一个对话框,让我们进行更新 break; case ENTER_HOME: enterHome(); break; case IO_ERROR: ToastUtils.show(getApplicationContext(), "IO异常"); enterHome(); break; case URL_ERROR: ToastUtils.show(getApplicationContext(), "url异常"); enterHome(); break; case JSON_ERROR: ToastUtils.show(getApplicationContext(), "URL异常");//SplashActivity.this enterHome(); break; } } }; protected void showUpdateDialog() { // TODO 自动生成的方法存根 //对话框是依赖activity存在的 Builder builder = new AlertDialog.Builder(this);//必须用this,而不是getApplicationContext() builder.setIcon(R.drawable.ic_launcher); builder.setTitle("版本更新"); //设置描述内容 builder.setMessage(mversionDes);//这个描述内容见上文是由其发送过来的 //积极按钮,立即更新 builder.setPositiveButton("立即更新", new DialogInterface.OnClickListener() { @Override public void onClick(DialogInterface dialog, int which) { //下载apk,apk链接地址,downloadUrl downloadApk(); } });//创建两个按钮监听器 builder.setNegativeButton("稍后再说", new DialogInterface.OnClickListener() { @Override public void onClick(DialogInterface dialog, int which) { //取消对话框,进入主界面 enterHome(); } }); builder.show(); } 接下来是对文件进行下载 protected void downloadApk() { //apk下载链接地址,放置apk的所在路径 //1,判断sd卡是否可用,是否挂在上 if(Environment.getExternalStorageState().equals(Environment.MEDIA_MOUNTED)){ //2,获取sd卡路径 String path=Environment.getExternalStorageDirectory().getAbsolutePath() +File.separator+"mobilesafe73.apk"; //发送请求,获取sdk,并且添加到指定路径 HttpUtils httpUtils=new HttpUtils(); //发送请求,传递参数吧(下载应用放置的位置) httpUtils.download(mdownloadUrl, path,new RequestCallBack<File>() {//mdownloadUrl刚才所获得的下载的地址 @Override public void onSuccess(ResponseInfo<File> responseInfo) { Log.i(tag, "下载成功"); // TODO 自动生成的方法存根 File file=responseInfo.result; //提示用户安装 installAPK(file); } @Override public void onFailure(HttpException arg0, String arg1) { Log.i(tag, "下载失败"); // TODO 自动生成的方法存根 } @Override public void onStart() { // TODO 自动生成的方法存根 Log.i(tag, "开始下载"); super.onStart(); } @Override public void onLoading(long total, long current, boolean isUploading) { // TODO 自动生成的方法存根 Log.i(tag, "下载中........"); Log.i(tag, "total = "+total); Log.i(tag, "current = "+current); super.onLoading(total, current, isUploading); } }); } } //开始安装 protected void installAPK(File file) { // TODO 自动生成的方法存根 //系统应用界面,源码,安装apk入口 Intent intent = new Intent("android.intent.action.VIEW"); intent.addCategory("android.intent.category.DEFAULT"); /*//文件作为数据源 intent.setData(Uri.fromFile(file)); //设置安装的类型 intent.setType("application/vnd.android.package-archive");*/ intent.setDataAndType(Uri.fromFile(file),"application/vnd.android.package-archive"); // startActivity(intent); startActivityForResult(intent, 0); } //开启另一个界面 protected void enterHome() { Intent intent = new Intent(this,HomeActivity.class); startActivity(intent); //在开启一个新的界面后将导航界面关闭,因为导航界面只可见一次 finish(); } 本文转自眉间雪 51CTO博客,原文链接:http://blog.51cto.com/13348847/2046800,如需转载请自行联系原作者

优秀的个人博客,低调大师

IOS学习——UI基础UIWindow、UIView(五)

在PC中,应用程序多是使用视窗的形式显示内容,手机应用也不例外,手机应用中要在屏幕上显示内容首先要创建一个窗口承载内容,iOS应用中使用UIWindow、UIView来实现内容显示。 UIWindow: UIWindow对象是所有UIView的根视图,管理和协调的应用程序的显示、分发事件给View。UIWindow类是UIView的子类,可以看作是特殊的UIView。一般应用程序只有一个UIWindow对象,即使有多个UIWindow对象,也只有一个UIWindow可以接受到用户的触屏事件。UIWindow初始化在appDeleDgate里面的 didFinishLaunchingWithOptions方法。 self.window = [[[UIWindow alloc] initWithFrame:[[UIScreen mainScreen] bounds]] autorelease]; // Override point for customization after application launch. self.window.backgroundColor = [UIColor whiteColor]; [self.window makeKeyAndVisible];//显示出UIWindow UIView: UIView类继承自UIResponder,负责在屏幕上 定义一个矩形区域,视图用于展示界面及响应用户界面交互。每个视图对象都要负责渲染视图区域的内容,并响应该区域中发生的操作事件。 除了显示内容和处理事件之外,视图可以嵌套并管理子视图。子视图是指嵌入到另一视图对象内部的视图对象,而被嵌入的视图对象是父视图。视图添加到window中就会显示出来,iOS中是怎么实现视图显示的,看下面的代码: - (BOOL)application:(UIApplication *)application didFinishLaunchingWithOptions:(NSDictionary *)launchOptions { self.window = [[[UIWindow alloc] initWithFrame:[[UIScreen mainScreen] bounds]] autorelease]; // Override point for customization after application launch. self.window.backgroundColor = [UIColor whiteColor]; CGRect rect=[UIScreen mainScreen].applicationFrame; NSLog(@"NSScreen application %@",NSStringFromCGRect(rect)); CGRect rect2=[UIScreen mainScreen].bounds; NSLog(@"NSString mainScreen %@",NSStringFromCGRect(rect2)); NSLog(@"iOS_didFinishLaunchingWithOptions"); UIView *view1=[[UIView alloc]initWithFrame:CGRectMake(60, 50, 200, 100)]; view1.backgroundColor=[UIColor greenColor]; [self.window addSubview:view1]; [view1 release]; UIView *view2=[[UIView alloc]initWithFrame:CGRectMake(60, 100, 200, 200) ]; view2.alpha=0.5; view2.backgroundColor=[UIColor cyanColor]; [self.window addSubview:view2]; UIView *view3=[[UIView alloc]initWithFrame:CGRectMake(100, 50, 60, 50)]; view3.backgroundColor=[UIColor colorWithRed:25/255.0 green:60/255.0 blue:150/255.0 alpha:1.0]; [view2 addSubview:view3]; [view3 release]; [view2 release]; [self.window makeKeyAndVisible]; return YES; } 上面添加了三个视图,view1、view2、view3,view3嵌套在view2中。 /** * @author 张兴业 * http://blog.csdn.net/xyz_lmn * iOS入门群: 83702688 * android开发进阶群: 241395671 * 我的新浪微博: @张兴业TBOW */ 本文转自xyz_lmn51CTO博客,原文链接:http://blog.51cto.com/xyzlmn/1230735,如需转载请自行联系原作者

资源下载

更多资源
Nacos

Nacos

Nacos /nɑ:kəʊs/ 是 Dynamic Naming and Configuration Service 的首字母简称,一个易于构建 AI Agent 应用的动态服务发现、配置管理和AI智能体管理平台。Nacos 致力于帮助您发现、配置和管理微服务及AI智能体应用。Nacos 提供了一组简单易用的特性集,帮助您快速实现动态服务发现、服务配置、服务元数据、流量管理。Nacos 帮助您更敏捷和容易地构建、交付和管理微服务平台。

Spring

Spring

Spring框架(Spring Framework)是由Rod Johnson于2002年提出的开源Java企业级应用框架,旨在通过使用JavaBean替代传统EJB实现方式降低企业级编程开发的复杂性。该框架基于简单性、可测试性和松耦合性设计理念,提供核心容器、应用上下文、数据访问集成等模块,支持整合Hibernate、Struts等第三方框架,其适用范围不仅限于服务器端开发,绝大多数Java应用均可从中受益。

Sublime Text

Sublime Text

Sublime Text具有漂亮的用户界面和强大的功能,例如代码缩略图,Python的插件,代码段等。还可自定义键绑定,菜单和工具栏。Sublime Text 的主要功能包括:拼写检查,书签,完整的 Python API , Goto 功能,即时项目切换,多选择,多窗口等等。Sublime Text 是一个跨平台的编辑器,同时支持Windows、Linux、Mac OS X等操作系统。

WebStorm

WebStorm

WebStorm 是jetbrains公司旗下一款JavaScript 开发工具。目前已经被广大中国JS开发者誉为“Web前端开发神器”、“最强大的HTML5编辑器”、“最智能的JavaScript IDE”等。与IntelliJ IDEA同源,继承了IntelliJ IDEA强大的JS部分的功能。

用户登录
用户注册