首页 文章 精选 留言 我的

精选列表

搜索[web开发框架],共10000篇文章
优秀的个人博客,低调大师

Android开发实践:实战演练隐式Intent的用法

任务:假设我们已经实现了一个视频播放器(PlayerActivity),我们希望能把它注册到系统中,当用户点击本地视频或者在线视频时,能启动这个视频播放器。 (假设该类的全路径为:com.jhuster.videoplayer.PlayerActivity) [注]:本文完整的示例代码请到我的Github下载,地址:VideoPlayer 1. 什么是隐式Intent? Intent是Android中比较重要的组件,常用来启动一个新的Activity或者Service、广播某个事件,以及在Android组件之间传递数据。通过Intent来启动新的Activity或者Service通常有两种方法,一种是显示启动,另一种是隐式启动。 显示启动就是在明确指出要启动的Activity或者Service的类或者包名。例如: 1 2 3 4 5 6 7 8 9 10 Intentintent=newIntent( this ,PlayerActivity. class ); startActivity(intent); Intentintent= new Intent(); intent.setClass( this ,PlayerActivity. class ); startActivity(intent); Intentintent= new Intent(); intent.setClassName(“com.jhuster.videoplayer”,“com.jhuster.videoplayer.PlayerActivity”); startActivity(intent); 隐式启动则是不明确指定启动哪个Activity或者Service,而是通过设置Action、Data、Category,让系统来筛选出合适的目标。 例如拨打电话: 1 2 Intentintent= new Intent(Intent.ACTION_DIAL,Uri.parse(“tel: 021 - 80961111 ”)); startActivity(intent); 系统接收到隐式启动请求后,会根据系统中各个Activity在AndroidManifest.xml文件中声明的<intent-filter>来比较和判断是否匹配当前的Intent请求的。 因此,如果我们希望PlayerActivity能够被系统隐式启动,则首先需要在AndroidManifest.xml文件中为该Activity添加<intent-filter>. 2. 为PlayerActivity添加<intent-filter> <intent-filter>的标签有很多,这里只介绍和添加最基本且最常用的三个标签,分别是<action>,<category>和<data>。 2.1 添加<action> 这个标签是必须添加的,可以自己定义,也可以使用系统预定义的变量,Android系统默认定义了很多action,具体可以查看SDK文档,或者Google一下“android.intent.action.”。 这里,因为我们的类是用来“播放视频”的,因此可以使用系统预定义的:android.intent.action.VIEW,它表示需要启动某个Activity显示指定的数据(包括图片、视频、文档等)。 添加了<action>后的<activity>如下所示: 1 2 3 4 5 <activityandroid:name= "com.jhuster.videoplayer.PlayerActivity" > <intent-filter> <actionandroid:name= "android.intent.action.VIEW" /> </intent-filter> </activity> 2.2 添加<category> category代表类别,定义了Activity的类别,Activity可以设置一个或者多个category标签。常用的一般有3个:DEFAULT,HOME,LAUNCHER 1 2 3 DEFAULT默认动作 HOME设置为本地桌面应用 LAUNCHER本APP的启动Activity 本应用中我们使用DEFAULT类别即可,DEFAULT也是category最常用的选项。 添加了category后的<activity>如下所示: 1 2 3 4 5 6 <activityandroid:name= "com.jhuster.videoplayer.PlayerActivity" > <intent-filter> <actionandroid:name= "android.intent.action.VIEW" /> <categoryandroid:name= "android.intent.category.DEFAULT" /> </intent-filter> </activity> 2.3 添加<data> data 代表数据源,是<intent-filter>中最复杂的标签,因为不同的Activity支持的数据来源和类型多种多样,所以需要通过详细的data标签信息来指明。 data 标签有很多属性,包括: 1 2 3 4 5 android:host:指定主机名,例如:google.com android:port:制定主机端口,例如:80 android:path:指定URL的有效路径值,例如:/index/examples android:mimeType:指定组件可以执行的数据类型,例如:image/jpeg,video/* android:scheme:指定特定的模式,例如:content,http 这里,假设我们的视频播放器支持多种数据来源,包括:本地视频文件,本地媒体URL,网络视频流(HTTP、RTMP、RTSP协议),另外,假设我们的视频播放器只支持mp4和3gpp两种文件格式。 那么,下面我们来添加两种最常用的<data>标签,scheme和mimeType,并且解释每条标签对应的是怎样的一种数据来源或者数据格式。 (1) <data android:scheme="xxx"/> 这里的xxx可以是:file,content,网络协议(HTTP,RTMP、RTSP等) 本应用中我们给PlayerActivity的<Intent-filter>中添加: 1 2 3 4 < data android:scheme = "file" /> < data android:scheme = "content" /> < data android:scheme = "http" /> < data android:scheme = "rtsp" /> 添加了这样几条data标签项之后,如果隐式Intent中的数据来源URL是以“file://”、“content://”、“http://”、“rtsp://”开头的URL资源,都会隐式地启动我们的PlayerActivity。 例如,其他的Activity可以通过下面的方法来隐式启动我们的PlayerActivity. 1 2 3 Intentintent= new Intent(Intent.ACTION_VIEW); intent.setData(Uri.fromFile( new File( "/sdcard/test.3gp" ))); startActivity(intent); Uri.fromFile这条语句会把指定的文件位置转换为以“file://”开头的Uri对象,如上述例子最终得到的URL为:“file:///sdcard/test.3gp” 同理,可以通过Uri.parse来转换我们常见的网络地址字符串为Uri对象,例如: 1 2 3 Intentintent= new Intent(Intent.ACTION_VIEW); intent.setData(Uri.parse( "http://ticktick.blog.51cto.com/test.mp4" )); startActivity(intent); (2) <data android:mimeType="xxx"/> mimeType用来设置数据类型,例如图像数据(image/png或者image/*),视频数据(video/mp4或者video/*),如果使用*代表匹配所有的子类型。 MIME TYPE是互联网的一种标记数据类型的标准,现在已经支持非常多的类型了,这里我不一一列举,大家可以在Google上搜索一下。 本应用中我们假设需要支持的是mp4和3gpp两种类型,那么,我们可以添加这样两条 mimeType : 1 2 <dataandroid:mimeType= "video/3gpp" /> <dataandroid:mimeType= "video/mp4" /> 那么,其他的Activity就可以通过下面的方法来隐式启动我们的PlayerActivity. 注意,当<Intent-filter>已经添加了mimeType之后,隐式Intent必须设置Type参数才能匹配到该Activity,所以建议使用setDataAndType方法,而不是单一的setData方法。 1 2 3 Intentintent= new Intent(Intent.ACTION_VIEW); intent.setDataAndType(Uri.fromFile( new File( "/sdcard/test.3gp" )), "video/3gpp" ); startActivity(intent); 当然,这里的"video/3gpp"也可以写成:"video/*",但这样可能会匹配到一些不支持3gpp的播放器。 (3) 小结 添加了<data>标签后的<intent-filter>如下所示: 1 2 3 4 5 6 7 8 9 10 11 12 13 < activity android:name = "com.jhuster.videoplayer.PlayerActivity" > < intent-filter > < action android:name = "android.intent.action.VIEW" /> < category android:name = "android.intent.category.DEFAULT" /> < data android:scheme = "file" /> < data android:scheme = "content" /> < data android:scheme = "http" /> < data android:scheme = "rtsp" /> < data android:scheme = "rtmp" /> < data android:mimeType = "video/3gpp" /> < data android:mimeType = "video/mp4" /> </ intent-filter > </ activity > 3. 在PlayerActivity中获取参数 通过上面的介绍,我们已经知道了怎样添加<intent-filter>以及怎样通过隐式Intent来调用我们的PlayerActivity,那么,下面我们还要了解如何在PlayerActivity中解析来自隐式Intent的参数。 其实,Intent提供了很多方法可以Get相关的参数信息,例如: 1 2 3 4 public StringgetAction(); public UrigetData(); public StringgetScheme(); public StringgetType(); 上述方法分别可以获取Intent的Action,Data Uri,Scheme和MimeType值。 对于“file://”开头的Uri对象,我们可以通过Uri.getPath方法得到去除了“file://”前缀的具体文件地址。例如: “file:///sdcard/test.mp4”则可以转换为实际的“/sdcard/test.mp4”。 对于网络码流,例如:“http://”、“rtsp://”等开头的Uri,则可以直接通过toString()方法转换为实际地址的字符串。 而对于“content://”开头的URI对象,一般是从系统的媒体数据库中检索出来的结果,因此需要反向查找得到实际的文件地址,这里提供一个函数进行转换。 1 2 3 4 5 6 7 8 9 10 11 12 13 14 15 16 17 public static StringgetVideoPath(Contextcontext,Uriuri){ UrivideopathURI=uri; if (uri.getScheme().toString().compareTo( "content" )== 0 ){ Cursorcursor=context.getContentResolver().query(uri, null , null , null , null ); if (cursor.moveToFirst()){ int column_index=cursor.getColumnIndexOrThrow(MediaStore.Video.Media.DATA); videopathURI=Uri.parse(cursor.getString(column_index)); return videopathURI.getPath(); } } else if (uri.getScheme().compareTo( "file" )== 0 ){ return videopathURI.getPath(); } return videopathURI.toString(); } 本文转自 Jhuster 51CTO博客,原文链接:http://blog.51cto.com/ticktick/1621957,如需转载请自行联系原作者

优秀的个人博客,低调大师

Android开发实践:自己动手编写图片剪裁应用(3)

打开图片 图片的打开主要是把各种格式的图片转换为Bitmap对象,Android通过BitmapFactory类提供了一系列的静态方法来协助完成这个操作,如下所示: 1 2 3 4 5 6 7 8 9 10 11 12 13 14 public class BitmapFactory{ public static BitmapdecodeFile(StringpathName,Optionsopts); public static BitmapdecodeFile(StringpathName); public static BitmapdecodeResourceStream(Resourcesres,TypedValuevalue, InputStreamis,Rectpad,Optionsopts); public static BitmapdecodeResource(Resourcesres, int id,Optionsopts); public static BitmapdecodeResource(Resourcesres, int id); public static BitmapdecodeByteArray( byte []data, int offset, int length,Optionsopts); public static BitmapdecodeByteArray( byte []data, int offset, int length); public static BitmapdecodeStream(InputStreamis,RectoutPadding,Optionsopts); public static BitmapdecodeStream(InputStreamis); public static BitmapdecodeFileDescriptor(FileDescriptorfd,RectoutPadding,Optionsopts); public static BitmapdecodeFileDescriptor(FileDescriptorfd); } 通过这些静态方法,我们可以方便地从文件、资源、字节流等各种途径打开图片,生成Bitmap对象。下面给出一个从文件中打开图片的函数封装: 1 2 3 4 5 6 7 8 9 10 11 12 13 14 15 16 public static Bitmapload(Stringfilepath){ Bitmapbitmap= null ; try { FileInputStreamfin= new FileInputStream(filepath); bitmap=BitmapFactory.decodeStream(fin); fin.close(); } catch (FileNotFoundExceptione){ } catch (IOExceptione){ } return bitmap; } 2. 保存图片 图片的保存则主要通过Bitmap的compress方法,该方法的原型如下: 1 2 3 4 5 6 7 8 9 10 11 /** *Writeacompressedversionofthebitmaptothespecifiedoutputstream. *@paramformatTheformatofthecompressedimage *@paramqualityHinttothecompressor,0-100.0meaningcompressfor *smallsize,100meaningcompressformaxquality.Some *formats,likePNGwhichislossless,willignorethe *qualitysetting *@paramstreamTheoutputstreamtowritethecompresseddata. *@returntrueifsuccessfullycompressedtothespecifiedstream. */ public boolean compress(CompressFormatformat, int quality,OutputStreamstream) 第一个参数是图片格式,只有JPEG、PNG和WEBP三种,第二个参数是压缩质量(0~100),数值越大图片信息损失越小,第三个参数则是文件流对象。 同样,这里给出一个保存图片的函数封装: 1 2 3 4 5 6 7 8 9 10 11 12 13 14 public static void save(Bitmapbitmap,Stringfilepath){ try { FileOutputStreamfos= new FileOutputStream(filepath); bitmap.compress(CompressFormat.JPEG, 100 ,fos); bitmap.recycle(); fos.close(); } catch (FileNotFoundExceptione){ } catch (IOExceptione){ } } 3. 剪裁图片 Android中剪裁图片主要有2种方法,一种通过Bitmap的createBitmap方法来生成剪裁的图片,另一种则是通过Canvas对象来“绘制”新的图片,这里先给出代码,再分析: 1 2 3 4 5 6 7 8 9 10 11 public static Bitmapcrop(Bitmapbitmap,RectcropRect){ return Bitmap.createBitmap(bitmap,cropRect.left,cropRect.top,cropRect.width(),cropRect.height()); } public static BitmapcropWithCanvas(Bitmapbitmap,RectcropRect){ RectdestRect= new Rect( 0 , 0 ,cropRect.width(),cropRect.height()); Bitmapcropped=Bitmap.createBitmap(cropRect.width(),cropRect.height(),Bitmap.Config.RGB_565); Canvascanvas= new Canvas(cropped); canvas.drawBitmap(bitmap,cropRect,destRect, null ); return cropped; } 其实第一种方法内部实现也是利用了Canvas对象来“绘制”新的图片的,Canvas对象通过一个Bitmap对象来构建,该Bitmap即为“画布”,drawBitmap则是将源bitmap对象“画”到“画布”之中,这样就实现了数据的搬移,实现了图片的剪裁。 4. 旋转图片 Android中旋转图片同样是通过Bitmap的createBitmap方法来生成旋转后的图片,不过图片的旋转需要借助Matrix对象来协助完成,代码如下: 1 2 3 4 5 public static Bitmaprotate(Bitmapbitmap, int degrees){ Matrixmatrix= new Matrix(); matrix.postRotate(degrees); return Bitmap.createBitmap(bitmap, 0 , 0 ,bitmap.getWidth(),bitmap.getHeight(),matrix, true ); } 当然,图片的旋转也是可以通过Canvas来“绘制”,由于图片旋转会导致边界坐标发生变化,所以需要以图片中心点坐标为中心来旋转,具体实现见如下代码: 1 2 3 4 5 6 7 8 9 10 11 12 13 14 15 16 17 18 19 20 21 22 23 24 25 26 27 28 public static BitmaprotateWithCanvas(Bitmapbitmap, int degrees){ int destWidth,destHeight; float centerX=bitmap.getWidth()/ 2 ; float centerY=bitmap.getHeight()/ 2 ; //Wewanttodotherotationatorigin,butsincethebounding //rectanglewillbechangedafterrotation,sothedeltavalues //arebasedonold&newwidth/heightrespectively. Matrixmatrix= new Matrix(); matrix.preTranslate(-centerX,-centerY); matrix.postRotate(degrees); if (degrees/ 90 % 2 == 0 ){ destWidth=bitmap.getWidth(); destHeight=bitmap.getHeight(); matrix.postTranslate(centerX,centerY); } else { destWidth=bitmap.getHeight(); destHeight=bitmap.getWidth(); matrix.postTranslate(centerY,centerX); } Bitmapcropped=Bitmap.createBitmap(destWidth,destHeight,Bitmap.Config.RGB_565); Canvascanvas= new Canvas(cropped); canvas.drawBitmap(bitmap,matrix, null ); return cropped; } 本文转自 Jhuster 51CTO博客,原文链接:http://blog.51cto.com/ticktick/1604074,如需转载请自行联系原作者


优秀的个人博客,低调大师

Android开发实践:自己动手编写图片剪裁应用(2)

其实Android系统本身也提供了图片剪裁的模块,我们可以直接通过Intent来调用系统的图片剪裁功能,本文我们就先了解一下系统自带的图片剪裁功能是如何调用的吧。 得到被剪裁图片的URL地址 既然是图片剪裁,就一定要有被剪裁的图片,由于图片数据一般很大,为了防止内存溢出,普通APP与Android系统图片剪裁应用之间是通过URL来传递图片地址的。这个URL与我们常说见的网络URL不一样,它并不是HTTP开头,而是以file或者content开头的字符串,例如: 1 2 3 “file: ///sdcard/test.jpg” “content: //media/external/images/media/21936” 这里,我们首先介绍获取图片URL的方法: (1) 从SDCard中得到图片的URL 假设知道图片存放的路径位于“/sdcard/test.jpg”,那么,可以通过下面这种方式来得到URL: 1 UriimageUri=Uri.fromFile( new File( "/sdcard/test.jpg" )); 当然,如果图片是从网络获取的,并不存在于sdcard中,则可以先保存一份临时文件到sdcard中,再通过上述方法得到URL。 注:通过这种方式得到的URL,一般以“file://”开头。 (2) 从多媒体数据库中得到图片的URL Android系统会在后台定期扫描存储在系统中的多媒体文件,如:音乐、图片和视频等,相关的信息会存放在系统的多媒体数据库中,位于/data/data/com.android.providers.media/databases中,我们可以通过检索该数据库得到图片的URL(例如:通过检索数据库得到系统最后一次添加/修改的照片URL),也可以通过Intent.ACTION_PICK来调用系统的图片选择器来选择一张图片,图片选择器会将图片的URL地址放入Intent的data中返回。 后者的应用更多一些,我们主要介绍一下后者,即通过Intent.ACTION_PICK来得到图片URL地址,方法如下: 1 2 3 4 5 6 7 8 9 10 11 12 13 14 15 16 public void pickImage(){ Intentintent= new Intent(Intent.ACTION_PICK); intent.setType( "image/*" ); startActivityForResult(intent,REQUEST_CODE_PICK_IMAGE); } @Override protected void onActivityResult( int requestCode, int resultCode,Intentdata){ if (resultCode!=RESULT_OK){ return ; } if (requestCode==REQUEST_CODE_PICK_IMAGE){ UriimageUri=data.getData(); //...... } } 注:通过这种方式得到的URL,一般以“content://media”开头。 (3) 调用系统的相机拍一张照片 当然,被剪裁的图片也可以是通过Camera拍摄的一张照片,方法如下: 1 2 3 4 5 6 7 8 9 10 11 12 13 14 15 16 17 18 UripictureURL=Uri.fromFile( new File( "/sdcard/temp.jpg" )); public void takenPicture(){ Intentintent= new Intent(MediaStore.ACTION_IMAGE_CAPTURE); intent.putExtra(MediaStore.EXTRA_OUTPUT,pictureURL); startActivityForResult(intent,REQUEST_CODE_TAKEN_PICTURE); } @Override protected void onActivityResult( int requestCode, int resultCode,Intentdata){ if (resultCode!=RESULT_OK){ return ; } if (requestCode==REQUEST_CODE_TAKEN_PICTURE){ UriimageUri=pictureURL; //...... } } 通过代码你可能已经注意到了,其实这种方式得到的图片URL,与第一种方式是一样的,通过图片的存储路径转化过来的,只不过传递给了系统Camera应用中。 2. 通过Intent调用系统的图片剪裁功能 有了图片的URL,调用系统的图片剪裁就很简单了,只需要构建一个Intent对象,并设置相关参数即可,用法示例如下: 1 2 3 4 5 6 7 8 9 10 11 12 13 14 15 16 17 18 19 20 21 22 23 24 25 26 27 28 29 30 31 32 33 34 35 36 37 38 39 40 41 42 43 44 45 46 47 48 49 50 51 public void test(UriimageUri){ UricroppedUri=Uri.fromFile( new File( "/sdcard/cropped.jpg" )); startSystemCropImage(imageUri,croppedUri); } public void startSystemCropImage(Urisrc,Uridst){ Intentintent= new Intent( "com.android.camera.action.CROP" ); intent.putExtra( "crop" , "true" ); //设置剪裁图片的源/目的地址URL intent.setDataAndType(src, "image/*" ); intent.putExtra(MediaStore.EXTRA_OUTPUT,dst); //设置剪裁图片的宽高比 //intent.putExtra("aspectX",2); //intent.putExtra("aspectY",1); //固定剪裁图片的宽高值 //intent.putExtra("outputX",680); //intent.putExtra("outputY",480); //为了防止内存限制以及各个厂商返回的数据不统一,建议不要直接使用这个返回的数据,而是数据返回的URL intent.putExtra( "return-data" , false ); startActivityForResult(intent,REQUEST_CODE_SYSTEM_CROPPER); } @Override protected void onActivityResult( int requestCode, int resultCode,Intentdata){ if (resultCode!=RESULT_OK){ return ; } if (requestCode==REQUEST_CODE_IMAGE_CROPPER){ UricroppedUri=data.getExtras().getParcelable(MediaStore.EXTRA_OUTPUT); InputStreamin= null ; try { in=getContentResolver().openInputStream(croppedUri); Bitmapb=BitmapFactory.decodeStream(in); mImageView.setImageBitmap(b); } catch (FileNotFoundExceptione){ e.printStackTrace(); } } super .onActivityResult(requestCode,resultCode,data); } 3. 小结 注意添加读写SDCard的权限: 1 <uses-permissionandroid:name= "android.permission.WRITE_EXTERNAL_STORAGE" /> 本文转自 Jhuster 51CTO博客,原文链接:http://blog.51cto.com/ticktick/1602611,如需转载请自行联系原作者

优秀的个人博客,低调大师

Android开发实践:自定义带动画的View

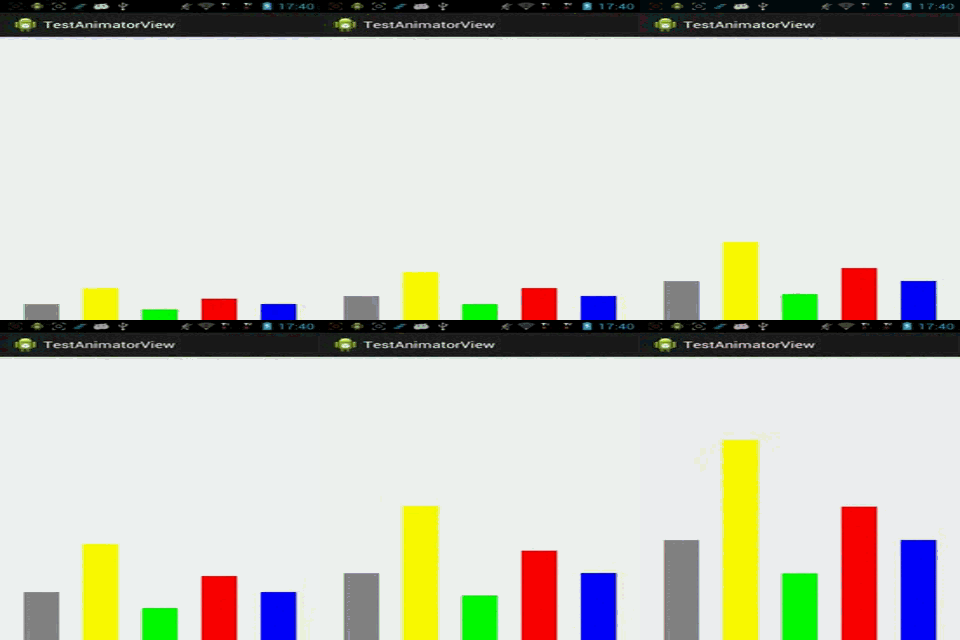
对于一个自定义View来说,onMeasure只是用来计算View尺寸,onDraw()才是真正执行View的绘制,所以一般我们都需要重写onDraw()函数来绘制我们期望的UI界面。下面我以一个具体的例子探索自定义View的onDraw()的实现过程和关键点。 我们的目标是制作一个柱状图动画,View的动画启动后,会显示一排柱状图增长的画面,这种动画多用于财务类或者统计类的APP中,效果如图所示(截屏的格式转换过程导致有些变形,还好不影响演示,图中设置了反复播放,真机上只会播放一次): 1. 首先,自定义View的派生类 1 2 3 4 5 6 7 8 9 10 11 12 13 14 15 16 17 18 19 20 21 22 23 24 25 public class AnimatorView extends View{ private PaintmPaint; public AnimatorView(Contextcontext){ super (context); initialize(); } public AnimatorView(Contextcontext,AttributeSetattrs){ super (context,attrs); initialize(); } public AnimatorView(Contextcontext,AttributeSetattrs, int defStyle){ super (context,attrs,defStyle); initialize(); } protected void initialize(){ mPaint= new Paint(); mPaint.setAntiAlias( true ); mPaint.setStyle(Style.FILL); } } 注: Paint是用来绘图的画笔,可以设置其样式、画面的粗细、填充模式、颜色等等。 2. 定义待绘制的图形数据 待绘制的图形数据一般是在程序中动态给出的,这里为了演示,直接定义好: 1 2 3 4 5 6 7 8 9 10 11 12 13 14 15 16 17 18 public class AnimatorView extends View{ private static final int RECT_WIDTH= 60 ; //每个矩形块的宽度 private static final int RECT_DISTANCE= 40 ; //矩形块之间的间距 private static final int TOTAL_PAINT_TIMES= 100 ; //控制绘制速度,分100次完成绘制 //待绘制的矩形块矩阵,left为高度,right为颜色 private static final int [][]RECT_ARRAY={ { 380 ,Color.GRAY}, { 600 ,Color.YELLOW}, { 200 ,Color.GREEN}, { 450 ,Color.RED}, { 300 ,Color.BLUE} }; private int mPaintTimes= 0 ; //当前已经绘制的次数 } 3. 重载onDraw()函数,实现绘制 1 2 3 4 5 6 7 8 9 10 11 12 13 14 15 16 17 18 19 20 21 22 public class AnimatorView extends View{ @Override protected void onDraw(Canvascanvas){ mPaintTimes++; for ( int i= 0 ;i<RECT_ARRAY.length;i++){ mPaint.setColor(RECT_ARRAY[i][ 1 ]); int paintXPos=i*(RECT_WIDTH+RECT_DISTANCE)+RECT_DISTANCE; int paintYPos=RECT_ARRAY[i][ 0 ]/TOTAL_PAINT_TIMES*mPaintTimes; canvas.drawRect(paintXPos,getHeight(),paintXPos+RECT_WIDTH,getHeight()-paintYPos,mPaint); } if (mPaintTimes<TOTAL_PAINT_TIMES){ invalidate(); //实现动画的关键点 } } } (1) onDraw()函数一般由系统布局管理器来调用,在View第一次加载的时候会调用一次,或者在系统认为需要重绘的时候也会被调用。当然,你也可以在程序中手动触发该View的重绘,通过调用View的invalidate()函数或者postInvalidate()函数即可,前者用于UI线程,后者用于非UI线程。 (2) onDraw()的参数Canvas我们可以理解成系统提供给我们的一块内存区域,所有的绘制都是在这块内存中进行的,绘制完成后系统会显示到屏幕中去。该Canvas对象提供了各种绘制点、线、矩形、圆、位图的方法,基本可以满足各种绘制要求。 (3) drawRect函数需要提供四个坐标,其中,前两个参数代表是被绘制矩形的起始点坐标,后两个参数则是相对于起点的斜对角坐标,注意,原点坐标(0,0)在屏幕的左上角。 (4) 注意,onDraw()每次被调用的时候,原来画布中的内容会被清空。 (5)本示例中,矩形高度每次增加Height/TOTAL_PAINT_TIMES,宽度不变。 4. Activity中测试该View 1 2 3 4 5 6 7 8 9 10 11 12 public class MainActivity extends Activity{ private AnimatorViewmAnimatorView; @Override protected void onCreate(BundlesavedInstanceState){ super .onCreate(savedInstanceState); mAnimatorView= new AnimatorView( this ); setContentView(mAnimatorView); } } 当然,也可以把该View放到layout文件中,这里就不赘述了。 本文转自 Jhuster 51CTO博客,原文链接:http://blog.51cto.com/ticktick/1545863,如需转载请自行联系原作者

资源下载

更多资源
Mario

Mario

马里奥是站在游戏界顶峰的超人气多面角色。马里奥靠吃蘑菇成长,特征是大鼻子、头戴帽子、身穿背带裤,还留着胡子。与他的双胞胎兄弟路易基一起,长年担任任天堂的招牌角色。

腾讯云软件源

腾讯云软件源

为解决软件依赖安装时官方源访问速度慢的问题,腾讯云为一些软件搭建了缓存服务。您可以通过使用腾讯云软件源站来提升依赖包的安装速度。为了方便用户自由搭建服务架构,目前腾讯云软件源站支持公网访问和内网访问。

Nacos

Nacos

Nacos /nɑ:kəʊs/ 是 Dynamic Naming and Configuration Service 的首字母简称,一个易于构建 AI Agent 应用的动态服务发现、配置管理和AI智能体管理平台。Nacos 致力于帮助您发现、配置和管理微服务及AI智能体应用。Nacos 提供了一组简单易用的特性集,帮助您快速实现动态服务发现、服务配置、服务元数据、流量管理。Nacos 帮助您更敏捷和容易地构建、交付和管理微服务平台。

Rocky Linux

Rocky Linux

Rocky Linux(中文名:洛基)是由Gregory Kurtzer于2020年12月发起的企业级Linux发行版,作为CentOS稳定版停止维护后与RHEL(Red Hat Enterprise Linux)完全兼容的开源替代方案,由社区拥有并管理,支持x86_64、aarch64等架构。其通过重新编译RHEL源代码提供长期稳定性,采用模块化包装和SELinux安全架构,默认包含GNOME桌面环境及XFS文件系统,支持十年生命周期更新。

用户登录
用户注册