HyperLedger Fabric 1.2 多机多节点部署(10.3)
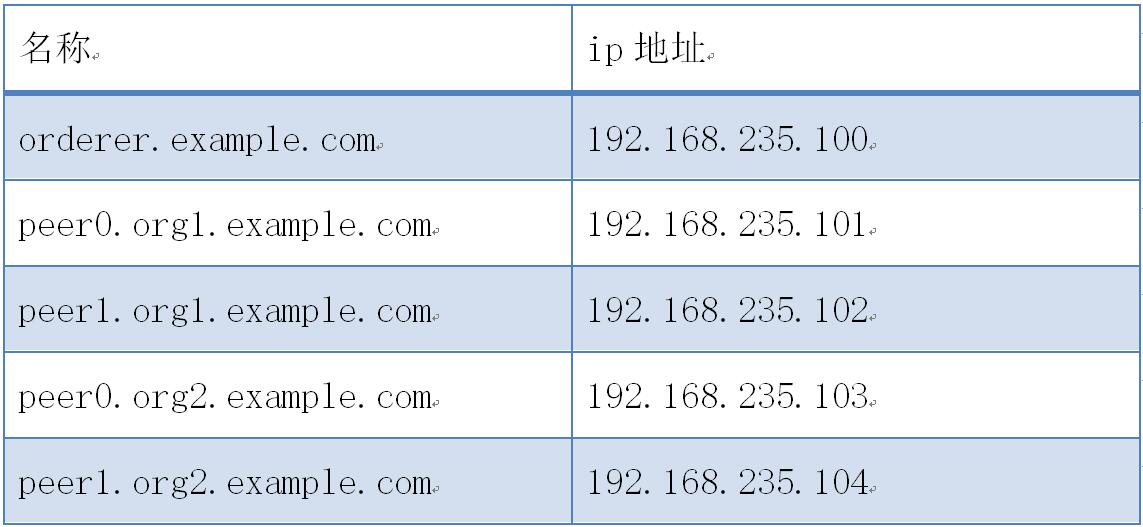
多机多节点指在多台电脑上部署多个组织和节点,本案例部署一个排序(orderer)服务,两个组织(org1,org2)和四个节点(peer),每个组织包括两个节点,需要五台计算机,计算机配置如下: 多机多节点部署结构图如下: 图:多机多节点部署结构图 多机多节点部署(1个orderer+4个peer)步骤如下:10.3.1 部署orderer.example.com1. 创建multipeer目录 # cd $GOPATH/src/github.com/hyperledger/fabric # mkdir multipeer # cd multipeer 2. 获取生成工具 把下载的hyperledger-fabric-linux-amd64-1.2.0.tar.gz二进制文件包解压,把其中的bin目录拷贝到multipeer目录下。 # chmod -R 777 ./bin 3. 准备生成证书和区块配置文件 配置crypto-config.yaml和configtx.yaml文件,拷贝到multipeer目录下。4. 生成公私钥和证书 crypto-config.yaml: # Copyright IBM Corp. All Rights Reserved. # # SPDX-License-Identifier: Apache-2.0 # # --------------------------------------------------------------------------- # "OrdererOrgs" - Definition of organizations managing orderer nodes # --------------------------------------------------------------------------- OrdererOrgs: # --------------------------------------------------------------------------- # Orderer # --------------------------------------------------------------------------- - Name: Orderer Domain: example.com CA: Country: US Province: California Locality: San Francisco # --------------------------------------------------------------------------- # "Specs" - See PeerOrgs below for complete description # --------------------------------------------------------------------------- Specs: - Hostname: orderer # --------------------------------------------------------------------------- # "PeerOrgs" - Definition of organizations managing peer nodes # --------------------------------------------------------------------------- PeerOrgs: # --------------------------------------------------------------------------- # Org1 # --------------------------------------------------------------------------- - Name: Org1 Domain: org1.example.com EnableNodeOUs: true CA: Country: US Province: California Locality: San Francisco # --------------------------------------------------------------------------- # "Specs" # --------------------------------------------------------------------------- # Uncomment this section to enable the explicit definition of hosts in your # configuration. Most users will want to use Template, below # # Specs is an array of Spec entries. Each Spec entry consists of two fields: # - Hostname: (Required) The desired hostname, sans the domain. # - CommonName: (Optional) Specifies the template or explicit override for # the CN. By default, this is the template: # # "{{.Hostname}}.{{.Domain}}" # # which obtains its values from the Spec.Hostname and # Org.Domain, respectively. # --------------------------------------------------------------------------- # Specs: # - Hostname: foo # implicitly "foo.org1.example.com" # CommonName: foo27.org5.example.com # overrides Hostname-based FQDN set above # - Hostname: bar # - Hostname: baz # --------------------------------------------------------------------------- # "Template" # --------------------------------------------------------------------------- # Allows for the definition of 1 or more hosts that are created sequentially # from a template. By default, this looks like "peer%d" from 0 to Count-1. # You may override the number of nodes (Count), the starting index (Start) # or the template used to construct the name (Hostname). # # Note: Template and Specs are not mutually exclusive. You may define both # sections and the aggregate nodes will be created for you. Take care with # name collisions # --------------------------------------------------------------------------- Template: Count: 2 # Start: 5 # Hostname: {{.Prefix}}{{.Index}} # default # --------------------------------------------------------------------------- # "Users" # --------------------------------------------------------------------------- # Count: The number of user accounts _in addition_ to Admin # --------------------------------------------------------------------------- Users: Count: 1 # --------------------------------------------------------------------------- # Org2: See "Org1" for full specification # --------------------------------------------------------------------------- - Name: Org2 Domain: org2.example.com EnableNodeOUs: true CA: Country: US Province: California Locality: San Francisco Template: Count: 2 Users: Count: 1 configtx.yaml: # Copyright IBM Corp. All Rights Reserved. # # SPDX-License-Identifier: Apache-2.0 # --- ################################################################################ # # Section: Organizations # # - This section defines the different organizational identities which will # be referenced later in the configuration. # ################################################################################ Organizations: # SampleOrg defines an MSP using the sampleconfig. It should never be used # in production but may be used as a template for other definitions - &OrdererOrg # DefaultOrg defines the organization which is used in the sampleconfig # of the fabric.git development environment Name: OrdererOrg # ID to load the MSP definition as ID: OrdererMSP # MSPDir is the filesystem path which contains the MSP configuration MSPDir: crypto-config/ordererOrganizations/example.com/msp # Policies defines the set of policies at this level of the config tree # For organization policies, their canonical path is usually # /Channel/<Application|Orderer>/<OrgName>/<PolicyName> Policies: Readers: Type: Signature Rule: "OR('OrdererMSP.member')" Writers: Type: Signature Rule: "OR('OrdererMSP.member')" Admins: Type: Signature Rule: "OR('OrdererMSP.admin')" - &Org1 # DefaultOrg defines the organization which is used in the sampleconfig # of the fabric.git development environment Name: Org1MSP # ID to load the MSP definition as ID: Org1MSP MSPDir: crypto-config/peerOrganizations/org1.example.com/msp # Policies defines the set of policies at this level of the config tree # For organization policies, their canonical path is usually # /Channel/<Application|Orderer>/<OrgName>/<PolicyName> Policies: Readers: Type: Signature Rule: "OR('Org1MSP.admin', 'Org1MSP.peer', 'Org1MSP.client')" Writers: Type: Signature Rule: "OR('Org1MSP.admin', 'Org1MSP.client')" Admins: Type: Signature Rule: "OR('Org1MSP.admin')" AnchorPeers: # AnchorPeers defines the location of peers which can be used # for cross org gossip communication. Note, this value is only # encoded in the genesis block in the Application section context - Host: peer0.org1.example.com Port: 7051 - &Org2 # DefaultOrg defines the organization which is used in the sampleconfig # of the fabric.git development environment Name: Org2MSP # ID to load the MSP definition as ID: Org2MSP MSPDir: crypto-config/peerOrganizations/org2.example.com/msp # Policies defines the set of policies at this level of the config tree # For organization policies, their canonical path is usually # /Channel/<Application|Orderer>/<OrgName>/<PolicyName> Policies: Readers: Type: Signature Rule: "OR('Org2MSP.admin', 'Org2MSP.peer', 'Org2MSP.client')" Writers: Type: Signature Rule: "OR('Org2MSP.admin', 'Org2MSP.client')" Admins: Type: Signature Rule: "OR('Org2MSP.admin')" AnchorPeers: # AnchorPeers defines the location of peers which can be used # for cross org gossip communication. Note, this value is only # encoded in the genesis block in the Application section context - Host: peer0.org2.example.com Port: 7051 ################################################################################ # # SECTION: Capabilities # # - This section defines the capabilities of fabric network. This is a new # concept as of v1.1.0 and should not be utilized in mixed networks with # v1.0.x peers and orderers. Capabilities define features which must be # present in a fabric binary for that binary to safely participate in the # fabric network. For instance, if a new MSP type is added, newer binaries # might recognize and validate the signatures from this type, while older # binaries without this support would be unable to validate those # transactions. This could lead to different versions of the fabric binaries # having different world states. Instead, defining a capability for a channel # informs those binaries without this capability that they must cease # processing transactions until they have been upgraded. For v1.0.x if any # capabilities are defined (including a map with all capabilities turned off) # then the v1.0.x peer will deliberately crash. # ################################################################################ Capabilities: # Channel capabilities apply to both the orderers and the peers and must be # supported by both. Set the value of the capability to true to require it. Global: &ChannelCapabilities # V1.1 for Global is a catchall flag for behavior which has been # determined to be desired for all orderers and peers running v1.0.x, # but the modification of which would cause incompatibilities. Users # should leave this flag set to true. V1_1: true # Orderer capabilities apply only to the orderers, and may be safely # manipulated without concern for upgrading peers. Set the value of the # capability to true to require it. Orderer: &OrdererCapabilities # V1.1 for Order is a catchall flag for behavior which has been # determined to be desired for all orderers running v1.0.x, but the # modification of which would cause incompatibilities. Users should # leave this flag set to true. V1_1: true # Application capabilities apply only to the peer network, and may be safely # manipulated without concern for upgrading orderers. Set the value of the # capability to true to require it. Application: &ApplicationCapabilities # V1.1 for Application is a catchall flag for behavior which has been # determined to be desired for all peers running v1.0.x, but the # modification of which would cause incompatibilities. Users should # leave this flag set to true. V1_2: true ################################################################################ # # SECTION: Application # # - This section defines the values to encode into a config transaction or # genesis block for application related parameters # ################################################################################ Application: &ApplicationDefaults # Organizations is the list of orgs which are defined as participants on # the application side of the network Organizations: # Policies defines the set of policies at this level of the config tree # For Application policies, their canonical path is # /Channel/Application/<PolicyName> Policies: Readers: Type: ImplicitMeta Rule: "ANY Readers" Writers: Type: ImplicitMeta Rule: "ANY Writers" Admins: Type: ImplicitMeta Rule: "MAJORITY Admins" # Capabilities describes the application level capabilities, see the # dedicated Capabilities section elsewhere in this file for a full # description Capabilities: <<: *ApplicationCapabilities ################################################################################ # # SECTION: Orderer # # - This section defines the values to encode into a config transaction or # genesis block for orderer related parameters # ################################################################################ Orderer: &OrdererDefaults # Orderer Type: The orderer implementation to start # Available types are "solo" and "kafka" OrdererType: solo Addresses: - orderer.example.com:7050 # Batch Timeout: The amount of time to wait before creating a batch BatchTimeout: 2s # Batch Size: Controls the number of messages batched into a block BatchSize: # Max Message Count: The maximum number of messages to permit in a batch MaxMessageCount: 10 # Absolute Max Bytes: The absolute maximum number of bytes allowed for # the serialized messages in a batch. AbsoluteMaxBytes: 98 MB # Preferred Max Bytes: The preferred maximum number of bytes allowed for # the serialized messages in a batch. A message larger than the preferred # max bytes will result in a batch larger than preferred max bytes. PreferredMaxBytes: 512 KB Kafka: # Brokers: A list of Kafka brokers to which the orderer connects. Edit # this list to identify the brokers of the ordering service. # NOTE: Use IP:port notation. Brokers: - 127.0.0.1:9092 # Organizations is the list of orgs which are defined as participants on # the orderer side of the network Organizations: # Policies defines the set of policies at this level of the config tree # For Orderer policies, their canonical path is # /Channel/Orderer/<PolicyName> Policies: Readers: Type: ImplicitMeta Rule: "ANY Readers" Writers: Type: ImplicitMeta Rule: "ANY Writers" Admins: Type: ImplicitMeta Rule: "MAJORITY Admins" # BlockValidation specifies what signatures must be included in the block # from the orderer for the peer to validate it. BlockValidation: Type: ImplicitMeta Rule: "ANY Writers" # Capabilities describes the orderer level capabilities, see the # dedicated Capabilities section elsewhere in this file for a full # description Capabilities: <<: *OrdererCapabilities ################################################################################ # # CHANNEL # # This section defines the values to encode into a config transaction or # genesis block for channel related parameters. # ################################################################################ Channel: &ChannelDefaults # Policies defines the set of policies at this level of the config tree # For Channel policies, their canonical path is # /Channel/<PolicyName> Policies: # Who may invoke the 'Deliver' API Readers: Type: ImplicitMeta Rule: "ANY Readers" # Who may invoke the 'Broadcast' API Writers: Type: ImplicitMeta Rule: "ANY Writers" # By default, who may modify elements at this config level Admins: Type: ImplicitMeta Rule: "MAJORITY Admins" # Capabilities describes the channel level capabilities, see the # dedicated Capabilities section elsewhere in this file for a full # description Capabilities: <<: *ChannelCapabilities ################################################################################ # # Profile # # - Different configuration profiles may be encoded here to be specified # as parameters to the configtxgen tool # ################################################################################ Profiles: TwoOrgsOrdererGenesis: <<: *ChannelDefaults Orderer: <<: *OrdererDefaults Organizations: - *OrdererOrg Consortiums: SampleConsortium: Organizations: - *Org1 - *Org2 TwoOrgsChannel: Consortium: SampleConsortium Application: <<: *ApplicationDefaults Organizations: - *Org1 - *Org2 5. 生成公私钥和证书 # ./bin/cryptogen generate --config=./crypto-config.yaml 6. 生成创世区块 # mkdir channel-artifacts # ./bin/configtxgen -profile TwoOrgsOrdererGenesis -outputBlock ./channel-artifacts/genesis.block 7. 生成通道配置区块 # ./bin/configtxgen -profile TwoOrgsChannel -outputCreateChannelTx ./channel-artifacts/mychannel.tx -channelID mychannel 8. 拷贝生成文件到其它电脑 # cd .. # scp -r multipeer root@192.168.235.101:/opt/gopath/src/github.com/hyperledger/fabric # scp -r multipeer root@192.168.235.102:/opt/gopath/src/github.com/hyperledger/fabric # scp -r multipeer root@192.168.235.103:/opt/gopath/src/github.com/hyperledger/fabric # scp -r multipeer root@192.168.235.104:/opt/gopath/src/github.com/hyperledger/fabric 9. 准备docker配置文件 配置docker-compose-orderer.yaml文件,拷贝到multipeer目录下。docker-compose-orderer.yaml: # Copyright IBM Corp. All Rights Reserved. # # SPDX-License-Identifier: Apache-2.0 # version: '2' services: orderer.example.com: container_name: orderer.example.com image: hyperledger/fabric-orderer environment: - ORDERER_GENERAL_LOGLEVEL=debug - ORDERER_GENERAL_LISTENADDRESS=0.0.0.0 - ORDERER_GENERAL_GENESISMETHOD=file - ORDERER_GENERAL_GENESISFILE=/var/hyperledger/orderer/orderer.genesis.block - ORDERER_GENERAL_LOCALMSPID=OrdererMSP - ORDERER_GENERAL_LOCALMSPDIR=/var/hyperledger/orderer/msp # enabled TLS - ORDERER_GENERAL_TLS_ENABLED=true - ORDERER_GENERAL_TLS_PRIVATEKEY=/var/hyperledger/orderer/tls/server.key - ORDERER_GENERAL_TLS_CERTIFICATE=/var/hyperledger/orderer/tls/server.crt - ORDERER_GENERAL_TLS_ROOTCAS=[/var/hyperledger/orderer/tls/ca.crt] - ORDERER_KAFKA_RETRY_SHORTINTERVAL=1s - ORDERER_KAFKA_RETRY_SHORTTOTAL=30s - ORDERER_KAFKA_VERBOSE=true working_dir: /opt/gopath/src/github.com/hyperledger/fabric command: orderer volumes: - ./channel-artifacts/genesis.block:/var/hyperledger/orderer/orderer.genesis.block - ./crypto-config/ordererOrganizations/example.com/orderers/orderer.example.com/msp:/var/hyperledger/orderer/msp - ./crypto-config/ordererOrganizations/example.com/orderers/orderer.example.com/tls/:/var/hyperledger/orderer/tls ports: - 7050:7050 10. 启动Fabric网络 # docker-compose -f docker-compose-orderer.yaml up -d 10.3.2 部署peer0.org1.example.com1. 准备docker配置文件 配置docker-compose-peer.yaml文件,拷贝到multipeer目录下。docker-compose-peer.yaml: # Copyright IBM Corp. All Rights Reserved. # # SPDX-License-Identifier: Apache-2.0 # version: '2' services: peer0.org1.example.com: container_name: peer0.org1.example.com image: hyperledger/fabric-peer environment: - CORE_PEER_ID=peer0.org1.example.com - CORE_PEER_ADDRESS=peer0.org1.example.com:7051 - CORE_PEER_CHAINCODEADDRESS=peer0.org1.example.com:7052 - CORE_PEER_CHAINCODELISTENADDRESS=0.0.0.0:7052 - CORE_PEER_GOSSIP_EXTERNALENDPOINT=peer0.org1.example.com:7051 - CORE_PEER_LOCALMSPID=Org1MSP - CORE_VM_ENDPOINT=unix:///host/var/run/docker.sock # the following setting starts chaincode containers on the same # bridge network as the peers # https://docs.docker.com/compose/networking/ - CORE_VM_DOCKER_HOSTCONFIG_NETWORKMODE=multipeer_default #- CORE_LOGGING_LEVEL=ERROR - CORE_LOGGING_LEVEL=DEBUG - CORE_PEER_TLS_ENABLED=true - CORE_PEER_GOSSIP_USELEADERELECTION=true - CORE_PEER_GOSSIP_ORGLEADER=false - CORE_PEER_PROFILE_ENABLED=true - CORE_PEER_TLS_CERT_FILE=/etc/hyperledger/fabric/tls/server.crt - CORE_PEER_TLS_KEY_FILE=/etc/hyperledger/fabric/tls/server.key - CORE_PEER_TLS_ROOTCERT_FILE=/etc/hyperledger/fabric/tls/ca.crt working_dir: /opt/gopath/src/github.com/hyperledger/fabric/peer command: peer node start volumes: - /var/run/:/host/var/run/ - ./crypto-config/peerOrganizations/org1.example.com/peers/peer0.org1.example.com/msp:/etc/hyperledger/fabric/msp - ./crypto-config/peerOrganizations/org1.example.com/peers/peer0.org1.example.com/tls:/etc/hyperledger/fabric/tls ports: - 7051:7051 - 7052:7052 - 7053:7053 extra_hosts: - "orderer.example.com:192.168.235.100" cli: container_name: cli image: hyperledger/fabric-tools tty: true environment: - GOPATH=/opt/gopath - CORE_VM_ENDPOINT=unix:///host/var/run/docker.sock - CORE_LOGGING_LEVEL=DEBUG - CORE_PEER_ID=cli - CORE_PEER_ADDRESS=peer0.org1.example.com:7051 - CORE_PEER_LOCALMSPID=Org1MSP - CORE_PEER_TLS_ENABLED=true - CORE_PEER_TLS_CERT_FILE=/opt/gopath/src/github.com/hyperledger/fabric/peer/crypto/peerOrganizations/org1.example.com/peers/peer0.org1.example.com/tls/server.crt - CORE_PEER_TLS_KEY_FILE=/opt/gopath/src/github.com/hyperledger/fabric/peer/crypto/peerOrganizations/org1.example.com/peers/peer0.org1.example.com/tls/server.key - CORE_PEER_TLS_ROOTCERT_FILE=/opt/gopath/src/github.com/hyperledger/fabric/peer/crypto/peerOrganizations/org1.example.com/peers/peer0.org1.example.com/tls/ca.crt - CORE_PEER_MSPCONFIGPATH=/opt/gopath/src/github.com/hyperledger/fabric/peer/crypto/peerOrganizations/org1.example.com/users/Admin@org1.example.com/msp working_dir: /opt/gopath/src/github.com/hyperledger/fabric/peer volumes: - /var/run/:/host/var/run/ - ./chaincode/go/:/opt/gopath/src/github.com/hyperledger/fabric/multipeer/chaincode/go - ./crypto-config:/opt/gopath/src/github.com/hyperledger/fabric/peer/crypto/ - ./channel-artifacts:/opt/gopath/src/github.com/hyperledger/fabric/peer/channel-artifacts depends_on: - peer0.org1.example.com extra_hosts: - "orderer.example.com:192.168.235.100" - "peer0.org1.example.com:192.168.235.101" - "peer1.org1.example.com:192.168.235.102" - "peer0.org2.example.com:192.168.235.103" - "peer1.org2.example.com:192.168.235.104" 2. 准备部署智能合约 拷贝examples/chaincode/go/example02目录下的文件到multipeer/chaincode/go/example02目录下。3. 启动Fabric网络1) 启动peer # cd $GOPATH/src/github.com/hyperledger/fabric/multipeer # docker-compose -f docker-compose-peer.yaml up -d 2) 启动cli容器 # docker exec -it cli bash 3) 创建Channel # ORDERER_CA=/opt/gopath/src/github.com/hyperledger/fabric/peer/crypto/ordererOrganizations/example.com/orderers/orderer.example.com/msp/tlscacerts/tlsca.example.com-cert.pem # peer channel create -o orderer.example.com:7050 -c mychannel -f ./channel-artifacts/mychannel.tx --tls --cafile $ORDERER_CA 4) Peer加入Channel # peer channel join -b mychannel.block 5) 保存mychannel.block 命令的xxxxxxxx替换为图中红框中的字符。 图:cli客户端 # exit # docker cp xxxxxxxx:/opt/gopath/src/github.com/hyperledger/fabric/peer/mychannel.block /opt/gopath/src/github.com/hyperledger/fabric/multipeer 6) mychannel.block拷贝到org1的peer1电脑 # scp mychannel.block root@192.168.235.102:/opt/gopath/src/github.com/hyperledger/fabric/multipeer # scp mychannel.block root@192.168.235.103:/opt/gopath/src/github.com/hyperledger/fabric/multipeer # scp mychannel.block root@192.168.235.104:/opt/gopath/src/github.com/hyperledger/fabric/multipeer 4. 安装与运行智能合约1) 安装智能合约 # docker exec -it cli bash # peer chaincode install -n mycc -p github.com/hyperledger/fabric/multipeer/chaincode/go/example02/cmd/ -v 1.0 2) 实例化智能合约区块初始化数据为a为100,b为200。 # ORDERER_CA=/opt/gopath/src/github.com/hyperledger/fabric/peer/crypto/ordererOrganizations/example.com/orderers/orderer.example.com/msp/tlscacerts/tlsca.example.com-cert.pem # peer chaincode instantiate -o orderer.example.com:7050 --tls --cafile $ORDERER_CA -C mychannel -n mycc -v 1.0 -c '{"Args":["init","a","100","b","200"]}' -P "OR ('Org1MSP.peer','Org2MSP.peer')" 3) Peer上查询a,显示100 # peer chaincode query -C mychannel -n mycc -c '{"Args":["query","a"]}' 查询a成功结果如下图所示: 图:查询a成功结果 4) Peer上进行a向b转10交易 # peer chaincode invoke --tls --cafile $ORDERER_CA -C mychannel -n mycc -c '{"Args":["invoke","a","b","10"]}' 交易成功结果如下图所示: 图:交易成功结果 5) Peer上查询a,显示210 # peer chaincode query -C mychannel -n mycc -c '{"Args":["query","b"]}' 查询b成功结果如下图所示: 10.3.3 部署peer1.org1.example.com1 准备docker配置文件 配置docker-compose-peer.yaml文件,拷贝到multipeer目录下。docker-compose-peer.yaml: # Copyright IBM Corp. All Rights Reserved. # # SPDX-License-Identifier: Apache-2.0 # version: '2' services: peer1.org1.example.com: container_name: peer1.org1.example.com image: hyperledger/fabric-peer environment: - CORE_PEER_ID=peer1.org1.example.com - CORE_PEER_ADDRESS=peer1.org1.example.com:7051 - CORE_PEER_CHAINCODEADDRESS=peer1.org1.example.com:7052 - CORE_PEER_CHAINCODELISTENADDRESS=0.0.0.0:7052 - CORE_PEER_GOSSIP_EXTERNALENDPOINT=peer1.org1.example.com:7051 - CORE_PEER_LOCALMSPID=Org1MSP - CORE_VM_ENDPOINT=unix:///host/var/run/docker.sock # the following setting starts chaincode containers on the same # bridge network as the peers # https://docs.docker.com/compose/networking/ - CORE_VM_DOCKER_HOSTCONFIG_NETWORKMODE=multipeer_default #- CORE_LOGGING_LEVEL=ERROR - CORE_LOGGING_LEVEL=DEBUG - CORE_PEER_TLS_ENABLED=true - CORE_PEER_GOSSIP_USELEADERELECTION=true - CORE_PEER_GOSSIP_ORGLEADER=false - CORE_PEER_PROFILE_ENABLED=true - CORE_PEER_TLS_CERT_FILE=/etc/hyperledger/fabric/tls/server.crt - CORE_PEER_TLS_KEY_FILE=/etc/hyperledger/fabric/tls/server.key - CORE_PEER_TLS_ROOTCERT_FILE=/etc/hyperledger/fabric/tls/ca.crt working_dir: /opt/gopath/src/github.com/hyperledger/fabric/peer command: peer node start volumes: - /var/run/:/host/var/run/ - ./crypto-config/peerOrganizations/org1.example.com/peers/peer1.org1.example.com/msp:/etc/hyperledger/fabric/msp - ./crypto-config/peerOrganizations/org1.example.com/peers/peer1.org1.example.com/tls:/etc/hyperledger/fabric/tls ports: - 7051:7051 - 7052:7052 - 7053:7053 extra_hosts: - "orderer.example.com:192.168.235.100" cli: container_name: cli image: hyperledger/fabric-tools tty: true environment: - GOPATH=/opt/gopath - CORE_VM_ENDPOINT=unix:///host/var/run/docker.sock - CORE_LOGGING_LEVEL=DEBUG - CORE_PEER_ID=cli - CORE_PEER_ADDRESS=peer1.org1.example.com:7051 - CORE_PEER_LOCALMSPID=Org1MSP - CORE_PEER_TLS_ENABLED=true - CORE_PEER_TLS_CERT_FILE=/opt/gopath/src/github.com/hyperledger/fabric/peer/crypto/peerOrganizations/org1.example.com/peers/peer1.org1.example.com/tls/server.crt - CORE_PEER_TLS_KEY_FILE=/opt/gopath/src/github.com/hyperledger/fabric/peer/crypto/peerOrganizations/org1.example.com/peers/peer1.org1.example.com/tls/server.key - CORE_PEER_TLS_ROOTCERT_FILE=/opt/gopath/src/github.com/hyperledger/fabric/peer/crypto/peerOrganizations/org1.example.com/peers/peer1.org1.example.com/tls/ca.crt - CORE_PEER_MSPCONFIGPATH=/opt/gopath/src/github.com/hyperledger/fabric/peer/crypto/peerOrganizations/org1.example.com/users/Admin@org1.example.com/msp working_dir: /opt/gopath/src/github.com/hyperledger/fabric/peer volumes: - /var/run/:/host/var/run/ - ./chaincode/go/:/opt/gopath/src/github.com/hyperledger/fabric/multipeer/chaincode/go - ./crypto-config:/opt/gopath/src/github.com/hyperledger/fabric/peer/crypto/ - ./channel-artifacts:/opt/gopath/src/github.com/hyperledger/fabric/peer/channel-artifacts depends_on: - peer1.org1.example.com extra_hosts: - "orderer.example.com:192.168.235.100" - "peer0.org1.example.com:192.168.235.101" - "peer1.org1.example.com:192.168.235.102" - "peer0.org2.example.com:192.168.235.103" - "peer1.org2.example.com:192.168.235.104" 2 准备部署智能合约 拷贝examples/chaincode/go/example02目录下的文件到multipeer/chaincode/go/example02目录下。3 启动Fabric网络1) 启动peer # cd $GOPATH/src/github.com/hyperledger/fabric/multipeer # docker-compose -f docker-compose-peer.yaml up -d 2) 启动cli容器 # docker exec -it cli bash 3) 拷贝mychannel.block到peer中命令的xxxxxxxx替换为图中红框中的字符。 图:cli客户端 # exit # docker cp /opt/gopath/src/github.com/hyperledger/fabric/multipeer/mychannel.block xxxxxxxx:/opt/gopath/src/github.com/hyperledger/fabric/peer/ 4) Peer加入Channel # docker exec -it cli bash # peer channel join -b mychannel.block 4 安装与运行智能合约1) 安装智能合约 # peer chaincode install -n mycc -p github.com/hyperledger/fabric/multipeer/chaincode/go/example02/cmd/ -v 1.0 2) Peer上查询a,显示90 # peer chaincode query -C mychannel -n mycc -c '{"Args":["query","a"]}' 查询a成功结果如下图所示: 图:查询a成功结果 3) Peer上进行a向b转10交易 # ORDERER_CA=/opt/gopath/src/github.com/hyperledger/fabric/peer/crypto/ordererOrganizations/example.com/orderers/orderer.example.com/msp/tlscacerts/tlsca.example.com-cert.pem # peer chaincode invoke --tls --cafile $ORDERER_CA -C mychannel -n mycc -c '{"Args":["invoke","a","b","10"]}' 交易成功结果如下图所示: 图:交易成功结果 4) Peer上查询b,显示220 # peer chaincode query -C mychannel -n mycc -c '{"Args":["query","b"]}' 查询b成功结果如下图所示: 10.3.4 部署peer0.org2.example.com1 准备docker配置文件 配置docker-compose-peer.yaml文件,拷贝到multipeer目录下。docker-compose-peer.yaml: # Copyright IBM Corp. All Rights Reserved. # # SPDX-License-Identifier: Apache-2.0 # version: '2' services: peer0.org2.example.com: container_name: peer0.org2.example.com image: hyperledger/fabric-peer environment: - CORE_PEER_ID=peer0.org2.example.com - CORE_PEER_ADDRESS=peer0.org2.example.com:7051 - CORE_PEER_CHAINCODEADDRESS=peer0.org2.example.com:7052 - CORE_PEER_CHAINCODELISTENADDRESS=0.0.0.0:7052 - CORE_PEER_GOSSIP_EXTERNALENDPOINT=peer0.org2.example.com:7051 - CORE_PEER_LOCALMSPID=Org2MSP - CORE_VM_ENDPOINT=unix:///host/var/run/docker.sock # the following setting starts chaincode containers on the same # bridge network as the peers # https://docs.docker.com/compose/networking/ - CORE_VM_DOCKER_HOSTCONFIG_NETWORKMODE=multipeer_default #- CORE_LOGGING_LEVEL=ERROR - CORE_LOGGING_LEVEL=DEBUG - CORE_PEER_TLS_ENABLED=true - CORE_PEER_GOSSIP_USELEADERELECTION=true - CORE_PEER_GOSSIP_ORGLEADER=false - CORE_PEER_PROFILE_ENABLED=true - CORE_PEER_TLS_CERT_FILE=/etc/hyperledger/fabric/tls/server.crt - CORE_PEER_TLS_KEY_FILE=/etc/hyperledger/fabric/tls/server.key - CORE_PEER_TLS_ROOTCERT_FILE=/etc/hyperledger/fabric/tls/ca.crt working_dir: /opt/gopath/src/github.com/hyperledger/fabric/peer command: peer node start volumes: - /var/run/:/host/var/run/ - ./crypto-config/peerOrganizations/org2.example.com/peers/peer0.org2.example.com/msp:/etc/hyperledger/fabric/msp - ./crypto-config/peerOrganizations/org2.example.com/peers/peer0.org2.example.com/tls:/etc/hyperledger/fabric/tls ports: - 7051:7051 - 7052:7052 - 7053:7053 extra_hosts: - "orderer.example.com:192.168.235.100" cli: container_name: cli image: hyperledger/fabric-tools tty: true environment: - GOPATH=/opt/gopath - CORE_VM_ENDPOINT=unix:///host/var/run/docker.sock - CORE_LOGGING_LEVEL=DEBUG - CORE_PEER_ID=cli - CORE_PEER_ADDRESS=peer0.org2.example.com:7051 - CORE_PEER_LOCALMSPID=Org2MSP - CORE_PEER_TLS_ENABLED=true - CORE_PEER_TLS_CERT_FILE=/opt/gopath/src/github.com/hyperledger/fabric/peer/crypto/peerOrganizations/org2.example.com/peers/peer0.org2.example.com/tls/server.crt - CORE_PEER_TLS_KEY_FILE=/opt/gopath/src/github.com/hyperledger/fabric/peer/crypto/peerOrganizations/org2.example.com/peers/peer0.org2.example.com/tls/server.key - CORE_PEER_TLS_ROOTCERT_FILE=/opt/gopath/src/github.com/hyperledger/fabric/peer/crypto/peerOrganizations/org2.example.com/peers/peer0.org2.example.com/tls/ca.crt - CORE_PEER_MSPCONFIGPATH=/opt/gopath/src/github.com/hyperledger/fabric/peer/crypto/peerOrganizations/org2.example.com/users/Admin@org2.example.com/msp working_dir: /opt/gopath/src/github.com/hyperledger/fabric/peer volumes: - /var/run/:/host/var/run/ - ./chaincode/go/:/opt/gopath/src/github.com/hyperledger/fabric/multipeer/chaincode/go - ./crypto-config:/opt/gopath/src/github.com/hyperledger/fabric/peer/crypto/ - ./channel-artifacts:/opt/gopath/src/github.com/hyperledger/fabric/peer/channel-artifacts depends_on: - peer0.org2.example.com extra_hosts: - "orderer.example.com:192.168.235.100" - "peer0.org1.example.com:192.168.235.101" - "peer1.org1.example.com:192.168.235.102" - "peer0.org2.example.com:192.168.235.103" - "peer1.org2.example.com:192.168.235.104" 2 准备部署智能合约 拷贝examples/chaincode/go/example02目录下的文件到multipeer/chaincode/go/example02目录下。3 启动Fabric网络1) 启动peer # cd $GOPATH/src/github.com/hyperledger/fabric/multipeer # docker-compose -f docker-compose-peer.yaml up -d 2) 启动cli容器 # docker exec -it cli bash 3) 拷贝mychannel.block到peer中命令的xxxxxxxx替换为图中红框中的字符。 图:cli客户端 # exit # docker cp /opt/gopath/src/github.com/hyperledger/fabric/multipeer/mychannel.block xxxxxxxx:/opt/gopath/src/github.com/hyperledger/fabric/peer/ 4) Peer加入Channel # docker exec -it cli bash # peer channel join -b mychannel.block 4 安装与运行智能合约1) 安装智能合约 # peer chaincode install -n mycc -p github.com/hyperledger/fabric/multipeer/chaincode/go/example02/cmd/ -v 1.0 2) Peer上查询a,显示80 # peer chaincode query -C mychannel -n mycc -c '{"Args":["query","a"]}' 查询a成功结果如下图所示: 图:查询a成功结果 3) Peer上进行a向b转20交易 # ORDERER_CA=/opt/gopath/src/github.com/hyperledger/fabric/peer/crypto/ordererOrganizations/example.com/orderers/orderer.example.com/msp/tlscacerts/tlsca.example.com-cert.pem # peer chaincode invoke --tls --cafile $ORDERER_CA -C mychannel -n mycc -c '{"Args":["invoke","a","b","20"]}' 交易成功结果如下图所示: 图:交易成功结果 4) Peer上查询b,显示240 # peer chaincode query -C mychannel -n mycc -c '{"Args":["query","b"]}' 查询b成功结果如下图所示: 10.3.5 部署peer1.org2.example.com1 准备docker配置文件 配置docker-compose-peer.yaml文件,拷贝到multipeer目录下。docker-compose-peer.yaml: # Copyright IBM Corp. All Rights Reserved. # # SPDX-License-Identifier: Apache-2.0 # version: '2' services: peer1.org2.example.com: container_name: peer1.org2.example.com image: hyperledger/fabric-peer environment: - CORE_PEER_ID=peer1.org2.example.com - CORE_PEER_ADDRESS=peer1.org2.example.com:7051 - CORE_PEER_CHAINCODEADDRESS=peer1.org2.example.com:7052 - CORE_PEER_CHAINCODELISTENADDRESS=0.0.0.0:7052 - CORE_PEER_GOSSIP_EXTERNALENDPOINT=peer1.org2.example.com:7051 - CORE_PEER_LOCALMSPID=Org2MSP - CORE_VM_ENDPOINT=unix:///host/var/run/docker.sock # the following setting starts chaincode containers on the same # bridge network as the peers # https://docs.docker.com/compose/networking/ - CORE_VM_DOCKER_HOSTCONFIG_NETWORKMODE=multipeer_default #- CORE_LOGGING_LEVEL=ERROR - CORE_LOGGING_LEVEL=DEBUG - CORE_PEER_TLS_ENABLED=true - CORE_PEER_GOSSIP_USELEADERELECTION=true - CORE_PEER_GOSSIP_ORGLEADER=false - CORE_PEER_PROFILE_ENABLED=true - CORE_PEER_TLS_CERT_FILE=/etc/hyperledger/fabric/tls/server.crt - CORE_PEER_TLS_KEY_FILE=/etc/hyperledger/fabric/tls/server.key - CORE_PEER_TLS_ROOTCERT_FILE=/etc/hyperledger/fabric/tls/ca.crt working_dir: /opt/gopath/src/github.com/hyperledger/fabric/peer command: peer node start volumes: - /var/run/:/host/var/run/ - ./crypto-config/peerOrganizations/org2.example.com/peers/peer1.org2.example.com/msp:/etc/hyperledger/fabric/msp - ./crypto-config/peerOrganizations/org2.example.com/peers/peer1.org2.example.com/tls:/etc/hyperledger/fabric/tls ports: - 7051:7051 - 7052:7052 - 7053:7053 extra_hosts: - "orderer.example.com:192.168.235.100" cli: container_name: cli image: hyperledger/fabric-tools tty: true environment: - GOPATH=/opt/gopath - CORE_VM_ENDPOINT=unix:///host/var/run/docker.sock - CORE_LOGGING_LEVEL=DEBUG - CORE_PEER_ID=cli - CORE_PEER_ADDRESS=peer1.org2.example.com:7051 - CORE_PEER_LOCALMSPID=Org2MSP - CORE_PEER_TLS_ENABLED=true - CORE_PEER_TLS_CERT_FILE=/opt/gopath/src/github.com/hyperledger/fabric/peer/crypto/peerOrganizations/org2.example.com/peers/peer1.org2.example.com/tls/server.crt - CORE_PEER_TLS_KEY_FILE=/opt/gopath/src/github.com/hyperledger/fabric/peer/crypto/peerOrganizations/org2.example.com/peers/peer1.org2.example.com/tls/server.key - CORE_PEER_TLS_ROOTCERT_FILE=/opt/gopath/src/github.com/hyperledger/fabric/peer/crypto/peerOrganizations/org2.example.com/peers/peer1.org2.example.com/tls/ca.crt - CORE_PEER_MSPCONFIGPATH=/opt/gopath/src/github.com/hyperledger/fabric/peer/crypto/peerOrganizations/org2.example.com/users/Admin@org2.example.com/msp working_dir: /opt/gopath/src/github.com/hyperledger/fabric/peer volumes: - /var/run/:/host/var/run/ - ./chaincode/go/:/opt/gopath/src/github.com/hyperledger/fabric/multipeer/chaincode/go - ./crypto-config:/opt/gopath/src/github.com/hyperledger/fabric/peer/crypto/ - ./channel-artifacts:/opt/gopath/src/github.com/hyperledger/fabric/peer/channel-artifacts depends_on: - peer1.org2.example.com extra_hosts: - "orderer.example.com:192.168.235.100" - "peer0.org1.example.com:192.168.235.101" - "peer1.org1.example.com:192.168.235.102" - "peer0.org2.example.com:192.168.235.103" - "peer1.org2.example.com:192.168.235.104" 2 准备部署智能合约 拷贝examples/chaincode/go/example02目录下的文件到multipeer/chaincode/go/example02目录下。3 启动Fabric网络1) 启动peer # cd $GOPATH/src/github.com/hyperledger/fabric/multipeer # docker-compose -f docker-compose-peer.yaml up -d 2) 启动cli容器 # docker exec -it cli bash 3) 拷贝mychannel.block到peer中命令的xxxxxxxx替换为图中红框中的字符。 # exit # docker cp /opt/gopath/src/github.com/hyperledger/fabric/multipeer/mychannel.block xxxxxxxx:/opt/gopath/src/github.com/hyperledger/fabric/peer/ 4) Peer加入Channel # docker exec -it cli bash # peer channel join -b mychannel.block 4 安装与运行智能合约1) 安装智能合约 # peer chaincode install -n mycc -p github.com/hyperledger/fabric/multipeer/chaincode/go/example02/cmd/ -v 1.0 2) Peer上查询a,显示60 # peer chaincode query -C mychannel -n mycc -c '{"Args":["query","a"]}' 查询a成功结果如下图所示: 图:查询a成功结果 3) Peer上进行a向b转30交易 # ORDERER_CA=/opt/gopath/src/github.com/hyperledger/fabric/peer/crypto/ordererOrganizations/example.com/orderers/orderer.example.com/msp/tlscacerts/tlsca.example.com-cert.pem # peer chaincode invoke --tls --cafile $ORDERER_CA -C mychannel -n mycc -c '{"Args":["invoke","a","b","30"]}' 交易成功结果如下图所示: 图:交易成功结果 4) Peer上查询b,显示270 # peer chaincode query -C mychannel -n mycc -c '{"Args":["query","b"]}' 查询b成功结果如下图所示: