首页 文章 精选 留言 我的

精选列表

搜索[自部署],共10008篇文章
优秀的个人博客,低调大师

Zabbix部署

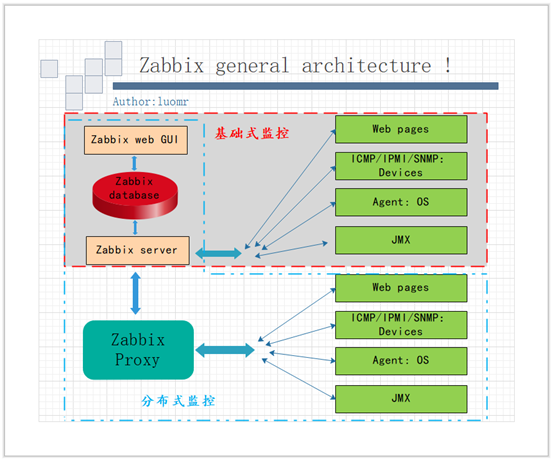
Zabbix框架 server端:zabbix-server zabbix-server-mysql zabbix-get web端:zabbix-web zabbix-web-mysql agent端:zabbix-sender zabbix-agent 前提: 配好本地yum源,以便安装时自动解决依赖 环境: server:192.168.10.11 agent:192.168.10.12 mysql:192.168.10.10 配置本地域名解析 # cat /etc/hosts 192.168.10.11 node1.kazihuo.com node1 192.168.10.12 node2.kazihuo.com node2 配置HOSTNAME [root@node1 ~]# cat /etc/sysconfig/network node1.kazihuo.com [root@node1 ~]# cat /etc/hostname node1.kazihuo.com [root@node2 ~]# cat /etc/sysconfig/network node2.kazihuo.com [root@node2 ~]# cat /etc/hostname node2.kazihuo.com 说明: 因虚拟机环境有限,故zabbix-server也作为一台zabbix-agent使用,当其需要监控起来时要按照agent端进行配置,及修改对应的zabbix_agent.conf文件! 服务端配置: # wget https://mirrors.aliyun.com/zabbix/zabbix/3.4/rhel/7/x86_64/zabbix-release-3.4-2.el7.noarch.rpm # yum -y install zabbix-release-3.2-1.el7.noarch.rpm # yum -y install zabbix zabbix-server zabbix-server-mysql zabbix-get zabbix-web zabbix-web-mysql zabbix-agent #安装完成后自动生成以下目录及文件 [root@node1 /etc/zabbix]# tree . ├── web │ └── maintenance.inc.php ├── zabbix_agentd.conf ├── zabbix_agentd.d │ └── userparameter_mysql.conf └── zabbix_server.conf 2 directories, 4 files [root@node1 /etc/httpd/conf.d]# ls zabbix.conf [root@node1 /usr/share/doc/zabbix-server-mysql-3.2.10]# ls AUTHORS ChangeLog COPYING create.sql.gz NEWS README [root@node1]# mysql -uroot -p<root_password> mysql> create database zabbix character set utf8 collate utf8_bin; mysql> grant all privileges on zabbix.* to zabbix@'%' identified by 'zabbix'; [root@node1]# zcat /usr/share/doc/zabbix-server-mysql-3.2.*/create.sql.gz | mysql -uzabbix -p zabbix [root@node1 ~]# cat /etc/zabbix/zabbix_server.conf|grep DB DBName=zabbix DBUser=zabbix DBHost=192.168.10.10 DBPassword=000000 [root@node1 ~]# cat /etc/php.ini [zabbix] php_value max_execution_time 300 php_value memory_limit 128M php_value post_max_size 16M php_value upload_max_filesize 2M php_value max_input_time 300 php_value always_populate_raw_post_data -1 # php_value date.timezone Europe/Riga date.timezone = Asia/Shanghai #此配置也可在zabbix_server.conf的配置文件中配置,默认以包含,根据需求修改时区即可 [root@node1 ~]# systemctl start httpd.service [root@node1 ~]# systemctl start zabbix-server 客户端配置: [root@node2 ~]# yum -y install zabbix-sender zabbix-agent [root@node2 ~]# cat /etc/zabbix/zabbix_agentd.conf PidFile=/var/run/zabbix/zabbix_agentd.pid LogFile=/var/log/zabbix/zabbix_agentd.log LogFileSize=0 Server=192.168.10.11 ListenPort=10050 ServerActive=192.168.10.11 Hostname=node2.kazihuo.com [root@node2 ~]# systemctl start zabbix-agent 页面初始化 # 浏览器输入192.168.10.11/zabbix ,进入欢迎页面 # 检查所需插件是否OK # 配置zabbix连接的数据库 # 细节设置 # 安装完成 # zabbix初始化页面设置后生成对应的配置文件:/etc/zabbix/web/zabbix.conf.php # 默认的登录名及密码:Admin/zabbix ------------------------------------------------------------- 作者: 罗穆瑞 出处: http://www.cnblogs.com/kazihuo/ 转载请保留此段声明,且在文章页面明显位置给出原文链接,谢谢! ------------------------------------------------------------------------------ 如果觉得这篇文章对你有小小的帮助的话,记得在右下角点个“推荐”哦,博主在此感谢! ------------------------------------------------------------------------------

优秀的个人博客,低调大师

docker部署

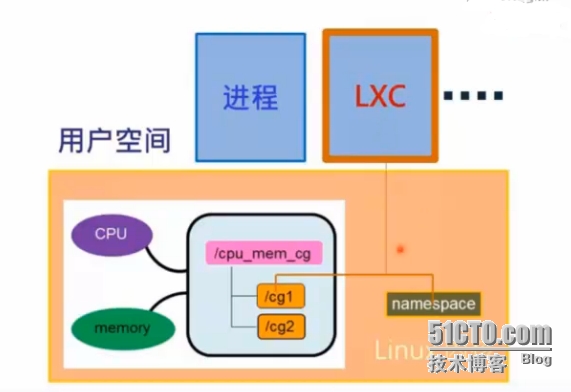
环境:ubuntu-14.04.4-server-amd64 1、更换阿里云源 备份源配置文件: $ sudo cp /etc/apt/sources.list /etc/apt/sources.list_backup $ sudo vim /etc/apt/sources.list 删除文件内容,更新为: deb http://mirrors.aliyun.com/ubuntu trusty main restricted deb-src http://mirrors.aliyun.com/ubuntu trusty main restricted ## Major bug fix updates produced after the final release of the ## distribution. deb http://mirrors.aliyun.com/ubuntu trusty-updates main restricted deb-src http://mirrors.aliyun.com/ubuntu trusty-updates main restricted ## N.B. software from this repository is ENTIRELY UNSUPPORTED by the Ubuntu ## team. Also, please note that software in universe WILL NOT receive any ## review or updates from the Ubuntu security team. deb http://mirrors.aliyun.com/ubuntu trusty universe deb-src http://mirrors.aliyun.com/ubuntu trusty universe deb http://mirrors.aliyun.com/ubuntu trusty-updates universe deb-src http://mirrors.aliyun.com/ubuntu trusty-updates universe ## N.B. software from this repository is ENTIRELY UNSUPPORTED by the Ubuntu ## team, and may not be under a free licence. Please satisfy yourself as to ## your rights to use the software. Also, please note that software in ## multiverse WILL NOT receive any review or updates from the Ubuntu ## security team. deb http://mirrors.aliyun.com/ubuntu trusty multiverse deb-src http://mirrors.aliyun.com/ubuntu trusty multiverse deb http://mirrors.aliyun.com/ubuntu trusty-updates multiverse deb-src http://mirrors.aliyun.com/ubuntu trusty-updates multiverse ## N.B. software from this repository may not have been tested as ## extensively as that contained in the main release, although it includes ## newer versions of some applications which may provide useful features. ## Also, please note that software in backports WILL NOT receive any review ## or updates from the Ubuntu security team. deb http://mirrors.aliyun.com/ubuntu trusty-backports main restricted universe multiverse deb-src http://mirrors.aliyun.com/ubuntu trusty-backports main restricted universe multiverse deb http://security.ubuntu.com/ubuntu trusty-security main restricted deb-src http://security.ubuntu.com/ubuntu trusty-security main restricted deb http://security.ubuntu.com/ubuntu trusty-security universe deb-src http://security.ubuntu.com/ubuntu trusty-security universe deb http://security.ubuntu.com/ubuntu trusty-security multiverse deb-src http://security.ubuntu.com/ubuntu trusty-security multiverse 执行如下命令刷新: $ sudo apt-get clean $ sudo apt-get update 2、检查内核版本: $ uname -r 4.2.0-27-generic 3、更新包信息确保APT工作于https模式并且安装好CA证书: $ sudo apt-get update $apt-get install apt-transport-https ca-certificates 4、增加一个新GPG密钥: $ sudo apt-key adv --keyserver hkp://p80.pool.sks-keyservers.net:80 --recv-keys 58118E89F3A912897C070ADBF76221572C52609D 5、新建docker.list文件并加入相关内容: $ sudo vim /etc/apt/sources.list.d/docker.list deb https://apt.dockerproject.org/repo ubuntu-trusty main 更新APT软件包索引: $ atp-get update 假如存在旧的repo则清除: $ apt-cache policy docker-engine 验证APT是否从正确的库中获取: $ apt-get purge lxc-docker 此命令下载一个测试图像并运行于一个容器中,它将打印一份欣喜然后自动退出。 6、安装linux-image-extra kernel package $ sudo apt-get update $ sudo apt-get install linux-image-extra-$(uname -r) 检查是否有安装apparmor $ whereis apparmor 没有的话 $ apt-get install -y apparmor $ sudo reboot 7、进入docker安装阶段 $ sudo apt-get update 安装docker $ sudo apt-get install docker-engine 启动docker服务 $ sudo service docker start 验证docker安装是否OK $ sudo docker run hello-world 8、创建一个docker组并加入当前用户 $ sudo usermod -aG docker ubuntu 验证 $ docker run hello-world 9、调整内存和交换分区 当运行docker出现如下报错: WARNING: Your kernel does not support cgroup swap limit. WARNING: Your kernel does not support swap limit capabilities. Limitation discarded. 需要做如下操作: $ sudo vim /etc/default/grub 设置GRUB_CMDLINE_LINUX="cgroup_enable=memory swapaccount=1" $ sudo update-grub $ sudo reboot 10、开启UFW转发 检查UFW是否安装并启动 $ sudo ufw status $ sudo vim /etc/default/ufw 设置DEFAULT_FORWARD_POLICY="ACCEPT" 重启UFW服务并使用新的配置 $ sudo ufw reload 放行2375端口 $ sudo ufw allow 2375/tcp 11、配置DNS服务器 当用台式机启动容器时报错: WARNING: Local (127.0.0.1) DNS resolver found in resolv.conf and containers can't use it. Using default external servers : [8.8.8.8 8.8.4.4] $ sudo vim /etc/default/docker 设置DOCKER_OPTS="--dns 8.8.8.8 --dns 8.8.4.4" 重启docker守护进程 $ sudo restart docker 关闭dnsmasq $ sudo vim /etc/NetworkManager/NetworkManager.conf 注释掉dns=dnsmasq 保存后重启NetworkManager和Docker $ sudo restart network-manager $ sudo restart docker 12、Ubuntu14.04.4版本安装docker后会将其服务设为开机自启动。 升级docker $ sudo apt-get upgrade docker-engine 卸载docker包 $ sudo apt-get purge docker-engine $ sudo apt-get autoremove --purge docker-engine 删除镜像、容器、卷 $ rm -rf /var/lib/docker 同时你需要手动删除用户生成的配置文件,此略!!!

优秀的个人博客,低调大师

智谱团队预告即将发布自研 IDE:Zcode

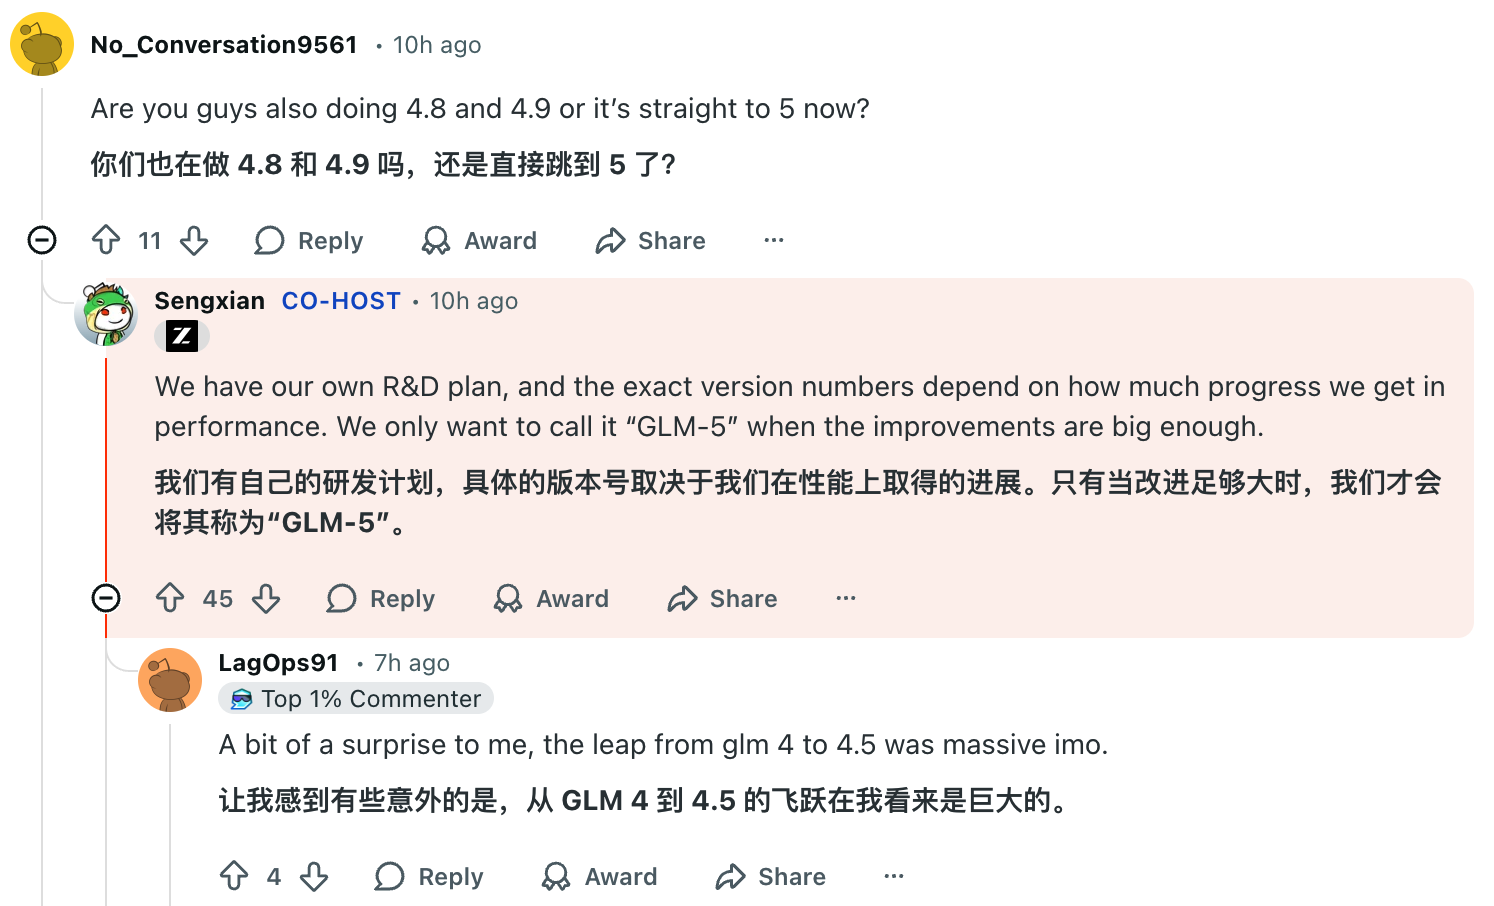
近日,智谱团队在 r/LocalLLaMA 举行了 AMA 问答,回答了关于模型迭代与开发生态等问题。在关于模型迭代的提问中,针对社区关于是否会有 GLM-4.8 或 GLM-4.9 版本的询问,智谱团队表示,版本号的命名取决于模型性能的进展。只有当模型性能有足够显著的改进时,才会将其命名为 GLM-5。 此外,团队成员透露,公司内部正在开发一款名为 Zcode 的 IDE,并表示该 IDE 即将发布。 智谱团队还在回答中指出,他们为 Claude Code 做了最多的优化工作。而 Claude Code 之外,Droid CLI 针对 GLM 模型进行了出色的提示词调优,因此在现有生态中表现较好。 来源:https://www.reddit.com/r/LocalLLaMA/comments/1ptxm3x/ama_with_zai_the_lab_behind_glm47/

资源下载

更多资源
Mario

Mario

马里奥是站在游戏界顶峰的超人气多面角色。马里奥靠吃蘑菇成长,特征是大鼻子、头戴帽子、身穿背带裤,还留着胡子。与他的双胞胎兄弟路易基一起,长年担任任天堂的招牌角色。

Nacos

Nacos

Nacos /nɑ:kəʊs/ 是 Dynamic Naming and Configuration Service 的首字母简称,一个易于构建 AI Agent 应用的动态服务发现、配置管理和AI智能体管理平台。Nacos 致力于帮助您发现、配置和管理微服务及AI智能体应用。Nacos 提供了一组简单易用的特性集,帮助您快速实现动态服务发现、服务配置、服务元数据、流量管理。Nacos 帮助您更敏捷和容易地构建、交付和管理微服务平台。

Rocky Linux

Rocky Linux

Rocky Linux(中文名:洛基)是由Gregory Kurtzer于2020年12月发起的企业级Linux发行版,作为CentOS稳定版停止维护后与RHEL(Red Hat Enterprise Linux)完全兼容的开源替代方案,由社区拥有并管理,支持x86_64、aarch64等架构。其通过重新编译RHEL源代码提供长期稳定性,采用模块化包装和SELinux安全架构,默认包含GNOME桌面环境及XFS文件系统,支持十年生命周期更新。

WebStorm

WebStorm

WebStorm 是jetbrains公司旗下一款JavaScript 开发工具。目前已经被广大中国JS开发者誉为“Web前端开发神器”、“最强大的HTML5编辑器”、“最智能的JavaScript IDE”等。与IntelliJ IDEA同源,继承了IntelliJ IDEA强大的JS部分的功能。


用户登录
用户注册