首页 文章 精选 留言 我的

精选列表

搜索[自动化研究],共10001篇文章
优秀的个人博客,低调大师

Android 中 OnTouch事件的研究

在Android中当一个ViewGroup 中包含一个组件,当点击这个组件同时监听其onTouch事件,那么到底是父组件响应还是子组件响应呢?傻蛋在网上找到了一篇相关的帖子,照着例子测试了一番,发现网上的那篇有点问题,先把测试结果总结如下. 在触发OnTouch事件的时候Android的GroupView会调用如下三个函数: public boolean dispatchTouchEvent(MotionEvent ev) 用于事件的分发 public boolean onInterceptTouchEvent(MotionEvent ev) 用于事件的拦截 public boolean onTouchEvent(MotionEvent ev) 处理事件 当然我们可以在容器类中如继承自LinearLayout的类中重写这三个方法。而继承View类的子类只能重写dispatch和onTouchEvent两个方法。当点击后这三个方法相继执行。 自己写了一个TextView子类MyTextView和LinearLayout子类MyLinearLayout,TextView包含在LinearLayout中。 当点击MyTextView时,程序会先进入到LinearLayout的dispatchTouchEvent中,这个类必须调用super.dispatchTouchEvent(ev); 否在后面的两个方法无法触发,所以傻蛋发现这个方法根本没有必要重写,因为框架是在super.dispatchTouchEvent(ev);中来调用onInterceptTouchEvent和onTouchEvent方法的,所以手动的设置dispatchTouchEvent的返回值是无效的,除非你不想让框架触发这两个方法。 当执行完dispathTouchEvent后会执行onInterception方法,如果返回为true,这表示MyLinearLayout把这个Touch事件拦截了,就会执行自己的Ontouch方法。如果为false则表示不拦截,此事件会分发到把事件传递给它的子控件MyTextView中。 当事件传递到MyTextView后,会执行dispatchTouchEvent,然后会执行onTouchEvent。挡在MyTextView中的onTouchEvent返回为false的话,当执行完onTouchEvent中的事件后,事件会再分发给MyLinearLaytout,执行LinearLayout的onTouchEvent。 主要代码如下 ?[Copy to clipboard] Downloadzuiniuwang.java /** *MyLinearLayout.java *com.androidtest.touch.test * *Function:TODO * *verdateauthor *────────────────────────────────── *2011-5-24Leon * *Copyright(c)2011,TNTAllRightsReserved. */ packagecom.androidtest.touch.test; importandroid.content.Context; importandroid.util.AttributeSet; importandroid.util.Log; importandroid.view.MotionEvent; importandroid.widget.LinearLayout; /** *ClassName:MyLinearLayoutFunction:TODOADDFUNCTIONReason:TODOADDREASON * *@authorLeon *@version *@sinceVer1.1 *@Date2011-5-24 */ publicclassMyLinearLayoutextendsLinearLayout{ privatefinalstaticStringTAG=MyLinearLayout.class.getSimpleName(); publicMyLinearLayout(Contextcontext,AttributeSetattrs){ super(context,attrs); //TODOAuto-generatedconstructorstub Log.v(TAG,TAG); } @Override publicbooleandispatchTouchEvent(MotionEventev){ intaction=ev.getAction(); switch(action){ caseMotionEvent.ACTION_DOWN: Log.d(TAG,"dispatchTouchEventaction:ACTION_DOWN"); break; caseMotionEvent.ACTION_MOVE: Log.d(TAG,"dispatchTouchEventaction:ACTION_MOVE"); break; caseMotionEvent.ACTION_UP: Log.d(TAG,"dispatchTouchEventaction:ACTION_UP"); break; caseMotionEvent.ACTION_CANCEL: Log.d(TAG,"dispatchTouchEventaction:ACTION_CANCEL"); break; } //Log.v(TAG,"dispatchTouchEvent"+super.dispatchTouchEvent(ev)); super.dispatchTouchEvent(ev); Log.v(TAG,"dispatchTouchEvent"+"test................."); returntrue; } @Override publicbooleanonInterceptTouchEvent(MotionEventev){ intaction=ev.getAction(); switch(action){ caseMotionEvent.ACTION_DOWN: Log.d(TAG,"onInterceptTouchEventaction:ACTION_DOWN"); break; caseMotionEvent.ACTION_MOVE: Log.d(TAG,"onInterceptTouchEventaction:ACTION_MOVE"); break; caseMotionEvent.ACTION_UP: Log.d(TAG,"onInterceptTouchEventaction:ACTION_UP"); break; caseMotionEvent.ACTION_CANCEL: Log.d(TAG,"onInterceptTouchEventaction:ACTION_CANCEL"); break; } returnfalse; } @Override publicbooleanonTouchEvent(MotionEventev){ intaction=ev.getAction(); switch(action){ caseMotionEvent.ACTION_DOWN: Log.d(TAG,"---onTouchEventaction:ACTION_DOWN"); break; caseMotionEvent.ACTION_MOVE: Log.d(TAG,"---onTouchEventaction:ACTION_MOVE"); break; caseMotionEvent.ACTION_UP: Log.d(TAG,"---onTouchEventaction:ACTION_UP"); break; caseMotionEvent.ACTION_CANCEL: Log.d(TAG,"---onTouchEventaction:ACTION_CANCEL"); break; } returntrue; } } /** *MyTestView.java *com.androidtest.touch.test * *Function:TODO * *verdateauthor *────────────────────────────────── *2011-5-24Leon * *Copyright(c)2011,TNTAllRightsReserved. */ packagecom.androidtest.touch.test; importandroid.content.Context; importandroid.util.AttributeSet; importandroid.util.Log; importandroid.view.MotionEvent; importandroid.widget.TextView; /** *ClassName:MyTestViewFunction:TODOADDFUNCTIONReason:TODOADDREASON * *@authorLeon *@version *@sinceVer1.1 *@Date2011-5-24 */ publicclassMyTestViewextendsTextView{ publicstaticfinalStringTAG=MyTestView.class.getSimpleName(); publicMyTestView(Contextcontext,AttributeSetattrs){ super(context,attrs); //TODOAuto-generatedconstructorstub Log.v(TAG,TAG); } @Override publicbooleandispatchTouchEvent(MotionEventev){ intaction=ev.getAction(); switch(action){ caseMotionEvent.ACTION_DOWN: Log.d(TAG,"dispatchTouchEventaction:ACTION_DOWN"); break; caseMotionEvent.ACTION_MOVE: Log.d(TAG,"dispatchTouchEventaction:ACTION_MOVE"); break; caseMotionEvent.ACTION_UP: Log.d(TAG,"dispatchTouchEventaction:ACTION_UP"); break; caseMotionEvent.ACTION_CANCEL: Log.d(TAG,"onTouchEventaction:ACTION_CANCEL"); break; } returnsuper.dispatchTouchEvent(ev); } @Override publicbooleanonTouchEvent(MotionEventev){ intaction=ev.getAction(); switch(action){ caseMotionEvent.ACTION_DOWN: Log.d(TAG,"---onTouchEventaction:ACTION_DOWN"); break; caseMotionEvent.ACTION_MOVE: Log.d(TAG,"---onTouchEventaction:ACTION_MOVE"); break; caseMotionEvent.ACTION_UP: Log.d(TAG,"---onTouchEventaction:ACTION_UP"); break; caseMotionEvent.ACTION_CANCEL: Log.d(TAG,"---onTouchEventaction:ACTION_CANCEL"); break; } returnfalse; } } /** *TestTouchEvent.java *com.androidtest.touch.test * *Function:TODO * *verdateauthor *────────────────────────────────── *2011-5-24Leon * *Copyright(c)2011,TNTAllRightsReserved. */ packagecom.androidtest.touch.test; importcom.androidtest.R; importandroid.app.Activity; importandroid.os.Bundle; /** *ClassName:TestTouchEvent *Function:TODOADDFUNCTION *Reason:TODOADDREASON * *@authorLeon *@version *@sinceVer1.1 *@Date2011-5-24 */ publicclassTestTouchEventextendsActivity{ @Override protectedvoidonCreate(BundlesavedInstanceState){ //TODOAuto-generatedmethodstub super.onCreate(savedInstanceState); this.setContentView(R.layout.test_touch_event); } } ?[Copy to clipboard] Downloadzuiniuwang.xml <?xmlversion="1.0"encoding="utf-8"?> <com.androidtest.touch.test.mylinearlayoutandroid:gravity="center"android:layout_height="fill_parent"android:layout_width="fill_parent"android:orientation="vertical"xmlns:android="http://schemas.android.com/apk/res/android"> <com.androidtest.touch.test.mytestviewandroid:background="#FFFFFF"android:id="@+id/tv"android:layout_height="200px"android:layout_width="200px"android:text="leon"android:textcolor="#0000FF"android:textsize="40sp"android:textstyle="bold"> </com.androidtest.touch.test.mytestview></com.androidtest.touch.test.mylinearlayout> 本文转自 最牛傻蛋 51CTO博客,原文链接:http://blog.51cto.com/zuiniuwang/718315,如需转载请自行联系原作者

优秀的个人博客,低调大师

Android着色器Tint研究

Tint 这个东西 主要用来减少apk体积的,比如说我现在有一个textview,他的背景图 有两种,一种是当获得焦点时显示的a图,另一种是 失去焦点时显示的b图。 相信大家开发的时候 这种需求做过很多次了,我们一般都会发现 这种a图和b图 除了颜色不一样,其他都是一样的,但是我们做的时候呢,通常是找ui要了两张图。 如果要适配分辨率的话 很有可能图片会更多,而且在切换的时候 因为是重新加载一次bitmap 效率也会下降很多。所以谷歌就给了一套解决方案 这个就是tint了。 他的目的就是当你发现有这种需求的时候,只需要 放一张图 在apk里即可,当你需要改变背景图的颜色的时候 就用Tint即可! 下面就来简单说一下,tint的使用 以及需要注意的地方。 首先 我们定义一个简单的布局文件: 我们发现这2个imageview 都是引用的同样一个drawable资源,并且 在studio这个xml编辑界面里面 我们很明显的 能看出来 这个图片的颜色是黑色的 对吧! 那 现在 我们想改一下,想把iv1 这个imageview的 背景色 改成绿色的! 我们想当然的 当然会这么写: iv1=(ImageView)this.findViewById(R.id.iv1); iv2=(ImageView)this.findViewById(R.id.iv2); finalDrawableoriginBitmapDrawable=getResources().getDrawable(R.drawable.ic_account_circle_black_18dp); iv1.setImageDrawable(tintDrawable(originBitmapDrawable,ColorStateList.valueOf(Color.GREEN))); 应该很好理解对吧,代码就不解释了。但是我们运行以后发现: 卧槽 怎么2个都变绿色了! 回顾一下 我们的代码 我们应该能明白 2个imageview 都是引用的同样的一个drawable,要知道 既然是一个drawable,那系统肯定为了优化资源 把这2个drawable 在内存里的拷贝弄成了一份! 还记得 我们以前讲的bitmap优化那篇么?http://www.cnblogs.com/punkisnotdead/p/4881771.html 和这个里面的inBitmap 属性有异曲同工之妙,如果还不理解 你看下面的图就理解了: 所以才会造成上面的情况。你修改了共同变量,所以2个图就都被影响了。 解决方法 其实也很简单: finalDrawableoriginBitmapDrawable=getResources().getDrawable(R.drawable. ic_account_circle_black_18dp).mutate(); 修改以后 我们再看: 你看这么做就一切正常了。 那有人就要问了,卧槽 你这么做 不是把谷歌给我们做好的图片内存优化方案给损坏了么,其实这种担心是多余的,这个http://android-developers.blogspot.hk/2009/05/drawable-mutations.html 这个地址会告诉你 其实我们做 只是把单独的受到影响的那部分 内存给单独拿出来了,其他没受到影响的还是共享的数据!换句话说 我们内存里 会另外存放的就是一些纯的标志位 之类的 类似于状态值这种东西。 大部分的内存还是公用的! 然后接着来,我们看下一个例子 关于editext的。 你看这个edittext 的颜色是这样的。那现在我们来修改一下 这个edittext的背景色 et1=(EditText)this.findViewById(R.id.et); finalDrawableoriginBitmapDrawable=et1.getBackground(); et1.setBackgroundDrawable(tintDrawable(originBitmapDrawable,ColorStateList.valueOf(Color.GREEN))); 背景色是修改成功了 但是这个光标的颜色 还没变 非常不协调, 有人又要说了 我们可以用: 这个xml 属性来修改呀,当然了这个方法确实是可以的 但是你想 你这么做的话 又要增加资源文件了,不是与我们的tint 背道而驰了么? 所以 这个地方 我们就要想办法 突破一下。其实很多人都能想到方法了,对于android 没有 提供给我们的api 比如那些private 函数, 我们通常都是通过反射的方法 去调用的。 这里也是一样,稍微想一下 我们就能明白, 这个地方 我们就先通过反射来获取到这个cursorDrawable 然后给他着色,然后在反射调用方法 给他set进去不就行了么? 首先我们都知道 editext 实际上就是textview,所以我们看一下textview 的源码 找找看 这个属性到底叫啥名字。经过一番努力发现 在这: //Althoughthesefieldsarespecifictoeditabletext,theyarenotaddedtoEditorbecause //theyaredefinedbytheTextView'sstyleandaretheme-dependent. intmCursorDrawableRes; 并且我们要看下editor的源码 这是和edittext息息相关的: /** *EditTextspecificdata,createdondemandwhenoneoftheEditorfieldsisused. *See{<ahref="http://www.jobbole.com/members/57845349">@link</a>#createEditorIfNeeded()}. */ privateEditormEditor; //注意这段代码属于editor finalDrawable[]mCursorDrawable=newDrawable[2]; 有了这段代码 我们就知道 剩下反射的代码怎么写了。 //参数就是要反射修改光标的edittext对象 privatevoidinvokeEditTextCallCursorDrawable(EditTextet){ try{ FieldfCursorDrawableRes=TextView.class.getDeclaredField("mCursorDrawableRes"); //看源码知道这个变量不是public的所以要设置下这个可访问属性 fCursorDrawableRes.setAccessible(true); //取得editext对象里的mCursorDrawableRes属性的值看源码知道这是一个int值 intmCursorDrawableRes=fCursorDrawableRes.getInt(et); //下面的代码是通过获取mEditor对象然后再通过拿到的mEditor对象来获取最终我们的mCursorDrawable这个光标的drawable FieldfEditor=TextView.class.getDeclaredField("mEditor"); fEditor.setAccessible(true); Objecteditor=fEditor.get(et); Class<?>clazz=editor.getClass(); FieldfCursorDrawable=clazz.getDeclaredField("mCursorDrawable"); fCursorDrawable.setAccessible(true); if(mCursorDrawableRes<=0){ return; } //到这里我们终于拿到了默认主题下edittext的光标的那个小图标的drawable DrawablecursorDrawable=et.getContext().getResources().getDrawable(mCursorDrawableRes); if(cursorDrawable==null){ return; } //既然都拿到了这个drawble那就修改他。 DrawabletintDrawable=tintDrawable(cursorDrawable,ColorStateList.valueOf(Color.GREEN)); //前面贴出的mCursorDrawable源码可以知道这是一个二维数组。所以我们要构造出一个全新的二维数组 Drawable[]drawables=newDrawable[]{tintDrawable,tintDrawable}; //然后再通过反射把这个二维数组的值放到editor里面即可! fCursorDrawable.set(editor,drawables); }catch(NoSuchFieldExceptione){ e.printStackTrace(); }catch(IllegalAccessExceptione){ e.printStackTrace(); } } 最后调用这个方法以后看一下效果: 很完美 对吧~~ 最后tintDrawable这个方法是用来向下兼容用的。你如果不考虑向下兼容的问题 用系统自带的方法 就可以了,这里就不做过多介绍了。 publicstaticDrawabletintDrawable(Drawabledrawable,ColorStateListcolors){ finalDrawablewrappedDrawable=DrawableCompat.wrap(drawable); DrawableCompat.setTintList(wrappedDrawable,colors); returnwrappedDrawable; } 当然你也可以用http://andraskindler.com/blog/2015/tinting_drawables/ 这个文章里的方法来做向下兼容:publicfinalclassTintedBitmapDrawableextendsBitmapDrawable{ privateinttint; privateintalpha; publicTintedBitmapDrawable(finalResourcesres,finalBitmapbitmap,finalinttint){ super(res,bitmap); this.tint=tint; this.alpha=Color.alpha(tint); } publicTintedBitmapDrawable(finalResourcesres,finalintresId,finalinttint){ super(res,BitmapFactory.decodeResource(res,resId)); this.tint=tint; this.alpha=Color.alpha(tint); } publicvoidsetTint(finalinttint){ this.tint=tint; this.alpha=Color.alpha(tint); } @Overridepublicvoiddraw(finalCanvascanvas){ finalPaintpaint=getPaint(); if(paint.getColorFilter()==null){ paint.setColorFilter(newLightingColorFilter(tint,0)); paint.setAlpha(alpha); } super.draw(canvas); } } 本文作者:佚名 来源:51CTO

优秀的个人博客,低调大师

Stitching模块中focalsFromHomography初步研究

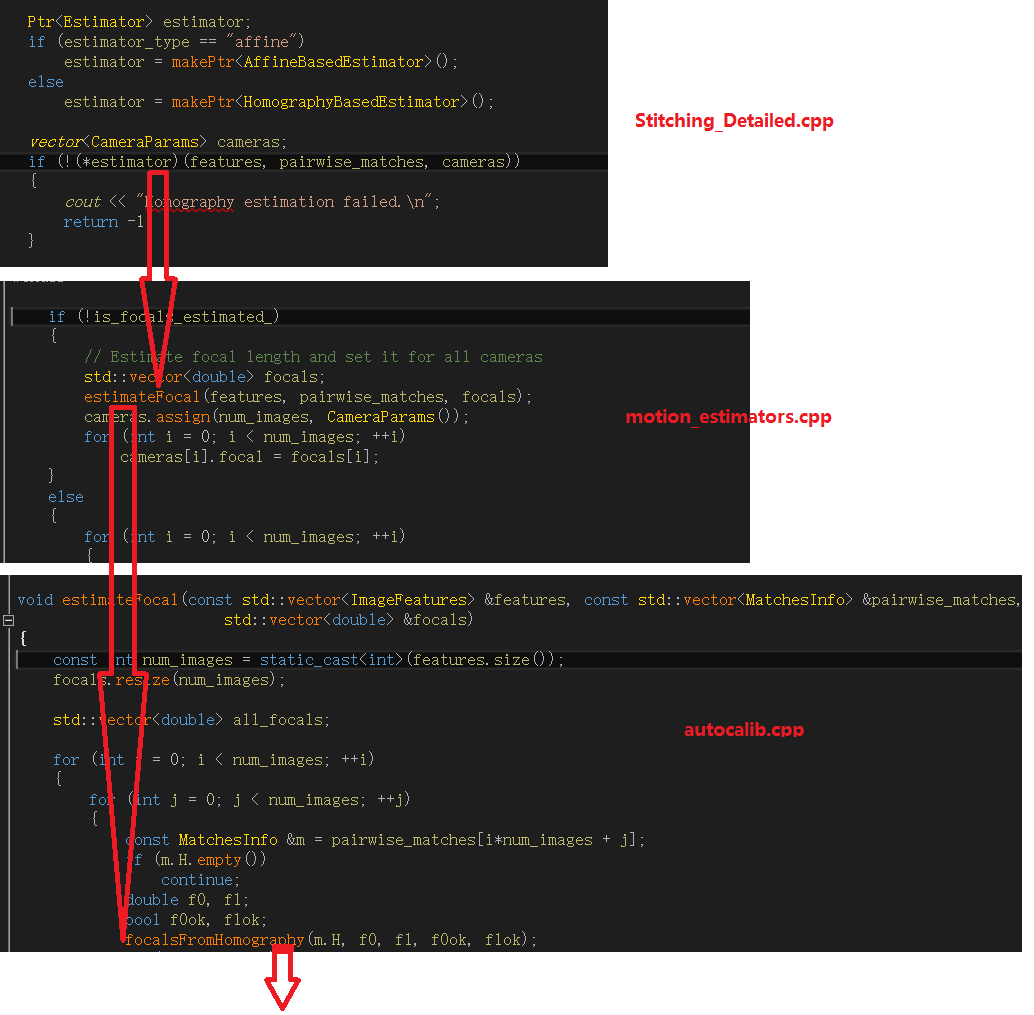
在Stitching模块中,通过“光束法平差”的时候,有一个步骤为“通过单应矩阵估算摄像头焦距”,调用的地方为: voidfocalsFromHomography( constMat &H, double &f0, double &f1, bool &f0_ok, bool &f1_ok) { CV_Assert(H.type() ==CV_64F &&H.size() ==Size( 3, 3)); const double *h =H.ptr < double >(); doubled1,d2; //Denominators doublev1,v2; //Focalsquaresvaluecandidates f1_ok = true; d1 =h[ 6] *h[ 7]; d2 =(h[ 7] -h[ 6]) *(h[ 7] +h[ 6]); v1 = -(h[ 0] *h[ 1] +h[ 3] *h[ 4]) /d1; v2 =(h[ 0] *h[ 0] +h[ 3] *h[ 3] -h[ 1] *h[ 1] -h[ 4] *h[ 4]) /d2; if(v1 <v2)std : :swap(v1,v2); if(v1 > 0 &&v2 > 0)f1 =std : :sqrt(std : :abs(d1) >std : :abs(d2) ?v1 :v2); else if(v1 > 0)f1 =std : :sqrt(v1); elsef1_ok = false; f0_ok = true; d1 =h[ 0] *h[ 3] +h[ 1] *h[ 4]; d2 =h[ 0] *h[ 0] +h[ 1] *h[ 1] -h[ 3] *h[ 3] -h[ 4] *h[ 4]; v1 = -h[ 2] *h[ 5] /d1; v2 =(h[ 5] *h[ 5] -h[ 2] *h[ 2]) /d2; if(v1 <v2)std : :swap(v1,v2); if(v1 > 0 &&v2 > 0)f0 =std : :sqrt(std : :abs(d1) >std : :abs(d2) ?v1 :v2); else if(v1 > 0)f0 =std : :sqrt(v1); elsef0_ok = false; } 本文具体分析 focalsFromHomography,函数的参数定义: Triestoestimatefocallengthsfromthegivenhomography undertheassumptionthatthecameraundergoesrotationsarounditscentreonly. Parameters H–Homography. f0–EstimatedfocallengthalongXaxis. f1–EstimatedfocallengthalongYaxis. f0_ok–True, iff0wasestimatedsuccessfully, falseotherwise. f1_ok–True, iff1wasestimatedsuccessfully, falseotherwise. 可以看到它通过输入的单应矩阵,最后得到了相机焦距的估计值,计算的过程也比较复杂。那这样做的理由是什么了?具体计算的时候又是如何实现的了? 论文也就是算法的依据为《Construction of Panoramic Image Mosaics with Global and Local Alignment》, Heung-Yeung Shum (hshum@microsoft.com) and Richard Szeliski (szeliski@microsoft.com) page 17.method "focals from homgraphy matrix" 我将具体的内容截出来: 原论文中40-44的推导,分为两个部分。一个部分是从“8参数”的变换,得出和x轴,y轴两个方向焦距的关系;一个部分是通过行列式的数学性质,计算出两个方向的焦距。这两个部分我目前都没有掌握足够的资料来进行证明,如果有能够证明的同学麻烦联系我一下。 然后来看算法实现。如果认为论文的表述是正确的,那么依据数学函数来对比c++的实现 代码中的h0-h8直接对应论文中的m0-m8,仅以f0来观察,那么f0^2可能有两种取值(这里x^2 是 x * x的一种简单表示方法,代表阶乘) f0^2 = - m2*m5/(m0*m3+m1*m4)或 f0^2 = m5^2 - m2^2 /(m0^2 + m1^2 - m3^2 - m4 ^2) 看代码 d1 =h[ 0] *h[ 3] +h[ 1] *h[ 4]; 那么 v1 = -h[ 2] *h[ 5] /d1 = -h[ 2] *h[ 5] /(h[ 0] *h[ 3] +h[ 1] *h[ 4]) d2 =h[ 0] *h[ 0] +h[ 1] *h[ 1] -h[ 3] *h[ 3] -h[ 4] *h[ 4]; 则 v2 =(h[ 5] *h[ 5] -h[ 2] *h[ 2]) /d2 =(h[ 5] *h[ 5] -h[ 2] *h[ 2]) /(h[ 0] *h[ 0] +h[ 1] *h[ 1] -h[ 3] *h[ 3] -h[ 4] *h[ 4]) 前后是一一对应的,计算f0^2的两个值是没有问题的。但是这里f0有两个计算结果,最后选择哪个了?这一点在论文中没有说,在代码中采用的方法是首先判断v1,v2的符号,如果都是负数,那么肯定是计算错误了,因为它们所代表的f0^2肯定是非负数;然后判断v1,v2的大小,取其中比较大的那个来进行计算。 但是在 if(v1 > 0 &&v2 > 0)f0 =std : :sqrt(std : :abs(d1) >std : :abs(d2) ?v1 :v2); 我认为这样写是没有用的,我也在尝试联系一下相关对这个问题比较熟悉的人共同讨论。f1的计算方法是同样的。到这里已经得到f0和f1,分别对应x轴和y轴,为了得到最后的结果,那么会取 f = sqrt(f0 * f1) 则得到这个当应矩阵的对于焦距的估计值。那么focalsFromHomography的一次运算也就结束了。 目前方向:图像拼接融合、图像识别 联系方式:jsxyhelu@foxmail.com

资源下载

更多资源
Mario

Mario

马里奥是站在游戏界顶峰的超人气多面角色。马里奥靠吃蘑菇成长,特征是大鼻子、头戴帽子、身穿背带裤,还留着胡子。与他的双胞胎兄弟路易基一起,长年担任任天堂的招牌角色。

腾讯云软件源

腾讯云软件源

为解决软件依赖安装时官方源访问速度慢的问题,腾讯云为一些软件搭建了缓存服务。您可以通过使用腾讯云软件源站来提升依赖包的安装速度。为了方便用户自由搭建服务架构,目前腾讯云软件源站支持公网访问和内网访问。

Rocky Linux

Rocky Linux

Rocky Linux(中文名:洛基)是由Gregory Kurtzer于2020年12月发起的企业级Linux发行版,作为CentOS稳定版停止维护后与RHEL(Red Hat Enterprise Linux)完全兼容的开源替代方案,由社区拥有并管理,支持x86_64、aarch64等架构。其通过重新编译RHEL源代码提供长期稳定性,采用模块化包装和SELinux安全架构,默认包含GNOME桌面环境及XFS文件系统,支持十年生命周期更新。

Sublime Text

Sublime Text

Sublime Text具有漂亮的用户界面和强大的功能,例如代码缩略图,Python的插件,代码段等。还可自定义键绑定,菜单和工具栏。Sublime Text 的主要功能包括:拼写检查,书签,完整的 Python API , Goto 功能,即时项目切换,多选择,多窗口等等。Sublime Text 是一个跨平台的编辑器,同时支持Windows、Linux、Mac OS X等操作系统。

用户登录
用户注册