首页 文章 精选 留言 我的

精选列表

搜索[快速入门],共10012篇文章
优秀的个人博客,低调大师

软件架构-zookeeper集群部署与快速入门

目前的公司是使用的阿里内部的dubbo,也就是EDAS,里面用了阿里自己的EDAS服务,如果是使用过dubbo的老铁,应该知道zookeeper,zookeeper在大数据和RPC通信上应用比较管饭。不管用过zookeeper没有,这次主要是介绍下zookeeper和集群的部署。这个必须要实际操作下,才能理解的深刻。源码:https://github.com/limingios/netFuture/ 【zookeeper】 (一)介绍zookeeper 历史 Zookeeper 最早起源于雅虎研究院的一个研究小组。在当时,研究人员发现,在雅虎内部很多大型系统基本都需要依赖一个类似的系统来进行分布式协调,但是这些系统往往都存在分布式单点问题。所以,雅虎的开发人员就试图开发一个通用的无单点问题的分布式协调框架,以便让开发人员将精力集中在处理业务逻辑上。关于“ZooKeeper”这个项目的名字,其实也有一段趣闻。在立项初期,考虑到之前内部很多项目都是使用动物的名字来命名的(例如著名的Pig项目),雅虎的工程师希望给这个项目也取一个动物的名字。时任研究院的首席科学家 RaghuRamakrishnan 开玩笑地说:“在这样下去,我们这儿就变成动物园了!”此话一出,大家纷纷表示就叫动物园管理员吧一一一因为各个以动物命名的分布式组件放在一起,雅虎的整个分布式系统看上去就像一个大型的动物园了,而 Zookeeper 正好要用来进行分布式环境的协调一一于是,Zookeeper 的名字也就由此诞生了。 为什么zookeeper会火 20世纪60年代,大型机被发明了出来,凭借自身的超强计算和I/O处理能力以及稳定、安全性,成为了世界的主流。但是大型机也有一些致命的问题,比如造价昂贵、操作复杂、单点问题等。特别是对大型机的人才的培养成本非常之高。随着这些问题的出现,不断影响了大型机的发展。而另一方面PC机性能的不断提升和网络普及,大家开始转向了使用小型机和普通的PC服务器来搭建分布式的计算机系统,来降级成本。而后分布式便不断火热起来。 zookeeper的官网 https://zookeeper.apache.org/ 下载地址: https://www-eu.apache.org/dist/zookeeper/ 源码地址:https://github.com/apache/zookeeper (二)集群部署 集群分为2类,一种是分布式集群,一种是伪分布式集群。分布式:每个应用在单独的独立主机上,端口都是一致的。伪分布式:多个应用在一台主机上,端口进行区别。伪分布式在实际生产环境很少。对于操作来说伪分布式集群更难一些。 mac 安装vgarant :https://idig8.com/2018/07/29/docker-zhongji-07/window安装vgaranthttps://idig8.com/2018/07/29/docker-zhongji-08/ 系统类型 IP地址 节点角色 CPU Memory Hostname Centos7 192.168.69.100 伪分布式 2 2G zookeeper-virtua Centos7 192.168.69.101 真分布式-领导者 2 2G zookeeper-Leader Centos7 192.168.69.102 真分布式-属下1 2 2G zookeeper-Follower1 Centos7 192.168.69.103 真分布式-属下2 2 2G zookeeper-Follower2 src的小技巧,这样就有颜色了,之前一直忽略了,看的眼疼,现在颜色分明了好多了。 (2.1)伪环境配置 还是用vagrant来,自从熟悉了vagrant 我基本没手动创建过虚拟机。 (2.1.1)基础设置 su #密码 vagrant cd ~ vi /etc/ssh/sshd_config sudo systemctl restart sshd vi /etc/resolv.conf 设置成8.8.8.8 service network restart ![](https://s4.51cto.com/images/blog/202103/29/f2f57966c3d058de71cd8876b72d400d.png?x-oss-process=image/watermark,size_16,text_QDUxQ1RP5Y2a5a6i,color_FFFFFF,t_100,g_se,x_10,y_10,shadow_90,type_ZmFuZ3poZW5naGVpdGk=) ![](https://s4.51cto.com/images/blog/202103/29/e4323f41090b580235fb1bb7799085b3.png?x-oss-process=image/watermark,size_16,text_QDUxQ1RP5Y2a5a6i,color_FFFFFF,t_100,g_se,x_10,y_10,shadow_90,type_ZmFuZ3poZW5naGVpdGk=) ![](https://s4.51cto.com/images/blog/202103/29/74a1b1cdbe2e9ed5a02c2548f32d43f7.png?x-oss-process=image/watermark,size_16,text_QDUxQ1RP5Y2a5a6i,color_FFFFFF,t_100,g_se,x_10,y_10,shadow_90,type_ZmFuZ3poZW5naGVpdGk=) >(2.1.2)jdk安装 >脚本在我的源码里面 ``` bash vi pro.sh sh pro.sh (2.1.3)zookeeper下载下载工具千万切记用最新的已经出到3.5.4,我还是用3.4.10 wget https://www-eu.apache.org/dist/zookeeper/zookeeper-3.4.10/zookeeper-3.4.10.tar.gz (2.1.4)解压zookeeper tar zxvf zookeeper-3.4.10.tar.gz (2.1.5)进入zk中的conf目录下拷贝3个文件 cd /root/zookeeper-3.4.10/conf cp zoo_sample.cfg zoo1.cfg cp zoo_sample.cfg zoo2.cfg cp zoo_sample.cfg zoo3.cfg (2.1.6) 编辑这3个文件zoo1.cfg,zoo2.cfg,zoo3.cfg (2.1.6.1)编辑zoo1.cfg vi zoo1.cfg dataDir=/apps/servers/data/d_1dataLogDir=/apps/servers/logs/logs_1clientPort=2181 # The number of milliseconds of each tick tickTime=2000 # The number of ticks that the initial # synchronization phase can take initLimit=10 # The number of ticks that can pass between # sending a request and getting an acknowledgement syncLimit=5 # the directory where the snapshot is stored. # do not use /tmp for storage, /tmp here is just # example sakes. dataDir=/apps/servers/data/d_1 dataLogDir=/apps/servers/logs/logs_1 # the port at which the clients will connect clientPort=2181 # the maximum number of client connections. # increase this if you need to handle more clients #maxClientCnxns=60 # # Be sure to read the maintenance section of the # administrator guide before turning on autopurge. # # http://zookeeper.apache.org/doc/current/zookeeperAdmin.html#sc_maintenance # # The number of snapshots to retain in dataDir #autopurge.snapRetainCount=3 # Purge task interval in hours # Set to "0" to disable auto purge feature #autopurge.purgeInterval=1 server.1=localhost:2187:2887 server.2=localhost:2188:2888 server.3=localhost:2189:2889 (2.1.6.2)编辑zoo2.cfg vi zoo2.cfg dataDir=/apps/servers/data/d_2dataLogDir=/apps/servers/logs/logs_2clientPort=2182 # The number of milliseconds of each tick tickTime=2000 # The number of ticks that the initial # synchronization phase can take initLimit=10 # The number of ticks that can pass between # sending a request and getting an acknowledgement syncLimit=5 # the directory where the snapshot is stored. # do not use /tmp for storage, /tmp here is just # example sakes. dataDir=/apps/servers/data/d_2 dataLogDir=/apps/servers/logs/logs_2 # the port at which the clients will connect clientPort=2182 # the maximum number of client connections. # increase this if you need to handle more clients #maxClientCnxns=60 # # Be sure to read the maintenance section of the # administrator guide before turning on autopurge. # # http://zookeeper.apache.org/doc/current/zookeeperAdmin.html#sc_maintenance # # The number of snapshots to retain in dataDir #autopurge.snapRetainCount=3 # Purge task interval in hours # Set to "0" to disable auto purge feature #autopurge.purgeInterval=1 server.1=localhost:2187:2887 server.2=localhost:2188:2888 server.3=localhost:2189:2889 (2.1.6.3)编辑zoo3.cfg vi zoo3.cfg dataDir=/apps/servers/data/d_3dataLogDir=/apps/servers/logs/logs_3clientPort=2183 # The number of milliseconds of each tick tickTime=2000 # The number of ticks that the initial # synchronization phase can take initLimit=10 # The number of ticks that can pass between # sending a request and getting an acknowledgement syncLimit=5 # the directory where the snapshot is stored. # do not use /tmp for storage, /tmp here is just # example sakes. dataDir=/apps/servers/data/d_3 dataLogDir=/apps/servers/logs/logs_3 # the port at which the clients will connect clientPort=2183 # the maximum number of client connections. # increase this if you need to handle more clients #maxClientCnxns=60 # # Be sure to read the maintenance section of the # administrator guide before turning on autopurge. # # http://zookeeper.apache.org/doc/current/zookeeperAdmin.html#sc_maintenance # # The number of snapshots to retain in dataDir #autopurge.snapRetainCount=3 # Purge task interval in hours # Set to "0" to disable auto purge feature #autopurge.purgeInterval=1 server.1=localhost:2187:2887 server.2=localhost:2188:2888 server.3=localhost:2189:2889 (2.1.7)创建data目录和日志目录 mkdir -p /apps/servers/data/d_1 mkdir -p /apps/servers/data/d_2 mkdir -p /apps/servers/data/d_3 mkdir -p /apps/servers/logs/logs_1mkdir -p /apps/servers/logs/logs_2mkdir -p /apps/servers/logs/logs_3 echo "1" >/apps/servers/data/d_1/myidecho "2" >/apps/servers/data/d_2/myidecho "3" >/apps/servers/data/d_3/myid ![](https://s4.51cto.com/images/blog/202103/29/bb0ddca4f266c6cd6403b404b78137a5.png?x-oss-process=image/watermark,size_16,text_QDUxQ1RP5Y2a5a6i,color_FFFFFF,t_100,g_se,x_10,y_10,shadow_90,type_ZmFuZ3poZW5naGVpdGk=) > (2.1.8)进入bin目录下输入命令 分别进行启动 ``` bash cd /root/zookeeper-3.4.10/bin sh zkServer.sh start ../conf/zoo1.cfg sh zkServer.sh start ../conf/zoo2.cfg sh zkServer.sh start ../conf/zoo3.cfg (2.1.9)进入每一个看看效果 source /etc/profile sh zkCli.sh -server localhost:2181 sh zkCli.sh -server localhost:2182 sh zkCli.sh -server localhost:2183 伪分布式其实就是这样就搭建完毕了。重点还是分布式的往下看。 (1.2)分布式环境配置 (1.2.1)基础设置(三台机器都需要设置) su #密码 vagrant cd ~ vi /etc/ssh/sshd_config sudo systemctl restart sshd vi /etc/resolv.conf 设置成8.8.8.8 service network restart ![](https://s4.51cto.com/images/blog/202103/29/8e99903cd4dd9b09d9678d7ca198e241.png?x-oss-process=image/watermark,size_16,text_QDUxQ1RP5Y2a5a6i,color_FFFFFF,t_100,g_se,x_10,y_10,shadow_90,type_ZmFuZ3poZW5naGVpdGk=) ![](https://s4.51cto.com/images/blog/202103/29/b568acb6d1a68f7dd273b9de8c28c4c9.png?x-oss-process=image/watermark,size_16,text_QDUxQ1RP5Y2a5a6i,color_FFFFFF,t_100,g_se,x_10,y_10,shadow_90,type_ZmFuZ3poZW5naGVpdGk=) ![](https://s4.51cto.com/images/blog/202103/29/40339ca5c1da8e223d163f09fdf662ef.png?x-oss-process=image/watermark,size_16,text_QDUxQ1RP5Y2a5a6i,color_FFFFFF,t_100,g_se,x_10,y_10,shadow_90,type_ZmFuZ3poZW5naGVpdGk=) ![](https://s4.51cto.com/images/blog/202103/29/34ff8d7ef04f5ecf8f9f22a2d3173118.png?x-oss-process=image/watermark,size_16,text_QDUxQ1RP5Y2a5a6i,color_FFFFFF,t_100,g_se,x_10,y_10,shadow_90,type_ZmFuZ3poZW5naGVpdGk=) ![](https://s4.51cto.com/images/blog/202103/29/57a2b18d8ed9be3e771109b235b19d27.png?x-oss-process=image/watermark,size_16,text_QDUxQ1RP5Y2a5a6i,color_FFFFFF,t_100,g_se,x_10,y_10,shadow_90,type_ZmFuZ3poZW5naGVpdGk=) ![](https://s4.51cto.com/images/blog/202103/29/de9aa1f23f76fe531c3f24a30817afac.png?x-oss-process=image/watermark,size_16,text_QDUxQ1RP5Y2a5a6i,color_FFFFFF,t_100,g_se,x_10,y_10,shadow_90,type_ZmFuZ3poZW5naGVpdGk=) ![](https://s4.51cto.com/images/blog/202103/29/1099f2467a970822e665d75894627044.png?x-oss-process=image/watermark,size_16,text_QDUxQ1RP5Y2a5a6i,color_FFFFFF,t_100,g_se,x_10,y_10,shadow_90,type_ZmFuZ3poZW5naGVpdGk=) ![](https://s4.51cto.com/images/blog/202103/29/7fb6e5410a73d2e47645441a788ece6d.png?x-oss-process=image/watermark,size_16,text_QDUxQ1RP5Y2a5a6i,color_FFFFFF,t_100,g_se,x_10,y_10,shadow_90,type_ZmFuZ3poZW5naGVpdGk=) ![](https://s4.51cto.com/images/blog/202103/29/9edf9d6539bf1d3ccc9a132089b57b05.png?x-oss-process=image/watermark,size_16,text_QDUxQ1RP5Y2a5a6i,color_FFFFFF,t_100,g_se,x_10,y_10,shadow_90,type_ZmFuZ3poZW5naGVpdGk=) >(1.2.2)jdk安装(三台机器都需要设置) >脚本在我的源码里面 ``` bash vi pro.sh sh pro.sh (1.2.3)zookeeper下载(三台机器都需要设置)下载工具千万切记用最新的已经出到3.5.4,我还是用3.4.10为什么是三个,因为Zookeeper喜欢奇数不喜欢偶数。 wget https://www-eu.apache.org/dist/zookeeper/zookeeper-3.4.10/zookeeper-3.4.10.tar.gz (1.2.4)解压zookeeper tar zxvf zookeeper-3.4.10.tar.gz (1.2.4)配置cfg文件(三台机器都需要设置) cd ~ cd zookeeper-3.4.10/ cd conf cp zoo_sample.cfg zoo.cfg (1.2.5)配置cfg文件,其实这3个机器的配置文件是一样的,我就不重复写cfg了,就直接截图了 vi zoo.cfg # The number of milliseconds of each tick tickTime=2000 # The number of ticks that the initial # synchronization phase can take initLimit=10 # The number of ticks that can pass between # sending a request and getting an acknowledgement syncLimit=5 # the directory where the snapshot is stored. # do not use /tmp for storage, /tmp here is just # example sakes. dataDir=/tmp/zookeeper dataLogDir=/tmp/zookeeper/logs # the port at which the clients will connect clientPort=2181 # the maximum number of client connections. # increase this if you need to handle more clients #maxClientCnxns=60 # # Be sure to read the maintenance section of the # administrator guide before turning on autopurge. # # http://zookeeper.apache.org/doc/current/zookeeperAdmin.html#sc_maintenance # # The number of snapshots to retain in dataDir #autopurge.snapRetainCount=3 # Purge task interval in hours # Set to "0" to disable auto purge feature #autopurge.purgeInterval=1 server.0=192.168.69.101:2888:3888 server.1=192.168.69.102:2888:3888 server.2=192.168.69.103:2888:3888 (1.2.6)配置myid需要配置到上边dataDir=/tmp/zookeeper的目录下。 cd / cd tmp mkdir zookeeper cd zookeeper (1.2.6.1)192.168.69.101配置myid echo '0'>myid cat myid (1.2.6.2)192.168.69.102配置myid echo '1'>myid cat myid (1.2.6.3)192.168.69.103配置myid echo '2'>myid cat myid 启动命令运行3台虚拟机下的zookeeper cd ~/zookeeper-3.4.10/bin sh zkServer.sh start ####(三) 概念梳理 (3.1)Zoo.cfg 配置 参数 意义 tickTime 2000 syncLimit Leader 和 follower 之间的通讯时长 最长不能超过initLimt*ticktime initLimt 接受客户端链接 zk 初始化的最长等待心跳时长initLimt*ticktime dataDir 数据目录 dataLogDir 日志文件 clientPort 客户端链接服务端端口号Server.A=B:C:D A:第几号服务器 B 服务 IP C 代表 Leader 和 follower 通讯端口 D 备用选 leader 端口 (3.2)角色 Leader: Leader 作为整个 ZooKeeper 集群的主节点,负责响应所有对 ZooKeeper 状态变更的请求。它会将每个状态更新请求进行排序和编号,以便保证整个集群内部消息处理的 FIFO,写操作都走 leader Follower : Follower 的逻辑就比较简单了。除了响应本服务器上的读请求外,follower 还要处理leader 的提议,并在 leader 提交该提议时在本地也进行提交。 另外需要注意的是,leader 和 follower 构成 ZooKeeper 集群的法定人数,也就是说,只有他们才参与新 leader的选举、响应 leader 的提议。 Observer : 如果 ZooKeeper 集群的读取负载很高,或者客户端多到跨机房,可以设置一些 observer服务器,以提高读取的吞吐量。Observer 和 Follower 比较相似,只有一些小区别:首先observer 不属于法定人数,即不参加选举也不响应提议;其次是 observer 不需要将事务持久化到磁盘,一旦 observer 被重启,需要从 leader 重新同步整个名字空间。 (3.3)Zookeeper 特性 Zookeeper 是一个由多个 server 组成的1.集群一个 leader,多个 follower2.每个 server 保存一份数据副本3.全局数据一致分布式读follower,写由 leader 实施更新请求转发,由 leader 实施更新请求顺序进行,来自同一个 client 的更新请求按其发送顺序依次执行数据更新原子性,4.一次数据更新要么成功,要么失败全局唯一数据视图,5.client 无论连接到哪个 server,数据视图都是一致的实时性,在一定事件范围内,client 能读到最新数据 PS:本次主要说说zookeeper的原理和集群部署,没有太详细的介绍里面的细节,下次说说zookeeper使用。


优秀的个人博客,低调大师

一文MyBatis-Plus快速入门

一、依赖及配置 使用下面的SQL创建数据库与添加数据 DROP TABLE IF EXISTS user; CREATE TABLE user ( id BIGINT(20) NOT NULL COMMENT '主键ID', name VARCHAR(30) NULL DEFAULT NULL COMMENT '姓名', age INT(11) NULL DEFAULT NULL COMMENT '年龄', email VARCHAR(50) NULL DEFAULT NULL COMMENT '邮箱', PRIMARY KEY (id) ); DELETE FROM user; INSERT INTO user (id, name, age, email) VALUES (1, 'Jone', 18, 'test1@baomidou.com'), (2, 'Jack', 20, 'test2@baomidou.com'), (3, 'Tom', 28, 'test3@baomidou.com'), (4, 'Sandy', 21, 'test4@baomidou.com'), (5, 'Billie', 24, 'test5@baomidou.com'); 1、在idea中创建一个SpringBoot项目,在pom.xml中添需要的依赖 添加MyBatis-Plus、mysql连接驱动、lombok的依赖 <dependency> <groupId>com.baomidou</groupId> <artifactId>mybatis-plus-boot-starter</artifactId> <version>3.0.5</version> </dependency> <dependency> <groupId>mysql</groupId> <artifactId>mysql-connector-java</artifactId> </dependency> <dependency> <groupId>org.projectlombok</groupId> <artifactId>lombok</artifactId> </dependency> </dependencies> 2、配置数据库连接 application.yml spring: datasource: driver-class-name: com.mysql.jdbc.Driver url: jdbc:mysql://localhost:3306/mp username: root password: 1234 3、在启动类中添加注解 ==@MapperScan== 扫描Mapper接口包 @SpringBootApplication @MapperScan("com.jikedaquan.study.mp.mapper") public class MpApplication { public static void main(String[] args) { SpringApplication.run(MpApplication.class, args); } } 4、编写实体类,使用lombok @Data public class User { private Long id; private String name; private Integer age; private String email; } 5、编写UserMapper接口 UserMapper接口继承MyBatis-Plus提供的BaseMapper接口即可拥有CRUD的方法,泛型中填写操作的实体类,这里为User public interface UserMapper extends BaseMapper<User> { } 6、测试查询数据 @RunWith(SpringRunner.class) @SpringBootTest public class MpApplicationTests { @Autowired private UserMapper userMapper; @Test public void contextLoads() { List<User> userList = userMapper.selectList(null);//条件为null时查询所有数据 userList.forEach(System.out::println); } } 二、日志配置 配置日志到控制台输出 mybatis-plus: configuration: log-impl: org.apache.ibatis.logging.stdout.StdOutImpl 三、主键生成策略 MyBatis-Plus提供了多种主键生成策略以应对不同的场景 策略 说明 AUTO 数据库ID自增 NONE 该类型为未设置主键类型 INPUT 用户输入ID,该类型可以通过自己注册自动填充插件进行填充 ID_WORKER 全局唯一ID (idWorker) UUID 全局唯一ID (UUID) ID_WORKER_STR 字符串全局唯一ID (idWorker 的字符串表示) 1、注解控制主键生成策略 在实体类的主键字段上添加注解(自增时注意配合数据库设置) @Data public class User { @TableId(type = IdType.AUTO) private Long id; private String name; private Integer age; private String email; } 2、全局配置控制主键生成策略 application.yml mybatis-plus: global-config: db-config: id-type: id_worker 四、自动填充 在常用业务中有些属性需要配置一些默认值,MyBatis-Plus提供了实现此功能的插件。在这里修改user表添加 create_time 字段和 update_time 字段,在User类中添加对应属性。 1、为需要自动填充的属性添加注解 ==@TableField== 提供了4种自动填充策略:DEFAULT,默认不处理。INSERT,插入填充字段。UPDATE,更新填充字段。INSERT_UPDATE,插入和更新填充字段。 @Data public class User { private Long id; private String name; private Integer age; private String email; @TableField(fill = FieldFill.INSERT) private Date createTime; @TableField(fill = FieldFill.INSERT_UPDATE) private Date updateTime; } 2、实现字段填充控制器,编写自定义填充规则 实现 MetaObjectHandler 接口,实现 insertFill 和 updateFill 方法,此处的 create_time 和update_time字段需要插入时填充值, 只有 update_time 字段在修改时需要填充,所以策略如下。 //需要将自定义填充控制器注册为组件 @Component public class MyMetaObjectHandler implements MetaObjectHandler { private static final Logger LOGGER= LoggerFactory.getLogger(MyMetaObjectHandler.class); //insert操作时要填充的字段 @Override public void insertFill(MetaObject metaObject) { LOGGER.info("start insert fill ..."); //根据属性名字设置要填充的值 this.setFieldValByName("createTime",new Date(),metaObject); this.setFieldValByName("updateTime",new Date(),metaObject); } //update操作时要填充的字段 @Override public void updateFill(MetaObject metaObject) { LOGGER.info("start insert fill ..."); this.setFieldValByName("updateTime",new Date(),metaObject); } } 3、插入数据测试 @RunWith(SpringRunner.class) @SpringBootTest public class CRUDTest { @Autowired private UserMapper userMapper; @Test public void testInsert(){ User user = new User(); user.setName("jack11"); user.setAge(20); user.setEmail("4849111@qq.com"); int result= userMapper.insert(user); System.out.println(result); System.out.println(user); } } 4、修改数据测试 @Test public void testUpdate(){ User user = new User(); user.setId(2L); user.setName("Jackie"); int result = userMapper.updateById(user); System.out.println(result); } 一次插入数据后,create_time和update_time都被填充了设置的时间,做update操作后只有update_time的进行了填充修改。 五、乐观锁插件 乐观锁的核心原理就是提交版本必须等于记录当前版本才能执行更新 意图: 当要更新一条记录的时候,希望这条记录没有被别人更新 乐观锁实现方式: 取出记录时,获取当前version 更新时,带上这个version 执行更新时, set version = newVersion where version = oldVersion 如果version不对,就更新失败 1、添加version到表和类中,为属性添加 ==@Version== 注解 @Version private Integer version; 2、配置插件 @Configuration public class MyBatisPlusConfig { @Bean public OptimisticLockerInterceptor optimisticLockerInterceptor(){ return new OptimisticLockerInterceptor(); } } 3、测试修改的两种情况 @Test public void testOptimisticLocker1() { User user = userMapper.selectById(1128212430124097543L); user.setName("修改后"); int result = userMapper.updateById(user); if (result == 1) { System.out.println("修改成功"); } else { System.out.println("修改失败"); } } @Test public void testOptimisticLocker2() { User user = userMapper.selectById(1128212430124097543L); user.setName("修改后"); user.setVersion(user.getVersion()-1);//测试旧版本 int result = userMapper.updateById(user); if (result == 1) { System.out.println("修改成功"); } else { System.out.println("修改失败"); } } 六、分页插件 启用分页插件和启用乐观锁插件都是通过注册一个Bean完成 1、启用分页插件 @Bean public PaginationInterceptor paginationInterceptor(){ return new PaginationInterceptor(); } 2、测试分页查询 @Test public void testSelectPage(){ //构建分页条件第二页每页显示3条 Page<User> page=new Page<>(2,3); //使用分页条件查询,不使用其他条件 userMapper.selectPage(page, null); //获取分页后查询出的记录 List<User> records = page.getRecords(); records.forEach(System.out::println); System.out.println("是否有下一页:"+page.hasNext()); System.out.println("是否有上一页:"+page.hasPrevious()); System.out.println("总记录数:"+page.getTotal()); } 七、逻辑删除插件 有些数据希望不再展示,但在物理上仍然存在,这时可以使用逻辑删除。逻辑删除就是在表中添加一个逻辑字段(在上面基础上添加字段 deleted),删除的实质操作就是操作这个逻辑值,在查询、修改时根据此逻辑值进行近一步操作。 1、启用逻辑删除插件 @Bean public LogicSqlInjector logicSqlInjector(){ return new LogicSqlInjector(); } 2、添加逻辑映射配置 mybatis-plus: global-config: db-config: logic-delete-value: 1 # 逻辑已删除值(默认为 1) logic-not-delete-value: 0 # 逻辑未删除值(默认为 0) 3、逻辑字段添加注解 ==@TableLogic== @TableLogic private Integer deleted; 4、测试逻辑删除 @Test public void testLogicDelete(){ int result=userMapper.deleteById(1L); System.out.println(result); } 观察日志可以看到生成的sql是update语句 八、性能分析插件 在开发和测试时观察sql执行耗时 1、配置SpringBoot为开发环境 spring: profiles: active: dev 2、启用插件 @Bean @Profile({"dev","test"}) //设置 dev test 环境开启 public PerformanceInterceptor performanceInterceptor(){ return new PerformanceInterceptor(); } 九、CRUD其他操作 @Test public void testSelectById() { User user = userMapper.selectById(1L); System.out.println(user); } @Test public void testSelectBatchIds() { List<User> users = userMapper.selectBatchIds(Arrays.asList(1, 2, 3)); users.forEach(System.out::println); } @Test public void testSelectByMap() { Map<String, Object> param = new HashMap<>(); param.put("name", "jack"); param.put("age", 18); List<User> users = userMapper.selectByMap(param); users.forEach(System.out::println); } @Test public void testSelectMap(){ Page<User> page = new Page<>(2, 3); IPage<Map<String, Object>> mapIPage = userMapper.selectMapsPage(page, null); } @Test public void testDeleteById(){ int result = userMapper.deleteById(1L); System.out.println(result); } @Test public void testDeleteBatchIds(){ int result = userMapper.deleteBatchIds(Arrays.asList(2L,3L,4L)); System.out.println(result); } 欢迎热爱技术的小伙伴和我交流

优秀的个人博客,低调大师

Kubernetes中,通过Service访问Pod快速入门

一.背景 理想状态下,我们可以认为Kubernetes Pod是健壮的。但是,理想与现实的差距往往是非常大的。很多情况下,Pod中的容器可能会因为发生故障而死掉。Deployment等Controller会通过动态创建和销毁Pod来保证应用整体的健壮性。众所周知,每个pod都拥有自己的IP地址,当新的Controller用新的Pod替代发生故障的Pod时,我们会发现,新的IP地址可能跟故障的Pod的IP地址可能不一致。此时,客户端如何访问这个服务呢?Kubernetes中的Service应运而生。 二.实践步骤 2.1 创建Deployment:httpd。 Kubernetes Service 逻辑上代表了一组具有某些label关联的Pod,Service拥有自己的IP,这个IP是不变的。无论后端的Pod如何变化,Service都不会发生改变。创建YAML如下: apiVersion: apps/v1beta1 kind: Deployment metadata: name: httpd spec: replicas: 4 template: metadata: labels: run: httpd spec: containers: - name: httpd image: httpd ports: - containerPort: 80 配置命令: [root@k8s-m ~]# kubectl apply -f Httpd-Deployment.yaml deployment.apps/httpd created 稍后片刻: [root@k8s-m ~]# kubectl get pod -o wide NAME READY STATUS RESTARTS AGE IP NODE NOMINATED NODE httpd-79c4f99955-dbbx7 1/1 Running 0 7m32s 10.244.2.35 k8s-n2 <none> httpd-79c4f99955-djv44 1/1 Running 0 7m32s 10.244.1.101 k8s-n1 <none> httpd-79c4f99955-npqxz 1/1 Running 0 7m32s 10.244.1.102 k8s-n1 <none> httpd-79c4f99955-vkjk6 1/1 Running 0 7m32s 10.244.2.36 k8s-n2 <none> [root@k8s-m ~]# curl 10.244.2.35 <html><body><h1>It works!</h1></body></html> [root@k8s-m ~]# curl 10.244.2.36 <html><body><h1>It works!</h1></body></html> [root@k8s-m ~]# curl 10.244.1.101 <html><body><h1>It works!</h1></body></html> [root@k8s-m ~]# curl 10.244.1.102 <html><body><h1>It works!</h1></body></html> 2.2 创建Service:httpd-svc。 创建YAML如下: apiVersion: v1 kind: Service metadata: name: httpd-svc spec: selector: run: httpd ports: - protocol: TCP port: 8080 targetPort: 80 配置完成并观察: [root@k8s-m ~]# kubectl apply -f Httpd-Service.yaml service/httpd-svc created [root@k8s-m ~]# kubectl get svc NAME TYPE CLUSTER-IP EXTERNAL-IP PORT(S) AGE httpd-svc ClusterIP 10.110.212.171 <none> 8080/TCP 14s kubernetes ClusterIP 10.96.0.1 <none> 443/TCP 11d [root@k8s-m ~]# curl 10.110.212.171:8080 <html><body><h1>It works!</h1></body></html> [root@k8s-m ~]# kubectl describe service httpd-svc Name: httpd-svc Namespace: default Labels: <none> Annotations: kubectl.kubernetes.io/last-applied-configuration: {"apiVersion":"v1","kind":"Service","metadata":{"annotations":{},"name":"httpd-svc","namespace":"default"},"spec":{"ports":[{"port":8080,"... Selector: run=httpd Type: ClusterIP IP: 10.110.212.171 Port: <unset> 8080/TCP TargetPort: 80/TCP Endpoints: 10.244.1.101:80,10.244.1.102:80,10.244.2.35:80 + 1 more... Session Affinity: None Events: <none> 从以上内容中的Endpoints可以看出服务httpd-svc下面包含我们指定的labels的Pod,cluster-ip通过iptables成功映射到Pod IP,成功。再通过iptables-save命令看一下相关的iptables规则。 [root@k8s-m ~]# iptables-save |grep "10.110.212.171" -A KUBE-SERVICES ! -s 10.244.0.0/16 -d 10.110.212.171/32 -p tcp -m comment --comment "default/httpd-svc: cluster IP" -m tcp --dport 8080 -j KUBE-MARK-MASQ -A KUBE-SERVICES -d 10.110.212.171/32 -p tcp -m comment --comment "default/httpd-svc: cluster IP" -m tcp --dport 8080 -j KUBE-SVC-RL3JAE4GN7VOGDGP [root@k8s-m ~]# iptables-save|grep -v 'default/httpd-svc'|grep 'KUBE-SVC-RL3JAE4GN7VOGDGP' :KUBE-SVC-RL3JAE4GN7VOGDGP - [0:0] -A KUBE-SVC-RL3JAE4GN7VOGDGP -m statistic --mode random --probability 0.25000000000 -j KUBE-SEP-R5YBMKYSG56R4KDU -A KUBE-SVC-RL3JAE4GN7VOGDGP -m statistic --mode random --probability 0.33332999982 -j KUBE-SEP-7G5ANBWSVVLRNZAH -A KUBE-SVC-RL3JAE4GN7VOGDGP -m statistic --mode random --probability 0.50000000000 -j KUBE-SEP-2PT6QZGNQHS4OL4I -A KUBE-SVC-RL3JAE4GN7VOGDGP -j KUBE-SEP-I4PXZ6UARQLLOV4E 我们可以进一步查看相关的转发规则,此处省略。iptables将访问Service的流量转发到后端Pod,使用类似于轮询的的负载均衡策略。 2.3 通过域名访问Service。 我们的平台是通过kubeadm部署的,版本是v1.12.1,这个版本自带的dns相关组件是coredns。 [root@k8s-m ~]# kubectl get deployment --namespace=kube-system NAME DESIRED CURRENT UP-TO-DATE AVAILABLE AGE coredns 2 2 2 2 17d 通过创建一个临时的隔离环境来验证一下DNS是否生效。 [root@k8s-m ~]# kubectl run -it --rm busybox --image=busybox /bin/sh kubectl run --generator=deployment/apps.v1beta1 is DEPRECATED and will be removed in a future version. Use kubectl create instead. If you don't see a command prompt, try pressing enter. / # wget httpd-svc.default:8080 Connecting to httpd-svc.default:8080 (10.110.212.171:8080) index.html 100% |*******************************************************************************************************************************| 45 0:00:00 ETA / # cat index.html <html><body><h1>It works!</h1></body></html> 顺便提一下,在未来版本中,kubectl run可能不再被支持,推荐使用kubectl create替代。此处偷了个懒,后续不建议如此操作。 在以上例子中,临时的隔离环境的namespace为default,与我们新建的httpd-svc都在同一namespace内,httpd-svc.default的default可以省略。如果跨namespace访问的话,那么namespace是不能省略的。 2.4 外网访问Service。 通常情况下,我们可以通过四种方式来访问Kubeenetes的Service,分别是ClusterIP,NodePort,Loadbalance,ExternalName。在此之前的实验都是基于ClusterIP的,集群内部的Node和Pod均可通过Cluster IP来访问Service。NodePort是通过集群节点的静态端口对外提供服务。接下来我们将以NodePort为例来进行实际演示。修改之后的Service的YAML如下: apiVersion: v1 kind: Service metadata: name: httpd-svc spec: type: NodePort selector: run: httpd ports: - protocol: TCP nodePort: 31688 port: 8080 targetPort: 80 配置后观察: [root@k8s-m ~]# kubectl apply -f Httpd-Service.yaml service/httpd-svc configured [root@k8s-m ~]# kubectl get svc NAME TYPE CLUSTER-IP EXTERNAL-IP PORT(S) AGE httpd-svc NodePort 10.110.212.171 <none> 8080:31688/TCP 117m kubernetes ClusterIP 10.96.0.1 <none> 443/TCP 12d Service httpd-svc的端口被映射到了主机的31688端口。YAML文件如果不指定nodePort的话,Kubernetes会在30000-32767范围内为Service分配一个端口。此刻我们就可以通过浏览器来访问我们的服务了。在与node网络互通的环境中,通过任意一个Node的IP:31688即可访问刚刚部署好的Service。 三.总结 这些天一直在看kubernetes相关的书籍和文档,也一直在测试环境中深度体验kubernetes带来的便捷,感触良多,综合自己的实践写下了这篇文章,以便后期温习。距离生产环境上线的时间越来越近,希望在生产环境上线之前吃透kubernetes。 学习任何新东西都必须静下心来,光看还不够,还要结合适量的实际操作。操作完成之后要反复思考,总结,沉淀,这样才能成长。 Kubernetes确实是一个比较复杂的系统,概念很多,也比较复杂,在操作之前需要把基本概念理解清楚。 四.参考资料 Kubernetes官方文档

优秀的个人博客,低调大师

轻量快速的CI工具Drone快速入门

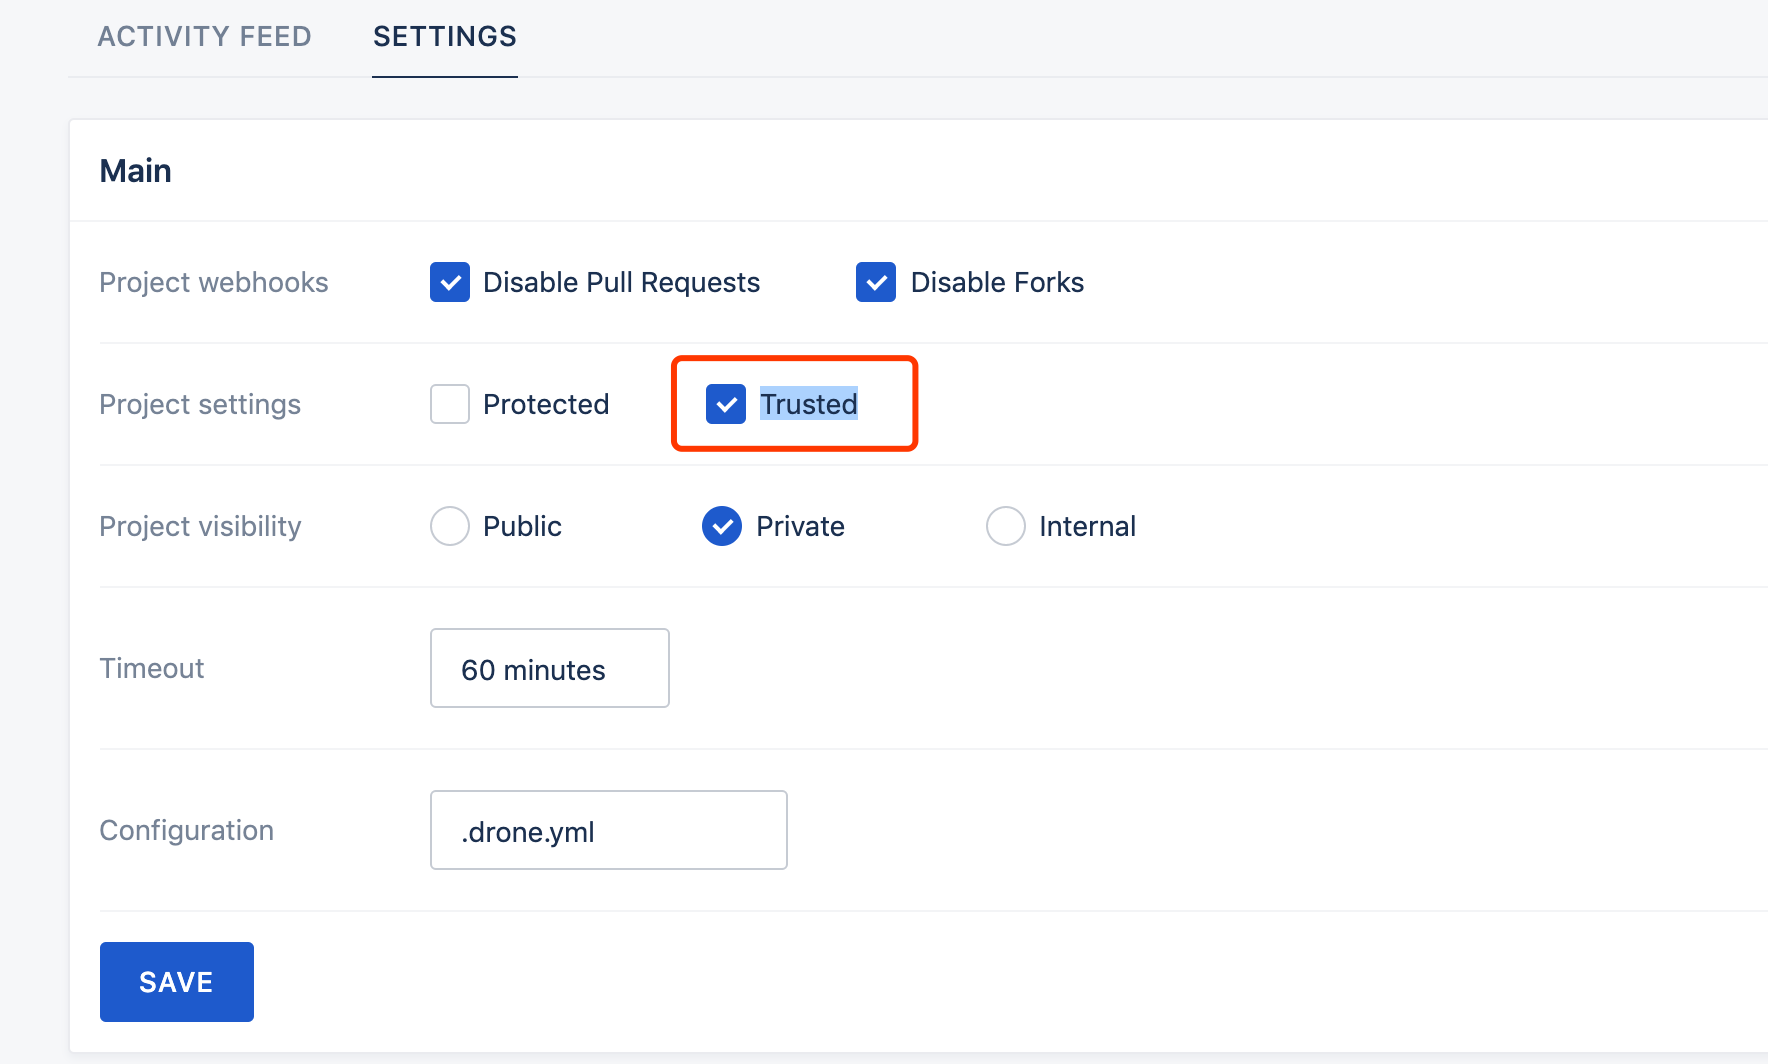
前言 公司之前一直在使用 Jenkins 作为 CI/CD 工具, Jenkins 非常强大,它完成了几乎所有 CI/CD 的工作,并且应用于整个团队有好长一段时间了。但是随着公司推荐数字化、智慧化,以及服务容器化的推进, Jenkins 的一些弊端也凸显了出来: 重量级: Jenkins 功能十分齐全,几乎可以做所有的事情。但是这也是他的一个弊端,过于重量级,有时候往往一个小的修改需要改动许多地方,升级\下载插件后需要进行重启等。 升级不易: 在一些安全 Jenkins 相关的安全漏洞被公开后,我们会对 Jenkins 进行升级,但这也不是一件容易的事。之前就出现过升级\重启后,所有 job 丢失,虽然我们所有项目配置都是以 Jenkinsfile 的形式统一存储,但是每个 job 都需要重新重新创建,包括每个 job 的权限....._(´ཀ`」 ∠)_ 权限控制复杂: 这其实也是 Jenkins 的一大优势,可以精确控制每个用户的权限,但是需要花费更多时间去配置,时间长了也会出现权限混乱的问题。 UI 界面: 这个其实是吐槽最多的部分,虽然有诸如:Blue Ocean 这样的插件来展示 pipeline ,但是还是没有从根本改变它简陋的 UI 界面。 那么为什么选择使用 Drone 呢? 其实在 GitHub 上提交 PR 后,大部分开源项目都会使用 travis-ci 对提交的代码进行 CI 及检查,而如果是 Kubernetes 相关的项目,则会使用 prow 进行 CI。但是 travis-ci 只能用于 GitHub ,在寻找类似项目的时候, Drone 进入了我的视野。 大道至简。和 Jenkins 相比, Drone 就轻量的多了,从应用本身的安装部署到流水线的构建都简洁的多。由于是和源码管理系统相集成,所以 Drone 天生就省去了各种账户\权限的配置,直接与 gitlab 、 github 、 Bitbucket 这样的源码管理系统操作源代码的权限一致。正如它官网上写的那样: Any Source Code Manager Drone integrates seamlessly with multiple source code management systems, including GitHub, GitHubEnterprise, Bitbucket, and GitLab. Any Platform Drone natively supports multiple operating systems and architectures, including Linux x64, ARM, ARM64 and Windows x64. Any Language Drone works with any language, database or service that runs inside a Docker container. Choose from thousands of public Docker images or provide your own. Drone 天生支持任何源码管理工具、任何平台和任何语言。 而写这篇文章的目的,并不是要吹捧这个工具有多么的好用,而是要总结在搭建 drone 和使用时候需要的各种坑,帮助读者绕过这些坑。 声明 鉴于在使用 Drone CI 中,遇到的各种坑都和 Drone 的版本有关,这里首先声明我使用的 Drone 版本为1.1,使用0.8版本的同学请绕道。 搭建 Drone 这里要说的就是在使用 drone 中遇到的第一个坑,在最初正准备搭建 drone 的时候 Google 了很多相关的 blog ,大部分 blog (包括某些 medium.com 上面近期的英文 blog) 推荐的安装方式都是使用 docker-compose,而无一例外的都失败了...走投无路之下,我回到了官网的文档,发现1.0之后许多参数都发生了变化,并且官方推荐使用 docker 的方式运行 Drone。 所以在使用任何开源软件之前都要去阅读它的文档,不要跟着一篇 blog 就开始了(包括我的),这样会少踩很多坑!!! 这里以 gitlab 为例,展示网上版本启动参数和实际参数的不同: 作用 各种blog 官网文档 设置 Drone 的管理员 DRONE_ADMIN=admin DRONE_USER_CREATE=username:admin,admin:true 设置GitLab的域名 DRONE_GITLAB_URL DRONE_SERVER_HOST GitLab的Application中的key DRONE_GITLAB_CLIENT DRONE_GITLAB_CLIENT_ID GitLab的Application中的secret DRONE_GITLAB_SECRET DRONE_GITLAB_CLIENT_SECRET Drone 域名 DRONE_HOST DRONE_GITLAB_SERVER 上面只是列举了部分官方文档和网上流产版本的不同,所以在使用之前一定要仔细阅读官方文档。下附运行 drone 的命令: docker run \ --volume=/var/run/docker.sock:/var/run/docker.sock \ --volume=/var/lib/drone:/data \ --env=DRONE_GIT_ALWAYS_AUTH=false \ --env=DRONE_GITLAB_SERVER={your-gitlab-url} \ # gitlab 的 URL --env=DRONE_GITLAB_CLIENT_ID={your-gitlab-applications-id} \ #GitLab的Application中的id --env=DRONE_GITLAB_CLIENT_SECRET={your-gitlab-applicati-secret} \ #GitLab的Application中的secret --env=DRONE_SERVER_HOST={your-drone-url} \ # drone 的URl --env=DRONE_SERVER_PROTO=http \ --env=DRONE_TLS_AUTOCERT=false \ --env=DRONE_USER_CREATE=username:{your-admin-username},admin:true \ # Drone的管理员 --publish=8000:80 \ --publish=443:443 \ --restart=always \ --detach=true \ --name=drone \ drone/drone:1.1 关于 gitlab Application 的配置和 Drone 其他参数含义请参考官方文档,这里只展示单节点办的运行方式。 核心文件 .drone.yml 要使用 Drone 只需在项目根创建一个 .drone.yml 文件即可,这个是 Drone 构建脚本的配置文件,它随项目一块进行版本管理,开发者不需要额外再去维护一个配置脚本。其实现代 CI 程序都是这么做了,这个主要是相对于 Jekins 来说的。虽然 Jekins 也有插件支持,但毕竟还是需要配置。 值得注意的事这个文件时 .drone.yml,由于 Kubernetes 使用的多了,第一次创建了一个 .drone.yaml 文件,导致怎么都获取不到配置..._(´ཀ`」 ∠)_... YAML 工程师石锤了... 这里放一个 Java 的 .drone.yml ,这个项目是 fork 别人的项目用作演示,记得要修改 deployment.yaml 中的镜像仓库地址修改为自己的私有仓库。 示例项目源码:https://github.com/sunny0826/pipeline-example-maven kind: pipeline name: pipeline-example-maven steps: - name: Maven编译 image: maven:3-jdk-7 volumes: - name: cache path: /root/.m2 commands: - mvn clean install - name: 构建镜像 image: plugins/docker volumes: - name: docker path: /var/run/docker.sock settings: username: from_secret: docker_user password: from_secret: docker_pass repo: {your-repo} registry: {your-registry} tags: ${DRONE_BUILD_NUMBER} - name: Kubernetes 部署 image: guoxudongdocker/kubectl:v1.14.1 volumes: - name: kube path: /root/.kube commands: - sed -i "s/#Tag/${DRONE_BUILD_NUMBER}/g" deployment.yaml - kubectl apply -f deployment.yaml - name: 钉钉通知 image: guoxudongdocker/drone-dingtalk settings: token: from_secret: dingding type: markdown message_color: true message_pic: true sha_link: true when: status: [failure, success] volumes: - name: cache host: path: /tmp/cache/.m2 - name: kube host: path: /tmp/cache/.kube/.test_kube - name: docker host: path: /var/run/docker.sock trigger: branch: - master 值得注意的事:上面的这个 .drone.yml 文件将本地的.m2文件、kubeconfig文件、docker.sock 文件挂载到 pipeline 中以实现 maven 打包缓存,k8s 部署、docker 缓存的作用,以提高 CI 速度。而是用挂载需要管理员在项目 settings 中勾选 Trusted ,这个操作只能管理员进行,普通用户是看不到这个选项的。而管理员就是在docker运行时候 --env=DRONE_USER_CREATE=username:{your-admin-username},admin:true 设置的。 而上传镜像和钉钉同时需要在 settings 设置中添加 secret docker_user:docker 仓库用户名 docker_pass:docker 仓库密码 dingding: 钉钉机器人 token 注意这里的钉钉 token 是 webhook 中 https://oapi.dingtalk.com/robot/send?access_token= 后这部分 构建结果 添加 .drone.yml 文件后,向 master 分支提交代码即可出发 CI 构建 CI 结束后,会在钉钉机器人所在群收到通知 插件支持 可以看到,每一步的镜像都是一个镜像,上面 pipeline 中的 Kubernetes 及钉钉通知插件就是我开发的,具体开发方法可以参考官方文档,而官方也提供了许多官方插件。 构建后部署:Kubernetes、helm、scp 构建后通知:钉钉 、Email、Slack、微信 后记 Drone 整体用起来还是很方便的,搭建、上手速度都很快,但是官方文档给的不够详实,而网上充斥着各种各样0.8版本的的实例,但是其实官网早就发布了1.0版本,而官方并没有 example 这样的示例项目,这样就又把本来降下来的学习曲线拉高了。许多坑都需要自己去趟,我在测试 drone 的时候,就构构建了上百次,不停的修改 .drone.yml , commit 信息看起来是很恐怖的。后续抽空会向官方贡献 example 这样的 PR。 作者简介: 郭旭东,2018年4月加入凯京科技。曾任高级研发和运维开发工程师,现任凯京科技研发中心架构&运维部运维负责人,阿里云MVP,负责公司运维团队建设。致力于推行devops理念及相关技术,提升开发效率,提高交付质量与速度,专注于云平台的容器化实践,探索更高效的运维系统架构。

资源下载

更多资源
Mario

Mario

马里奥是站在游戏界顶峰的超人气多面角色。马里奥靠吃蘑菇成长,特征是大鼻子、头戴帽子、身穿背带裤,还留着胡子。与他的双胞胎兄弟路易基一起,长年担任任天堂的招牌角色。

Spring

Spring

Spring框架(Spring Framework)是由Rod Johnson于2002年提出的开源Java企业级应用框架,旨在通过使用JavaBean替代传统EJB实现方式降低企业级编程开发的复杂性。该框架基于简单性、可测试性和松耦合性设计理念,提供核心容器、应用上下文、数据访问集成等模块,支持整合Hibernate、Struts等第三方框架,其适用范围不仅限于服务器端开发,绝大多数Java应用均可从中受益。

Rocky Linux

Rocky Linux

Rocky Linux(中文名:洛基)是由Gregory Kurtzer于2020年12月发起的企业级Linux发行版,作为CentOS稳定版停止维护后与RHEL(Red Hat Enterprise Linux)完全兼容的开源替代方案,由社区拥有并管理,支持x86_64、aarch64等架构。其通过重新编译RHEL源代码提供长期稳定性,采用模块化包装和SELinux安全架构,默认包含GNOME桌面环境及XFS文件系统,支持十年生命周期更新。

WebStorm

WebStorm

WebStorm 是jetbrains公司旗下一款JavaScript 开发工具。目前已经被广大中国JS开发者誉为“Web前端开发神器”、“最强大的HTML5编辑器”、“最智能的JavaScript IDE”等。与IntelliJ IDEA同源,继承了IntelliJ IDEA强大的JS部分的功能。

用户登录
用户注册