首页 文章 精选 留言 我的

精选列表

搜索[API],共10000篇文章
优秀的个人博客,低调大师

ArcGIS API for JavaScript 标注错位问题解决思路

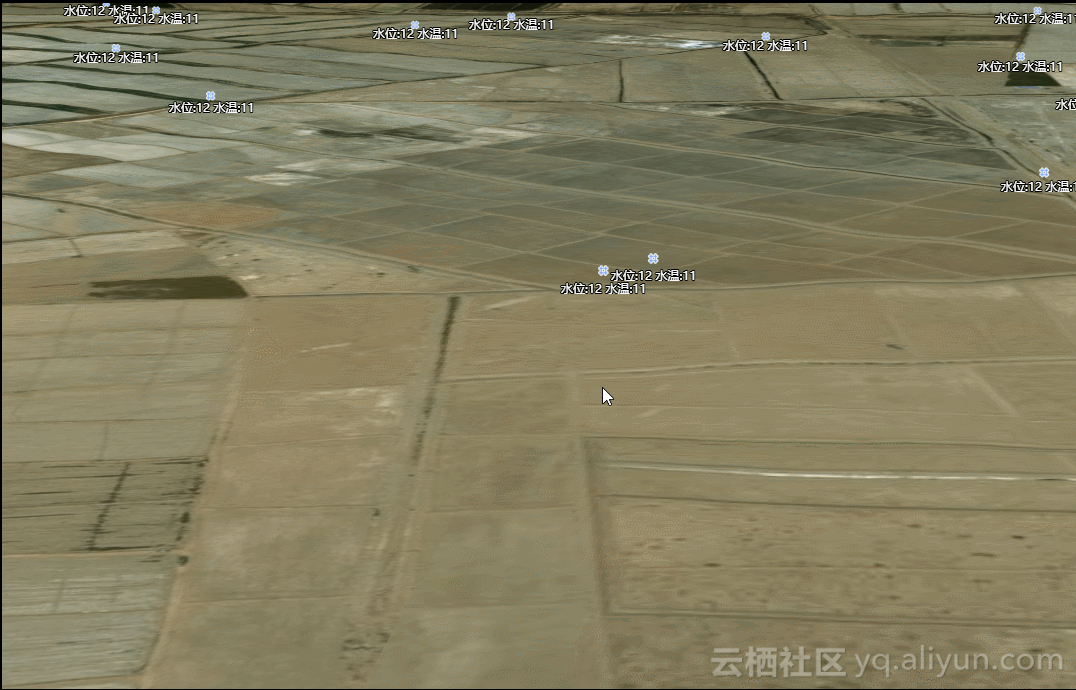
项目需求:完成对点的符号化显示,并将点的某些信息显示在点符号的旁边。 设计 调研开始,展示数据前端一般用GraphicsLayer,再结合Graphic,PictureMarkerSymbol与TextSymbol就可以完成此工作。直接上代码 jidianjing_graphicsLayer: null, jidianjing_text_featureLayer: null, ... this.graphicsLayer = new GraphicsLayer({ id: "graphicsLayer", elevationInfo: { mode: "relative-to-ground", offset: 3 } }); ... view.map.add(this.graphicsLayer); ... let jidianjing_graphics = []; // 处理Graphics $.each(result, function (i, item) { item.widgetModule = 'jidianjingWidgetModule_click'; var stcd = item.STCD; var stnm = item.STNM; let tempPoint = new Point({ type: "point", x: item.LGTD, y: item.LTTD }); let normalsymbol = { type: "picture-marker", url: 'img/menu/081.png', width: "18px", height: "18px" }; if (!StringUtil.isNull(item.WARN_NAME)) { normalsymbol = { type: "picture-marker", url: 'img/menu/083.png', width: "28px", height: "28px" }; } else if (!StringUtil.isNull(item.LL)) { normalsymbol = { type: "picture-marker", url: 'img/menu/082.png', width: "28px", height: "28px" }; } let tempPop = new PopupTemplate({ title: '机电井:' + stnm, content: _self.setjidianjingContentInfo }); let tempGraphic = new Graphic({ geometry: tempPoint, attributes: item, symbol: normalsymbol, popupTemplate: tempPop }); let textGraphic = new Graphic({ geometry: tempPoint, symbol: new TextSymbol({ color: "#FFF", backgroundColor: new Color('red'), borderLineColor: new Color("#fff"), borderLineSize: 2, haloColor: "black", haloSize: "1px", text: '水位:12 水温:11', font: { size: 8, family: "sans-serif" } }) }); _self.jidianjing_graphicsLayer.add(tempGraphic); _self.jidianjing_text_graphicsLayer.add(textGraphic); ... 效果 说明gif图太大,aliyun拒绝了我的上传,所以只能用文字描述;在小比例尺下,符号标注和文字标注之间的距离较小,看着效果还可以,但是有会出现标注覆盖文字或者文字覆盖标注;随着比例尺的放大,符号和标注之间的距离会增大,如第二张图所示。但是拿给项目经理看的时候,不要这种效果,距离和标注与符号之间的距离不能变。so...改改改 新思路-构造FeatureLayer 查看了官网好多例子,发现只有FeatureLayer的标注和符号之间的距离是边的,因为我们拿到的数据是点数据,所以我们可以构造组成FeatureLayer的source,其实就对应ags里的Graphics;还有一个标注LabelClass,这个类就是用来显示标注的。so...又开干了。 jidianjing_featureLayer: null, ... let tempGraphics = []; // 处理Graphics $.each(result, function (i, item) { item.widgetModule = 'jidianjingWidgetModule_click'; var stcd = item.STCD; var stnm = item.STNM; let tempPoint = new Point({ type: "point", x: item.LGTD, y: item.LTTD }); let normalsymbol = { type: "picture-marker", url: 'img/menu/081.png', width: "18px", height: "18px" }; if (!StringUtil.isNull(item.WARN_NAME)) { normalsymbol = { type: "picture-marker", url: 'img/menu/083.png', width: "28px", height: "28px" }; } else if (!StringUtil.isNull(item.LL)) { normalsymbol = { type: "picture-marker", url: 'img/menu/082.png', width: "28px", height: "28px" }; } let tempPop = new PopupTemplate({ title: '机电井:' + stnm, content: _self.setjidianjingContentInfo }); let tempGraphic = new Graphic({ geometry: tempPoint, attributes: item, symbol: normalsymbol, popupTemplate: tempPop }); let textGraphic = new Graphic({ geometry: tempPoint, symbol: new TextSymbol({ color: "#FFF", backgroundColor: new Color('red'), borderLineColor: new Color("#fff"), borderLineSize: 2, haloColor: "black", haloSize: "1px", text: '水位:12 水温:11', font: { size: 8, family: "sans-serif" } }) }); tempGraphics.push(tempGraphic); ... // popup let tempPop = new PopupTemplate({ title: '机电井:' + '{STNM}', content: _self.setjidianjingContentInfo }); // 标注 var labelClass = new LabelClass({ minScale: 20000, symbol: { type: "label-3d", symbolLayers: [{ type: "text", material: { color: "white" }, size: 10, halo: { color: [0, 0, 0, 0.8], size: 0.5 } }], verticalOffset:{ minWorldLength: 20, } }, labelPlacement: "above-center", labelExpression: "水位:[STTP], 水温:[STCD]" // labelExpressionInfo: { // expression: "$feature.STNM" // } }); // 构建feetureLayer并实现标注 this.jidianjing_text_featureLayer = new FeatureLayer({ id: 'jidianjing_featureLayer', fields: [{ name: "STCD", alias: "STCD", type: "oid" }, { name: "LGTD", alias: "LGTD", type: "string" }, { name: "LTTD", alias: "LTTD", type: "string" }, { name: "STCD", alias: "STCD", type: "string" }, { name: "STNM", alias: "STNM", type: "string" }, { name: "STTP", alias: "STTP", type: "string" }, { name: "widgetModule", alias: "widgetModule", type: "string" }], objectIdField: "STCD", geometryType: "point", spatialReference: { wkid: 4326 }, source: tempGraphics, // an array of graphics with geometry and attributes // popupTemplate and symbol are not required in each graphic // since those are handled with the popupTemplate and // renderer properties of the layer popupTemplate: tempPop, // renderer: iconSymbolRenderer, maxScale: 0, minScale: 0, labelsVisible: true, labelingInfo: [labelClass] }); view.map.add(this.jidianjing_text_featureLayer); 效果 说明 可以在上面两张图中看到,标注和符号的位置一直都是固定的,并没有随着距离的变化而变化;这时候拿给项目经理,就这个效果还算满意。 总结 符号和标注之间的距离在GraphicsLayer和FeatureLayer中的表现是不一样的,所以要根据合适的场景进行选择取舍。另外,GraphicsLayer和FeatureLayer标注换行不能实现,对GraphicsLayer可以采用加多个TextSymbol的GraphicsLayer,设置GraphicsLayer相对地面的高度就可以实现,但是距离永远是个问题,在此给一些朋友一些提醒。

优秀的个人博客,低调大师

使用 ES decorators 构建一致性 API

![pic] 重用和一致性是程序设计中经久不衰的两个课题。在最新的 ES Proposal 中,「decorators 语法」为此带来了一定的便利,并且,很适合应用于大型的类库中。 装饰模式 提到 decorator 大家都不会陌生,即「装饰模式」—— 我们可以在「不侵入原有代码」的情况下,为代码增加一些「额外的功能」。 所谓「额外的功能」一般都比较独立,不和原有逻辑耦合,只是做一层包装。你也可以把它看成「包装模式」。形如: // 旧方法 function func() {} // 包装后的新方法 function funcWrapped() { // 有的没的 doSomethingBefore(); // 旧方法的过程本身并不变化 func(); // 这啊那的 doSomethingAfter

优秀的个人博客,低调大师

Android2.2 API 中文文档系列(2) —— EditText

正文 一、结构 java.lang.Object android.view.View android.widget.TextView android.widget.EditText 已知直接子类: AutoCompleteTextView, ExtractEditText 已知间接子类: MultiAutoCompleteTextView 二、xml属性 属性名称 描述 android:autoLink 设置是否当文本为URL链接/email/电话号码/map时,文本显示为可点击的链接。可选值(none/web/email/phone/map/all)。这里只有在同时设置text时才自动识别链接,后来输入的无法自动识别。 android:autoText 自动拼写帮助。这里单独设置是没有效果的,可能需要其他输入法辅助才行,效果参见视频。 android:bufferType 指定getText()方式取得的文本类别。选项editable 类似于StringBuilder可追加字符, 也就是说getText后可调用append方法设置文本内容。spannable 则可在给定的字符区域使用样式,参见这里1、这里2。 android:capitalize 设置英文字母大写类型。设置如下值:sentences仅第一个字母大写;words每一个单词首字母大小,用空格区分单词;characters每一个英文字母都大写。在模拟器上用PC键盘直接输入可以出效果,但是用软键盘无效果。 android:cursorVisible 设定光标为显示/隐藏,默认显示。如果设置false,即使选中了也不显示光标栏。 android:digits 设置允许输入哪些字符。如“1234567890.+-*/%\n()” android:drawableTop 在text的正上方输出一个drawable。在EditView中的效果比较搞笑:,居然在文本框里,而且删不了。 android:drawableBottom 在text的下方输出一个drawable,如图片。如果指定一个颜色的话会把text的背景设为该颜色,并且同时和background使用时覆盖后者。 android:drawableLeft 在text的左边输出一个drawable(如图片)。 android:drawablePadding 设置text与drawable(图片)的间隔,与drawableLeft、drawableRight、drawableTop、drawableBottom一起使用,可设置为负数,单独使用没有效果。 android:drawableRight 在text的右边输出一个drawable,如图片。 android:editable 设置是否可编辑。仍然可以获取光标,但是无法输入。 android:editorExtras 指定特定输入法的扩展,如“com.mydomain.im.SOME_FIELD”。源码跟踪至EditorInfo.extras,暂无相关实现代码。 android:ellipsize 设置当文字过长时,该控件该如何显示。有如下值设置:”start”—–省略号显示在开头;”end”——省略号显示在结尾;”middle”—-省略号显示在中间;”marquee” ——以跑马灯的方式显示(动画横向移动) android:freezesText 设置保存文本的内容以及光标的位置。参见:这里。 android:gravity 设置文本位置,如设置成“center”,文本将居中显示。 android:hint Text为空时显示的文字提示信息,可通过textColorHint设置提示信息的颜色。 android:imeOptions 设置软键盘的Enter键。有如下值可设置:normal,actionUnspecified,actionNone,actionGo ,actionSearch,actionSend,actionNext,actionDone ,flagNoExtractUi,flagNoAccessoryAction,flagNoEnterAction。可用’|’设置多个。这里仅设置显示图标之用,参见文章末尾例子。 android:imeActionId 设置IME动作ID,在onEditorAction中捕获判断进行逻辑操作。 android:imeActionLabel 设置IME动作标签。但是不能保证一定会使用,猜想在输入法扩展的时候应该有用。 android:includeFontPadding 设置文本是否包含顶部和底部额外空白,默认为true。 android:inputMethod 为文本指定输入法,需要完全限定名(完整的包名)。例如:com.google.android.inputmethod.pinyin,但是这里报错找不到。关于自定义输入法参见这里。 android:inputType 设置文本的类型,用于帮助输入法显示合适的键盘类型。有如下值设置:none、text、textCapCharacters字母大小、textCapWords单词首字母大小、textCapSentences仅第一个字母大小、textAutoCorrect、textAutoComplete自动完成、textMultiLine多行输入、textImeMultiLine输入法多行(如果支持)、textNoSuggestions不提示、textEmailAddress电子邮件地址、textEmailSubject邮件主题、textShortMessage短信息(会多一个表情按钮出来,点开如下图: )、textLongMessage长讯息?、textPersonName人名、textPostalAddress地址、textPassword密码、textVisiblePassword可见密码、textWebEditText作为网页表单的文本、textFilte文本筛选过滤、textPhonetic拼音输入、numberSigned有符号数字格式、numberDecimal可带小数点的浮点格式、phone电话号码、datetime时间日期、date日期、time时间。部分参考这里。 android:marqueeRepeatLimit 在ellipsize指定marquee的情况下,设置重复滚动的次数,当设置为marquee_forever时表示无限次。 android:ems 设置TextView的宽度为N个字符的宽度。参见TextView中此属性的截图。 android:maxEms 设置TextView的宽度为最长为N个字符的宽度。与ems同时使用时覆盖ems选项。 android:minEms 设置TextView的宽度为最短为N个字符的宽度。与ems同时使用时覆盖ems选项。 android:maxLength 限制输入字符数。如设置为5,那么仅可以输入5个汉字/数字/英文字母。 android:lines 设置文本的行数,设置两行就显示两行,即使第二行没有数据。 android:maxLines 设置文本的最大显示行数,与width或者layout_width结合使用,超出部分自动换行,超出行数将不显示。 android:minLines 设置文本的最小行数,与lines类似。 android:linksClickable 设置链接是否点击连接,即使设置了autoLink。 android:lineSpacingExtra 设置行间距。 android:lineSpacingMultiplier 设置行间距的倍数。如”1.2” android:numeric 如果被设置,该TextView有一个数字输入法。有如下值设置:integer正整数、signed带符号整数、decimal带小数点浮点数。 android:password 以小点”.”显示文本 android:phoneNumber 设置为电话号码的输入方式。 android:privateImeOptions 提供额外的输入法选项(字符串格式)。依据输入法而决定是否提供,如这里所见。自定义输入法继承 InputMethodService。这篇文章也许有帮助。 android:scrollHorizontally 设置文本超出TextView的宽度的情况下,是否出现横拉条。 android:selectAllOnFocus 如果文本是可选择的,让他获取焦点而不是将光标移动为文本的开始位置或者末尾位置。TextView中设置后无效果。 android:shadowColor 指定文本阴影的颜色,需要与shadowRadius一起使用。参见TextView中此属性的截图。 android:shadowDx 设置阴影横向坐标开始位置。 android:shadowDy 设置阴影纵向坐标开始位置。 android:shadowRadius 设置阴影的半径。设置为0.1就变成字体的颜色了,一般设置为3.0的效果比较好。 android:singleLine 设置单行显示。如果和layout_width一起使用,当文本不能全部显示时,后面用“…”来表示。如android:text="test_ singleLine " android:singleLine="true" android:layout_width="20dp"将只显示“t…”。如果不设置singleLine或者设置为false,文本将自动换行 android:text 设置显示文本. android:textAppearance 设置文字外观。如“?android:attr/textAppearanceLargeInverse ”这里引用的是系统自带的一个外观,?表示系统是否有这种外观,否则使用默认的外观。可设置的值如下:textAppearanceButton/textAppearanceInverse/textAppearanceLarge/textAppearanceLargeInverse/textAppearanceMedium/textAppearanceMediumInverse/textAppearanceSmall/textAppearanceSmallInverse android:textColor 设置文本颜色 android:textColorHighlight 被选中文字的底色,默认为蓝色 android:textColorHint 设置提示信息文字的颜色,默认为灰色。与hint一起使用。 android:textColorLink 文字链接的颜色. android:textScaleX 设置文字之间间隔,默认为1.0f。参见TextView的截图。 android:textSize 设置文字大小,推荐度量单位”sp”,如”15sp” android:textStyle 设置字形[bold(粗体) 0, italic(斜体) 1, bolditalic(又粗又斜) 2]可以设置一个或多个,用“|”隔开 android:typeface 设置文本字体,必须是以下常量值之一:normal 0, sans 1, serif 2, monospace(等宽字体) 3] android:height 设置文本区域的高度,支持度量单位:px(像素)/dp/sp/in/mm(毫米) android:maxHeight 设置文本区域的最大高度 android:minHeight 设置文本区域的最小高度 android:width 设置文本区域的宽度,支持度量单位:px(像素)/dp/sp/in/mm(毫米),与layout_width的区别看这里。 android:maxWidth 设置文本区域的最大宽度 android:minWidth 设置文本区域的最小宽度 补充说明: a). 由于是继承自TextView,所以属性是一样的,但是这里重点补充了输入法相关的属性说明和研究,部分注释也做了相应的调整。 b). Word格式下载 http://download.csdn.net/source/2664164 三、例子 3.1 <!--[endif]-->android:imeOptions例子 < EditText android:id ="@+id/txtTest" android:imeOptions ="actionGo" android:layout_width ="100dp" android:layout_height ="wrap_content" ></ EditText > ((EditText)findViewById(R.id.txtTest)).setOnEditorActionListener( new TextView.OnEditorActionListener(){ @Override public boolean onEditorAction(TextViewv, int actionId, KeyEventevent){ if (actionId == EditorInfo.IME_ACTION_GO){ Toast.makeText(TestActivity. this , " 你点了Go! " ,Toast.LENGTH_SHORT).show(); } return false ; } }); 本文转自over140 51CTO博客,原文链接:http://blog.51cto.com/over140/582733,如需转载请自行联系原作者

优秀的个人博客,低调大师

Android2.2 API 中文文档系列(6) —— ImageView

正文 一、结构 java.lang.Object android.view.View android.widget.ImageView 已知直接子类: ImageButton, QuickContactBadge 已知间接子类: ZoomButton 二、类概述 显示任意图像,例如图标。ImageView类可以加载各种来源的图片(如资源或图片库),需要计算图像的尺寸,比便它可以在其他布局中使用,并提供例如缩放和着色(渲染)各种显示选项。 三、XML属性 属性名称 描述 android:adjustViewBounds 是否保持宽高比。需要与maxWidth、MaxHeight一起使用,否则单独使用没有效果。 android:cropToPadding 是否截取指定区域用空白代替。单独设置无效果,需要与scrollY一起使用,效果如下,实现代码见代码部分: android:maxHeight 设置View的最大高度,单独使用无效,需要与setAdjustViewBounds一起使用。如果想设置图片固定大小,又想保持图片宽高比,需要如下设置: 1)设置setAdjustViewBounds为true; 2)设置maxWidth、MaxHeight; 3)设置设置layout_width和layout_height为wrap_content。 android:maxWidth 设置View的最大宽度。同上。 android:scaleType 设置图片的填充方式。 matrix 0 用矩阵来绘图 fitXY 1 拉伸图片(不按比例)以填充View的宽高 layout_ height :30px layout_ width :120px fitStart 2 按比例拉伸图片,拉伸后图片的高度为View的高度,且显示在View的左边 fitCenter 3 按比例拉伸图片,拉伸后图片的高度为View的高度,且显示在View的中间 fitEnd 4 按比例拉伸图片,拉伸后图片的高度为View的高度,且显示在View的右边 center 5 按原图大小显示图片,但图片宽高大于View的宽高时,截图图片中间部分显示 layout_ height :60px layout_ width :80px padding :10px centerCrop 6 按比例放大原图直至等于某边View的宽高显示。 centerInside 7 当原图宽高或等于View的宽高时,按原图大小居中显示;反之将原图缩放至View的宽高居中显示。 android:src 设置View的drawable(如图片,也可以是颜色,但是需要指定View的大小) android:tint 将图片渲染成指定的颜色。见下图: 左边为原图,右边为设置后的效果,见后面代码。 四、代码 4.1 android:tint < ImageView android:background ="@android:color/white" android:src ="@drawable/btn_mode_switch_bg" android:layout_width ="wrap_content" android:layout_height ="wrap_content" ></ ImageView > < ImageView android:layout_marginLeft ="5dp" android:background ="@android:color/white" android:tint ="#ffff00" android:src ="@drawable/btn_mode_switch_bg" android:layout_width ="wrap_content" android:layout_height ="wrap_content" ></ ImageView > 4.2 android:cropToPadding < ImageView android:background ="@android:color/white" android:scrollY ="-10px" android:cropToPadding ="true" android:src ="@drawable/btn_mode_switch_bg" android:layout_width ="wrap_content" android:layout_height ="wrap_content" ></ ImageView > < ImageView android:background ="@android:color/white" android:scrollY ="10px" android:cropToPadding ="true" android:src ="@drawable/btn_mode_switch_bg" android:layout_width ="wrap_content" android:layout_height ="wrap_content" ></ ImageView > < ImageView android:paddingTop ="10px" android:background ="@android:color/white" android:scrollY ="10px" android:cropToPadding ="true" android:src ="@drawable/btn_mode_switch_bg" android:layout_width ="wrap_content" android:layout_height ="wrap_content" ></ ImageView > < ImageView android:paddingTop ="10px" android:background ="@android:color/white" android:scrollY ="10px" android:cropToPadding ="false" android:src ="@drawable/btn_mode_switch_bg" android:layout_width ="wrap_content" android:layout_height ="wrap_content" ></ ImageView > 本文转自over140 51CTO博客,原文链接:http://blog.51cto.com/over140/582712,如需转载请自行联系原作者

优秀的个人博客,低调大师

Android 3.1 r1 中文API文档 (121) —— ResourceCursorTreeAdapter

结构 继承关系 public abstract classtResourceCursorTreeAdapterextendsCursorTreeAdapter java.lang.Object android.widget.BaseExpandableListAdapter android.widget.CursorTreeAdapter android.widget.ResourceCursorTreeAdapter 直接子类 SimpleCursorTreeAdapter 类概述 一个简单的可扩展的ExpandableListAdapter,通过在XML文件来创建views。你可以指定一个定义了views外观的XML文件。 构造函数 publicResourceCursorTreeAdapter(Context context, Cursor cursor, int collapsedGroupLayout, int expandedGroupLayout, int childLayout, int lastChildLayout) 构造函数。 参数 context和正在运行的SimpleListItemFactory关联的ListView的上下文 cursor数据库游标 collapsedGroupLayout定义了收缩组的视图布局文件的资源标识 expandedGroupLayout定义了展开组的视图布局文件的资源标识 childLayout定义了除了最后一个的所有子视图的布局文件的资源标识 lastChildLayout定义了一组中最后一个子视图的布局文件的资源标识 publicResourceCursorTreeAdapter(Context context, Cursor cursor, int collapsedGroupLayout, int expandedGroupLayout, int childLayout) 构造函数。 参数 context和正在运行的SimpleListItemFactory关联的ListView的上下文 cursor数据库游标 collapsedGroupLayout定义了收缩组的视图布局文件的资源标识 expandedGroupLayout定义了展开组的视图布局文件的资源标识 childLayout定义了除了最后一个的所有子视图的布局文件的资源标识 publicResourceCursorTreeAdapter(Context context, Cursor cursor, int groupLayout, int childLayout) 构造函数。 参数 context和正在运行的SimpleListItemFactory关联的ListView的上下文 cursor数据库游标 groupLayout为所有组定义了视图布局文件的资源标识 expandedGroupLayout 定义了展开组的视图布局文件的资源标识 childLayout定义了除了最后一个的所有子视图的布局文件的资源标识 公共方法 protected abstract ViewnewChildView(Context context, Cursor cursor, booleanisLastChild, ViewGroup parent) 创建一个新的子元素视图并持有指向数据的游标cursor。 参数 context应用程序上下文对象 cursor获取数据的游标对象,它已经移动到正确的位置 IsLastChild子元素是否处于组中的最后一个 parent新视图(View)所依附于的父对象。 返回值 新创建的视图 protected abstract ViewnewGroupView(Context context, Cursor cursor, booleanisExpanded, ViewGroup parent) 创建一个新的组视图并持有组中指向数据的游标cursor。 参数 context应用程序上下文对象 cursor获取数据的游标对象,它已经移动到正确的位置 isExpanded该组是否展开状态 parent新视图(View)所依附于的父对象。 返回值 新创建的视图 本文转自over140 51CTO博客,原文链接:http://blog.51cto.com/over140/582335,如需转载请自行联系原作者

优秀的个人博客,低调大师

Hadoop MapReduce编程 API入门系列之FOF(Fund of Fund)

代码 package zhouls.bigdata.myMapReduce.friend; import org.apache.hadoop.io.Text; public class Fof extends Text{//自定义Fof,表示f1和f2关系 public Fof(){//无参构造 super(); } public Fof(String a,String b){//有参构造 super(getFof(a, b)); } public static String getFof(String a,String b){ int r =a.compareTo(b); if(r<0){ return a+"\t"+b; }else{ return b+"\t"+a; } } } package zhouls.bigdata.myMapReduce.friend; import java.io.DataInput; import java.io.DataOutput; import java.io.IOException; import org.apache.hadoop.io.WritableComparable; public class User implements WritableComparable<User>{ //WritableComparable,实现这个方法,要多很多 //readFields是读入,write是写出 private String uname; private int friendsCount; public String getUname() { return uname; } public void setUname(String uname) { this.uname = uname; } public int getFriendsCount() { return friendsCount; } public void setFriendsCount(int friendsCount) { this.friendsCount = friendsCount; }//这一大段的get和set,可以右键,source,产生get和set,自动生成。 public User() {//无参构造 } public User(String uname,int friendsCount){//有参构造 this.uname=uname; this.friendsCount=friendsCount; } public void write(DataOutput out) throws IOException { //序列化 out.writeUTF(uname); out.writeInt(friendsCount); } public void readFields(DataInput in) throws IOException {//反序列化 this.uname=in.readUTF(); this.friendsCount=in.readInt(); } public int compareTo(User o) {//核心 int result = this.uname.compareTo(o.getUname()); if(result==0){ return Integer.compare(this.friendsCount, o.getFriendsCount()); } return result; } } package zhouls.bigdata.myMapReduce.friend; import org.apache.hadoop.io.WritableComparable; import org.apache.hadoop.io.WritableComparator; public class FoFSort extends WritableComparator{ public FoFSort() {//把自定义的User,传进了 super(User.class,true); } public int compare(WritableComparable a, WritableComparable b) {//排序核心 User u1 =(User) a; User u2=(User) b; int result =u1.getUname().compareTo(u2.getUname()); if(result==0){ return -Integer.compare(u1.getFriendsCount(), u2.getFriendsCount()); } return result; } } package zhouls.bigdata.myMapReduce.friend; import org.apache.hadoop.io.WritableComparable; import org.apache.hadoop.io.WritableComparator; public class FoFGroup extends WritableComparator{ public FoFGroup() {//把自定义的User,传进了 super(User.class,true); } public int compare(WritableComparable a, WritableComparable b) {//分组核心 User u1 =(User) a; User u2=(User) b; return u1.getUname().compareTo(u2.getUname()); } } package zhouls.bigdata.myMapReduce.friend; import java.io.IOException; import java.text.SimpleDateFormat; import java.util.Calendar; import java.util.Date; import org.apache.hadoop.conf.Configuration; import org.apache.hadoop.fs.FileSystem; import org.apache.hadoop.fs.Path; import org.apache.hadoop.io.DoubleWritable; import org.apache.hadoop.io.IntWritable; import org.apache.hadoop.io.NullWritable; import org.apache.hadoop.io.Text; import org.apache.hadoop.mapreduce.Job; import org.apache.hadoop.mapreduce.Mapper; import org.apache.hadoop.mapreduce.Reducer; import org.apache.hadoop.mapreduce.lib.input.FileInputFormat; import org.apache.hadoop.mapreduce.lib.input.KeyValueTextInputFormat; import org.apache.hadoop.mapreduce.lib.output.FileOutputFormat; import org.apache.hadoop.util.StringUtils; public class RunJob { // 小明 老王 如花 林志玲 // 老王 小明 凤姐 排序在FoFSort.java // 如花 小明 李刚 凤姐 // 林志玲 小明 李刚 凤姐 郭美美 分组在FoFGroup.java // 李刚 如花 凤姐 林志玲 // 郭美美 凤姐 林志玲 // 凤姐 如花 老王 林志玲 郭美美 public static void main(String[] args) { Configuration config =new Configuration(); // config.set("fs.defaultFS", "hdfs://HadoopMaster:9000"); // config.set("yarn.resourcemanager.hostname", "HadoopMaster"); // config.set("mapred.jar", "C:\\Users\\Administrator\\Desktop\\wc.jar"); // config.set("mapreduce.input.keyvaluelinerecordreader.key.value.separator", ",");//默认分隔符是制表符"\t",这里自定义,如"," if(run1(config)){ run2(config);//设置两个run,即两个mr。 } } public static void run2(Configuration config) { try { FileSystem fs =FileSystem.get(config); Job job =Job.getInstance(config); job.setJarByClass(RunJob.class); job.setJobName("fof2"); job.setMapperClass(SortMapper.class); job.setReducerClass(SortReducer.class); job.setSortComparatorClass(FoFSort.class); job.setGroupingComparatorClass(FoFGroup.class); job.setMapOutputKeyClass(User.class); job.setMapOutputValueClass(User.class); job.setInputFormatClass(KeyValueTextInputFormat.class); // //设置MR执行的输入文件 // FileInputFormat.addInputPath(job, new Path("hdfs://HadoopMaster:9000/f1")); // // //该目录表示MR执行之后的结果数据所在目录,必须不能存在 // Path outputPath=new Path("hdfs://HadoopMaster:9000/out/f2"); //设置MR执行的输入文件 FileInputFormat.addInputPath(job, new Path("./out/f1")); //该目录表示MR执行之后的结果数据所在目录,必须不能存在 Path outputPath=new Path("./out/f2"); if(fs.exists(outputPath)){ fs.delete(outputPath, true); } FileOutputFormat.setOutputPath(job, outputPath); boolean f =job.waitForCompletion(true); if(f){ System.out.println("job 成功执行"); } } catch (Exception e) { e.printStackTrace(); } } public static boolean run1(Configuration config) { try { FileSystem fs =FileSystem.get(config); Job job =Job.getInstance(config); job.setJarByClass(RunJob.class); job.setJobName("friend"); job.setMapperClass(FofMapper.class); job.setReducerClass(FofReducer.class); job.setMapOutputKeyClass(Fof.class); job.setMapOutputValueClass(IntWritable.class); job.setInputFormatClass(KeyValueTextInputFormat.class); // FileInputFormat.addInputPath(job, new Path("hdfs://HadoopMaster:9000/friend/friend.txt"));//下有friend.txt // // Path outpath =new Path("hdfs://HadoopMaster:9000/out/f1"); FileInputFormat.addInputPath(job, new Path("./data/friend/friend.txt"));//下有friend.txt Path outpath =new Path("./out/f1"); if(fs.exists(outpath)){ fs.delete(outpath, true); } FileOutputFormat.setOutputPath(job, outpath); boolean f= job.waitForCompletion(true); return f; } catch (Exception e) { e.printStackTrace(); } return false; } static class FofMapper extends Mapper<Text, Text, Fof, IntWritable>{ protected void map(Text key, Text value, Context context) throws IOException, InterruptedException { String user =key.toString(); String[] friends =StringUtils.split(value.toString(), '\t'); for (int i = 0; i < friends.length; i++) { String f1 = friends[i]; Fof ofof =new Fof(user, f1); context.write(ofof, new IntWritable(0)); for (int j = i+1; j < friends.length; j++) { String f2 = friends[j]; Fof fof =new Fof(f1, f2); context.write(fof, new IntWritable(1)); } } } } static class FofReducer extends Reducer<Fof, IntWritable, Fof, IntWritable>{ protected void reduce(Fof arg0, Iterable<IntWritable> arg1, Context arg2) throws IOException, InterruptedException { int sum =0; boolean f =true; for(IntWritable i: arg1){ if(i.get()==0){ f=false; break; }else{ sum=sum+i.get(); } } if(f){ arg2.write(arg0, new IntWritable(sum)); } } } static class SortMapper extends Mapper<Text, Text, User, User>{ protected void map(Text key, Text value, Context context) throws IOException, InterruptedException { String[] args=StringUtils.split(value.toString(),'\t'); String other=args[0]; int friendsCount =Integer.parseInt(args[1]); context.write(new User(key.toString(),friendsCount), new User(other,friendsCount)); context.write(new User(other,friendsCount), new User(key.toString(),friendsCount)); } } static class SortReducer extends Reducer<User, User, Text, Text>{ protected void reduce(User arg0, Iterable<User> arg1, Context arg2) throws IOException, InterruptedException { String user =arg0.getUname(); StringBuffer sb =new StringBuffer(); for(User u: arg1 ){ sb.append(u.getUname()+":"+u.getFriendsCount()); sb.append(","); } arg2.write(new Text(user), new Text(sb.toString())); } } 本文转自大数据躺过的坑博客园博客,原文链接:http://www.cnblogs.com/zlslch/p/6166095.html,如需转载请自行联系原作者

优秀的个人博客,低调大师

Android 3.1 r1 中文API文档 (120) —— SearchView

结构 继承关系 public classSearchView extendsLinearLayout java.lang.Object android.view.View android.view.ViewGroup android.widget.LinearLayout android.widget.SearchView 类概述 一个为用户提供输入搜索查询和提交请求给搜索提供者的用户界面部件。显示查询建议或结果列表,如果有的话,运行用户选择一条查询建议或结果并启动与其相关的操作。 更多信息,参见Search文档。 内部类 interface SearchView.OnCloseListener (译者注:当用户关闭SearchView时触发的回调函数) interface SearchView.OnQueryTextListener 当查询文本改变时的回调函数。 interfaceSearchView.OnSuggestionListener 在建议上选择事件时的回调接口。 XML属性 属性名称 描述 android:iconifiedByDefault 设置SearchView的默认状态。 如果为true,在没有被使用和点击展开时它将被图形化。 android:maxWidth SearchView的可选择的最大宽度 android:queryHint 当查询条件为空时显示的一个提示字符串。 公共方法 public CharSequencegetQuery() 返回当前文本域中的查询字符串 返回值 查询字符串 public CursorAdaptergetSuggestionsAdapter() 如果有的话,返回用于搜索建议的适配器。 返回值 查询适配器 public booleanisIconfiedByDefault() 返回查询区域默认的图标状态。 public booleanisIconified() 返回SearchView当前的图标状态 返回值 如果SearchView目前是图标状态,返回true,如果查询区域是完全可见的返回false public booleanisQueryRefinementEnabled() 返回查询优化是否是对所有的条目都起作用或者只是对特别的几个起作用 返回值 如果是对所有的条目起作用,刚返回true,否则返回false。 public booleanisSubmitButtonEnabled() 返回当提交按钮在必须的时候是否可用或者从不显示 返回值 提交按钮在必须的时候是否自动启用 public booleanonKeyDown(int keyCode, KeyEvent event) 是否处理操作键按下事件 参数 keyCode键入的键盘值,同时和键盘事件中的参数相同 event输入键的完整事件记录 返回值 如果事件在这里被处理,返回true,不处理返回false public voidsetIconified(boolean iconify) 图标化或者展开SearchView。当图标化时任何查询条件都被清除。这是一个临时的状态,不会重写被setIconifiedByDefault(boolean)设置的默认图标状态。如果默认的是图标化状态,则在用户关闭这个区域前都是false。如果默认的是展开状态,这里就是true,同时清除文本区域,但不关闭它。 参数 iconify true值会把SearchView收缩成一个图标,false值会展开它 返回值 查询字符串 public voidsetIconifiedByDefault(boolean iconified) 设置搜索栏的默认状态或者静止状态。如果是true,当被按下时,一个单一的搜索图标就会被默认显示,同时显示文本字段和其他按钮。如果默认的状态是图标,在按下关闭按钮时它就会收缩成那个状态。这个属性的改变会立即生效。 参数 iconified搜索栏是否默认被图标化 public voidsetMaxWidth(int maxpixels) 以最宽的像素相看 相关的XML属性 android:maxWidth public voidsetOnCloseListener(SearchView.OnCloseListener listener) 当用户关闭SearchView时设置一个监听器通知用户 参数 listener设置用户关闭SearchView时的监听器 public voidsetOnQueryTextFocusChangeListener(View.OnFocusChangeListener listener) 设置当查询区域字段改变时通知用户的监听器 参数 listener设置焦点更改时的监听器 public voidsetOnQueryTextListener(SearchView.OnQueryTextListener listener) 为用户在SearchView内的操作设置监听器 参数 listener当用户在SearchView操作时比如说点击按钮或者输入查询内容时,设置接收回调的监听器对象 public voidsetOnSearchClickListener(View.OnClickListener listener) 设置按钮被按下时的监听器。在默认情况下当文本字段不可见时才起作用,调用setIconified(false)也可以通知这个监听器。 参数 listener当搜索按钮被点击或者文本字段编辑取消图形化时通知监听器 public voidsetOnSuggestionListener(SearchView.OnSuggestionListener listener) 设置当一条搜索建议被选中或者点击的时候的监听器 参数 listener选择搜索建议事件的监听器 public voidsetQuery(CharSequence query, boolean submit) 设置文本区域的一个查询字符串并选择提交和查询。 参数 query查询字符串。代替在文本区域已经存在的查询文本 submit是否立即提交查询或者只更新文本区域的内容 public voidsetQueryHint(CharSequence hint) 设置在查询文本区域的提示文本。将覆盖SearchableInfo中的任何提示。 相关XML属性 android:queryHint 参数 hint要显示的提示文本 public voidsetQueryRefinementEnabled(boolean enable) 指定如果精确查询按钮是否在每条建议的旁边显示或者是否根据运营商建议中的设置在个别项目的标志决定。点击精确查询的按钮会用建议中的文本替换查询文本区域中的字段。这个标志只是在一个SearchableInfo中指定setSearchableInfo(SearchableInfo)且不使用定制的适配器时起作用。 参数 enable如果所有的条目都有一个精确查询按钮刚为true,如果只有带精确查询标志的条目需要按钮,则为false。 参见 SUGGEST_COLUMN_FLAGS FLAG_QUERY_REFINEMENT public voidsetSearchableInfo(SearchableInfo searchable) 给SearchView设置SearchableInfo。SearchableInfo中的属性用来显示标签,提示(hints),搜索建议,创建打开查询结果和控制其他功能比如一个声音按钮的intents。 参数 searchable对于一个特殊的activiey或者,能从SearchManager中检索的SearchableInfo,全局的搜索提供者。 public voidsetSubmitButtonEnabled(boolean enabled) 当查询不为空时,显示一个提交按钮。如果SearchView被用来填充当前activity的内容,并且不会启动一个单独的activity,这里提交按钮会消失。 参数 enabled设置为True时显示一个提交请求的按钮,当不需要请求按钮时设置为false。 public voidsetSuggestionsAdapter(CursorAdapter adapter) 如果你愿意,你可以设置一个定制的适配器。否则使用默认的适配器来显示和SearchableInfo相关的建议提供者的建议。 参见 setSearchableInfo(SearchableInfo) 补充 文章精选 Android ApiDemo示例解析(36):App->Search->Invoke Search SearchView默认扩展 SearchViewを使用してListViewのアイテムにフィルターをかける SearchView.OnCloseListener 译者署名:xiaoQLu 译者链接:http://www.cnblogs.com/xiaoQLu 版本:Android 3.0 r1 结构 继承关系 public static interfaceSearchView.OnCloseListener android.widget.SearchView.OnCloseListener 公共方法 public abstract booleanonClose() 当用户尝试关闭SearchView的时候调用本方法。 返回值 如果用户想重写默认清除文本域的动作,返回true,否则返回false。 SearchView.OnQueryTextListener 译者署名:xiaoQLu 译者链接:http://www.cnblogs.com/xiaoQLu 版本:Android 3.0 r1 结构 继承关系 public static interfaceSearchView.OnQueryTextListener android.widget.SearchView.OnQueryTextListener 类概述 查询内容发生改变时调用 公共方法 public abstract booleanonQueryTextChange(String newText) 当用户改变查询内容的时候调用 参数 newText查询的文本字段的新内容 返回值 如果SearchView执行默认的动作,显示可能出现的建议,刚返回false。如果动作由监听器处理,刚返回true public abstract booleanonQueryTextSubmit(String query) 当用户提交请求时调用。这可能是因为在键盘上按下一个键或者点击一个提交按钮。这个监听器可以通过返回true来重写标准的动作,指明由它来处理提交请求。否则返回false让SearchView把这个请求转发到与之关联的intent去处理。 参数 query要提交的查询内容 返回值 如果查询请求被监听器处理,刚返回true,如果SearchView执行默认的动作则返回false SearchView.OnSuggestionListener 译者署名:xiaoQLu 译者链接:http://www.cnblogs.com/xiaoQLu 版本:Android 2.3 r1 结构 继承关系 Public static interfaceSearchView.OnSuggestionListener android.widget.SearchView.OnSuggestionListener 类概述 选中搜索建议时的回调接口。当SearchableInfo通过setSearchableInfo(SearchableInfo).特别指定时,才调用这些回调函数。 公共方法 public abstract booleanonSuggestionClick(int position) 当点击一条搜索建议时调用 参数 position在建议列表中的点击项的绝对位置。 返回值 如果监听器处理这个事件,并且重写默认的处理方法,处理发送的intent请求或者是在这条目中指定的查询请求,刚返回true。否则返回false。 public abstract booleanonSuggestionSelect(int position) 通过导航选中搜索建议时调用 参数 position在建议列表中绝对位置。 返回值 如果监听器处理这个事件,并且重写基于选中条目的处理方法,刚返回 true 。否则返回 false 。 本文转自over140 51CTO博客,原文链接:http://blog.51cto.com/over140/582339,如需转载请自行联系原作者

优秀的个人博客,低调大师

Android2.2 API 中文文档系列(9) —— ZoomButton

正文 一、类结构 java.lang.Object android.view.View android.widget.ImageView android.widget.ImageButton android.widget.ZoomButton public class ZoomButton extends ImageButton implements View.OnLongClickListener 二、概述 缩放按钮,实际上是很普通的两个按钮,可以简单的理解为一个ImageButton加上一张缩放的图标。如下代码: 三、公共方法 public boolean dispatchUnhandledMove (View focused, int direction) 对于获得焦点的View,这个方法是捕获箭头事件最后的机会。这就是在获取焦点的View没有在内部处理、系统在要求的方向也不能找到一个新的View让其获得焦点时调用。 参数 focused 当前焦点View direction焦点移动的方向。其中之一:FOCUS_UP, FOCUS_DOWN, FOCUS_LEFT和FOCUS_RIGHT. 返回值 如果为true,将清除这个View未处理的事件。 (注:从源码中可看出ZoomButton覆盖了父类的该方法,在super之前调用了一下clearFocus,如下代码: public boolean onKeyUp (int keyCode, KeyEvent event) 默认实现至KeyEvent.Callback.onKeyMultiple():当点击执行时KEYCODE_DPAD_CENTER或KEYCODE_ENTER被释放。 参数 keyCode按下按钮代表的键值,属于KeyEvent (注:KeyEvent的静态属性)。 event 该KeyEvent对象,定义按钮动作 返回值 如果您处理这一事件中,返回true。如果你想允许事件被下一个接收器处理,返回false。 public boolean onLongClick (View v) 当一个View被长按时调用。 参数 v 被长按的View。 返回值 如果返回true,这个回调在长按时被执行了,反之返回false. public boolean onTouchEvent (MotionEvent event) 实现这个方法处理触摸屏移动事件。 参数 event 该移动事件. 返回值 如果是true,该事件是触摸,反之返回false。 public void setEnabled (boolean enabled) 设置这个View启用状态。 参数 enabled设置true表示启用,反之表示禁用。 public void setZoomSpeed (long speed) (注:单独使用无实际意义,可以用来存放临时数据) 本文转自over140 51CTO博客,原文链接:http://blog.51cto.com/over140/582701,如需转载请自行联系原作者

优秀的个人博客,低调大师

Android2.2 API 中文文档系列(5) —— View

正文 一、结构 java.lang.Object android.view.View 已知直接子类: AnalogClock, ImageView, KeyboardView, ProgressBar, SurfaceView,TextView, ViewGroup, ViewStub 已知间接子类: AbsListView, AbsSeekBar, AbsSpinner, AbsoluteLayout, AdapterView<T extends Adapter>, AppWidgetHostView, AutoCompleteTextView, Button, CheckBox, CheckedTextView, Chronometer, CompoundButton, DatePicker, DialerFilter, DigitalClock,EditText, ExpandableListView, ExtractEditText, FrameLayout, GLSurfaceView, Gallery, GestureOverlayView, GridView, HorizontalScrollView, ImageButton, ImageSwitcher, LinearLayout, ListView, MediaController, MultiAutoCompleteTextView, QuickContactBadge, RadioButton, RadioGroup, RatingBar, RelativeLayout, ScrollView, SeekBar, SlidingDrawer, Spinner, TabHost, TabWidget, TableLayout, TableRow, TextSwitcher, TimePicker, ToggleButton, TwoLineListItem, VideoView, ViewAnimator, ViewFlipper, ViewSwitcher, WebView, ZoomButton, ZoomControls 二、xml属性 属性名称 描述 android:background 设置背景色/背景图片。可以通过以下两种方法设置背景为透明:"@android:color/transparent"和"@null"。注意TextView默认是透明的,不用写此属性,但是Buttom/ImageButton/ImageView想透明的话就得写这个属性了。 android:clickable 是否响应点击事件。 android:contentDescription 设置View的备注说明,作为一种辅助功能提供,为一些没有文字描述的View提供说明,如ImageButton。这里在界面上不会有效果,自己在程序中控制,可临时放一点字符串数据。 android:drawingCacheQuality 设置绘图时半透明质量。有以下值可设置:auto(默认,由框架决定)/high(高质量,使用较高的颜色深度,消耗更多的内存/low(低质量,使用较低的颜色深度,但是用更少的内存)。 android:duplicateParentState 如果设置此属性,将直接从父容器中获取绘图状态(光标,按下等)。见下面代码部分,注意根据目前测试情况仅仅是获取绘图状态,而没有获取事件,也就是你点一下LinearLayout时Button有被点击的效果,但是不执行点击事件。 android:fadingEdge 设置拉滚动条时,边框渐变的放向。none(边框颜色不变),horizontal(水平方向颜色变淡),vertical(垂直方向颜色变淡)。参照fadingEdgeLength的效果图 android:fadingEdgeLength 设置边框渐变的长度。 android:fitsSystemWindows 设置布局调整时是否考虑系统窗口(如状态栏) android:focusable 设置是否获得焦点。若有requestFocus()被调用时,后者优先处理。注意在表单中想设置某一个如EditText获取焦点,光设置这个是不行的,需要将这个EditText前面的focusable都设置为false才行。在Touch模式下获取焦点需要设置focusableInTouchMode为true。 android:focusableInTouchMode 设置在Touch模式下View是否能取得焦点。 android:hapticFeedbackEnabled 设置触感反馈。(译者注:按软键以及进行某些UI交互时振动,暂时不知道用法,大家可以找找performHapticFeedback或HapticFeedback这个关键字的资料看看。) android:id 给当前View设置一个在当前layout.xml中的唯一编号,可以通过调用View.findViewById()或Activity.findViewById()根据这个编号查找到对应的View。不同的layout.xml之间定义相同的id不会冲突。格式如”@+id/btnName” android:isScrollContainer 设置当前View为滚动容器。这里没有测试出效果来,ListView/ GridView/ ScrollView根本就不用设置这个属性,而EdidText设置android:scrollbars也能出滚动条。 android:keepScreenOn View在可见的情况下是否保持唤醒状态。常在LinearLayout使用该属性,但是模拟器这里没有效果。 android:longClickable 设置是否响应长按事件. android:minHeight 设置视图最小高度 android:minWidth 设置视图最小宽度度 android:nextFocusDown 设置下方指定视图获得下一个焦点。焦点移动是基于一个在给定方向查找最近邻居的算法。如果指定视图不存在,移动焦点时将报运行时错误。可以设置imeOptions= actionDone,这样输入完即跳到下一个焦点。 android:nextFocusLeft 设置左边指定视图获得下一个焦点。 android:nextFocusRight 设置右边指定视图获得下一个焦点。 android:nextFocusUp 设置上方指定视图获得下一个焦点。 android:onClick 点击时从上下文中调用指定的方法。这里指定一个方法名称,一般在Activity定义符合如下参数和返回值的函数并将方法名字符串指定为该值即可: public void onClickButton(View view) android:onClick=” onClickButton” android:padding 设置上下左右的边距,以像素为单位填充空白。 android:paddingBottom 设置底部的边距,以像素为单位填充空白。 android:paddingLeft 设置左边的边距,以像素为单位填充空白。 android:paddingRight 设置右边的边距,以像素为单位填充空白。 android:paddingTop 设置上方的边距,以像素为单位填充空白。 android:saveEnabled 设置是否在窗口冻结时(如旋转屏幕)保存View的数据,默认为true,但是前提是你需要设置id才能自动保存,参见这里。 android:scrollX 以像素为单位设置水平方向滚动的的偏移值,在GridView中可看的这个效果。 android:scrollY 以像素为单位设置垂直方向滚动的的偏移值 android:scrollbarAlwaysDraw HorizontalTrack 设置是否始终显示垂直滚动条。这里用ScrollView、ListView测试均没有效果。 android:scrollbarAlwaysDraw VerticalTrack 设置是否始终显示垂直滚动条。这里用ScrollView、ListView测试均没有效果。 android:scrollbarDefault DelayBeforeFade 设置N毫秒后开始淡化,以毫秒为单位。 android:scrollbarFadeDuration 设置滚动条淡出效果(从有到慢慢的变淡直至消失)时间,以毫秒为单位。Android2.2中滚动条滚动完之后会消失,再滚动又会出来,在1.5、1.6版本里面会一直显示着。 android:scrollbarSize 设置滚动条的宽度。 android:scrollbarStyle 设置滚动条的风格和位置。设置值:insideOverlay、insideInset、outsideOverlay、outsideInset。这里没有试出太多效果,以下依次是outsideOverlay与outsideInset效果截图比较: android:scrollbarThumbHorizontal 设置水平滚动条的drawable。 android:scrollbarThumbVertical 设置垂直滚动条的drawable. android:scrollbarTrackHorizontal 设置水平滚动条背景(轨迹)的色drawable android:scrollbarTrackVertical 设置垂直滚动条背景(轨迹)的drawable注意直接 设置颜色值如”android:color/white”将得出很难看的效果, 甚至都不理解这个属性了,这里可以 参见ApiDemos里res/drawable/ scrollbar_vertical_thumb.xml和 scrollbar_vertical_track.xml,设置代码为: android:scrollbarTrackVertical ="@drawable/scrollbar_vertical_track" android:scrollbars 设置滚动条显示。none(隐藏),horizontal(水平),vertical(垂直)。见下列代码演示使用该属性让EditText内有滚动条。但是其他容器如LinearLayout设置了但是没有效果。 android:soundEffectsEnabled 设置点击或触摸时是否有声音效果 android:tag 设置一个文本标签。可以通过View.getTag()或for with View.findViewWithTag()检索含有该标签字符串的View。但 一般最好通过ID来查询View,因为它的速度更快,并且允 许编译时类型检查。 android:visibility 设置是否显示View。设置值:visible(默认值,显示),invisible(不显示,但是仍然占用空间),gone (不显示,不占用空间) 四、代码 4.1 android:duplicateParentState < LinearLayout android:clickable ="true" android:background ="#ff0fff" android:layout_width ="100dp" android:layout_height ="100dp" > < Button android:duplicateParentState ="true" android:layout_width ="wrap_content" android:layout_height ="wrap_content" /> </ LinearLayout > 4.2 android:scrollbars < EditText android:layout_width ="fill_parent" android:layout_height ="wrap_content" android:minHeight ="50dp" android:background ="@android:drawable/editbox_background" android:scrollbars ="vertical" android:maxLines ="4" > </ EditText > 五、遗留问题 5.1 以下几个属性翻遍了资料试了很多次都没有效果,只能暂时搁置,以后补上,也欢迎的大家提供意见和线索,分享大家的经验: android:scrollbarAlwaysDrawHorizontalTrack android:scrollbarAlwaysDrawVerticalTrack android:isScrollContainer 本文转自over140 51CTO博客,原文链接:http://blog.51cto.com/over140/582718,如需转载请自行联系原作者

优秀的个人博客,低调大师

Android2.2 API 中文文档系列(7) —— ImageButton

正文 一、结构 java.lang.Objectandroid.view.Viewandroid.widget.ImageView android.widget.ImageButton 已知直接子类: ZoomButton 二、类摘要 显示一个可以被用户点击的图片按钮,默认情况下,ImageButton看起来像一个普通的按钮,在不同状态(如按下)下改变背景颜色。按钮的图片可用通过<ImageButton> XML元素的android:src属性或setImageResource(int)方法指定。 要删除按钮的背景,可以定义自己的背景图片或设置背景为透明。(注:请看 原图和图片按钮,默认图片周围有按钮的背景,选中之后为黄色) 为了表示不同的按钮状态(焦点,选择等),你可以为各种状态定义不同的图片。例如,定义蓝色图片为默认图片,黄色图片为获取时焦点时显示的图片,黄色图片为按钮被按下时显示的图片。一个简单的方法可以做到这点——通过XML的"selector."配置,如下: 保存上面的XML到res/drawable/文件夹下(注:注意文件名大小写!),将该文件名作为一个参数设置到ImageButton的android:src属性(注:如xml文件名为myselector.xml,那么这里设置为"@drawable/myselector",设置android:background也是可以的,但效果不太一样)。Android根据按钮的状态改变会自动的去XML中查找相应的图片以显示。 <item>元素的顺序很重要,因为是根据这个顺序判断是否适用于当前按钮状态,这也是为什么正常(默认)状态指定的图片放在最后,是因为它只会在pressed和focused都判断失败之后才会被采用。(注:例如按钮被按下时是同时获得焦点的,但是获得焦点并不一定按了按钮,所以这里会按顺序查找,找到合适的就不往下找了。这里按钮被点击了,那么第一个将被选中,且不再在后面查找其他状态。) 参见Form Stuff tutorial。 三、 继承自父类的方法 public void setAlpha (int alpha) 设置ImageButton图片的透明度(注意不是背景图片的)。效果如图: 参数 alpha 透明值0~255,0为完全透明,255为完全不透明 本文转自over140 51CTO博客,原文链接:http://blog.51cto.com/over140/582708,如需转载请自行联系原作者

优秀的个人博客,低调大师

Android2.2 API 中文文档系列(3) —— AccessibilityService

正文<!--[endif]--> 一、结构 java.lang.Object android.content.Context android.content.ContextWrapper android.app.Service android.accessibilityservice.AccessibilityService publicabstractclassAccessibilityServiceextendsService 二、类概述 当AccessibilityEvent事件被启动后AccessibilityService会接收回调函数运行于后台,这些事件指的是在用户接口间的状态转换,比如,焦点变化,按钮被点击等。一些辅助服务继承于此类并且实现它的抽象方法,像这样的一个服务和其他服务一样在AndroidManifest.xml中被声明但它必须被指定操纵 android.accessibilityservice.AccessibilityService的意图,下面的是一段例子: < service android:name =".MyAccessibilityService" > < intent-filter > < action android:name ="android.accessibilityservice.AccessibilityService" /> </ intent-filter > </ service > 辅助服务的声明周期只能被系统管理,启动或者停止这个服务必须由明确的用户通过启用或停用设备的设定,在系统通过呼叫onServiceConnected()方法与服务绑定后,这个方法才能被想要执行装载的客户端所重载使用,一个辅助服务通过呼叫setServiceInfo(AccessibilityServiceInfo)方法来设定AccessibilityServiceInfo而配置。你可以在任何时候改变这个服务的配置但最好是在重载方法onServiceConnected().中来使用。一个辅助服务可以在特定的包中注册事件以提供特殊的反馈类型并且当最后一个关联的事件被解除的时候发出明确的超时提醒。 三、通告策略 对于每个回馈类型只有一个辅助服务被通知,服务登记处按顺序被通知,因此,如果有两个服务为同一个包中的同一回馈类型注册那么第一个会被通知,然而有可能的是,可以为一个给定的回馈类型去把一个服务注册为默认的,这样的话如果没有其他的服务来取代这个事件这个服务就会被呼出使用,换句话说,默认的服务不会与其他的服务竞争并且不管注册的顺序而被通知。 四、公共方法: abstract void onAccessibilityEvent(AccessibilityEvent event) 回调AccessibilityEvents. 参数 event一个事件 public final IBinder onBind (Intent intent) 实现返回一个内部的辅助接口的实现,子类不能被重写。 参数 intent与服务相绑定的意图,注意其他任何包含在Intent的外部意图将不能在此使用。 返回值 返回一个客户端可以在服务上访问的IBinder。 public abstract void onInterrupt () 打断辅助回馈内容时呼叫。 五、保护方法: 5.1 protected void onServiceConnected () 这个方法是AccessibilityService声明周期的一部分,在系统成功与服务绑定后才被呼叫,如果用来设定AccessibilityServiceInfo.这个方法更为方便。 本文转自over140 51CTO博客,原文链接:http://blog.51cto.com/over140/582730,如需转载请自行联系原作者

资源下载

更多资源
腾讯云软件源

腾讯云软件源

为解决软件依赖安装时官方源访问速度慢的问题,腾讯云为一些软件搭建了缓存服务。您可以通过使用腾讯云软件源站来提升依赖包的安装速度。为了方便用户自由搭建服务架构,目前腾讯云软件源站支持公网访问和内网访问。

Nacos

Nacos

Nacos /nɑ:kəʊs/ 是 Dynamic Naming and Configuration Service 的首字母简称,一个易于构建 AI Agent 应用的动态服务发现、配置管理和AI智能体管理平台。Nacos 致力于帮助您发现、配置和管理微服务及AI智能体应用。Nacos 提供了一组简单易用的特性集,帮助您快速实现动态服务发现、服务配置、服务元数据、流量管理。Nacos 帮助您更敏捷和容易地构建、交付和管理微服务平台。

Rocky Linux

Rocky Linux

Rocky Linux(中文名:洛基)是由Gregory Kurtzer于2020年12月发起的企业级Linux发行版,作为CentOS稳定版停止维护后与RHEL(Red Hat Enterprise Linux)完全兼容的开源替代方案,由社区拥有并管理,支持x86_64、aarch64等架构。其通过重新编译RHEL源代码提供长期稳定性,采用模块化包装和SELinux安全架构,默认包含GNOME桌面环境及XFS文件系统,支持十年生命周期更新。

WebStorm

WebStorm

WebStorm 是jetbrains公司旗下一款JavaScript 开发工具。目前已经被广大中国JS开发者誉为“Web前端开发神器”、“最强大的HTML5编辑器”、“最智能的JavaScript IDE”等。与IntelliJ IDEA同源,继承了IntelliJ IDEA强大的JS部分的功能。

用户登录
用户注册