首页 文章 精选 留言 我的

精选列表

搜索[API],共10000篇文章
优秀的个人博客,低调大师

Marketing Cloud demo环境和API使用方法说明

version 1.0作者:Wang Jerry更多问题请联系我 demo 系统url:https:/jerry.hybris.com/sap/bc/ui5_ui5/ui2/ushell/shells/abap/FioriLaunchpad.html 用户名/密码:Jerry1/Diablo1登录成功之后,可以在菜单"快速启动"->"Manage Contacts"里找到Marketing Cloud contact管理应用。单击: 这里就能看到该系统里所有的contact列表了。左边的1218377是系统contact总个数,正下方Create就是新建按钮,可以通过这个按钮打开contact创建页面。右边的search bar就是一个Google风格的模糊搜索入口。 这个界面第一次使用的话需要注意一些小技巧。 上图高亮的四个控件实际

优秀的个人博客,低调大师

SAP S4CRM 1811 服务订单API介绍

Jerry在今年2月28日,SAP Customer Management for S/4HANA 1.0正式问世这个具有纪念意义的日子,同时发布了中英文版的博客进行介绍。 英文版发在SAP社区上,至今超过16000的阅读量: 而发布在微信公众号上的中文版,也有两千多的阅读量: 一转眼大半年就过去了,如今SAP S4CRM的标准开发,进行得怎么样了呢?在SAP社区上我写的那个英文博客里,有很多国外的partners在上面留言询问各种各样的问题。由于今年4月份起Jerry就离开了S4CRM开发团队,所以很多问题我没有办法回答,于是我邀请了SAP S4CRM的首席产品经理Frick Oliver在社区上回答大家提出的问题: 这是Oliver介绍S4CRM的视频,节选自SAP官方招聘公众号上的一篇文章。大家可以一睹这位德国老帅哥的风采。 今天这篇

优秀的个人博客,低调大师

利用Java编码测试CSRF令牌验证的Web API

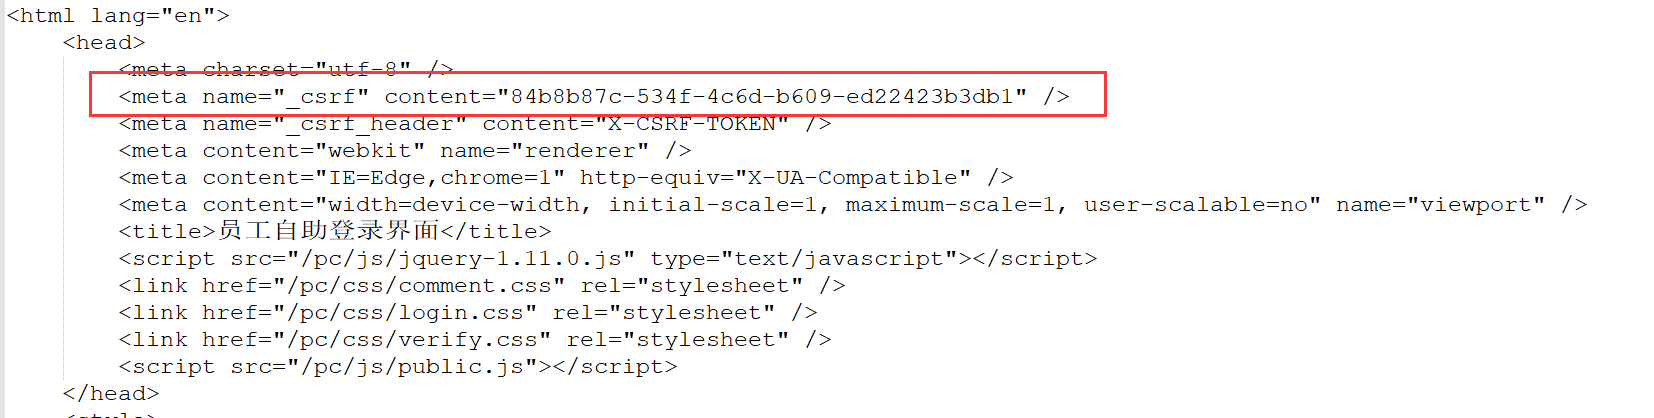
前一篇拙文是利用了Jmeter来测试带有CSRF令牌验证的WebAPI;最近几天趁着项目不忙,练习了用编码的方式实现。 有了之前Jmeter脚本的基础,基本上难点也就在两个地方:获取CSRF令牌、Cookie的传递。 首先添加依赖,在POM.xml中添加以下内容: <!-- https://mvnrepository.com/artifact/org.apache.httpcomponents/httpclient --> <dependency> <groupId>org.apache.httpcomponents</groupId> <artifactId>httpclient</artifactId> <version>4.5.6</version> </dependency> <!-- https://mvnrepository.com/artifact/org.jsoup/jsoup --> <dependency> <groupId>org.jsoup</groupId> <artifactId>jsoup</artifactId> <version>1.11.3</version> </dependency> 解释作用: - httpClient:用来创建httpClient、管理Get和Post的方法、获取请求报文头、应答报文内容、管理CookieStore等等; -jsoup:用来解析应答报文,获得CSRF令牌的值。 创建一个WebAPI测试类: public class LoginEHR { private final static String EHR_ADDRESS = "http://ourTestEHRServer:8083"; static BasicCookieStore cookieStore = new BasicCookieStore(); static CloseableHttpClient httpClient = HttpClients.custom().setDefaultCookieStore(cookieStore).build(); } 我选择了CookieStore的方式管理会话;HttpClient现在还有另一种Context的方式实现会话持久,以后再做深入研究。 先写一个打印应答报文的方法,并不做什么处理,纯打印;根据实际需要调用或者注释: public class LoginEHR { private static void printResponse(HttpResponse httpResponse) throws ParseException, IOException { // 获取响应消息实体 HttpEntity entity = httpResponse.getEntity(); // 响应状态 System.out.println("--------Status: " + httpResponse.getStatusLine()); System.out.println("--------Headers: "); HeaderIterator iterator = httpResponse.headerIterator(); while (iterator.hasNext()) { System.out.println("\t" + iterator.next()); } // 判断响应实体是否为空 if (entity != null) { String responseString = EntityUtils.toString(entity); System.out.println("--------Response length: " + responseString.length()); System.out.println("--------Response content: " + responseString.replace("\r\n", "")); } }} 现在开始写测试方法,虽然篇幅较长,仍然写在main()方法里,便于展示: public class LoginEHR { private final static String EHR_ADDRESS = "http://ourTestEHRServer:8083"; static BasicCookieStore cookieStore = new BasicCookieStore(); static CloseableHttpClient httpClient = HttpClients.custom().setDefaultCookieStore(cookieStore).build(); public static void main(String[] args) throws Exception { String username = "00022222"; String password = "abc123456"; CloseableHttpResponse httpResponse = null; try { HttpGet httpGet = new HttpGet(EHR_ADDRESS); httpResponse = httpClient.execute(httpGet); System.out.println("--------Cookie store for the 1st GET: " + cookieStore.getCookies()); // 唯一的作用是打印应答报文,没有任何处理;实际测试时,可以不执行 // printResponse(httpResponse); // 取出第一次请求时,服务器端返回的JSESSIONID; // 实际上此处只是取出JSESSIONID用作打印;cookieStore自动保存了本次会话的Cookie信息 // List cookies = cookieStore.getCookies(); // String cookie = cookies.toString(); // String sessionID = cookie.substring("[[version: 0][name: JSESSIONID][value: ".length(), // cookie.indexOf("][domain")); // System.out.println("--------The current JSESSIONID is: " + sessionID); httpClient.close(); } catch (Exception ex) { ex.printStackTrace(); } } private static void printResponse(HttpResponse httpResponse) throws ParseException, IOException { ...... } } 根据之前Jmeter测试脚本的经验,先发送一次Get请求,从应答报文中得到CSRF令牌和JSESSIONID。 大家注意我注释掉的那几行打印JSESSIONID的代码,之前在没有引入CookieStore之前,我想的是自己写一个新的Cookie,并把它赋给后面几次请求。 当使用CookieStore之后,就不需要自己封装Cookie、以及添加到Request的Header了,这过程会自动完成。没有删掉也是为了需要的时候打印。 交代完Cookie之后,该轮到处理CSRF令牌了。如果打印出第一次Get的应答,我们能看到令牌的格式是如下呈现的: 之前在Jmeter脚本中,我是添加了一个正则表达式提取器,把_csrf的content提取出来。 现在我将用jsoup来解析和返回content的内容,代码如下: private static String getCsrfToken(HttpEntity responseEntity) throws IOException{ //获取网页内容,指定编码 String web = EntityUtils.toString(responseEntity,"utf-8"); Document doc= Jsoup.parse(web); // 选择器,选取特征信息 String token = doc.select("meta[name=_csrf]").get(0).attr("content"); System.out.println( "--------The current CSRF Token is: " + token); return token; } 在main()中调用此方法: // 利用Jsoup从应答报文中读取CSRF Token HttpEntity responseEntity = httpResponse.getEntity(); String token = getCsrfToken(responseEntity); 然后再封装POST的请求内容: // 获取到CSRF Token后,用Post方式登录 HttpPost httpPost = new HttpPost(EHR_ADDRESS); // 拼接Post的消息体 List<NameValuePair> nvps = new ArrayList<NameValuePair>(); nvps.add(new BasicNameValuePair("username", username)); nvps.add(new BasicNameValuePair("password", password)); nvps.add(new BasicNameValuePair("_csrf", token)); HttpEntity loginParams = new UrlEncodedFormEntity(nvps, "utf-8"); httpPost.setEntity(loginParams); // 第二次请求,带有CSRF Token httpResponse = httpClient.execute(httpPost); // System.out.println("--------Cookie store for the POST: " + cookieStore.getCookies()); printResponse(httpResponse); 然后。。。这里发生了一点小意外: 按照设想,应该能跳转到登录成功、或者验证失败的页面;而Post方法执行后,从服务器返回的状态码是302,被跳转到另一个网址。 如果放任不管,直接提交后面的业务查询,是不会得到成功的;执行的结果是又回到了登录页面。 我在网上爬了一会,发现提问Post得到301、302的人还不在少数,说明这个坑还是给很多人造成了困扰。 简单的说,如果得到了服务器重定向到新的地址,我们也要跟着执行一次新地址的访问;否则服务器会认为这次请求没有得到正确处理,即便我之后的请求带着全套的验证令牌和Cookie,也会被拦截在系统外。 有了这个认识,下面我需要完成的就是对Code:302的处理;添加代码如下: // 取POST方法返回的HTTP状态码;不出意外的话是302 int code = httpResponse.getStatusLine().getStatusCode(); if (code == 302) { Header header = httpResponse.getFirstHeader("location"); // 跳转的目标地址是在 HTTP-HEAD 中的 String newUri = header.getValue(); // 这就是跳转后的地址,再向这个地址发出新申请,以便得到跳转后的信息是啥。 // 实际打印出来的是接口服务地址,不包括IP Address部分 System.out.println("--------Redirect to new location: " + newUri); httpGet = new HttpGet(EHR_ADDRESS + newUri); httpResponse = httpClient.execute(httpGet); // printResponse(httpResponse); } 这里需要注意的地方是跳转的location内容。在我这里,服务器给的只是一个单词【/work】,最好加一个打印的步骤。 确认不是一个完整的URL之后,需要把链接拼完整,然后进行一次httpGet请求。 这个httpGet执行之后,我可以确认已经登录成功(或者,又被送回登录页面,当然我这里是成功了)。 接下来是提交一次业务查询的Get,确认能够在系统中进行业务操作: // 请求一次绩效;确认登录成功 String queryUrl = EHR_ADDRESS + "/emp/performance/mt/query"; httpGet = new HttpGet(queryUrl); httpResponse = httpClient.execute(httpGet); System.out.println("--------Result of the Cardpunch Query: "); printResponse(httpResponse); 最后确认查询的结果无误后,整个脚本完成;只需要修改最后的业务查询,就可以生成其他的测试脚本了。 完整的源码如下: package com.jason.apitest; import org.apache.http.Header; import org.apache.http.HeaderIterator; import org.apache.http.HttpEntity; import org.apache.http.HttpResponse; import org.apache.http.NameValuePair; import org.apache.http.ParseException; import org.apache.http.client.entity.UrlEncodedFormEntity; import org.apache.http.client.methods.HttpGet; import org.apache.http.client.methods.HttpPost; import org.apache.http.impl.client.BasicCookieStore; import org.apache.http.impl.client.CloseableHttpClient; import org.apache.http.impl.client.HttpClients; import org.apache.http.message.BasicNameValuePair; import org.apache.http.protocol.HTTP; import org.apache.http.util.EntityUtils; import org.jsoup.Jsoup; import org.jsoup.nodes.Document; import java.io.IOException; import java.util.ArrayList; import java.util.List; public class LoginEHR { private final static String EHR_ADDRESS = "http://ourTestEHRServer:8083"; static BasicCookieStore cookieStore = new BasicCookieStore(); static CloseableHttpClient httpClient = HttpClients.custom().setDefaultCookieStore(cookieStore).build(); public static void main(String[] args) throws Exception { String username = "00022222"; String password = "abc123456"; HttpResponse httpResponse = null; try { HttpGet httpGet = new HttpGet(EHR_ADDRESS); httpResponse = httpClient.execute(httpGet); System.out.println("--------Cookie store for the 1st GET: " + cookieStore.getCookies()); // 唯一的作用是打印应答报文,没有任何处理;实际测试时,可以不执行 // printResponse(httpResponse); // 取出第一次请求时,服务器端返回的JSESSIONID; // 实际上此处只是取出JSESSIONID用作打印;cookieStore自动保存了本次会话的Cookie信息 // List cookies = cookieStore.getCookies(); // String cookie = cookies.toString(); // String sessionID = cookie.substring("[[version: 0][name: JSESSIONID][value: ".length(), // cookie.indexOf("][domain")); // System.out.println("--------The current JSESSIONID is: " + sessionID); // 利用Jsoup从应答报文中读取CSRF Token HttpEntity responseEntity = httpResponse.getEntity(); String token = getCsrfToken(responseEntity); // 获取到CSRF Token后,用Post方式登录 HttpPost httpPost = new HttpPost(EHR_ADDRESS); // 拼接Post的消息体 List<NameValuePair> nvps = new ArrayList<NameValuePair>(); nvps.add(new BasicNameValuePair("username", username)); nvps.add(new BasicNameValuePair("password", password)); nvps.add(new BasicNameValuePair("_csrf", token)); HttpEntity loginParams = new UrlEncodedFormEntity(nvps, "utf-8"); httpPost.setEntity(loginParams); // 第二次请求,带有CSRF Token httpResponse = httpClient.execute(httpPost); // System.out.println("--------Cookie store for the POST: " + cookieStore.getCookies()); printResponse(httpResponse); // 取POST方法返回的HTTP状态码;不出意外的话是302 int code = httpResponse.getStatusLine().getStatusCode(); if (code == 302) { Header header = httpResponse.getFirstHeader("location"); // 跳转的目标地址是在 HTTP-HEAD 中的 String newUri = header.getValue(); // 这就是跳转后的地址,再向这个地址发出新申请,以便得到跳转后的信息是啥。 // 实际打印出来的是接口服务地址,不包括IP Address部分 System.out.println("--------Redirect to new location: " + newUri); httpGet = new HttpGet(EHR_ADDRESS + newUri); httpResponse = httpClient.execute(httpGet); // printResponse(httpResponse); } // 请求一次绩效;确认登录成功 String queryUrl = EHR_ADDRESS + "/emp/performance/mt/query"; httpGet = new HttpGet(queryUrl); httpResponse = httpClient.execute(httpGet); System.out.println("--------Result of the Cardpunch Query: "); printResponse(httpResponse); httpClient.close(); } catch (Exception ex) { ex.printStackTrace(); } } private static void printResponse(HttpResponse httpResponse) throws ParseException, IOException { // 获取响应消息实体 HttpEntity entity = httpResponse.getEntity(); // 响应状态 System.out.println("--------Status: " + httpResponse.getStatusLine()); System.out.println("--------Headers: "); HeaderIterator iterator = httpResponse.headerIterator(); while (iterator.hasNext()) { System.out.println("\t" + iterator.next()); } // 判断响应实体是否为空 if (entity != null) { String responseString = EntityUtils.toString(entity); System.out.println("--------Response length: " + responseString.length()); System.out.println("--------Response content: " + responseString.replace("\r\n", "")); } } private static String getCsrfToken(HttpEntity responseEntity) throws IOException{ //获取网页内容,指定编码 String web = EntityUtils.toString(responseEntity,"utf-8"); Document doc= Jsoup.parse(web); // 选择器,选取特征信息 String token = doc.select("meta[name=_csrf]").get(0).attr("content"); System.out.println( "--------The current CSRF Token is: " + token); return token; } } 补充:如果使用HttpClientContext方式来维持会话,与CookieStore很接近;直接帖上需要修改的部分内容: // 创建httpClient和context static CloseableHttpClient httpClient = HttpClients.createDefault(); static HttpClientContext context = HttpClientContext.create(); // 下面的代码写在main()方法中 CloseableHttpResponse httpResponse = null; // 先发起一个Get请求,获取CSRF令牌和Cookie HttpGet httpGet = new HttpGet(EHR_ADDRESS); // 保存context上下文 httpResponse = httpClient.execute(httpGet, context); ... // 处理完CSRF令牌后,准备发起POST请求 HttpPost httpPost = new HttpPost(EHR_ADDRESS); ... // 封装POST报文 // 发起POST请求 httpResponse = httpClient.execute(httpPost, context); // 处理HTTP 302和业务查询操作的GET,也要携带着context httpResponse = httpClient.execute(httpGet, context);

优秀的个人博客,低调大师

12.源码阅读(IPC Binder机制-android api 26)

调用bindService方法绑定服务最终会执行Service的onBind方法并在ServiceConnection的onServiceConnected中得到IBinder对象,我们从源码角度看看这一过程是如何进行的 首先从ContextImpl的bindService看起 @Override 1538 public boolean bindService(Intent service, ServiceConnection conn, 1539 int flags) { 1540 warnIfCallingFromSystemProcess(); 1541 return bindServiceCommon(service, conn, flags, mMainThread.getHandler(), 1542 Process.myUserHandle()); 1543 } private boolean bindServiceCommon(Intent service, ServiceConnection conn, int flags, Handler 1582 handler, UserHandle user) { 1583 //注意这里得到的一个IServiceConnection在后边会用到 1584 IServiceConnection sd; 1585 ...... 1588 if (mPackageInfo != null) { 1589 sd = mPackageInfo.getServiceDispatcher(conn, getOuterContext(), handler, flags); 1590 } ...... 1602 int res = ActivityManager.getService().bindService( 1603 mMainThread.getApplicationThread(), getActivityToken(), service, 1604 service.resolveTypeIfNeeded(getContentResolver()), 1605 sd, flags, getOpPackageName(), user.getIdentifier()); 1606 ...... 1614 } 1615 ActivityManager.getService()这行代码我们已经非常熟悉了,前边看activity启动的时候就遇到过 4199 public static IActivityManager getService() { 4200 return IActivityManagerSingleton.get(); 4201 } private static final Singleton<IActivityManager> IActivityManagerSingleton = 4204 new Singleton<IActivityManager>() { 4205 @Override 4206 protected IActivityManager create() { 4207 final IBinder b = ServiceManager.getService(Context.ACTIVITY_SERVICE); 4208 final IActivityManager am = IActivityManager.Stub.asInterface(b); 4209 return am; 4210 } 4211 }; ActivityManager.getService()得到的是IActivityManger,而IActivityManger是一个接口,所以我们要去看它的实现类ActivityManagerService中的bindService方法 ActivityManagerService中 public int bindService(IApplicationThread caller, IBinder token, Intent service, String resolvedType, IServiceConnection connection, int flags, String callingPackage, int userId) throws TransactionTooLargeException { ...... synchronized(this) { return mServices.bindServiceLocked(caller, token, service, resolvedType, connection, flags, callingPackage, userId); } } ActiveServices中 int bindServiceLocked(IApplicationThread caller, IBinder token, Intent service, String resolvedType, final IServiceConnection connection, int flags, String callingPackage, final int userId) throws TransactionTooLargeException { ...... try { //注意,这个方法和下边是殊途同归的 bringUpServiceLocked(serviceRecord, serviceIntent.getFlags(), callerFg, false, false); } catch (RemoteException e) { /* ignore - local call */ } ...... if (s.app != null && b.intent.received) { ...... if (b.intent.apps.size() == 1 && b.intent.doRebind) { requestServiceBindingLocked(s, b.intent, callerFg, true); } } else if (!b.intent.requested) { requestServiceBindingLocked(s, b.intent, callerFg, false); } ...... } private final boolean requestServiceBindingLocked(ServiceRecord r, IntentBindRecord i, boolean execInFg, boolean rebind) throws TransactionTooLargeException { ...... bumpServiceExecutingLocked(r, execInFg, "bind"); r.app.forceProcessStateUpTo(ActivityManager.PROCESS_STATE_SERVICE); r.app.thread.scheduleBindService(r, i.intent.getIntent(), rebind, r.app.repProcState); if (!rebind) { i.requested = true; } i.hasBound = true; i.doRebind = false; ...... } 需要找到 r.app.thread.scheduleBindService这个方法究竟是哪个类中的方法,r是ServiceRecord,那么到它里边去找发现app是ProcessRecord类,然后进入到ProcessRecord中去找thread,可以看到IApplicationThread thread,IApplicationThread很明显是一个接口,我们还要找到它的实现类才行,这里也不再卖关子了,我们要找的实现类就是ApplicationThread,而ApplicationThread是ActivityThread的一个内部类,所以去ActivityThread中继续寻找 public final void scheduleBindService(IBinder token, Intent intent, boolean rebind, int processState) { updateProcessState(processState, false); BindServiceData s = new BindServiceData(); s.token = token; s.intent = intent; s.rebind = rebind; if (DEBUG_SERVICE) Slog.v(TAG, "scheduleBindService token=" + token + " intent=" + intent + " uid=" + Binder.getCallingUid() + " pid=" + Binder.getCallingPid()); sendMessage(H.BIND_SERVICE, s); } private void sendMessage(int what, Object obj) { sendMessage(what, obj, 0, 0, false); } 可以看到是通过handler发送了一个消息,找到这个消息的处理 case BIND_SERVICE: Trace.traceBegin(Trace.TRACE_TAG_ACTIVITY_MANAGER, "serviceBind"); handleBindService((BindServiceData)msg.obj); Trace.traceEnd(Trace.TRACE_TAG_ACTIVITY_MANAGER); break; private void handleBindService(BindServiceData data) { //从集合中取出service,可以猜测服务在之前已经被存储起来了 Service s = mServices.get(data.token); ...... if (!data.rebind) { //调用service的onBind方法,这里终于找到了 IBinder binder = s.onBind(data.intent); //这里是回调到onServiceConnected方法的关键 ActivityManager.getService().publishService( data.token, data.intent, binder); } else { s.onRebind(data.intent); ActivityManager.getService().serviceDoneExecuting( data.token, SERVICE_DONE_EXECUTING_ANON, 0, 0); } ...... } } 再次回到ActivityManagerService中 public void publishService(IBinder token, Intent intent, IBinder service) { // Refuse possible leaked file descriptors if (intent != null && intent.hasFileDescriptors() == true) { throw new IllegalArgumentException("File descriptors passed in Intent"); } synchronized(this) { if (!(token instanceof ServiceRecord)) { throw new IllegalArgumentException("Invalid service token"); } mServices.publishServiceLocked((ServiceRecord)token, intent, service); } } 再次回到ActiveServices类中 void publishServiceLocked(ServiceRecord r, Intent intent, IBinder service) { final long origId = Binder.clearCallingIdentity(); try { if (DEBUG_SERVICE) Slog.v(TAG_SERVICE, "PUBLISHING " + r + " " + intent + ": " + service); if (r != null) { Intent.FilterComparison filter = new Intent.FilterComparison(intent); IntentBindRecord b = r.bindings.get(filter); if (b != null && !b.received) { b.binder = service; b.requested = true; b.received = true; for (int conni=r.connections.size()-1; conni>=0; conni--) { ArrayList<ConnectionRecord> clist = r.connections.valueAt(conni); for (int i=0; i<clist.size(); i++) { ConnectionRecord c = clist.get(i); if (!filter.equals(c.binding.intent.intent)) { if (DEBUG_SERVICE) Slog.v( TAG_SERVICE, "Not publishing to: " + c); if (DEBUG_SERVICE) Slog.v( TAG_SERVICE, "Bound intent: " + c.binding.intent.intent); if (DEBUG_SERVICE) Slog.v( TAG_SERVICE, "Published intent: " + intent); continue; } if (DEBUG_SERVICE) Slog.v(TAG_SERVICE, "Publishing to: " + c); try { c.conn.connected(r.name, service, false); } catch (Exception e) { Slog.w(TAG, "Failure sending service " + r.name + " to connection " + c.conn.asBinder() + " (in " + c.binding.client.processName + ")", e); } } } } serviceDoneExecutingLocked(r, mDestroyingServices.contains(r), false); } } finally { Binder.restoreCallingIdentity(origId); } } 关键代码 c.conn.connected(r.name, service, false); c表示ConnectionRecord,conn就是IServiceConnection,看到这个IServiceConnection我们很容易把它和ServiceConnection联系起来,是不是这样呢,其实这时候我们可以回到最初的那个地方埋下的伏笔,我们写了一句注释 //注意这里得到的一个IServiceConnection在后边会用到 IServiceConnection sd; 从代码ArrayList<ConnectionRecord> clist = r.connections.valueAt(conni);中就可以看出,每一个ConnectionRecord都是提前存入集合中保存的,那么每个ConnectionRecord中的IServiceConnection也就在那时候已经存在了,IServiceConnection是一个接口,我们同样要找到它的实现类,那么回到ContextImpl中,看看,这个IServiceConnection是如何创建出来的 IServiceConnection sd; if (conn == null) { throw new IllegalArgumentException("connection is null"); } if (mPackageInfo != null) { sd = mPackageInfo.getServiceDispatcher(conn, getOuterContext(), handler, flags); @Override 1564 public IServiceConnection getServiceDispatcher(ServiceConnection conn, Handler handler, 1565 int flags) { 1566 return mPackageInfo.getServiceDispatcher(conn, getOuterContext(), handler, flags); 1567 } 进入LoadedApk中 public final IServiceConnection getServiceDispatcher(ServiceConnection c, 1397 Context context, Handler handler, int flags) { 1398 synchronized (mServices) { 1399 LoadedApk.ServiceDispatcher sd = null; 1400 ArrayMap<ServiceConnection, LoadedApk.ServiceDispatcher> map = mServices.get(context); 1401 if (map != null) { 1402 if (DEBUG) Slog.d(TAG, "Returning existing dispatcher " + sd + " for conn " + c); 1403 sd = map.get(c); 1404 } 1405 if (sd == null) { 1406 sd = new ServiceDispatcher(c, context, handler, flags); 1407 if (DEBUG) Slog.d(TAG, "Creating new dispatcher " + sd + " for conn " + c); 1408 if (map == null) { 1409 map = new ArrayMap<>(); 1410 mServices.put(context, map); 1411 } 1412 map.put(c, sd); 1413 } else { 1414 sd.validate(context, handler); 1415 } 1416 return sd.getIServiceConnection(); 1417 } 1418 } 1419 IServiceConnection getIServiceConnection() { 1553 return mIServiceConnection; 1554 } 看到这个 private final ServiceDispatcher.InnerConnection mIServiceConnection; 我们找到了IServiceConnection的实现类,InnerConnection,那么c.conn.connected(r.name, service, false);执行的就是它的connect方法 private static class InnerConnection extends IServiceConnection.Stub { 1489 final WeakReference<LoadedApk.ServiceDispatcher> mDispatcher; 1490 1491 InnerConnection(LoadedApk.ServiceDispatcher sd) { 1492 mDispatcher = new WeakReference<LoadedApk.ServiceDispatcher>(sd); 1493 } 1494 1495 public void connected(ComponentName name, IBinder service, boolean dead) 1496 throws RemoteException { 1497 LoadedApk.ServiceDispatcher sd = mDispatcher.get(); 1498 if (sd != null) { 1499 sd.connected(name, service, dead); 1500 } 1501 } 1502 } public void connected(ComponentName name, IBinder service, boolean dead) { 1569 if (mActivityThread != null) { 1570 mActivityThread.post(new RunConnection(name, service, 0, dead)); 1571 } else { 1572 doConnected(name, service, dead); 1573 } 1574 } public void connected(ComponentName name, IBinder service, boolean dead) { 1569 if (mActivityThread != null) { 1570 mActivityThread.post(new RunConnection(name, service, 0, dead)); 1571 } else { 1572 doConnected(name, service, dead); 1573 } 1574 } 终于找到了,看下边 public void doConnected(ComponentName name, IBinder service, boolean dead) { 1585 ServiceDispatcher.ConnectionInfo old; 1586 ServiceDispatcher.ConnectionInfo info; 1587 1588 ...... 1625 // If there was an old service, it is now disconnected. 1626 if (old != null) { 1627 mConnection.onServiceDisconnected(name); 1628 } 1629 ...... 1632 // If there is a new service, it is now connected. 1633 if (service != null) { //onServiceConnected被调用 1634 mConnection.onServiceConnected(name, service); 1635 } 1636 }


资源下载

更多资源
腾讯云软件源

腾讯云软件源

为解决软件依赖安装时官方源访问速度慢的问题,腾讯云为一些软件搭建了缓存服务。您可以通过使用腾讯云软件源站来提升依赖包的安装速度。为了方便用户自由搭建服务架构,目前腾讯云软件源站支持公网访问和内网访问。

Nacos

Nacos

Nacos /nɑ:kəʊs/ 是 Dynamic Naming and Configuration Service 的首字母简称,一个易于构建 AI Agent 应用的动态服务发现、配置管理和AI智能体管理平台。Nacos 致力于帮助您发现、配置和管理微服务及AI智能体应用。Nacos 提供了一组简单易用的特性集,帮助您快速实现动态服务发现、服务配置、服务元数据、流量管理。Nacos 帮助您更敏捷和容易地构建、交付和管理微服务平台。

Rocky Linux

Rocky Linux

Rocky Linux(中文名:洛基)是由Gregory Kurtzer于2020年12月发起的企业级Linux发行版,作为CentOS稳定版停止维护后与RHEL(Red Hat Enterprise Linux)完全兼容的开源替代方案,由社区拥有并管理,支持x86_64、aarch64等架构。其通过重新编译RHEL源代码提供长期稳定性,采用模块化包装和SELinux安全架构,默认包含GNOME桌面环境及XFS文件系统,支持十年生命周期更新。

Sublime Text

Sublime Text

Sublime Text具有漂亮的用户界面和强大的功能,例如代码缩略图,Python的插件,代码段等。还可自定义键绑定,菜单和工具栏。Sublime Text 的主要功能包括:拼写检查,书签,完整的 Python API , Goto 功能,即时项目切换,多选择,多窗口等等。Sublime Text 是一个跨平台的编辑器,同时支持Windows、Linux、Mac OS X等操作系统。

用户登录
用户注册