首页 文章 精选 留言 我的

精选列表

搜索[网站开发],共10000篇文章
优秀的个人博客,低调大师

dba+ 开源工具:面向开发的 MongoDB 图形可视化监控

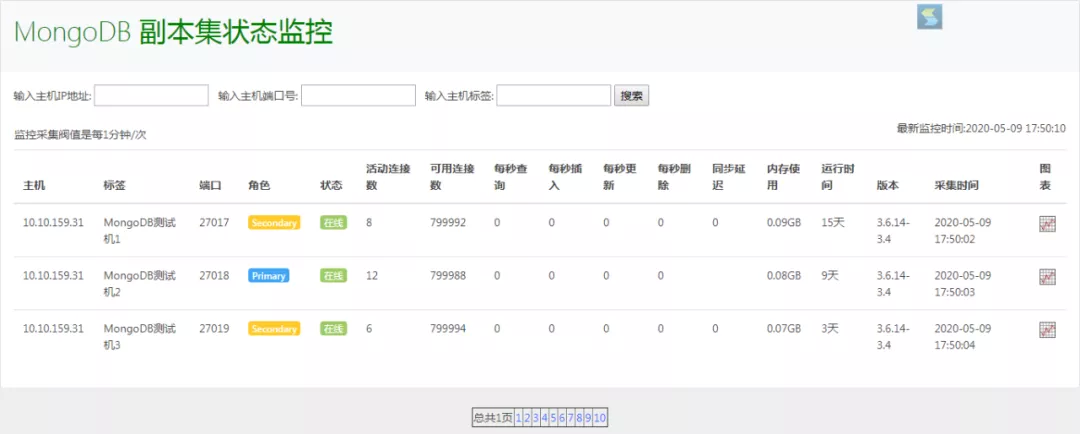
云栖号资讯:【点击查看更多行业资讯】在这里您可以找到不同行业的第一手的上云资讯,还在等什么,快来! 简介 一款面向研发人员查看的 MongoDB 图形可视化监控工具,借鉴了 Percona PMM Grafana 以及官方自带的 mongostat 工具输出的监控指标项,去掉了一些不必要、看不懂的监控项。目前采集了数据库连接数、QPS/TPS、内存使用率统计,副本集 replset 状态信息和同步复制延迟时长。 采用远程连接方式进去获取数据,所以不需要在数据库服务器端部署相关 agent 或计划任务,可实现微信和邮件报警。 注:监控环境为 MongoDB 3.2 以上版本,2.X 版本未测试。 Mongo 状态监控,点击图表,可以查看历史曲线图: 1、连接数 2、QPS 图表 环境搭建1、php-mysql 驱动安装:shell> yum install -y php-pear php-devel php gcc openssl openssl-devel cyrus-sasl cyrus-sasl-devel httpd mysql php-mysql 2、php-mongo 驱动安装:shell> pecl install mongo把 extension=mongo.so 加入到 /etc/php.ini 最后一行重启 httpd 服务,service httpd restart注:如果通过 pecl 安装报错,请参考以下链接,进行源码安装。PHP 5.4 版本对应的驱动版本是 mongodb-1.3.4.tgz参考链接: https://www.runoob.com/mongodb/mongodb-install-php-driver.html 3、创建 MongoDB 超级用户权限(监控采集数据时使用):首先我们在被监控的数据库端创建授权帐号,允许采集器服务器能连接到 MongoDB 数据库。由于需要执行命令 db.runCommand({serverStatus:1,repl:1}).repl 和 db.adminCommand( { replSetGetStatus: 1 } ).members,所以需要授予 root 角色,授权方式如下所示: > use admin >db.createUser({user:"admin",pwd:"123456",roles:[{role:"root",db:"admin"}]}) mongo_monitor 部署把 https://github.com/hcymysql/mongo_monitor/archive/master.zip 安装包解压缩到 /var/www/html/ 目录下:cd /var/www/html/mongo_monitor/chmod 755 ./mail/sendEmailchmod 755 ./weixin/wechat.py注:邮件和微信报警调用的第三方工具,所以这里要赋予可执行权限 755。1、导入 Mongo Monitor 监控工具表结构(mongo_monitor 库):cd /var/www/html/mongo_monitor/ mysql -uroot -p123456 < mongo_monitor_schema.sql 2、录入被监控主机的信息: INSERT INTO `mongo_status_info` (ip,tag,USER,pwd,PORT,authdb,send_mail_to_list,send_weixin_to_list,threshold_alarm_connection,threshold_alarm_repl) VALUES('10.10.159.31','MongoDB 测试机 1','admin','hechunyang','27017','admin','hechunyang','hechunyang@126.com',1000,60); 注,以下字段可以按照需求变更:ip 字段含义:输入被监控 Mongo 的 IP 地址tag 字段含义:输入被监控 Mongo 的业务名字user 字段含义:输入被监控 Mongo 的用户名(ROOT 权限)pwd 字段含义:输入被监控 Mongo 的密码port 字段含义:输入被监控 MySQL 的端口号authdb 字段含义:输入被监控 Mongo 的数据库登录权限认证库名monitor 字段含义:0 为关闭监控(也不采集数据,直接跳过);1 为开启监控(采集数据)send_mail 字段含义:0 为关闭邮件报警 ;1 为开启邮件报警send_mail_to_list 字段含义:邮件人列表send_weixin 字段含义:0 为关闭微信报警 ;1 为开启微信报警send_weixin_to_list 字段含义:微信公众号threshold_alarm_connection 字段含义:设置连接数阀值(单位个)threshold_alarm_repl 字段含义:设置主从复制延迟阀值(单位秒)3、修改 conn.php 配置文件:vim /var/www/html/mongo_monitor/conn.php$con = mysqli_connect(“127.0.0.1”,“admin”,“hechunyang”,“mongo_monitor”,“3306”) or die(“数据库链接错误”.mysql_error());改成你的 Mongo Monitor 监控工具表结构(mongo_monitor 库)连接信息。4、修改邮件报警信息:cd /var/www/html/mongo_monitor/mail/vim mail.phpsystem("./mail/sendEmail -f chunyang_he@139.com -t ‘{$this->send_mail_to_list}’ -s smtp.139.com:25 -u ‘{$this->alarm_subject}’ -o message-charset=utf8 -o message-content-type=html -m '报警信息:{$this->alarm_info}’ -xu chunyang_he@139.com -xp ‘123456’ -o tls=no");改成你的发件人地址、账号密码,里面的变量不用修改。5、修改微信报警信息:cd /var/www/html/mongo_monitor/weixin/vim wechat.py微信企业号设置移步 https://github.com/X-Mars/Zabbix-Alert-WeChat/blob/master/README.md 看此教程配置。6、定时任务每分钟抓取一次:crontab -l */1 * * * * cd /var/www/html/mongo_monitor; /usr/bin/php /var/www/html/mongo_monitor/check_mongo_status.php > /dev/null 2 >&1 */1 * * * * cd /var/www/html/mongo_monitor; /usr/bin/php /var/www/html/mongo_monitor/check_mongo_repl.php > /dev/null 2 >&1 check_mongo_status.php(用来采集被监控端 Mongo 状态信息和触发报警)check_mongo_repl.php(用来采集被监控端 Mongo 主从复制信息和触发报警)7、更改页面自动刷新频率:vim mongo_replset_monitor.php http-equiv="refresh" content="600" 默认页面每 600 秒自动刷新一次。8、页面访问:http://yourIP/mongo_monitor/mongo_replset_monitor.php 加一个超链接,可方便地接入你们的自动化运维平台里。下载方式此工具现通过 dbaplus 社群免费为大家提供下载使用。若使用过程中有任何问题或建议,可随时与我们联系,欢迎大家试用。 登录以下链接即可下载: https://github.com/hcymysql/mongo_monitor 更多开源工具 & 脚本 详情及下载: http://dbaplus.cn/list-142-1.html 工具下载:https://github.com/hcymysql/mongo_monitor 作者介绍:贺春旸,凡普金科爱钱进 DBA 团队负责人,《MySQL 管理之道:性能调优、高可用与监控》第一、二版作者,曾任职于中国移动飞信、安卓机锋网。致力于 MariaDB、MongoDB 等开源技术的研究,主要负责数据库性能调优、监控和架构设计。 【云栖号在线课堂】每天都有产品技术专家分享!课程地址:https://yqh.aliyun.com/zhibo 立即加入社群,与专家面对面,及时了解课程最新动态!【云栖号在线课堂 社群】https://c.tb.cn/F3.Z8gvnK 原文发布时间:2020-05-22本文作者:dbaplus社群本文来自:“InfoQ”,了解相关信息可以关注“InfoQ”

优秀的个人博客,低调大师

使用Chrome开发者工具研究JavaScript里函数的原生实现

As the size of my blog Chrome Development Tool tips used in my daily work turns to be larger I create a separate post to record down this small tip.Are you curious about the “native code” here? At least I am. Today I find that the Profiles tab in Chrome development tool can help us to unveil the mysteries to some degree.In Chrome development, just select this checkbox: And then execute the simple JavaScript code below: var arr = []; for (var i=0; i<1000; i++){ arr.push(i) } console.profile("Array toString"); for( var i = 0; i < 1000; i++){ var a = arr.toString(); } console.profileEnd("Array toString"); Once done, you can see a profile record with the name specified in JavaScript code above, “Array toString”. Hover the mouse to the first row, “anonymous function”, we find the hint “array.js”. Switch display style from Chart to Tree: From here the callstack of native implementation of toString is displayed: The next step is to look into in array.js.Launch url: https://cs.chromium.org/Click this hyperlink: now you can find the array.js file via path: src/v8/src/js/array.js The callstack analyzed through the source code exactly matches the one we get in Chrome development tool Profile tab:ArrayToString will delegate to Join if current caller is an Array: Join will call DoJoin: DoJoin will first call UseSparseVariant to evaluate the possibility to perform Join via SparseVariant. If not possible, call ConvertToString as fall back. ( The line number of source code may vary with the one you see in Chrome Development Tool profile tab due to the different version of Chrome being used. ) If you could not tolerate the poor performance of this online source code repository, you could download the whole source code of V8 to your local laptop by cloning this github repository:https://chromium.googlesource.com/v8/v8.git/ 本文来自云栖社区合作伙伴“汪子熙”,了解相关信息可以关注微信公众号"汪子熙"。

优秀的个人博客,低调大师

使用Chrome开发者工具研究JavaScript的垃圾回收机制

I use the following simple JavaScript code to illustrate: var JerryTestArray = []; (function(){ for( var i = 0; i < 100; i++){ JerryTestArray[i] = document.createElement("div"); } })(); Create a new empty tab in your Chrome, and first create a snapshot with empty heap status by click “Take Snapshot” button: The Snapshot1 is generated. Now switch to tab Console, paste the JavaScript code and execute it in console. And switch to Profiles tab again to make the second snapshot: Once done, select the second snapshot, choose “Comparison” and “Snapshot1” as filter: We can find out from column “New” that 100 div nodes are created as we expect. Since these nodes are not appended to document node so they are invisible to end user, so displayed as “Detached DOM”. The JerryTestArray still holds the reference to each div node so Garbage collector will not touch these nodes. In order to make Garbage collector recycle the memory occupied by these nodes, just assign another value to JerryTestArray in console: Once done, make the third snapshot and compare it with the second. Now we can find that the re-assignment to JerryTestArray will trigger the destruction of those 100 div nodes by Garbage collector: Meanwhile, the string we use in assignment could also be inspected via the combination of filters below: There is another kind of profile in Chrome development tool which can give you an overview about timeline of memory allocation: Click Start button in above screenshot, and paste the following code in console and executed: var JerryTestArray = []; (function(){ for( var i = 0; i < 98; i++){ JerryTestArray[i] = document.createElement("span"); JerryTestArray[i].className = "JerryClassName" + i; } })(); After the code is executed, paste the following code and execute: JerryTestArray[30] = "this is a long test............................end"; Now stop the profile. The profile is displayed as below. The highlighted vertical blue line indicates the timeslot when the 97 Span elements are created. Note that the number of Span elements displayed here is not 98 but 97 since Chrome development tool displays the final status of objects after “stop profile” button is clicked ( the reference to 30th Span element is replaced by String, so it is recycled by GC ). You can drag the two vertical bars to define the time range between which you would like to inspect. For example the time range below contains the timeslot when the below assignment occurs: JerryTestArray[30] = "this is a long test............................end"; With this gained knowledge now we can check the memory allocation and destruction in some real application. For example click tile “My Tasks” to enter this application, make the first snapshot and click back button within application to return to launchpad, and make the second snapshot and review the comparison result. From the result we find out lots of stuff are deleted after we return to launchpad: Hover your mouse to a given destructed object and you can review its detail: For more tips How I use Chrome development tool in my daily work, please refer to this blog Chrome Development Tool tips used in my daily work 本文来自云栖社区合作伙伴“汪子熙”,了解相关信息可以关注微信公众号"汪子熙"。

优秀的个人博客,低调大师

Electron 9.0.0-beta.4 发布,跨平台桌面应用开发工具

Electron 9.0.0-beta.4现已发布,该版本以 beta 标签发布到 npm,可以通过 npm install electron@beta 或 npm i electron@9.0.0-beta.4安装。 更新内容如下: Breaking Changes 将默认值更改app.allowRendererProcessReuse为true,这将阻止在渲染器进程中加载 non-context-awarenative modules。可参见#18397以了解有关此更改的更多信息。#22401 Features 添加了session.serviceWorkerContextAPI 以访问基本服务人员信息并接收来自服务人员的控制台日志。#22313 Fixes 向后移植的 V8 补丁可修复类型推断中的错误。#22426 修复了safeDialog首选项无法正确传递的问题。#22378 更新说明

资源下载

更多资源
腾讯云软件源

腾讯云软件源

为解决软件依赖安装时官方源访问速度慢的问题,腾讯云为一些软件搭建了缓存服务。您可以通过使用腾讯云软件源站来提升依赖包的安装速度。为了方便用户自由搭建服务架构,目前腾讯云软件源站支持公网访问和内网访问。

Rocky Linux

Rocky Linux

Rocky Linux(中文名:洛基)是由Gregory Kurtzer于2020年12月发起的企业级Linux发行版,作为CentOS稳定版停止维护后与RHEL(Red Hat Enterprise Linux)完全兼容的开源替代方案,由社区拥有并管理,支持x86_64、aarch64等架构。其通过重新编译RHEL源代码提供长期稳定性,采用模块化包装和SELinux安全架构,默认包含GNOME桌面环境及XFS文件系统,支持十年生命周期更新。

Sublime Text

Sublime Text

Sublime Text具有漂亮的用户界面和强大的功能,例如代码缩略图,Python的插件,代码段等。还可自定义键绑定,菜单和工具栏。Sublime Text 的主要功能包括:拼写检查,书签,完整的 Python API , Goto 功能,即时项目切换,多选择,多窗口等等。Sublime Text 是一个跨平台的编辑器,同时支持Windows、Linux、Mac OS X等操作系统。

WebStorm

WebStorm

WebStorm 是jetbrains公司旗下一款JavaScript 开发工具。目前已经被广大中国JS开发者誉为“Web前端开发神器”、“最强大的HTML5编辑器”、“最智能的JavaScript IDE”等。与IntelliJ IDEA同源,继承了IntelliJ IDEA强大的JS部分的功能。

用户登录
用户注册